2012 MERCEDES-BENZ SL ROADSTER ECO mode
[x] Cancel search: ECO modePage 399 of 637
tooth
®
(SAP profile), you can switch the tel-
ephony mode.
You can change the mode of telephony in the
Bluetooth ®
phone list by selecting either a
Bluetooth ®
telephone or an SAP telephone.
X Call up the phone list (Y page 390).
X To select the mobile phone with the con-
troller: turn and press the controller.
i SAP telephony:
mobile phones which are
connected to an optional data-enabled
telephone module with Bluetooth ®
(SAP
profile) are shown in the telephone list
under the title Telephones of the SAP
Telephones of the SAP
module
module . By selecting an SAP telephone,
you change to SAP telephony. Reception and transmission volume
Once the mobile phone has been authorised,
you can optimise the transmission and recep- tion volume settings. To find out about the
best possible settings for your mobile phone, contact a Mercedes-Benz Service Centre or
visit http://www.mercedes-benz.com/
connect . X
Press the %function button.
X Select Connect device Connect device in the telephone
basic menu by sliding VÆand turning
cVdthe COMAND controller and press W
to confirm.
X Select an authorised mobile phone from
the list by turning cVd. X
Select the list symbol to the right of the
entry by sliding VYthe COMAND control-
ler and press Wto confirm.
X Select Reception volume Reception volume orTransmis‐
Transmis‐
sion volume
sion volume and pressWto confirm.
X Select a volume setting by turning cVdthe
COMAND controller.
X To close the setting scale: pressWor
slide XVY .
i Incorrect settings may have an impact on
the quality of calls. Telephone operation
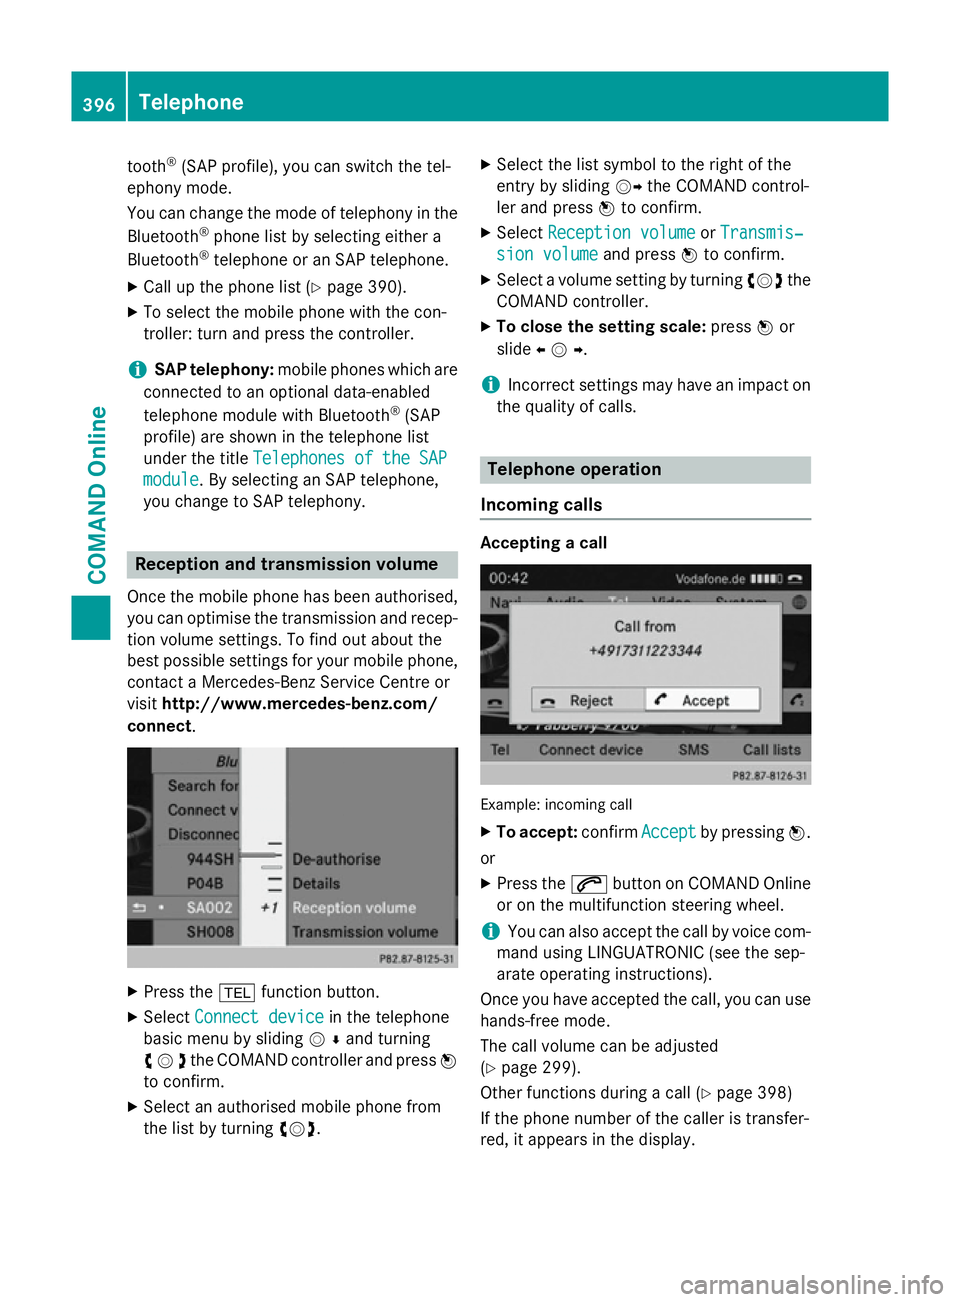
Incoming calls Accepting a call
Example: incoming call
X To accept: confirmAccept
Acceptby pressing W.
or X Press the 6button on COMAND Online
or on the multifunction steering wheel.
i You can also accept the call by voice com-
mand using LINGUATRONIC (see the sep-
arate operating instructions).
Once you have accepted the call, you can use
hands-free mode.
The call volume can be adjusted
(Y page 299).
Other functions during a call (Y page 398)
If the phone number of the caller is transfer-
red, it appears in the display. 396
TelephoneCOMAND Online
Page 423 of 637
The following functions are available in
COMAND Online when the module is used:
R hands-free mode
R data modem mode (Y page 423)
R sending and receiving text messages
(Y page 425)
R access to the phone book of the mobile
phone (if supported by the mobile phone)
(Y page 424)
R loading a mobile phone via the mini USB
connection (Y page 426)
When the module is installed, the vehicle's
exterior aerial is used for reception. This
ensures optimal language quality and Internet connectivity.
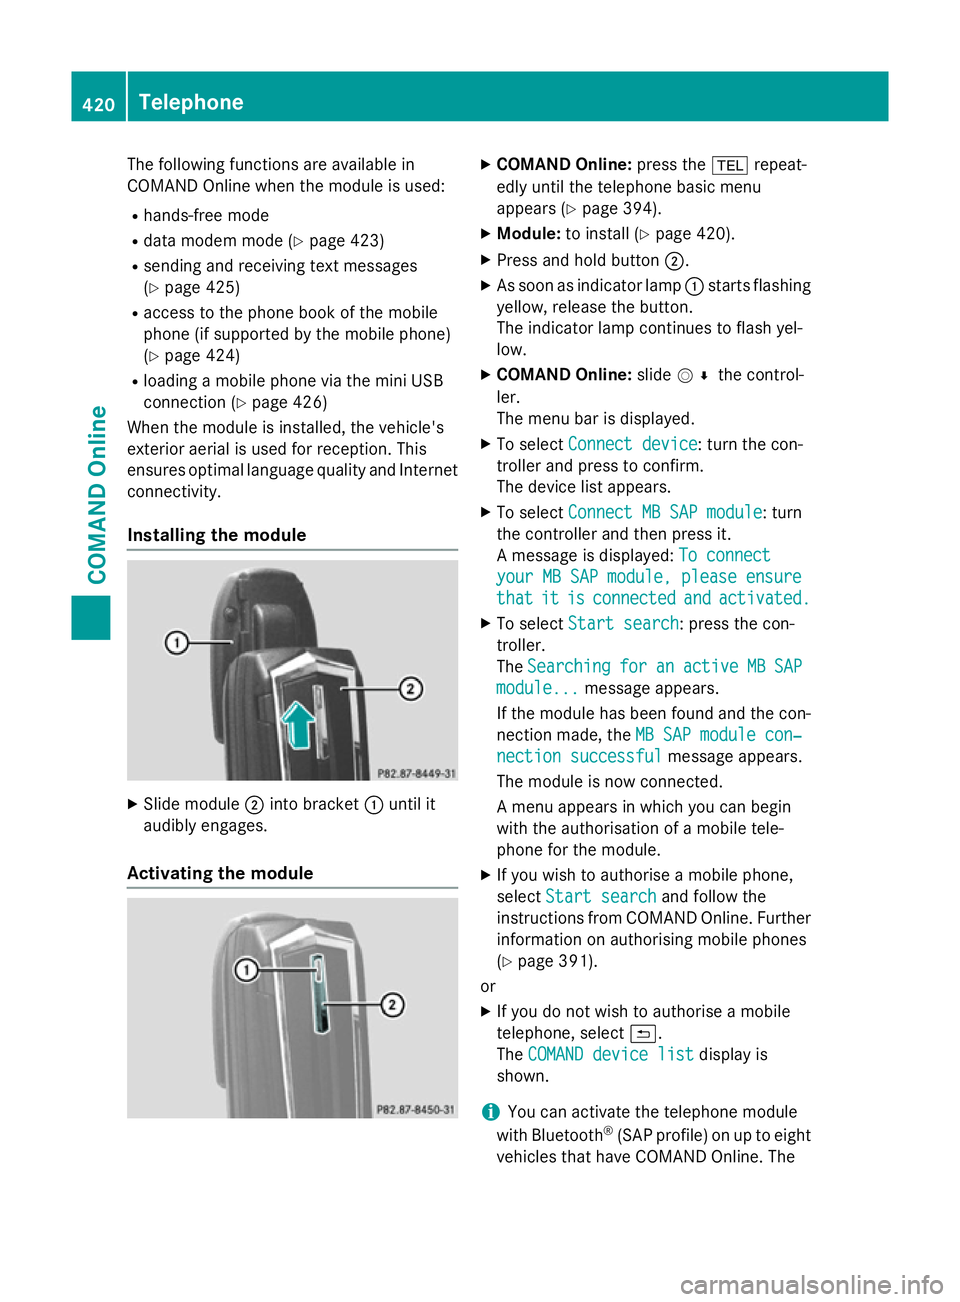
Installing the module X
Slide module ;into bracket :until it
audibly engages.
Activating the module X
COMAND Online: press the%repeat-
edly until the telephone basic menu
appears (Y page 394).
X Module: to install (Y page 420).
X Press and hold button ;.
X As soon as indicator lamp :starts flashing
yellow, release the button.
The indicator lamp continues to flash yel-
low.
X COMAND Online: slideV¬ the control-
ler.
The menu bar is displayed.
X To select Connect device
Connect device: turn the con-
troller and press to confirm.
The device list appears.
X To select Connect MB SAP module Connect MB SAP module: turn
the controller and then press it.
A message is displayed: To connect To connect
your MB SAP module, please ensure
your MB SAP module, please ensure
that that it
itis
isconnected
connected and
andactivated.
activated.
X To select Start search
Start search: press the con-
troller.
The Searching Searching for
foran
anactive
active MB
MBSAP
SAP
module...
module... message appears.
If the module has been found and the con-
nection made, the MB SAP module con‐
MB SAP module con‐
nection successful
nection successful message appears.
The module is now connected.
A menu appears in which you can begin
with the authorisation of a mobile tele-
phone for the module.
X If you wish to authorise a mobile phone,
select Start search Start search and follow the
instructions from COMAND Online. Further
information on authorising mobile phones
(Y page 391).
or
X If you do not wish to authorise a mobile
telephone, select &.
The COMAND device list COMAND device list display is
shown.
i You can activate the telephone module
with Bluetooth ®
(SAP profile) on up to eight
vehicles that have COMAND Online. The 420
TelephoneCOMAND Online
Page 427 of 637
obtained from the mobile phone network pro-
vider.
Activating phone number transmission:
X Enter the number "00031" in the telephone
basic menu.
X Press the 6button.
The phone number will be transmitted in
future.
Deactivating phone number transmis-
sion: X Enter the number "00030" in the telephone
basic menu.
X Press the 6button.
The phone number will no longer be trans-
mitted in future.
Activating/deactivating data roaming
Prerequisite: the module is connected with
the mobile telephone (Y page 421) or is being
used in SIM card mode (Y page 421).
If you activate data roaming, you can receive
and send data abroad via the module.
Data roaming is deactivated in the standard
setting.
To activate data roaming:
X Enter the number "00061" in the telephone
basic menu.
X Press the 6button.
Data roaming is activated.
To deactivate data roaming: X Enter the number "00060" in the telephone
basic menu.
X Press the 6button.
Data roaming is deactivated.
Activating/deactivating network pro-
vider restriction
Prerequisite: the module is connected with
the mobile telephone (Y page 421) or is being
used in SIM card mode (Y page 421).
When you activate network provider restric-
tion, the module will not log into foreign net-
works. You will then be unable to conduct telephone calls or send and receive text mes-
sages when abroad.
Network provider restriction is deactivated in
the standard setting.
To deactivate network provider restric-
tion:
X Enter the number "00070" in the telephone
basic menu.
X Press the 6button.
Network provider restriction is deactiva-
ted.
To activate network provider restriction: X Enter the number "00071" in the telephone
basic menu.
X Press the 6button.
Network provider restriction is activated.
Adjusting the brightness of the indicator
lamp
Situation-related dimming:
X Enter the number "00082" in the telephone
basic menu.
X Press the 6button.
The LED is dimmed as long as the user does
not perform any actions (press a key etc.).
No change to brightness:
X Enter the number "00083" in the telephone
basic menu.
X Press the 6button.
The LED is always bright regardless of any
user actions.
Transferring the phone book In order to use the phone book of the mobile
phone via COMAND Online, the phone book
must be transferred using the module.
The data transfer may take up to ten minutes.
Transmission occurs automatically after a
Bluetooth ®
connection is automatically
established.
i If the mobile phone supports the PBAP
(Phone BookAccess Profile), the system 424
TelephoneCOMAND Online
Page 429 of 637
Deleting call lists
X Enter the number "0002" in the telephone
basic menu.
X Press the 6button.
The call lists stored in the module are reset and will no longer appear starting with the
next phone book transfer.
The call lists of the connected mobile phone
are not deleted. Deleting the call lists of the
mobile phone (see the operating instructions
for the mobile phone).
Deleting call lists from COMAND Online
(Y page 407).
i In SIM card mode, the
Delete call Delete call
lists
lists menu item is available in COMAND
Online.
Terminating the connection between
the mobile phone and the module Automatic disconnection
Once outside the receiving range, the Blue-
tooth ®
connection between the mobile phone
and the module is automatically terminated.
Manual disconnection
X Terminate the Bluetooth ®
connection on
the mobile phone (see the operating
instructions for the mobile phone).
Re-establishing a connection
X You can re-establish the Bluetooth ®
con-
nection after disconnecting manually
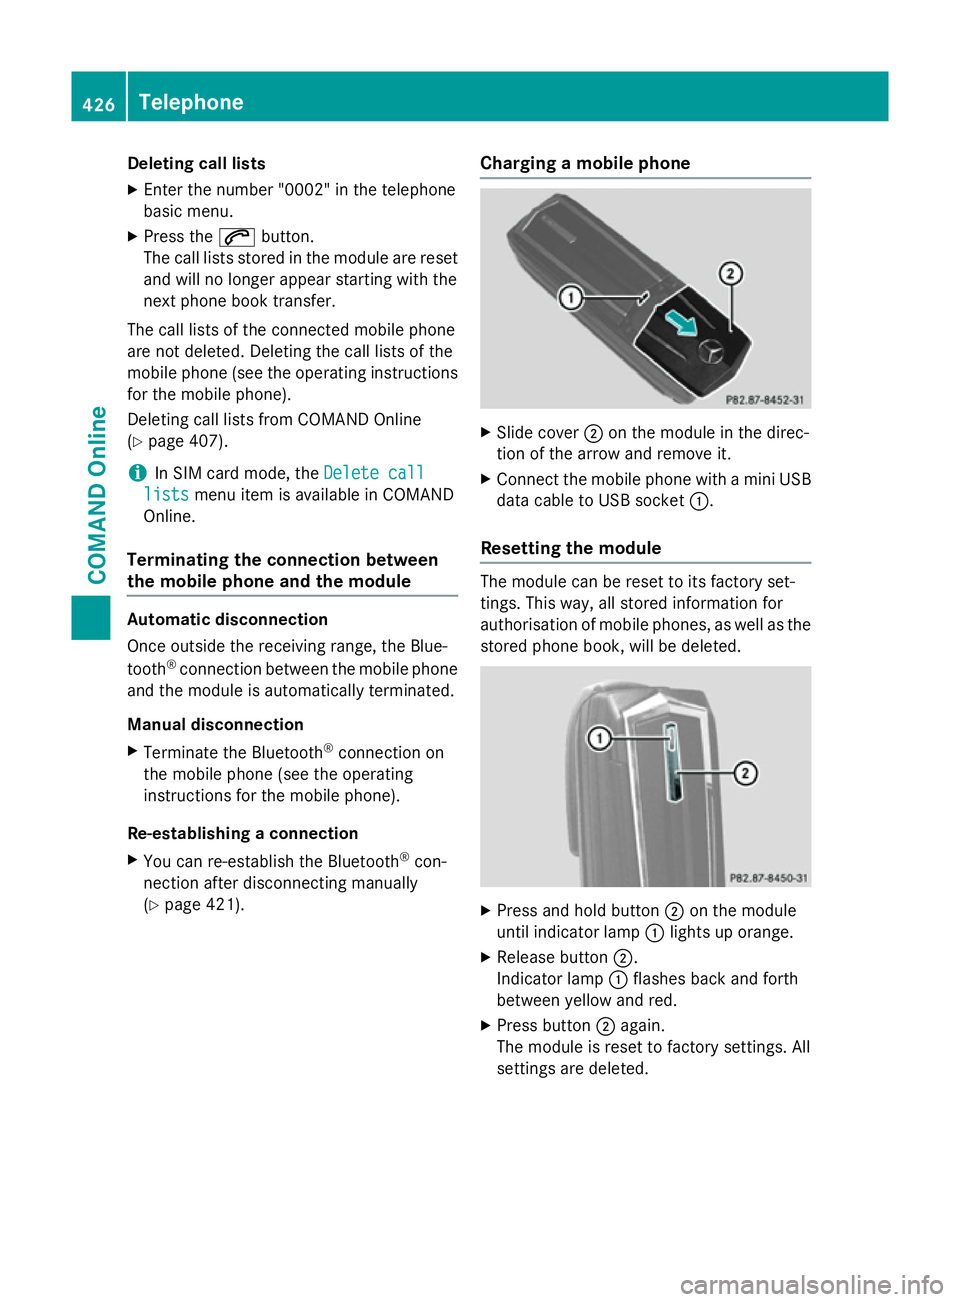
(Y page 421). Charging a mobile phone X
Slide cover ;on the module in the direc-
tion of the arrow and remove it.
X Connect the mobile phone with a mini USB
data cable to USB socket :.
Resetting the module The module can be reset to its factory set-
tings. This way, all stored information for
authorisation of mobile phones, as well as the stored phone book, will be deleted. X
Press and hold button ;on the module
until indicator lamp :lights up orange.
X Release button ;.
Indicator lamp :flashes back and forth
between yellow and red.
X Press button ;again.
The module is reset to factory settings. All
settings are deleted. 426
TelephoneCOMAND Online
Page 465 of 637
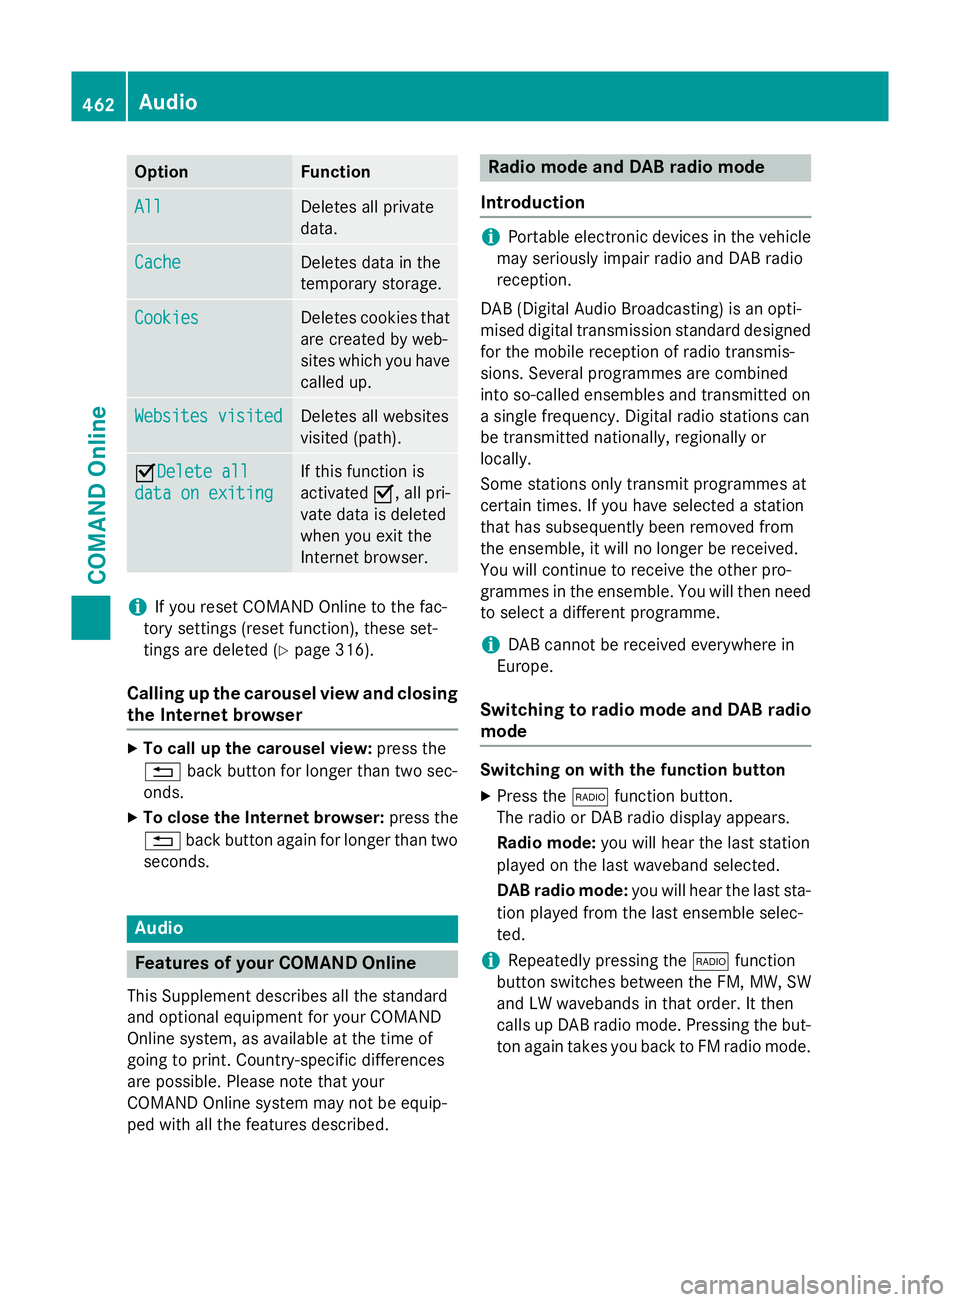
Option Function
All
All Deletes all private
data.
Cache Cache Deletes data in the
temporary storage.
Cookies Cookies Deletes cookies that
are created by web-
sites which you have called up. Websites visited Websites visited Deletes all websites
visited (path).
ODelete all
Delete all
data on exiting data on exiting If this function is
activated
O, all pri-
vate data is deleted
when you exit the
Internet browser. i
If you reset COMAND Online to the fac-
tory settings (reset function), these set-
tings are deleted (Y page 316).
Calling up the carousel view and closing the Internet browser X
To call up the carousel view: press the
% back button for longer than two sec-
onds.
X To close the Internet browser: press the
% back button again for longer than two
seconds. Audio
Features of your COMAND Online
This Supplement describes all the standard
and optional equipment for your COMAND
Online system, as available at the time of
going to print. Country-specific differences
are possible. Please note that your
COMAND Online system may not be equip-
ped with all the features described. Radio mode and DAB radio mode
Introduction i
Portable electronic devices in the vehicle
may seriously impair radio and DAB radio
reception.
DAB (Digital Audio Broadcasting) is an opti-
mised digital transmission standard designed
for the mobile reception of radio transmis-
sions. Several programmes are combined
into so-called ensembles and transmitted on
a single frequency. Digital radio stations can
be transmitted nationally, regionally or
locally.
Some stations only transmit programmes at
certain times. If you have selected a station
that has subsequently been removed from
the ensemble, it will no longer be received.
You will continue to receive the other pro-
grammes in the ensemble. You will then need
to select a different programme.
i DAB cannot be received everywhere in
Europe.
Switching to radio mode and DAB radio mode Switching on with the function button
X Press the $function button.
The radio or DAB radio display appears.
Radio mode: you will hear the last station
played on the last waveband selected.
DAB radio mode: you will hear the last sta-
tion played from the last ensemble selec-
ted.
i Repeatedly pressing the
$function
button switches between the FM, MW, SW
and LW wavebands in that order. It then
calls up DAB radio mode. Pressing the but- ton again takes you back to FM radio mode. 462
AudioCOMAND Online
Page 478 of 637
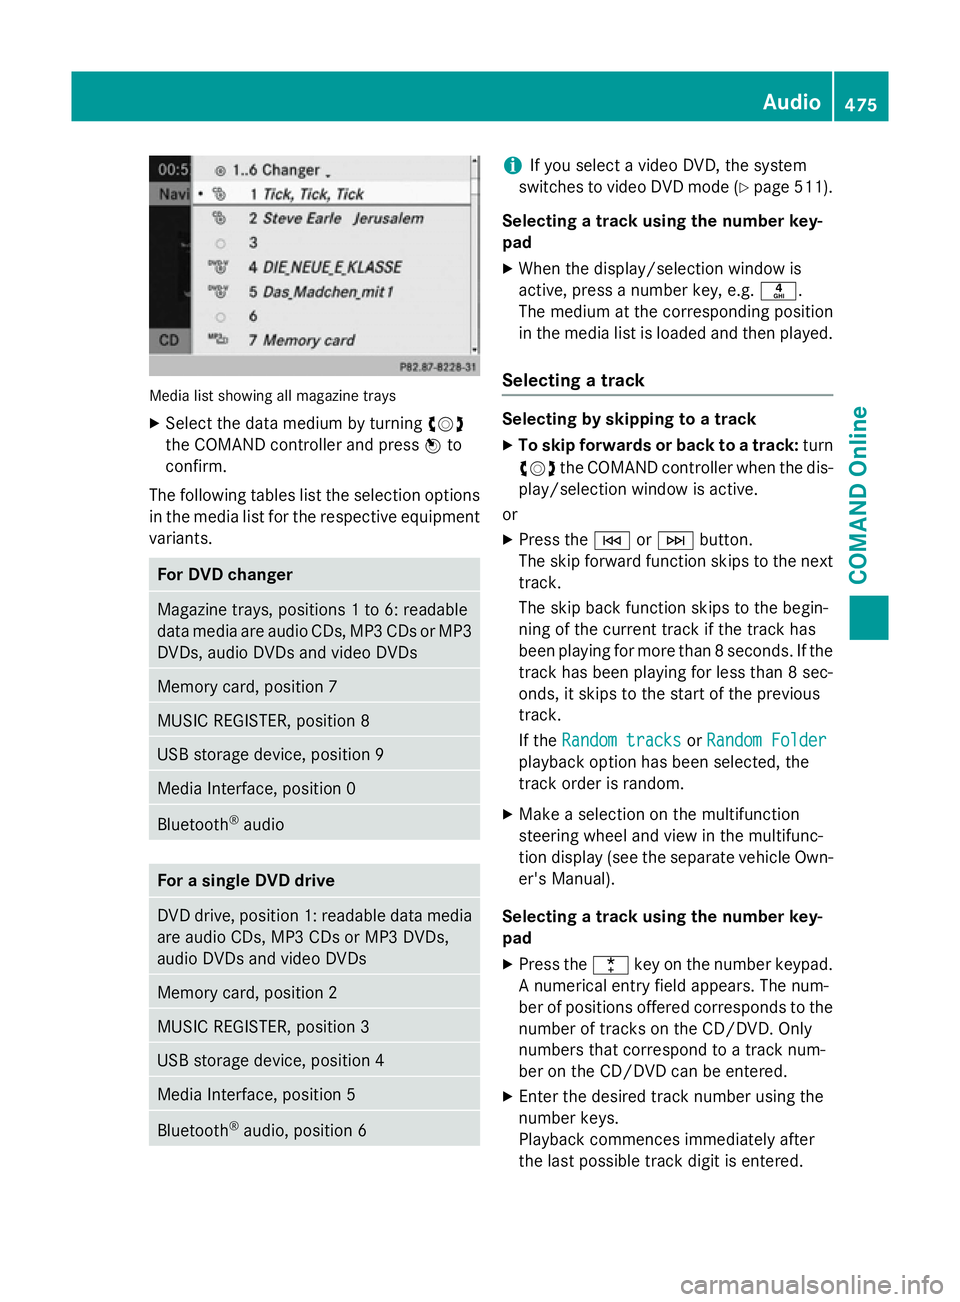
Media list showing all magazine trays
X Select the data medium by turning cVd
the COMAND controller and press Wto
confirm.
The following tables list the selection options
in the media list for the respective equipment variants. For DVD changer
Magazine trays, positions 1 to 6: readable
data media are audio CDs, MP3 CDs or MP3 DVDs, audio DVDs and video DVDs Memory card, position 7
MUSIC REGISTER, position 8
USB storage device, position 9
Media Interface, position 0
Bluetooth
®
audio For a single DVD drive
DVD drive, position 1: readable data media
are audio CDs, MP3 CDs or MP3 DVDs,
audio DVDs and video DVDs Memory card, position 2
MUSIC REGISTER, position 3
USB storage device, position 4
Media Interface, position 5
Bluetooth
®
audio, position 6 i
If you select a video DVD, the system
switches to video DVD mode (Y page 511).
Selecting a track using the number key-
pad X When the display/selection window is
active, press a number key, e.g. n.
The medium at the corresponding position
in the media list is loaded and then played.
Selecting a track Selecting by skipping to a track
X To skip forwards or back to a track: turn
cVd the COMAND controller when the dis-
play/selection window is active.
or
X Press the EorF button.
The skip forward function skips to the next track.
The skip back function skips to the begin-
ning of the current track if the track has
been playing for more than 8 seconds. If the
track has been playing for less than 8 sec-
onds, it skips to the start of the previous
track.
If the Random tracks Random tracks orRandom Folder
Random Folder
playback option has been selected, the
track order is random.
X Make a selection on the multifunction
steering wheel and view in the multifunc-
tion display (see the separate vehicle Own-
er's Manual).
Selecting a track using the number key-
pad X Press the ¯key on the number keypad.
A numerical entry field appears. The num-
ber of positions offered corresponds to the
number of tracks on the CD/DVD. Only
numbers that correspond to a track num-
ber on the CD/DVD can be entered.
X Enter the desired track number using the
number keys.
Playback commences immediately after
the last possible track digit is entered. Audio
475COMAND Online Z
Page 479 of 637
i
Pressing and holding a number key for
more than 2 seconds completes the entry
and the corresponding track is played.
Selecting a track using music search X
Select Current tracklist
Current tracklist ,Folder
Folder or a
category and press Wto confirm.
Select music via categories (e.g. albums,
artists etc.) with the music search function.
If you select a category, COMAND Online
starts a search for track information if the fol-
lowing conditions are fulfilled:
R the data carriers are inserted or connected.
R the track information from these data car-
riers is not yet contained in the COMAND
music database.
COMAND Online imports track information
from the following data carriers:
R disc (audio CD/DVD/MP3)
R memory card
R MUSIC REGISTER
R USB memory
The Track information is complete
Track information is complete
message appears once the search is comple-
ted. COMAND Online stores the music data in its own database. You can now select the
available music data within the desired cate-
gory.
You will find further information on searching
for music in the "Music search" section
(Y page 481).
X In audio CD/audio DVD mode/MP3 mode,
select Search
Search by sliding VÆand turning cVd
the COMAND controller and press W
to confirm.
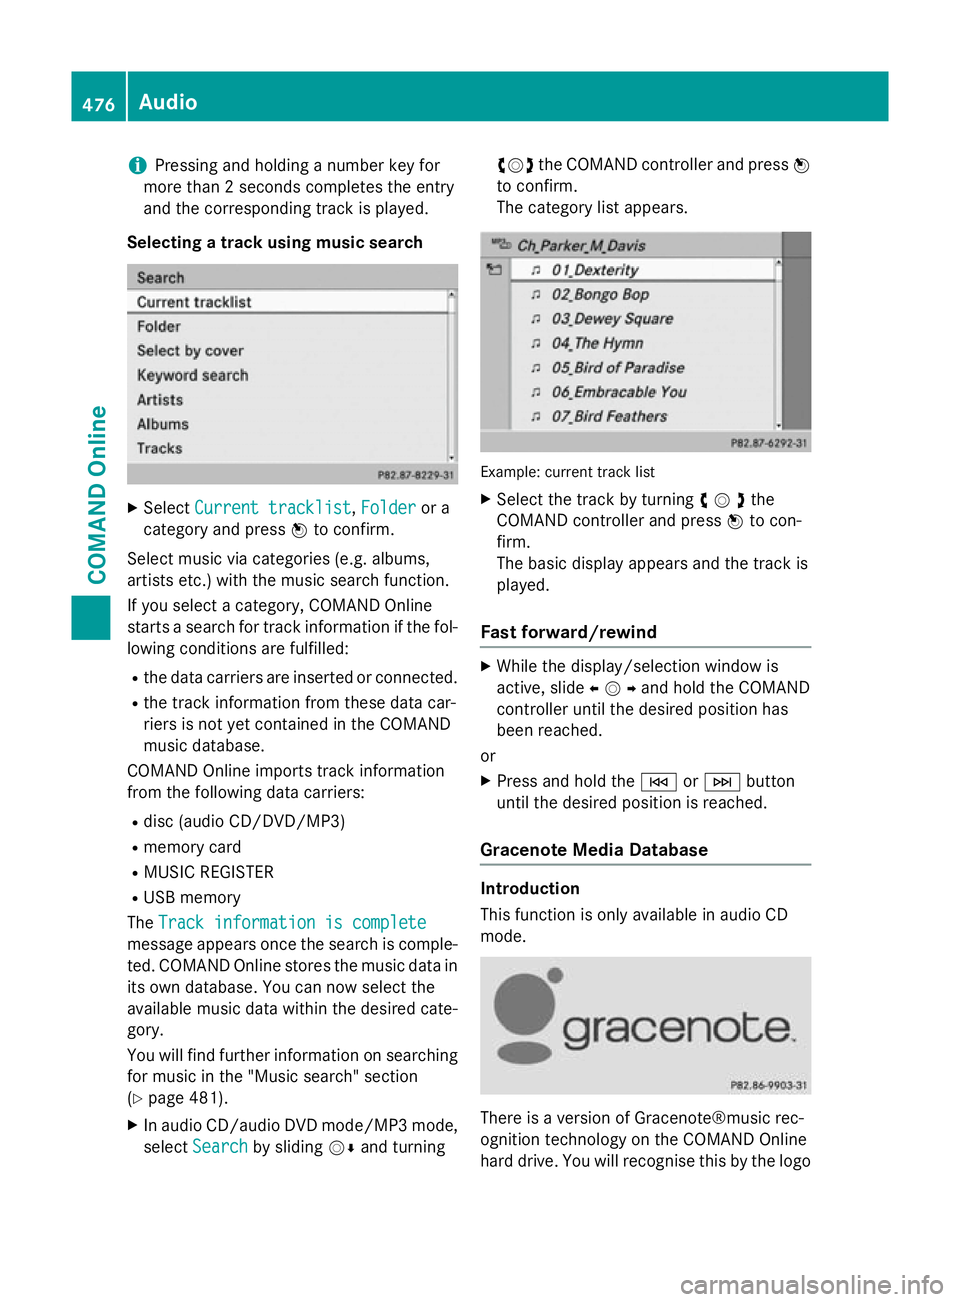
The category list appears. Example: current track list
X Select the track by turning cVdthe
COMAND controller and press Wto con-
firm.
The basic display appears and the track is
played.
Fast forward/rewind X
While the display/selection window is
active, slide XVYand hold the COMAND
controller until the desired position has
been reached.
or X Press and hold the EorF button
until the desired position is reached.
Gracenote Media Database Introduction
This function is only available in audio CD
mode.
There is a version of Gracenote®music rec-
ognition technology on the COMAND Online
hard drive. You will recognise this by the logo 476
AudioCOMAND Online
Page 480 of 637
in the bottom right-hand corner of certain
audio displays.
Many audio CDs contain CD text.
COMAND Online uses the information con-
tained therein to display the artist, album and track name.
If the audio CD does not contain any CD text
information, COMAND Online can use the
Gracenote ®
Media Database to identify
unknown audio tracks when in audio CD
mode. This is only possible if the relevant
information is saved in the Gracenote Media
Database and if the Gracenote Media Data-
base function is activated.
If this is the case, COMAND Online will display
the corresponding data such as artist, album
and track name in the relevant displays and
lists.
Selecting Gracenote ®
data to be displayed X
Switch on audio CD mode (Y page 472).
X Select CD
CD by sliding VÆand turning cVd
the COMAND controller and press Wto
confirm.
X Select Gracenote Media Database
Gracenote Media Database by
turning cVdthe COMAND controller and
press Wto confirm.
A menu appears.
The #dot indicates the current selection
for the display.
If several entries exist for the CD of a partic-
ular artist, you can select which of the entries
should be shown.
If the inserted CD does not contain any
Gracenote® data, the Gracenote Media
Gracenote Media Database Database
menu item is shown in grey and
cannot be selected.
X Select an entry by turning cVdthe
COMAND controller and press Wto con-
firm.
Switching the Gracenote ®
data display
on/off
X Switch on audio CD mode (Y page 472).
X Select CD
CDby sliding VÆand turning cVd
the COMAND controller and press Wto
confirm.
X Select Gracenote Media Database
Gracenote Media Database by
turning cVdthe COMAND controller and
press Wto confirm.
X To switch off the display: selectNone
Noneand
press Wto confirm.
In the basic display, Track 1
Track 1,Track 2
Track 2etc.
are shown instead of the Gracenote ®
data,
for example (Y page 473).
X To switch on the display: select an entry
in the menu by turning cVdthe COMAND
controller and press Wto confirm.
Updating Gracenote ®
music recognition
technology and the Gracenote Media
Database
Due to the release of new CDs, the digital data
on the Gracenote Media Database must be
updated. Optimum functionality can only be
attained with up-to-date Gracenote ®
music
recognition technology. Information about
new versions can be obtained from a
Mercedes-Benz Service Centre.
You can have your music recognition soft-
ware updated there with a DVD, or you can
update it yourself.
i The Gracenote Media Database is upda-
ted in conjunction with the navigation sys-
tem's digital map (Y page 382). Audio
477COMAND Online Z