2012 MERCEDES-BENZ SL ROADSTER dimensions
[x] Cancel search: dimensionsPage 10 of 637
Bonnet
Active bonnet (pedestrian protec-tion) ............................................... 562
Closing ........................................... 563
Display message ............................ 270
Important safety notes .................. 562
Opening ......................................... 563
Boot
Emergency release .......................... 99
Important safety notes .................... 94
Locking separately ........................... 98
Opening/closing (automatically
from inside) ...................................... 98
Opening/closing (automatically
from outside) ................................... 95
Opening/closing (from the out-
side, HANDS-FREE ACCESS) ............ 96
Opening/closing (manually from
outside) ............................................ 95
Overview .......................................... 94
Power closing .................................. 93
Boot lid
Display message ............................ 270
Opening dimensions ...................... 629
Opening/closing .............................. 94
Boot load (maximum) ........................ 629
Boot separator
Display message ............................ 271
Fitting ............................................ 106
General notes ................................ 105
Opening/closing ............................ 106
Removing ....................................... 106
Bottle holders .................................... 549
Brake Assist
see BAS (Brake Assist System)
Brake fluid
Display message ............................ 253
Notes ............................................. 627
Brake lamps
Adaptive ........................................... 73
Display message ............................ 256
Brakes
ABS .................................................. 71
BAS .................................................. 71
BAS PLUS ........................................ 72
Brake fluid (notes) ......................... 627
Display message ............................ 248
Driving tips .................................... 179 High-performance brake system .... 180
Important safety notes .................. 179
Parking brake ................................ 176
Warning lamp ................................. 275
Breakdown
see Flat tyre
see Towing away
Buttons on the COMAND control-
ler ........................................................ 296 C
Call ...................................................... 397
Accepting/ending/rejecting .......... 396
Connecting .................................... 397
see Telephone
Call list
Display details ............................... 406
Call lists
Deleting ......................................... 407
Opening and selecting an entry ..... 405
Saving an entry in the address
book .............................................. 406
Calling up a fault
see Display messages
Capacities (technical data) ............... 622
Car
see Vehicle
Car key
see Key
Car wash (care) ................................. 568
Care
Automatic car wash ....................... 568
Carpets .......................................... 574
Display ........................................... 572
Exhaust pipe .................................. 572
Exterior lighting ............................. 571
Gear or selector lever .................... 573
High-pressure cleaner .................... 569
Interior ........................................... 572
Matt paintwork .............................. 570
Night View Assist Plus ................... 572
Notes ............................................. 568
Paint .............................................. 570
Plastic trim .................................... 573
Reversing camera .......................... 572
Roof lining ...................................... 574
Seat belt ........................................ 574 Index
7
Page 32 of 637
Locking (in an emergency) ............... 93
Locking (key) ................................... 85
Lowering ........................................ 609
Pulling away ................................... 158
Raising ........................................... 607
Registration ..................................... 34
Securing from rolling away ............ 606
Tow-starting ................................... 588
Towing away .................................. 588
Transporting .................................. 591
Unlocking (in an emergency) ........... 93
Unlocking (key) ................................ 85
Vehicle data ................................... 629
Vehicle battery
see Battery (vehicle)
Vehicle data ....................................... 629
Vehicle dimensions ........................... 629
Vehicle emergency locking ................ 93
Vehicle identification number
see VIN
Vehicle identification plate .............. 622
Vehicle level
Active Body Control (AMG vehi-
cles) ............................................... 202
Active Body Control (except AMG
vehicles) ........................................ 199
Display message ............................ 260
Vehicle tool kit .................................. 577
Video
Operating the DVD ......................... 235
see Video DVD
Video DVD .......................................... 514
Automatic picture shutoff .............. 501
Data carrier .................................... 511
DVD menu ..................................... 514
Fast forward/rewind ...................... 513
Function restrictions ...................... 511
Interactive content ........................ 516
Operation ....................................... 511
Pause function ............................... 513
Playing conditions .......................... 511
Safety notes .................................. 511
Selecting ........................................ 514
Selecting a film/title ...................... 514
Selecting a scene/chapter ............ 513
Setting the audio format ................ 515
Setting the language ...................... 515 Setting the picture ......................... 502
Showing/hiding the menu ............. 512
Showing/hiding the navigation
menu ............................................. 512
Stop function ................................. 513
Subtitles ........................................ 516
Switching on .................................. 512
Video-AUX
Setting the picture ......................... 502
VIN ...................................................... 622 W
Warning and indicator lamps ABS ................................................ 275
Brakes ........................................... 275
Distance warning signal ................. 283
ESP® ............................................. 277
ESP® OFF ...................................... 278
LIM (cruise control) ........................ 182
LIM (DISTRONIC PLUS) .................. 186
LIM (variable SPEEDTRONIC) ......... 194
Overview .......................................... 42
PASSENGER AIRBAG OFF ................ 63
Reserve fuel ................................... 280
Seat belt ........................................ 274
SRS ................................................ 280
Tyre pressure monitor ................... 284
Warning triangle ................................ 576
Washer fluid
Display message ............................ 272
Waypoints .......................... 335, 337, 338
Accepting waypoints for the
route .............................................. 338
Creating ......................................... 335
Editing ........................................... 337
Entering ......................................... 335
Searching for a filling station when the fuel level is lo w........................ 338
Weather display (COMAND
Online) ........................................ 447, 448
Calling up the weather map ........... 448
Information chart ........................... 447
Selecting locations in the informa-
tion chart ....................................... 447
Selecting the location .................... 447
Selecting the location in the
weather map .................................. 448 Index
29
Page 76 of 637
PLUS automatically increases the brake pres-
sure to a degree suited to the traffic situation.
BAS PLUS provides braking assistance in haz- ardous situations with vehicles in front within
a speed range between 7 km/h and
250 km/h.
At speeds of up to approximately 70 km/h,
BAS PLUS can also detect stationary objects. Examples of stationary objects are stopped or
parked vehicles.
i If BAS PLUS demands particularly high
braking force, preventative passenger pro-
tection measures (PRE-SAFE ®
) are activa-
ted simultaneously.
X Keep the brake pedal depressed until the
emergency braking situation is over.
ABS prevents the wheels from locking.
BAS PLUS is deactivated and the brakes func-
tion as usual again, if:
R you release the brake pedal
R there is no longer a risk of collision
R no obstacle is detected in front of your
vehicle
R you depress the accelerator pedal
R you activate kickdown Adaptive brake lamps
i Observe the "Important safety notes" sec-
tion (Y page 70).
If you brake sharply from a speed of more
than 50 km/ho r if braking is assisted by BAS
or BAS PLUS, the brake lamps flash rapidly. In this way, traffic travelling behind you is
warned in an even more noticeable manner.
If you brake sharply from a speed of more
than 70 km/h to a standstill, the hazard warn-
ing lamps are activated automatically. If the
brakes are applied again, the brake lamps
light up continuously. The hazard warning
lamps switch off automatically if you travel
faster than 10 km/h. You can also switch off the hazard warning lamps using the hazard
warning button (Y page 130). ESP
®
(Electronic Stability Program)
General notes i
Observe the "Important safety notes" sec-
tion (Y page 70).
ESP ®
monitors driving stability and traction,
i.e. power transmission between the tyres
and the road surface.
If ESP ®
detects that the vehicle is deviating
from the direction desired by the driver, one
or more wheels are braked to stabilise the
vehicle. The engine output is also modified to keep the vehicle on the desired course within
physical limits. ESP ®
assists the driver when
pulling away on wet or slippery roads. ESP ®
can also stabilise the vehicle during braking.
ETS (Electronic Traction System) i
Observe the "Important safety notes" sec-
tion (Y page 70).
ETS traction control is part of ESP ®
.
ETS brakes the drive wheels individually if
they spin. This enables you to pull away and
accelerate on slippery surfaces, for example
if the road surface is slippery on one side. In
addition, more drive torque is transferred to
the wheel or wheels with traction.
ETS remains active when you deactivate
ESP ®
.
i AMG vehicles:
your vehicle may be
equipped with 20-inch tyres on the rear
axle. If replaced with a 19-inch tyre, ETS
may intervene noticeably sooner for the
first few kilometres. After approximately
10 km ETS will function as usual again.
Information on the dimensions and types of wheels and tyres for your vehicle can be
found under "Wheel/tyre combinations"
(Y page 610). Driving safety systems
73Safety Z
Page 97 of 637
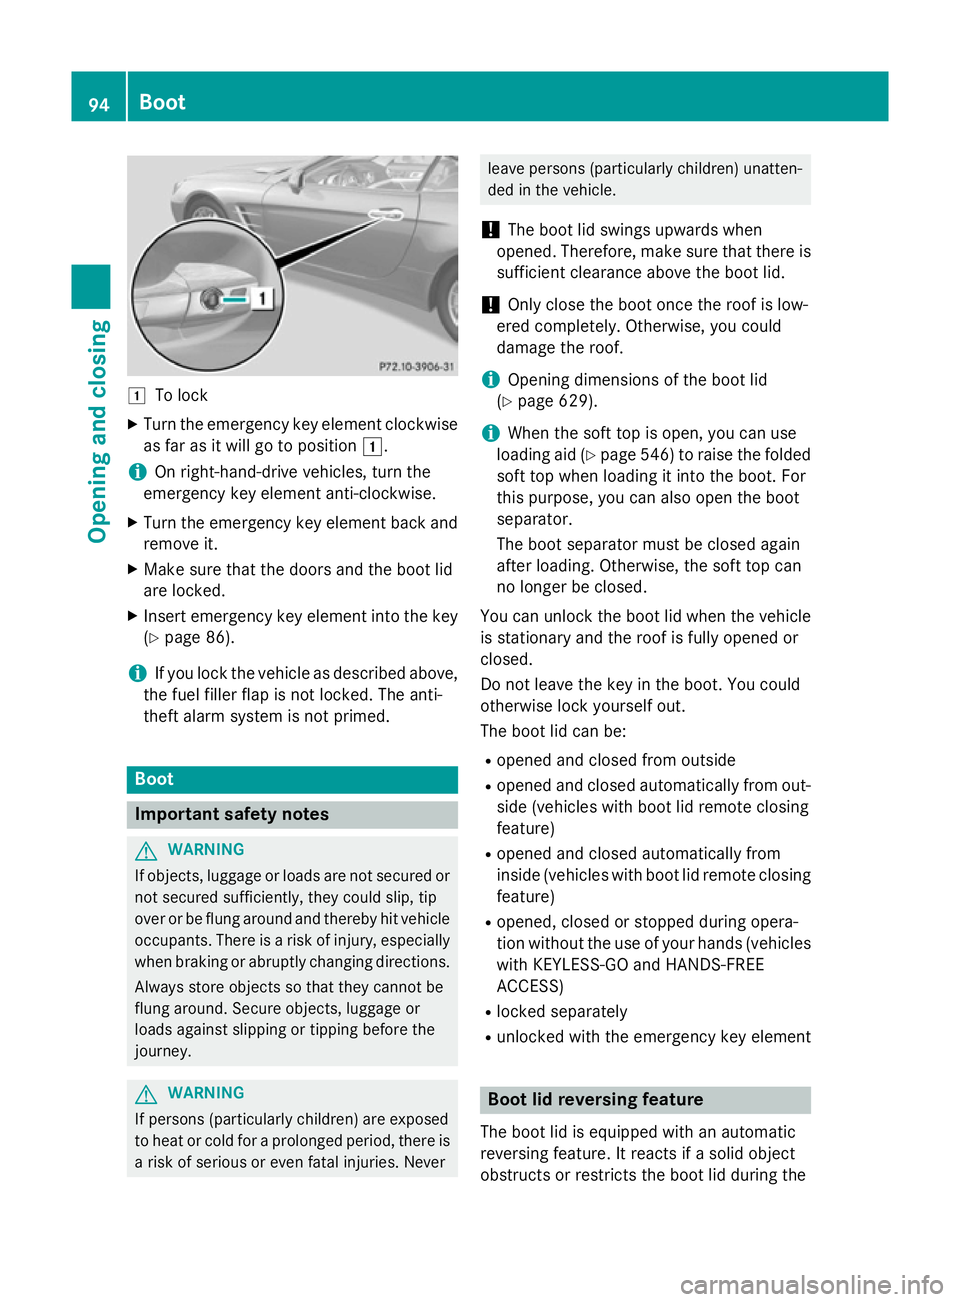
1
To lock
X Turn the emergency key element clockwise
as far as it will go to position 1.
i On right-hand-drive vehicles, turn the
emergency key element anti-clockwise.
X Turn the emergency key element back and
remove it.
X Make sure that the doors and the boot lid
are locked.
X Insert emergency key element into the key
(Y page 86).
i If you lock the vehicle as described above,
the fuel filler flap is not locked. The anti-
theft alarm system is not primed. Boot
Important safety notes
G
WARNING
If objects, luggage or loads are not secured or not secured sufficiently, they could slip, tip
over or be flung around and thereby hit vehicle
occupants. There is a risk of injury, especially when braking or abruptly changing directions.
Always store objects so that they cannot be
flung around. Secure objects, luggage or
loads against slipping or tipping before the
journey. G
WARNING
If persons (particularly children) are exposed
to heat or cold for a prolonged period, there is a risk of serious or even fatal injuries. Never leave persons (particularly children) unatten-
ded in the vehicle.
! The boot lid swings upwards when
opened. Therefore, make sure that there is sufficient clearance above the boot lid.
! Only close the boot once the roof is low-
ered completely. Otherwise, you could
damage the roof.
i Opening dimensions of the boot lid
(Y page 629).
i When the soft top is open, you can use
loading aid (Y page 546) to raise the folded
soft top when loading it into the boot. For
this purpose, you can also open the boot
separator.
The boot separator must be closed again
after loading. Otherwise, the soft top can
no longer be closed.
You can unlock the boot lid when the vehicle
is stationary and the roof is fully opened or
closed.
Do not leave the key in the boot. You could
otherwise lock yourself out.
The boot lid can be:
R opened and closed from outside
R opened and closed automatically from out-
side (vehicles with boot lid remote closing
feature)
R opened and closed automatically from
inside (vehicles with boot lid remote closing
feature)
R opened, closed or stopped during opera-
tion without the use of your hands (vehicles
with KEYLESS-GO and HANDS-FREE
ACCESS)
R locked separately
R unlocked with the emergency key element Boot lid reversing feature
The boot lid is equipped with an automatic
reversing feature. It reacts if a solid object
obstructs or restricts the boot lid during the 94
BootOpening and closing
Page 99 of 637
R
press the closing or locking button on the
tailgate.
R pull the handle on the tailgate.
! The boot lid swings upwards when
opened. Therefore, make sure that there is
sufficient clearance above the boot lid.
i Opening dimensions of the boot lid
(Y page 629).
Opening You can automatically open the boot lid using
the handle in the boot lid.
X If the boot is unlocked, pull the boot lid
handle and release it again immediately.
Vehicles with the boot lid remote closing fea-
ture: the boot lid can also be opened auto-
matically with the key.
X Press and hold the Fbutton on the key
until the boot lid opens.
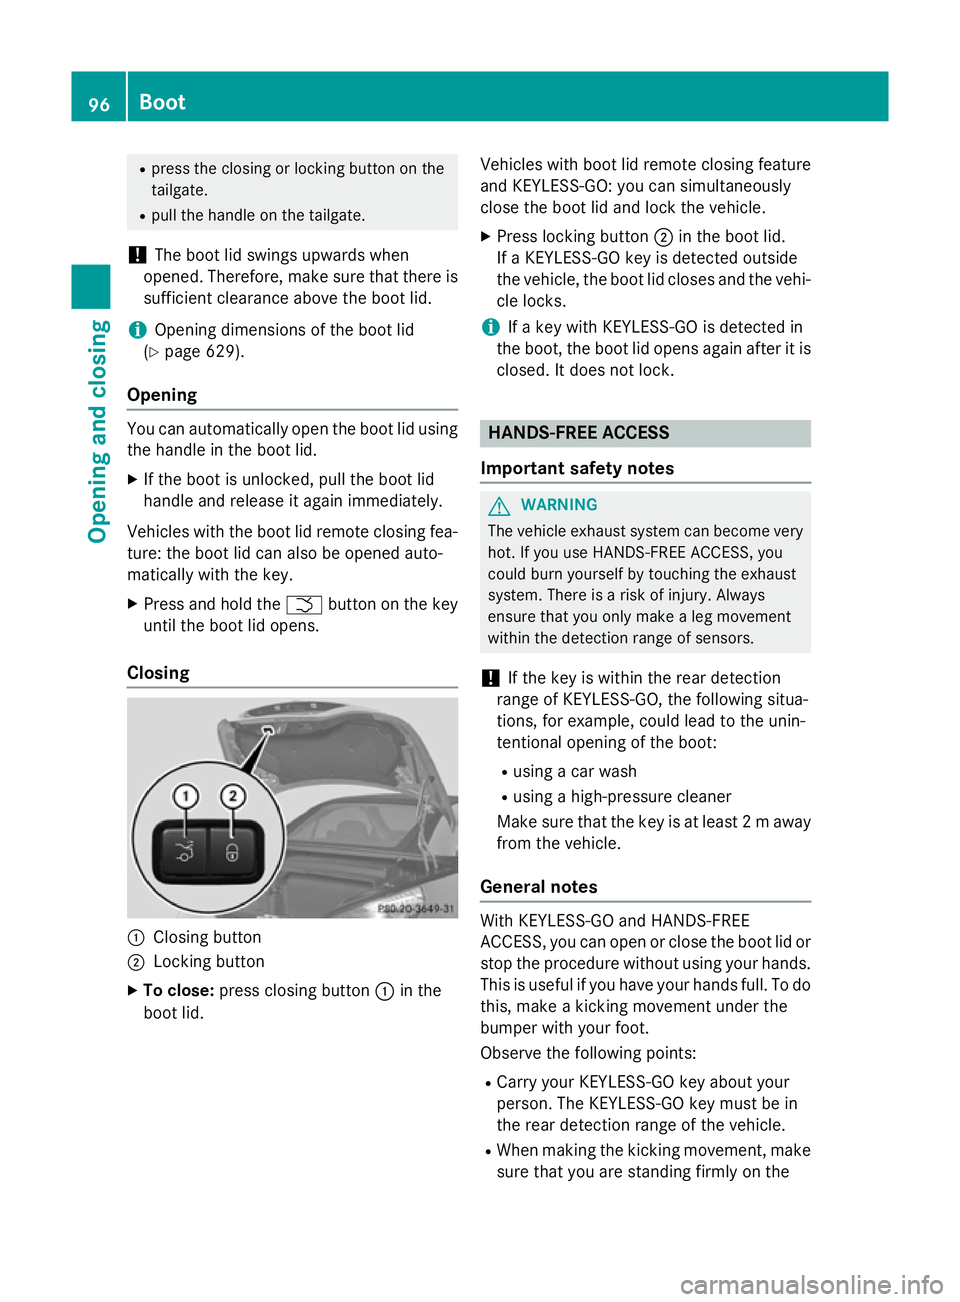
Closing :
Closing button
; Locking button
X To close: press closing button :in the
boot lid. Vehicles with boot lid remote closing feature
and KEYLESS-GO: you can simultaneously
close the boot lid and lock the vehicle.
X Press locking button ;in the boot lid.
If a KEYLESS-GO key is detected outside
the vehicle, the boot lid closes and the vehi-
cle locks.
i If a key with KEYLESS-GO is detected in
the boot, the boot lid opens again after it is
closed. It does not lock. HANDS-FREE ACCESS
Important safety notes G
WARNING
The vehicle exhaust system can become very
hot. If you use HANDS-FREE ACCESS, you
could burn yourself by touching the exhaust
system. There is a risk of injury. Always
ensure that you only make a leg movement
within the detection range of sensors.
! If the key is within the rear detection
range of KEYLESS-GO, the following situa-
tions, for example, could lead to the unin-
tentional opening of the boot:
R using a car wash
R using a high-pressure cleaner
Make sure that the key is at least 2 maway
from the vehicle.
General notes With KEYLESS-GO and HANDS-FREE
ACCESS, you can open or close the boot lid or
stop the procedure without using your hands.
This is useful if you have your hands full. To do
this, make a kicking movement under the
bumper with your foot.
Observe the following points:
R Carry your KEYLESS-GO key about your
person. The KEYLESS-GO key must be in
the rear detection range of the vehicle.
R When making the kicking movement, make
sure that you are standing firmly on the 96
BootOpening and closing
Page 101 of 637
Opening/closing automatically from
the inside
Important safety notes G
WARNING
Parts of the body could become trapped dur-
ing automatic closing of the tailgate. In addi-
tion, people may be standing in the closing
area or may enter the closing area, e.g. chil-
dren, during the closing procedure. There is a risk of injury.
Make sure that nobody is in the vicinity of theclosing area during the closing process.
Release the remote operating switch imme-
diately if somebody becomes trapped. To re-
open the tailgate pull on the remote operating
switch. G
WARNING
The boot lid can be automatically opened or
closed even if the key is not in the vehicle. If
children are left unsupervised in the vehicle,
they could activate the functions. There is a
risk of injury.
When leaving the vehicle, always take the key with you and lock the vehicle. Never leave
children unattended in the vehicle.
! The boot lid swings upwards when
opened. Therefore, make sure that there is sufficient clearance above the boot lid.
i Opening dimensions of the boot lid
(Y page 629).
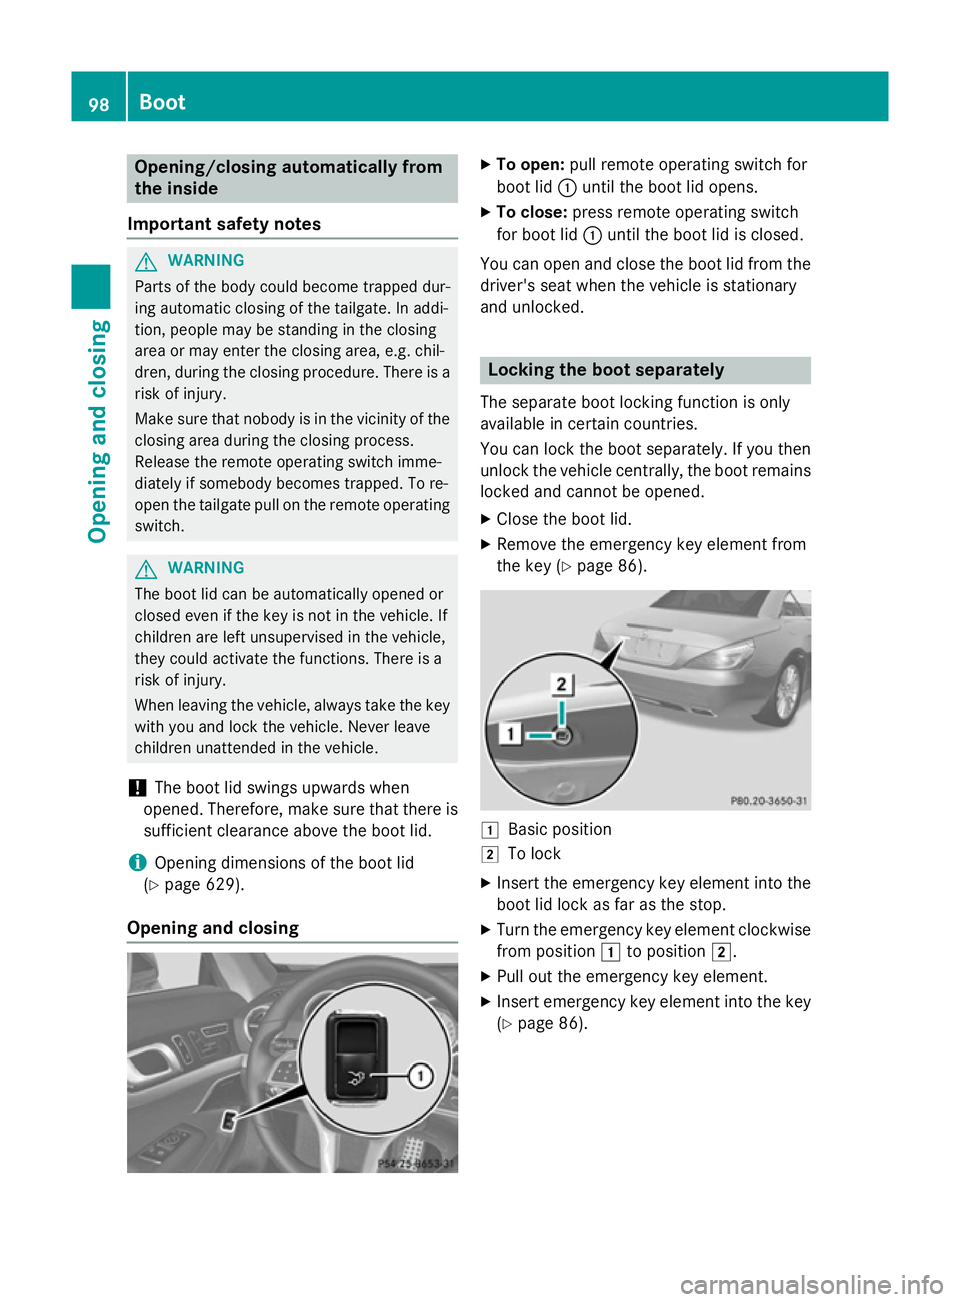
Opening and closing X
To open: pull remote operating switch for
boot lid :until the boot lid opens.
X To close: press remote operating switch
for boot lid :until the boot lid is closed.
You can open and close the boot lid from the
driver's seat when the vehicle is stationary
and unlocked. Locking the boot separately
The separate boot locking function is only
available in certain countries.
You can lock the boot separately. If you then
unlock the vehicle centrally, the boot remains locked and cannot be opened.
X Close the boot lid.
X Remove the emergency key element from
the key (Y page 86). 1
Basic position
2 To lock
X Insert the emergency key element into the
boot lid lock as far as the stop.
X Turn the emergency key element clockwise
from position 1to position 2.
X Pull out the emergency key element.
X Insert emergency key element into the key
(Y page 86). 98
BootOpening and closing
Page 107 of 637
!
When opening and closing the roof, make
sure that:
R there is sufficient upward clearance, as
the roof swings upwards.
R there is sufficient clearance behind the
vehicle, as the boot lid swings backwards beyond the bumper.
R the boot is only loaded to below the boot
separator.
R the boot separator is not pushed up by
the load.
R the boot separator is closed.
R the boot lid is closed.
R the outside temperature is above Ò15 †.
You could otherwise damage the roof, boot
and other parts of the vehicle.
i Vehicle dimensions when opening/clos-
ing the roof (Y page 629).
i Make sure that the roof and rear window
are dry and clean before opening the roof.
Otherwise, water or dirt could enter the
vehicle interior or boot. Opening and closing using the roof
switch
Important safety notes G
WARNING
When opening or closing the roof, body parts could be trapped by, for example, the roof
mechanism, boot lid or side windows. There is a risk of injury.
When raising or lowering the roof, make sure
that no body parts are in the vicinity of moving
components. If someone becomes trapped,
release the button. Opening and closing X
Secure the vehicle against rolling away
(Y page 175).
X Close the boot separator (Y page 106).
X Close the boot lid.
X Turn the key to position 2in the ignition
lock.
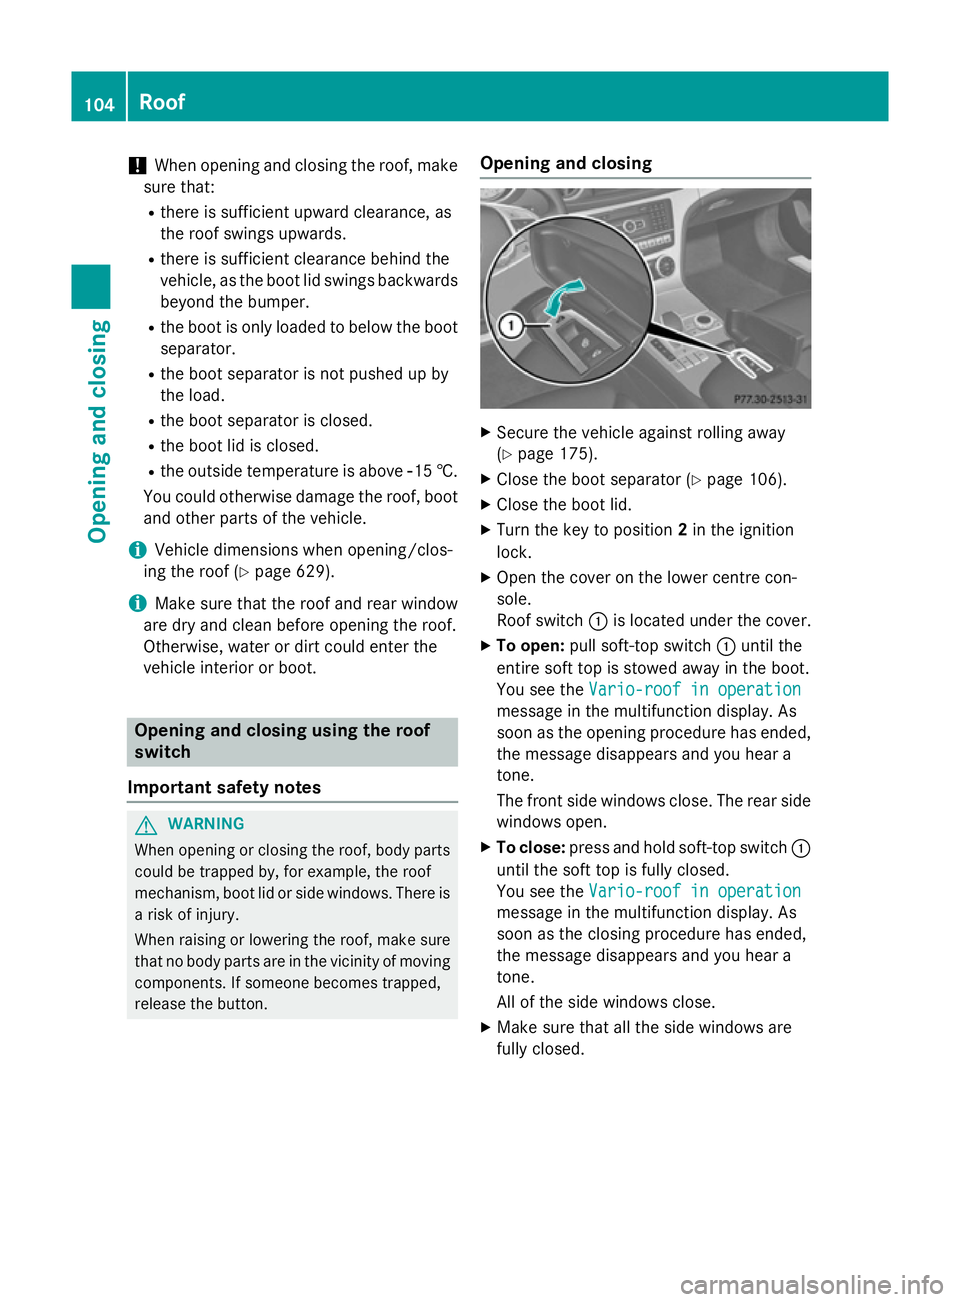
X Open the cover on the lower centre con-
sole.
Roof switch :is located under the cover.
X To open: pull soft-top switch :until the
entire soft top is stowed away in the boot.
You see the Vario-roof in operation Vario-roof in operation
message in the multifunction display. As
soon as the opening procedure has ended, the message disappears and you hear a
tone.
The front side windows close. The rear side
windows open.
X To close: press and hold soft-top switch :
until the soft top is fully closed.
You see the Vario-roof in operation Vario-roof in operation
message in the multifunction display. As
soon as the closing procedure has ended,
the message disappears and you hear a
tone.
All of the side windows close.
X Make sure that all the side windows are
fully closed. 104
RoofOpening and closing
Page 599 of 637
Useful information
i This Owner's Manual describes all mod-
els, series and optional equipment for your
vehicle that were available at the time of
going to press. National variations are pos- sible. Note that your vehicle may not be
equipped with all of the functions descri-
bed. This is also the case for systems and
functions relevant to safety.
i Read the information on qualified special-
ist workshops: (Y page 34). Important safety notes
G
WARNING
If wheels and tyres of the wrong size are used, the wheel brakes or suspension components
may be damaged. There is a risk of an acci-
dent.
Always replace wheels and tyres with those
that fulfil the specifications of the original
part.
When replacing wheels, make sure to fit the
correct:
R designation
R type
When replacing tyres, make sure to fit the
correct:
R designation
R manufacturer
R type G
WARNING
A flat tyre severely impairs the driving, steer-
ing and braking characteristics of the vehicle.
There is a risk of accident.
Tyres without run-flat characteristics:
R do not drive with a flat tyre.
R immediately replace the flat tyre with your
emergency spare wheel or spare wheel, or
consult a qualified specialist workshop. Tyres with run-flat characteristics:
R pay attention to the information and warn-
ing notices on MOExtended tyres (tyres
with run-flat characteristics).
Accessories that are not approved for your
vehicle by Mercedes-Benz or that are not
being used correctly can impair the operating
safety.
Before purchasing and using non-approved
accessories, visit a qualified specialist work-
shop and enquire about:
R suitability
R legal stipulations
R factory recommendations
Information on dimensions and types of
wheels and tyres for your vehicle can be
found (Y page 610).
Information on air pressure for the tyres on
your vehicle can be found:
R on the tyre pressure label on the fuel filler
flap (Y page 174)
R in the "Tyre pressure" section
Modification work on the brake system and
wheels is not permitted. The use of wheel
spacers or brake dust shields is not permit-
ted. This invalidates the general operating
permit for the vehicle.
i Further information on wheels and tyres
can be obtained at any qualified specialist
workshop. Operation
Information on driving
Check the tyre pressures when the vehicle is
heavily laden and, if necessary, adjust.
While driving, pay attention to vibrations,
noises and unusual handling characteristics,
e.g. pulling to one side. This may indicate that the wheels or tyres are damaged. If you sus-
pect that a tyre is defective, reduce your
speed immediately. Stop the vehicle as soon
as possible to check the wheels and tyres for 596
OperationWheels and tyres