2012 MERCEDES-BENZ SL ROADSTER ECO mode
[x] Cancel search: ECO modePage 540 of 637
X
To continue playback: selectÌand
press the 9button to confirm.
The menu is hidden.
Stop function X
To show the menu: press the9button on
the remote control.
or
X Select Menu
Menuwhile the control menu is
shown and press the 9button to confirm.
X To interrupt playback: selectÉand
press the 9button to confirm.
The Ë display changes to Ì. The
video image is hidden.
X To continue playback: selectÌand
press the 9button to confirm.
Playback continues from the point where it
was interrupted. The menu is hidden.
X To stop playback: while playback is inter-
rupted, select Éagain and press the 9
button to confirm.
Playback stops and returns to the begin-
ning of the DVD. Ìis highlighted.
X To restart playback: selectÌand
press the 9button to confirm.
Playback starts from the beginning of the
DVD.
Selecting a scene/chapter General notes
Also observe the information on the video
DVD mode (Y page 513).
Skipping forwards/backwards
X Press the =or; button on the
remote control.
or
X Press the EorF button.
The control menu (Y page 512) appears for
approximately eight seconds. Selecting a scene/chapter directly
The examples illustrate how to select scene/
chapter 5.
X Option 1: while the film is playing, press
the h button on the remote control.
X Press the corresponding number key, such
as 5.
X Option 2: while the film is playing, press
the 9button on the remote control and
show the menu.
X Select DVD-V DVD-Vand press the 9button to
confirm.
X Select DVD functions DVD functions and press the9
button to confirm.
X Select Scene
Scene selection
selection and press the 9
button to confirm.
X Select 5
5using the 9or: button and
press the 9button to confirm.
In both cases, playback will begin from the
5th scene/chapter after a brief pause.
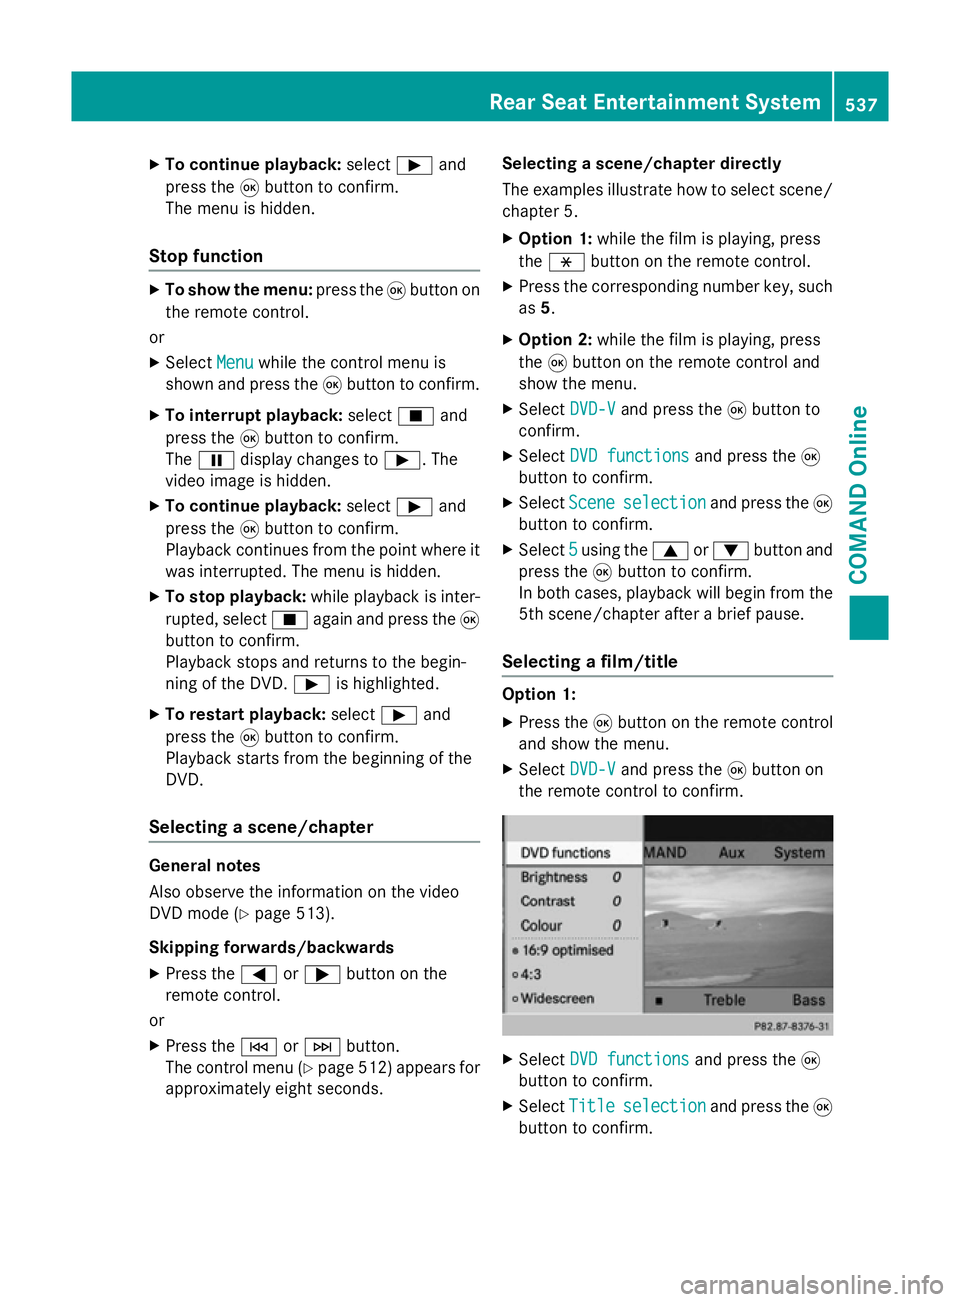
Selecting a film/title Option 1:
X Press the 9button on the remote control
and show the menu.
X Select DVD-V
DVD-Vand press the 9button on
the remote control to confirm. X
Select DVD functions DVD functions and press the9
button to confirm.
X Select Title Title selection
selection and press the 9
button to confirm. Rear Seat Entertainment System
537COMAND Online Z
Page 542 of 637
Going back to the film
X Press the %button repeatedly until you
see the movie.
or
X Select any menu item in the DVD menu and
press the 9button to confirm.
X Select the Back (to the movie)
Back (to the movie) menu
item in the menu and press the 9button to
confirm.
Setting the audio format This function is not available on all DVDs. If it
is available, you can set the audio language or
the audio format. The number of settings is
dependent on the DVD content. It may also be possible to access the settings from the DVD
menu.
X Press the 9button on the remote control
and show the menu.
X Select DVD-V
DVD-Vand press the 9button on
the remote control to confirm.
X Select DVD functions
DVD functions and press the9
button to confirm.
X Select Audio language
Audio language and press the9
button to confirm.
A menu appears after a short while. The #
dot in front of an entry indicates the cur-
rently selected language.
X Select a language using the 9:but-
tons and press the 9button to confirm.
X To exit the menu: press the=or;
button.
Subtitles and camera angle These functions are not available on all DVDs.
The number of subtitle languages and camera
angles available depends on the content of
the DVD. It may also be possible to access the settings from the DVD menu.
X Press the 9button on the remote control
and show the menu.
X Select DVD-V
DVD-V and press the 9button on
the remote control to confirm. X
Select DVD functions DVD functions and press the9
button to confirm.
X Select Subtitles Subtitles orCamera angle
Camera angle and
press the 9button to confirm.
In both cases, a menu appears after a few
seconds. The #dot in front of an entry
indicates the current setting.
X Select a setting using the 9:but-
tons and press the 9button to confirm.
X To exit the menu: press the=or;
button.
Interactive content DVDs may also contain interactive content
(e.g. a video game). In a video game, you may
be able to influence events, for example, by
selecting and triggering actions. The type and
number of actions depend on the DVD.
X Select an action using the
9;:= buttons on the
remote control and press the 9button to
execute it.
A menu appears and the first entry, Select Select,
is highlighted.
X Press the 9button. Active COMAND source mode
Switching the function on/off in
COMAND Online You can transfer an audio or video source
selected in COMAND Online to the Rear Seat
Entertainment System. If you subsequently
switch modes in COMAND Online, the new
source will not be transmitted to the Rear
Seat Entertainment System.
X To switch on the function in COMAND
Online: switch to the desired audio mode in
COMAND Online, e.g. CD mode
(Y page 472), or show the menu in video
DVD mode (Y page 512).
X Select the menu item at the bottom left,
e.g. CD CDin audio CD mode, by sliding VÆ Rear Seat Entertainment System
539COMAND Online Z
Page 543 of 637
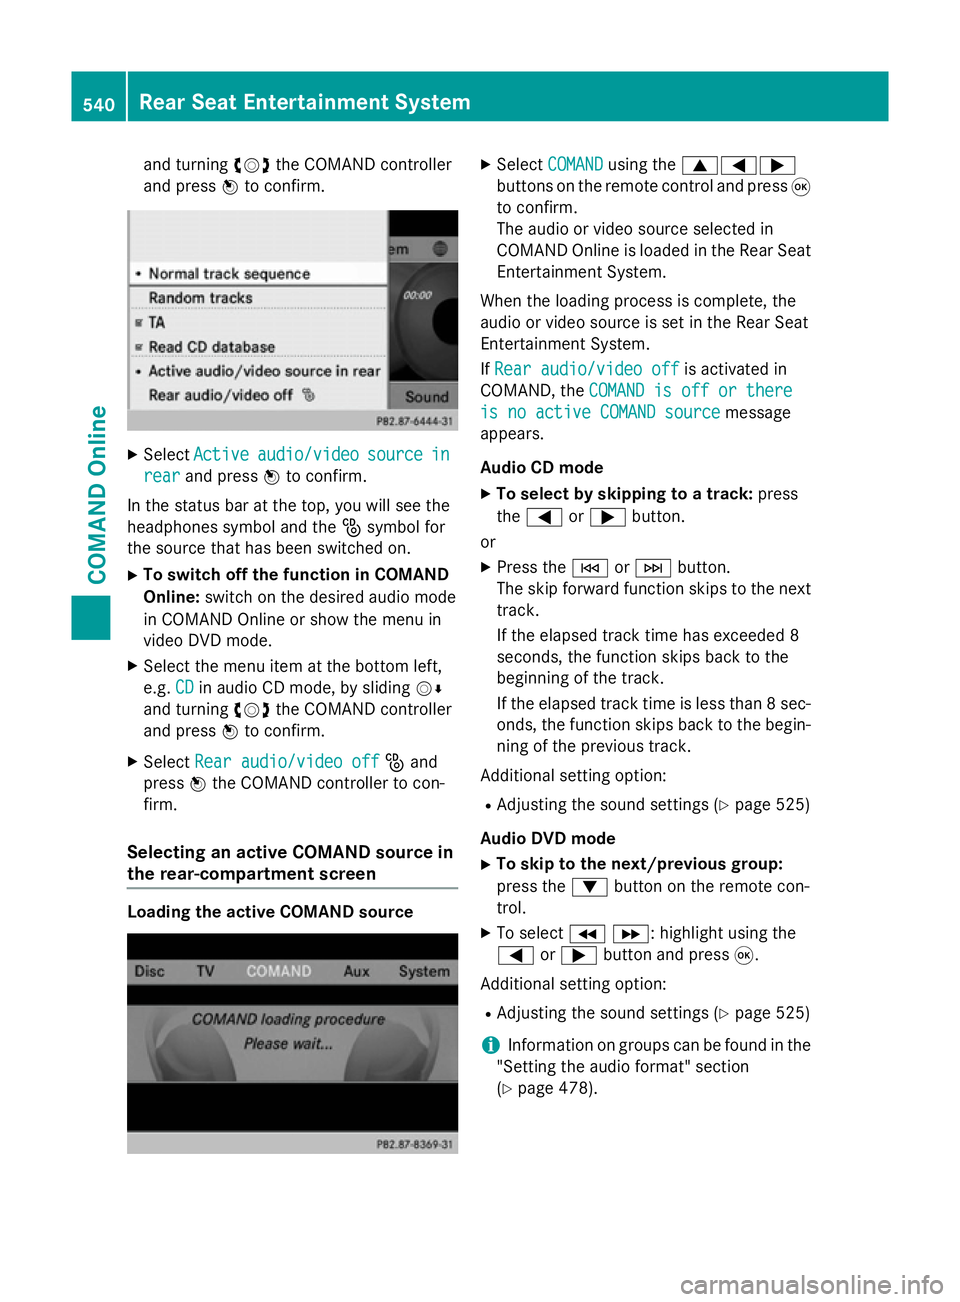
and turning
cVdthe COMAND controller
and press Wto confirm. X
Select Active
Active audio/video
audio/video source
sourcein
in
rear
rear and press Wto confirm.
In the status bar at the top, you will see the
headphones symbol and the _symbol for
the source that has been switched on.
X To switch off the function in COMAND
Online: switch on the desired audio mode
in COMAND Online or show the menu in
video DVD mode.
X Select the menu item at the bottom left,
e.g. CD
CD in audio CD mode, by sliding VÆ
and turning cVdthe COMAND controller
and press Wto confirm.
X Select Rear audio/video off
Rear audio/video off _and
press Wthe COMAND controller to con-
firm.
Selecting an active COMAND source in
the rear-compartment screen Loading the active COMAND source X
Select COMAND COMAND using the 9=;
buttons on the remote control and press 9
to confirm.
The audio or video source selected in
COMAND Online is loaded in the Rear Seat Entertainment System.
When the loading process is complete, the
audio or video source is set in the Rear Seat
Entertainment System.
If Rear audio/video off
Rear audio/video off is activated in
COMAND, the COMAND is off or there COMAND is off or there
is no active COMAND source
is no active COMAND source message
appears.
Audio CD mode
X To select by skipping to a track: press
the = or; button.
or X Press the EorF button.
The skip forward function skips to the next track.
If the elapsed track time has exceeded 8
seconds, the function skips back to the
beginning of the track.
If the elapsed track time is less than 8 sec- onds, the function skips back to the begin-
ning of the previous track.
Additional setting option:
R Adjusting the sound settings (Y page 525)
Audio DVD mode
X To skip to the next/previous group:
press the :button on the remote con-
trol.
X To select KL : highlight using the
= or; button and press 9.
Additional setting option: R Adjusting the sound settings (Y page 525)
i Information on groups can be found in the
"Setting the audio format" section
(Y page 478). 540
Rear Seat Entertainment SystemCOMAND Online
Page 544 of 637
MP3 mode
X To select a track by skipping to a track:
press the =or; button on the
remote control.
or X Press the EorF button.
The skip forward function skips to the next track.
If the elapsed track time has exceeded 8
seconds, the function skips back to the
beginning of the track.
If the elapsed track time is less than 8 sec- onds, the function skips back to the begin-
ning of the previous track.
X To select a folder: press the:button
on the remote control.
X Highlight one of the two folder symbols
with the =or; button and press 9
to confirm.
Depending on your selection, the previous
or next folder is selected and the first track
is played.
Additional setting option:
R Adjusting the sound settings (Y page 525)
Video DVD mode X To hide a menu: confirmMenu
Menu with the 9
button.
The video image is played in full screen
mode.
Additional setting options: R Adjusting the brightness, contrast and col-
our (Y page 526)
R Changing the picture format (Y page 526)
R Adjusting the sound settings (Y page 525)AUX mode
Introduction You can connect one external video source to
each of the displays of the Rear Seat Enter-
tainment System (AUX display) and also one
external video source to the rear-compart- ment drive (AUX drive) with a sound and video
signal.
Please see the corresponding operating
instructions for information on how to oper-
ate the external video source.
For further details about external video sour- ces, please consult a Mercedes-Benz Service
Centre.
Connecting AUX equipment AUX drive
The AUX drive jacks are located on the
CD/DVD drive on the right next to the
CD/DVD eject button (Y
page 521).
AUX display
The AUX display jacks are on the side of the
screen (Y page 520).
Audio and video connection X Insert the audio plugs for the left and right
signals into the corresponding Land R
jacks.
X Insert the video plug into the Vjack.
Switching to AUX mode AUX drive
X
Select Aux Auxin the menu using the
9=; buttons on the remote
control and press the 9button to confirm.
The AUX menu appears.
X Select Source
Source from the AUX menu and
press the 9button to confirm.
X Select Disc drive Aux
Disc drive Aux and press the9
button to confirm.
You will hear and see the content of the
external video source if it is connected to
the CD/DVD drive and switched to play-
back. If no video image is available from the AUX source connected, you will see an
audio menu. Rear Seat Entertainment System
541COMAND Online Z
Page 555 of 637
More information on suitable mobile phones,
mobile phone brackets and on connecting
Bluetooth ®
-capable mobile phones with
COMAND Online can be obtained:
R at your Mercedes-Benz Service Centre
R on the Internet at http://www.mercedes-
benz.com/connect
i The functions and services available when
you use the phone depend on your mobile
phone model and service provider.
Using a mobile phone If the mobile phone is inserted in the mobile
phone bracket, the mobile phone will be
charged and connected with the exterior aer-
ial.
X Open the telephone compartment
(Y page 545).
X Place the mobile phone bracket into the
pre-installed fitting; see the separate instal-
lation instructions for the mobile phone fit-
ting.
X Insert the mobile phone into the mobile
phone bracket; see the separate installa-
tion instructions for the mobile phone fit-
ting.
Operating the mobile phone You can operate the telephone using the
6 and~ buttons on the multifunction
steering wheel. You can operate other mobile
phone functions via the on-board computer
(Y page 235).
When you remove the key from the ignition
lock, the mobile phone is disconnected from
the hands-free system. Active calls will first
be transferred to the mobile phone directly. Charge maintenance socket
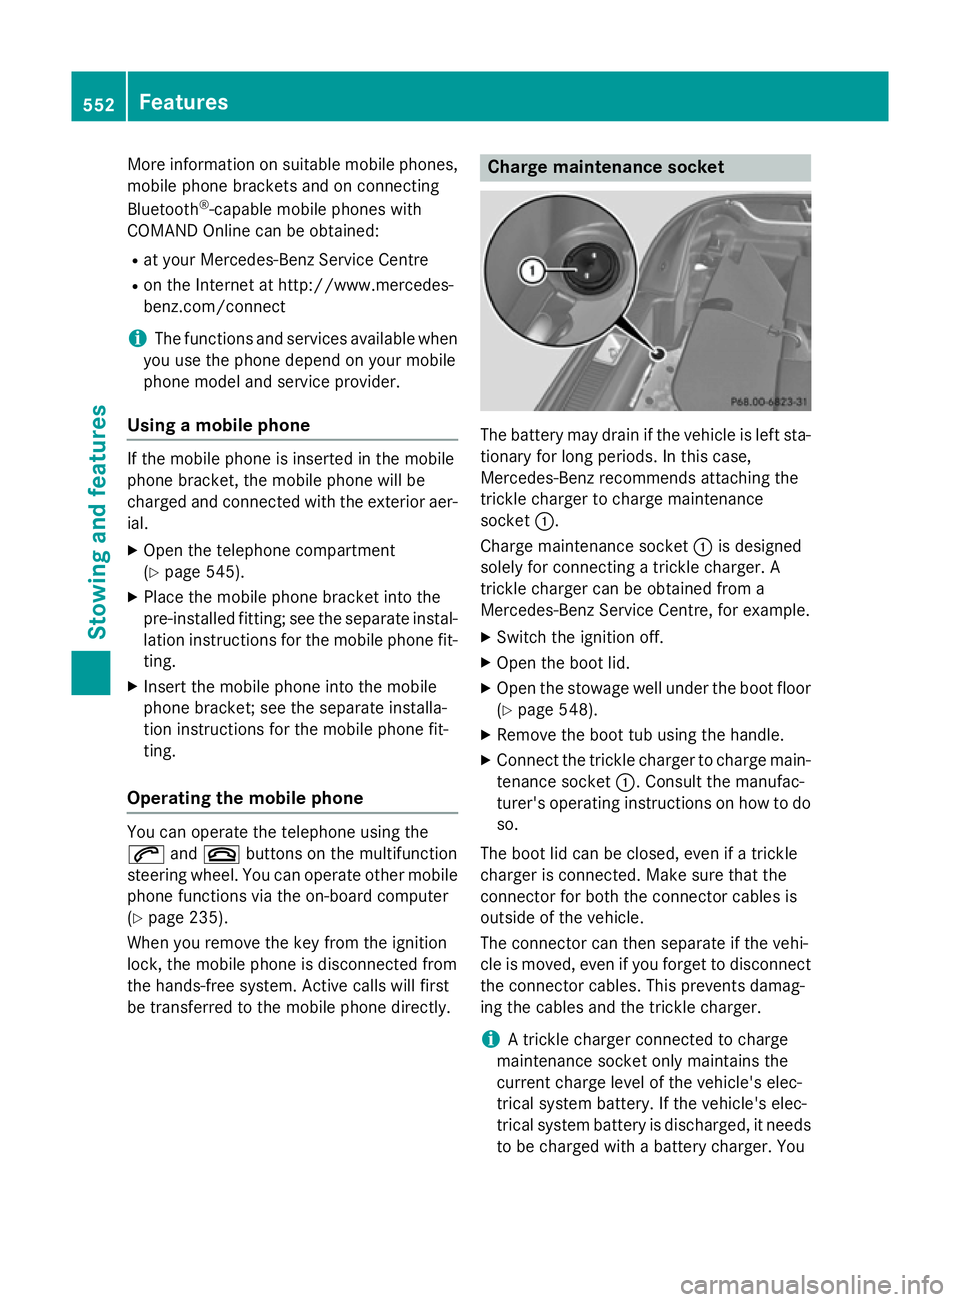
The battery may drain if the vehicle is left sta-
tionary for long periods. In this case,
Mercedes-Benz recommends attaching the
trickle charger to charge maintenance
socket :.
Charge maintenance socket :is designed
solely for connecting a trickle charger. A
trickle charger can be obtained from a
Mercedes-Benz Service Centre, for example.
X Switch the ignition off.
X Open the boot lid.
X Open the stowage well under the boot floor
(Y page 548).
X Remove the boot tub using the handle.
X Connect the trickle charger to charge main-
tenance socket :. Consult the manufac-
turer's operating instructions on how to do
so.
The boot lid can be closed, even if a trickle
charger is connected. Make sure that the
connector for both the connector cables is
outside of the vehicle.
The connector can then separate if the vehi-
cle is moved, even if you forget to disconnect
the connector cables. This prevents damag-
ing the cables and the trickle charger.
i A trickle charger connected to charge
maintenance socket only maintains the
current charge level of the vehicle's elec-
trical system battery. If the vehicle's elec-
trical system battery is discharged, it needs
to be charged with a battery charger. You 552
FeaturesStowing and features
Page 556 of 637
will find further information on charging the
battery on (Y page 582). Garage door opener
General notes The HomeLink
®
garage door opener integra-
ted in the rear-view mirror allows you to oper- ate up to three different door and gate sys-
tems.
Once programmed, the integrated garage
door opener in the rear-view mirror will
assume the function of the garage door sys-
tem's remote control. Please also read the
operating instructions for the garage door
system.
When programming a garage door opener,
park the vehicle outside the garage. Do not
run the engine while programming.
The garage door opener is only available for
certain countries. Observe the legal require-
ments for each individual country.
The HomeLink ®
garage door opener is com-
patible with most European garage and gate
opener drives. More information on Home-
Link ®
and/or compatible products is availa-
ble:
R at a qualified specialised workshop
R via the HomeLink ®
Hotline
(0) 08000 466 354 65 or alternatively
+49 (0) 6838 907-277
R on the Internet at
http://www.homelink.com
Important safety notes G
WARNING
When you operate or program the garage door with the integrated garage door opener, per-
sons in the range of movement of the garage
door can become trapped or struck by the
garage door. There is a risk of injury.
When using the integrated garage door
opener, always make sure that nobody is within the range of movement of the garage
door.
G
WARNING
Combustion engines emit poisonous exhaust
gases such as carbon monoxide. Inhaling
these exhaust gases leads to poisoning. There is a risk of fatal injury. Therefore never leave
the engine running in enclosed spaces with-
out sufficient ventilation.
Programming Programming buttons
Pay attention to the "Important safety notes"
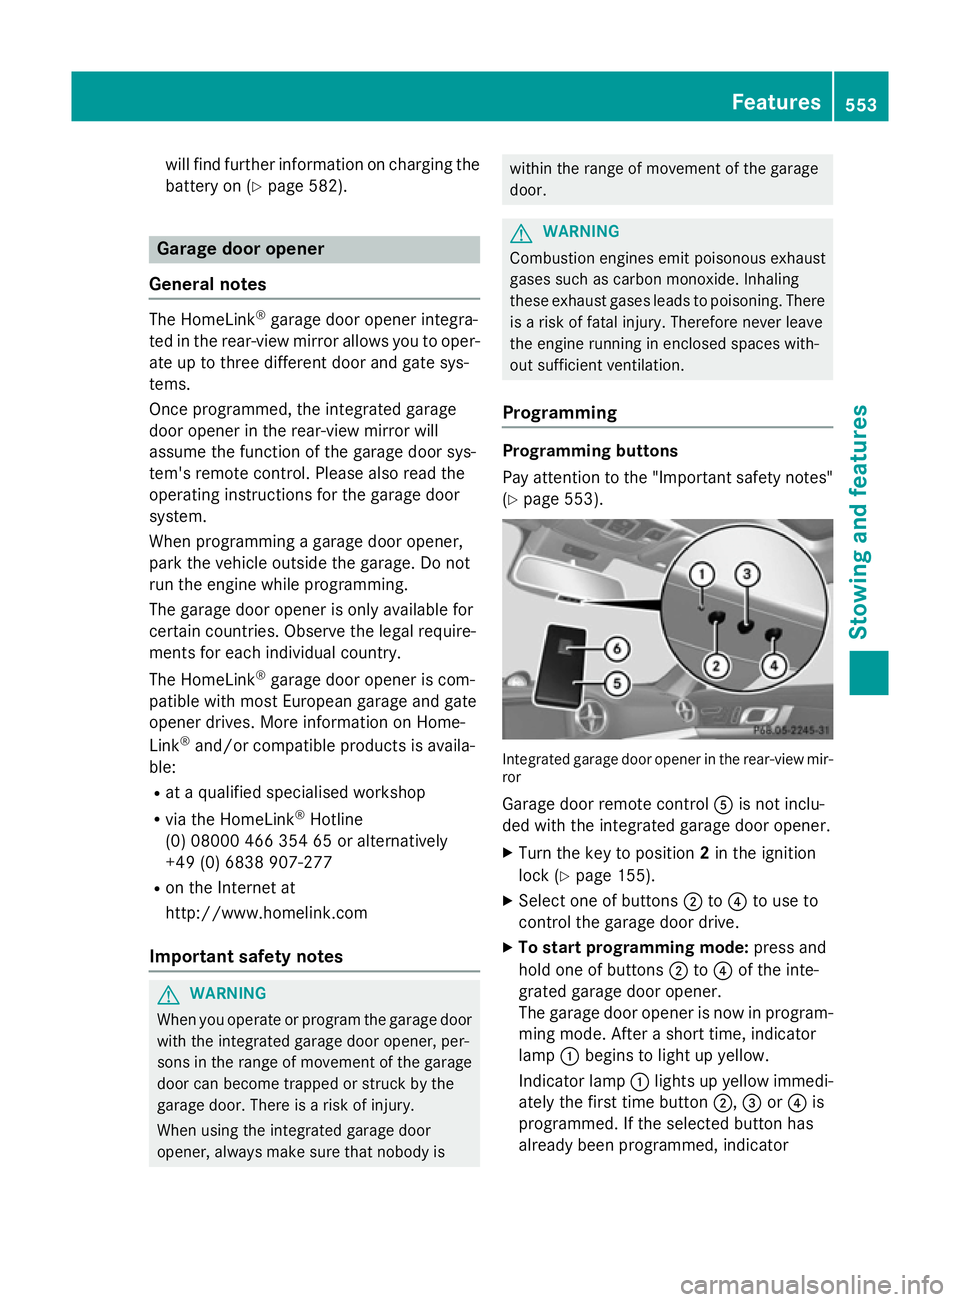
(Y page 553). Integrated garage door opener in the rear-view mir-
ror
Garage door remote control Ais not inclu-
ded with the integrated garage door opener.
X Turn the key to position 2in the ignition
lock (Y page 155).
X Select one of buttons ;to? to use to
control the garage door drive.
X To start programming mode: press and
hold one of buttons ;to? of the inte-
grated garage door opener.
The garage door opener is now in program-
ming mode. After a short time, indicator
lamp :begins to light up yellow.
Indicator lamp :lights up yellow immedi-
ately the first time button ;,=or? is
programmed. If the selected button has
already been programmed, indicator Features
553Stowing and features Z
Page 582 of 637
You can recognise MOExtended tyres by the
MOExtended marking which appears on the
tyre wall. You will find this marking next to the
tyre size designation, the load-bearing capa-
city and the speed index.
MOExtended tyres may only be used in con-
junction with an activated tyre pressure loss
warning system or tyre pressure monitor.
If the pressure loss warning message
appears in the multifunction display:
R observe the instructions in the display mes-
sages (Y page 267).
R check the tyre for damage
R if driving on, observe the following notes
The maximum driving distance is approx-
imately 80 km when the vehicle is partially
laden and approximately 30 km when the
vehicle is fully laden.
In addition to the vehicle load, the driving dis- tance possible depends upon:
R speed
R road condition
R outside temperature
The driving distance possible in run-flat mode may be reduced by extreme driving condi-
tions/manoeuvres, or it can be increased
through a moderate style of driving.
The maximum permissible distance which
can be driven in run-flat mode is counted from
the moment the tyre pressure loss warning
appears in the multifunction display.
You must not exceed a maximum speed of
80 km/h.
i When replacing one or all tyres, make
sure that you use only:
R the tyre size specified for the vehicle and
R tyre(s) marked "MOExtended"
If a tyre has gone flat and cannot be
replaced with an MOExtended tyre, a
standard tyre may be used as a temporary
measure. Make sure that you use the
proper size and type (summer or winter
tyre). i
Vehicles with MOExtended tyres are not
equipped with a TIREFIT kit at the factory. It
is therefore recommended that you addi-
tionally equip your vehicle with a TIREFIT kit if you fit tyres that do not feature run-flat
characteristics, e.g. winter tyres. A TIREFIT
kit is available, for example, from a qualified
specialist workshop.
Important safety notes G
WARNING
When driving in emergency mode, the driving characteristics deteriorate, e.g. when corner-
ing, accelerating quickly and when braking.
There is a risk of accident.
Do not exceed the stated maximum speed.
Avoid abrupt steering and driving manoeu-
vres, and driving over obstacles (kerbs, pot-
holes, off-road). This applies in particular to a laden vehicle.
Stop driving in emergency mode if:
R you hear banging noises.
R the vehicle starts to shake.
R you see smoke and smell rubber.
R ESP ®
is intervening constantly.
R there are tears in the sidewalls of the tyre.
After driving in emergency mode, have the
wheel rims checked at a qualified specialist
workshop with regard to their further use. The
faulty tyre must be replaced. TIREFIT kit
Important safety notes TIREFIT is a tyre sealant.
You can use TIREFIT to seal punctures of up to
4 mm, particularly those in the tyre tread. You can use TIREFIT at outside temperatures
down to Ò20 †. Flat tyre
579Breakdown assistance Z
Page 601 of 637
tyre load rating and speed rating required for
your vehicle.
Pay special attention to country-specific
requirements for tyre approval. These
requirements can stipulate a specific tyre
type for your vehicle. Furthermore, the use of certain tyre types in certain regions and areas
of operation can be highly beneficial. You can find further information regarding tyres at
specialist tyre retailers, at qualified specialist
workshops or at any Mercedes-Benz Service
Centre.
R Only fit tyres and wheels of the same type
and make.
Exception: it is permissible to fit a different
type or make in the event of a flat tyre.
Observe the "MOExtended tyres (tyres with
run-flat characteristics" section
(Y page 578).
R Only fit tyres of the correct size onto the
wheels.
R Run in new tyres at moderate speeds for
the first 100 km. They only reach their full
performance after this distance.
R Do not drive with tyres which have too little
tread depth. This otherwise significantly
reduces the traction on wet roads (aqua-
planing).
R Replace the tyres after six years at the lat-
est, regardless of wear.
Observe the notes on the emergency spare
wheel (Y page 614). MOExtended tyres (tyres with run-flat
characteristics)
With MOExtended tyres (tyres with run-flat
characteristics), you can continue to drive
your vehicle even if there is a total loss of
pressure in one or more tyres.
Only use MOExtended tyres in conjunction
with an activated tyre pressure loss warning
system or tyre pressure monitoring system
and only on tyres specifically inspected by
Mercedes ‑Benz. Notes on driving with MOExtended tyres with
a flat tyre (Y page 578).
i Vehicles with MOExtended tyres are not
equipped with a TIREFIT kit at the factory. It
is therefore recommended that you addi-
tionally equip your vehicle with a TIREFIT kit if you fit tyres that do not feature run-flat
characteristics, e.g. winter tyres. A TIREFIT
kit can be obtained from a qualified spe-
cialist workshop. Winter operation
General notes
Have your vehicle winterproofed at a qualified
specialist workshop at the onset of winter.
Observe the notes in the "Changing a wheel" section (Y page 605). Driving with summer tyres
At temperatures below +7 †, summer tyres
lose elasticity and therefore traction and
braking power. Change the tyres on your vehi- cle to M+S tyres. Using summer tyres at very
cold temperatures could cause tears to form, thereby damaging the tyres permanently.
Mercedes-Benz cannot accept responsibility
for this type of damage. M+S tyres
G
WARNING
M+S tyres with a tyre tread depth of less than 4 mm are not suitable for use in winter as they
do not provide sufficient traction. There is a
risk of accident.
M+S tyres with a tread depth of less than
4 mm must be replaced.
At temperatures below +7 †, use winter tyres or all-season tyres. Both are marked with
M+S. 598
Winter operationWheels and tyres