Page 57 of 183
 Owners Manual Seats and Stowage
56
Luggage compartment cover (Octavia)
You can use the luggage compartment cover behind the head
restraints for storing light and soft items.The luggage compartment cover can be rem")
Seats and Stowage
56
Luggage compartment cover (Octavia)
You can use the luggage compartment cover behind the head
restraints for storing light and soft items.The luggage compartment cover can be removed as required if one must transport
bulky goods.
– Unhook the support straps on the boot lid fig. 60 .
– Place the cover in the horizontal position.
– Pull the cover out of the holder horizontally to the rear.
– Install again by pushing the luggage compartment cover forwards into the
holder and hanging the suppor t straps on the boot lid.
You can stow the removed luggage compartment cover behind the rear seat back-
rest.
WARNING
No objects should be placed on the luggage compartment cover, the vehicle
occupants could be endangered if there is sudden braking or the vehicle collides
with something.
Caution
Please ensure that the heating elements of the rear window heater are not
damaged as a result of objects placed in this area.
Note
Opening the tailgate also lifts up the luggage compartment cover.Foldable luggage compartment cover (Combi)Fig. 61 Luggage compartment: Foldable lugg age compartment cover/removing the foldable
luggage compartment coverPulling out– Pull the foldable luggage compartment cover in direction of arrow as far as the stop into the secured position fig. 61 .Folding– Press the cover in the handle area in direction of arrow , the cover rolls up
automatically.Removing– Have the foldable luggage compartment cover removed to transport bulky
goods by pressing on the side of the cros s rod in direction of arrow and taking
it out by moving it in direction of arrow .
WARNING
No objects should be placed on the luggage compartment cover.
Fig. 60 Removing the luggage compart-
ment cover1
2
2
1
1
2
3
4
s2lk.2.book Page 56 Monday, April 18, 2011 7:41 AM
Page 58 of 183
 Owners Manual Seats and Stowage57
Using the system
Safety
Driving Tips
General Maintenance
Breakdown assistance
Technical Data
Net partition* (Combi)Use the net partition be hind the rear seatsFig. 62 Folding down")
Seats and Stowage57
Using the system
Safety
Driving Tips
General Maintenance
Breakdown assistance
Technical Data
Net partition* (Combi)Use the net partition be hind the rear seatsFig. 62 Folding down the storage compartment cover/pulling out the net partitionPulling out– Fold down the storage compartmen t cover behind the rear seats fig. 62 - left.
– Pull the net partition at the bracket out of the housing in direction of the holders .
– Insert the cross rod into one of the mo unts and push the cross rod forwards.
– In the same way, fix the cross rod to the other side of the vehicle, mount .
– Fold the storage compartment cover downwards.Folding– Fold down the storage compartmen t cover behind the rear seats fig. 62 .
– Pull the cross rod back slightly, first on the one side then on the other side and
take the cross rod out of the mounts .
– Hold the cross rod in such a way that the net partition can roll up slowly and
without damage into housing .
– Fold the storage compartment cover downwards.
If you wish to use the entire luggage compartment, you can remove the luggage
compartment cover page 56, fig. 61 .
WARNING
•
First check for yourself that the cross road is inserted into the mounts in
the front position!
•
Pay attention that the rear seat backrest is correctly interlocked. It is only
then that the three-point seat belt for the middle seat can reliably fulfil its
function.
Using the net partition behind the front seatsPulling out– Fold the rear seats forwards page 51
– Pull the net partition net at the plate out of the housing fig. 63 .
– Insert the cross rod into the mount first on the one side and push the cross rod forwards.
– In the same way, fix the cross rod to the other side of the vehicle, mount .Folding–Pull the cross rod back slightly, first on the one side then on the other side and
take the cross rod out of the mounts fig. 63 .
– Hold the cross rod in such a way that th e net partition can roll up slowly and
without damage into housing .
– Fold the rear seats back into their original position.
A
B
C
C
C
C
B
C
Fig. 63 Pull out the net partition
A
B
C
C
C
B
s2lk.2.book Page 57 Monday, April 18, 2011 7:41 AM
Page 59 of 183
 Owners Manual Seats and Stowage
58WARNING
•
The belt locks and the belts must be in their original position after folding
back the seat cushions and the seat backrests - they must be ready to use.
•
The seat")
Seats and Stowage
58WARNING
•
The belt locks and the belts must be in their original position after folding
back the seat cushions and the seat backrests - they must be ready to use.
•
The seat backrests must be securely interlocked in position so that no
objects in the luggage compartment can slide forwards if there is sudden
braking - risk of injury!
•
Pay attention that the rear seat backrest is correctly interlocked. It is only
then that the three-point seat belt for the middle seat can reliably fulfil its func-
tion.
•
First check for yourself that the cross road is inserted into the mounts in
the front position!
Removing and installing net partition housingRemoving– Fold the rear seats forwards page 51
– Open the right rear door.
– Push the net partition housing fig. 64 in the direction of arrow and take
it out of the mount of the rear seats in the direction of arrow .Installing– Position the net partition housing into the mounts of the rear seat backrests.
– Push the net partition housing in the opposite direction of arrow as far as the stop.
– Fold the rear seats back in to their original position.
The roof rack*DescriptionPay attention to the following points if you wish to transport luggage or other items
on the roof of your vehicle:•
A special roof luggage rack system was developed for the vehicle, that is why
you should only use a roof luggage rack which has been released for use by Škoda
Auto.
•
The base carrier is the basis for a complete roof luggage rack system. Separate
additional holders are required for safety reasons for transporting luggage, bikes,
surfboards, skis and boats.
•
The basic version of the roof luggage ra ck system and further components are
obtainable as accessories from the authorised Škoda Service Partners.Caution
•
If you use other roof rack systems or if th e roof bars are not properly fitted, then
any damage which may result to your car is not covered by the warranty agree-
ments. It is therefore essential to pay atte ntion to the fitting instructions supplied
with the roof luggage rack system.
•
On models fitted with a power sliding/tilting roof, ensure that the opened
sliding/tilting roof does not strike any items of luggage transported on the roof.
•
Ensure that the opened boot lid do es not collide with the roof load.For the sake of the environment
The increased aerodynamic drag results in a higher fuel consumption. One should
therefore take off the roof bar system after use.
Note
A roof rail is obtainable from a specialist garage if hasn't been fitted onto an estate
car at the works, which carries out the professional fitting.
C
Fig. 64 Rear seats: Net partition housing
A
1
21
s2lk.2.book Page 58 Monday, April 18, 2011 7:41 AM
Page 60 of 183
 Owners Manual Seats and Stowage59
Using the system
Safety
Driving Tips
General Maintenance
Breakdown assistance
Technical Data
Lashing points (Octavia)Perform the assembly and the disassembly according to the attac")
Seats and Stowage59
Using the system
Safety
Driving Tips
General Maintenance
Breakdown assistance
Technical Data
Lashing points (Octavia)Perform the assembly and the disassembly according to the attached instructions.
Note
•
If you have any questions, please contact a specialist garage.
•
The figure is not valid for an estate car.
Roof loadDistribute weight evenly over the roof luggage rack system. The maximum permis-
sible roof load (including roof rack system) of 75 kg and the maximum permissible
total weight of the vehicle should not be exceeded.
You cannot make full use of the permissible roof load if you use a roof luggage rack
system with a lower load carrying capaci ty. The load transported on the roof
luggage rack system must not exceed the we ight limit which is stated in the fitting
instructions.
WARNING
•
The items which you transport on the roof bar system must be reliably
attached - risk of accident!
•
You must on no account exceed the pe rmissible roof load, the permissible
axle loads and the permissible gross weight of your vehicle - risk of accident!
•
Please note that the handling properties of your vehicle change when you
transport heavy or bulky items on the roof bar system as a result of the displace-
ment of the centre of gravity and the incr eased wind attack area - risk of acci- dent! You must absolutely
adapt your style of driving and the speed of the
vehicle to the specific circumstances.
Cup holderCup holder in front centre consoleYou can place two cups or beverage cans into the recesses fig. 66 .
WARNING
•
Do not place any hot beverages into the cup holder. If the vehicle moves, the
hot beverages may spill - risk of scalding!
•
Do not use any cups or beakers which are made of brittle material (e.g. glass,
porcelain). You might be injured by them in the event of an accident.Caution
Do not open the beverages in the cup holder while driving. They may spill when
braking and while doing so damage the vehicle.
Fig. 65 Attachment points for base roof
carrier
WARNING (continued)
Fig. 66 Front centre console: Cup holder
s2lk.2.book Page 59 Monday, April 18, 2011 7:41 AM
Page 61 of 183
 Owners Manual Seats and Stowage
60
Note holderThe note holder is designed e.g. for attaching a car park ticket in parking areas.
The attached note has to always be removed before starting off in order not to
rest")
Seats and Stowage
60
Note holderThe note holder is designed e.g. for attaching a car park ticket in parking areas.
The attached note has to always be removed before starting off in order not to
restrict the driver's vision.Ashtray*Fig. 68 Centre console: Re moving ashtray/ashtray insertOpening ashtray– Press on the bottom part of the cover of the ashtray - refer to fig. 68 .Removing ashtray insert– Press on the ashtray insert in the area (the insert comes out) and you can
take it out.
Insert ashtray insert– Insert the ashtray insert into the mount and press it in.
WARNING
Never lay flammable objects in the ashtray basin - risk of fire!Cigarette lighter*, power socketsCigarette lighter
You can also use the socket on the cigarette lighter for other elec-
trical appliances.Using the cigarette lighter– Press in the button of the cigarette lighter fig. 69 .
– Wait until the button jumps forward.
– Remove the cigarette lighter immediately and use it.
– Insert the cigarette lighter again into the socket.Using the socket– Remove the cigarette lighter or the cover of the power socket.
– Connect the plug of the electrical appliance to the socket.
The 12 volt power socket can also be used to supply power to additional electrical
accessories with a power uptake up to 120 watts.
Fig. 67 Windscreen: Note holder
A
B
Fig. 69 Centre console: Cigarette lighter
s2lk.2.book Page 60 Monday, April 18, 2011 7:41 AM
Page 62 of 183
 Owners Manual Seats and Stowage61
Using the system
Safety
Driving Tips
General Maintenance
Breakdown assistance
Technical Data
WARNING
•
Take care when using the cigarette lighter! Not paying proper attention or")
Seats and Stowage61
Using the system
Safety
Driving Tips
General Maintenance
Breakdown assistance
Technical Data
WARNING
•
Take care when using the cigarette lighter! Not paying proper attention or
incorrect use the cigarette lighter in an uncontrolled manner may result in burns.
•
The cigarette lighter and the power socket also operates when the ignition
is switched off or the ignition key withdrawn. You should therefore never leave
children unattended in the vehicle.Caution
Always use matching plugs to avoid damaging the power socket.
Note
•
Connecting electrical components when the engine is not running will drain
the battery of the vehicle - risk of battery draining!
•
Further information page 146, “Accessories, changing and replacing parts”.
Power socket in the luggage compartment (Combi)– Open the cover of the power socket fig. 70.
– Connect the plug of the electrical appliance to the socket.
You can only use the power socket for the connection of approved electrical acces-
sories with a power uptake up to 120 watts. The vehicle battery will be discharged
in the process if the engine is stationary.
The same remarks apply here as for page 60, “Cigarette lighter*, power sockets”.
Further information page 146, “Accessories, changing and replacing parts”.
Storage compartmentsOverviewYou will find the following storage facilities in your vehicle:
WARNING
•
Please do not place anything on top of the dash panel. Such objects might
slide or fall down when driving (when accelerating or cornering) and may
distract you from concentrating on the traffic situation - risk of accident!
•
Ensure that when driving no objects from the centre console of from other
storage possibilities may get into the footwell of the driver. You would then no
longer be able to apply th e brakes, operate the clutch or accelerator - risk of
accident!
Fig. 70 Luggage compartment: Power
socket
Storage compartment on the front passenger side
page 62
Storage compartment on the driver's side
page 62
Storage compartment on the dash panel
page 62
Storage compartment in front centre console*
page 63
Storage compartment in the front doors
page 63
Front seat armrest with storage compartment*
page 63
Rear armrest with storage compartment*
page 64
Storage compartment in rear centre console*
page 64
Seat backrest with opening for skis*
page 64
Clothes hooks*
page 65
s2lk.2.book Page 61 Monday, April 18, 2011 7:41 AM
Page 63 of 183
 Owners Manual Seats and Stowage
62
Storage compartment on the front passenger sideOpening and closing the storage co mpartment on the front passenger
side– Press the handle of the lid fig. 71 - the lid fold")
Seats and Stowage
62
Storage compartment on the front passenger sideOpening and closing the storage co mpartment on the front passenger
side– Press the handle of the lid fig. 71 - the lid folds down.
– Raise the lid and press it unti l the catch is heard to engage.
There is a holder for a pen and note book on the inside of the lid.
WARNING
•
The storage compartment must always be closed when driving for safety
reasons.
•
Do not place any beverages into the cup holder while driving. Spilled bever-
ages can damage the electrical system and the upholstery. Hot beverages may
result in burns.
Storage compartment on the driver's side– The storage compartment is opened by lifting the handle and folding open in the direction of arrow fig. 72.
WARNING
The storage compartment must always be closed when driving for safety
reasons.Storage compartment on the dash panelThe storage compartment on the dash panel with a cover.
WARNING
•
The storage compartment is not a substi tute for the ashtray and must also
not be used for such purposes - risk of fire!
•
Do not put any highly inflammable obje cts or objects which are sensitive to
heat (e.g. lighters, sprays, spectacles , carbonated drinks) in the storage
compartment.
•
During the journey, no objects must be in the storage compartment. In the
event of a vehicle collision these objects could be thrown out of the compart-
ment - risk of injuries!
Fig. 71 Dash panel: Storage compart-
ment on the front passenger side
Fig. 72 Dash panel: Storage compart-
ment on the driver's side
s2lk.2.book Page 62 Monday, April 18, 2011 7:41 AM
Page 64 of 183
 Owners Manual Seats and Stowage63
Using the system
Safety
Driving Tips
General Maintenance
Breakdown assistance
Technical Data
Storage compartment in front centre console*– Press on the bottom part of the storag")
Seats and Stowage63
Using the system
Safety
Driving Tips
General Maintenance
Breakdown assistance
Technical Data
Storage compartment in front centre console*– Press on the bottom part of the storage compartment in the area fig. 73 -
the lid opens.
WARNING
The storage compartment is not a substitu te for the ashtray and must also not
be used for such purposes - risk of fire!Storage compartment in the front doorsA bottle holder is located in the area of the storage compartment for the front
doors.
WARNING
Use the area fig. 74 of the storage compartment only for storing objects
which do not project so that the effe ctiveness of the side airbag is not
impaired.Front seat armrest with storage compartment*Fig. 75 Armrest: Storage compartm ent/cooling of storage compartmentThe armrest is adjustable for height and length.Opening storage compartment– Open the lid of the armrest in the direction of arrow fig. 75 - left.Closing storage compartment– Open the lid up to the stop, then you can fold it downwards.Setting height– First of all fold the lid to the bottom and lift it in the direction of arrow into one
of the 4 fixed positions.Adjusting in forward/back direction– Push the lid into the desired position.Opening air inlet– Pull the lock in upward direction.
Fig. 73 Front centre console: Storage
compartment
A
Fig. 74 Storage compartment in the
front doors
B
AA
s2lk.2.book Page 63 Monday, April 18, 2011 7:41 AM
 1
1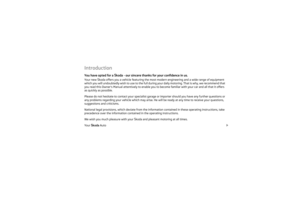 2
2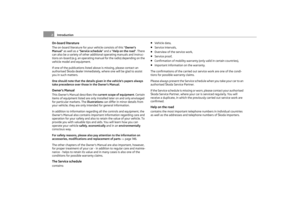 3
3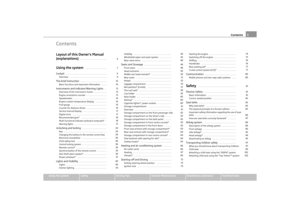 4
4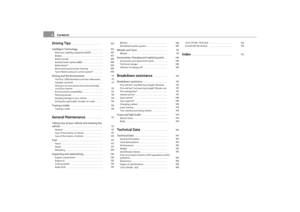 5
5 6
6 7
7 8
8 9
9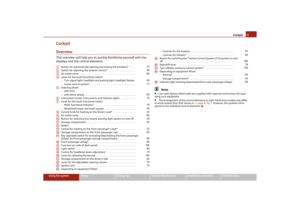 10
10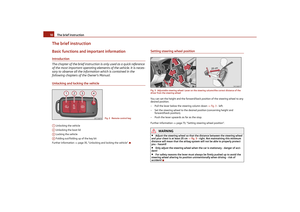 11
11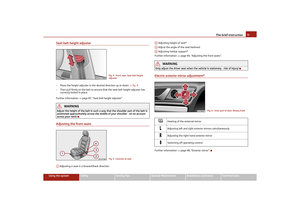 12
12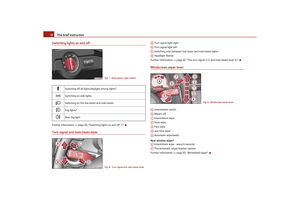 13
13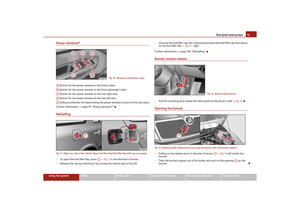 14
14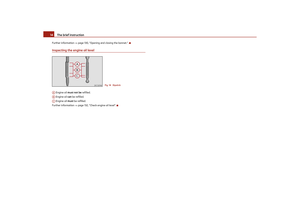 15
15 16
16 17
17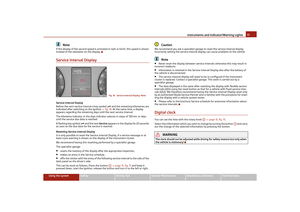 18
18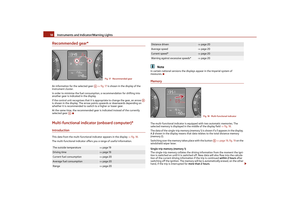 19
19 20
20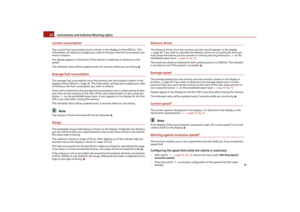 21
21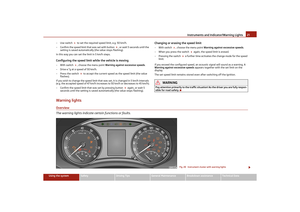 22
22 23
23 24
24 25
25 26
26 27
27 28
28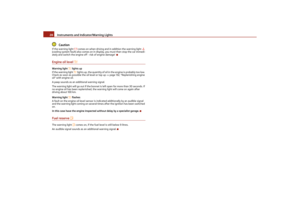 29
29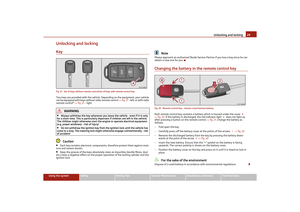 30
30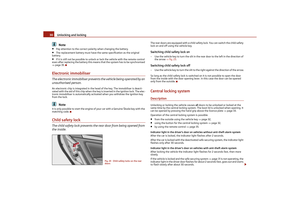 31
31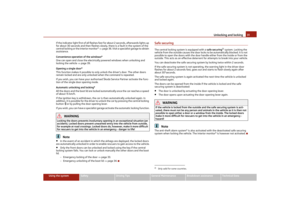 32
32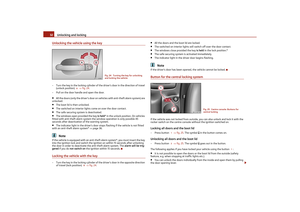 33
33 34
34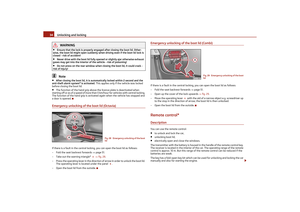 35
35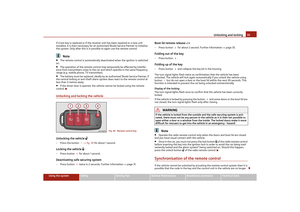 36
36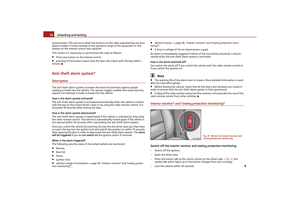 37
37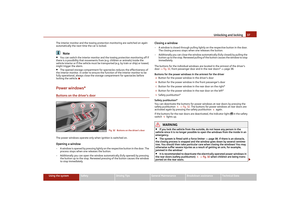 38
38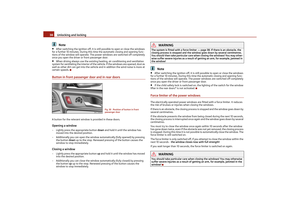 39
39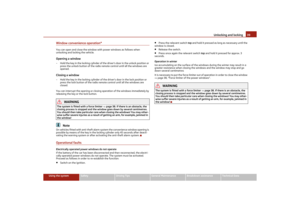 40
40 41
41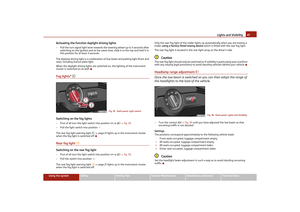 42
42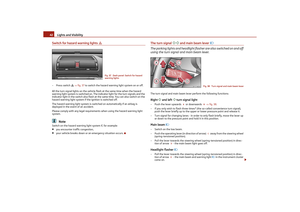 43
43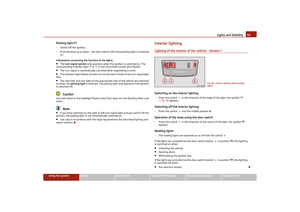 44
44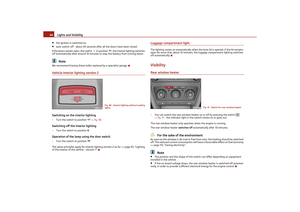 45
45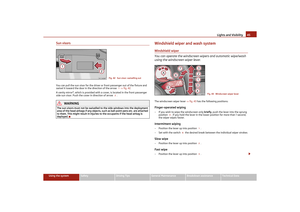 46
46 47
47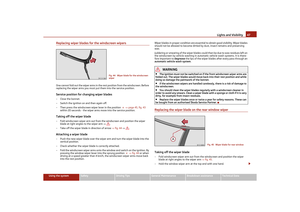 48
48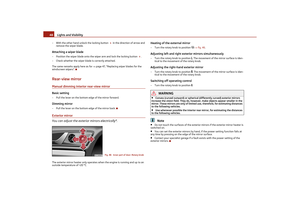 49
49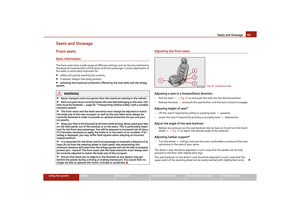 50
50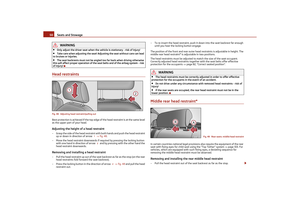 51
51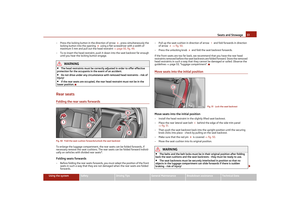 52
52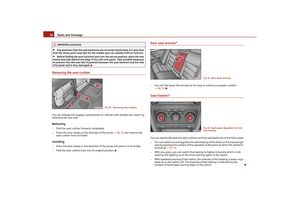 53
53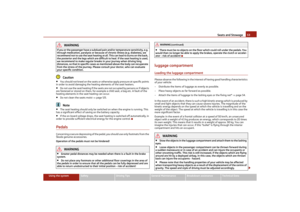 54
54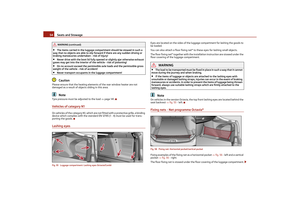 55
55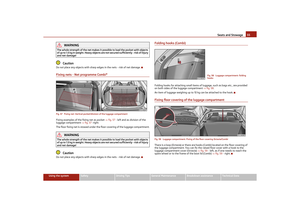 56
56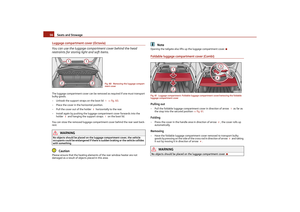 57
57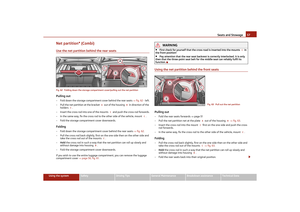 58
58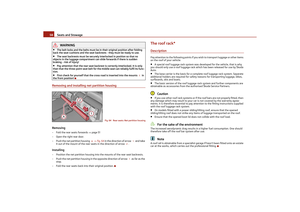 59
59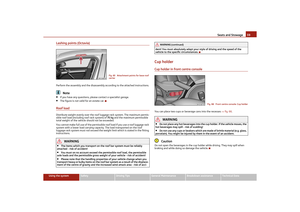 60
60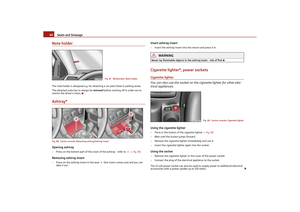 61
61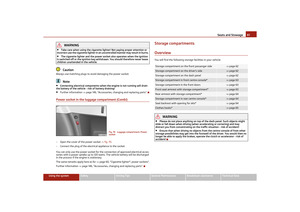 62
62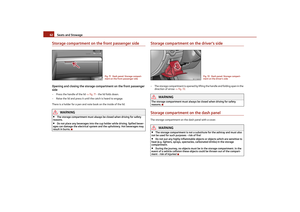 63
63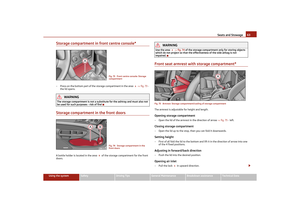 64
64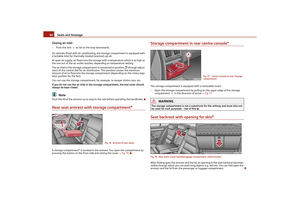 65
65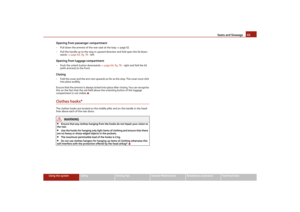 66
66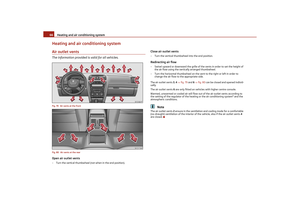 67
67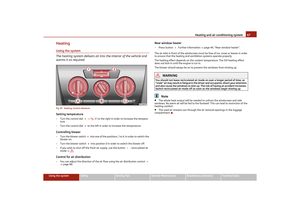 68
68 69
69 70
70 71
71 72
72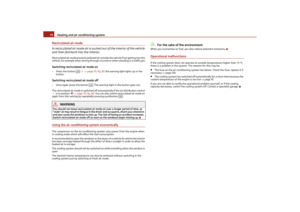 73
73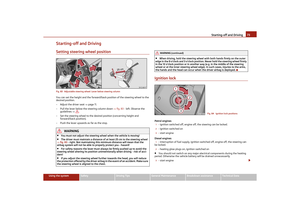 74
74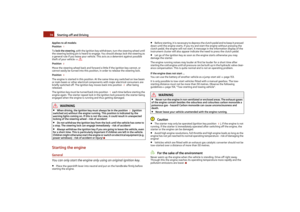 75
75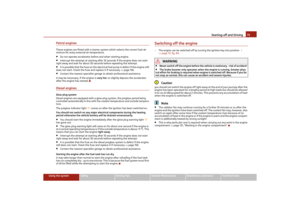 76
76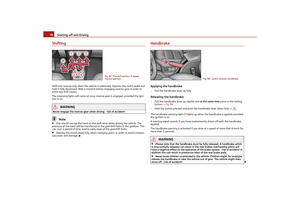 77
77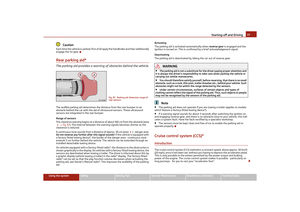 78
78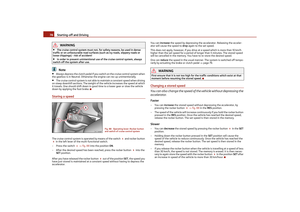 79
79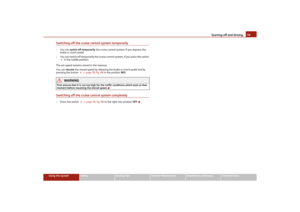 80
80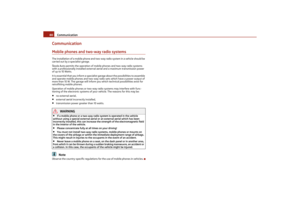 81
81 82
82 83
83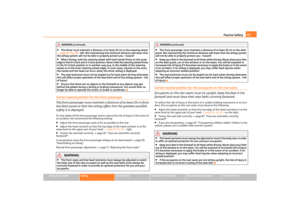 84
84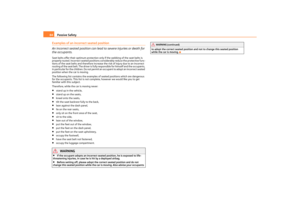 85
85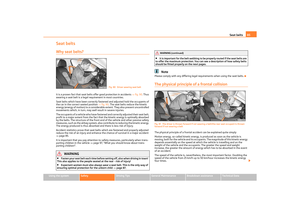 86
86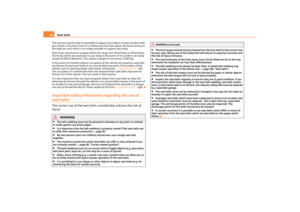 87
87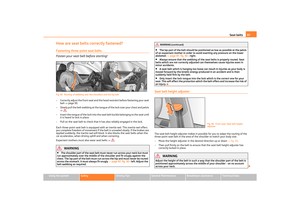 88
88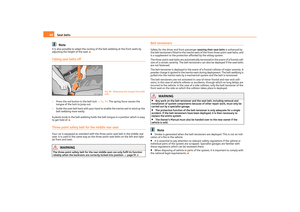 89
89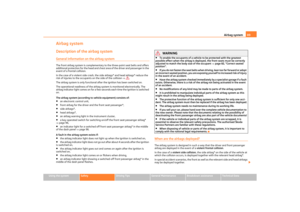 90
90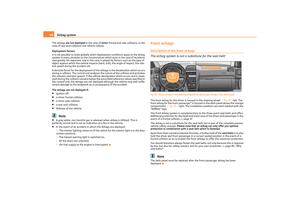 91
91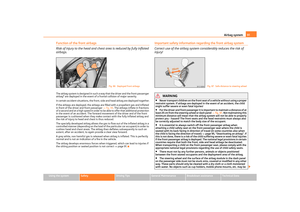 92
92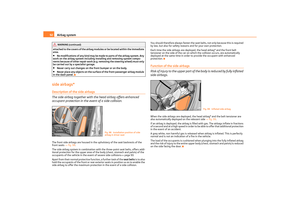 93
93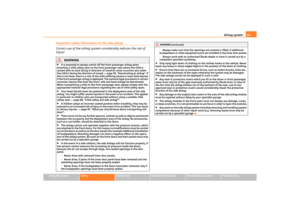 94
94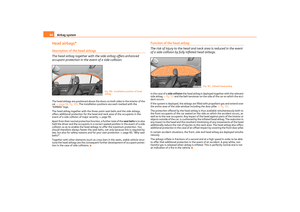 95
95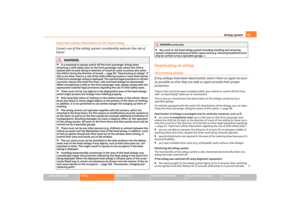 96
96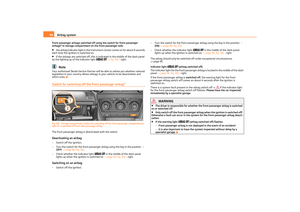 97
97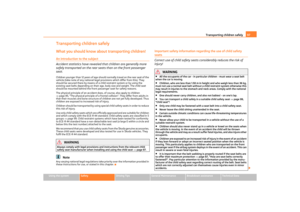 98
98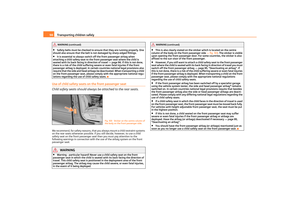 99
99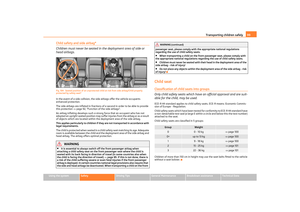 100
100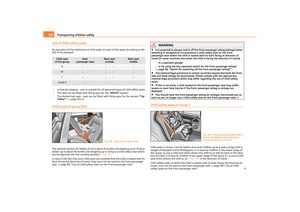 101
101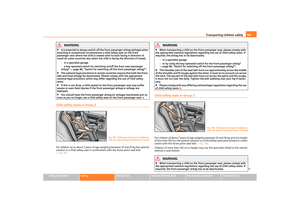 102
102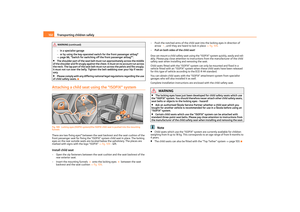 103
103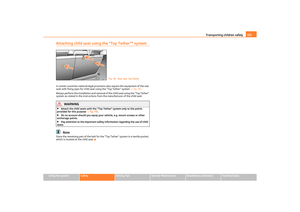 104
104 105
105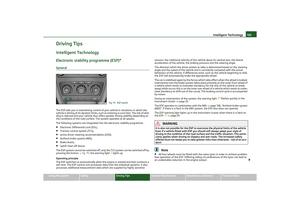 106
106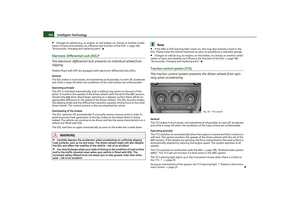 107
107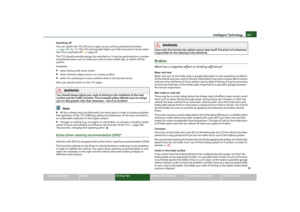 108
108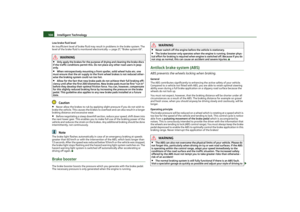 109
109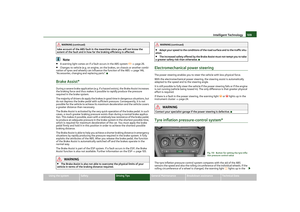 110
110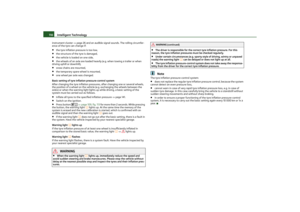 111
111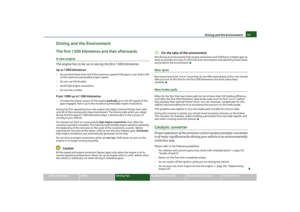 112
112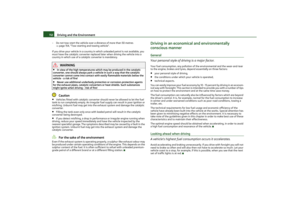 113
113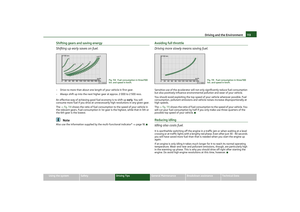 114
114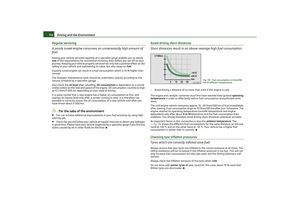 115
115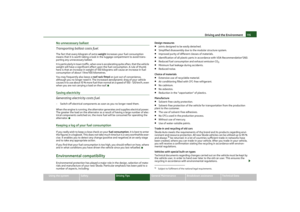 116
116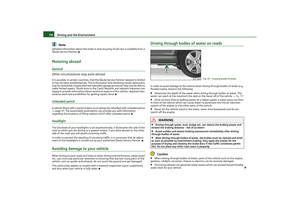 117
117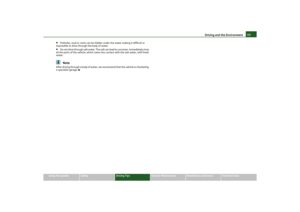 118
118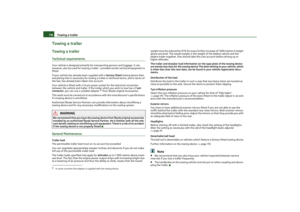 119
119 120
120 121
121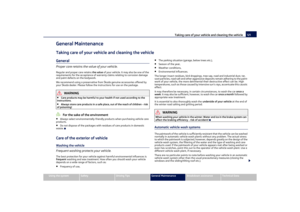 122
122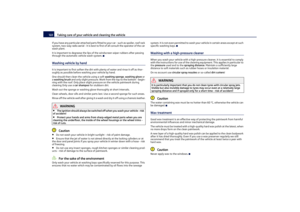 123
123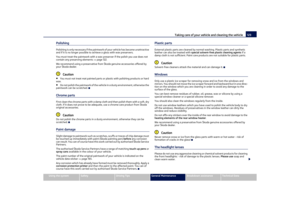 124
124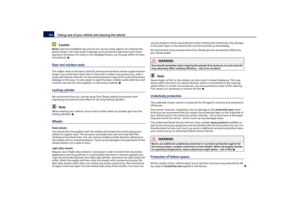 125
125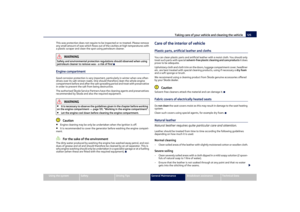 126
126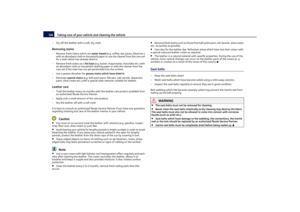 127
127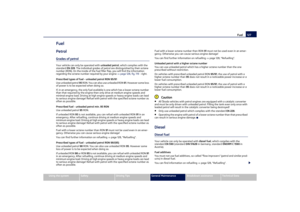 128
128 129
129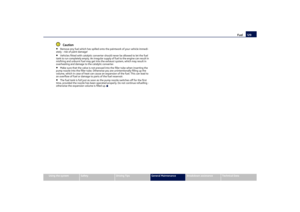 130
130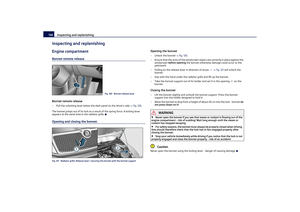 131
131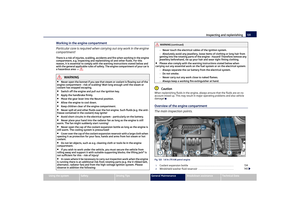 132
132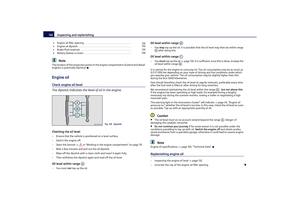 133
133 134
134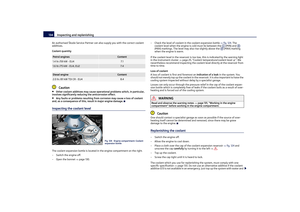 135
135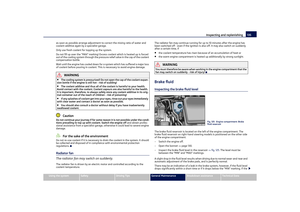 136
136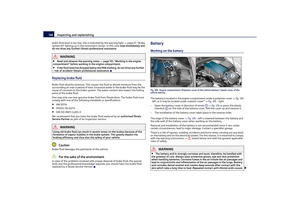 137
137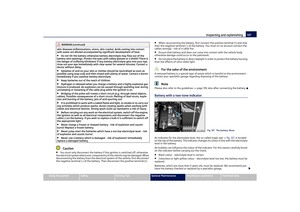 138
138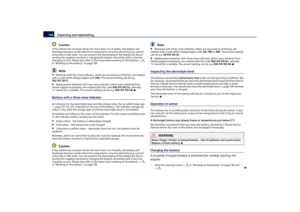 139
139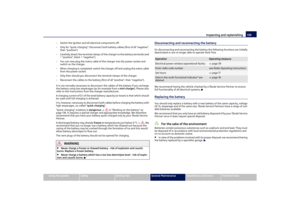 140
140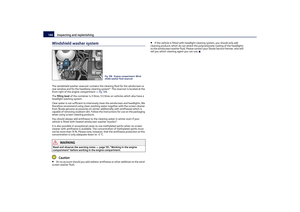 141
141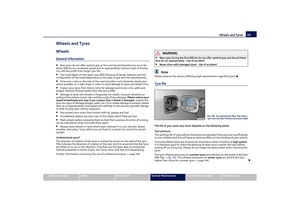 142
142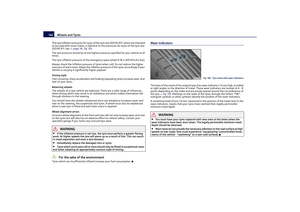 143
143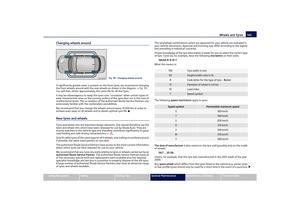 144
144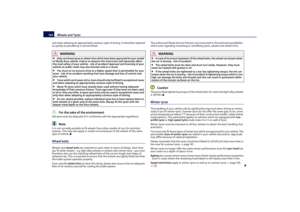 145
145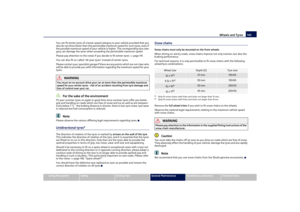 146
146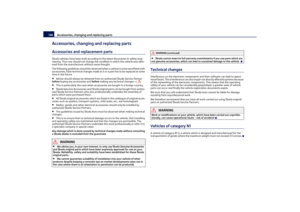 147
147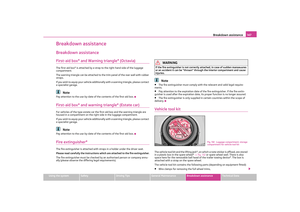 148
148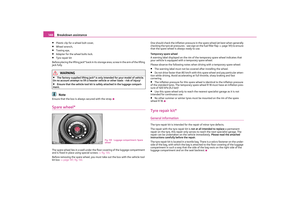 149
149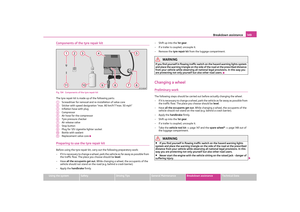 150
150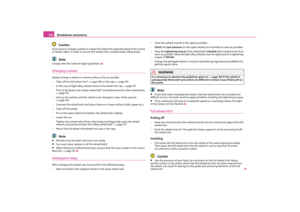 151
151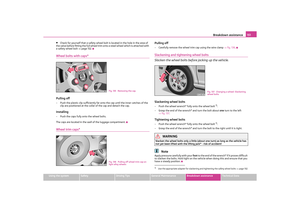 152
152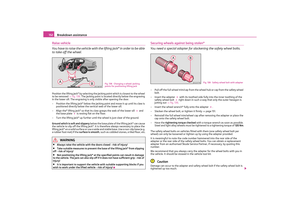 153
153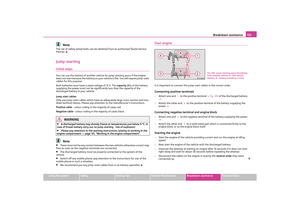 154
154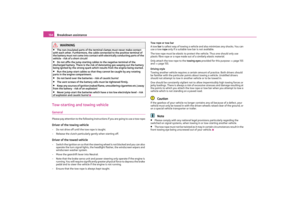 155
155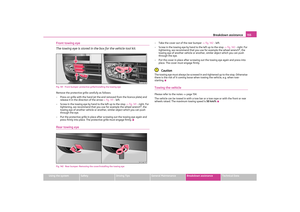 156
156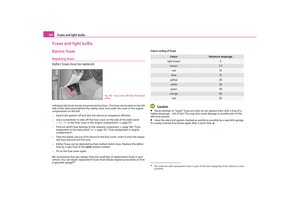 157
157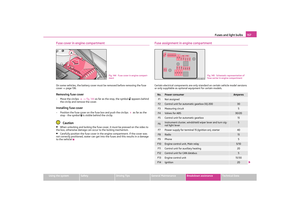 158
158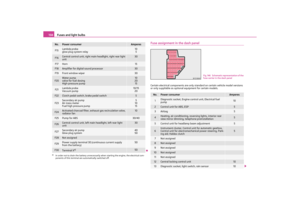 159
159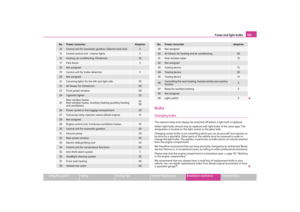 160
160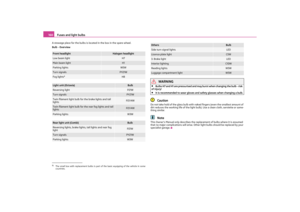 161
161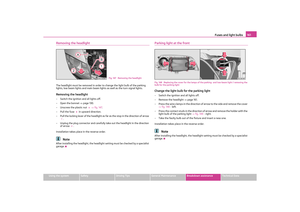 162
162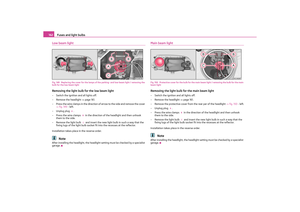 163
163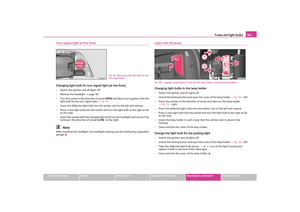 164
164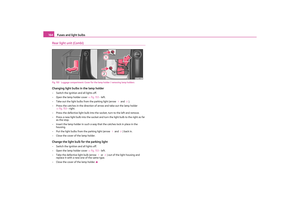 165
165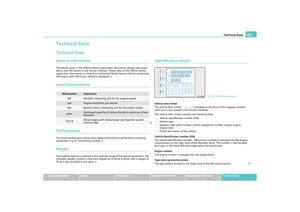 166
166 167
167 168
168 169
169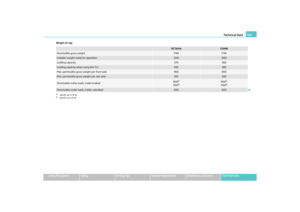 170
170 171
171 172
172 173
173 174
174 175
175 176
176 177
177 178
178 179
179 180
180 181
181 182
182