2009 SUBARU TRIBECA fuel pressure
[x] Cancel search: fuel pressurePage 1585 of 2453
FU(H6DO)-24
Fuel Injector
FUEL INJECTION (FUEL SYSTEMS)
11.Fuel Injector
A: REMOVAL
1. RH SIDE
1) Remove the collector cover.
2) Release the fuel pressure.
DURE, Fuel.>
3) Disconnect the ground cable from battery.
4) Open the fuel filler flap lid, and remove the fuel
filler cap.
5) Remove the air cleaner case.
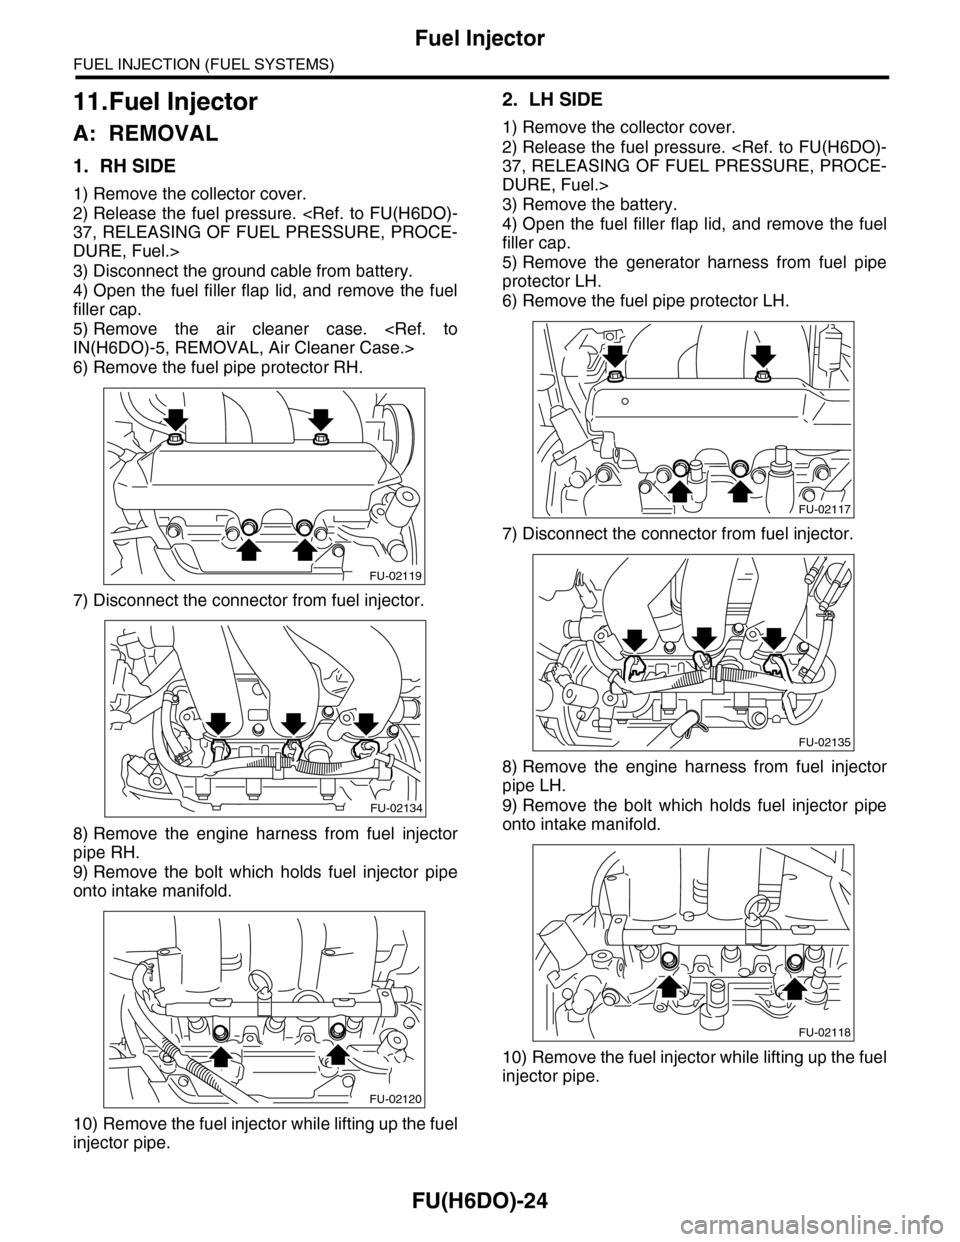
6) Remove the fuel pipe protector RH.
7) Disconnect the connector from fuel injector.
8) Remove the engine harness from fuel injector
pipe RH.
9) Remove the bolt which holds fuel injector pipe
onto intake manifold.
10) Remove the fuel injector while lifting up the fuel
injector pipe.
2. LH SIDE
1) Remove the collector cover.
2) Release the fuel pressure.
DURE, Fuel.>
3) Remove the battery.
4) Open the fuel filler flap lid, and remove the fuel
filler cap.
5) Remove the generator harness from fuel pipe
protector LH.
6) Remove the fuel pipe protector LH.
7) Disconnect the connector from fuel injector.
8) Remove the engine harness from fuel injector
pipe LH.
9) Remove the bolt which holds fuel injector pipe
onto intake manifold.
10) Remove the fuel injector while lifting up the fuel
injector pipe.
FU-02119
FU-02134
FU-02120
FU-02117
FU-02135
FU-02118
Page 1587 of 2453
FU(H6DO)-26
Variable Valve Lift Diagnosis Oil Pressure Switch
FUEL INJECTION (FUEL SYSTEMS)
12.Variable Valve Lift Diagnosis
Oil Pressure Switch
A: REMOVAL
1) Remove the collector cover.
2) Disconnect the ground cable from battery.
3) Remove the air intake chamber.
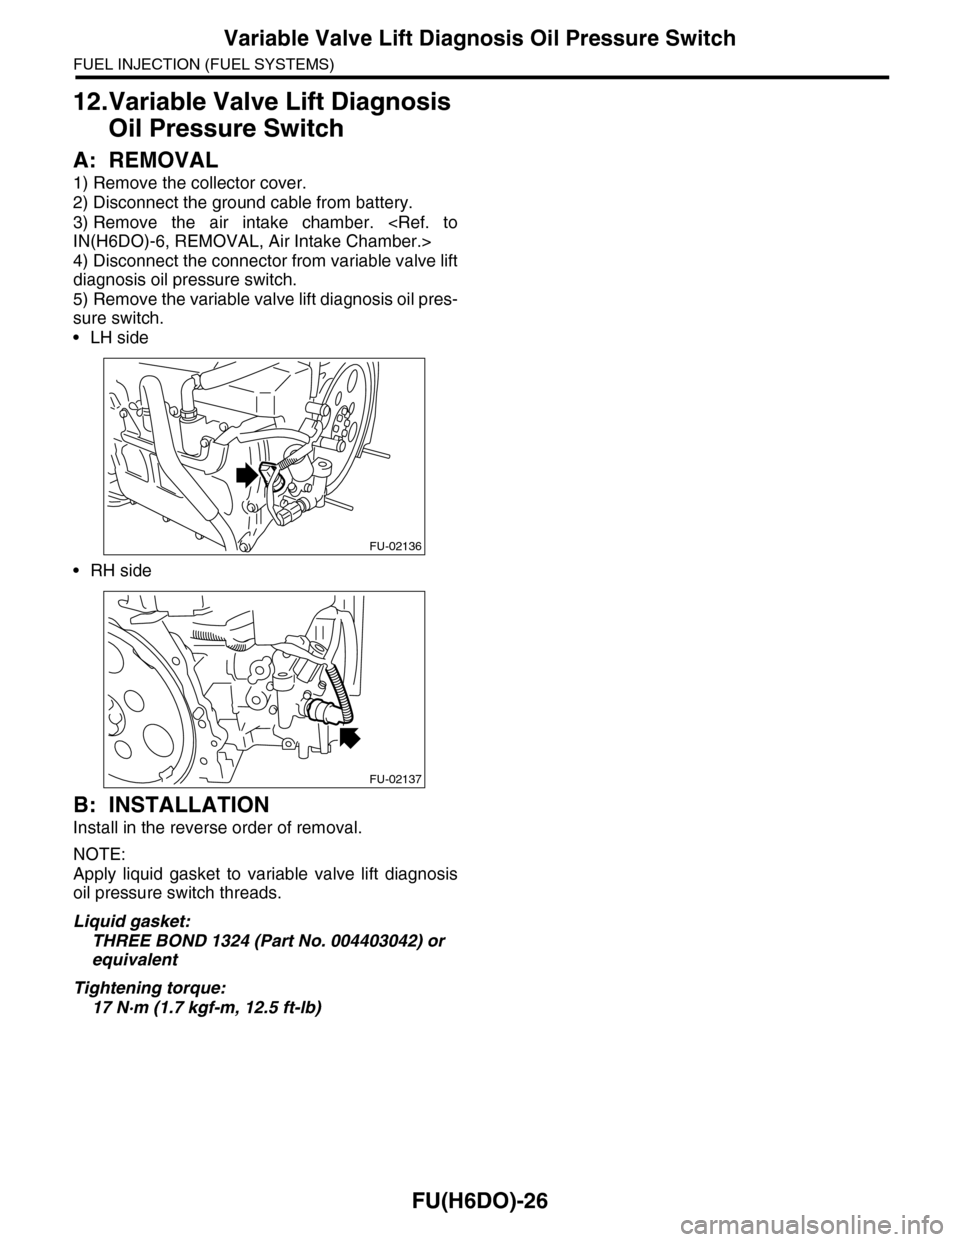
4) Disconnect the connector from variable valve lift
diagnosis oil pressure switch.
5) Remove the variable valve lift diagnosis oil pres-
sure switch.
•LH side
•RH side
B: INSTALLATION
Install in the reverse order of removal.
NOTE:
Apply liquid gasket to variable valve lift diagnosis
oil pressure switch threads.
Liquid gasket:
THREE BOND 1324 (Part No. 004403042) or
equivalent
Tightening torque:
17 N·m (1.7 kgf-m, 12.5 ft-lb)
FU-02136
FU-02137
Page 1598 of 2453
FU(H6DO)-37
Fuel
FUEL INJECTION (FUEL SYSTEMS)
21.Fuel
A: PROCEDURE
1. RELEASING OF FUEL PRESSURE
WARNING:
•Place “NO FIRE” signs near the working area.
•Be careful not to spill fuel on the floor.
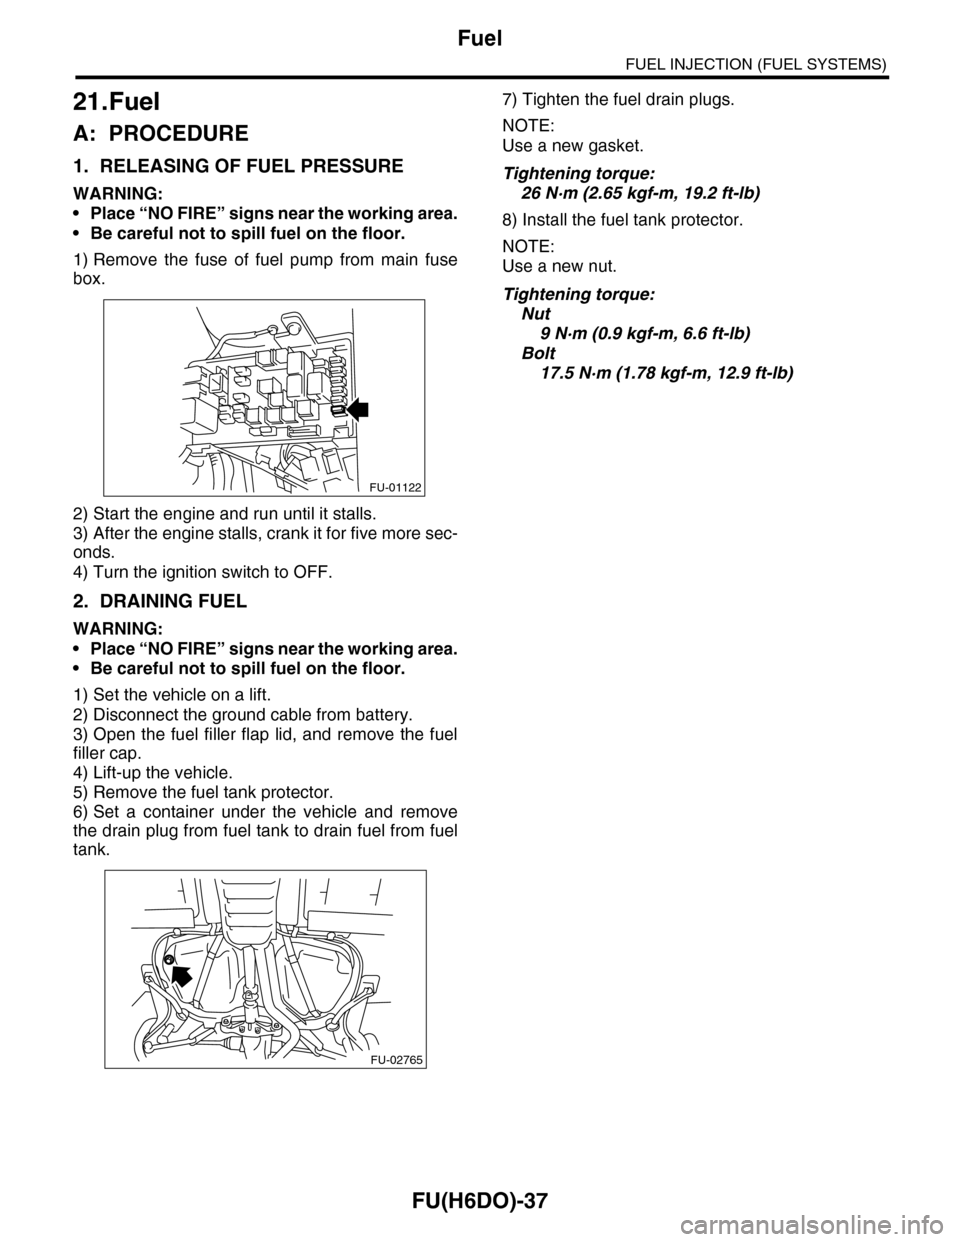
1) Remove the fuse of fuel pump from main fuse
box.
2) Start the engine and run until it stalls.
3) After the engine stalls, crank it for five more sec-
onds.
4) Turn the ignition switch to OFF.
2. DRAINING FUEL
WARNING:
•Place “NO FIRE” signs near the working area.
•Be careful not to spill fuel on the floor.
1) Set the vehicle on a lift.
2) Disconnect the ground cable from battery.
3) Open the fuel filler flap lid, and remove the fuel
filler cap.
4) Lift-up the vehicle.
5) Remove the fuel tank protector.
6) Set a container under the vehicle and remove
the drain plug from fuel tank to drain fuel from fuel
tank.
7) Tighten the fuel drain plugs.
NOTE:
Use a new gasket.
Tightening torque:
26 N·m (2.65 kgf-m, 19.2 ft-lb)
8) Install the fuel tank protector.
NOTE:
Use a new nut.
Tightening torque:
Nut
9 N·m (0.9 kgf-m, 6.6 ft-lb)
Bolt
17.5 N·m (1.78 kgf-m, 12.9 ft-lb)
FU-01122
FU-02765
Page 1599 of 2453
FU(H6DO)-38
Fuel Tank
FUEL INJECTION (FUEL SYSTEMS)
22.Fuel Tank
A: REMOVAL
WARNING:
•Place “NO FIRE” signs near the working area.
•Be careful not to spill fuel on the floor.
1) Set the vehicle on a lift.
2) Release the fuel pressure.
DURE, Fuel.>
3) Disconnect the ground cable from battery.
4) Drain fuel from fuel tank.
5) Remove the second seat.
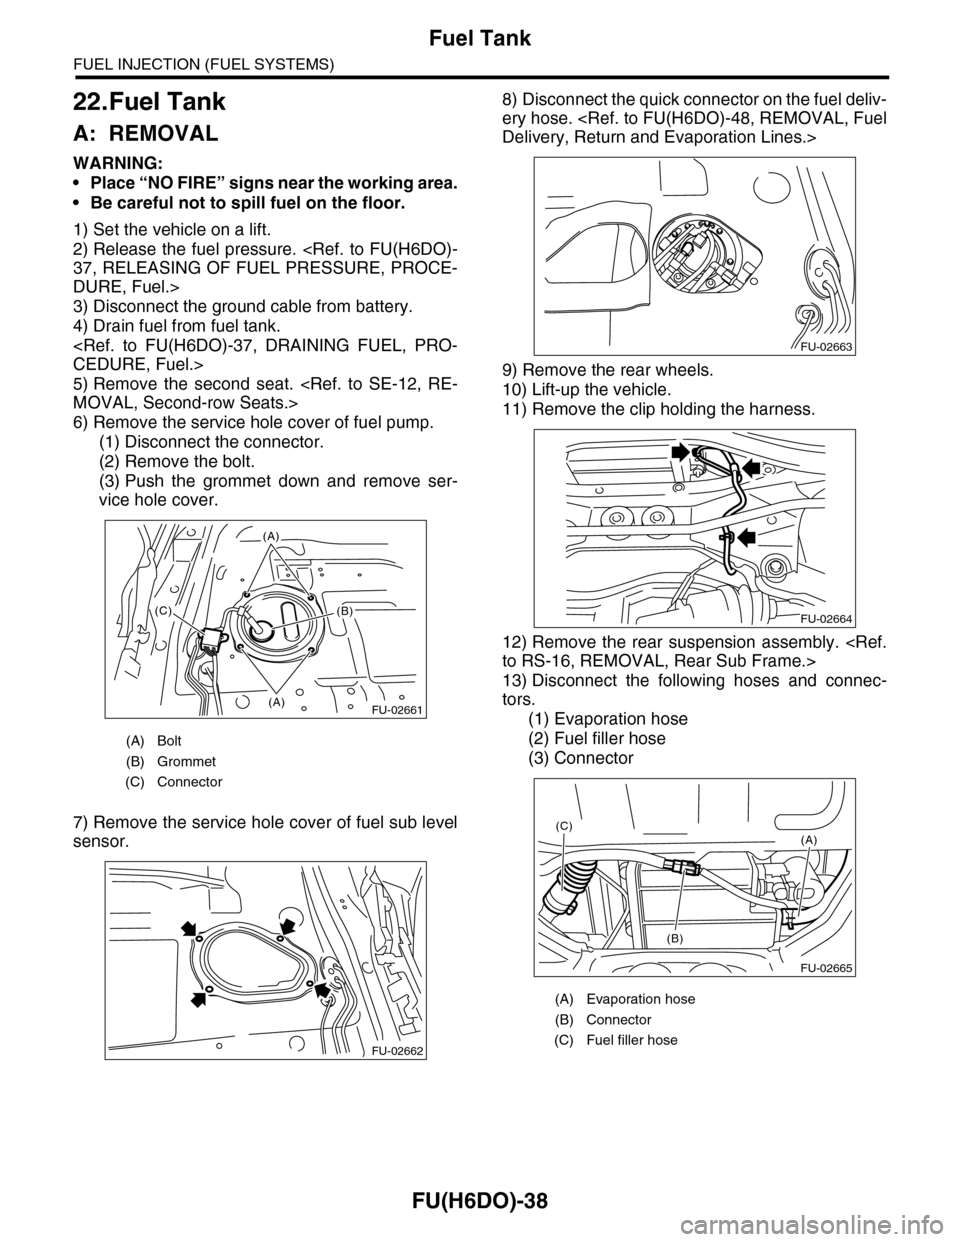
6) Remove the service hole cover of fuel pump.
(1) Disconnect the connector.
(2) Remove the bolt.
(3) Push the grommet down and remove ser-
vice hole cover.
7) Remove the service hole cover of fuel sub level
sensor.
8) Disconnect the quick connector on the fuel deliv-
ery hose.
9) Remove the rear wheels.
10) Lift-up the vehicle.
11) Remove the clip holding the harness.
12) Remove the rear suspension assembly.
13) Disconnect the following hoses and connec-
tors.
(1) Evaporation hose
(2) Fuel filler hose
(3) Connector
(A) Bolt
(B) Grommet
(C) Connector
FU-02661(A)
(A)
(B)(C)
FU-02662
(A) Evaporation hose
(B) Connector
(C) Fuel filler hose
FU-02663
FU-02664
FU-02665
(A)
(B)
(C)
Page 1604 of 2453
FU(H6DO)-43
Fuel Pump
FUEL INJECTION (FUEL SYSTEMS)
24.Fuel Pump
A: REMOVAL
WARNING:
•Place “NO FIRE” signs near the working area.
•Be careful not to spill fuel on the floor.
NOTE:
Fuel pump assembly consists of fuel pump and fuel
level sensor.
1) Release the fuel pressure.
DURE, Fuel.>
2) Drain fuel.
3) Remove the second seat.
4) Remove the service hole cover.
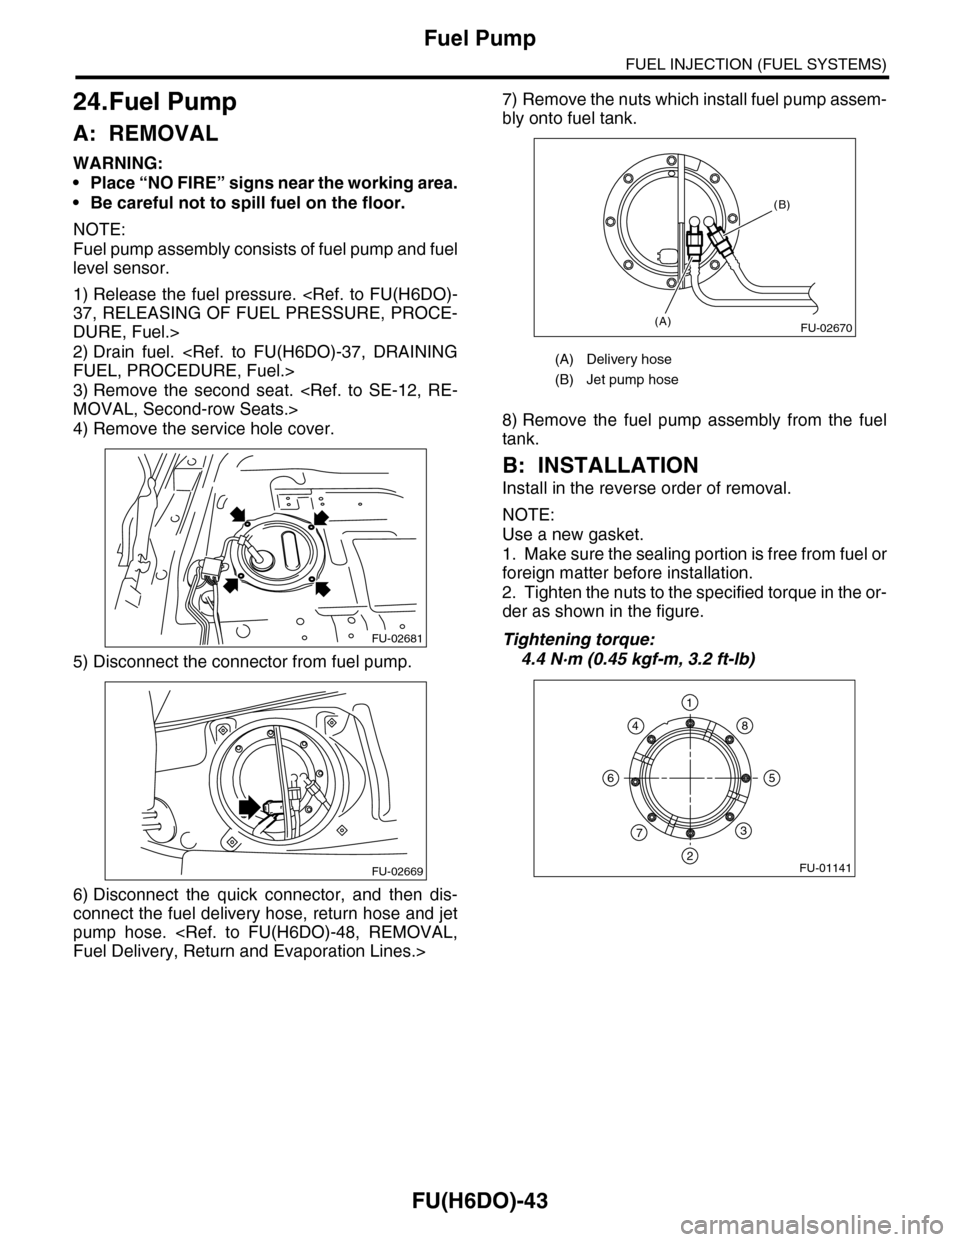
5) Disconnect the connector from fuel pump.
6) Disconnect the quick connector, and then dis-
connect the fuel delivery hose, return hose and jet
pump hose.
7) Remove the nuts which install fuel pump assem-
bly onto fuel tank.
8) Remove the fuel pump assembly from the fuel
tank.
B: INSTALLATION
Install in the reverse order of removal.
NOTE:
Use a new gasket.
1. Make sure the sealing portion is free from fuel or
foreign matter before installation.
2. Tighten the nuts to the specified torque in the or-
der as shown in the figure.
Tightening torque:
4.4 N·m (0.45 kgf-m, 3.2 ft-lb)
FU-02681
FU-02669
(A) Delivery hose
(B) Jet pump hose
FU-02670(A)
(B)
FU-01141
1
2
3
4
56
7
8
Page 1609 of 2453
FU(H6DO)-48
Fuel Delivery, Return and Evaporation Lines
FUEL INJECTION (FUEL SYSTEMS)
28.Fuel Delivery, Return and Evaporation Lines
A: REMOVAL
1) Set the vehicle on a lift.
2) Release the fuel pressure.
3) Open the fuel filler flap lid, and remove the fuel filler cap.
4) Remove the floor mat.
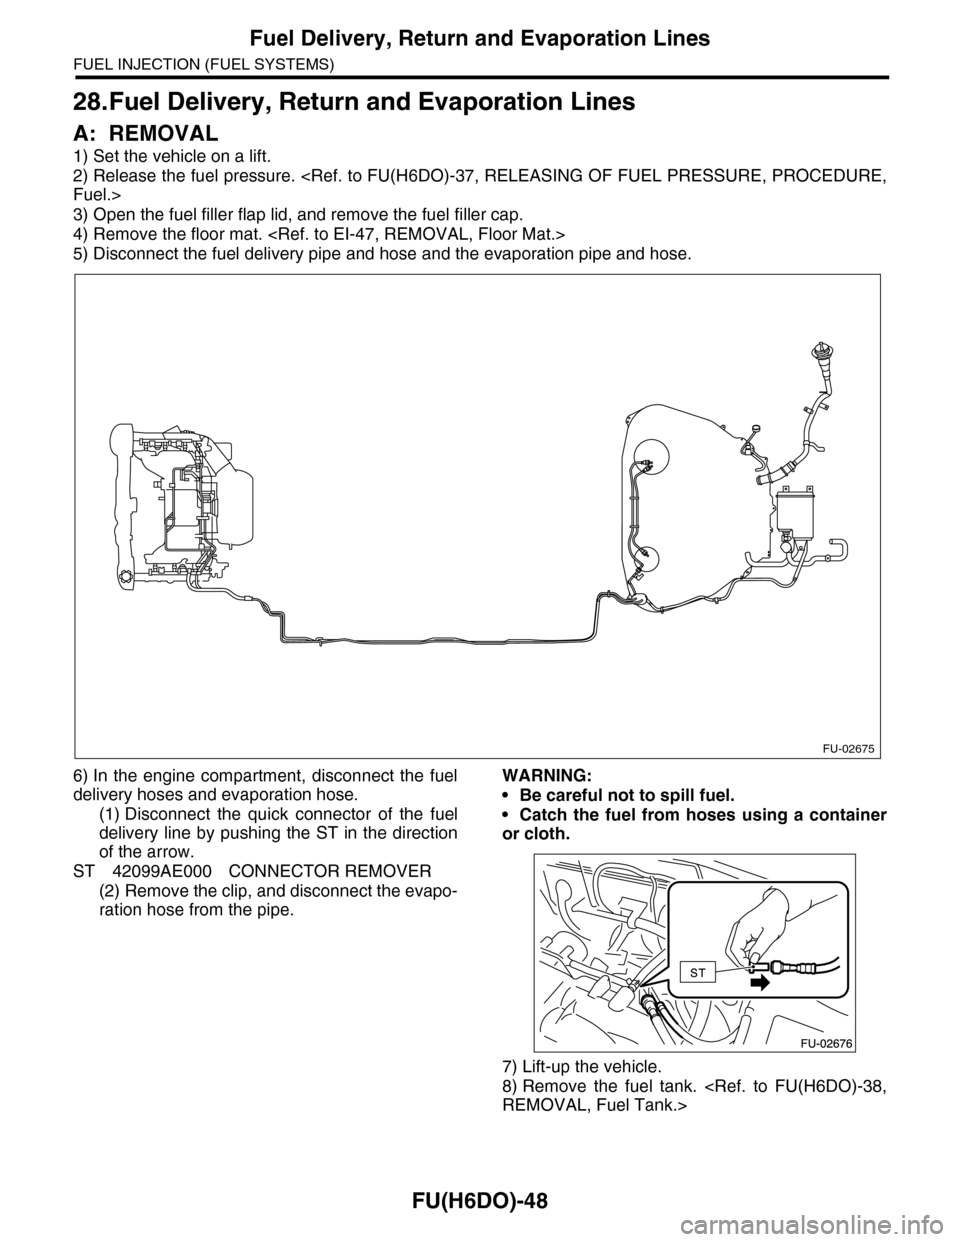
5) Disconnect the fuel delivery pipe and hose and the evaporation pipe and hose.
6) In the engine compartment, disconnect the fuel
delivery hoses and evaporation hose.
(1) Disconnect the quick connector of the fuel
delivery line by pushing the ST in the direction
of the arrow.
ST 42099AE000 CONNECTOR REMOVER
(2) Remove the clip, and disconnect the evapo-
ration hose from the pipe.
WARNING:
•Be careful not to spill fuel.
•Catch the fuel from hoses using a container
or cloth.
7) Lift-up the vehicle.
8) Remove the fuel tank.
FU-02675
Page 1612 of 2453
FU(H6DO)-51
Fuel System Trouble in General
FUEL INJECTION (FUEL SYSTEMS)
29.Fuel System Trouble in General
A: INSPECTION
NOTE:
•When the vehicle is left unattended for an extended period of time, water may accumulate in the fuel tank.
Fill fuel fully to prevent those problem. And also drain water from fuel filter.
•In snow-covered areas, mountainous areas, skiing areas, etc. where ambient temperatures drop below
0°C (32°F) throughout the winter season, use a water removing agent in the fuel system to prevent freezing
fuel system and accumulating water. Fill the water removing agent at the time when the fuel reduced at half
to maintain the advantage.
•When water is accumulated in fuel filter, drain water from both the fuel filter and fuel tank or use water re-
moving agent in the fuel tank.
•Before using water removing agent, follow the cautions noted on the bottle.
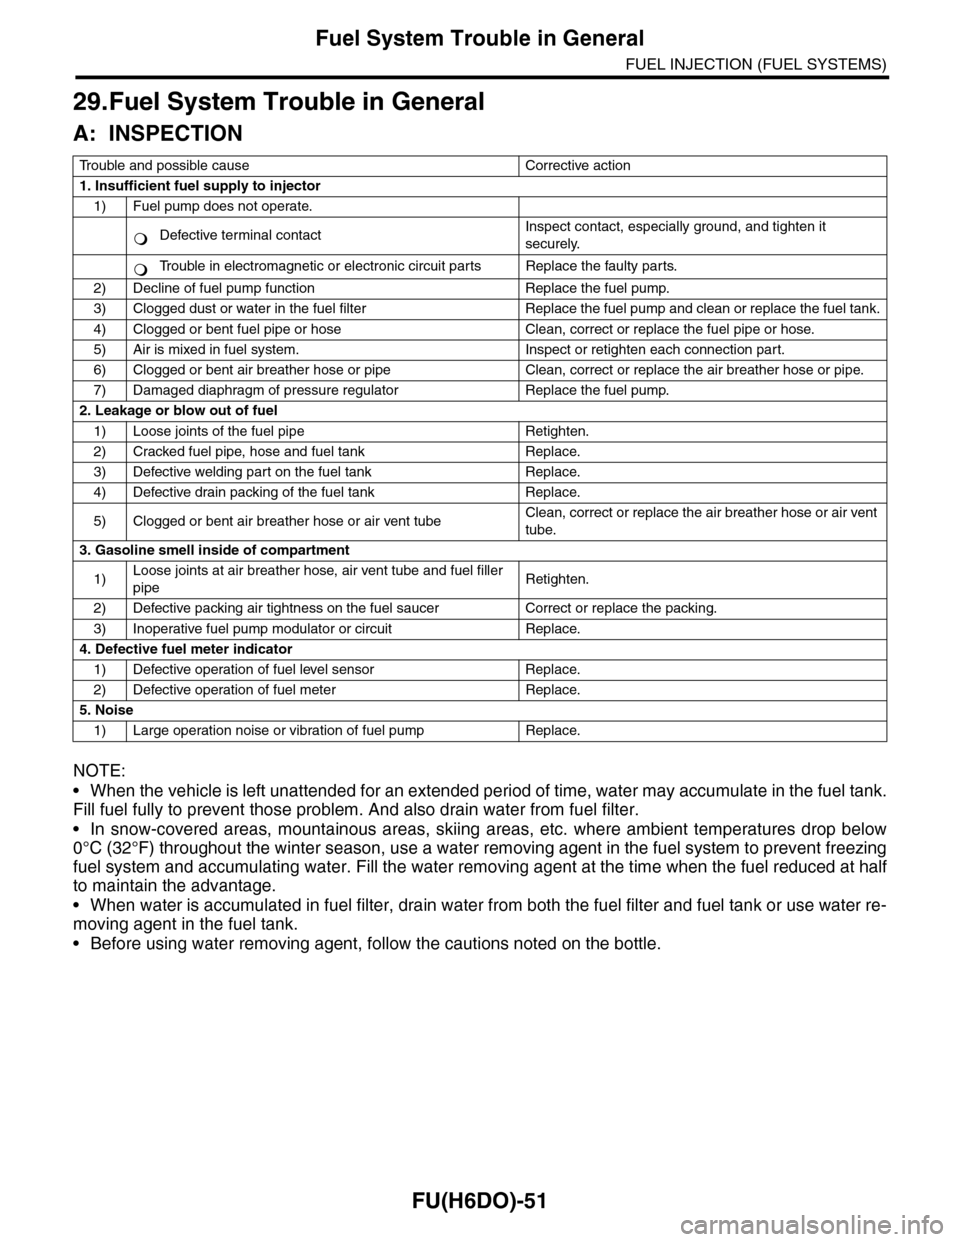
Tr o u b l e a n d p o s s i b l e c a u s e C o r r e c t i v e a c t i o n
1. Insufficient fuel supply to injector
1) Fuel pump does not operate.
Defective terminal contactInspect contact, especially ground, and tighten it
securely.
Tr o u b l e i n e l e c t r o m a g n e t i c o r e l e c t r o n i c c i r c u i t p a r t s R e p l a c e t h e f a u l t y p a r t s .
2) Decline of fuel pump function Replace the fuel pump.
3) Clogged dust or water in the fuel filter Replace the fuel pump and clean or replace the fuel tank.
4) Clogged or bent fuel pipe or hose Clean, correct or replace the fuel pipe or hose.
5) Air is mixed in fuel system. Inspect or retighten each connection part.
6) Clogged or bent air breather hose or pipe Clean, correct or replace the air breather hose or pipe.
7) Damaged diaphragm of pressure regulator Replace the fuel pump.
2. Leakage or blow out of fuel
1) Loose joints of the fuel pipe Retighten.
2) Cracked fuel pipe, hose and fuel tank Replace.
3) Defective welding part on the fuel tank Replace.
4) Defective drain packing of the fuel tank Replace.
5) Clogged or bent air breather hose or air vent tubeClean, correct or replace the air breather hose or air vent
tube.
3. Gasoline smell inside of compartment
1)Loose joints at air breather hose, air vent tube and fuel filler
pipeRetighten.
2) Defective packing air tightness on the fuel saucer Correct or replace the packing.
3) Inoperative fuel pump modulator or circuit Replace.
4. Defective fuel meter indicator
1) Defective operation of fuel level sensor Replace.
2) Defective operation of fuel meter Replace.
5. Noise
1) Large operation noise or vibration of fuel pump Replace.
�
Page 1615 of 2453
GD(H6DO)-3
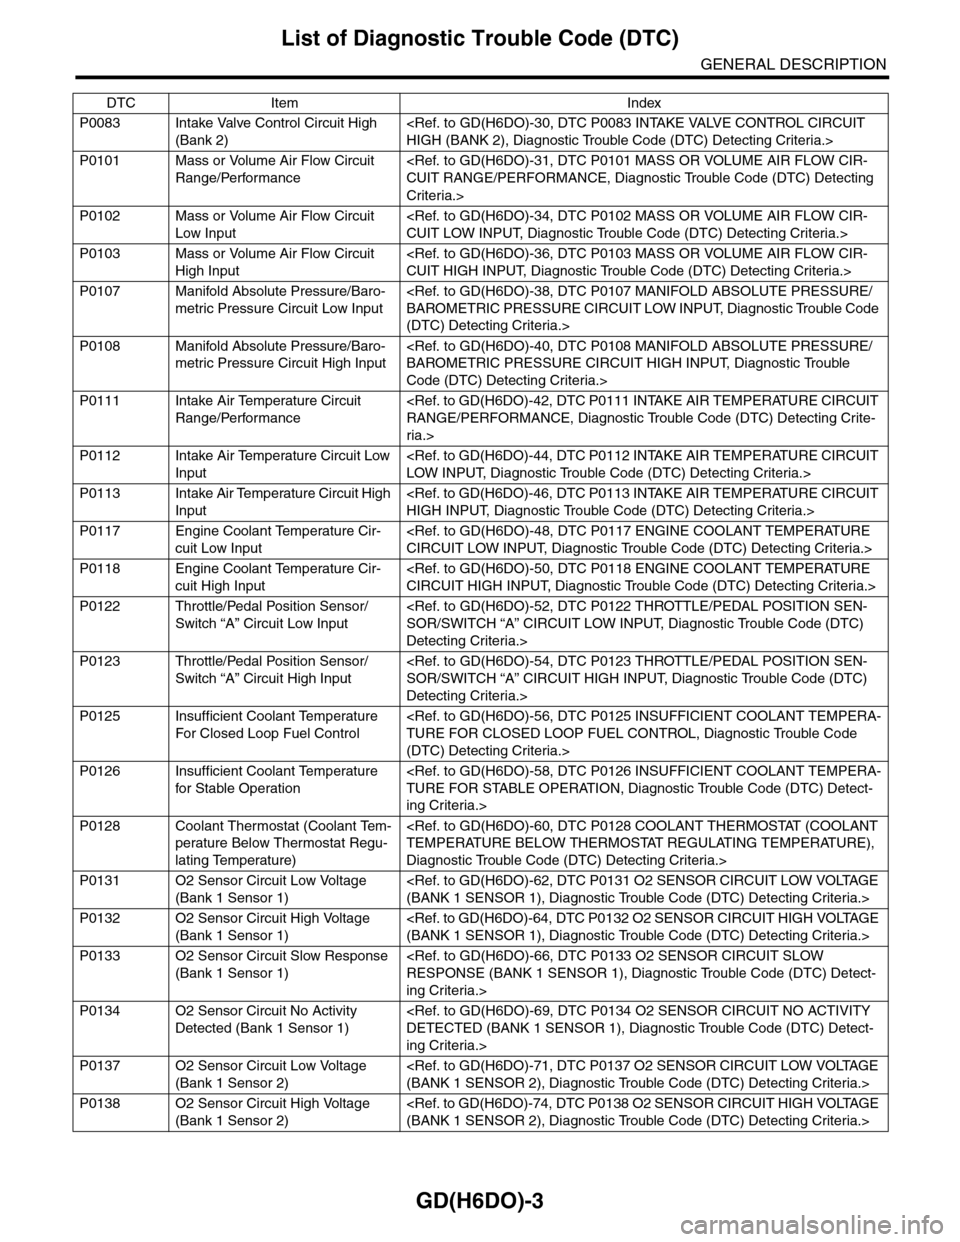
List of Diagnostic Trouble Code (DTC)
GENERAL DESCRIPTION
P0083 Intake Valve Control Circuit High
(Bank 2)
P0101 Mass or Volume Air Flow Circuit
Range/Performance
Criteria.>
P0102 Mass or Volume Air Flow Circuit
Low Input
P0103 Mass or Volume Air Flow Circuit
High Input
P0107 Manifold Absolute Pressure/Baro-
metric Pressure Circuit Low Input
(DTC) Detecting Criteria.>
P0108 Manifold Absolute Pressure/Baro-
metric Pressure Circuit High Input
Code (DTC) Detecting Criteria.>
P0111 Intake Air Temperature Circuit
Range/Performance
ria.>
P0112 Intake Air Temperature Circuit Low
Input
P0113 Intake Air Temperature Circuit High
Input
P0117 Engine Coolant Temperature Cir-
cuit Low Input
P0118 Engine Coolant Temperature Cir-
cuit High Input
P0122 Throttle/Pedal Position Sensor/
Switch “A” Circuit Low Input
Detecting Criteria.>
P0123 Throttle/Pedal Position Sensor/
Switch “A” Circuit High Input
Detecting Criteria.>
P0125 Insufficient Coolant Temperature
For Closed Loop Fuel Control
(DTC) Detecting Criteria.>
P0126 Insufficient Coolant Temperature
for Stable Operation
ing Criteria.>
P0128 Coolant Thermostat (Coolant Tem-
perature Below Thermostat Regu-
lating Temperature)
Diagnostic Trouble Code (DTC) Detecting Criteria.>
P0131 O2 Sensor Circuit Low Voltage
(Bank 1 Sensor 1)
P0132 O2 Sensor Circuit High Voltage
(Bank 1 Sensor 1)
P0133 O2 Sensor Circuit Slow Response
(Bank 1 Sensor 1)
ing Criteria.>
P0134 O2 Sensor Circuit No Activity
Detected (Bank 1 Sensor 1)
ing Criteria.>
P0137 O2 Sensor Circuit Low Voltage
(Bank 1 Sensor 2)
P0138 O2 Sensor Circuit High Voltage
(Bank 1 Sensor 2)
DTC Item Index