2009 SUBARU TRIBECA brake fluid
[x] Cancel search: brake fluidPage 441 of 2453

IDI-2
General Description
INSTRUMENTATION/DRIVER INFO
1. General Description
A: SPECIFICATION
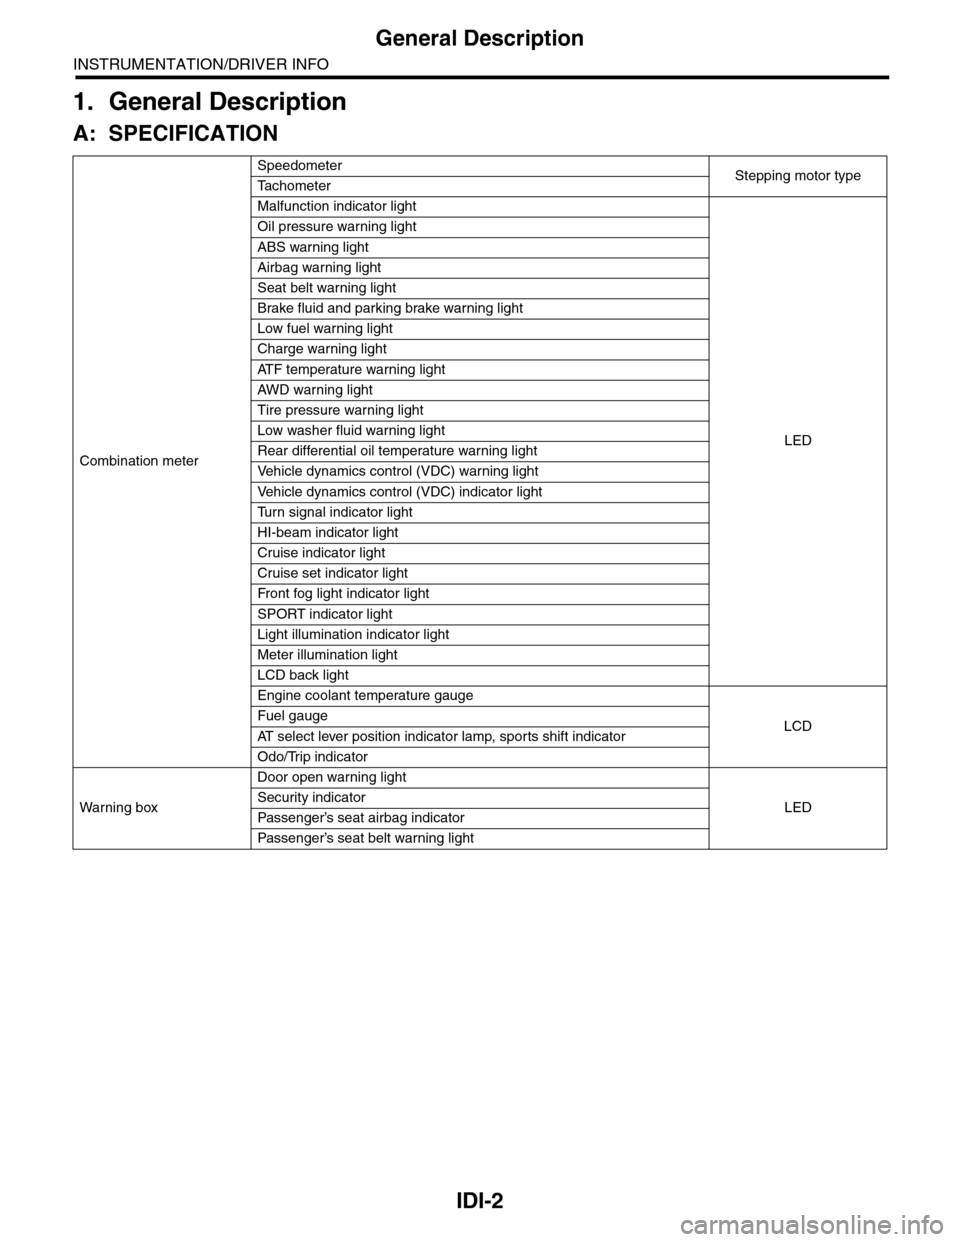
Combination meter
SpeedometerStepping motor typeTa c h o m e t e r
Malfunction indicator light
LED
Oil pressure warning light
ABS warning light
Airbag warning light
Seat belt warning light
Brake fluid and parking brake warning light
Low fuel warning light
Charge warning light
AT F t e m p e r a t u r e w a r n i n g l i g h t
AW D war n in g l i gh t
Tire pressure warning light
Low washer fluid warning light
Rear differential oil temperature warning light
Ve h i c l e d y n a m i c s c o n t r o l ( V D C ) w a r n i n g l i g h t
Ve h i c l e d y n a m i c s c o n t r o l ( V D C ) i n d i c a t o r l i g h t
Tu r n s i g n a l i n d i c a t o r l i g h t
HI-beam indicator light
Cruise indicator light
Cruise set indicator light
Fr o nt fog li g ht i nd i ca to r li g ht
SPORT indicator light
Light illumination indicator light
Meter illumination light
LCD back light
Engine coolant temperature gauge
LCDFuel gauge
AT s e l e c t l e v e r p o s i t i o n i n d i c a t o r l a m p , s p o r t s s h i f t i n d i c a t o r
Odo/Trip indicator
Wa r ni n g b ox
Door open warning light
LEDSecurity indicator
Passenger’s seat airbag indicator
Passenger’s seat belt war ning light
Page 716 of 2453

BR-2
General Description
BRAKE
1. General Description
A: SPECIFICATION
NOTE:
Refer to “PB” section for parking brake specifications.
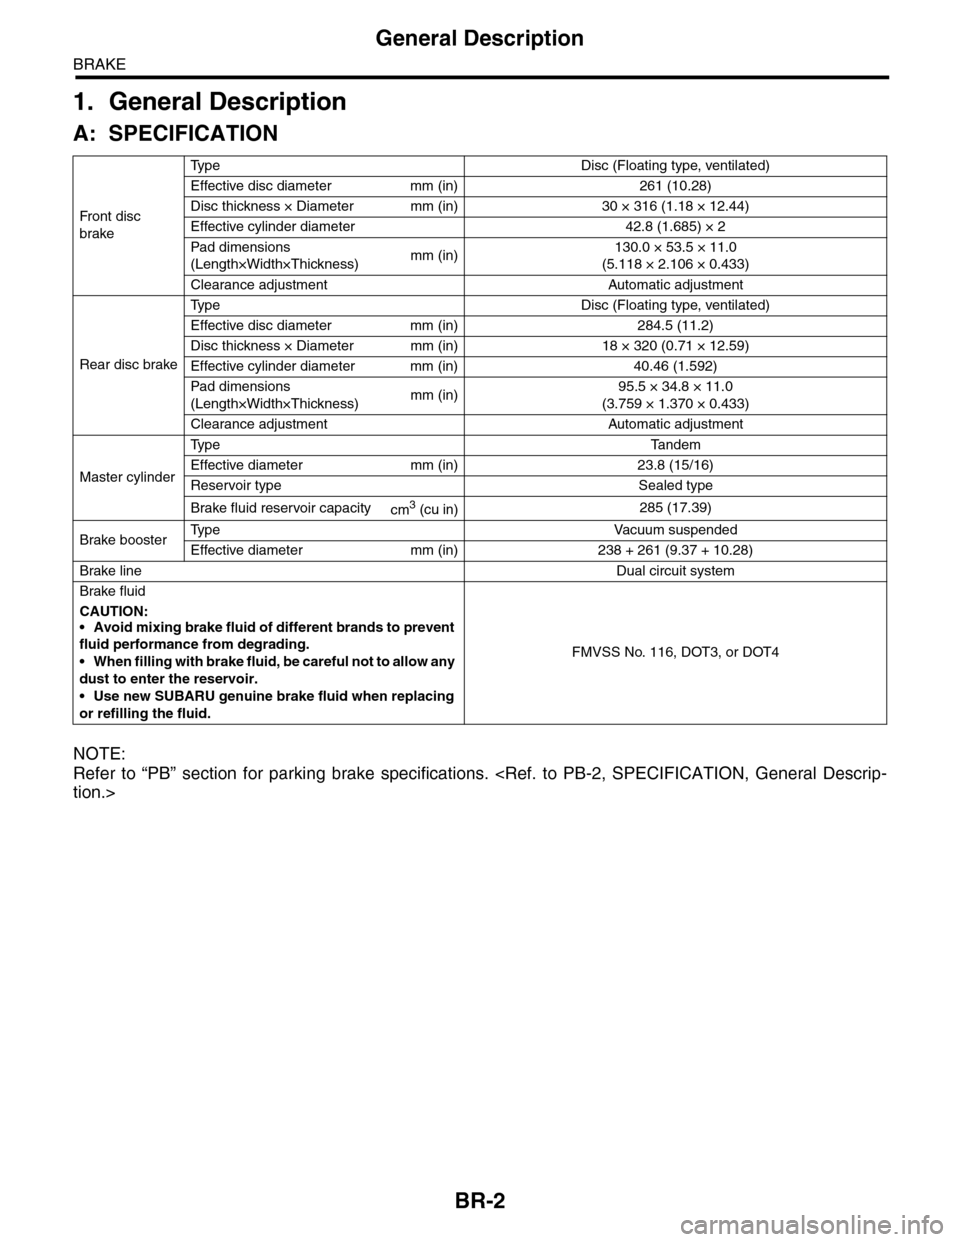
Fr o nt d is c
brake
Ty p e D i s c ( F l o a t i n g t y p e , v e n t i l a t e d )
Effective disc diameter mm (in) 261 (10.28)
Disc thickness × Diameter mm (in) 30 × 316 (1.18 × 12.44)
Effective cylinder diameter 42.8 (1.685) × 2
Pad dimensions
(Length×Width×Thickness)mm (in)130.0 × 53.5 × 11.0
(5.118 × 2.106 × 0.433)
Clearance adjustment Automatic adjustment
Rear disc brake
Ty p e D i s c ( F l o a t i n g t y p e , v e n t i l a t e d )
Effective disc diameter mm (in) 284.5 (11.2)
Disc thickness × Diameter mm (in) 18 × 320 (0.71 × 12.59)
Effective cylinder diameter mm (in) 40.46 (1.592)
Pad dimensions
(Length×Width×Thickness)mm (in)95.5 × 34.8 × 11.0
(3.759 × 1.370 × 0.433)
Clearance adjustment Automatic adjustment
Master cylinder
Ty p e Ta n d e m
Effective diameter mm (in) 23.8 (15/16)
Reservoir type Sealed type
Brake fluid reservoir capacitycm3 (cu in)285 (17.39)
Brake boosterTy p e V a c u u m s u s p e n d e d
Effective diameter mm (in) 238 + 261 (9.37 + 10.28)
Brake lineDual circuit system
Brake fluid
CAUTION:
•Avoid mixing brake fluid of different brands to prevent
fluid performance from degrading.
•When filling with brake fluid, be careful not to allow any
dust to enter the reservoir.
•Use new SUBARU genuine brake fluid when replacing
or refilling the fluid.
FMVSS No. 116, DOT3, or DOT4
Page 717 of 2453

BR-3
General Description
BRAKE
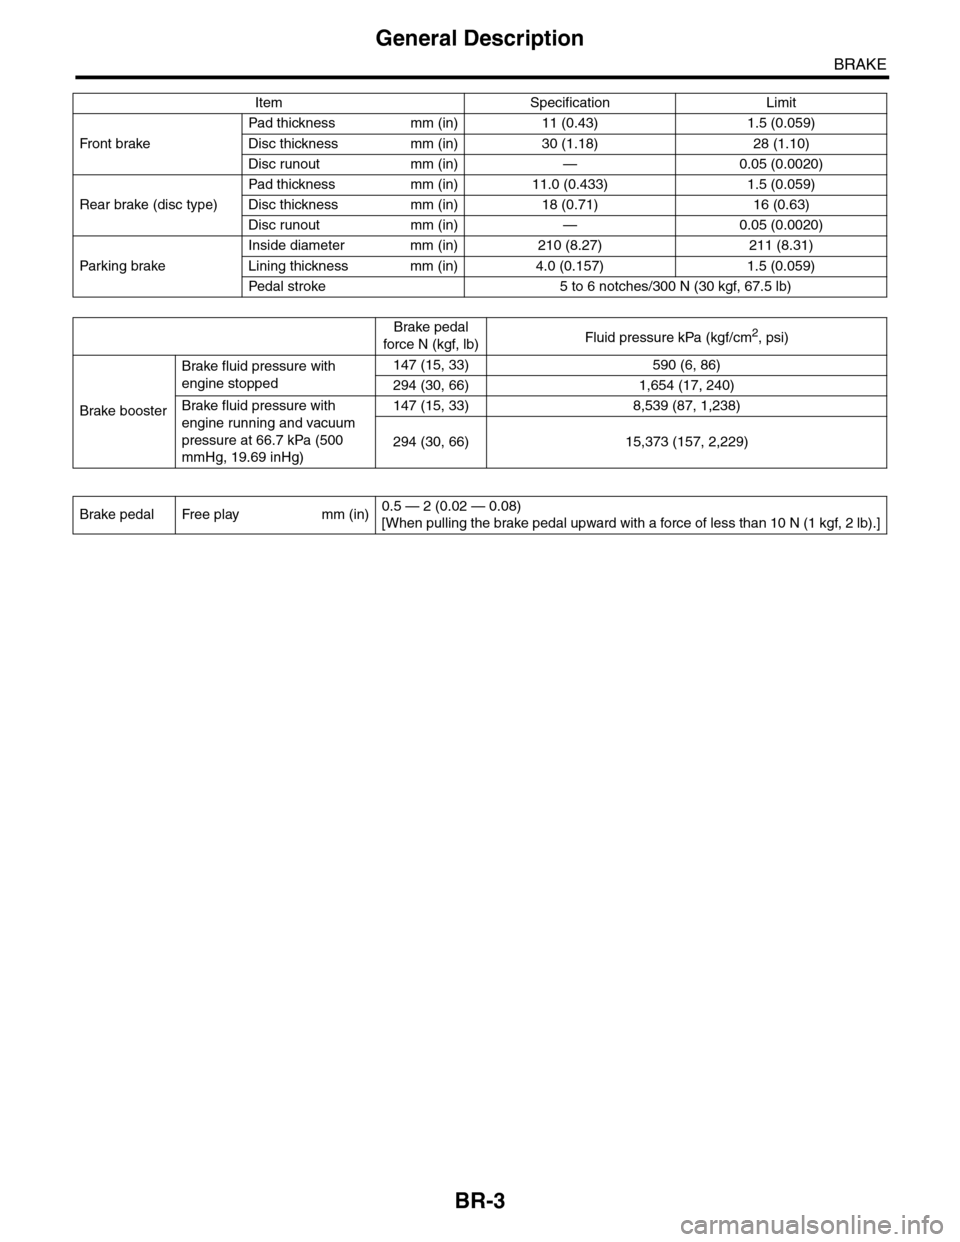
Item Specification Limit
Fr o nt b rake
Pad thickness mm (in) 11 (0.43) 1.5 (0.059)
Disc thickness mm (in) 30 (1.18) 28 (1.10)
Disc runout mm (in) — 0.05 (0.0020)
Rear brake (disc type)
Pad thickness mm (in) 11.0 (0.433) 1.5 (0.059)
Disc thickness mm (in) 18 (0.71) 16 (0.63)
Disc runout mm (in) — 0.05 (0.0020)
Par king brake
Inside diameter mm (in) 210 (8.27) 211 (8.31)
Lining thickness mm (in) 4.0 (0.157) 1.5 (0.059)
Pedal stroke 5 to 6 notches/300 N (30 kgf, 67.5 lb)
Brake pedal
force N (kgf, lb)Fluid pressure kPa (kgf/cm2, psi)
Brake booster
Brake fluid pressure with
engine stopped
147 (15, 33) 590 (6, 86)
294 (30, 66) 1,654 (17, 240)
Brake fluid pressure with
engine running and vacuum
pressure at 66.7 kPa (500
mmHg, 19.69 inHg)
147 (15, 33) 8,539 (87, 1,238)
294 (30, 66) 15,373 (157, 2,229)
Brake pedal Free play mm (in)0.5 — 2 (0.02 — 0.08)
[When pulling the brake pedal upward with a force of less than 10 N (1 kgf, 2 lb).]
Page 725 of 2453

BR-11
General Description
BRAKE
C: CAUTION
Please clearly understand and adhere to the follow-
ing general precautions. They must be strictly fol-
lowed to avoid any injury to the person doing the
work or people in the area.
1. OPERATION
•Wear work clothing, including a cap, protective
goggles and protective shoes during operation.
•Before removal, installation or disassembly, be
sure to clarify the failure. Avoid unnecessary re-
moval, installation, disassembly and replacement.
•Use SUBARU genuine grease etc. or equivalent.
Do not mix grease etc. with that of another grade or
from other manufacturers.
•Before securing a part in a vise, place cushioning
material such as wood blocks, aluminum plate or
cloth between the part and the vise.
•Be sure to tighten fasteners including bolts and
nuts to the specified torque.
•Place shop jacks or rigid racks at the specified
points.
2. OIL
When handling oil, follow the rules below to prevent
unexpected accidents.
•Prepare container and waste cloths when per-
forming work which oil could possibly spill. If oil
spills, wipe it off immediately to prevent from pene-
trating into floor or flowing outside, for environmen-
tal protection.
•Follow all government and local regulations con-
cerning waste disposal.
3. BRAKE FLUID
If brake fluid gets in your eyes or on your skin, do
the following:
•Wash eyes and seek immediate medical atten-
tion.
•Wash your skin with soap and then rinse thor-
oughly with water.
Follow all government and local regulations con-
cerning waste disposal.
D: PREPARATION TOOL
1. GENERAL TOOL
TOOL NAME REMARKS
Snap ring pliers Used for removing and installing snap rings.
Page 729 of 2453

BR-15
Front Disc Brake Assembly
BRAKE
4. Front Disc Brake Assembly
A: REMOVAL
CAUTION:
Do not allow brake fluid to come in contact with
vehicle body. If it does, wash off with water and
wipe away completely.
1) Lift-up the vehicle, and remove the front wheels.
2) Remove the union bolt, and disconnect the
brake hose from the caliper body assembly.
3) Remove the bolt securing the lock pin to caliper
body.
4) Raise the caliper body, and then move it toward
vehicle center to separate it from the support.
5) Remove the support from housing.
NOTE:
Remove the support only when replacing the rotor
or support. It need not be removed when servicing
the caliper body assembly.
6) Remove mud and foreign matter from the caliper
body assembly and support.
B: INSTALLATION
1) Install the support to the housing.
Tightening torque:
120 N·m (12.2 kgf-m, 88.5 ft-lb)
2) Apply a thin coat of Molykote M7439 to the pad
clip.
3) Apply a thin coat of Molykote AS880N (Part No.
K0777YA010) to the contact surface between pad
and inner shim.
4) Apply a thin coat of Molykote AS880N (Part No.
K0779YA010) to the three contact surfaces be-
tween inner shim and outer shim of outer pads.
BR-00021
BR-00022
BR-00023
BR-00340
BR-00238
BR-00341
Page 731 of 2453

BR-17
Front Disc Brake Assembly
BRAKE
C: DISASSEMBLY
1) Remove mud and foreign matter from the caliper
body assembly and support.
CAUTION:
Be careful not to allow foreign matter to enter
the brake hose connector.
2) Place a wooden block in the caliper body as
shown in the figure to prevent the piston from jump-
ing out and being damaged.
3) Gradually apply compressed air via the brake
hose installation hole to push the piston out.
4) Remove the piston boot.
5) Remove the piston seal from caliper body cylinder.
CAUTION:
Do not damage the cylinder and piston seal
groove.
6) Remove the guide pin and boot from caliper body.
D: ASSEMBLY
1) Clean the inside of the caliper body using brake
fluid.
2) Apply a coat of brake fluid to piston seal and in-
stall piston seal in the groove on caliper body.
3) Apply a coat of brake fluid to the inner surface of
cylinder and the entire outer surface of the piston.
4) Apply a coat of specified grease to the boot, and
fit to the groove on the ends of the cylinder.
Grease:
NIGLUBE RX-2 (Part No. K0779GA102)
5) Insert the piston into cylinder.
CAUTION:
Do not force the piston into cylinder.
6) Position the boot in the grooves on cylinder and
piston.
7) Apply a coat of specified grease to the lock pin
and guide pin outer surface, cylinder inner surface,
and boot grooves.
Grease:
NIGLUBE RX-2 (Part No. K0779GA102)
(1) Place a wood block of 30 mm (1.18 in) width.
(1) Piston seal
(1)BR-00026
BR-00240
(1)
BR-00027
(1) Piston
(2) Piston boot
(1) Piston
(2) Piston boot
(3) Caliper body
(4) Piston seal
BR-00242
(1)
(2)
BR-00243
(1)
(2)
(3)
(4)
Page 736 of 2453

BR-22
Rear Disc Brake Assembly
BRAKE
7. Rear Disc Brake Assembly
A: REMOVAL
CAUTION:
Do not allow brake fluid to come in contact with
vehicle body. If it does, wash off with water and
wipe away completely.
1) Lift-up the vehicle, and then remove the rear
wheels.
2) Disconnect the brake hose from caliper body as-
sembly.
3) Remove the caliper lower bolt.
4) Raise the caliper body, and then move it toward
vehicle center to separate it from the support.
5) Remove the support from housing.
NOTE:
Remove the support only when replacing the rotor
or support. It need not be removed when servicing
the caliper body assembly.
6) Remove mud and foreign matter from the caliper
body assembly and support.
CAUTION:
Be careful not to allow foreign matter to enter
the brake hose connector.
B: INSTALLATION
1) Install the support to the housing.
Tightening torque:
66 N·m (6.7 kgf-m, 48.7 ft-lb)
2) Apply a thin coat of Molykote M7439 to the pad
clip.
3) Apply a thin coat of Molykote AS880N (Part No.
K0777YA010) to the contact surface between the
pad and shim.
4) Install the pad to support.
5) Install the caliper body to the support.
Tightening torque:
27 N·m (2.8 kgf-m, 19.9 ft-lb)
6) Connect the brake hose using a new brake hose
gasket.
Tightening torque:
18 N·m (1.8 kgf-m, 13.0 ft-lb)
7) Bleed air from the brake system.
C: DISASSEMBLY
1) Remove the piston boot.
2) Place a wooden block in the caliper body as
shown in the figure to prevent the piston from jump-
ing out and being damaged.
3) Gradually apply compressed air via the brake
hose installation hole to push the piston out.
BR-00498
BR-00345
(1) Place a wood block of 30 mm (1.18 in) width.
BR-00041
(1)BR-00042
Page 737 of 2453

BR-23
Rear Disc Brake Assembly
BRAKE
4) Remove the piston seal from caliper body cylin-
der.
CAUTION:
Do not damage the cylinder and piston seal
groove.
5) Remove the lock pin sleeve and boot from cali-
per body.
6) Remove the guide pin boot.
D: ASSEMBLY
1) Clean the inside of the caliper body using brake
fluid.
2) Apply a coat of brake fluid to piston seal and in-
stall piston seal in the groove on caliper body.
3) Apply a coat of brake fluid to the inner surface of
cylinder and the entire outer surface of the piston.
4) Apply a coat of specified grease to the boot and
fit to the groove on the ends of cylinder.
Grease:
NIGLUBE RX-2 (Part No. K0779GA102)
5) Insert the piston into cylinder.
CAUTION:
Do not force the piston into cylinder.
6) Position the boot in the grooves on piston and
cylinder.
7) Apply a coat of specified grease to the guide pin,
outer surface, sleeve outer surface, cylinder inner
surface, and boot grooves.
Grease:
NIGLUBE RX-2 (Part No. K0779GA102)
8) Install the guide pin boot to the support.
9) Install the lock pin boot to support, and then in-
sert the lock pin sleeve into the specified position.
E: INSPECTION
1) Repair or replace the faulty parts.
2) Check the caliper body and piston for uneven
wear, damage or rust.
3) Check the rubber parts for damage or deteriora-
tion.
(1) Piston
(2) Piston boot
(3) Caliper body
(4) Piston seal
BR-00043
BR-00243
(1)
(2)
(3)
(4)
(1) Pin boot
(2) Lock pin or guide pin
(3) Grease applied area
BR-00362
(1)(2)
: (3)