Page 1909 of 2453
ME(H6DO)-43
Front Chain Cover
MECHANICAL
4) Tighten the bolts in the numerical order as shown in the figure.
Tightening torque:
6.6 N·m (0.67 kgf-m, 4.8 ft-lb)
5) Install the crank pulley.
C: INSPECTION
Check the cover surface for scratch and damage.
Check for oil leakage on cover mating surface and installation part of crank pulley.
ME-02031
(21)
(22)(40)(39)
(38)
(37)
(36)
(35)
(34)
(33)
(32)(13)(12)(11)
(9)(10)
(23)(24)
(8)
(6)
(25)
(26)
(27)
(28)
(29)(30) (31)(19)
(18)
(17)(16) (15)(14)(20)
(3)
(2)
(4)(5)
(1)
(7)
Page 1912 of 2453
ME(H6DO)-46
Timing Chain Assembly
MECHANICAL
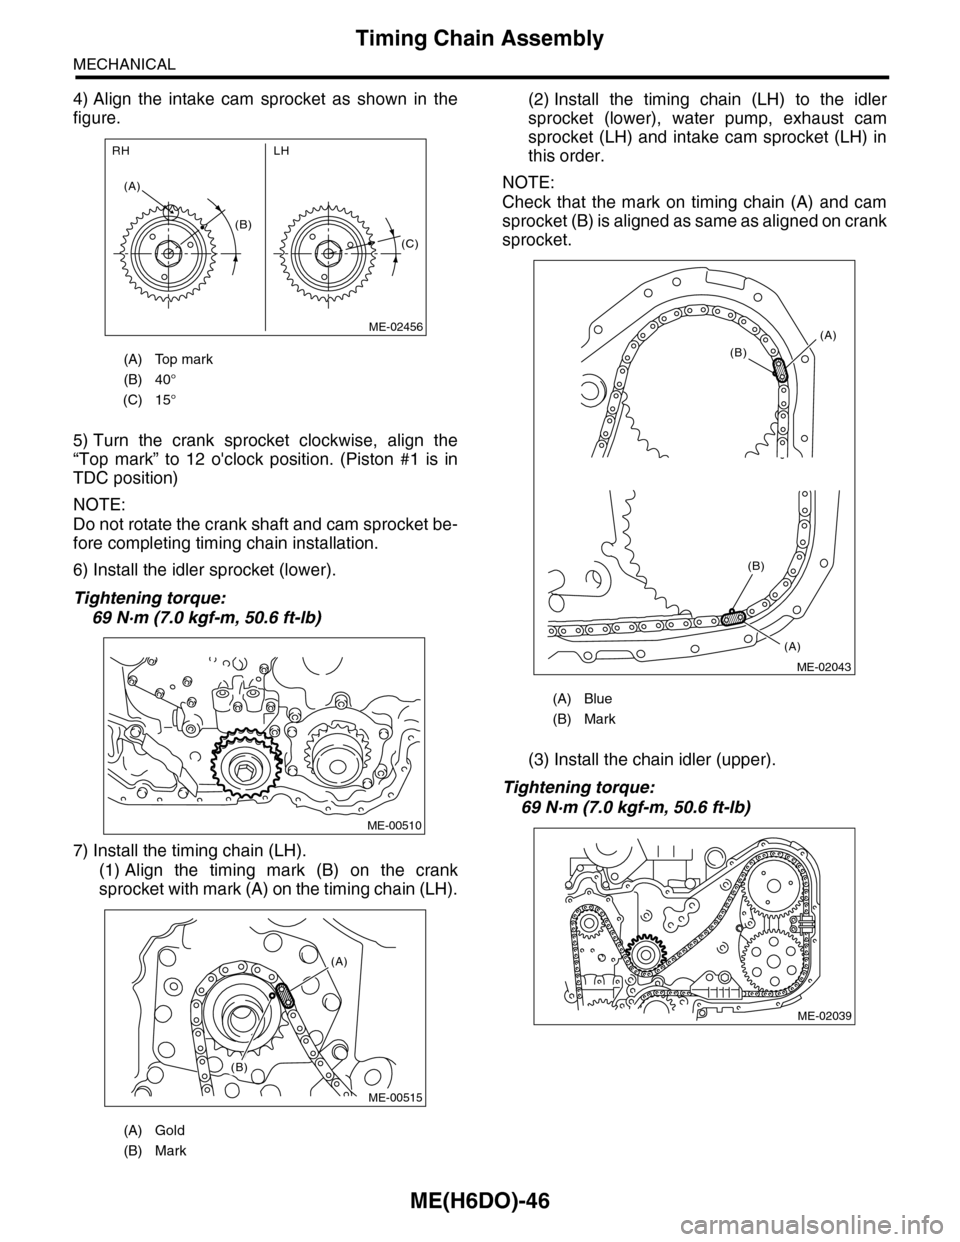
4) Align the intake cam sprocket as shown in the
figure.
5) Turn the crank sprocket clockwise, align the
“Top mark” to 12 o'clock position. (Piston #1 is in
TDC position)
NOTE:
Do not rotate the crank shaft and cam sprocket be-
fore completing timing chain installation.
6) Install the idler sprocket (lower).
Tightening torque:
69 N·m (7.0 kgf-m, 50.6 ft-lb)
7) Install the timing chain (LH).
(1) Align the timing mark (B) on the crank
sprocket with mark (A) on the timing chain (LH).
(2) Install the timing chain (LH) to the idler
sprocket (lower), water pump, exhaust cam
sprocket (LH) and intake cam sprocket (LH) in
this order.
NOTE:
Check that the mark on timing chain (A) and cam
sprocket (B) is aligned as same as aligned on crank
sprocket.
(3) Install the chain idler (upper).
Tightening torque:
69 N·m (7.0 kgf-m, 50.6 ft-lb)
(A) Top mark
(B) 40°
(C) 15°
(A) Gold
(B) Mark
(B)
(A)
LHRH
(C)
ME-02456
ME-00510
(A)
(B)
ME-00515
(A) Blue
(B) Mark
(A)
(B)
(A)
(B)
ME-02043
ME-02039
Page 1913 of 2453
ME(H6DO)-47
Timing Chain Assembly
MECHANICAL
(4) Install the chain guide (LH: between cams).
Tightening torque:
6.4 N·m (0.65 kgf-m, 4.7 ft-lb)
NOTE:
Use a new installing bolt.
(5) Install the chain guide (LH).
Tightening torque:
16 N·m (1.6 kgf-m, 12 ft-lb)
(6) Install the chain tensioner lever (LH).
Tightening torque:
16 N·m (1.6 kgf-m, 12 ft-lb)
(7) Install the chain tensioner (LH).
Tightening torque:
16 N·m (1.6 kgf-m, 12 ft-lb)
8) Install the timing chain (RH).
(1) Align the marks of timing chain LH and RH
on the idler sprocket (lower).
ME-02036
ME-02037
ME-02035
(A) Idler sprocket (lower)
(B) Timing chain (RH)
(C) Timing chain (LH)
(D) Blue
ME-02034
(A)(B)
(C)
(D)
ME-00518
Page 1914 of 2453
ME(H6DO)-48
Timing Chain Assembly
MECHANICAL
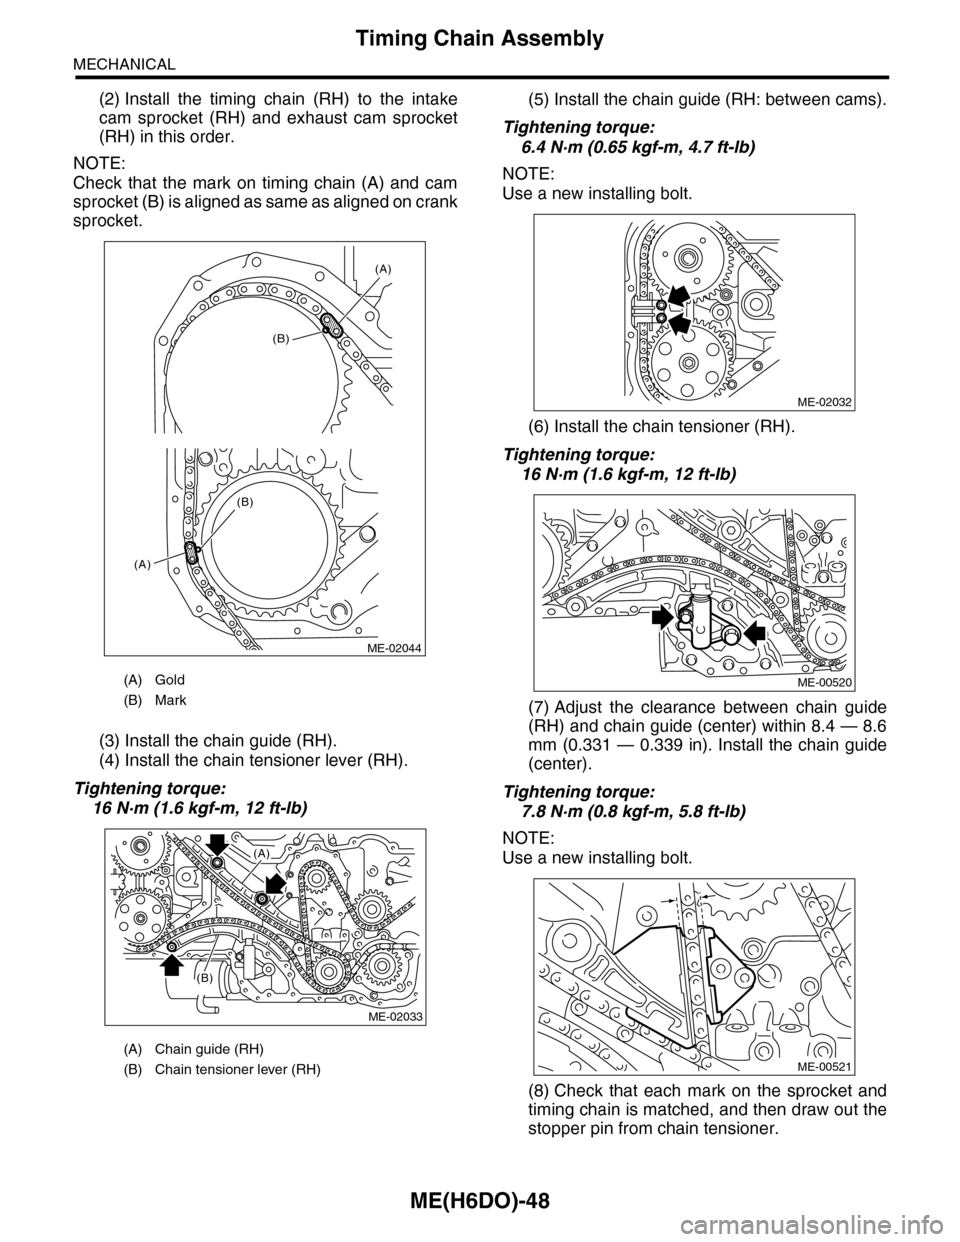
(2) Install the timing chain (RH) to the intake
cam sprocket (RH) and exhaust cam sprocket
(RH) in this order.
NOTE:
Check that the mark on timing chain (A) and cam
sprocket (B) is aligned as same as aligned on crank
sprocket.
(3) Install the chain guide (RH).
(4) Install the chain tensioner lever (RH).
Tightening torque:
16 N·m (1.6 kgf-m, 12 ft-lb)
(5) Install the chain guide (RH: between cams).
Tightening torque:
6.4 N·m (0.65 kgf-m, 4.7 ft-lb)
NOTE:
Use a new installing bolt.
(6) Install the chain tensioner (RH).
Tightening torque:
16 N·m (1.6 kgf-m, 12 ft-lb)
(7) Adjust the clearance between chain guide
(RH) and chain guide (center) within 8.4 — 8.6
mm (0.331 — 0.339 in). Install the chain guide
(center).
Tightening torque:
7.8 N·m (0.8 kgf-m, 5.8 ft-lb)
NOTE:
Use a new installing bolt.
(8) Check that each mark on the sprocket and
timing chain is matched, and then draw out the
stopper pin from chain tensioner.
(A) Gold
(B) Mark
(A) Chain guide (RH)
(B) Chain tensioner lever (RH)
(A)
(A)
(B)
(B)
ME-02044
ME-02033
(A)
(B)
ME-02032
ME-00520
ME-00521
Page 1915 of 2453
ME(H6DO)-49
Cam Sprocket
MECHANICAL
16.Cam Sprocket
A: REMOVAL
1) Remove the crank pulley.
41, REMOVAL, Crank Pulley.>
2) Remove the front chain cover.
ME(H6DO)-42, REMOVAL, Front Chain Cover.>
3) Remove the timing chain assembly.
Assembly.>
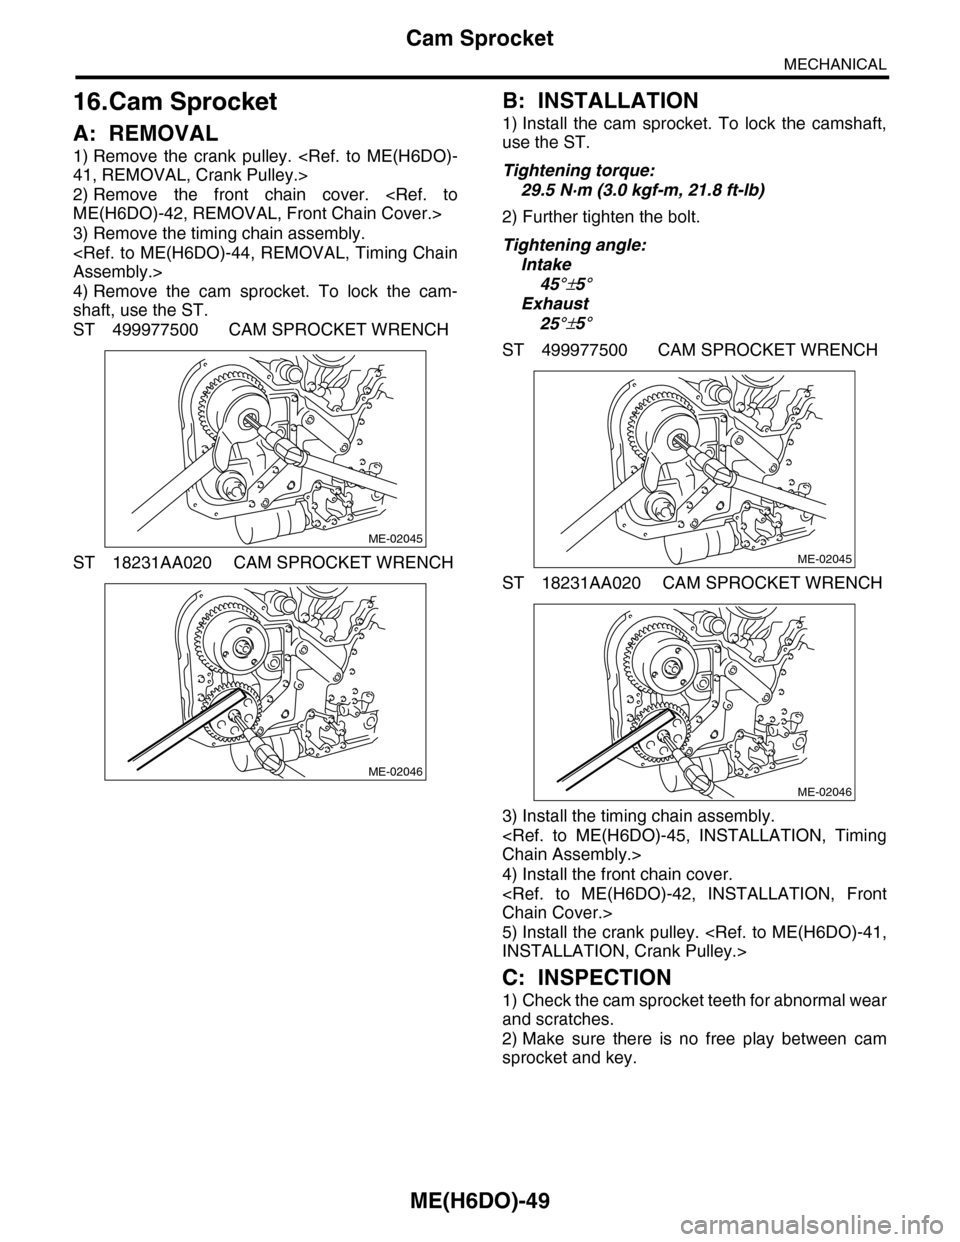
4) Remove the cam sprocket. To lock the cam-
shaft, use the ST.
ST 499977500 CAM SPROCKET WRENCH
ST 18231AA020 CAM SPROCKET WRENCH
B: INSTALLATION
1) Install the cam sprocket. To lock the camshaft,
use the ST.
Tightening torque:
29.5 N·m (3.0 kgf-m, 21.8 ft-lb)
2) Further tighten the bolt.
Tightening angle:
Intake
45°±5°
Exhaust
25°±5°
ST 499977500 CAM SPROCKET WRENCH
ST 18231AA020 CAM SPROCKET WRENCH
3) Install the timing chain assembly.
Chain Assembly.>
4) Install the front chain cover.
Chain Cover.>
5) Install the crank pulley.
INSTALLATION, Crank Pulley.>
C: INSPECTION
1) Check the cam sprocket teeth for abnormal wear
and scratches.
2) Make sure there is no free play between cam
sprocket and key.
ME-02045
ME-02046
ME-02045
ME-02046
Page 1918 of 2453
ME(H6DO)-52
Rear Chain Cover
MECHANICAL
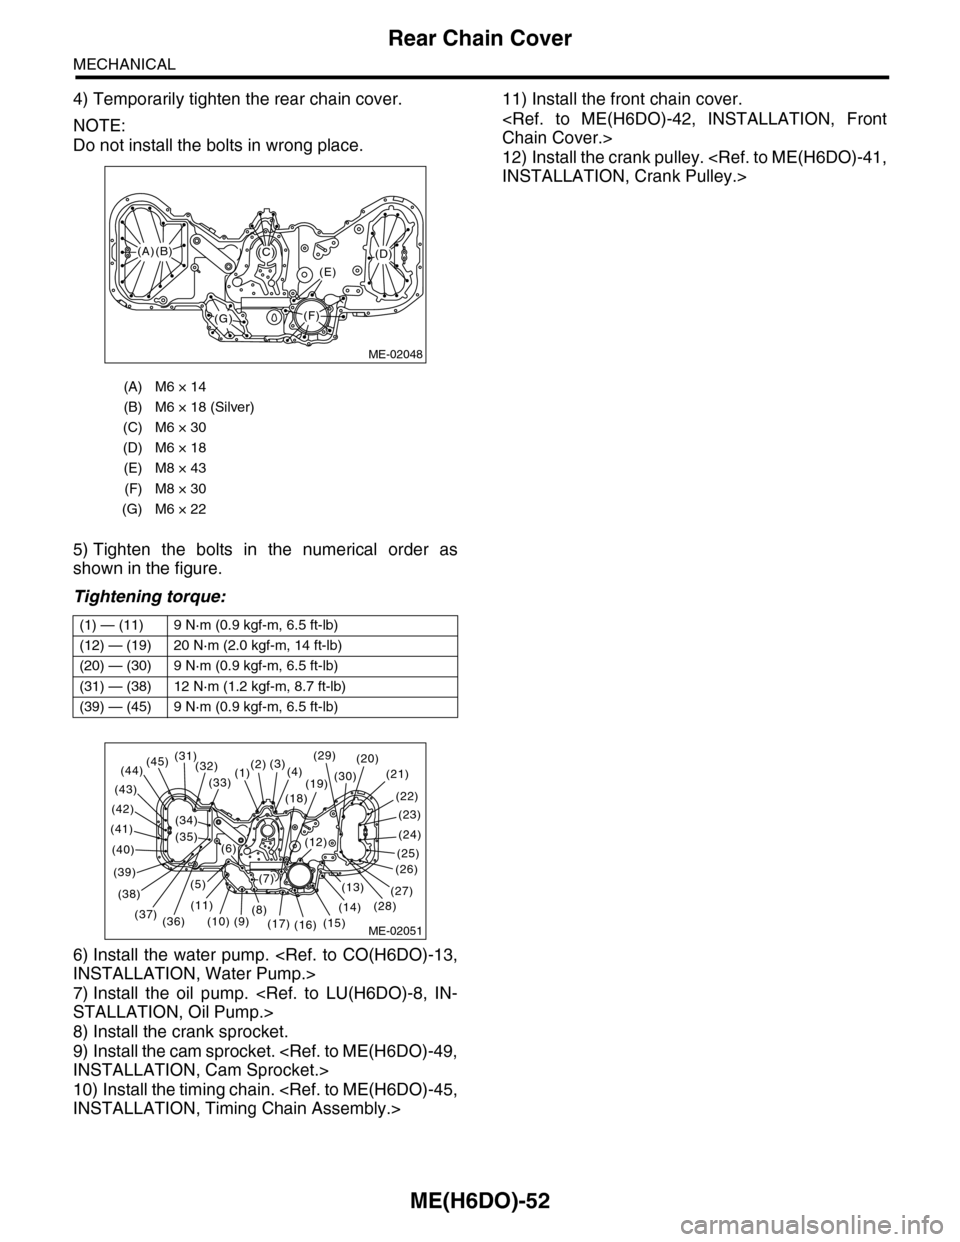
4) Temporarily tighten the rear chain cover.
NOTE:
Do not install the bolts in wrong place.
5) Tighten the bolts in the numerical order as
shown in the figure.
Tightening torque:
6) Install the water pump.
INSTALLATION, Water Pump.>
7) Install the oil pump.
STALLATION, Oil Pump.>
8) Install the crank sprocket.
9) Install the cam sprocket.
INSTALLATION, Cam Sprocket.>
10) Install the timing chain.
INSTALLATION, Timing Chain Assembly.>
11) Install the front chain cover.
Chain Cover.>
12) Install the crank pulley.
INSTALLATION, Crank Pulley.>
(A) M6 × 14
(B) M6 × 18 (Silver)
(C) M6 × 30
(D) M6 × 18
(E) M8 × 43
(F) M8 × 30
(G) M6 × 22
(1) — (11) 9 N·m (0.9 kgf-m, 6.5 ft-lb)
(12) — (19) 20 N·m (2.0 kgf-m, 14 ft-lb)
(20) — (30) 9 N·m (0.9 kgf-m, 6.5 ft-lb)
(31) — (38) 12 N·m (1.2 kgf-m, 8.7 ft-lb)
(39) — (45) 9 N·m (0.9 kgf-m, 6.5 ft-lb)
ME-02048
(F)
(C)(D)
(E)
(G)
(A)(B)
ME-02051(15)
(14)
(26)
(27)(13)
(25)
(24)
(23)
(22)
(21)(20)
(16)(17)
(12)
(19)(30)
(18)
(4)(3)(2)(1)(33)
(8)(9)(10)
(11)
(32)(31)(45)(44)
(43)
(42)
(41)
(40)
(39)
(38)
(37)(36)
(5)
(6)
(7)
(29)
(28)
(35)
(34)
Page 1920 of 2453
ME(H6DO)-54
Camshaft
MECHANICAL
B: INSTALLATION
1) Apply engine oil to camshaft journals, and install
the camshaft.
2) Install the camshaft cap.
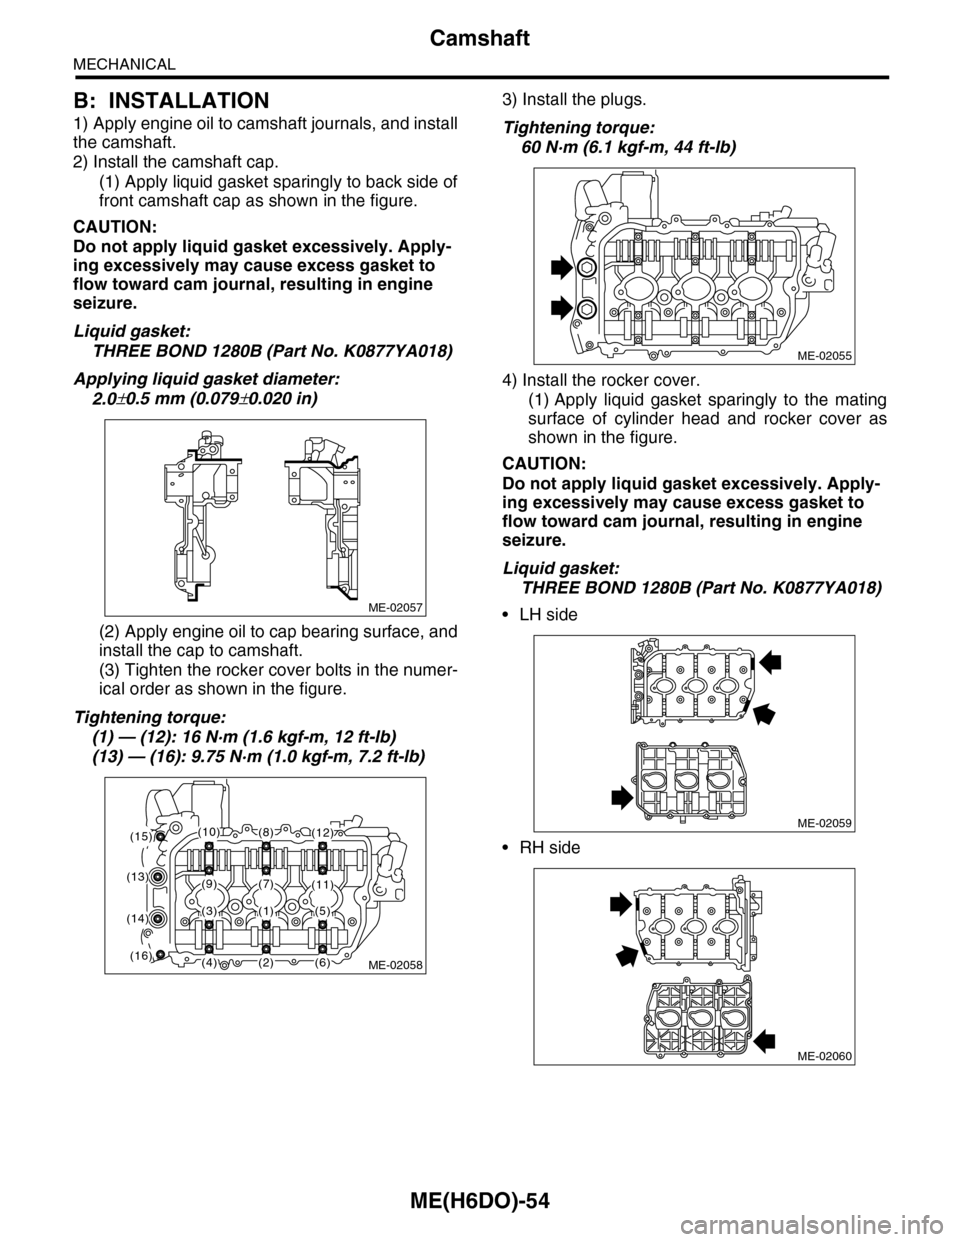
(1) Apply liquid gasket sparingly to back side of
front camshaft cap as shown in the figure.
CAUTION:
Do not apply liquid gasket excessively. Apply-
ing excessively may cause excess gasket to
flow toward cam journal, resulting in engine
seizure.
Liquid gasket:
THREE BOND 1280B (Part No. K0877YA018)
Applying liquid gasket diameter:
2.0±0.5 mm (0.079±0.020 in)
(2) Apply engine oil to cap bearing surface, and
install the cap to camshaft.
(3) Tighten the rocker cover bolts in the numer-
ical order as shown in the figure.
Tightening torque:
(1) — (12): 16 N·m (1.6 kgf-m, 12 ft-lb)
(13) — (16): 9.75 N·m (1.0 kgf-m, 7.2 ft-lb)
3) Install the plugs.
Tightening torque:
60 N·m (6.1 kgf-m, 44 ft-lb)
4) Install the rocker cover.
(1) Apply liquid gasket sparingly to the mating
surface of cylinder head and rocker cover as
shown in the figure.
CAUTION:
Do not apply liquid gasket excessively. Apply-
ing excessively may cause excess gasket to
flow toward cam journal, resulting in engine
seizure.
Liquid gasket:
THREE BOND 1280B (Part No. K0877YA018)
•LH side
•RH side
ME-02057
ME-02058
(1)
(2)
(8)
(7)(9)
(3)
(4)
(5)
(6)
(10)
(11)(13)
(14)
(15)
(16)
(12)
ME-02055
ME-02059
ME-02060
Page 1921 of 2453
ME(H6DO)-55
Camshaft
MECHANICAL
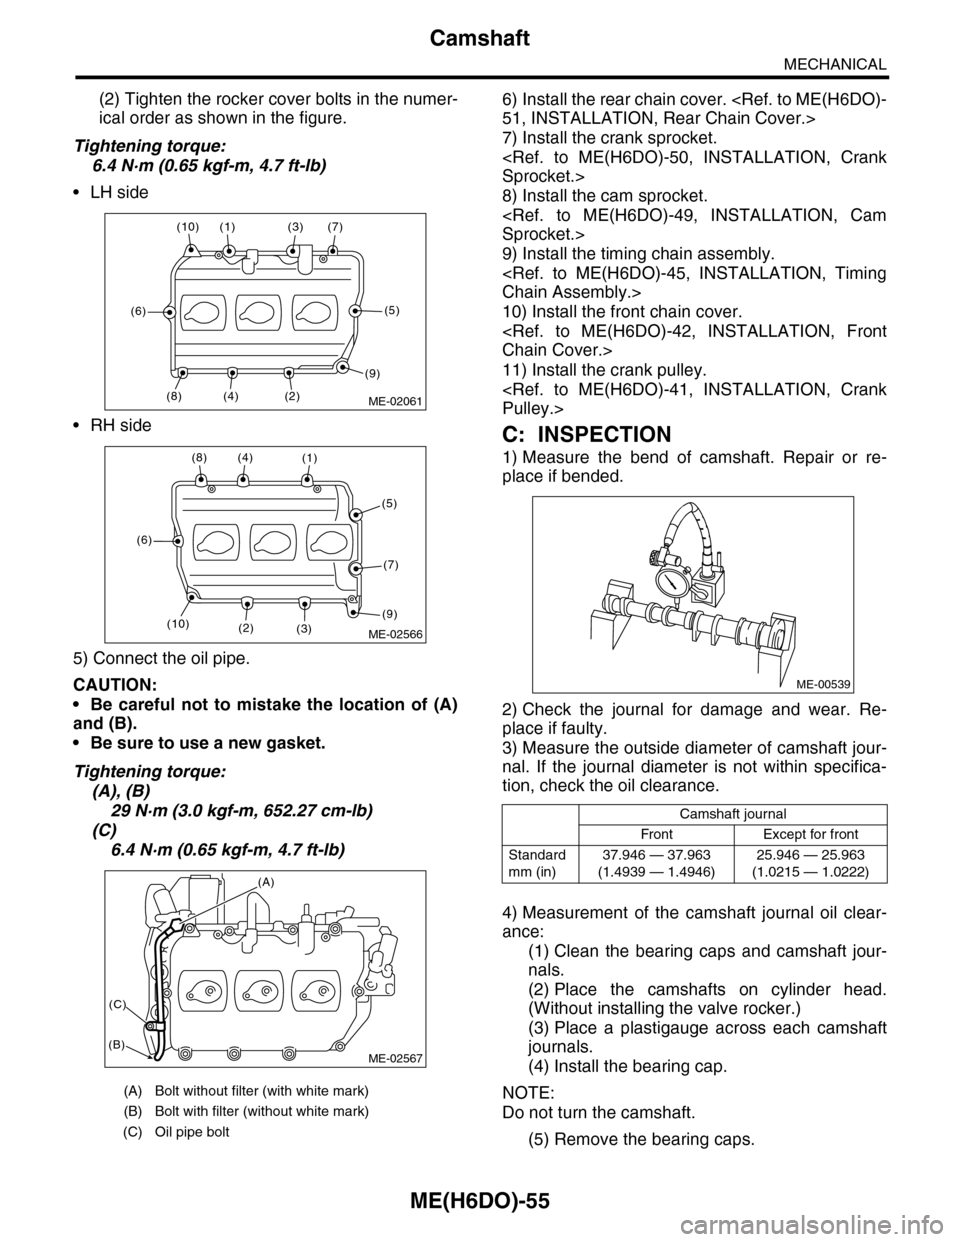
(2) Tighten the rocker cover bolts in the numer-
ical order as shown in the figure.
Tightening torque:
6.4 N·m (0.65 kgf-m, 4.7 ft-lb)
•LH side
•RH side
5) Connect the oil pipe.
CAUTION:
•Be careful not to mistake the location of (A)
and (B).
•Be sure to use a new gasket.
Tightening torque:
(A), (B)
29 N·m (3.0 kgf-m, 652.27 cm-lb)
(C)
6.4 N·m (0.65 kgf-m, 4.7 ft-lb)
6) Install the rear chain cover.
51, INSTALLATION, Rear Chain Cover.>
7) Install the crank sprocket.
Sprocket.>
8) Install the cam sprocket.
Sprocket.>
9) Install the timing chain assembly.
Chain Assembly.>
10) Install the front chain cover.
Chain Cover.>
11) Install the crank pulley.
Pulley.>
C: INSPECTION
1) Measure the bend of camshaft. Repair or re-
place if bended.
2) Check the journal for damage and wear. Re-
place if faulty.
3) Measure the outside diameter of camshaft jour-
nal. If the journal diameter is not within specifica-
tion, check the oil clearance.
4) Measurement of the camshaft journal oil clear-
ance:
(1) Clean the bearing caps and camshaft jour-
nals.
(2) Place the camshafts on cylinder head.
(Without installing the valve rocker.)
(3) Place a plastigauge across each camshaft
journals.
(4) Install the bearing cap.
NOTE:
Do not turn the camshaft.
(5) Remove the bearing caps.
(A) Bolt without filter (with white mark)
(B) Bolt with filter (without white mark)
(C) Oil pipe bolt
ME-02061(2)
(7)(3)(1)(10)
(6)
(8)(4)
(5)
(9)
ME-02566
(8)(4)(1)
(5)
(7)
(9)(3)(2)
(6)
(10)
ME-02567
(A)
(C)
(B)
Camshaft journal
Front Except for front
Standard
mm (in)
37.946 — 37.963
(1.4939 — 1.4946)
25.946 — 25.963
(1.0215 — 1.0222)
ME-00539