Page 1853 of 2453
LU(H6DO)-4
General Description
LUBRICATION
C: CAUTION
•Wear work clothing, including a cap, protective goggles and protective shoes during operation.
•Remove contamination including dirt and corrosion before removal, installation or disassembly.
•Keep the disassembled parts in order and protect them from dust and dirt.
•Before removal, installation or disassembly, be sure to clarify the failure. Avoid unnecessary removal, in-
stallation, disassembly and replacement.
•Be careful not to burn yourself, because each part on the vehicle is hot after running.
•Be sure to tighten fasteners including bolts and nuts to the specified torque.
•Place shop jacks or rigid racks at the specified points.
•Before disconnecting connectors of sensors or units, be sure to disconnect the ground cable from battery.
D: PREPARATION TOOL
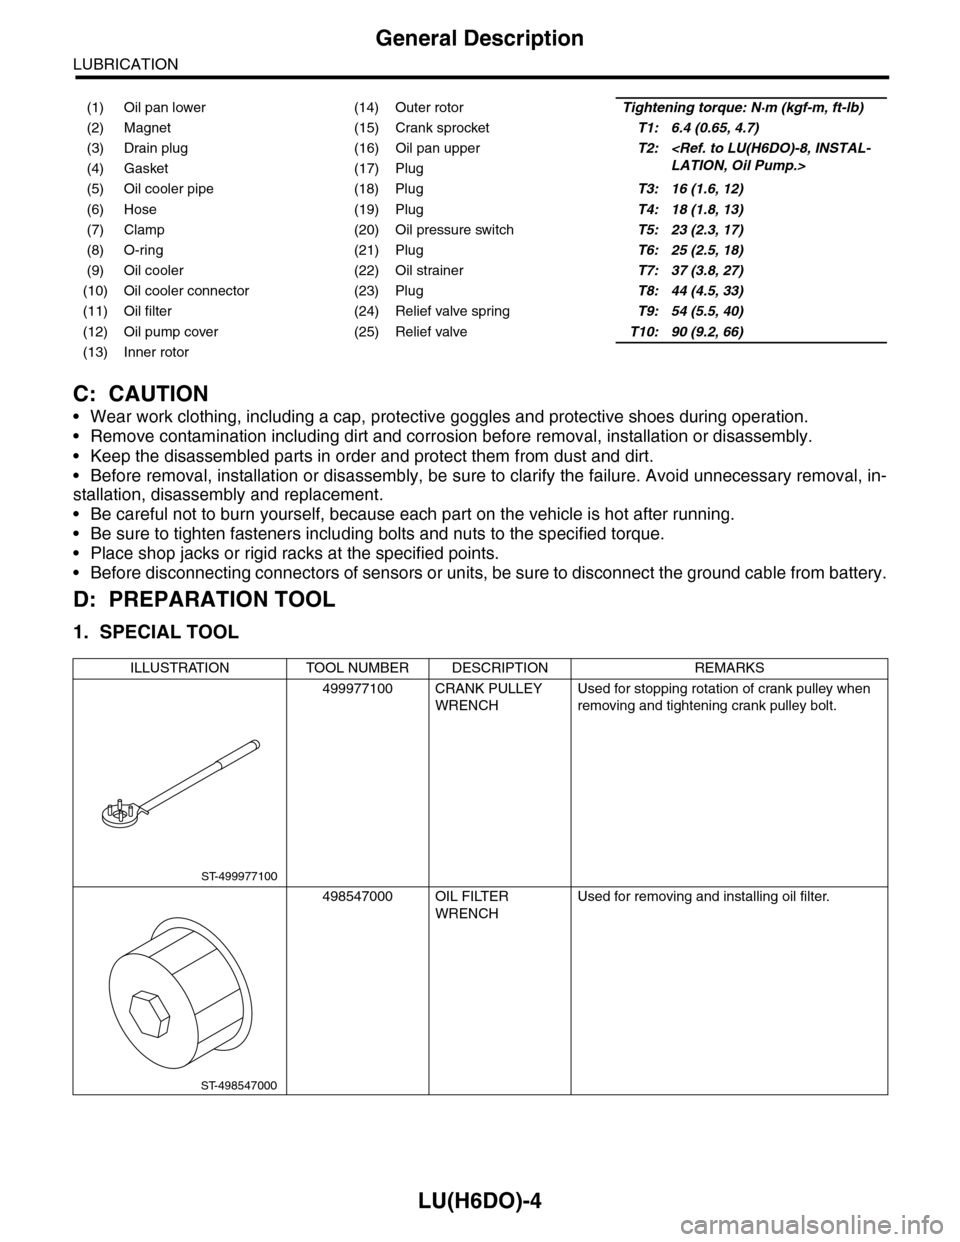
1. SPECIAL TOOL
(1) Oil pan lower (14) Outer rotorTightening torque: N·m (kgf-m, ft-lb)
(2) Magnet (15) Crank sprocketT1: 6.4 (0.65, 4.7)
(3) Drain plug (16) Oil pan upperT2:
LATION, Oil Pump.>(4) Gasket (17) Plug
(5) Oil cooler pipe (18) PlugT3: 16 (1.6, 12)
(6) Hose (19) PlugT4: 18 (1.8, 13)
(7) Clamp (20) Oil pressure switchT5: 23 (2.3, 17)
(8) O-ring (21) PlugT6: 25 (2.5, 18)
(9) Oil cooler (22) Oil strainerT7: 37 (3.8, 27)
(10) Oil cooler connector (23) PlugT8: 44 (4.5, 33)
(11) Oil filter (24) Relief valve springT9: 54 (5.5, 40)
(12) Oil pump cover (25) Relief valveT10: 90 (9.2, 66)
(13) Inner rotor
ILLUSTRATION TOOL NUMBER DESCRIPTION REMARKS
499977100 CRANK PULLEY
WRENCH
Used for stopping rotation of crank pulley when
removing and tightening crank pulley bolt.
498547000 OIL FILTER
WRENCH
Used for removing and installing oil filter.
ST-499977100
ST-498547000
Page 1856 of 2453
LU(H6DO)-7
Engine Oil
LUBRICATION
3. Engine Oil
A: INSPECTION
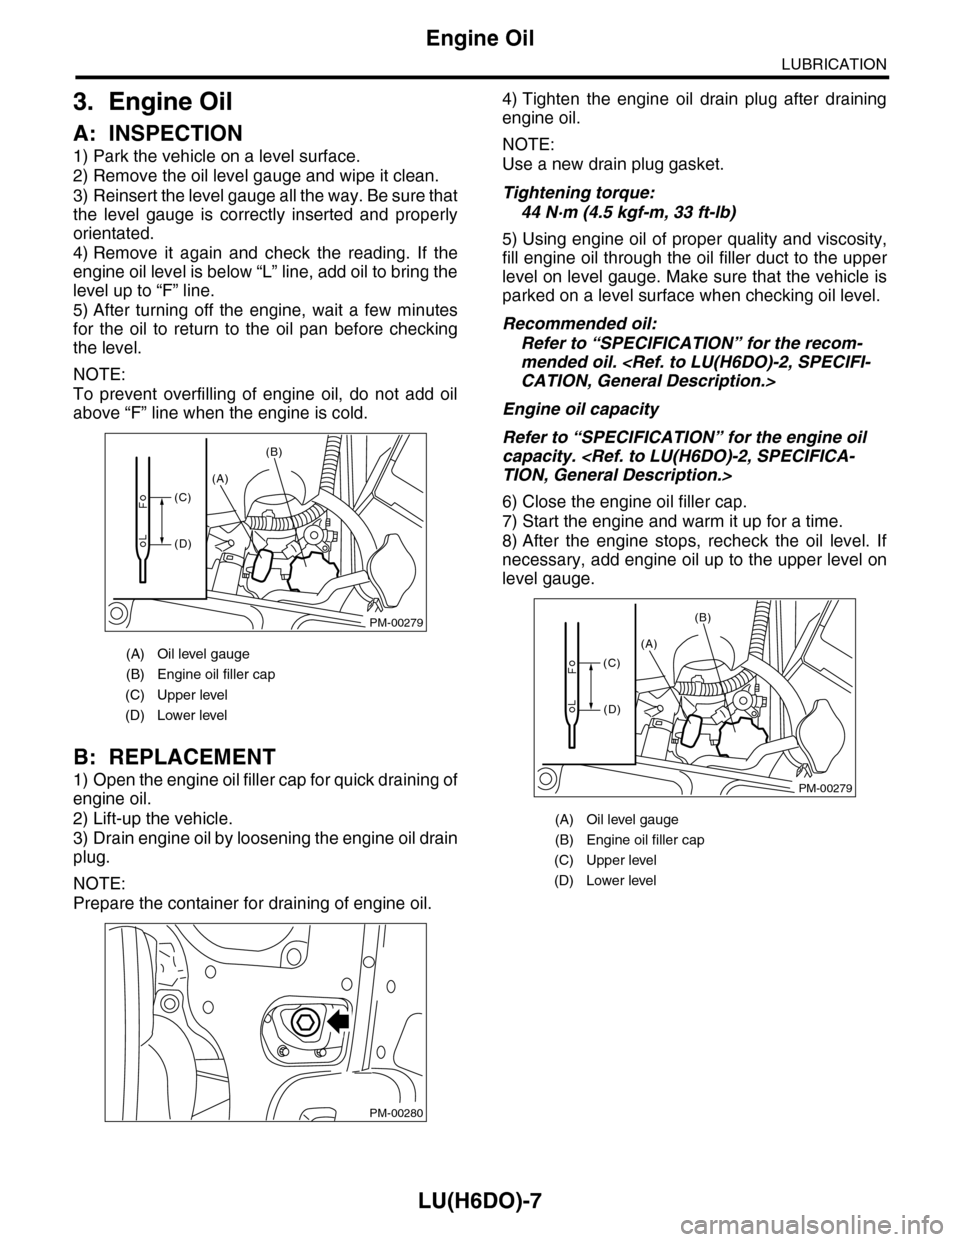
1) Park the vehicle on a level surface.
2) Remove the oil level gauge and wipe it clean.
3) Reinsert the level gauge all the way. Be sure that
the level gauge is correctly inserted and properly
orientated.
4) Remove it again and check the reading. If the
engine oil level is below “L” line, add oil to bring the
level up to “F” line.
5) After turning off the engine, wait a few minutes
for the oil to return to the oil pan before checking
the level.
NOTE:
To prevent overfilling of engine oil, do not add oil
above “F” line when the engine is cold.
B: REPLACEMENT
1) Open the engine oil filler cap for quick draining of
engine oil.
2) Lift-up the vehicle.
3) Drain engine oil by loosening the engine oil drain
plug.
NOTE:
Prepare the container for draining of engine oil.
4) Tighten the engine oil drain plug after draining
engine oil.
NOTE:
Use a new drain plug gasket.
Tightening torque:
44 N·m (4.5 kgf-m, 33 ft-lb)
5) Using engine oil of proper quality and viscosity,
fill engine oil through the oil filler duct to the upper
level on level gauge. Make sure that the vehicle is
parked on a level surface when checking oil level.
Recommended oil:
Refer to “SPECIFICATION” for the recom-
mended oil.
CATION, General Description.>
Engine oil capacity
Refer to “SPECIFICATION” for the engine oil
capacity.
TION, General Description.>
6) Close the engine oil filler cap.
7) Start the engine and warm it up for a time.
8) After the engine stops, recheck the oil level. If
necessary, add engine oil up to the upper level on
level gauge.
(A) Oil level gauge
(B) Engine oil filler cap
(C) Upper level
(D) Lower level
PM-00279
(A)
(B)
(C)
(D)
PM-00280
(A) Oil level gauge
(B) Engine oil filler cap
(C) Upper level
(D) Lower level
PM-00279
(A)
(B)
(C)
(D)
Page 1857 of 2453
LU(H6DO)-8
Oil Pump
LUBRICATION
4. Oil Pump
A: REMOVAL
1) Remove the collector cover.
2) Disconnect the ground cable from battery.
3) Lift-up the vehicle.
4) Remove the under cover.
5) Drain engine coolant.
DRAINING OF ENGINE COOLANT, REPLACE-
MENT, Engine Coolant.>
6) Lower the vehicle.
7) Remove the radiator.
REMOVAL, Radiator.>
8) Remove the V-belts.
REMOVAL, V-belt.>
9) Remove the front chain cover.
ME(H6DO)-42, REMOVAL, Front Chain Cover.>
10) Remove the timing chain.
44, REMOVAL, Timing Chain Assembly.>
11) Remove the crank sprocket.
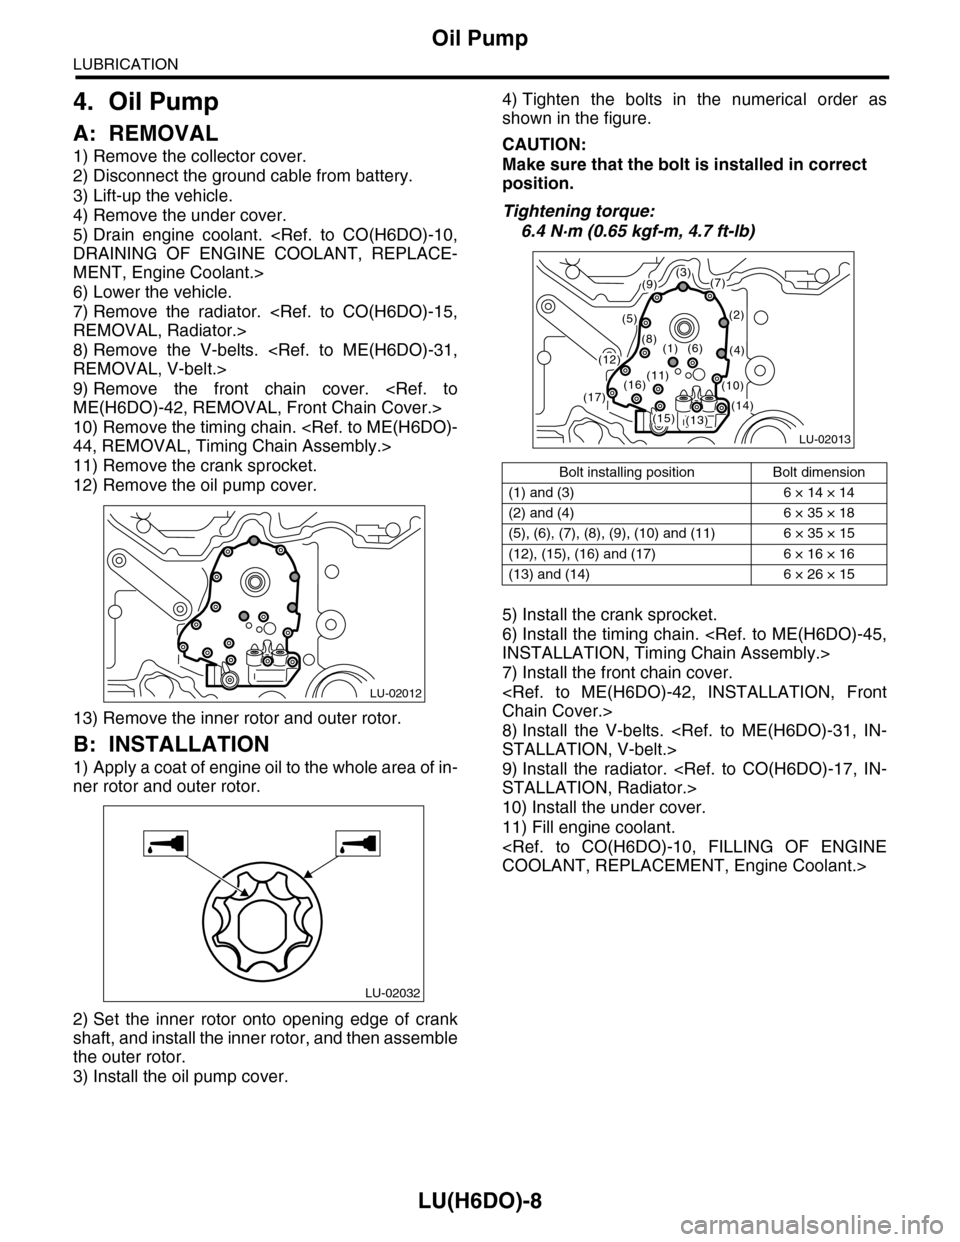
12) Remove the oil pump cover.
13) Remove the inner rotor and outer rotor.
B: INSTALLATION
1) Apply a coat of engine oil to the whole area of in-
ner rotor and outer rotor.
2) Set the inner rotor onto opening edge of crank
shaft, and install the inner rotor, and then assemble
the outer rotor.
3) Install the oil pump cover.
4) Tighten the bolts in the numerical order as
shown in the figure.
CAUTION:
Make sure that the bolt is installed in correct
position.
Tightening torque:
6.4 N·m (0.65 kgf-m, 4.7 ft-lb)
5) Install the crank sprocket.
6) Install the timing chain.
INSTALLATION, Timing Chain Assembly.>
7) Install the front chain cover.
Chain Cover.>
8) Install the V-belts.
STALLATION, V-belt.>
9) Install the radiator.
STALLATION, Radiator.>
10) Install the under cover.
11) Fill engine coolant.
COOLANT, REPLACEMENT, Engine Coolant.>
LU-02012
LU-02032
Bolt installing position Bolt dimension
(1) and (3) 6 × 14 × 14
(2) and (4) 6 × 35 × 18
(5), (6), (7), (8), (9), (10) and (11) 6 × 35 × 15
(12), (15), (16) and (17) 6 × 16 × 16
(13) and (14) 6 × 26 × 15
LU-02013
(3)(7)
(2)
(4)
(9)
(5)
(8)(1)(6)(12)
(13)(14)(15)
(16)(17)
(11)(10)
Page 1859 of 2453
LU(H6DO)-10
Oil Pump Relief Valve
LUBRICATION
5. Oil Pump Relief Valve
A: REMOVAL
1. REAR CHAIN COVER SIDE
Oil pump relief valve is integrated into oil pump cov-
er as one unit; therefore, refer to “Oil Pump” for re-
moval procedure.
REMOVAL, Oil Pump.>
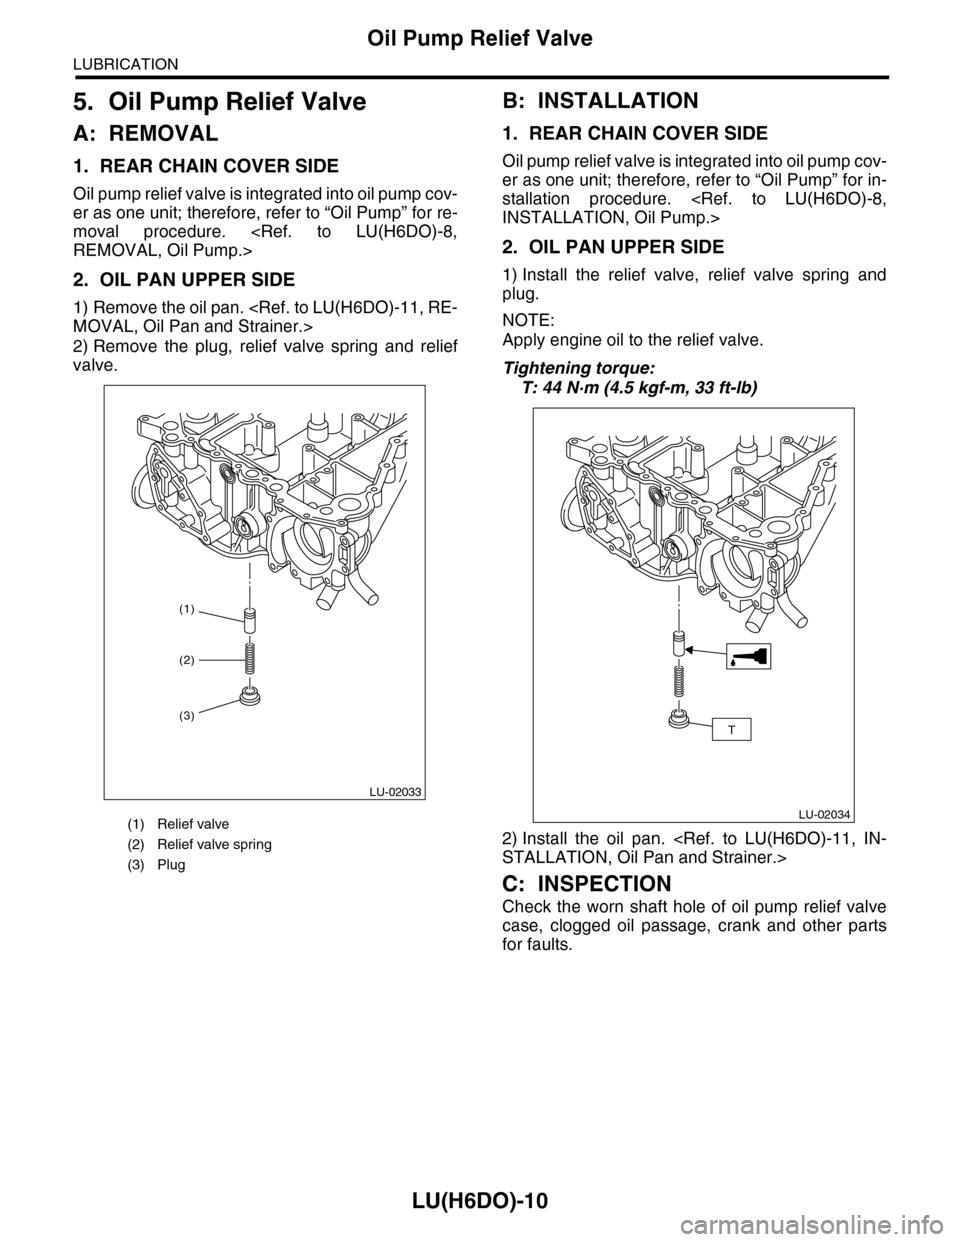
2. OIL PAN UPPER SIDE
1) Remove the oil pan.
MOVAL, Oil Pan and Strainer.>
2) Remove the plug, relief valve spring and relief
valve.
B: INSTALLATION
1. REAR CHAIN COVER SIDE
Oil pump relief valve is integrated into oil pump cov-
er as one unit; therefore, refer to “Oil Pump” for in-
stallation procedure.
INSTALLATION, Oil Pump.>
2. OIL PAN UPPER SIDE
1) Install the relief valve, relief valve spring and
plug.
NOTE:
Apply engine oil to the relief valve.
Tightening torque:
T: 44 N·m (4.5 kgf-m, 33 ft-lb)
2) Install the oil pan.
STALLATION, Oil Pan and Strainer.>
C: INSPECTION
Check the worn shaft hole of oil pump relief valve
case, clogged oil passage, crank and other parts
for faults.
(1) Relief valve
(2) Relief valve spring
(3) Plug
(1)
LU-02033
(2)
(3)
LU-02034
T
Page 1860 of 2453
LU(H6DO)-11
Oil Pan and Strainer
LUBRICATION
6. Oil Pan and Strainer
A: REMOVAL
NOTE:
Before removing the oil pan upper, remove the en-
gine from vehicle.
MOVAL, Engine Assembly.>
62, REMOVAL, Cylinder Block.>
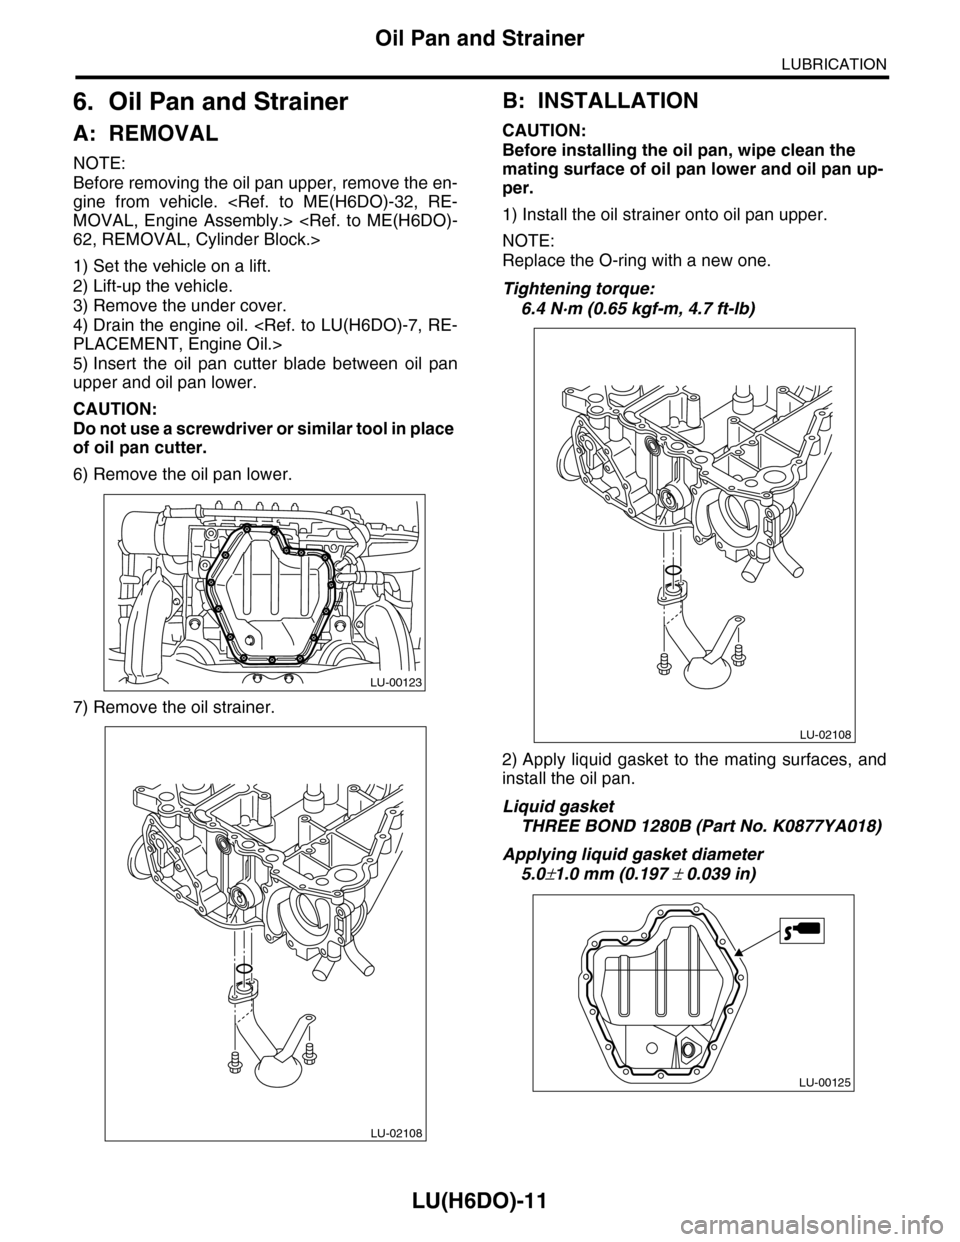
1) Set the vehicle on a lift.
2) Lift-up the vehicle.
3) Remove the under cover.
4) Drain the engine oil.
PLACEMENT, Engine Oil.>
5) Insert the oil pan cutter blade between oil pan
upper and oil pan lower.
CAUTION:
Do not use a screwdriver or similar tool in place
of oil pan cutter.
6) Remove the oil pan lower.
7) Remove the oil strainer.
B: INSTALLATION
CAUTION:
Before installing the oil pan, wipe clean the
mating surface of oil pan lower and oil pan up-
per.
1) Install the oil strainer onto oil pan upper.
NOTE:
Replace the O-ring with a new one.
Tightening torque:
6.4 N·m (0.65 kgf-m, 4.7 ft-lb)
2) Apply liquid gasket to the mating surfaces, and
install the oil pan.
Liquid gasket
THREE BOND 1280B (Part No. K0877YA018)
Applying liquid gasket diameter
5.0±1.0 mm (0.197 ± 0.039 in)
LU-00123
LU-02108
LU-02108
LU-00125
Page 1861 of 2453
LU(H6DO)-12
Oil Pan and Strainer
LUBRICATION
3) Tighten the oil pan lower installing bolts in the
numerical order as shown in the figure.
Tightening torque:
6.4 N·m (0.65 kgf-m, 4.7 ft-lb)
4) Install the under cover.
5) Refill the engine oil.
SPECTION, Engine Oil.>
C: INSPECTION
Visually check that the oil pan, oil strainer and oil
strainer stay are not damaged.
(1)(2)
(3)
(4)
(5)
(6)
(7)(8)(9)
(10)
(11)
(12)
(13)
(14)
(15)
LU-00126
Page 1862 of 2453
LU(H6DO)-13
Oil Pressure Switch
LUBRICATION
7. Oil Pressure Switch
A: REMOVAL
1) Set the vehicle on a lift.
2) Disconnect the ground cable from battery.
3) Lift-up the vehicle.
4) Remove the under cover.
5) Disconnect the terminal from oil pressure switch.
6) Remove the oil pressure switch.
B: INSTALLATION
1) Apply liquid gasket to the oil pressure switch
threads.
Liquid gasket
THREE BOND 1324 (Part No. 004403042) or
equivalent
2) Install the oil pressure switch.
Tightening torque:
25 N·m (2.5 kgf-m, 18 ft-lb)
3) Connect the terminal of the oil pressure switch.
4) Install the under cover.
C: INSPECTION
Make sure oil does not leak or seep from where the
oil pressure switch is installed.
LU-00127
LU-00128
LU-00129
LU-00128
LU-00127
Page 1863 of 2453
LU(H6DO)-14
Engine Oil Filter
LUBRICATION
8. Engine Oil Filter
A: REMOVAL
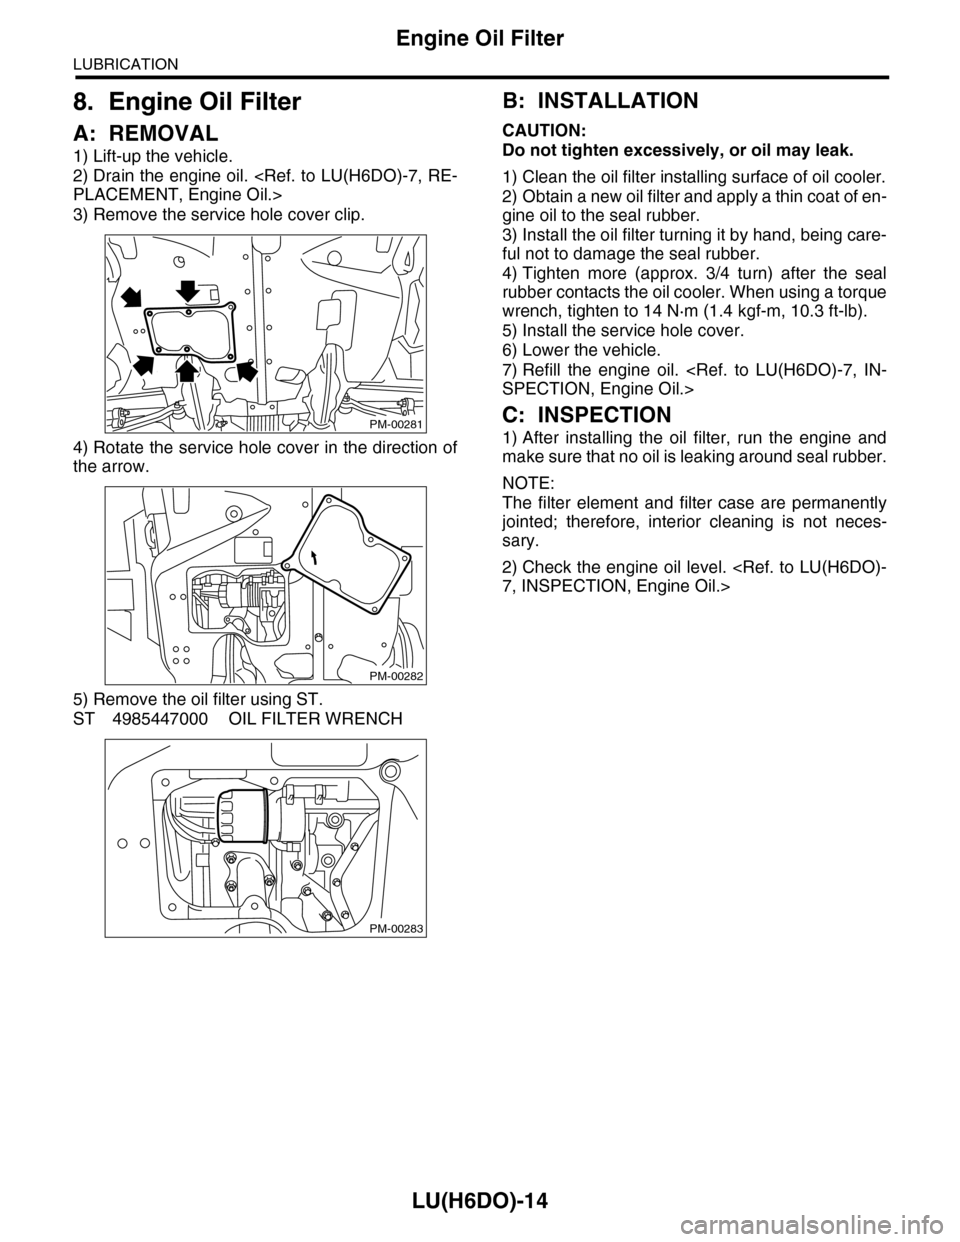
1) Lift-up the vehicle.
2) Drain the engine oil.
PLACEMENT, Engine Oil.>
3) Remove the service hole cover clip.
4) Rotate the service hole cover in the direction of
the arrow.
5) Remove the oil filter using ST.
ST 4985447000 OIL FILTER WRENCH
B: INSTALLATION
CAUTION:
Do not tighten excessively, or oil may leak.
1) Clean the oil filter installing surface of oil cooler.
2) Obtain a new oil filter and apply a thin coat of en-
gine oil to the seal rubber.
3) Install the oil filter turning it by hand, being care-
ful not to damage the seal rubber.
4) Tighten more (approx. 3/4 turn) after the seal
rubber contacts the oil cooler. When using a torque
wrench, tighten to 14 N·m (1.4 kgf-m, 10.3 ft-lb).
5) Install the service hole cover.
6) Lower the vehicle.
7) Refill the engine oil.
SPECTION, Engine Oil.>
C: INSPECTION
1) After installing the oil filter, run the engine and
make sure that no oil is leaking around seal rubber.
NOTE:
The filter element and filter case are permanently
jointed; therefore, interior cleaning is not neces-
sary.
2) Check the engine oil level.
7, INSPECTION, Engine Oil.>
PM-00281
PM-00282
PM-00283