2008 NISSAN TEANA sensor
[x] Cancel search: sensorPage 2511 of 5121

GI-18
< HOW TO USE THIS MANUAL >
TERMINOLOGY
Exhaust gas recirculation control-BPT
valveEGRC-BPT valve BPT valve
Exhaust gas recirculation control-solenoid
valveEGRC-solenoid valve EGR control solenoid valve
Exhaust gas recirculation temperature sen-
sor
EGRT sensor Exhaust gas temperature sensor
EGR temperature sensor
Flash electrically erasable programmable
read only memoryFEEPROM ***
Flash erasable programmable read only
memoryFEPROM ***
Flexible fuel sensor FFS ***
Flexible fuel system FF system ***
Fuel pressure regulator *** Pressure regulator
Fuel pressure regulator control solenoid
valve*** PRVR control solenoid valve
Fuel trim FT ***
Heated Oxygen sensor HO2S Exhaust gas sensor
Idle air control system IAC system Idle speed control
Idle air control valve-air regulator IACV-air regulator Air regulator
Idle air control valve-auxiliary air control
valveIACV-AAC valve Auxiliary air control (AAC) valve
Idle air control valve-FICD solenoid valve IACV-FICD solenoid valve FICD solenoid valve
Idle air control valve-idle up control sole-
noid valveIACV-idle up control solenoid valve Idle up control solenoid valve
Idle speed control-FI pot ISC-FI pot FI pot
Idle speed control system ISC system ***
Ignition control IC ***
Ignition control module ICM ***
Indirect fuel injection system IFI system ***
Intake air IA Air
Intake air temperature sensor IAT sensor Air temperature sensor
Knock *** Detonation
Knock sensor KS Detonation sensor
Malfunction indicator lamp MIL Check engine light
Manifold absolute pressure MAP ***
Manifold absolute pressure sensor MAPS ***
Manifold differential pressure MDP ***
Manifold differential pressure sensor MDPS ***
Manifold surface temperature MST ***
Manifold surface temperature sensor MSTS ***
Manifold vacuum zone MVZ ***
Manifold vacuum zone sensor MVZS ***
Mass air flow sensor MAFS Air flow meter
Mixture control solenoid valve MC solenoid valve Air-fuel ratio control solenoid valve
Multiport fuel injection system MFI system Fuel injection controlNEW TERMNEW ACRONYM /
ABBREVIATIONOLD TERM
Page 2512 of 5121

TERMINOLOGY
GI-19
< HOW TO USE THIS MANUAL >
C
D
E
F
G
H
I
J
K
L
MB
GI
N
O
P
Nonvolatile random access memory NVRAM ***
On board diagnostic system OBD system Self-diagnosis
Open loop OL Open loop
Oxidation catalyst OC Catalyst
Oxidation catalytic converter system OC system ***
Oxygen sensor O2S Exhaust gas sensor
Park position switch *** Park switch
Park/neutral position switch PNP switchPark/neutral switch
Inhibitor switch
Neutral position switch
Periodic trap oxidizer system PTOX system ***
Positive crankcase ventilation PCV Positive crankcase ventilation
Positive crankcase ventilation valve PCV valve PCV valve
Powertrain control module PCM ***
Programmable read only memory PROM ***
Pulsed secondary air injection control sole-
noid valvePAIRC solenoid valve AIV control solenoid valve
Pulsed secondary air injection system PAIR system Air induction valve (AIV) control
Pulsed secondary air injection valve PAIR valve Air induction valve
Random access memory RAM ***
Read only memory ROM ***
Scan tool ST ***
Secondary air injection pump AIR pump ***
Secondary air injection system AIR system ***
Sequential multiport fuel injection system SFI system Sequential fuel injection
Service reminder indicator SRI ***
Simultaneous multiport fuel injection sys-
tem*** Simultaneous fuel injection
Smoke puff limiter system SPL system ***
Supercharger SC ***
Supercharger bypass SCB ***
System readiness test SRT ***
Thermal vacuum valve TVV Thermal vacuum valve
Three way catalyst TWC Catalyst
Three way catalytic converter system TWC system ***
Three way + oxidation catalyst TWC + OC Catalyst
Three way + oxidation catalytic converter
systemTWC + OC system ***
Throttle body TBThrottle chamber
SPI body
Throttle body fuel injection system TBI system Fuel injection control
Throttle position TP Throttle position
Throttle position sensor TPS Throttle sensor
Throttle position switch TP switch Throttle switch
Torque converter clutch solenoid valve TCC solenoid valveLock-up cancel solenoid
Lock-up solenoid NEW TERMNEW ACRONYM /
ABBREVIATIONOLD TERM
Page 2513 of 5121

GI-20
< HOW TO USE THIS MANUAL >
TERMINOLOGY
***: Not applicableTransmission control module TCM A/T control unit
Turbocharger TC Turbocharger
Vehicle speed sensor VSS Vehicle speed sensor
Volume air flow sensor VAFS Air flow meter
Warm up oxidation catalyst WU-OC Catalyst
Warm up oxidation catalytic converter sys-
temWU-OC system ***
Warm up three way catalyst WU-TWC Catalyst
Warm up three way catalytic converter sys-
temWU-TWC system ***
Wide open throttle position switch WOTP switch Full switchNEW TERMNEW ACRONYM /
ABBREVIATIONOLD TERM
Page 2520 of 5121

PRECAUTIONS
GI-27
< PRECAUTION >
C
D
E
F
G
H
I
J
K
L
MB
GI
N
O
P
system. The connectors should be disconnected only when working according to the WORK FLOW of
TROUBLE DIAGNOSES in EC and AT sections.
Three Way CatalystINFOID:0000000003852782
If a large amount of unburned fuel flows into the catalyst, the catalyst temperature will be excessively high. To
prevent this, follow the instructions.
Use unleaded gasoline only. Leaded gasoline will seriously damage the three way catalyst.
When checking for ignition spark or measuring engine compression, make tests quickly and only when nec-
essary.
Do not run engine when the fuel tank level is low, otherwise the engine may misfire, causing damage to the
catalyst.
Do not place the vehicle on flammable material. Keep flammable material off the exhaust pipe and the three
way catalyst.
Multiport Fuel Injection System or Engine Control SystemINFOID:0000000003852783
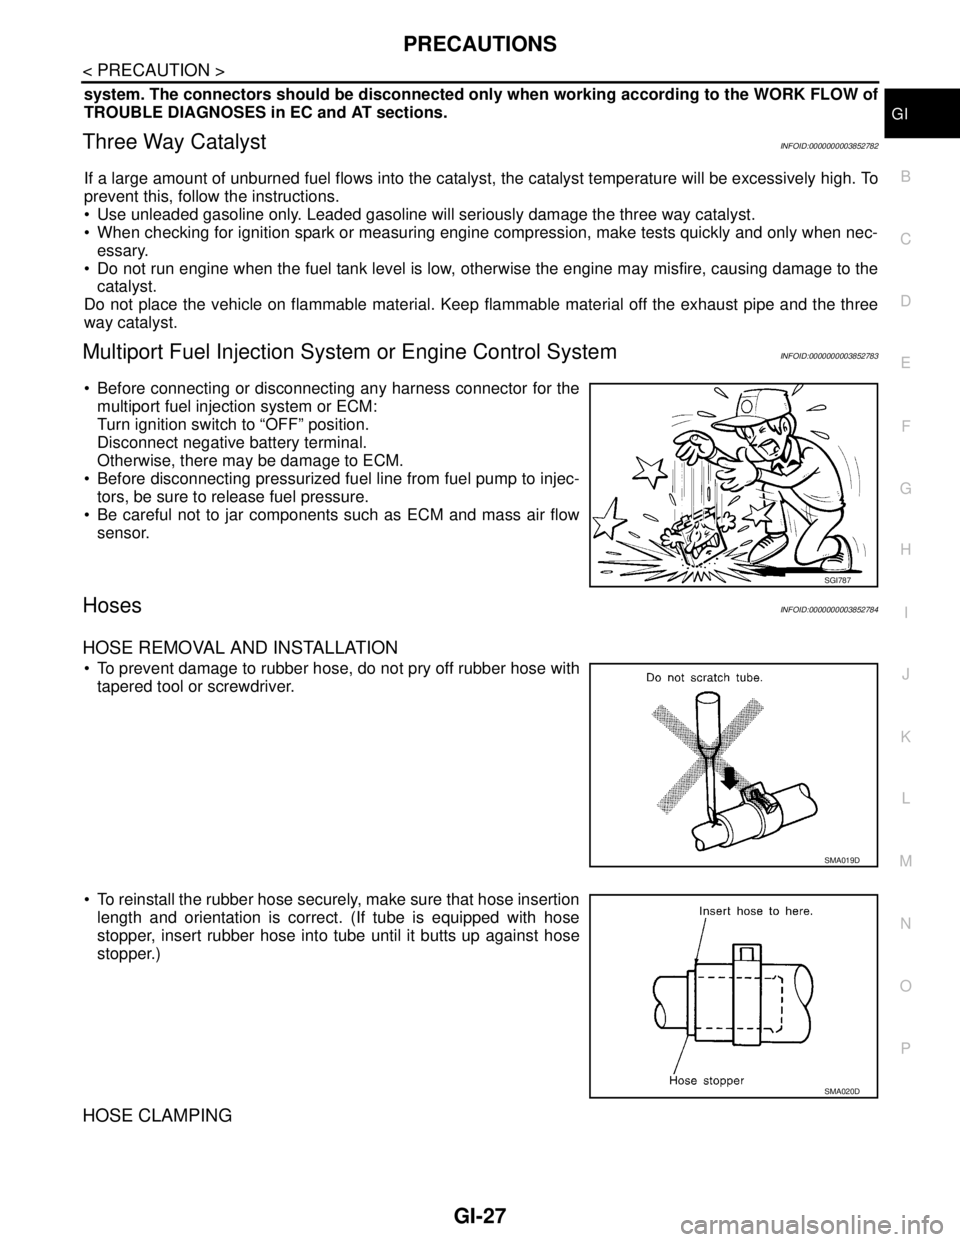
Before connecting or disconnecting any harness connector for the
multiport fuel injection system or ECM:
Turn ignition switch to “OFF” position.
Disconnect negative battery terminal.
Otherwise, there may be damage to ECM.
Before disconnecting pressurized fuel line from fuel pump to injec-
tors, be sure to release fuel pressure.
Be careful not to jar components such as ECM and mass air flow
sensor.
HosesINFOID:0000000003852784
HOSE REMOVAL AND INSTALLATION
To prevent damage to rubber hose, do not pry off rubber hose with
tapered tool or screwdriver.
To reinstall the rubber hose securely, make sure that hose insertion
length and orientation is correct. (If tube is equipped with hose
stopper, insert rubber hose into tube until it butts up against hose
stopper.)
HOSE CLAMPING
SGI787
SMA019D
SMA020D
Page 2529 of 5121

GI-36
< BASIC INSPECTION >
SERVICE INFORMATION FOR ELECTRICAL INCIDENT
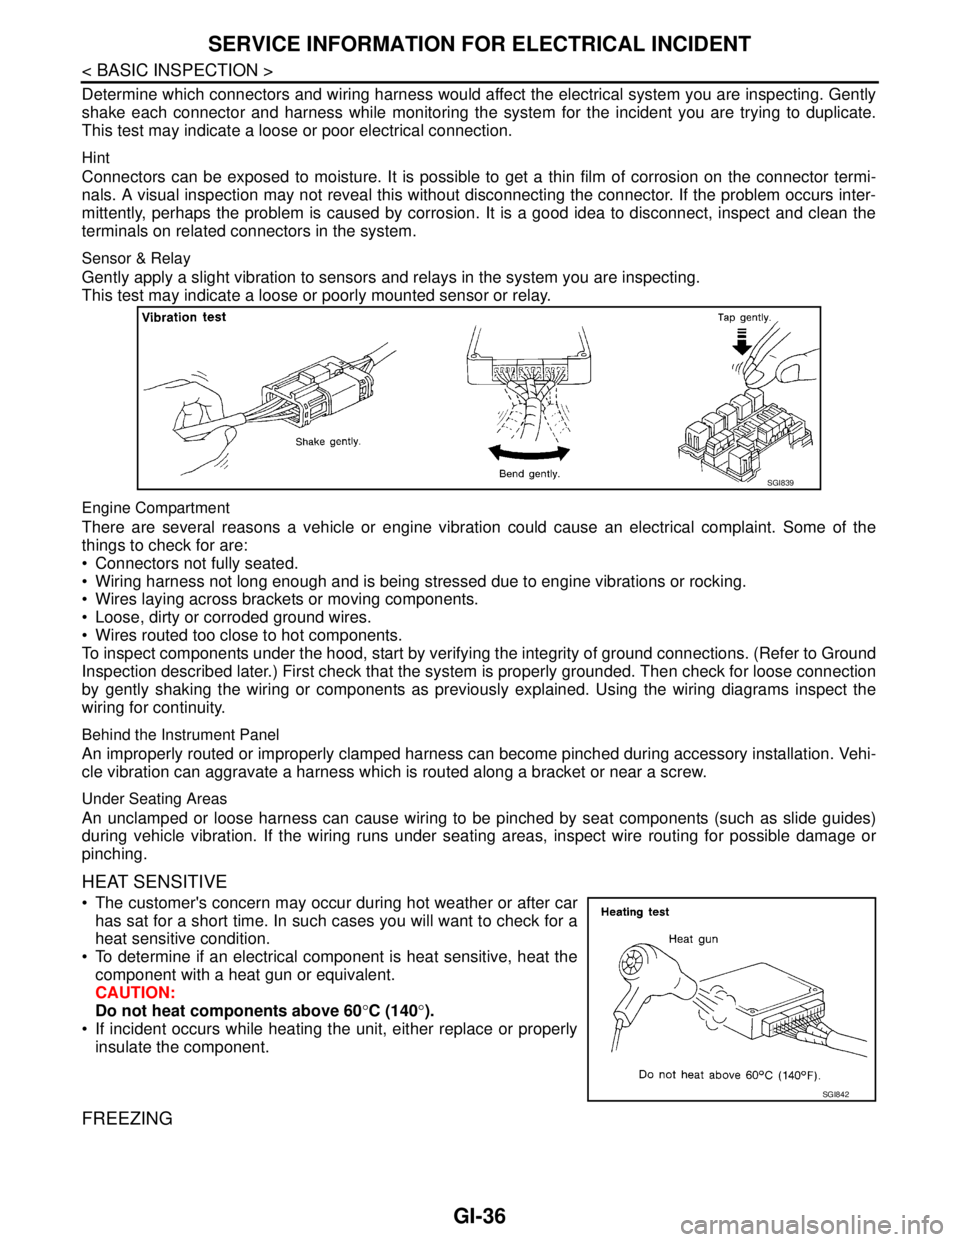
Determine which connectors and wiring harness would affect the electrical system you are inspecting. Gently
shake each connector and harness while monitoring the system for the incident you are trying to duplicate.
This test may indicate a loose or poor electrical connection.
Hint
Connectors can be exposed to moisture. It is possible to get a thin film of corrosion on the connector termi-
nals. A visual inspection may not reveal this without disconnecting the connector. If the problem occurs inter-
mittently, perhaps the problem is caused by corrosion. It is a good idea to disconnect, inspect and clean the
terminals on related connectors in the system.
Sensor & Relay
Gently apply a slight vibration to sensors and relays in the system you are inspecting.
This test may indicate a loose or poorly mounted sensor or relay.
Engine Compartment
There are several reasons a vehicle or engine vibration could cause an electrical complaint. Some of the
things to check for are:
Connectors not fully seated.
Wiring harness not long enough and is being stressed due to engine vibrations or rocking.
Wires laying across brackets or moving components.
Loose, dirty or corroded ground wires.
Wires routed too close to hot components.
To inspect components under the hood, start by verifying the integrity of ground connections. (Refer to Ground
Inspection described later.) First check that the system is properly grounded. Then check for loose connection
by gently shaking the wiring or components as previously explained. Using the wiring diagrams inspect the
wiring for continuity.
Behind the Instrument Panel
An improperly routed or improperly clamped harness can become pinched during accessory installation. Vehi-
cle vibration can aggravate a harness which is routed along a bracket or near a screw.
Under Seating Areas
An unclamped or loose harness can cause wiring to be pinched by seat components (such as slide guides)
during vehicle vibration. If the wiring runs under seating areas, inspect wire routing for possible damage or
pinching.
HEAT SENSITIVE
The customer's concern may occur during hot weather or after car
has sat for a short time. In such cases you will want to check for a
heat sensitive condition.
To determine if an electrical component is heat sensitive, heat the
component with a heat gun or equivalent.
CAUTION:
Do not heat components above 60°C (140°).
If incident occurs while heating the unit, either replace or properly
insulate the component.
FREEZING
SGI839
SGI842
Page 2536 of 5121

CONSULT-III/GST CHECKING SYSTEM
GI-43
< BASIC INSPECTION >
C
D
E
F
G
H
I
J
K
L
MB
GI
N
O
PCONSULT-III/GST CHECKING SYSTEM
DescriptionINFOID:0000000003852797
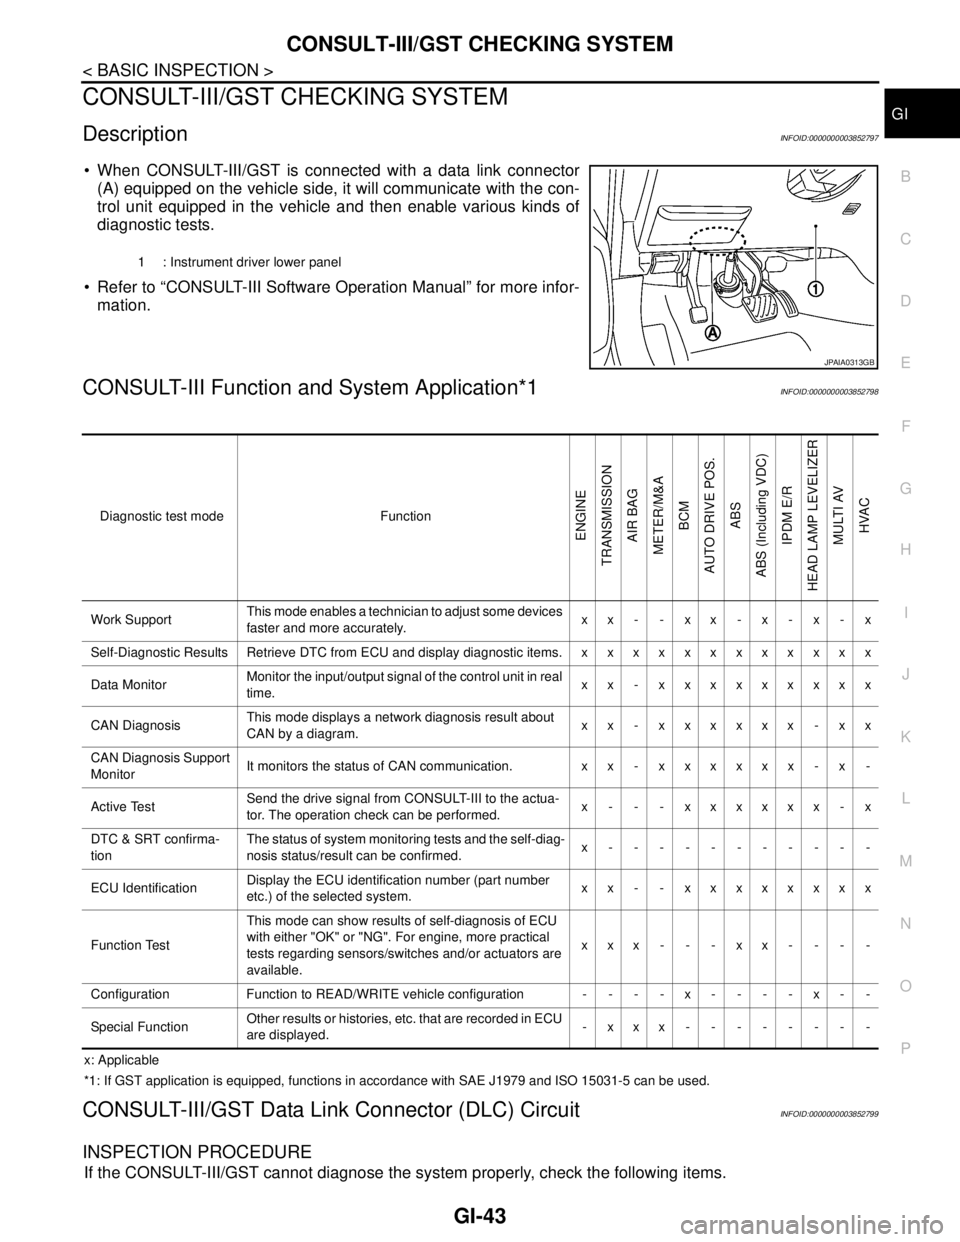
When CONSULT-III/GST is connected with a data link connector
(A) equipped on the vehicle side, it will communicate with the con-
trol unit equipped in the vehicle and then enable various kinds of
diagnostic tests.
Refer to “CONSULT-III Software Operation Manual” for more infor-
mation.
CONSULT-III Function and System Application*1INFOID:0000000003852798
x: Applicable
*1: If GST application is equipped, functions in accordance with SAE J1979 and ISO 15031-5 can be used.
CONSULT-III/GST Data Link Connector (DLC) CircuitINFOID:0000000003852799
INSPECTION PROCEDURE
If the CONSULT-III/GST cannot diagnose the system properly, check the following items.
1 : Instrument driver lower panel
JPAIA0313GB
Diagnostic test mode Function
ENGINE
TRANSMISSION
AIR BAG
METER/M&A
BCM
AUTO DRIVE POS.
ABS
ABS (Including VDC)
IPDM E/R
HEAD LAMP LEVELIZER
MULTI AV
HVAC
Work SupportThis mode enables a technician to adjust some devices
faster and more accurately.xx- -xx-x-x-x
Self-Diagnostic Results Retrieve DTC from ECU and display diagnostic items. x x x x x x x x x x x x
Data MonitorMonitor the input/output signal of the control unit in real
time.xx - xxxxxxxxx
CAN DiagnosisThis mode displays a network diagnosis result about
CAN by a diagram.xx - xxxxxx - xx
CAN Diagnosis Support
MonitorIt monitors the status of CAN communication. x x - x x x x x x - x -
Active TestSend the drive signal from CONSULT-III to the actua-
tor. The operation check can be performed.x - - - xxxxxx - x
DTC & SRT confirma-
tionThe status of system monitoring tests and the self-diag-
nosis status/result can be confirmed.x-----------
ECU IdentificationDisplay the ECU identification number (part number
etc.) of the selected system.xx - - xxxxxxxx
Function TestThis mode can show results of self-diagnosis of ECU
with either "OK" or "NG". For engine, more practical
tests regarding sensors/switches and/or actuators are
available.xxx---xx----
Configuration Function to READ/WRITE vehicle configuration - - - - x - - - - x - -
Special FunctionOther results or histories, etc. that are recorded in ECU
are displayed.-xxx--------
Page 2542 of 5121

INSPECTION AND ADJUSTMENT
GI-49
< BASIC INSPECTION >
C
D
E
F
G
H
I
J
K
L
MB
GI
N
O
P
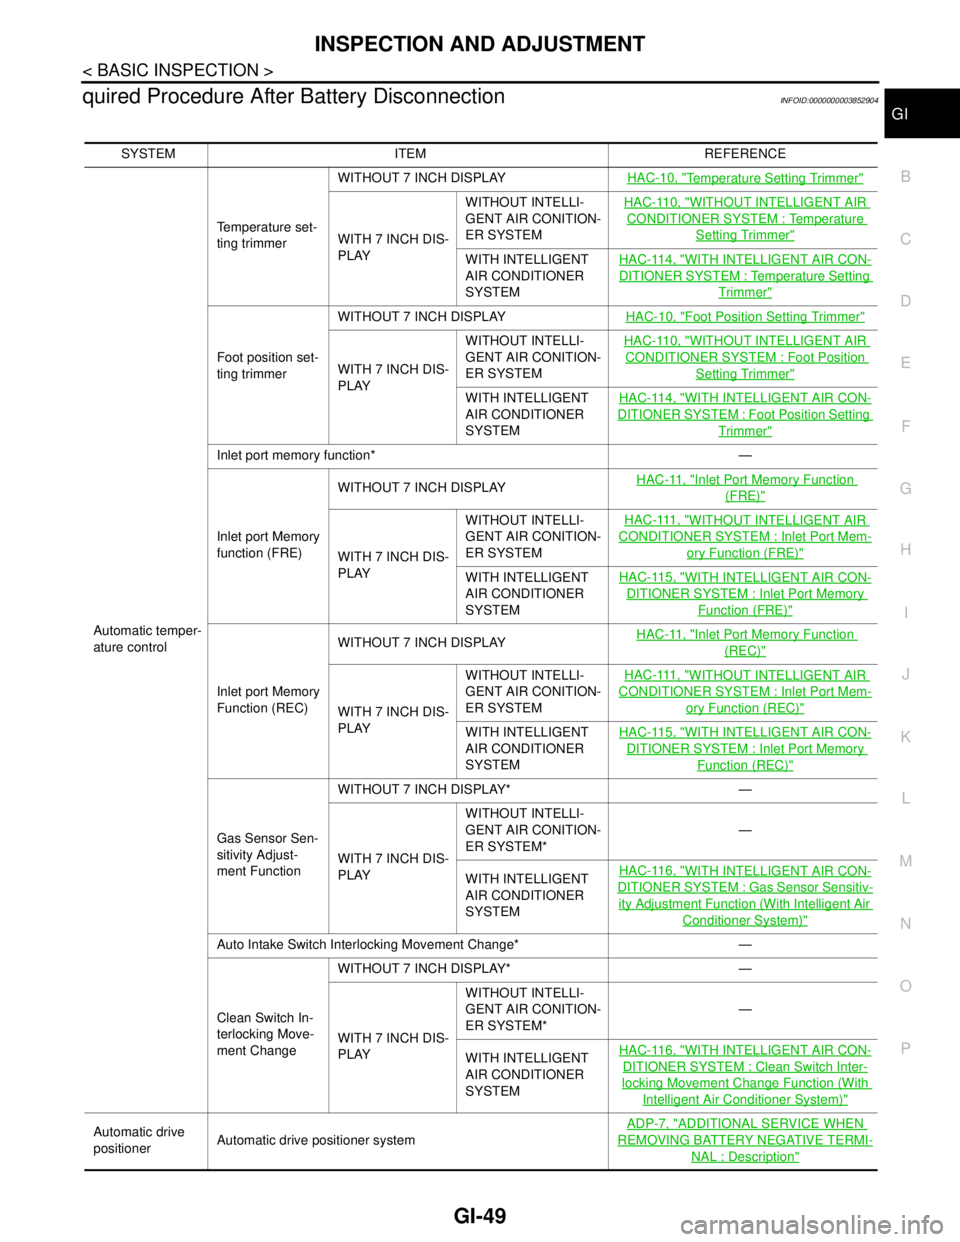
quired Procedure After Battery DisconnectionINFOID:0000000003852904
SYSTEM ITEM REFERENCE
Automatic temper-
ature controlTemperature set-
ting trimmerWITHOUT 7 INCH DISPLAYHAC-10, "
Temperature Setting Trimmer"
WITH 7 INCH DIS-
PLAYWITHOUT INTELLI-
GENT AIR CONITION-
ER SYSTEMHAC-110, "
WITHOUT INTELLIGENT AIR
CONDITIONER SYSTEM : Temperature
Setting Trimmer"
WITH INTELLIGENT
AIR CONDITIONER
SYSTEMHAC-114, "WITH INTELLIGENT AIR CON-
DITIONER SYSTEM : Temperature Setting
Trimmer"
Foot position set-
ting trimmerWITHOUT 7 INCH DISPLAYHAC-10, "
Foot Position Setting Trimmer"
WITH 7 INCH DIS-
PLAYWITHOUT INTELLI-
GENT AIR CONITION-
ER SYSTEMHAC-110, "
WITHOUT INTELLIGENT AIR
CONDITIONER SYSTEM : Foot Position
Setting Trimmer"
WITH INTELLIGENT
AIR CONDITIONER
SYSTEMHAC-114, "WITH INTELLIGENT AIR CON-
DITIONER SYSTEM : Foot Position Setting
Trimmer"
Inlet port memory function* —
Inlet port Memory
function (FRE)WITHOUT 7 INCH DISPLAYHAC-11, "
Inlet Port Memory Function
(FRE)"
WITH 7 INCH DIS-
PLAYWITHOUT INTELLI-
GENT AIR CONITION-
ER SYSTEMHAC-111, "
WITHOUT INTELLIGENT AIR
CONDITIONER SYSTEM : Inlet Port Mem-
ory Function (FRE)"
WITH INTELLIGENT
AIR CONDITIONER
SYSTEMHAC-115, "WITH INTELLIGENT AIR CON-
DITIONER SYSTEM : Inlet Port Memory
Function (FRE)"
Inlet port Memory
Function (REC)WITHOUT 7 INCH DISPLAYHAC-11, "
Inlet Port Memory Function
(REC)"
WITH 7 INCH DIS-
PLAYWITHOUT INTELLI-
GENT AIR CONITION-
ER SYSTEMHAC-111, "
WITHOUT INTELLIGENT AIR
CONDITIONER SYSTEM : Inlet Port Mem-
ory Function (REC)"
WITH INTELLIGENT
AIR CONDITIONER
SYSTEMHAC-115, "WITH INTELLIGENT AIR CON-
DITIONER SYSTEM : Inlet Port Memory
Function (REC)"
Gas Sensor Sen-
sitivity Adjust-
ment FunctionWITHOUT 7 INCH DISPLAY* —
WITH 7 INCH DIS-
PLAYWITHOUT INTELLI-
GENT AIR CONITION-
ER SYSTEM*—
WITH INTELLIGENT
AIR CONDITIONER
SYSTEMHAC-116, "
WITH INTELLIGENT AIR CON-
DITIONER SYSTEM : Gas Sensor Sensitiv-
ity Adjustment Function (With Intelligent Air
Conditioner System)"
Auto Intake Switch Interlocking Movement Change* —
Clean Switch In-
terlocking Move-
ment Change WITHOUT 7 INCH DISPLAY* —
WITH 7 INCH DIS-
PLAYWITHOUT INTELLI-
GENT AIR CONITION-
ER SYSTEM*—
WITH INTELLIGENT
AIR CONDITIONER
SYSTEMHAC-116, "
WITH INTELLIGENT AIR CON-
DITIONER SYSTEM : Clean Switch Inter-
locking Movement Change Function (With
Intelligent Air Conditioner System)"
Automatic drive
positionerAutomatic drive positioner systemADP-7, "ADDITIONAL SERVICE WHEN
REMOVING BATTERY NEGATIVE TERMI-
NAL : Description"
Page 2571 of 5121

HA-2
LOW-PRESSURE PIPE .....................................42
Exploded View ........................................................42
Removal and Installation ........................................42
HIGH-PRESSURE PIPE ....................................44
Exploded View ........................................................44
Removal and Installation ........................................44
CONDENSER ....................................................46
Exploded View ........................................................46
Removal and Installation ........................................46
CONDENSER PIPE ASSEMBLY ......................48
Exploded View ........................................................48
Removal and Installation ........................................48
LIQUID TANK ....................................................50
Exploded View ........................................................50
Removal and Installation ........................................50
REFRIGERANT PRESSURE SENSOR ............51
Exploded View ........................................................51
Removal and Installation ........................................51
EVAPORATOR ..................................................52
Exploded View ........................................................52
Removal and Installation .........................................53
EVAPORATOR PIPE ASSEMBLY ....................54
Exploded View ........................................................54
Removal and Installation .........................................55
EXPANSION VALVE .........................................57
Exploded View ........................................................57
Removal and Installation .........................................58
SERVICE DATA AND SPECIFICATIONS
(SDS) ..........................................................
59
SERVICE DATA AND SPECIFICATIONS
(SDS) .................................................................
59
Compressor ............................................................59
Lubricant .................................................................59
Refrigerant ..............................................................59
Engine Idling Speed ................................................59
Belt Tension ............................................................59