2007 TOYOTA SIENNA check engine
[x] Cancel search: check enginePage 644 of 3000

2GR-FE ENGINE CONTROL SYSTEM – SFI SYSTEMES–351
ES
HINT:
These DTCs relate to the Accelerator Pedal Position (APP) sensor.
DESCRIPTION
HINT:
This ETCS (Electronic Throttle Control System) does not use a throttle cable.
The Accelerator Pedal Position (APP) sensor is integrated with the accelerator pedal bracket and has 2
sensor circuits: VPA (main) and VPA2 (sub). This sensor is a non-contact type, and uses Hall-effect
elements, in order to yield accurate signals, even in extreme driving conditions, such as at high speeds as
well as very low speeds. The voltage, which is applied to terminals VPA and VPA2 of the ECM, varies
between 0 V and 5 V in proportion to the operating angle of the accelerator pedal (throttle valve). A signal
from VPA indicates the actual accelerator pedal opening angle (throttle valve opening angle) and is used
for engine control. A signal from VPA2 conveys the status of the VPA circuit and is used to check the APP
sensor itself.
The ECM monitors the actual accelerator pedal opening angle (throttle valve opening angle) through the
signals from VPA and VPA2, and controls the throttle actuator according to these signals.
DTC P2120Throttle / Pedal Position Sensor / Switch "D"
Circuit
DTC P2122Throttle / Pedal Position Sensor / Switch "D"
Circuit Low Input
DTC P2123Throttle / Pedal Position Sensor / Switch "D"
Circuit High Input
DTC P2125Throttle / Pedal Position Sensor / Switch "E"
Circuit
DTC P2127Throttle / Pedal Position Sensor / Switch "E"
Circuit Low Input
DTC P2128Throttle / Pedal Position Sensor / Switch "E"
Circuit High Input
DTC P2138Throttle / Pedal Position Sensor / Switch "D" /
"E" Voltage Correlation
Page 646 of 3000

2GR-FE ENGINE CONTROL SYSTEM – SFI SYSTEMES–353
ES
HINT:
When any of these DTCs are set, check the APP sensor voltage by selecting the following menu items on
the intelligent tester: DIAGNOSIS / ENHANCED OBD II / DATA LIST / PRIMARY / ACCEL POS #1 and
ACCEL POS #2.
HINT:
• Accelerator pedal positions are expressed as voltages.
• AP denotes Accelerator Pedal.
MONITOR DESCRIPTION
When either of the voltage outputs of VPA or VPA2 deviates from the standard range, or the difference
between the voltage outputs of the 2 sensor circuits is less than the threshold, the ECM determines that
there is a malfunction in the APP sensor. The ECM then illuminates the MIL and sets a DTC.
Example:
When the voltage output of VPA drops below 0.4 V for more than 0.5 seconds when the accelerator pedal
is fully depressed, DTC P2122 is set.
If the malfunction is not repaired successfully, a DTC is set 2 seconds after the engine is next started.
MONITOR STRATEGY
TYPICAL ENABLING CONDITIONS
P2138Condition (a) or (b) continues for 2.0 seconds or more
(1 trip detection logic):
(a) Difference between VPA and VPA2 is 0.02 V or less
(b) VPA is 0.4 V or less and VPA2 is 1.2 V or less• Short between VPA and VPA2 circuits
• APP sensor
•ECM
Trouble AreasACCEL POS #1 When
AP ReleasedACCEL POS #2 When
AP ReleasedACCEL POS #1 When
AP DepressedACCEL POS #2 When
AP Depressed
VCP circuit open 0 to 0.2 V 0 to 0.2 V 0 to 0.2 V 0 to 0.2 V
Open or ground short in VPA circuit 0 to 0.2 V 1.2 to 2.0 V 0 to 0.2 V 3.4 to 5.0 V
Open or ground short in VPA2 circuit 0.5 to 1.1 V 0 to 0.2 V 2.6 to 4.5 V 0 to 0.2 V
EPA circuit open 4.5 to 5.0 V 4.5 to 5.0 V 4.5 to 5.0 V 4.5 to 5.0 V
Normal condition 0.5 to 1.1 V 1.2 to 2.0 V 2.6 to 4.5 V 3.4 to 5.0 V
Related DTCsP2120: Accelerator Pedal Position (APP) sensor 1 range check (fluctuating)
P2122: APP sensor 1 range check (low voltage)
P2123: APP sensor 1 range check (high voltage)
P2125: APP sensor 2 range check (fluctuating)
P2127: APP sensor 2 range check (low voltage)
P2128: APP sensor 2 range check (high voltage)
P2138: APP sensor range check (correlation)
Required Sensors / Components (Main) APP sensor
Required Sensors / Components (Related) -
Frequency of Operation Continuous
Duration0.5 seconds: P2120, P2122, P2125 and P2127
2.0 seconds: P2123, P2128 and P2138
MIL Operation Immediate
Sequence of Operation None
The monitor will run whenever these DTCs are not
presentNone
Throttle actuator power ONDTC No. DTC Detection Condition Trouble Area
Page 649 of 3000

ES–3562GR-FE ENGINE CONTROL SYSTEM – SFI SYSTEM
ES
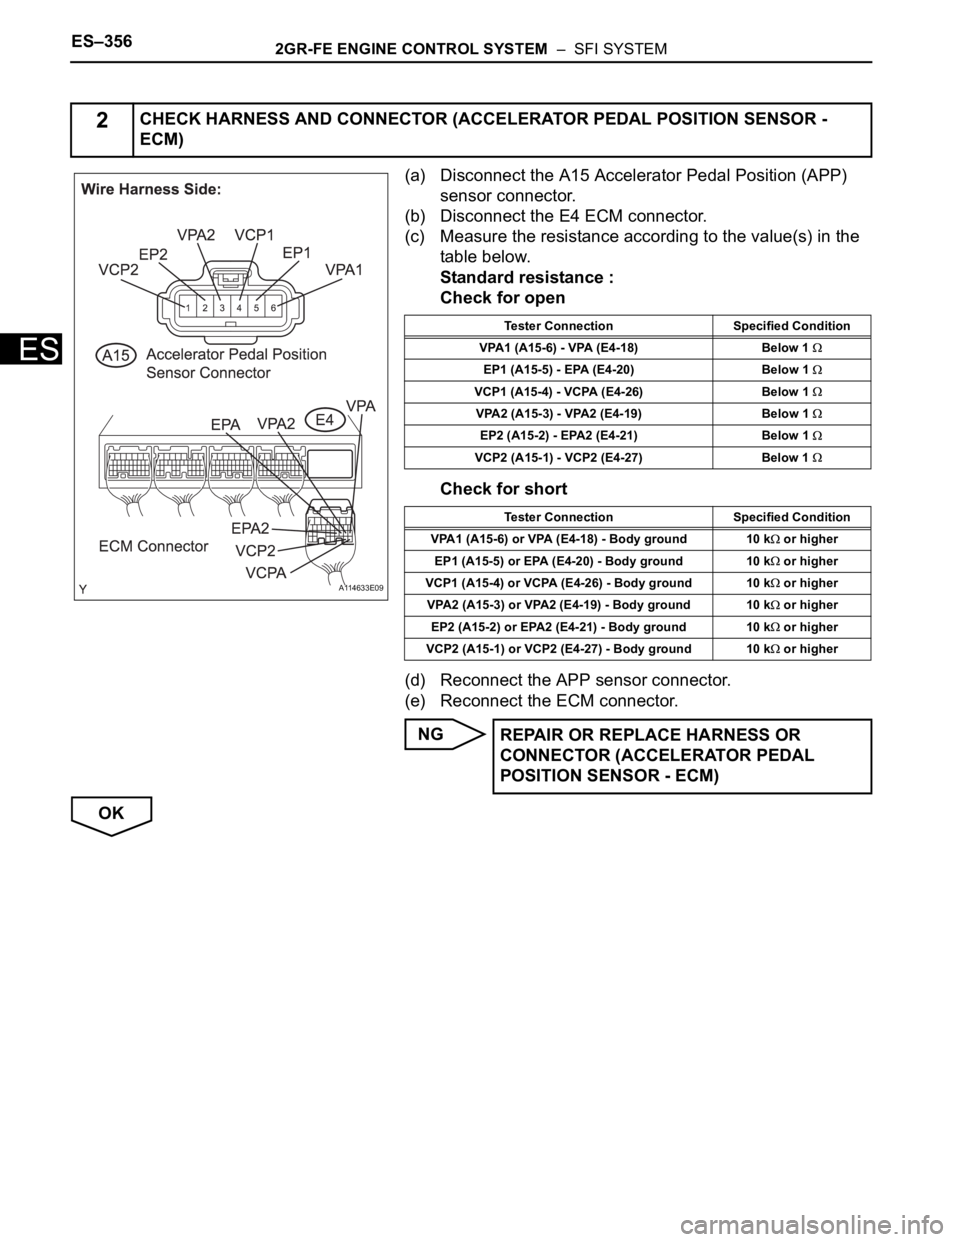
(a) Disconnect the A15 Accelerator Pedal Position (APP)
sensor connector.
(b) Disconnect the E4 ECM connector.
(c) Measure the resistance according to the value(s) in the
table below.
Standard resistance :
Check for open
Check for short
(d) Reconnect the APP sensor connector.
(e) Reconnect the ECM connector.
NG
OK
2CHECK HARNESS AND CONNECTOR (ACCELERATOR PEDAL POSITION SENSOR -
ECM)
A114633E09
Tester Connection Specified Condition
VPA1 (A15-6) - VPA (E4-18) Below 1
EP1 (A15-5) - EPA (E4-20) Below 1
VCP1 (A15-4) - VCPA (E4-26) Below 1
VPA2 (A15-3) - VPA2 (E4-19) Below 1
EP2 (A15-2) - EPA2 (E4-21) Below 1
VCP2 (A15-1) - VCP2 (E4-27) Below 1
Tester Connection Specified Condition
VPA1 (A15-6) or VPA (E4-18) - Body ground 10 k
or higher
EP1 (A15-5) or EPA (E4-20) - Body ground 10 k
or higher
VCP1 (A15-4) or VCPA (E4-26) - Body ground 10 k
or higher
VPA2 (A15-3) or VPA2 (E4-19) - Body ground 10 k
or higher
EP2 (A15-2) or EPA2 (E4-21) - Body ground 10 k
or higher
VCP2 (A15-1) or VCP2 (E4-27) - Body ground 10 k
or higher
REPAIR OR REPLACE HARNESS OR
CONNECTOR (ACCELERATOR PEDAL
POSITION SENSOR - ECM)
Page 650 of 3000

2GR-FE ENGINE CONTROL SYSTEM – SFI SYSTEMES–357
ES
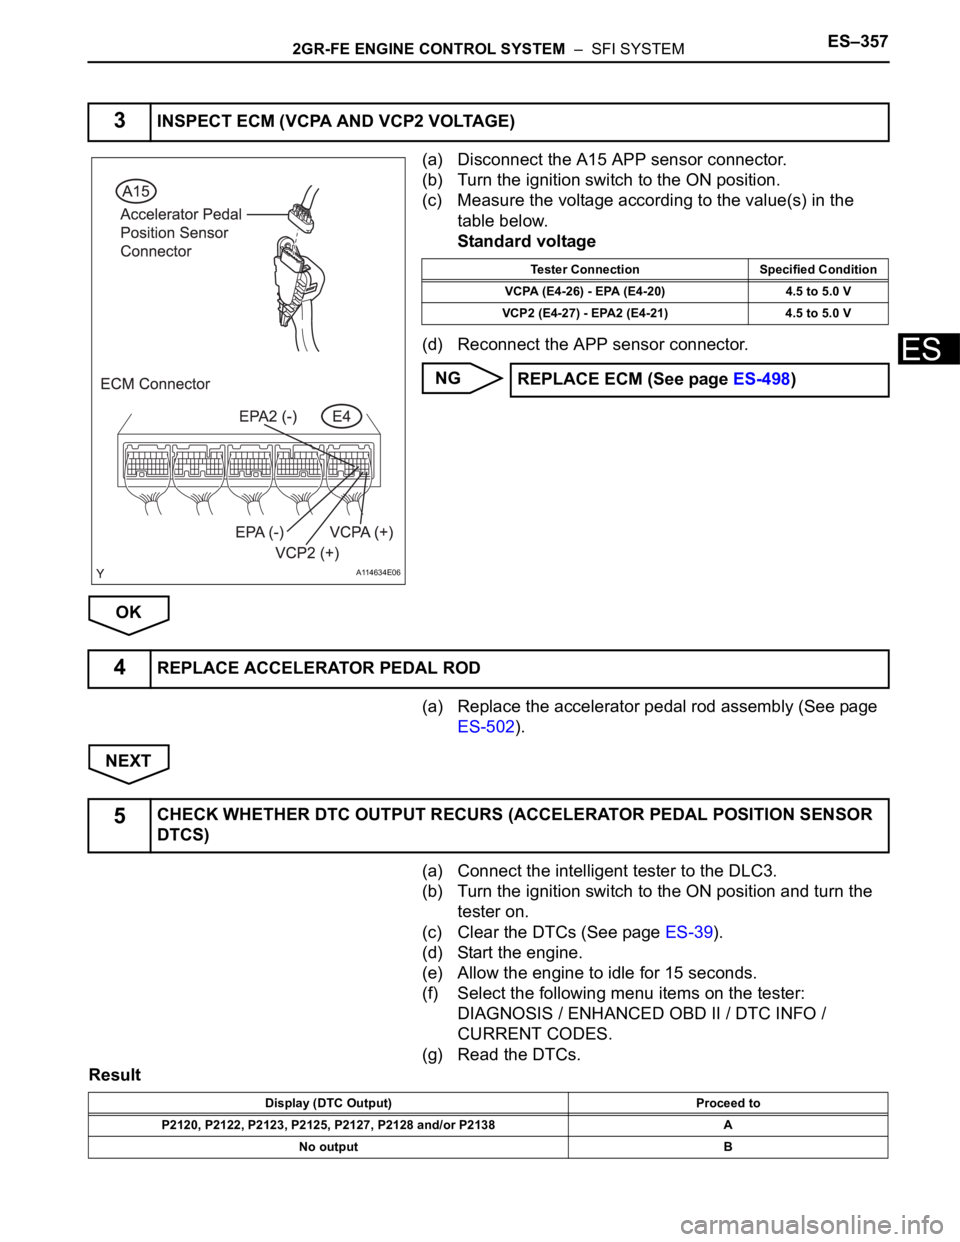
(a) Disconnect the A15 APP sensor connector.
(b) Turn the ignition switch to the ON position.
(c) Measure the voltage according to the value(s) in the
table below.
Standard voltage
(d) Reconnect the APP sensor connector.
NG
OK
(a) Replace the accelerator pedal rod assembly (See page
ES-502).
NEXT
(a) Connect the intelligent tester to the DLC3.
(b) Turn the ignition switch to the ON position and turn the
tester on.
(c) Clear the DTCs (See page ES-39).
(d) Start the engine.
(e) Allow the engine to idle for 15 seconds.
(f) Select the following menu items on the tester:
DIAGNOSIS / ENHANCED OBD II / DTC INFO /
CURRENT CODES.
(g) Read the DTCs.
Result
3INSPECT ECM (VCPA AND VCP2 VOLTAGE)
A114634E06
Tester Connection Specified Condition
VCPA (E4-26) - EPA (E4-20) 4.5 to 5.0 V
VCP2 (E4-27) - EPA2 (E4-21) 4.5 to 5.0 V
REPLACE ECM (See page ES-498)
4REPLACE ACCELERATOR PEDAL ROD
5CHECK WHETHER DTC OUTPUT RECURS (ACCELERATOR PEDAL POSITION SENSOR
DTCS)
Display (DTC Output) Proceed to
P2120, P2122, P2123, P2125, P2127, P2128 and/or P2138 A
No output B
Page 654 of 3000

2GR-FE ENGINE CONTROL SYSTEM – SFI SYSTEMES–361
ES
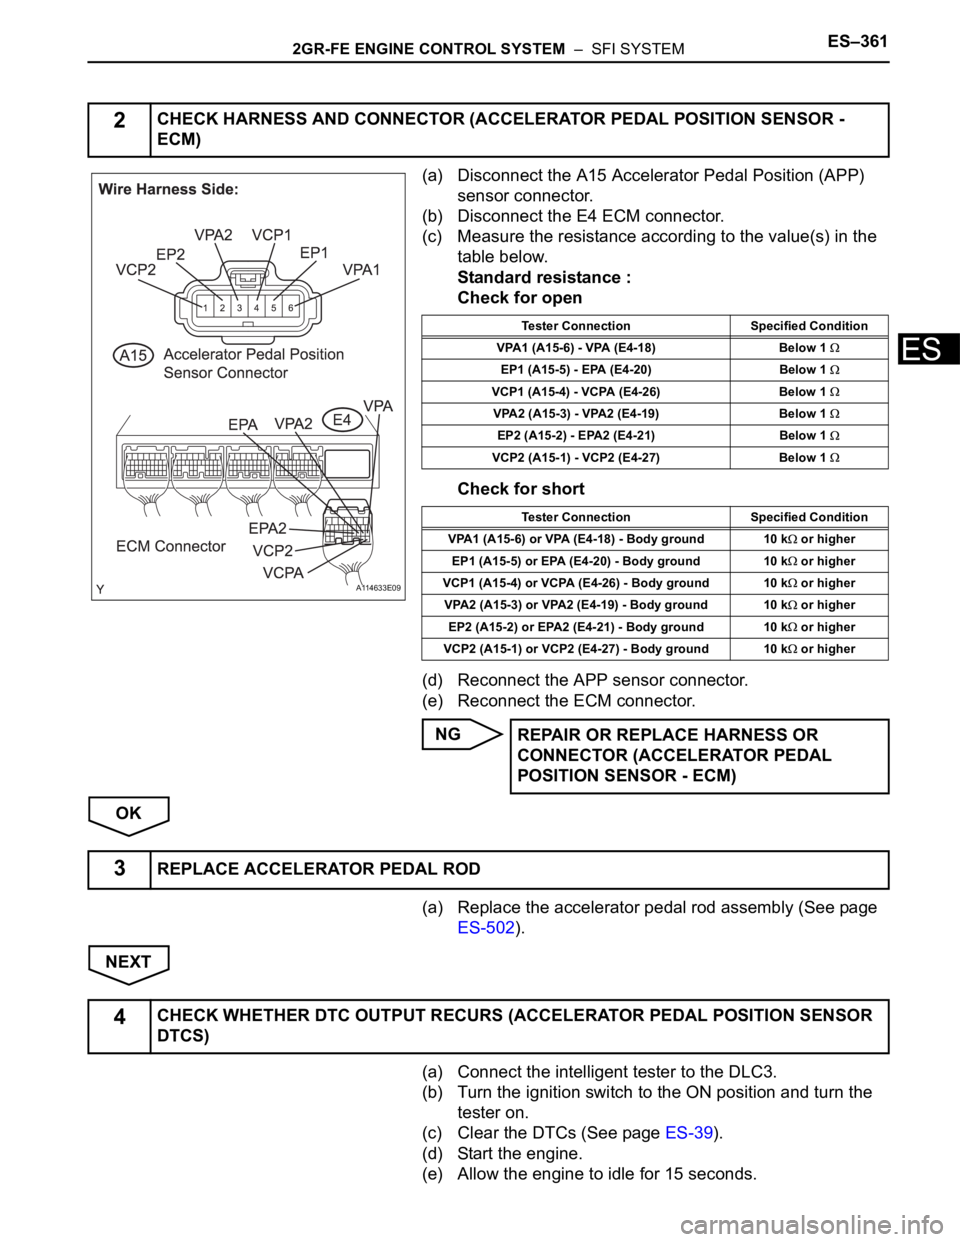
(a) Disconnect the A15 Accelerator Pedal Position (APP)
sensor connector.
(b) Disconnect the E4 ECM connector.
(c) Measure the resistance according to the value(s) in the
table below.
Standard resistance :
Check for open
Check for short
(d) Reconnect the APP sensor connector.
(e) Reconnect the ECM connector.
NG
OK
(a) Replace the accelerator pedal rod assembly (See page
ES-502).
NEXT
(a) Connect the intelligent tester to the DLC3.
(b) Turn the ignition switch to the ON position and turn the
tester on.
(c) Clear the DTCs (See page ES-39).
(d) Start the engine.
(e) Allow the engine to idle for 15 seconds.
2CHECK HARNESS AND CONNECTOR (ACCELERATOR PEDAL POSITION SENSOR -
ECM)
A114633E09
Tester Connection Specified Condition
VPA1 (A15-6) - VPA (E4-18) Below 1
EP1 (A15-5) - EPA (E4-20) Below 1
VCP1 (A15-4) - VCPA (E4-26) Below 1
VPA2 (A15-3) - VPA2 (E4-19) Below 1
EP2 (A15-2) - EPA2 (E4-21) Below 1
VCP2 (A15-1) - VCP2 (E4-27) Below 1
Tester Connection Specified Condition
VPA1 (A15-6) or VPA (E4-18) - Body ground 10 k
or higher
EP1 (A15-5) or EPA (E4-20) - Body ground 10 k
or higher
VCP1 (A15-4) or VCPA (E4-26) - Body ground 10 k
or higher
VPA2 (A15-3) or VPA2 (E4-19) - Body ground 10 k
or higher
EP2 (A15-2) or EPA2 (E4-21) - Body ground 10 k
or higher
VCP2 (A15-1) or VCP2 (E4-27) - Body ground 10 k
or higher
REPAIR OR REPLACE HARNESS OR
CONNECTOR (ACCELERATOR PEDAL
POSITION SENSOR - ECM)
3REPLACE ACCELERATOR PEDAL ROD
4CHECK WHETHER DTC OUTPUT RECURS (ACCELERATOR PEDAL POSITION SENSOR
DTCS)
Page 657 of 3000

ES–3642GR-FE ENGINE CONTROL SYSTEM – SFI SYSTEM
ES
HINT:
• DTCs P2195 and P2196 indicate malfunctions related to the bank 1 A/F sensor circuit.
• DTCs P2197 and P2198 indicate malfunctions related to the bank 2 A/F sensor circuit.
• Bank 1 refers to the bank that includes cylinder No. 1.
• Bank 2 refers to the bank that includes cylinder No. 2.
• When any of these DTCs are set, check the A/F sensor voltage output by selecting the following menu
items on the intelligent tester: DIAGNOSIS / ENHANCED OBDII / DATA LIST / PRIMARY / AFS B1S1.
• Short-term fuel trim values can also be read using the intelligent tester.
• The ECM regulates the voltages at the A1A+, A2A+, A1A- and A2A- terminals of the ECM to a
constant level. Therefore, the A/F sensor voltage output cannot be confirmed without using the
intelligent tester.
• If an A/F sensor malfunction is detected, the ECM sets a DTC.
MONITOR DESCRIPTION
Sensor voltage detection monitor
Under the air-fuel ratio feedback control, if the A/F sensor voltage output indicates rich or lean for a certain
period of time, the ECM determines that there is a malfunction in the A/F sensor. The ECM illuminates the
MIL and sets a DTC.
Example:
If the A/F sensor voltage output is less than 2.8 V (very rich condition) for 10 seconds, despite the HO2
sensor voltage output being less than 0.6 V, the ECM sets DTC P2196. Alternatively, if the A/F sensor
voltage output is more than 3.8 V (very lean condition) for 10 seconds, despite the HO2 sensor voltage
output being 0.15 V or more, DTC P2195 is set.
Sensor current detection monitor
A rich air-fuel mixture causes a low A/F sensor current, and a lean air-fuel mixture causes a high A/F
sensor current. Therefore, the sensor output becomes low during acceleration, and it becomes high
during deceleration with the throttle valve fully closed. The ECM monitors the A/F sensor current during
fuel-cut and detects any abnormal current values.
If the A/F sensor output is 3.6 mA or more for more than 3 seconds of cumulative time, the ECM interprets
this as a malfunction in the A/F sensor and sets DTC P2195 (high-side stuck). If the A/F sensor output is
1.0 mA or less for more than 3 seconds of cumulative time, the ECM sets DTC P2196 (low-side stuck).
DTC No. DTC Detection Condition Trouble Area
P2195
P2197Conditions (a) and (b) continue for 2 seconds or more
(2 trip detection logic):
(a) Air-Fuel Ratio (A/F) sensor voltage is more than 3.8
V
(b) Heated Oxygen (HO2) sensor voltage is 0.15 V or
more• Open or short in A/F sensor (bank 1, 2 sensor 1)
circuit
• A/F sensor (bank 1, 2 sensor 1)
• A/F sensor (bank 1, 2 sensor 1) heater
• A/F sensor heater relay
• A/F sensor heater and relay circuits
• Intake system
• Fuel pressure
• Injector
•ECM
P2195
P2197While fuel-cut operation is performed (during vehicle
deceleration), air-furl ratio (A/F) sensor current is 3.6
mA or more for 3 seconds (2 trip detection logic)• A/F sensor
•ECM
P2196
P2198Conditions (a) and (b) continue for 2 seconds or more
(2 trip detection logic):
(a) A/F sensor voltage is less than 2.8 V
(b) HO2 sensor voltage is less than 0.6 V• Open or short in A/F sensor (bank 1, 2 sensor 1)
circuit
• A/F sensor (bank 1, 2 sensor 1)
• A/F sensor (bank 1, 2 sensor 1) heater
• A/F sensor heater relay
• A/F sensor heater and relay circuits
• Intake system
• Fuel pressure
•Injector
•ECM
P2196
P2198While fuel-cut operation is performed (during vehicle
deceleration), air-furl ratio (A/F) sensor current is less
than 1.4 mA for 3 seconds (2 trip detection logic)• A/F sensor
•ECM
Page 659 of 3000

ES–3662GR-FE ENGINE CONTROL SYSTEM – SFI SYSTEM
ES
Sensor voltage detection monitor (Rich side malfunction P2196, P2198):
Sensor Current detection monitor P2195, P2196, P2197, P2198
TYPICAL MALFUNCTION THRESHOLDS
Sensor voltage detection monitor (Lean side malfunction P2195, P2197):
Sensor voltage detection monitor (Rich side malfunction P2196, P2198):
Sensor current detection monitor (High side malfunction P2195, P2197):
Sensor current detection monitor (Rich side malfunction P2196, P2198):
MONITOR RESULT
Refer to CHECKING MONITOR STATUS (See page ES-19).
Duration while all of the following conditions are met 2 seconds or more
Rear HO2 sensor voltage Less than 0.6 V
Time after engine start 30 seconds or more
A/F sensor status Activated
Fuel system status Closed-loop
Engine Running
Battery voltage 11 V or more
Atmospheric pressure 0.75 or more
Air-fuel ratio sensor status Activated
Engine coolant temperature 75
C (167F) or more
Continuous time of fuel-cut 3 to 10 seconds
A/F sensor voltage More than 3.8 V
A/F sensor voltage Less than 2.8 V
Air-fuel ratio sensor current during fuel cut 3.6 mA or more
Air-fuel ratio sensor current during fuel cut Less than 1.4 mA
Page 661 of 3000

ES–3682GR-FE ENGINE CONTROL SYSTEM – SFI SYSTEM
ES
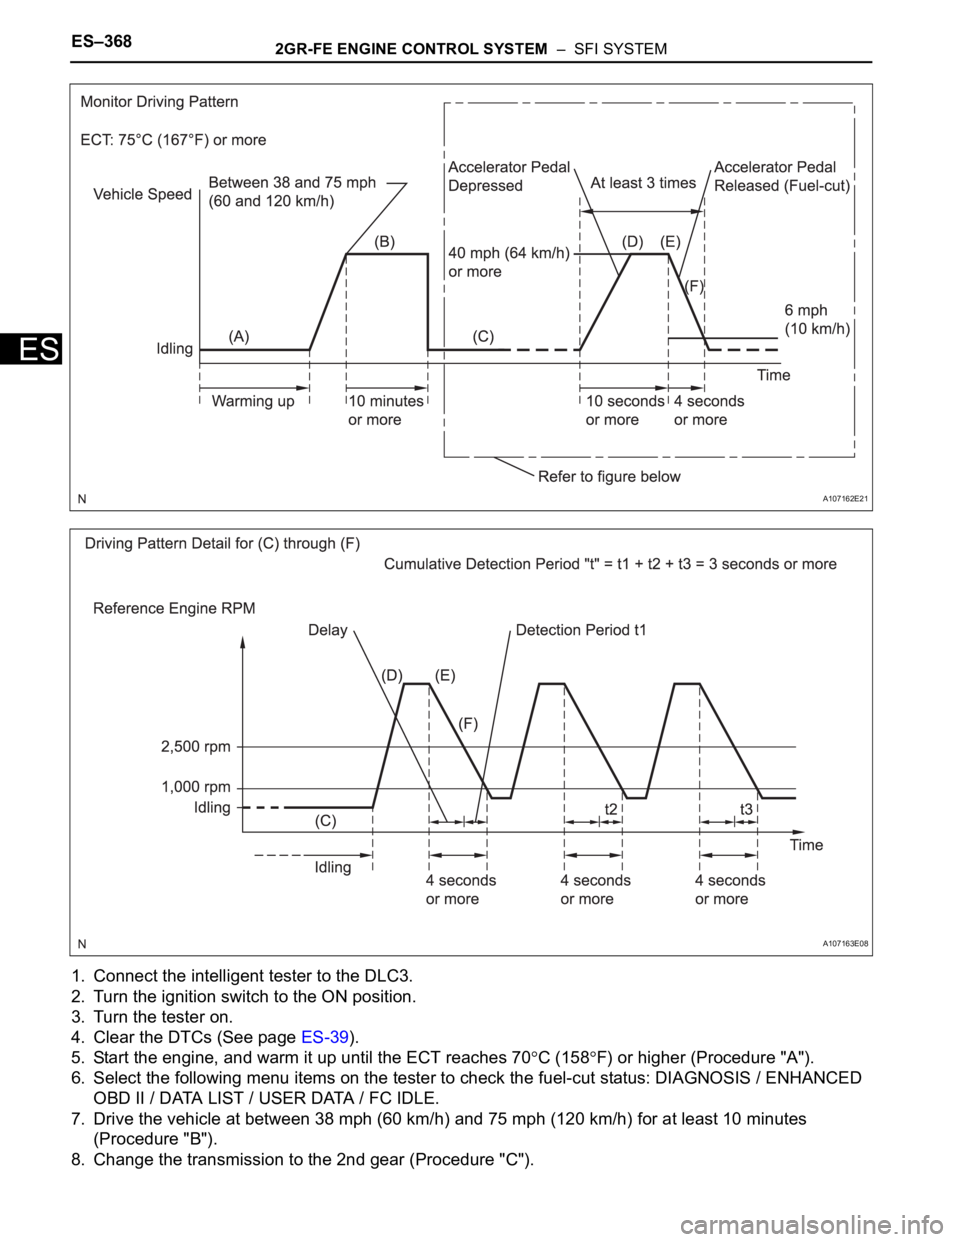
1. Connect the intelligent tester to the DLC3.
2. Turn the ignition switch to the ON position.
3. Turn the tester on.
4. Clear the DTCs (See page ES-39).
5. Start the engine, and warm it up until the ECT reaches 70
C (158F) or higher (Procedure "A").
6. Select the following menu items on the tester to check the fuel-cut status: DIAGNOSIS / ENHANCED
OBD II / DATA LIST / USER DATA / FC IDLE.
7. Drive the vehicle at between 38 mph (60 km/h) and 75 mph (120 km/h) for at least 10 minutes
(Procedure "B").
8. Change the transmission to the 2nd gear (Procedure "C").
A107162E21
A107163E08