Page 185 of 3000
BRAKE – BRAKE PEDALBR–11
BR
REMOVAL
1. SEPARATE BATTERY NEGATIVE TERMINAL
2. REMOVE FRONT DOOR SCUFF PLATE LH
3. REMOVE COWL SIDE TRIM BOARD LH
4. REMOVE INSTRUMENT PANEL FINISH PANEL SUB-
ASSEMBLY LOWER LH
(a) Remove the 2 bolts and instrument panel finish
panel sub-assembly lower LH.
5. REMOVE INSTRUMENT PANEL SAFETY PAD
INSERT SUB-ASSEMBLY NO. 1
(a) Remove the 4 bolts and instrument panel safety pad
insert sub-assembly No. 1.
6. LOOSEN BRAKE PEDAL SHAFT
(a) Loosen the 2 brake pedal shafts.
7. REMOVE BRAKE PEDAL SUPPORT ASSEMBLY
(a) Remove the 4 nuts and brake pedal support sub-
assembly.
(b) Using needle-nose pliers, remove the tension
spring.
(c) Remove the clip and clevis pin from the brake pedal
lever.
(d) Remove the 2 bolts from the brake pedal bracket
No. 3.
(e) Remove the stop light switch harness clamp from
the brake pedal support sub-assembly.
(f) Disconnect the stop light switch connector.
F045360E01
G024262
G024263
Page 187 of 3000

PARKING BRAKE – PARKING BRAKE PEDALPB–5
PB
REMOVAL
1. DISCONNECT BATTERY NEGATIVE TERMINAL
2. REMOVE FRONT DOOR SCUFF PLATE LH
3. REMOVE COWL SIDE TRIM BOARD LH
4. REMOVE INSTRUMENT PANEL FINISH PANEL SUB-
ASSEMBLY LOWER LH (See page IP-6)
5. REMOVE REAR DOOR SCUFF PLATE RH
6. REMOVE REAR DOOR SCUFF PLATE LH
7. REMOVE FRONT SEAT ASSEMBLY LH
HINT:
• Manual Seat Type (See page SE-48)
• Power Seat Type (See page SE-58)
• Fold Flat Type (See page SE-40)
8. REMOVE REAR SEAT NO.1 ASSEMBLY
HINT:
• Captain Seat Type (See page SE-68)
• Center Seat Type (See page SE-77)
9. REMOVE REAR FLOOR SEAT LOCK COVER
10. REMOVE REAR FLOOR SEAT LOCK COVER
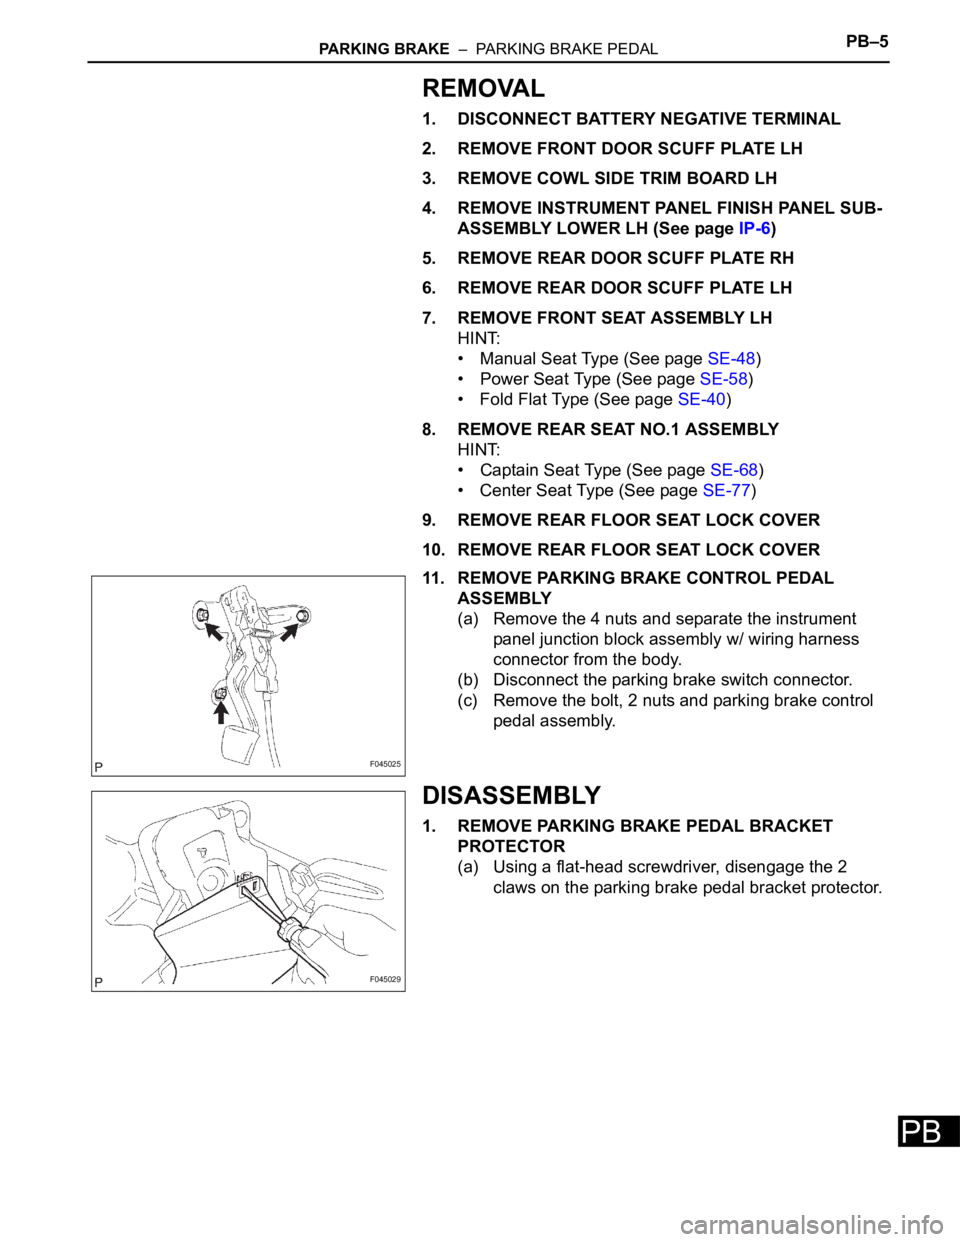
11. REMOVE PARKING BRAKE CONTROL PEDAL
ASSEMBLY
(a) Remove the 4 nuts and separate the instrument
panel junction block assembly w/ wiring harness
connector from the body.
(b) Disconnect the parking brake switch connector.
(c) Remove the bolt, 2 nuts and parking brake control
pedal assembly.
DISASSEMBLY
1. REMOVE PARKING BRAKE PEDAL BRACKET
PROTECTOR
(a) Using a flat-head screwdriver, disengage the 2
claws on the parking brake pedal bracket protector.
F045025
F045029
Page 279 of 3000
OTHER SYSTEM – CIGARETTE LIGHTEROT–5
OT
REMOVAL
1. REMOVE INSTRUMENT CLUSTER CENTER NO. 1
FINISH PANEL (See page IP-8)
2. REMOVE INSTRUMENT CLUSTER CENTER NO. 2
FINISH PANEL
3. REMOVE SHIFT LEVER KNOB SUB-ASSEMBLY (See
page IP-8)
4. REMOVE POSITION INDICATOR HOUSING
ASSEMBLY (See page IP-9)
5. REMOVE INSTRUMENT CLUSTER CENTER LOWER
FINISH PANEL SUB-ASSEMBLY (See page IP-9)
6. REMOVE CIGARETTE LIGHTER COVER
(a) Release the 2 claw fittings and remove the cigarette
lighter cover.
7. REMOVE CIGARETTE LIGHTER ASSEMBLY
(a) Remove the cigarette lighter knob.
(b) Release the 2 claw fittings and remove the cigarette
lighter assembly.
INSTALLATION
1. INSTALL CIGARETTE LIGHTER ASSEMBLY
(a) Engage the 2 claws to install the cigarette lighter
assembly.
(b) Install the cigarette lighter knob.
I035589E01
I037256E01
I037256E01
Page 280 of 3000
OT–6OTHER SYSTEM – CIGARETTE LIGHTER
OT
2. INSTALL CIGARETTE LIGHTER COVER
(a) Engage the 2 claws to install the cigarette lighter
cover.
3. INSTALL INSTRUMENT CLUSTER CENTER LOWER
FINISH PANEL SUB-ASSEMBLY
4. INSTALL POSITION INDICATOR HOUSING
ASSEMBLY
5. INSTALL SHIFT LEVER KNOB SUB-ASSEMBLY
6. INSTALL INSTRUMENT CLUSTER CENTER NO. 2
FINISH PANEL
7. INSTALL INSTRUMENT CLUSTER CENTER NO. 1
FINISH PANEL
I035589E01
Page 289 of 3000
INSTRUMENT PANEL – INSTRUMENT PANEL SAFETY PADIP–5
IP
REMOVAL
1. BOLT, SCREW AND NUT TABLE
(a) The bolts, the screws and the nuts, which are
necessary for installation and removal of the
instrument panel are shown in the illustration below
with alphabets.
2. DISCONNECT BATTERY NEGATIVE TERMINAL (See
page RS-423)
3. REMOVE STEERING WHEEL COVER LOWER NO.2
4. REMOVE STEERING WHEEL COVER LOWER NO.3
5. REMOVE HORN BUTTON ASSEMBLY (See page RS-
424)
6. REMOVE STEERING WHEEL ASSEMBLY (See page
SR-6)
7. REMOVE STEERING COLUMN COVER (See page
RS-434)
8. REMOVE HEADLIGHT DIMMER SWITCH ASSEMBLY
(See page LI-102)
9. REMOVE WINDSHIELD WIPER SWITCH ASSEMBLY
(See page WW-17)
B066709E01
Page 290 of 3000
Page 291 of 3000
INSTRUMENT PANEL – INSTRUMENT PANEL SAFETY PADIP–7
IP
18. REMOVE GLOVE COMPARTMENT DOOR STOPPER
SUB-ASSEMBLY
(a) Disengage the claw, and remove the glove
compartment door stopper sub-assembly.
19. REMOVE GLOVE COMPARTMENT DOOR
ASSEMBLY
(a) Push the right side wall and then push the left wall
to release the stoppers.
(b) Pull the glove compartment door sub-assembly
rearward to remove it.
20. REMOVE INSTRUMENT PANEL BOX NO.2
(a) Disengage the 2 claws and the 4 clips, and remove
the instrument panel box No. 2.
21. REMOVE INSTRUMENT SIDE PANEL LH
(a) Disengage the 5 claws by pulling up the edge of the
instrument side panel LH from the rear of the
vehicle.
(b) Remove the instrument side panel LH.
22. REMOVE INSTRUMENT SIDE PANEL RH
B066072
B066073E01
B066074
B066075E01
B066076E01
Page 292 of 3000

IP–8INSTRUMENT PANEL – INSTRUMENT PANEL SAFETY PAD
IP
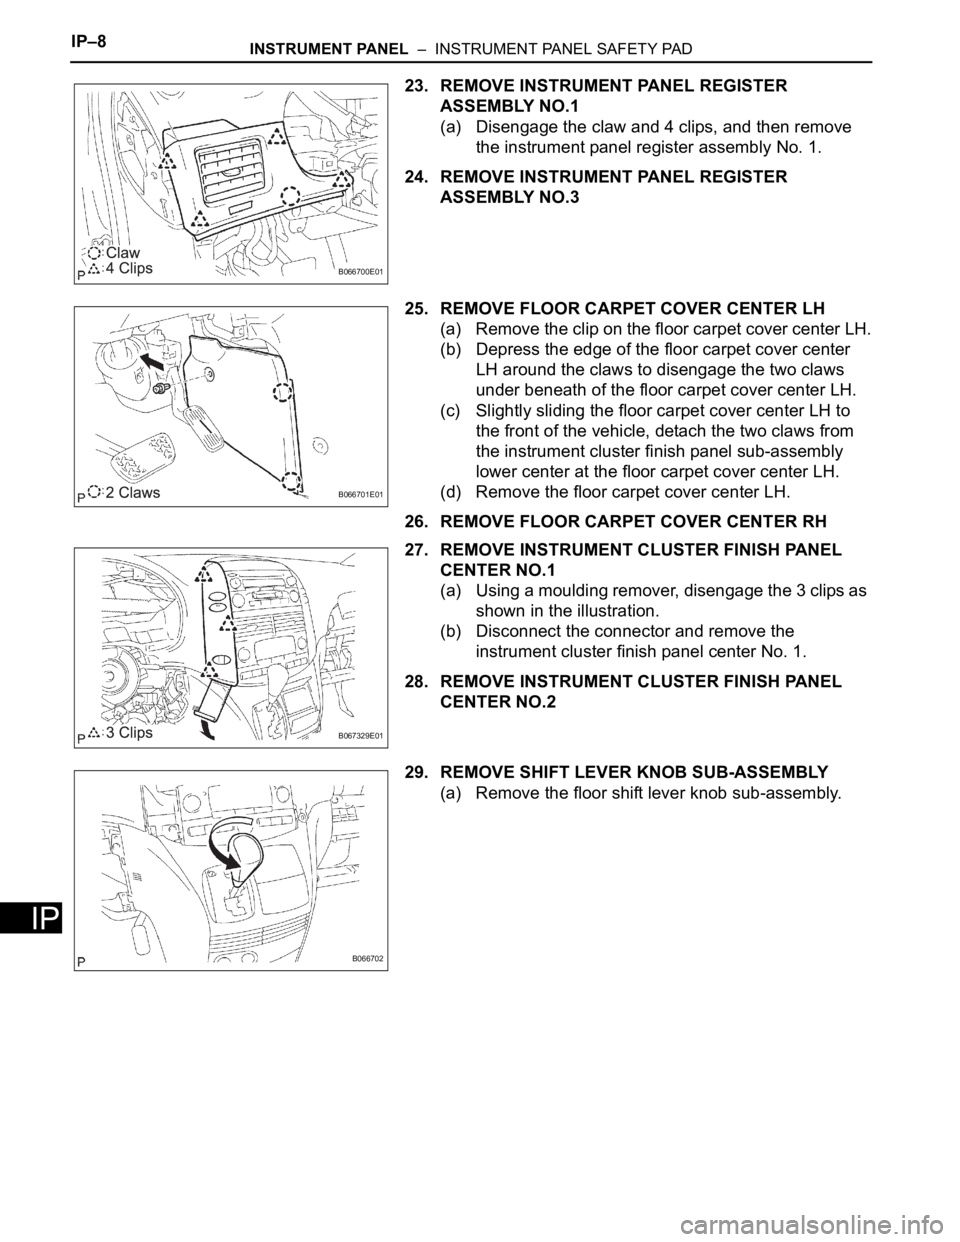
23. REMOVE INSTRUMENT PANEL REGISTER
ASSEMBLY NO.1
(a) Disengage the claw and 4 clips, and then remove
the instrument panel register assembly No. 1.
24. REMOVE INSTRUMENT PANEL REGISTER
ASSEMBLY NO.3
25. REMOVE FLOOR CARPET COVER CENTER LH
(a) Remove the clip on the floor carpet cover center LH.
(b) Depress the edge of the floor carpet cover center
LH around the claws to disengage the two claws
under beneath of the floor carpet cover center LH.
(c) Slightly sliding the floor carpet cover center LH to
the front of the vehicle, detach the two claws from
the instrument cluster finish panel sub-assembly
lower center at the floor carpet cover center LH.
(d) Remove the floor carpet cover center LH.
26. REMOVE FLOOR CARPET COVER CENTER RH
27. REMOVE INSTRUMENT CLUSTER FINISH PANEL
CENTER NO.1
(a) Using a moulding remover, disengage the 3 clips as
shown in the illustration.
(b) Disconnect the connector and remove the
instrument cluster finish panel center No. 1.
28. REMOVE INSTRUMENT CLUSTER FINISH PANEL
CENTER NO.2
29. REMOVE SHIFT LEVER KNOB SUB-ASSEMBLY
(a) Remove the floor shift lever knob sub-assembly.
B066700E01
B066701E01
B067329E01
B066702