Page 2549 of 3061
SUNROOF
RF-17
< SERVICE INFORMATION >
C
D
E
F
G
H
J
K
L
MA
B
RF
N
O
P
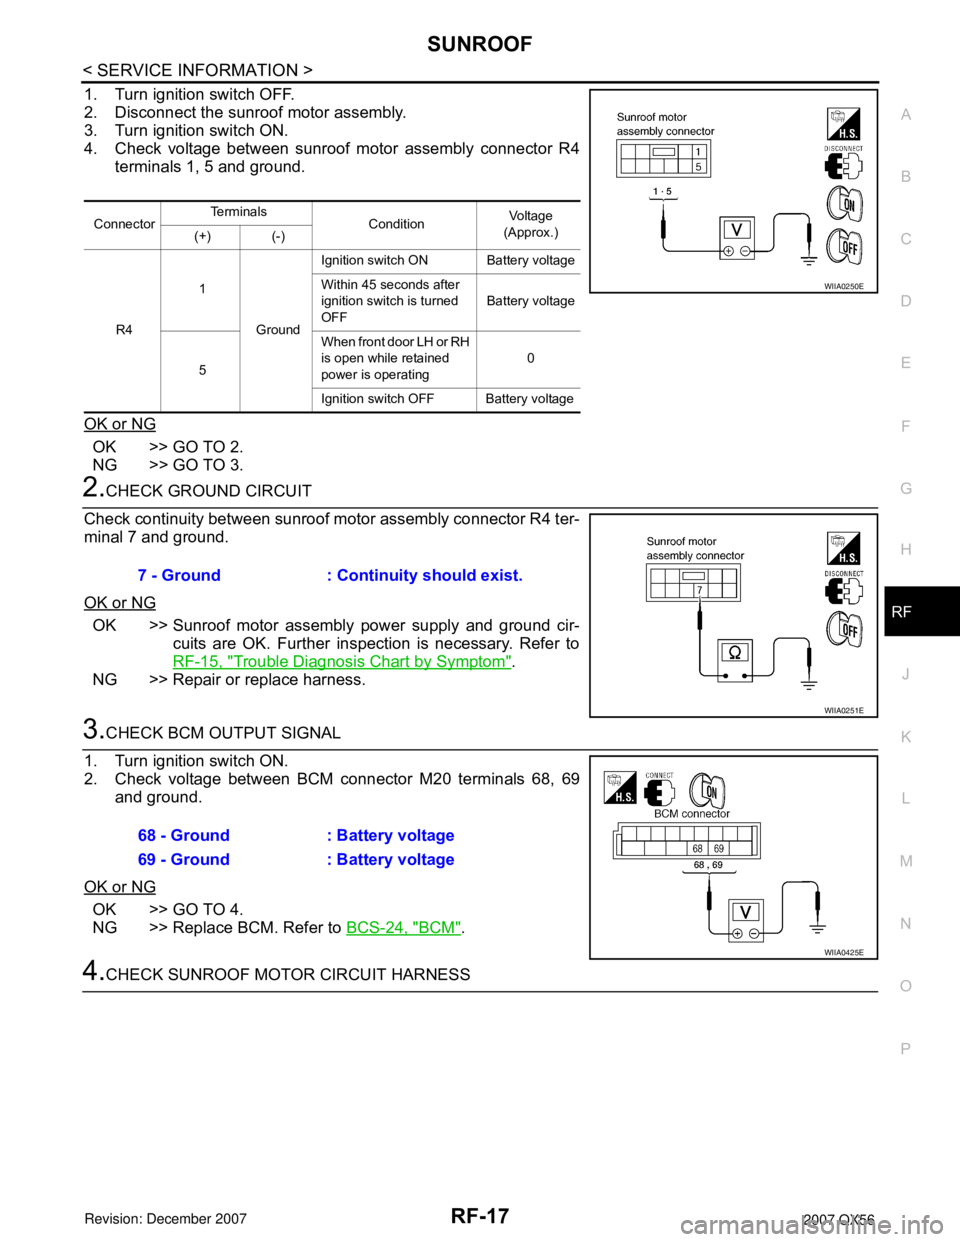
1. Turn ignition switch OFF.
2. Disconnect the sunroof motor assembly.
3. Turn ignition switch ON.
4. Check voltage between sunroof motor assembly connector R4
terminals 1, 5 and ground.
OK or NG
OK >> GO TO 2.
NG >> GO TO 3.
2.CHECK GROUND CIRCUIT
Check continuity between sunroof motor assembly connector R4 ter-
minal 7 and ground.
OK or NG
OK >> Sunroof motor assembly power supply and ground cir-
cuits are OK. Further inspection is necessary. Refer to
RF-15, "
Trouble Diagnosis Chart by Symptom".
NG >> Repair or replace harness.
3.CHECK BCM OUTPUT SIGNAL
1. Turn ignition switch ON.
2. Check voltage between BCM connector M20 terminals 68, 69
and ground.
OK or NG
OK >> GO TO 4.
NG >> Replace BCM. Refer to BCS-24, "
BCM".
4.CHECK SUNROOF MOTOR CIRCUIT HARNESS
ConnectorTe r m i n a l s
Condition Vo l ta g e
(Approx.)
(+) (-)
R41
GroundIgnition switch ON Battery voltage
Within 45 seconds after
ignition switch is turned
OFFBattery voltage
5When front door LH or RH
is open while retained
power is operating0
Ignition switch OFF Battery voltage
WIIA0250E
7 - Ground : Continuity should exist.
WIIA0251E
68 - Ground : Battery voltage
69 - Ground : Battery voltage
WIIA0425E
Page 2550 of 3061
RF-18
< SERVICE INFORMATION >
SUNROOF
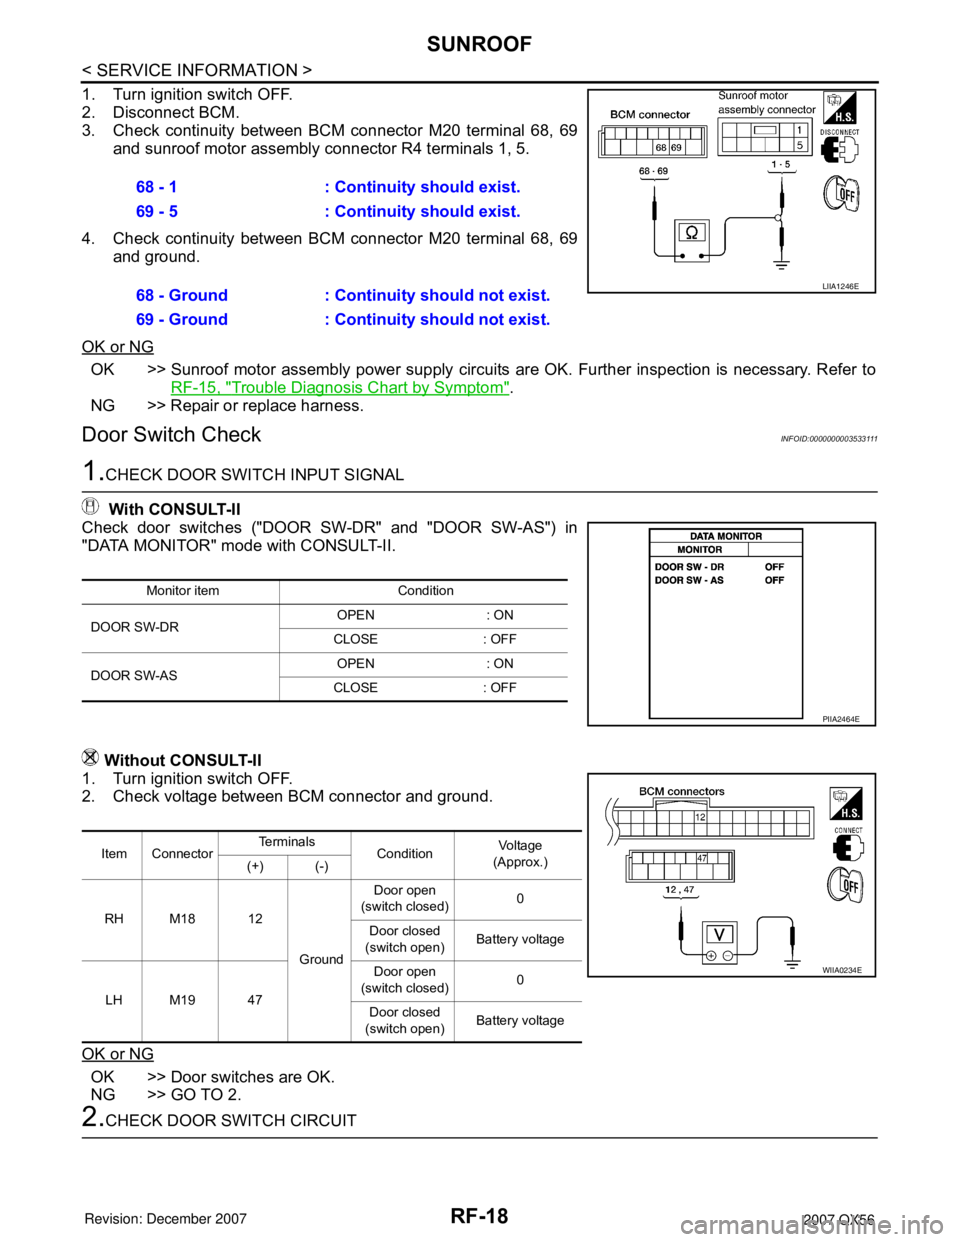
1. Turn ignition switch OFF.
2. Disconnect BCM.
3. Check continuity between BCM connector M20 terminal 68, 69
and sunroof motor assembly connector R4 terminals 1, 5.
4. Check continuity between BCM connector M20 terminal 68, 69
and ground.
OK or NG
OK >> Sunroof motor assembly power supply circuits are OK. Further inspection is necessary. Refer to
RF-15, "
Trouble Diagnosis Chart by Symptom".
NG >> Repair or replace harness.
Door Switch CheckINFOID:0000000003533111
1.CHECK DOOR SWITCH INPUT SIGNAL
With CONSULT-II
Check door switches ("DOOR SW-DR" and "DOOR SW-AS") in
"DATA MONITOR" mode with CONSULT-II.
Without CONSULT-II
1. Turn ignition switch OFF.
2. Check voltage between BCM connector and ground.
OK or NG
OK >> Door switches are OK.
NG >> GO TO 2.
2.CHECK DOOR SWITCH CIRCUIT 68 - 1 : Continuity should exist.
69 - 5 : Continuity should exist.
68 - Ground : Continuity should not exist.
69 - Ground : Continuity should not exist.
LIIA1246E
Monitor item Condition
DOOR SW-DROPEN : ON
CLOSE : OFF
DOOR SW-ASOPEN : ON
CLOSE : OFF
PIIA2464E
Item ConnectorTe r m i n a l s
ConditionVo l ta g e
(Approx.)
(+) (-)
RH M18 12
GroundDoor open
(switch closed)0
Door closed
(switch open)Battery voltage
LH M19 47Door open
(switch closed)0
Door closed
(switch open)Battery voltage
WIIA0234E
Page 2551 of 3061
SUNROOF
RF-19
< SERVICE INFORMATION >
C
D
E
F
G
H
J
K
L
MA
B
RF
N
O
P
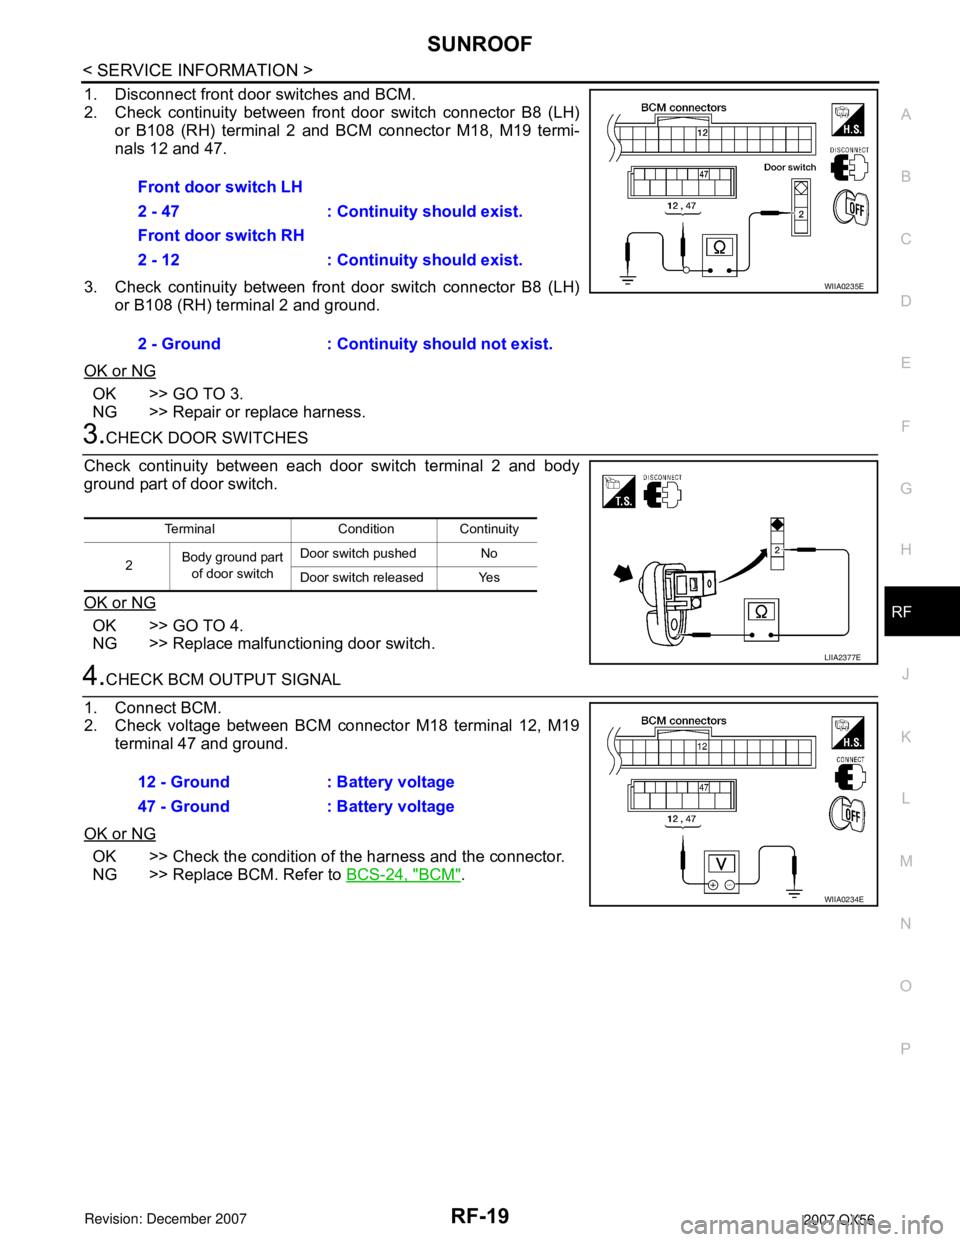
1. Disconnect front door switches and BCM.
2. Check continuity between front door switch connector B8 (LH)
or B108 (RH) terminal 2 and BCM connector M18, M19 termi-
nals 12 and 47.
3. Check continuity between front door switch connector B8 (LH)
or B108 (RH) terminal 2 and ground.
OK or NG
OK >> GO TO 3.
NG >> Repair or replace harness.
3.CHECK DOOR SWITCHES
Check continuity between each door switch terminal 2 and body
ground part of door switch.
OK or NG
OK >> GO TO 4.
NG >> Replace malfunctioning door switch.
4.CHECK BCM OUTPUT SIGNAL
1. Connect BCM.
2. Check voltage between BCM connector M18 terminal 12, M19
terminal 47 and ground.
OK or NG
OK >> Check the condition of the harness and the connector.
NG >> Replace BCM. Refer to BCS-24, "
BCM". Front door switch LH
2 - 47 : Continuity should exist.
Front door switch RH
2 - 12 : Continuity should exist.
2 - Ground : Continuity should not exist.
WIIA0235E
Terminal Condition Continuity
2Body ground part
of door switchDoor switch pushed No
Door switch released Yes
LIIA2377E
12 - Ground : Battery voltage
47 - Ground : Battery voltage
WIIA0234E
Page 2555 of 3061
SUNROOF
RF-23
< SERVICE INFORMATION >
C
D
E
F
G
H
J
K
L
MA
B
RF
N
O
P
3. Adjust the glass lid assembly. Refer to RF-20, "Fitting Adjustment".
4. Install side cover LH and RH.
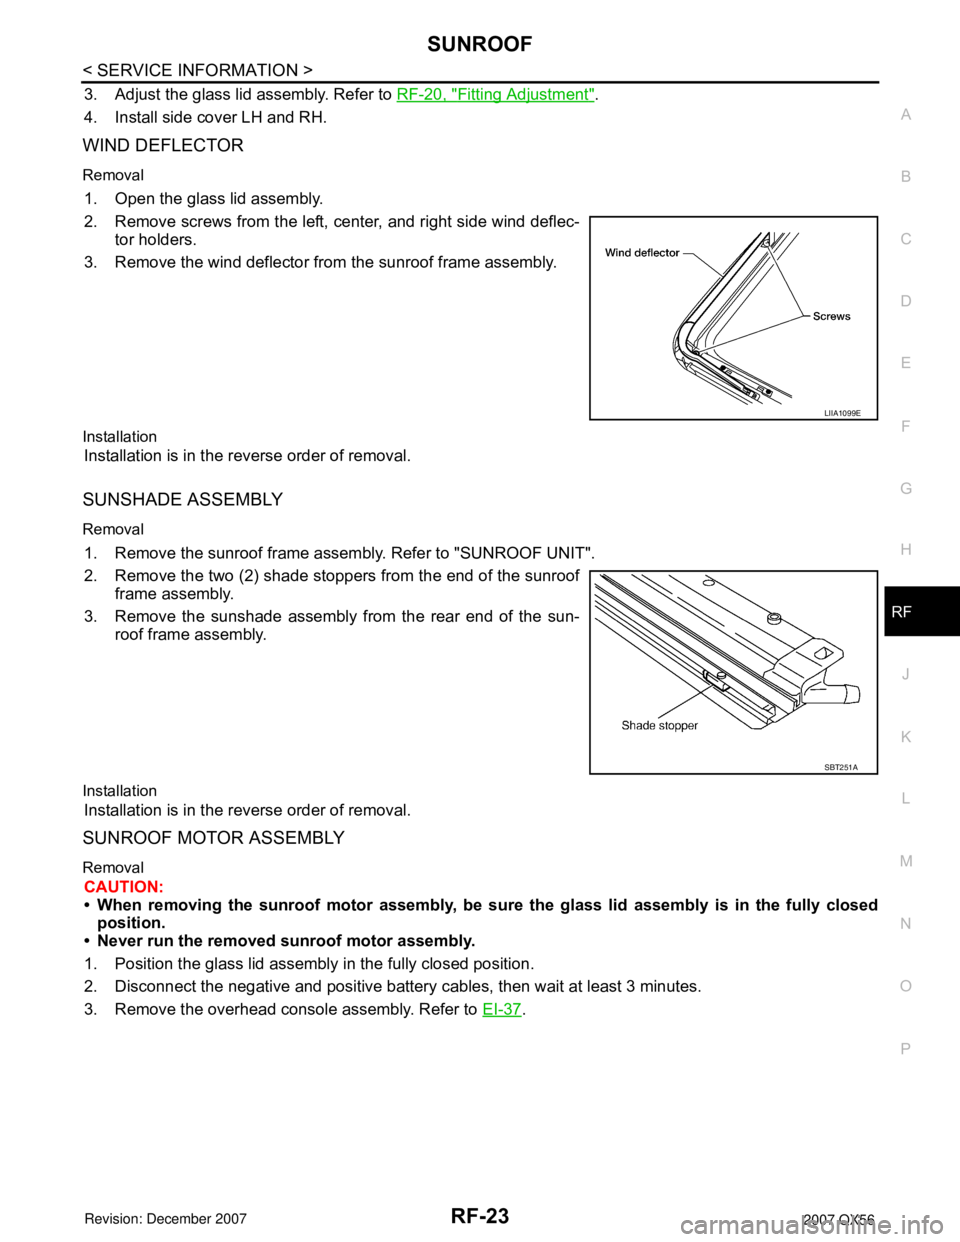
WIND DEFLECTOR
Removal
1. Open the glass lid assembly.
2. Remove screws from the left, center, and right side wind deflec-
tor holders.
3. Remove the wind deflector from the sunroof frame assembly.
Installation
Installation is in the reverse order of removal.
SUNSHADE ASSEMBLY
Removal
1. Remove the sunroof frame assembly. Refer to "SUNROOF UNIT".
2. Remove the two (2) shade stoppers from the end of the sunroof
frame assembly.
3. Remove the sunshade assembly from the rear end of the sun-
roof frame assembly.
Installation
Installation is in the reverse order of removal.
SUNROOF MOTOR ASSEMBLY
Removal
CAUTION:
• When removing the sunroof motor assembly, be sure the glass lid assembly is in the fully closed
position.
• Never run the removed sunroof motor assembly.
1. Position the glass lid assembly in the fully closed position.
2. Disconnect the negative and positive battery cables, then wait at least 3 minutes.
3. Remove the overhead console assembly. Refer to EI-37
.
LIIA1099E
SBT251A
Page 2556 of 3061
RF-24
< SERVICE INFORMATION >
SUNROOF
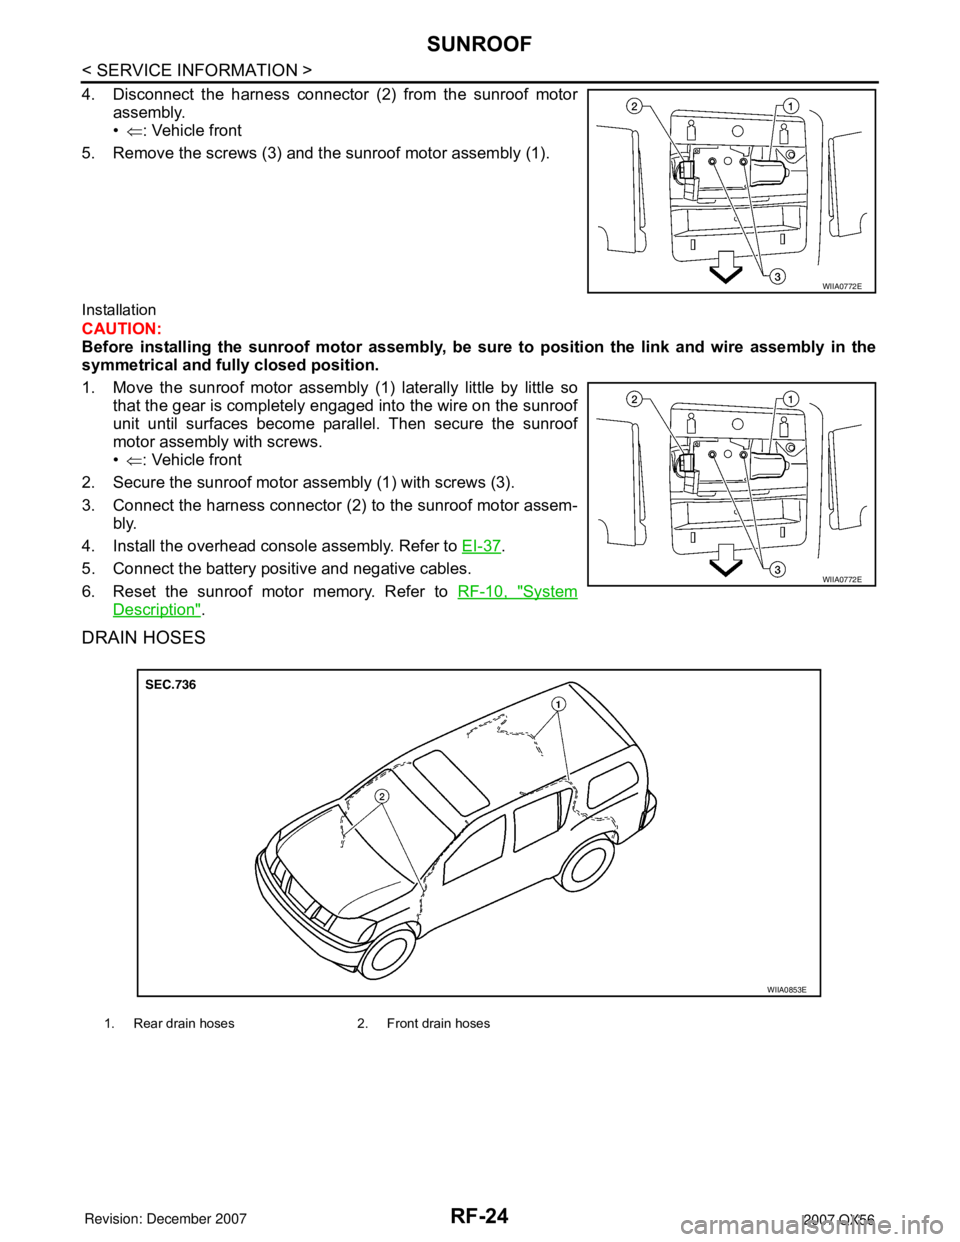
4. Disconnect the harness connector (2) from the sunroof motor
assembly.
•⇐: Vehicle front
5. Remove the screws (3) and the sunroof motor assembly (1).
Installation
CAUTION:
Before installing the sunroof motor assembly, be sure to position the link and wire assembly in the
symmetrical and fully closed position.
1. Move the sunroof motor assembly (1) laterally little by little so
that the gear is completely engaged into the wire on the sunroof
unit until surfaces become parallel. Then secure the sunroof
motor assembly with screws.
•⇐: Vehicle front
2. Secure the sunroof motor assembly (1) with screws (3).
3. Connect the harness connector (2) to the sunroof motor assem-
bly.
4. Install the overhead console assembly. Refer to EI-37
.
5. Connect the battery positive and negative cables.
6. Reset the sunroof motor memory. Refer to RF-10, "
System
Description".
DRAIN HOSES
WIIA0772E
WIIA0772E
1. Rear drain hoses 2. Front drain hoses
WIIA0853E
Page 2601 of 3061
TROUBLE DIAGNOSIS
RSU-11
< SERVICE INFORMATION >
C
D
F
G
H
I
J
K
L
MA
B
RSU
N
O
P
POWER SYSTEM TERMINAL LOOSENESS AND BATTERY INSPECTION
Make sure the battery positive cable, negative cable and ground connection are not loose. In addition, make
sure the battery is sufficiently charged.
CK SUSP INDICATOR LAMP INSPECTION
1. Make sure the CK SUSP indicator lamp turns on for approximately 2 seconds when the ignition switch is
turned ON. If it does not, check the combination meter. Refer to DI-5
.
2. Make sure the lamp turns off approximately 2 seconds after the ignition switch is turned ON. If the lamp
does not turn off, conduct self-diagnosis of the suspension control unit.
3. After conducting the self-diagnosis, be sure to erase the error memory. Refer to RSU-11, "
CONSULT-II
Function (AIR LEVELIZER)" .
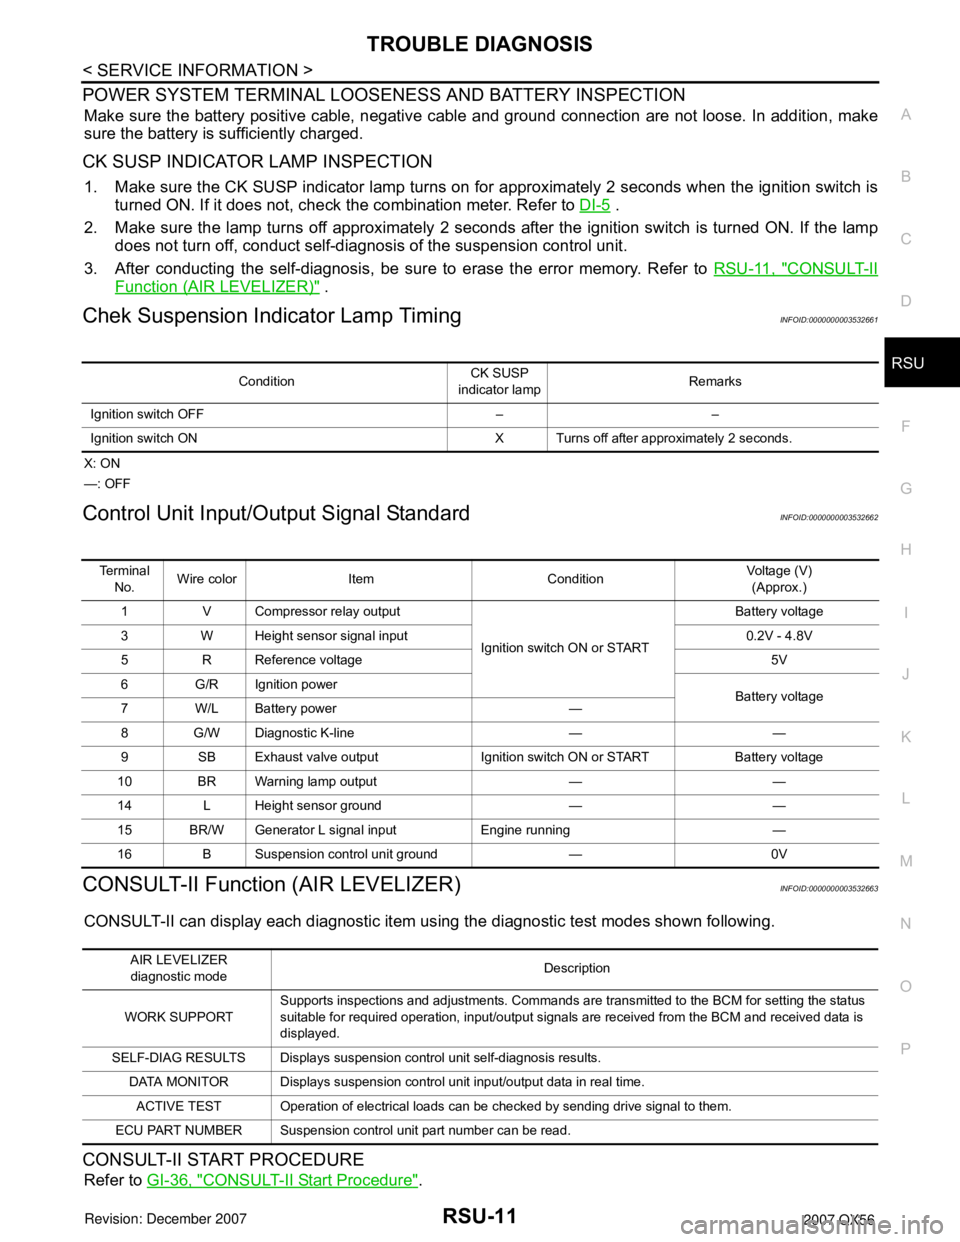
Chek Suspension Indicator Lamp TimingINFOID:0000000003532661
X: ON
—: OFF
Control Unit Input/Output Signal StandardINFOID:0000000003532662
CONSULT-II Function (AIR LEVELIZER)INFOID:0000000003532663
CONSULT-II can display each diagnostic item using the diagnostic test modes shown following.
CONSULT-II START PROCEDURE
Refer to GI-36, "CONSULT-II Start Procedure".
ConditionCK SUSP
indicator lampRemarks
Ignition switch OFF – –
Ignition switch ON X Turns off after approximately 2 seconds.
Te r m i n a l
No.Wire color Item ConditionVoltage (V)
(Approx.)
1 V Compressor relay output
Ignition switch ON or STARTBattery voltage
3 W Height sensor signal input 0.2V - 4.8V
5 R Reference voltage 5V
6 G/R Ignition power
Battery voltage
7W/LBattery power —
8 G/W Diagnostic K-line — —
9 SB Exhaust valve output Ignition switch ON or START Battery voltage
10 BR Warning lamp output — —
14 L Height sensor ground — —
15 BR/W Generator L signal input Engine running —
16 B Suspension control unit ground — 0V
AIR LEVELIZER
diagnostic modeDescription
WORK SUPPORTSupports inspections and adjustments. Commands are transmitted to the BCM for setting the status
suitable for required operation, input/output signals are received from the BCM and received data is
displayed.
SELF-DIAG RESULTS Displays suspension control unit self-diagnosis results.
DATA MONITOR Displays suspension control unit input/output data in real time.
ACTIVE TEST Operation of electrical loads can be checked by sending drive signal to them.
ECU PART NUMBER Suspension control unit part number can be read.
Page 2609 of 3061
TROUBLE DIAGNOSES FOR SYMPTOMS
RSU-19
< SERVICE INFORMATION >
C
D
F
G
H
I
J
K
L
MA
B
RSU
N
O
P
TROUBLE DIAGNOSES FOR SYMPTOMS
Load Leveling Rear Air Suspension System Does Not OperateINFOID:0000000003532667
1.CHECK WARNING LAMP ACTIVATION
Make sure warning lamp remains off while driving.
OK or NG
OK >> GO TO 2.
NG >> Carry out self-diagnosis. Refer to RSU-11, "
CONSULT-II Function (AIR LEVELIZER)" .
2.CHECK FUSES AND FUSIBLE LINK
Check that the following fuses and fusible link are not blown.
OK or NG
OK >> GO TO 3.
NG >> If fuse or fusible link is blown, be sure to eliminate cause of malfunction before installing new fuse
or fusible link.
3.CHECK SUSPENSION CONTROL UNIT POWER AND GROUND
1. Turn the ignition switch ON.
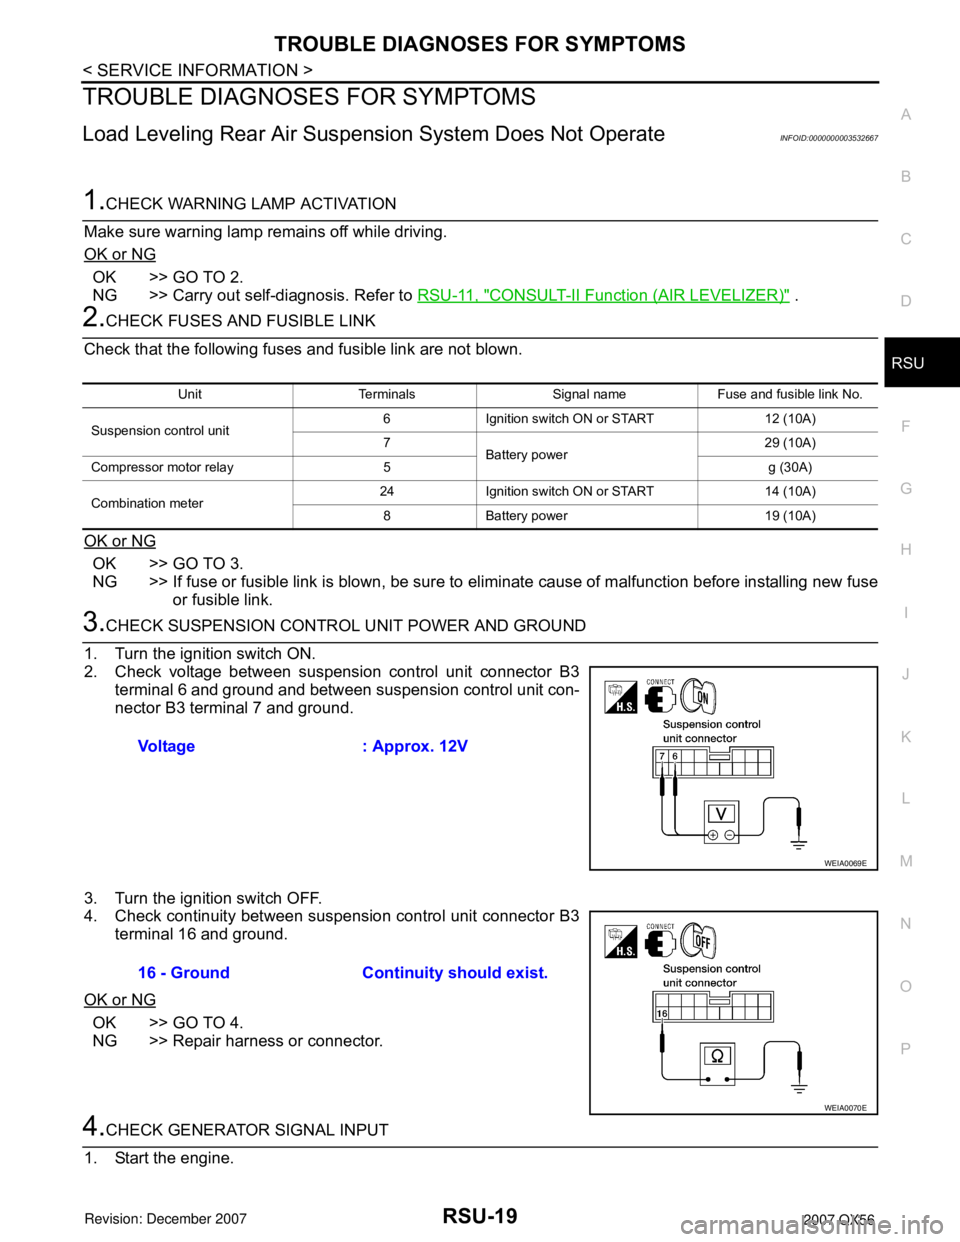
2. Check voltage between suspension control unit connector B3
terminal 6 and ground and between suspension control unit con-
nector B3 terminal 7 and ground.
3. Turn the ignition switch OFF.
4. Check continuity between suspension control unit connector B3
terminal 16 and ground.
OK or NG
OK >> GO TO 4.
NG >> Repair harness or connector.
4.CHECK GENERATOR SIGNAL INPUT
1. Start the engine.
Unit Terminals Signal name Fuse and fusible link No.
Suspension control unit6 Ignition switch ON or START 12 (10A)
7
Battery power29 (10A)
Compressor motor relay 5 g (30A)
Combination meter24 Ignition switch ON or START 14 (10A)
8 Battery power 19 (10A)
Voltage : Approx. 12V
WEIA0069E
16 - Ground Continuity should exist.
WEIA0070E
Page 2632 of 3061
RSU-42
< SERVICE INFORMATION >
CONTROL UNIT
CONTROL UNIT
Removal and InstallationINFOID:0000000003532680
REMOVAL
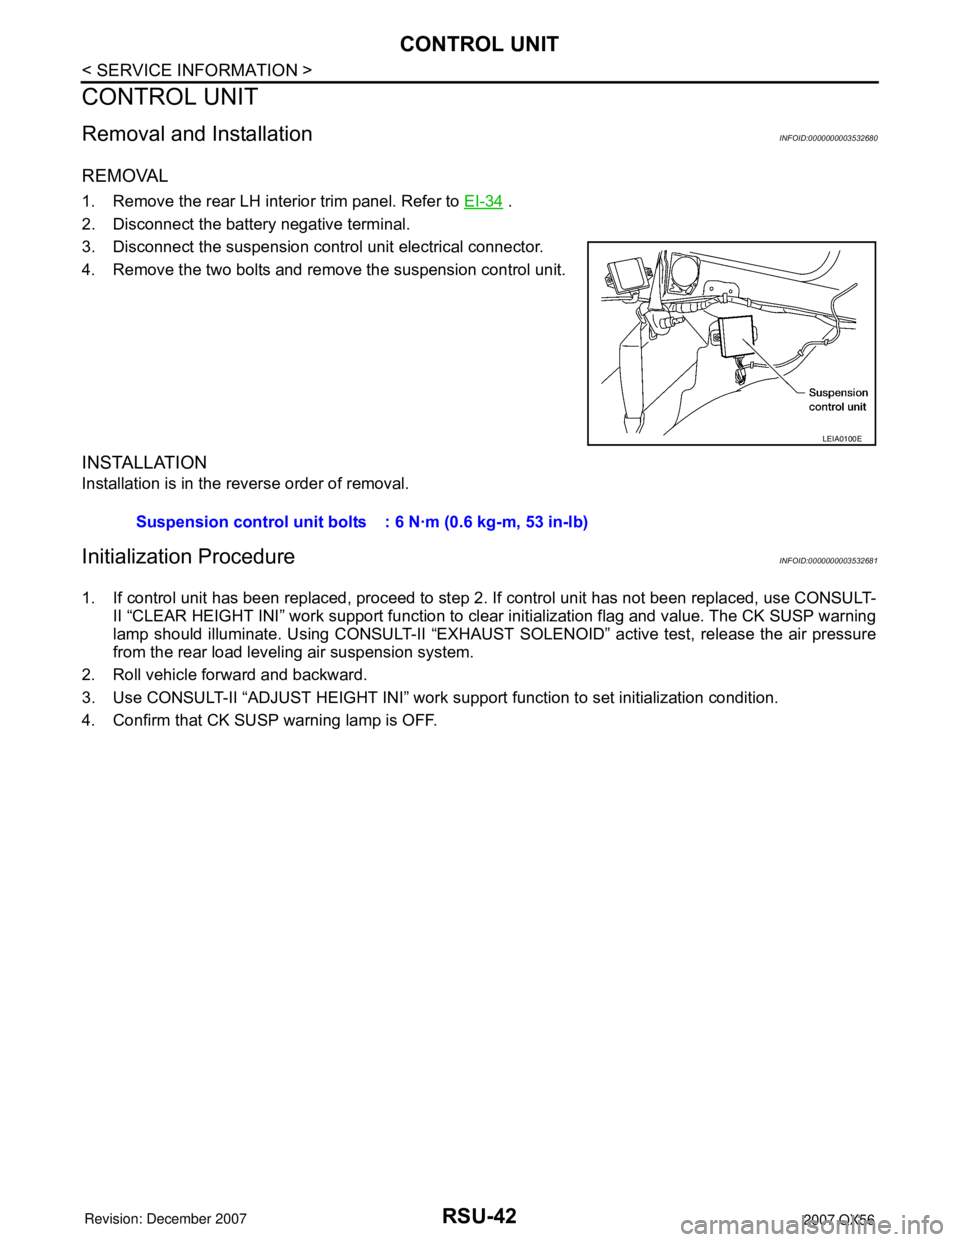
1. Remove the rear LH interior trim panel. Refer to EI-34 .
2. Disconnect the battery negative terminal.
3. Disconnect the suspension control unit electrical connector.
4. Remove the two bolts and remove the suspension control unit.
INSTALLATION
Installation is in the reverse order of removal.
Initialization ProcedureINFOID:0000000003532681
1. If control unit has been replaced, proceed to step 2. If control unit has not been replaced, use CONSULT-
II “CLEAR HEIGHT INI” work support function to clear initialization flag and value. The CK SUSP warning
lamp should illuminate. Using CONSULT-II “EXHAUST SOLENOID” active test, release the air pressure
from the rear load leveling air suspension system.
2. Roll vehicle forward and backward.
3. Use CONSULT-II “ADJUST HEIGHT INI” work support function to set initialization condition.
4. Confirm that CK SUSP warning lamp is OFF.
LEIA0100E
Suspension control unit bolts : 6 N·m (0.6 kg-m, 53 in-lb)