2006 LAND ROVER FRELANDER 2 fuel pump
[x] Cancel search: fuel pumpPage 1003 of 3229
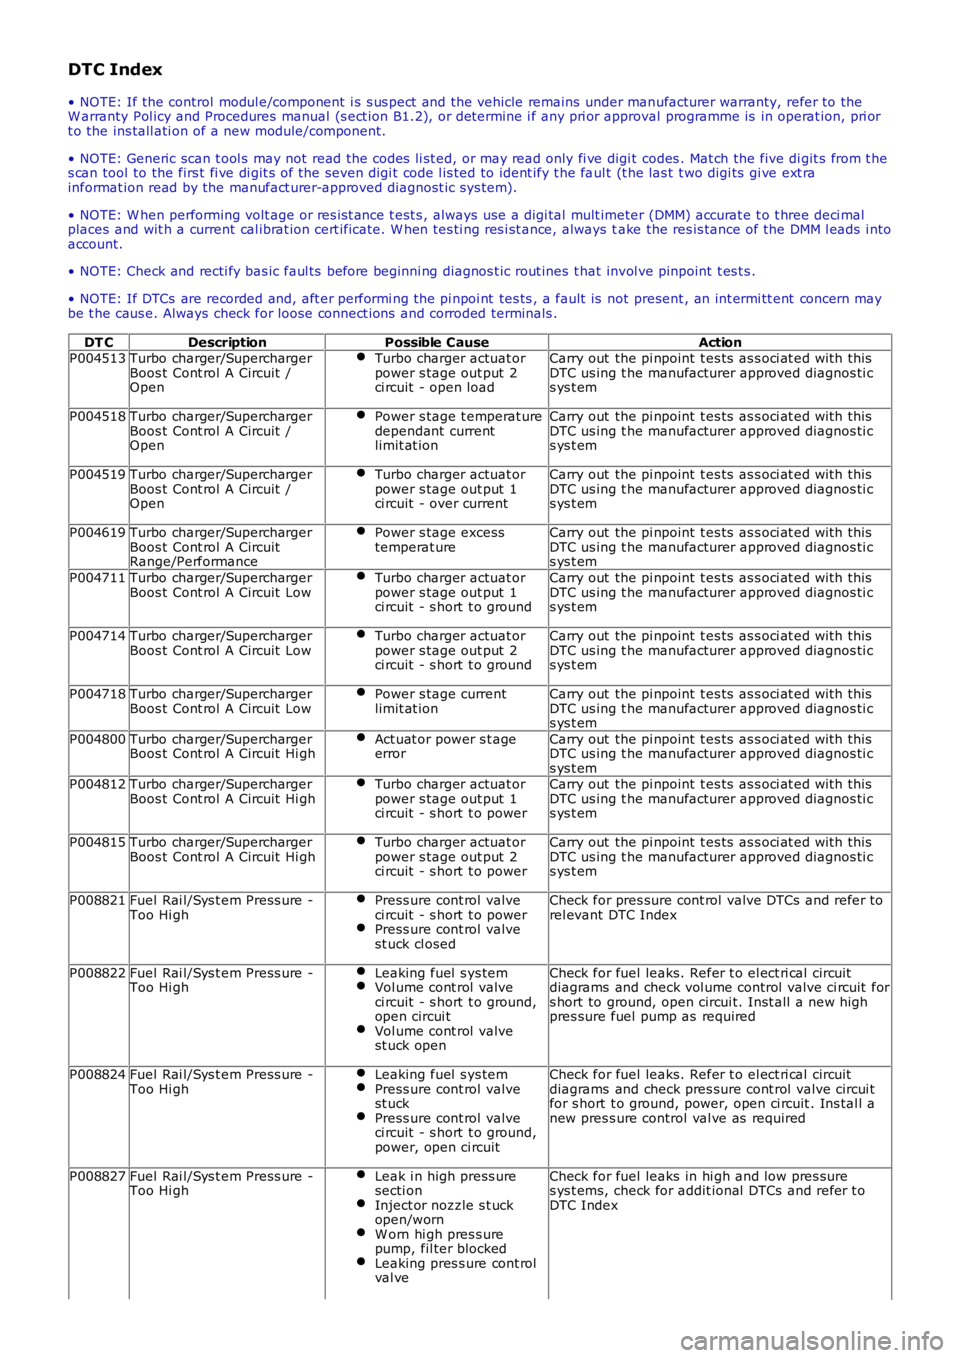
DTC Index
• NOTE: If the control modul e/component i s s us pect and the vehicle remains under manufacturer warranty, refer to theW arranty Pol icy and Procedures manual (s ect ion B1.2), or determine i f any pri or approval programme is in operat ion, pri ort o the ins tall ati on of a new module/component.
• NOTE: Generic scan t ool s may not read the codes li st ed, or may read only fi ve digit codes . Mat ch the five di git s from t hes can tool to the firs t fi ve di git s of the seven digi t code l is ted to ident ify t he faul t (t he las t t wo digi ts gi ve ext rainformat ion read by the manufact urer-approved diagnost ic s ys tem).
• NOTE: W hen performing volt age or res is t ance t est s , always use a digi tal mult imeter (DMM) accurat e t o t hree deci malplaces and wit h a current cal ibrat ion cert ificate. W hen tes ti ng res i st ance, always take the res is tance of the DMM l eads i ntoaccount.
• NOTE: Check and recti fy bas ic faul ts before beginni ng diagnos t ic rout ines t hat invol ve pinpoint t es t s .
• NOTE: If DTCs are recorded and, aft er performi ng the pi npoi nt tes ts , a fault is not present , an int ermi tt ent concern maybe t he caus e. Always check for loose connect ions and corroded terminals .
DT CDescriptionPossible CauseActionP004513Turbo charger/SuperchargerBoos t Cont rol A Circuit /Open
Turbo charger actuat orpower s tage out put 2ci rcuit - open load
Carry out the pi npoint t es ts as s oci at ed wi th thisDTC us ing t he manufacturer approved diagnos ti cs ys t em
P004518Turbo charger/SuperchargerBoos t Cont rol A Circuit /Open
Power s tage t emperat uredependant currentlimit at ion
Carry out the pi npoint t es ts as s oci at ed wi th thisDTC us ing t he manufacturer approved diagnos ti cs ys t em
P004519Turbo charger/SuperchargerBoos t Cont rol A Circuit /Open
Turbo charger actuat orpower s tage out put 1ci rcuit - over current
Carry out the pi npoint t es ts as s oci at ed wi th thisDTC us ing t he manufacturer approved diagnos ti cs ys t em
P004619Turbo charger/SuperchargerBoos t Cont rol A CircuitRange/Performance
Power s tage excesstemperat ureCarry out the pi npoint t es ts as s oci at ed wi th thisDTC us ing t he manufacturer approved diagnos ti cs ys t em
P004711Turbo charger/SuperchargerBoos t Cont rol A Circuit LowTurbo charger actuat orpower s tage out put 1ci rcuit - s hort t o ground
Carry out the pi npoint t es ts as s oci at ed wi th thisDTC us ing t he manufacturer approved diagnos ti cs ys t em
P004714Turbo charger/SuperchargerBoos t Cont rol A Circuit LowTurbo charger actuat orpower s tage out put 2ci rcuit - s hort t o ground
Carry out the pi npoint t es ts as s oci at ed wi th thisDTC us ing t he manufacturer approved diagnos ti cs ys t em
P004718Turbo charger/SuperchargerBoos t Cont rol A Circuit LowPower s tage currentlimit at ionCarry out the pi npoint t es ts as s oci at ed wi th thisDTC us ing t he manufacturer approved diagnos ti cs ys t em
P004800Turbo charger/SuperchargerBoos t Cont rol A Circuit Hi ghAct uat or power s t ageerrorCarry out the pi npoint t es ts as s oci at ed wi th thisDTC us ing t he manufacturer approved diagnos ti cs ys t emP004812Turbo charger/SuperchargerBoos t Cont rol A Circuit Hi ghTurbo charger actuat orpower s tage out put 1ci rcuit - s hort t o power
Carry out the pi npoint t es ts as s oci at ed wi th thisDTC us ing t he manufacturer approved diagnos ti cs ys t em
P004815Turbo charger/SuperchargerBoos t Cont rol A Circuit Hi ghTurbo charger actuat orpower s tage out put 2ci rcuit - s hort t o power
Carry out the pi npoint t es ts as s oci at ed wi th thisDTC us ing t he manufacturer approved diagnos ti cs ys t em
P008821Fuel Rai l/Sys t em Press ure -Too Hi ghPress ure cont rol valveci rcuit - s hort t o powerPress ure cont rol valvest uck cl osed
Check for pres sure cont rol valve DTCs and refer torel evant DTC Index
P008822Fuel Rai l/Sys t em Press ure -Too Hi ghLeaking fuel s ys temVol ume cont rol valveci rcuit - s hort t o ground,open circui tVol ume cont rol valvest uck open
Check for fuel leaks. Refer t o el ect ri cal circuitdiagrams and check vol ume control valve ci rcuit fors hort to ground, open circui t. Inst all a new highpres sure fuel pump as required
P008824Fuel Rai l/Sys t em Press ure -Too Hi ghLeaking fuel s ys temPress ure cont rol valvest uckPress ure cont rol valveci rcuit - s hort t o ground,power, open ci rcuit
Check for fuel leaks. Refer t o el ect ri cal circuitdiagrams and check pres sure cont rol valve circui tfor s hort t o ground, power, open ci rcuit . Ins tal l anew pres s ure control val ve as required
P008827Fuel Rai l/Sys t em Press ure -Too Hi ghLeak i n high press uresecti onInject or nozzle s t uckopen/wornW orn hi gh pres s urepump, fil ter blockedLeaking pres s ure cont rolval ve
Check for fuel leaks in hi gh and low pres sures ys t ems, check for addit ional DTCs and refer t oDTC Index
Page 1004 of 3229
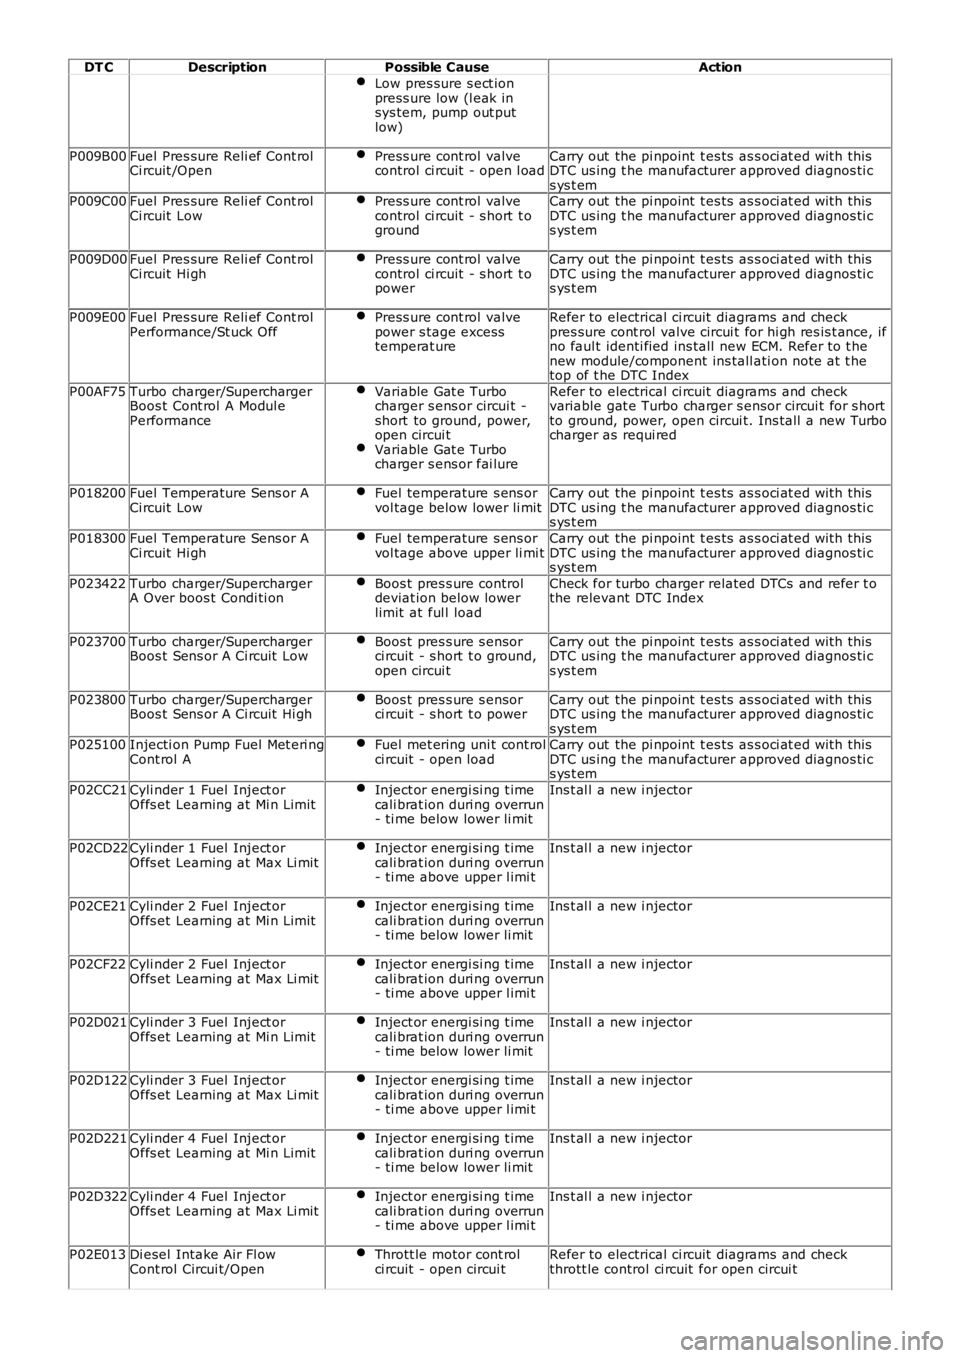
DT CDescriptionPossible CauseAction
Low pres sure s ect ionpress ure low (l eak insys tem, pump out putlow)
P009B00Fuel Pres sure Reli ef Cont rolCi rcuit /OpenPress ure cont rol valvecontrol ci rcuit - open l oadCarry out the pi npoint t es ts as s oci at ed wi th thisDTC us ing t he manufacturer approved diagnos ti cs ys t emP009C00Fuel Pres sure Reli ef Cont rolCi rcuit LowPress ure cont rol valvecontrol ci rcuit - s hort t oground
Carry out the pi npoint t es ts as s oci at ed wi th thisDTC us ing t he manufacturer approved diagnos ti cs ys t em
P009D00Fuel Pres sure Reli ef Cont rolCi rcuit Hi ghPress ure cont rol valvecontrol ci rcuit - s hort t opower
Carry out the pi npoint t es ts as s oci at ed wi th thisDTC us ing t he manufacturer approved diagnos ti cs ys t em
P009E00Fuel Pres sure Reli ef Cont rolPerformance/St uck OffPress ure cont rol valvepower s tage excesstemperat ure
Refer to electrical ci rcuit diagrams and checkpres sure cont rol valve circui t for hi gh res is t ance, ifno faul t identi fied ins tall new ECM. Refer to t henew module/component ins tall ati on note at t hetop of t he DTC Index
P00AF75Turbo charger/SuperchargerBoos t Cont rol A Modul ePerformance
Variable Gat e Turbocharger s ens or circui t -short to ground, power,open circui tVariable Gat e Turbocharger s ens or fai lure
Refer to electrical ci rcuit diagrams and checkvariable gat e Turbo charger s ensor circui t for s hortto ground, power, open circui t. Ins tall a new Turbocharger as requi red
P018200Fuel Temperature Sens or ACi rcuit LowFuel temperature s ens orvol tage below lower li mitCarry out the pi npoint t es ts as s oci at ed wi th thisDTC us ing t he manufacturer approved diagnos ti cs ys t em
P018300Fuel Temperature Sens or ACi rcuit Hi ghFuel temperature s ens orvol tage above upper li mi tCarry out the pi npoint t es ts as s oci at ed wi th thisDTC us ing t he manufacturer approved diagnos ti cs ys t em
P023422Turbo charger/SuperchargerA Over boos t Condi ti onBoos t pres s ure controldeviat ion below lowerlimit at ful l load
Check for turbo charger related DTCs and refer t othe relevant DTC Index
P023700Turbo charger/SuperchargerBoos t Sens or A Ci rcuit LowBoos t pres s ure s ensorci rcuit - s hort t o ground,open circui t
Carry out the pi npoint t es ts as s oci at ed wi th thisDTC us ing t he manufacturer approved diagnos ti cs ys t em
P023800Turbo charger/SuperchargerBoos t Sens or A Ci rcuit Hi ghBoos t pres s ure s ensorci rcuit - s hort t o powerCarry out the pi npoint t es ts as s oci at ed wi th thisDTC us ing t he manufacturer approved diagnos ti cs ys t emP025100Injecti on Pump Fuel Met eri ngCont rol AFuel met ering uni t cont rolci rcuit - open loadCarry out the pi npoint t es ts as s oci at ed wi th thisDTC us ing t he manufacturer approved diagnos ti cs ys t em
P02CC21Cyli nder 1 Fuel Inject orOffs et Learning at Mi n LimitInject or energi si ng t imecali brat ion duri ng overrun- ti me below lower li mit
Ins t al l a new i njector
P02CD22Cyli nder 1 Fuel Inject orOffs et Learning at Max Li mitInject or energi si ng t imecali brat ion duri ng overrun- ti me above upper l imi t
Ins t al l a new i njector
P02CE21Cyli nder 2 Fuel Inject orOffs et Learning at Mi n LimitInject or energi si ng t imecali brat ion duri ng overrun- ti me below lower li mit
Ins t al l a new i njector
P02CF22Cyli nder 2 Fuel Inject orOffs et Learning at Max Li mitInject or energi si ng t imecali brat ion duri ng overrun- ti me above upper l imi t
Ins t al l a new i njector
P02D021Cyli nder 3 Fuel Inject orOffs et Learning at Mi n LimitInject or energi si ng t imecali brat ion duri ng overrun- ti me below lower li mit
Ins t al l a new i njector
P02D122Cyli nder 3 Fuel Inject orOffs et Learning at Max Li mitInject or energi si ng t imecali brat ion duri ng overrun- ti me above upper l imi t
Ins t al l a new i njector
P02D221Cyli nder 4 Fuel Inject orOffs et Learning at Mi n LimitInject or energi si ng t imecali brat ion duri ng overrun- ti me below lower li mit
Ins t al l a new i njector
P02D322Cyli nder 4 Fuel Inject orOffs et Learning at Max Li mitInject or energi si ng t imecali brat ion duri ng overrun- ti me above upper l imi t
Ins t al l a new i njector
P02E013Di esel Intake Air Fl owCont rol Circui t/OpenThrott le motor cont rolci rcuit - open circui tRefer to electrical ci rcuit diagrams and checkthrott le control ci rcuit for open circui t
Page 1006 of 3229
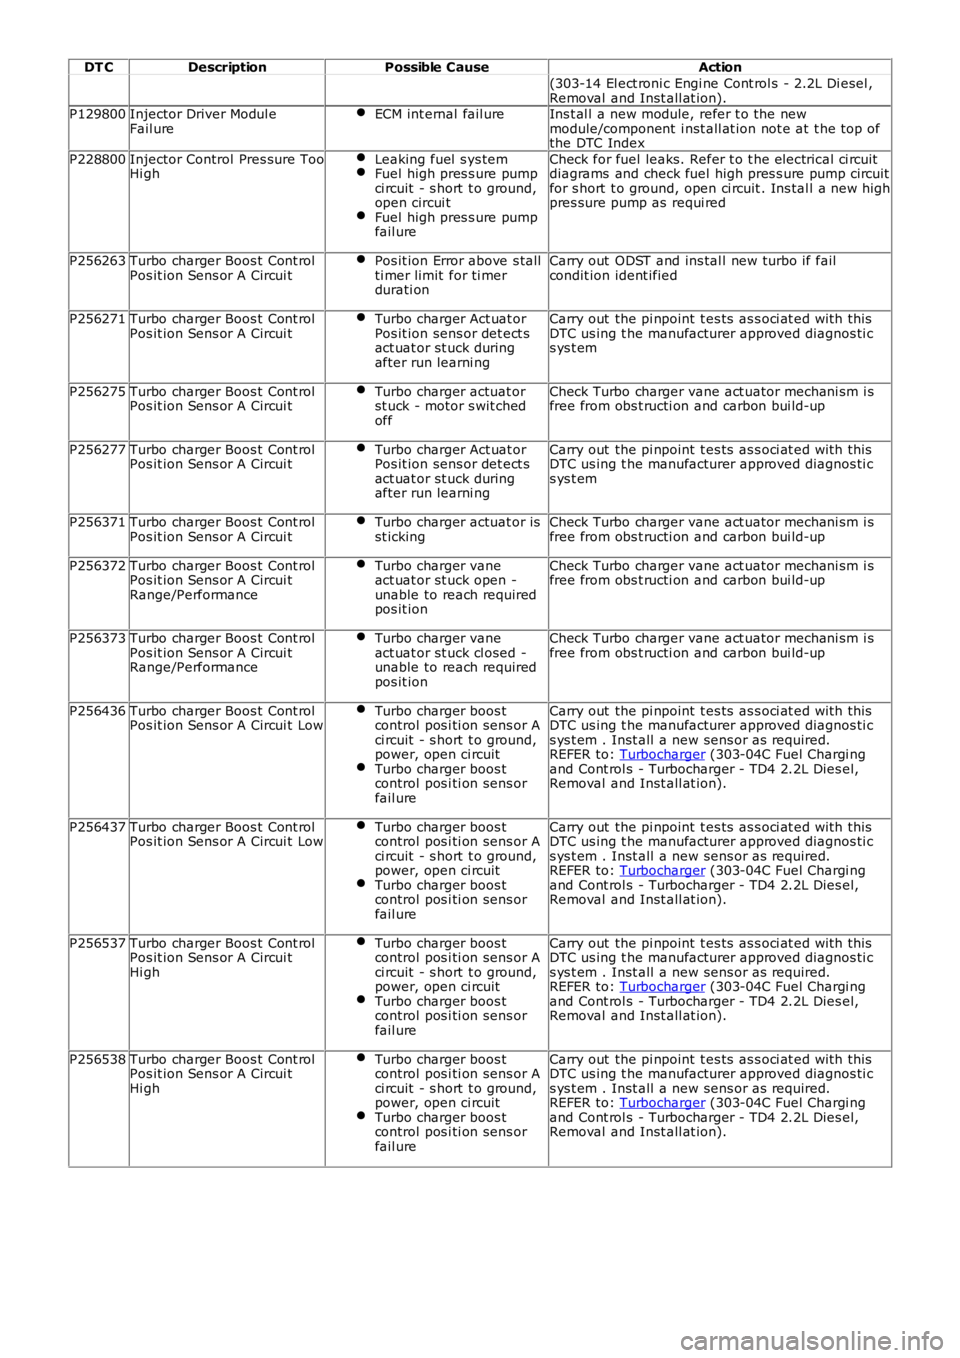
DT CDescriptionPossible CauseAction
(303-14 El ect roni c Engi ne Cont rol s - 2.2L Di esel ,Removal and Inst all at ion).P129800Injector Driver Modul eFail ureECM int ernal fail ureIns t al l a new module, refer t o the newmodule/component i nst all at ion not e at t he top ofthe DTC Index
P228800Injector Control Pres sure TooHi ghLeaking fuel s ys temFuel high pres s ure pumpci rcuit - s hort t o ground,open circui tFuel high pres s ure pumpfail ure
Check for fuel leaks. Refer t o t he electrical ci rcuitdiagrams and check fuel high pres s ure pump circuitfor s hort t o ground, open ci rcuit . Ins tal l a new highpres sure pump as requi red
P256263Turbo charger Boos t Cont rolPos it ion Sens or A Circui tPos it ion Error above s tallti mer limit for ti merdurati on
Carry out ODST and ins tal l new turbo if failcondit ion ident ified
P256271Turbo charger Boos t Cont rolPos it ion Sens or A Circui tTurbo charger Act uat orPos it ion sens or det ect sact uat or st uck duringafter run learni ng
Carry out the pi npoint t es ts as s oci at ed wi th thisDTC us ing t he manufacturer approved diagnos ti cs ys t em
P256275Turbo charger Boos t Cont rolPos it ion Sens or A Circui tTurbo charger actuat orst uck - motor s wit chedoff
Check Turbo charger vane act uator mechani sm i sfree from obs t ructi on and carbon bui ld-up
P256277Turbo charger Boos t Cont rolPos it ion Sens or A Circui tTurbo charger Act uat orPos it ion sens or det ect sact uat or st uck duringafter run learni ng
Carry out the pi npoint t es ts as s oci at ed wi th thisDTC us ing t he manufacturer approved diagnos ti cs ys t em
P256371Turbo charger Boos t Cont rolPos it ion Sens or A Circui tTurbo charger actuat or isst ickingCheck Turbo charger vane act uator mechani sm i sfree from obs t ructi on and carbon bui ld-up
P256372Turbo charger Boos t Cont rolPos it ion Sens or A Circui tRange/Performance
Turbo charger vaneact uat or st uck open -unable to reach requiredpos it ion
Check Turbo charger vane act uator mechani sm i sfree from obs t ructi on and carbon bui ld-up
P256373Turbo charger Boos t Cont rolPos it ion Sens or A Circui tRange/Performance
Turbo charger vaneact uat or st uck cl osed -unable to reach requiredpos it ion
Check Turbo charger vane act uator mechani sm i sfree from obs t ructi on and carbon bui ld-up
P256436Turbo charger Boos t Cont rolPos it ion Sens or A Circui t LowTurbo charger boos tcontrol pos i ti on sens or Aci rcuit - s hort t o ground,power, open ci rcuitTurbo charger boos tcontrol pos i ti on sens orfail ure
Carry out the pi npoint t es ts as s oci at ed wi th thisDTC us ing t he manufacturer approved diagnos ti cs ys t em . Inst all a new sens or as required.REFER to: Turbocharger (303-04C Fuel Chargi ngand Cont rol s - Turbocharger - TD4 2.2L Dies el,Removal and Inst all at ion).
P256437Turbo charger Boos t Cont rolPos it ion Sens or A Circui t LowTurbo charger boos tcontrol pos i ti on sens or Aci rcuit - s hort t o ground,power, open ci rcuitTurbo charger boos tcontrol pos i ti on sens orfail ure
Carry out the pi npoint t es ts as s oci at ed wi th thisDTC us ing t he manufacturer approved diagnos ti cs ys t em . Inst all a new sens or as required.REFER to: Turbocharger (303-04C Fuel Chargi ngand Cont rol s - Turbocharger - TD4 2.2L Dies el,Removal and Inst all at ion).
P256537Turbo charger Boos t Cont rolPos it ion Sens or A Circui tHi gh
Turbo charger boos tcontrol pos i ti on sens or Aci rcuit - s hort t o ground,power, open ci rcuitTurbo charger boos tcontrol pos i ti on sens orfail ure
Carry out the pi npoint t es ts as s oci at ed wi th thisDTC us ing t he manufacturer approved diagnos ti cs ys t em . Inst all a new sens or as required.REFER to: Turbocharger (303-04C Fuel Chargi ngand Cont rol s - Turbocharger - TD4 2.2L Dies el,Removal and Inst all at ion).
P256538Turbo charger Boos t Cont rolPos it ion Sens or A Circui tHi gh
Turbo charger boos tcontrol pos i ti on sens or Aci rcuit - s hort t o ground,power, open ci rcuitTurbo charger boos tcontrol pos i ti on sens orfail ure
Carry out the pi npoint t es ts as s oci at ed wi th thisDTC us ing t he manufacturer approved diagnos ti cs ys t em . Inst all a new sens or as required.REFER to: Turbocharger (303-04C Fuel Chargi ngand Cont rol s - Turbocharger - TD4 2.2L Dies el,Removal and Inst all at ion).
Page 1013 of 3229
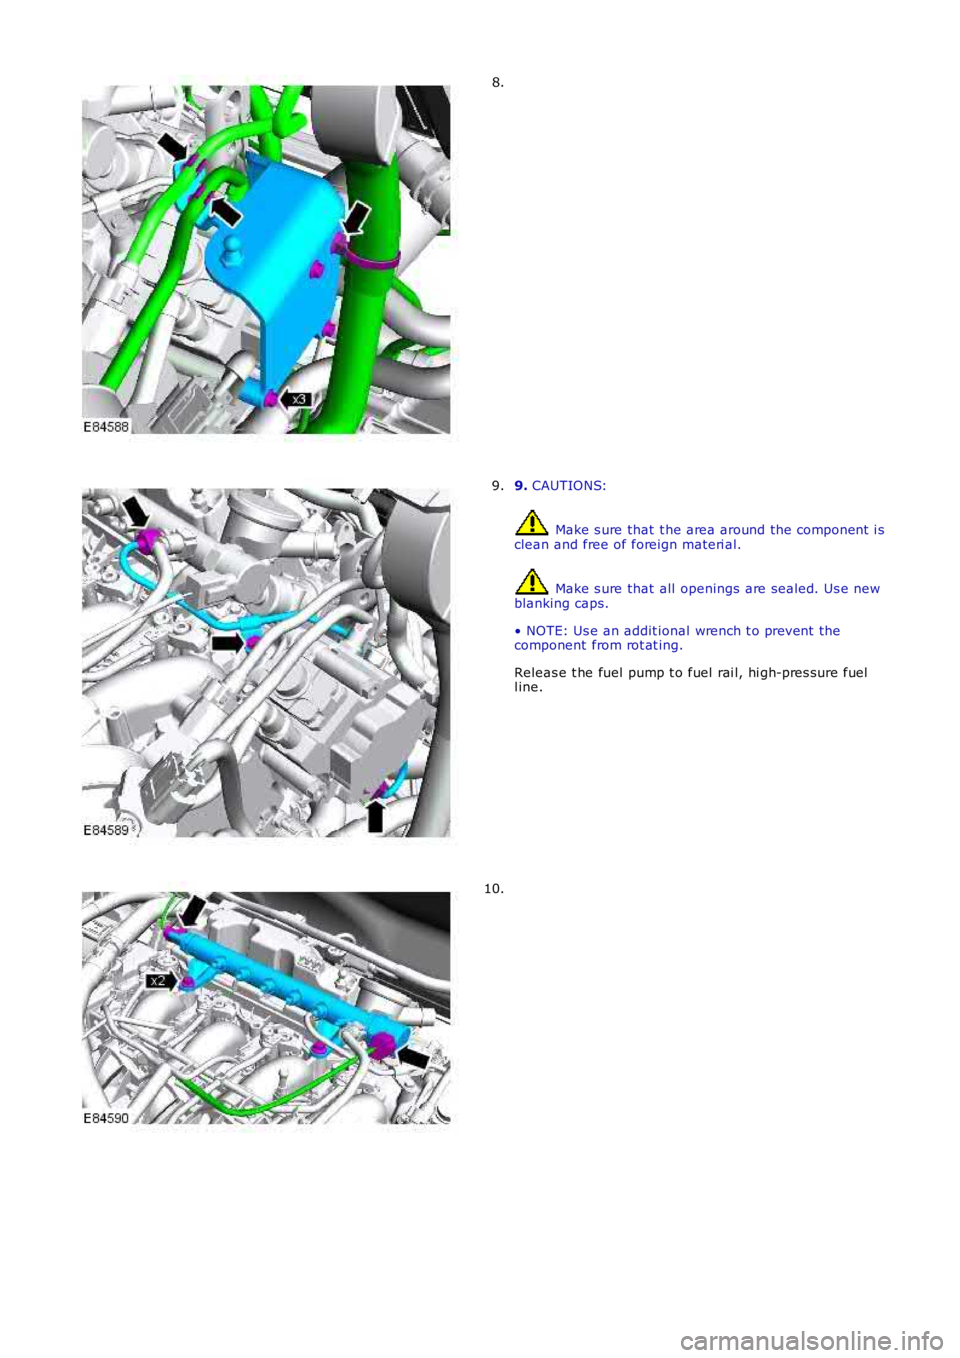
8.
9. CAUTIONS:
Make s ure that t he area around the component i sclean and free of foreign materi al.
Make s ure that all openings are sealed. Us e newblanking caps.
• NOTE: Us e an addit ional wrench t o prevent thecomponent from rot at ing.
Releas e t he fuel pump t o fuel rai l, hi gh-pres sure fuell ine.
9.
10.
Page 1014 of 3229
Stage 1:
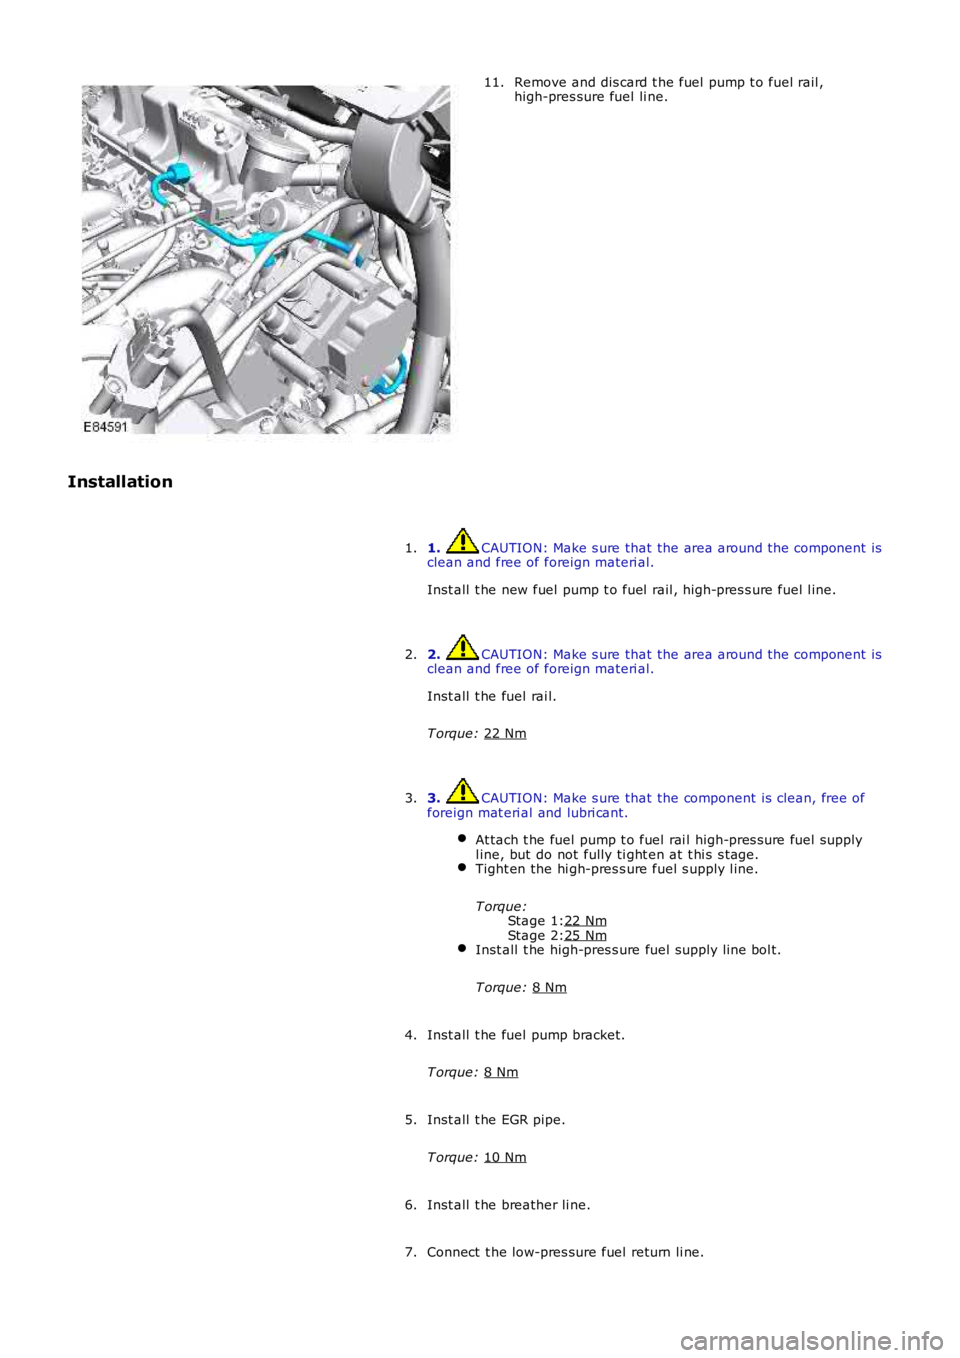
Stage 2: Remove and dis card t he fuel pump t o fuel rail ,
high-pres sure fuel li ne.
11.
Installation 1. CAUTION: Make s ure that the area around t he component is
clean and free of foreign materi al.
Inst all t he new fuel pump t o fuel rail , hi gh-pres s ure fuel l ine.
1.
2. CAUTION: Make s ure that the area around t he component is
clean and free of foreign materi al.
Inst all t he fuel rai l.
T orque: 22 Nm 2.
3. CAUTION: Make s ure that the component is clean, free of
foreign mat eri al and lubri cant.
At tach t he fuel pump t o fuel rai l high-pres s ure fuel supply
l ine, but do not fully ti ght en at t hi s s tage. Tight en the hi gh-pres s ure fuel s upply l ine.
T orque: 22 Nm 25 Nm
Inst all t he high-pres s ure fuel supply line bol t.
T orque: 8 Nm 3.
Inst all t he fuel pump bracket.
T orque: 8 Nm 4.
Inst all t he EGR pipe.
T orque: 10 Nm 5.
Inst all t he breather li ne.
6.
Connect t he low-pres sure fuel return li ne.
7.
Page 1016 of 3229
Publi s hed: 11-May-2011
Fuel Charging and Controls - TD4 2.2L Diesel - Fuel Pump
Removal and Inst all ati on
Removal
• W ARNINGS:
Avoid flames , s parks or li ght ed s ubs t ances .
W ai t for a mini mum of 1 minute aft er the engine has s t opped before carryi ng out any repair t o t he fuel inject ions ys t em.
• CAUTIO NS:
Make s ure that t he area around t he component i s cl ean and free of foreign mat eri al .
Make s ure that all openi ngs are s ealed. Us e new bl anking caps .
Bl eed the fuel s ys tem by cranki ng t he engi ne to purge t he air from the s ys tem.
Di sconnect t he bat t ery ground cable.
Refer t o: Specificati ons (414-00 Bat tery and Charging Sys tem -General Informat ion, Specificati ons).
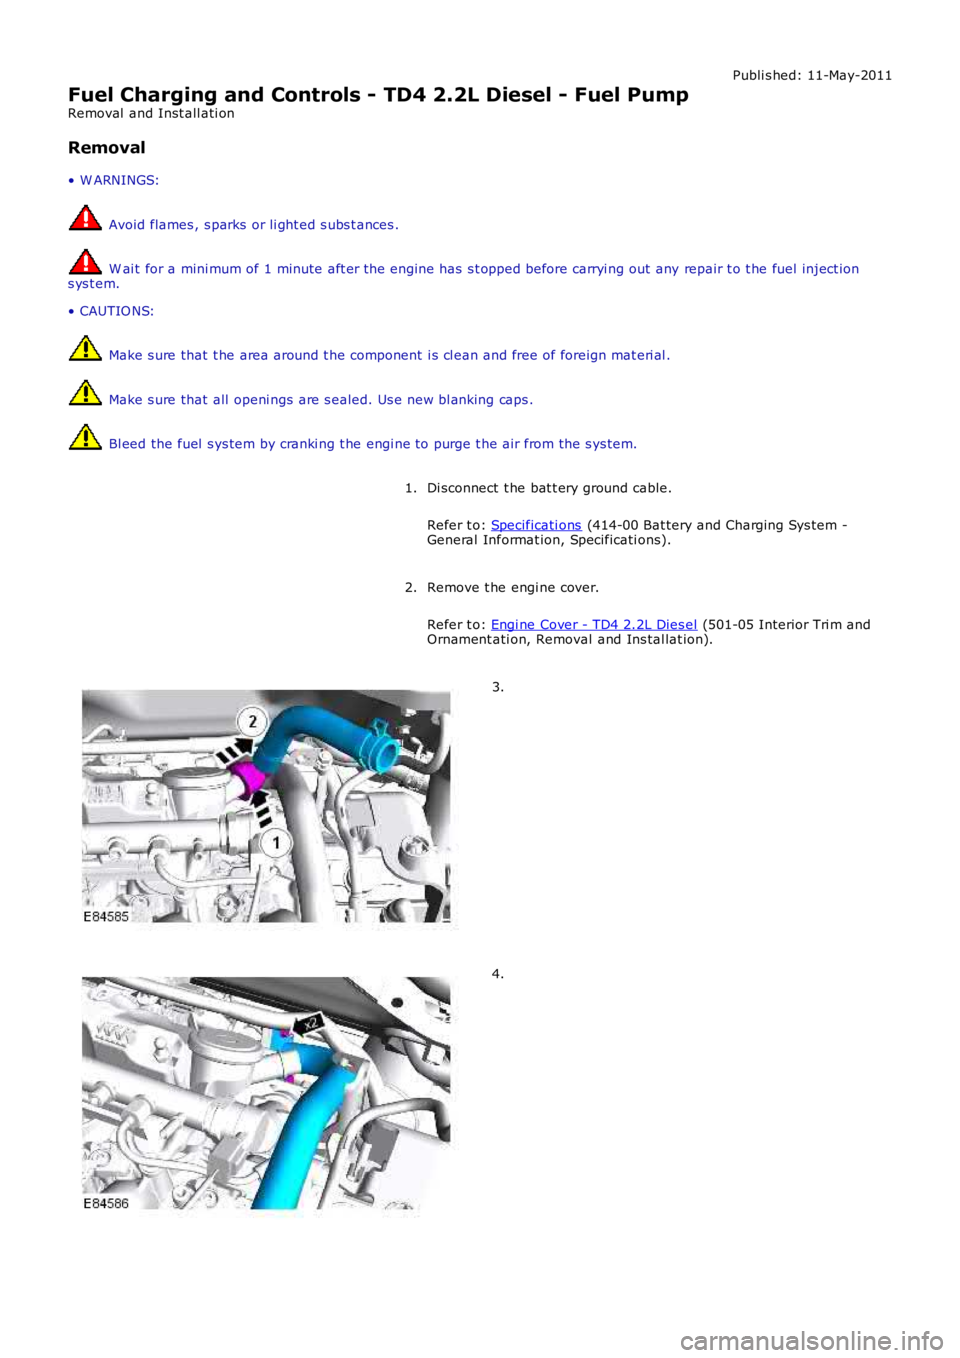
1.
Remove t he engi ne cover.
Refer t o: Engi ne Cover - TD4 2.2L Dies el (501-05 Interior Tri m andOrnament ati on, Removal and Ins tal lat ion).
2.
3.
4.
Page 1018 of 3229
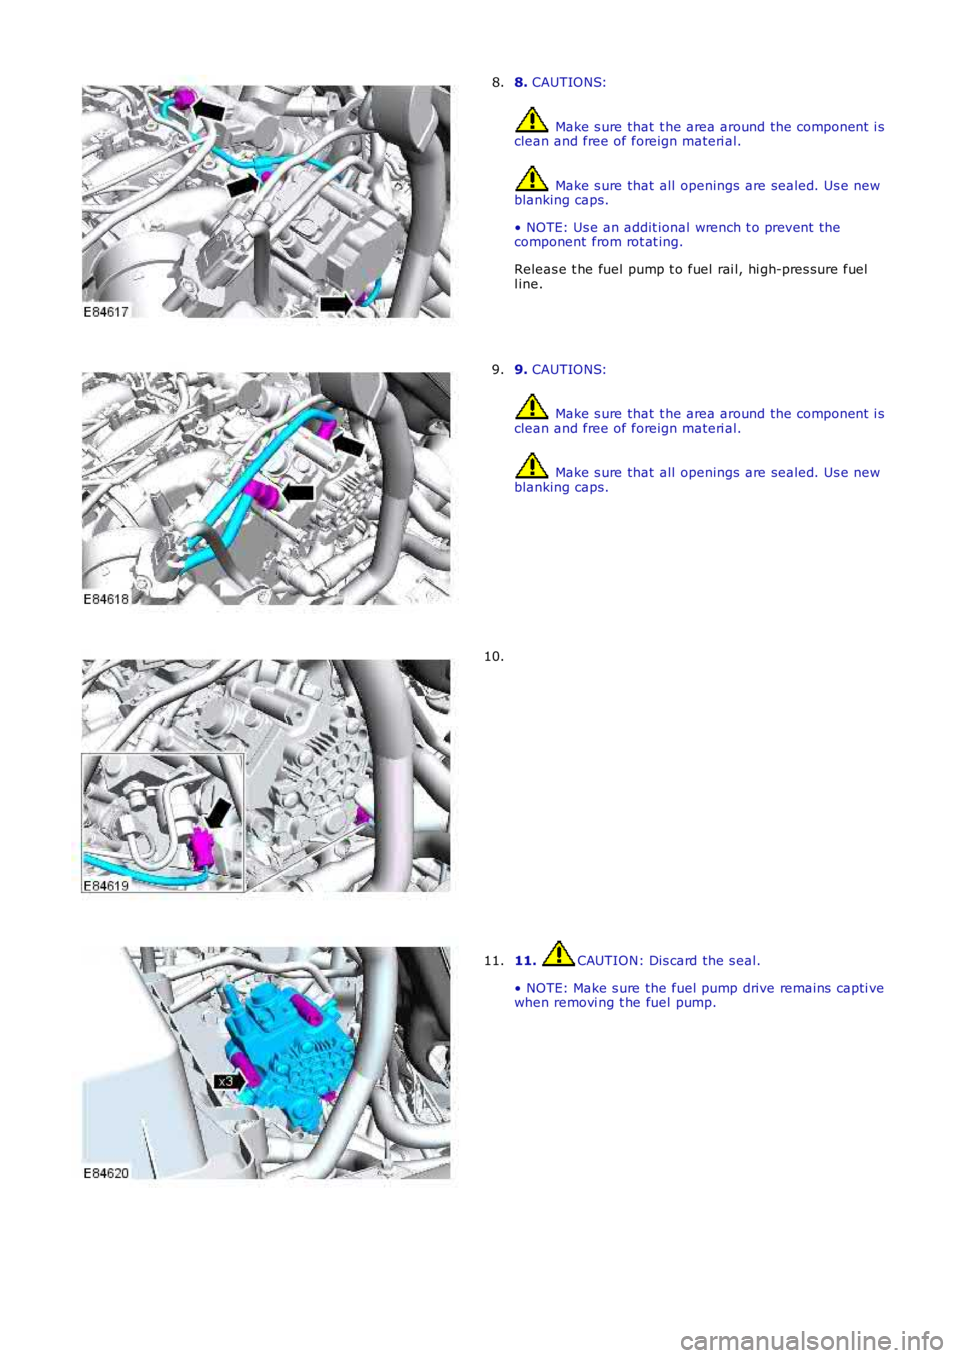
8. CAUTIONS:
Make s ure that t he area around the component i sclean and free of foreign materi al.
Make s ure that all openings are sealed. Us e newblanking caps.
• NOTE: Us e an addit ional wrench t o prevent thecomponent from rot at ing.
Releas e t he fuel pump t o fuel rai l, hi gh-pres sure fuell ine.
8.
9. CAUTIONS:
Make s ure that t he area around the component i sclean and free of foreign materi al.
Make s ure that all openings are sealed. Us e newblanking caps.
9.
10.
11. CAUTION: Dis card the s eal.
• NOTE: Make s ure the fuel pump drive remains capti vewhen removi ng t he fuel pump.
11.
Page 1019 of 3229
Stage 1:
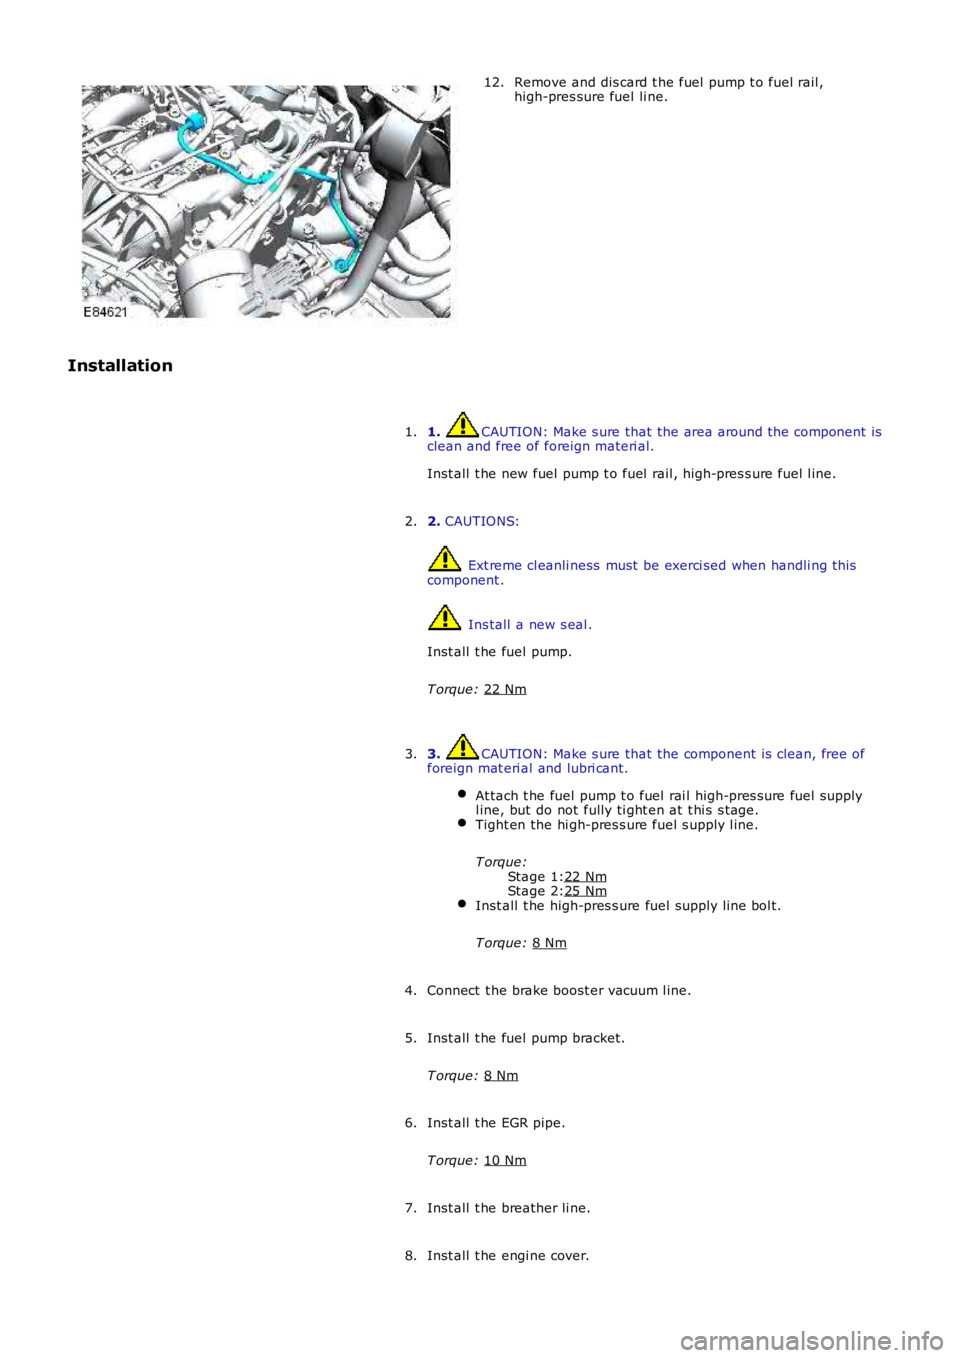
Stage 2: Remove and dis card t he fuel pump t o fuel rail ,
high-pres sure fuel li ne.
12.
Installation 1. CAUTION: Make s ure that the area around t he component is
clean and free of foreign materi al.
Inst all t he new fuel pump t o fuel rail , hi gh-pres s ure fuel l ine.
1.
2. CAUTIONS: Ext reme cl eanli ness must be exerci sed when handli ng t hi s
component . Ins tall a new s eal .
Inst all t he fuel pump.
T orque: 22 Nm 2.
3. CAUTION: Make s ure that the component is clean, free of
foreign mat eri al and lubri cant.
At tach t he fuel pump t o fuel rai l high-pres s ure fuel supply
l ine, but do not fully ti ght en at t hi s s tage. Tight en the hi gh-pres s ure fuel s upply l ine.
T orque: 22 Nm 25 Nm
Inst all t he high-pres s ure fuel supply line bol t.
T orque: 8 Nm 3.
Connect t he brake boost er vacuum l ine.
4.
Inst all t he fuel pump bracket.
T orque: 8 Nm 5.
Inst all t he EGR pipe.
T orque: 10 Nm 6.
Inst all t he breather li ne.
7.
Inst all t he engi ne cover.
8.