2006 LAND ROVER FRELANDER 2 service
[x] Cancel search: servicePage 2675 of 3229
Publ is hed: 11-May-2011
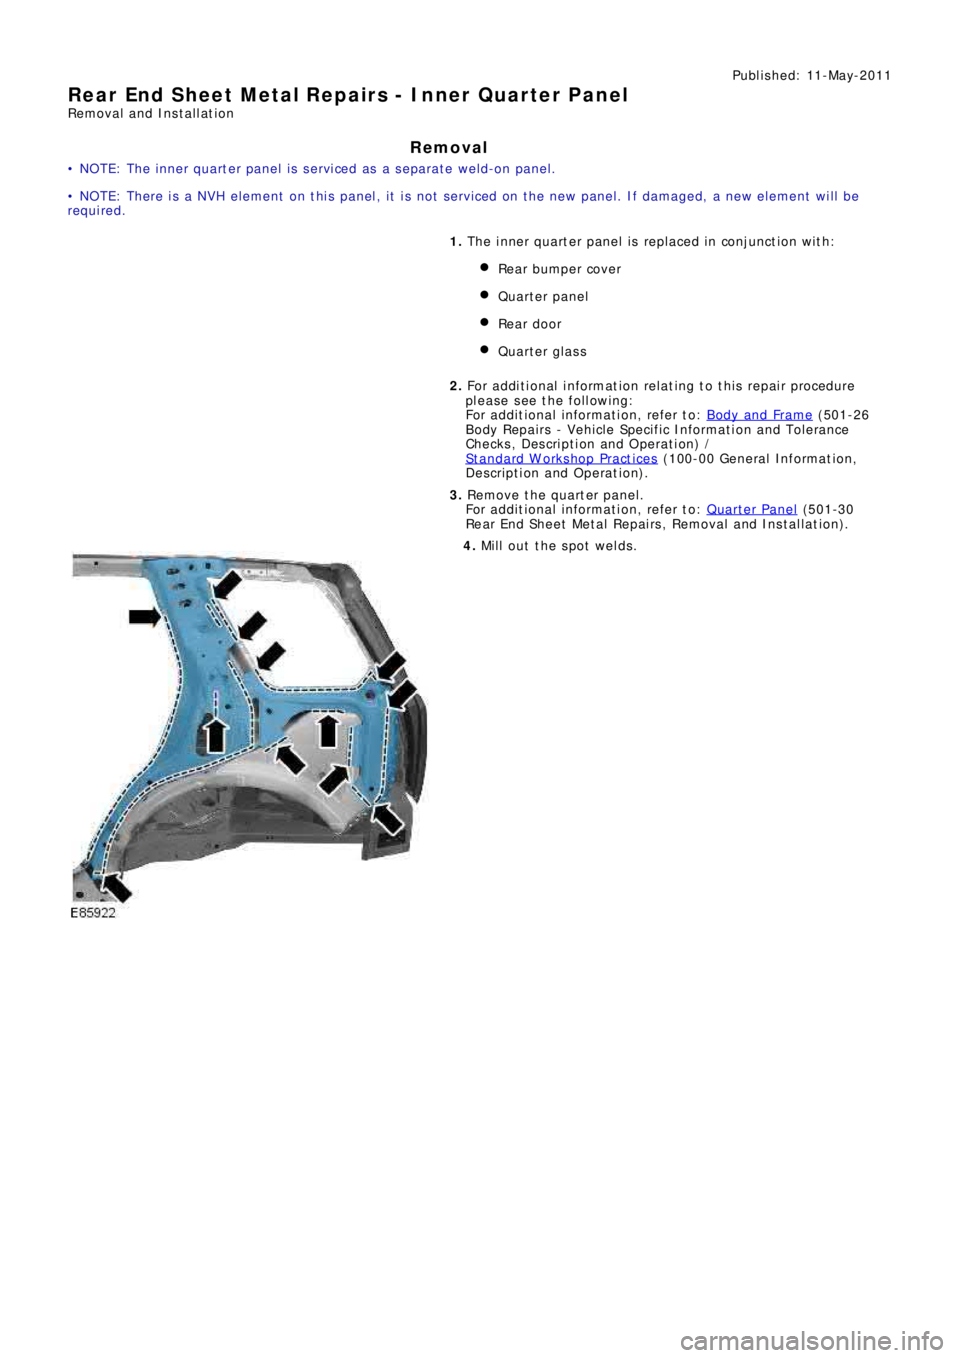
Rear End Sheet Metal Repairs - Inner Quarter Panel
Removal and Installation
Removal
• N O T E: T he i nne r q ua rt e r p a ne l i s s e rvi ce d a s a s e p a ra t e w e l d -o n p a ne l .
• NOTE: There is a NVH element on this panel, it is not serviced on the new panel. If damaged, a new element will be
re q ui re d .
1. The i nner quart er panel i s replaced i n conjunct i on wit h:
Rear bumper cover
Quarter panel
Rear door
Quarter glass
2. Fo r a d d i t i o na l i nf o rma t i o n re l a t i ng t o t hi s re p a i r p ro ce d ure
please see the following:
Fo r a d d i t i o na l i nf o rma t i o n, re f e r t o : Body and Frame
(501-26
Body Repairs - Vehicle Specific Information and Tolerance
Checks, Description and Operation) /
St a nd a rd W o rks ho p P ra ct i ce s
(100-00 Ge ne ra l I nf o rma t i o n,
Description and Operation).
3. Remove the quarter panel.
Fo r a d d i t i o na l i nf o rma t i o n, re f e r t o : Quarter Panel
(501-30
Rear End Sheet Metal Repairs, Removal and Installation).
4. Mill out the spot welds.
Page 2679 of 3229
Publ is hed: 11-May-2011
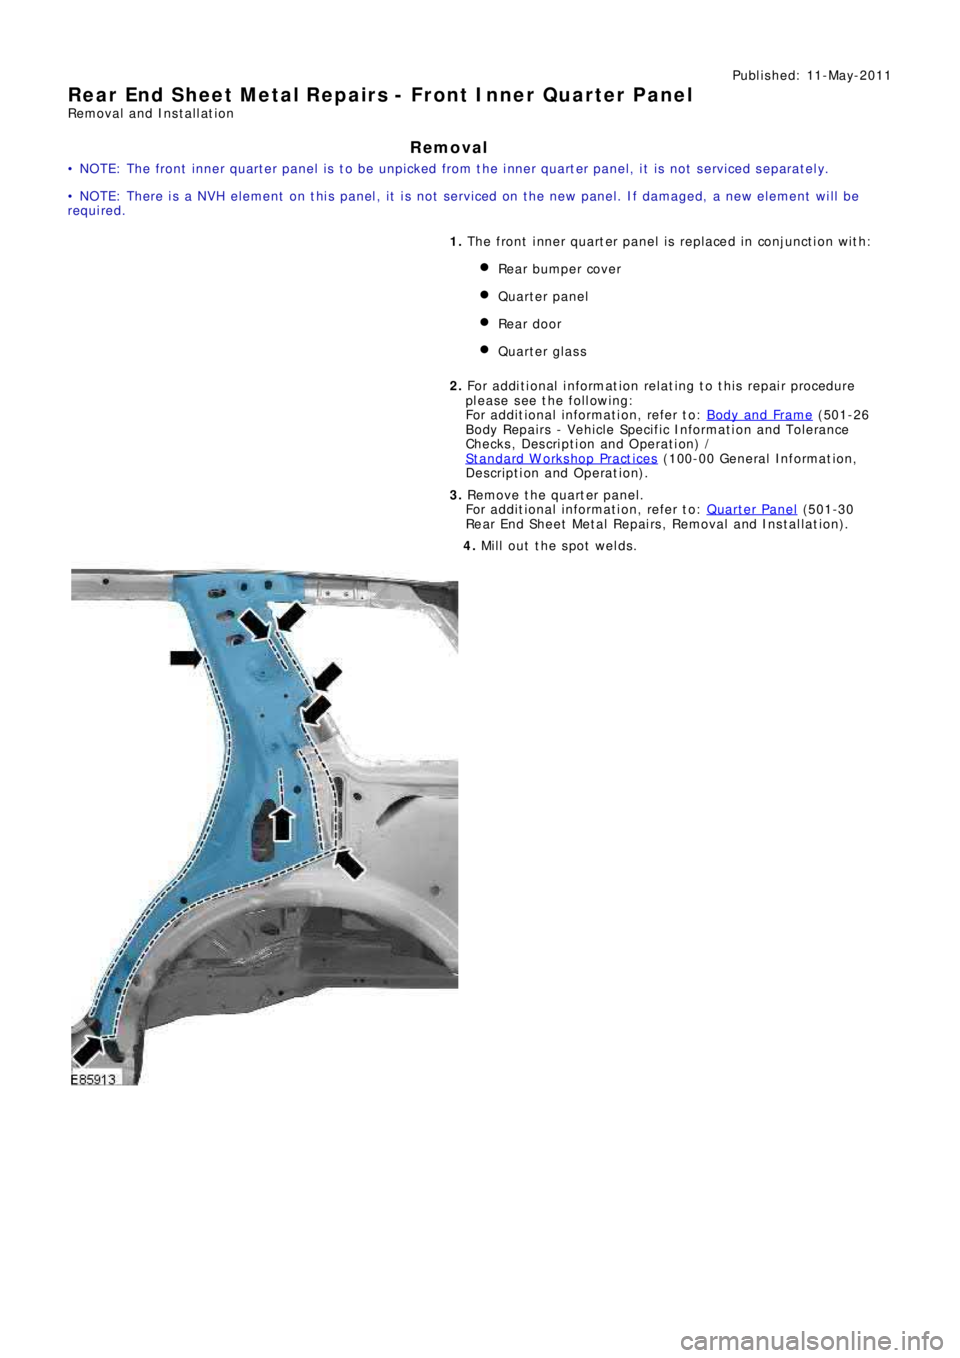
Rear End Sheet Metal Repairs - Front Inner Quarter Panel
Removal and Installation
Removal
• NOTE: The front inner quarter panel is to be unpicked from the inner quarter panel, it is not serviced separately.
• NOTE: There is a NVH element on this panel, it is not serviced on the new panel. If damaged, a new element will be
re q ui re d .
1. The front i nner quart er panel i s replaced i n conjunct i on wit h:
Rear bumper cover
Quarter panel
Rear door
Quarter glass
2. Fo r a d d i t i o na l i nf o rma t i o n re l a t i ng t o t hi s re p a i r p ro ce d ure
please see the following:
Fo r a d d i t i o na l i nf o rma t i o n, re f e r t o : Body and Frame
(501-26
Body Repairs - Vehicle Specific Information and Tolerance
Checks, Description and Operation) /
St a nd a rd W o rks ho p P ra ct i ce s
(100-00 Ge ne ra l I nf o rma t i o n,
Description and Operation).
3. Remove the quarter panel.
Fo r a d d i t i o na l i nf o rma t i o n, re f e r t o : Quarter Panel
(501-30
Rear End Sheet Metal Repairs, Removal and Installation).
4. Mill out the spot welds.
Page 2680 of 3229
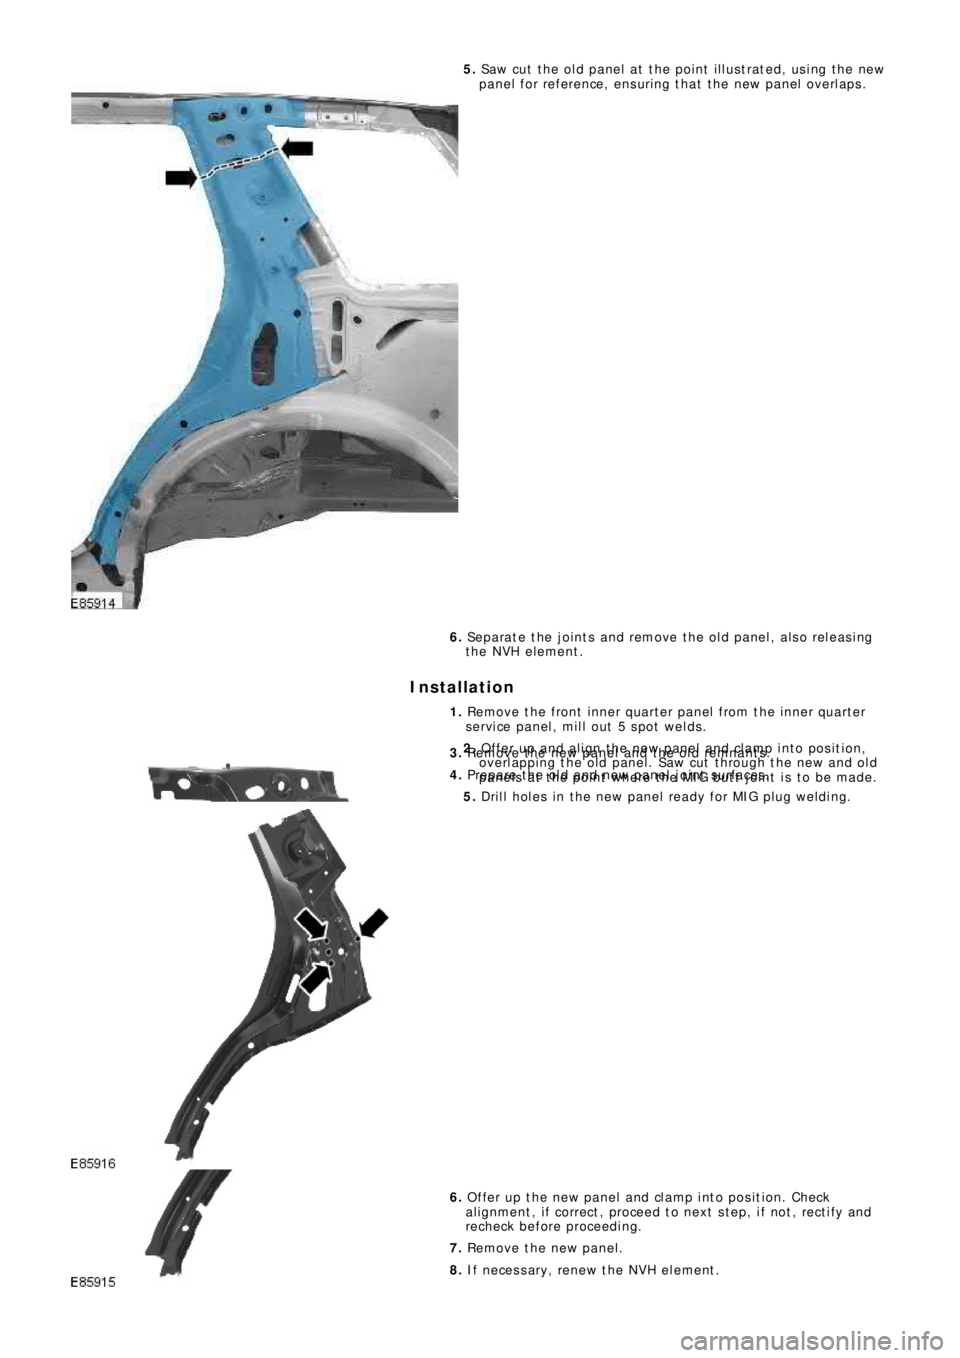
5. Saw cut the old panel at the point illustrated, using the new
p a ne l f o r re f e re nce , e ns uri ng t ha t t he ne w p a ne l o ve rl a p s .
6. Separate the joints and remove the old panel, also releasing
the NVH element.
Installation
1. Remove the front inner quarter panel from the inner quarter
service panel, mill out 5 spot welds.
2. Offer up and align the new panel and clamp into position,
overlapping the old panel. Saw cut through the new and old
panels at the point where the MIG butt joint is to be made.
3.
Remove the new panel and the old remnants.
4. Prepare the old and new panel joint surfaces.
5. Drill holes in the new panel ready for MIG plug welding.
6. Offer up the new panel and clamp into position. Check
al ignment , i f correct , proceed t o next s t ep, i f not , rect i fy and
recheck before proceeding.
7. Remove the new panel.
8. If necessary, renew the NVH element.
Page 2683 of 3229
Publ is hed: 11-May-2011
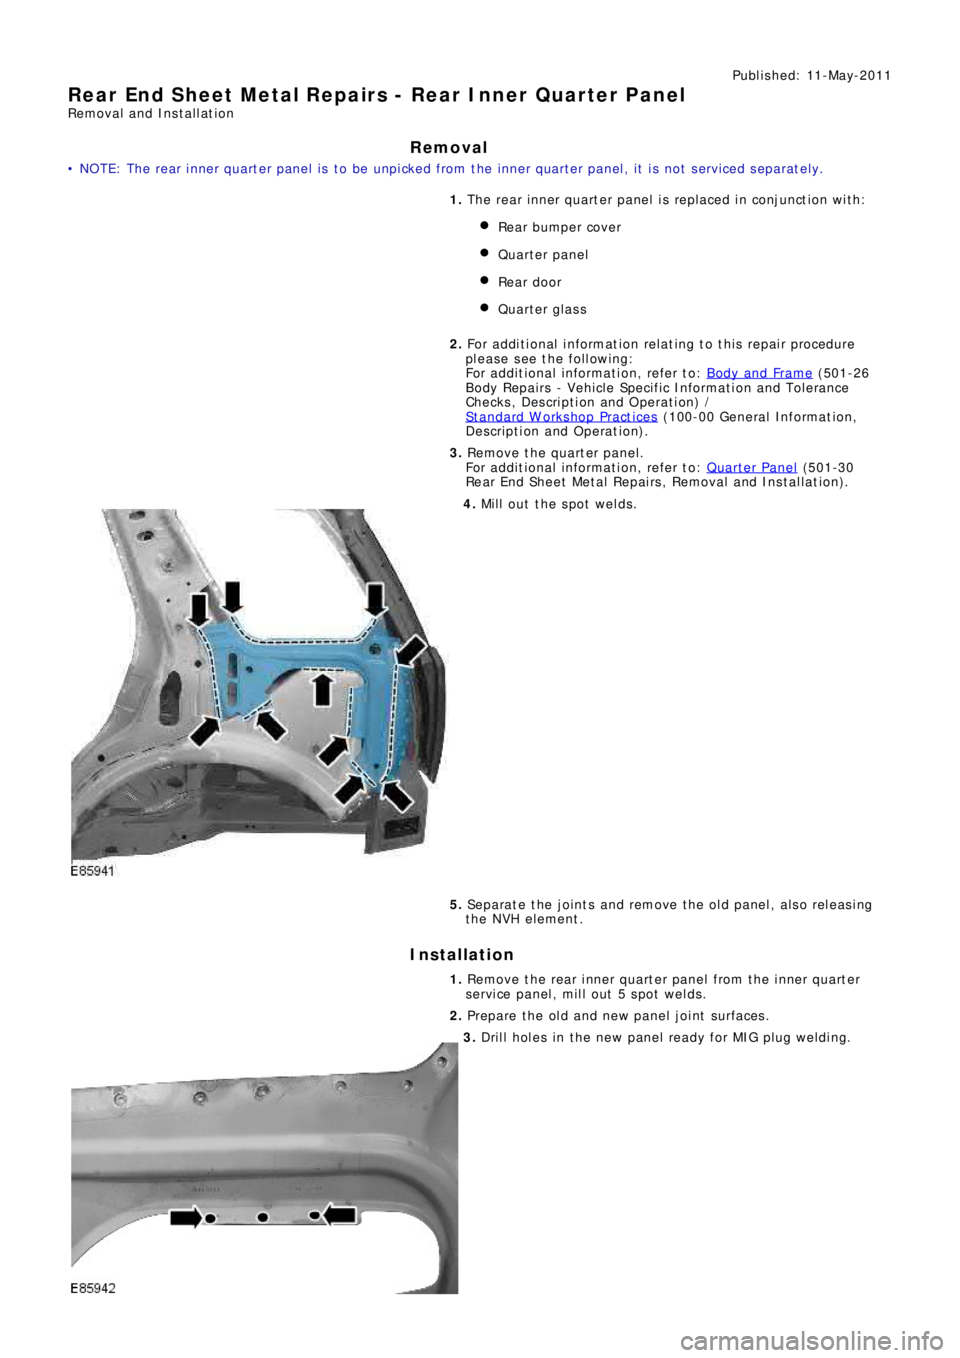
Rear End Sheet Metal Repairs - Rear Inner Quarter Panel
Removal and Installation
Removal
• N O T E: T he re a r i nne r q ua rt e r p a ne l i s t o b e unp i cke d f ro m t he i nne r q ua rt e r p a ne l , i t i s no t s e rvi ce d s e p a ra t e l y.
1. The rear inner quart er panel is replaced in conjunct ion wit h:
Rear bumper cover
Quarter panel
Rear door
Quarter glass
2. Fo r a d d i t i o na l i nf o rma t i o n re l a t i ng t o t hi s re p a i r p ro ce d ure
please see the following:
Fo r a d d i t i o na l i nf o rma t i o n, re f e r t o : Body and Frame
(501-26
Body Repairs - Vehicle Specific Information and Tolerance
Checks, Description and Operation) /
St a nd a rd W o rks ho p P ra ct i ce s
(100-00 Ge ne ra l I nf o rma t i o n,
Description and Operation).
3. Remove the quarter panel.
Fo r a d d i t i o na l i nf o rma t i o n, re f e r t o : Quarter Panel
(501-30
Rear End Sheet Metal Repairs, Removal and Installation).
4. Mill out the spot welds.
5. Separate the joints and remove the old panel, also releasing
the NVH element.
Installation
1. Re mo ve t he re a r i nne r q ua rt e r p a ne l f ro m t he i nne r q ua rt e r
service panel, mill out 5 spot welds.
2. Prepare the old and new panel joint surfaces.
3. Drill holes in the new panel ready for MIG plug welding.
Page 2685 of 3229
Publ is hed: 11-May-2011
Rear End Sheet Metal Repairs - Inner Quarter Panel and Wheelhouse
Removal and Installation
Removal
• NOTE: The inner quarter panel and wheelhouse is an assembly of the inner quarter panel, rear wheelhouse inner, rear
wheelhous e out er and t he rear lamp mount ing panel.
• NOTE: The service panel is not fully welded.
• NOTE: The panel is sectioned to avoid disturbing the roof panel.
1. The inner quarter panel and wheelhouse is replaced in
conjunct ion wit h:
Rear bumper cover
Rear bumper
Quarter panel
Rear door
Quarter glass
Rear subframe and suspension assembly
2. Fo r a d d i t i o na l i nf o rma t i o n re l a t i ng t o t hi s re p a i r p ro ce d ure
please see the following:
Fo r a d d i t i o na l i nf o rma t i o n, re f e r t o : Body and Frame
(501-26
Body Repairs - Vehicle Specific Information and Tolerance
Checks, Description and Operation) /
St a nd a rd W o rks ho p P ra ct i ce s
(100-00 Ge ne ra l I nf o rma t i o n,
Description and Operation).
3. Remove the quarter panel.
Fo r a d d i t i o na l i nf o rma t i o n, re f e r t o : Quarter Panel
(501-30
Rear End Sheet Metal Repairs, Removal and Installation).
4. Remove the rear subframe / suspension as an assembly.
5. Remove the brake pipe.
6. RH Only: Release and lay aside the fuel vent hose.
7. Remove the rear seat backrest.
Fo r a d d i t i o na l i nf o rma t i o n, re f e r t o : Front Seat Backres t Heat er
Ma t (501-10 Seating, Removal and Installation).
8. Release and lay aside the wiring harness.
Page 2691 of 3229
Publ is hed: 11-May-2011
Rear End Sheet Metal Repairs - Inner Back Panel Assembly
Removal and Installation
Removal
• NOTE: The inner back panel assembly is serviced as a separate weld-on panel.
• NOTE: The panel is serviced less its weld studs.
• NOTE: There are NVH elements attached to the panel, they are not serviced on the new panel. If damaged, new
elements will be required.
• NOTE: It is necessary to remove the back panel and both rear lamp mounting panels to enable removal and refitment of
t he i nner back panel .
1. The inner back panel as s embly is replaced in conjunct ion wit h:
Rear bumper cover
Re a r bumpe r a rma t ure
Back panel
Bot h rear l amp mount ing panel s
2. Fo r a d d i t i o na l i nf o rma t i o n re l a t i ng t o t hi s re p a i r p ro ce d ure
please see the following:
Fo r a d d i t i o na l i nf o rma t i o n, re f e r t o : Body and Frame
(501-26
Body Repairs - Vehicle Specific Information and Tolerance
Checks, Description and Operation) /
St a nd a rd W o rks ho p P ra ct i ce s
(100-00 Ge ne ra l I nf o rma t i o n,
Description and Operation).
3. Re move bot h re a r l a mp mount i ng pa ne l s .
Fo r a d d i t i o na l i nf o rma t i o n, re f e r t o : Rear Lamp Mount i ng Panel
(501-30 Rear End Sheet Metal Repairs, Removal and
Installation).
4. Remove the back panel.
Fo r a d d i t i o na l i nf o rma t i o n, re f e r t o : B a ck P a ne l A s s e mb l y
(501-30, Removal and Ins t al l at i on).
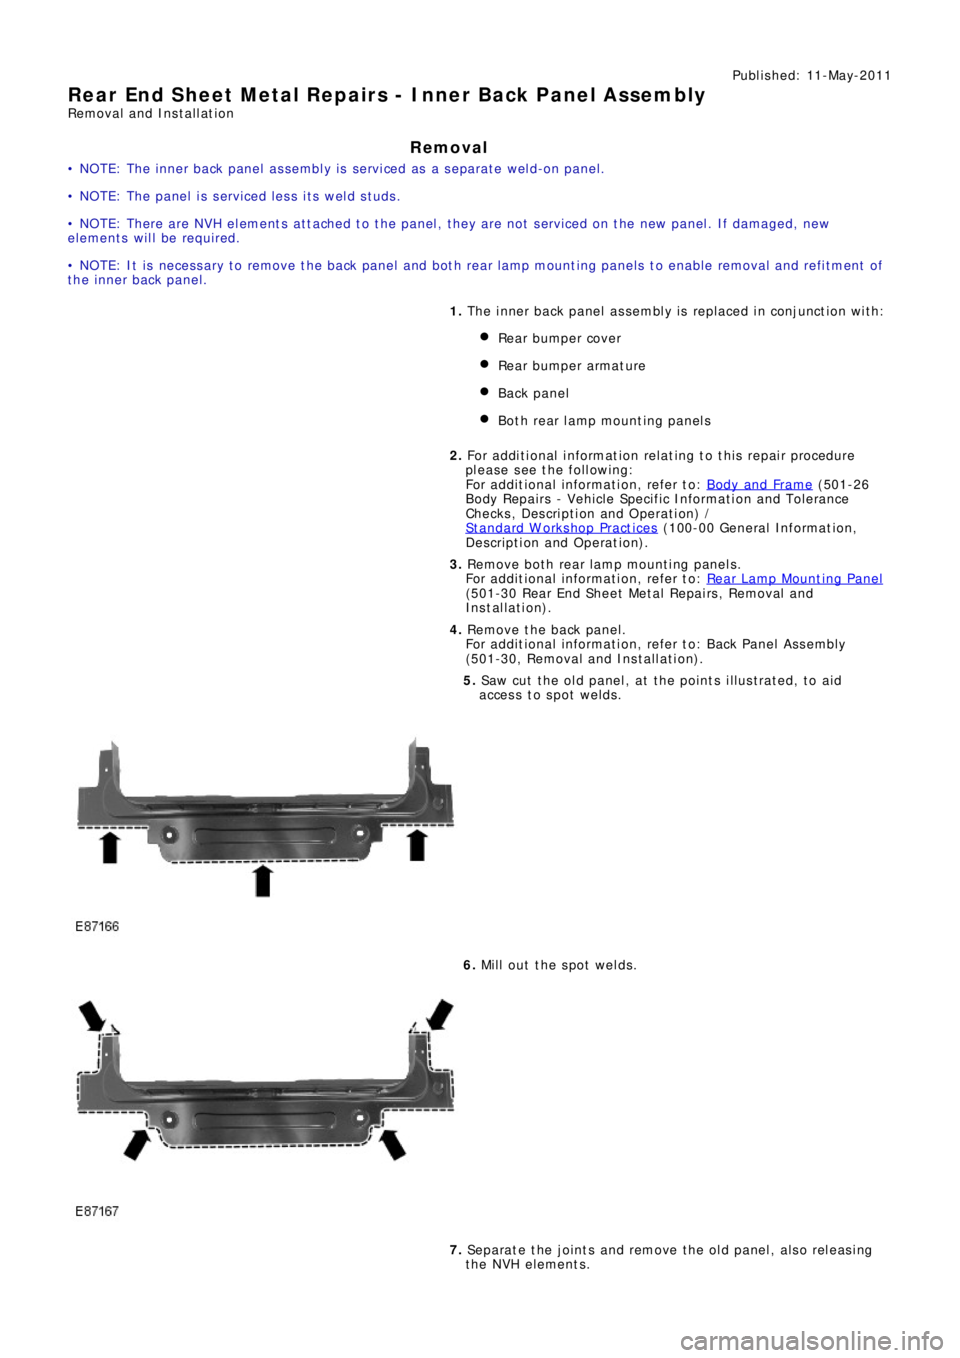
5. Saw cut the old panel, at the points illustrated, to aid
access to spot welds.
6. Mill out the spot welds.
7. Separate the joints and remove the old panel, also releasing
the NVH elements.
Page 2694 of 3229
Publ is hed: 11-May-2011
Rear End Sheet Metal Repairs - Rear Side Member Upper Side Extension
Removal and Installation
Removal
• NOTE: The rear side member upper side extension is serviced as a separate weld on panel, it is also serviced on the rear
s i de me mbe r.
• NOTE: The panel is serviced less its weld studs. 1. The rear side member upper side extension is replaced in
conjunct ion wit h:
Rear bumper cover
Re a r bumpe r a rma t ure
Rear l amp mount ing panel
Re a r s i de me mbe r l owe r s i de e xt e ns i o n
2. Fo r a d d i t i o na l i nf o rma t i o n re l a t i ng t o t hi s re p a i r p ro ce d ure
please see the following:
Fo r a d d i t i o na l i nf o rma t i o n, re f e r t o : Body and Frame
(501-26
Body Repairs - Vehicle Specific Information and Tolerance
Checks, Description and Operation) /
St a nd a rd W o rks ho p P ra ct i ce s
(100-00 Ge ne ra l I nf o rma t i o n,
Description and Operation).
3. Re move t he re a r s i de me mbe r l o we r s i de e xt e ns i on.
Fo r a d d i t i o na l i nf o rma t i o n, re f e r t o : Rear Side Member Lower
Si d e E xt e n s i o n (501-30 Rear End Sheet Met al Repai rs , Removal
and Installation).
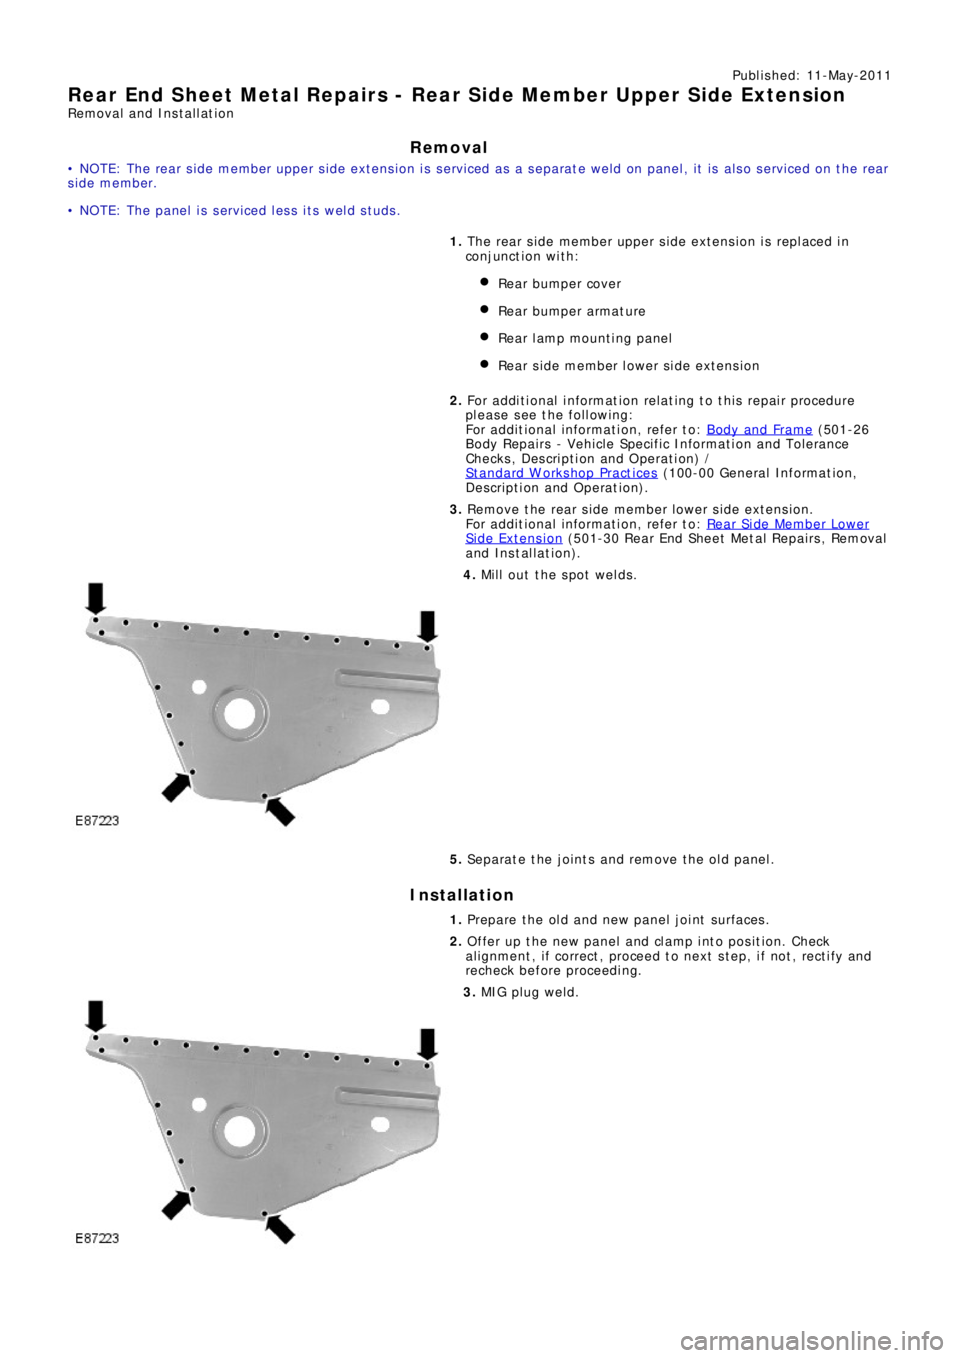
4. Mill out the spot welds.
5. Separate the joints and remove the old panel.
Installation
1. Prepare the old and new panel joint surfaces.
2. Offer up the new panel and clamp into position. Check
al ignment , i f correct , proceed t o next s t ep, i f not , rect i fy and
recheck before proceeding.
3. MIG pl ug we l d.
Page 2723 of 3229

Contents
3
R
Quick start
QUICK START ................................................... 7
Filling station information
FILLING STATION INFORMATION................... 33
Introduction
SYMBOLS GLOSSARY .................................... 35
LABEL LOCATIONS ......................................... 35
HEALTH AND SAFETY ..................................... 36
DATA RECORDING.......................................... 37
DISABILITY MODIFICATIONS ......................... 37
PARTS AND ACCESSORIES ............................ 37
Keys and remote controls
USING THE KEY .............................................. 40
GENERAL INFORMATION ON RADIO
FREQUENCIES ................................................ 40
USING THE REMOTE CONTROL ..................... 41
Locks
LOCKING AND UNLOCKING ............................ 44
Alarm
ARMING THE ALARM ..................................... 45
DISARMING THE ALARM ............................... 46
Seats
SITTING IN THE CORRECT POSITION ............ 47
MANUAL SEATS ............................................. 48
ELECTRIC SEATS ............................................ 49
HEAD RESTRAINTS ........................................ 51
REAR SEATS................................................... 51
HEATED SEATS............................................... 53
Seat belts
PRINCIPLE OF OPERATION ............................ 54
SEAT BELT REMINDER ................................... 55
FASTENING THE SEAT BELTS ........................ 56
SEAT BELT HEIGHT ADJUSTMENT................. 56
USING SEAT BELTS DURI NG PREGNANCY .... 57
Supplementary restraints system
PRINCIPLE OF OPERATION ............................ 58
AIRBAG WARNING LAMP ............................... 61
DISABLING THE PASSENGER AIRBAG ........... 62
AIRBAG SERVICE INFORMATION ................... 63
Child safety
CHILD SEATS ................................................. 64
BOOSTER CUSHIONS ..................................... 66
ISOFIX ANCHOR POINTS................................ 67
CHILD SAFETY LOCKS ................................... 69
Steering wheel
ADJUSTING THE STEERING WHEEL .............. 70
AUDIO CONTROL ........................................... 70
Lighting
LIGHTING CONTROL ...................................... 72
FRONT FOG LAMPS........................................ 72
REAR FOG LAMPS.......................................... 73
ADJUSTING THE HEADLAMPS....................... 73
HEADLAMP LEVELLING ................................. 73
HAZARD WARNING FLASHERS...................... 74
ADAPTIVE FRONT LIGHTING SYSTEM (AFS) . 74
DIRECTION INDICATORS ............................... 75
INTERIOR LAMPS .......................................... 76
APPROACH LAMPS ........................................ 76
CHANGING A BULB ........................................ 77
BULB SPECIFICATION CHART ........................ 86
Wipers and washers
WINDSCREEN WIPERS .................................. 87
RAIN SENSOR ................................................ 87
WINDSCREEN WASHERS............................... 88
HEADLAMP WASHERS................................... 88
REAR WINDOW WIPER AND WASHERS ........ 89
ADJUSTING THE WINDSCREEN WASHER JETS .
89
CHECKING THE WIPER BLADES .................... 90
CHANGING THE WIPER BLADES.................... 90
Windows and mirrors
ELECTRIC WINDOWS ..................................... 93
EXTERIOR MIRRORS ..................................... 94
ELECTRIC EXTERIOR MIRRORS .................... 95
INTERIOR MIRROR ........................................ 96
Instruments
INSTRUMENT PANEL OVERVIEW .................. 97
Information displays
TRIP COMPUTER ........................................... 99
INFORMATION MESSAGES ............................ 99