2006 DODGE RAM SRT-10 air conditioning
[x] Cancel search: air conditioningPage 5135 of 5267
7. If equipped, engage the engine wire harness retaining clip to the plastic wire harness bracket located on the side
of the A/C accumulator.
8. Connect the A/C suction line (10) to the accumulator outlet tube (2) and install the secondaryretaining clip (11)
(Refer to 24 - HEATING & AIR CONDITIONING/PLUMBING/COUPLER-REFRIGERANTLINE - INSTALLATION).
9. Install the air filter housing cover (Refer to 9 - ENGINE/AIR INTAKE SYSTEM).
10. Evacuate the refrigerant system (Refer to 24 - HEATING & AIR CONDITIONING/PLUMBING - STANDARD
PROCEDURE - REFRIGERANT SYSTEM EVACUATE).
11. Charge the refrigerant system (Refer to 24 - HEATING & AIR CONDITIONING/PLUMBING - STANDARD PRO-
CEDURE - REFRIGERANT SYSTEM CHARGE).
12. Reconnect the battery negative cable.
Page 5137 of 5267
DIAGNOSIS AND TESTING
A/C COMPRESSOR
When investigating an A/C system related noise, you must first know the conditions under which the noise occurs.
These conditions include: weather, vehicle speed, transmission in gear or neutral, engine speed, engine tempera-
ture, and any other special conditions. Noises that develop during A/C operation can often be misleading. For exam-
ple: What sounds like a failed front engine bearing or connecting rod, may be caused by loose bolts, nuts, mounting
brackets or a loose compressor clutch assembly.
Drive belts are speed sensitive. At different engine speeds and dependingupon drive belt tension, drive belts can
develop noises that are mistaken for an A/C compressor noise. Improper drive belt tension can cause a misleading
noise when the compressor clutch is engaged, which may not occur when the compressor clutch is disengaged.
Check the accessory drive belt condition and tension as described in Cooling before beginning this procedure.
1. Select a quiet area for testing. Duplicate the complaint conditions as much as possible. Turn the A/C compressor
On and Off several times to clearly identify the compressor noise. Listen to the A/C compressor while the clutch
is engaged and disengaged. Probe the A/C compressor with an engine stethoscope or a long screwdriver with
the handle held to your ear to better localize the source of the noise.
2. Loosen all of the compressor mounting hardware and retighten. Check thecompressor clutch retainer. Be certain
that the clutch field coil is mounted securely to the A/C compressor, and that the clutch plate and pulley are
properly aligned and have the correct air gap (Refer to 24 - HEATING & AIR CONDITIONING/CONTROLS/
CLUTCH-A/C COMPRESSOR - INSTALLATION).
3. To duplicate high-ambient temperature conditions (high head pressure), restrict the air flow through the A/C con-
denser. Install a manifold gauge set or a scan tool to be certain that the discharge pressure does not exceed
2760 kPa (400 psi).
4. Check the refrigerant system plumbing for incorrect routing, rubbing or interference, which can cause unusual
noises. Also check the refrigerant lines and hoses for kinks or sharp bendsthat will restrict refrigerant flow, which
can cause noises (Refer to 24 - HEATING & AIR CONDITIONING/PLUMBING - DESCRIPTION - REFRIGER-
ANT LINES).
5. If the noise is from opening and closing of the high pressure relief valve, recover, evacuate and recharge the
refrigerant system (Refer to 24 - HEATING & AIR CONDITIONING/PLUMBING - STANDARD PROCEDURE -
REFRIGERANT SYSTEM RECOVERY), (Refer to 24 - HEATING & AIR CONDITIONING/PLUMBING - STAN-
DARD PROCEDURE - REFRIGERANT SYSTEM EVACUATE) and (Refer to 24 - HEATING & AIR CONDITION-
ING/PLUMBING - STANDARD PROCEDURE - REFRIGERANT SYSTEM CHARGE). If the high pressure relief
valve still does not seat properly, replace the A/C compressor (Refer to 24- HEATING & AIR CONDITIONING/
PLUMBING/COMPRESSOR-A/C - REMOVAL).
6. If the noise is from liquid refrigerant slugging in the A/C suction line,replace the A/C accumulator (Refer to 24 -
HEATING & AIR CONDITIONING/PLUMBING/ACCUMULATOR-A/C - REMOVAL) and check the refrigerant oil
level and the refrigerant system charge (Refer to 24 - HEATING & AIR CONDITIONING/PLUMBING/REFRIG-
ERANT OIL - STANDARD PROCEDURE - REFRIGERANT OIL LEVEL) (Refer to 24 - HEATING & AIR CON-
DITIONING/PLUMBING- STANDARD PROCEDURE - REFRIGERANT SYSTEM CHARGE).
7. If a slugging condition still exists after replacing the A/C accumulator, then replace the A/C compressor (Refer to
24 - HEATING & AIR CONDITIONING/PLUMBING/COMPRESSOR-A/C - REMOVAL) and repeat Step 1.
REMOVAL
3.7L/4.7L ENGINES
WARNING: Refer to the applicable warnings and cautions for this system before performing the following
operation (Refer to 24 - HEATING & AIR CONDITIONING/PLUMBING - WARNINGS) and (Refer to 24 - HEAT-
ING & AIR CONDITIONING/PLUMBING - CAUTIONS). Failure to follow the warnings and cautions could result
in possible personal injury or death.
NOTE: The A/C compressor may be removed and repositioned without disconnecting the refrigerant lines or
discharging the refrigerant system. Discharging is not necessary if servicing the compressor clutch, clutch
coil, engine, engine cylinder head or the generator.
Page 5138 of 5267
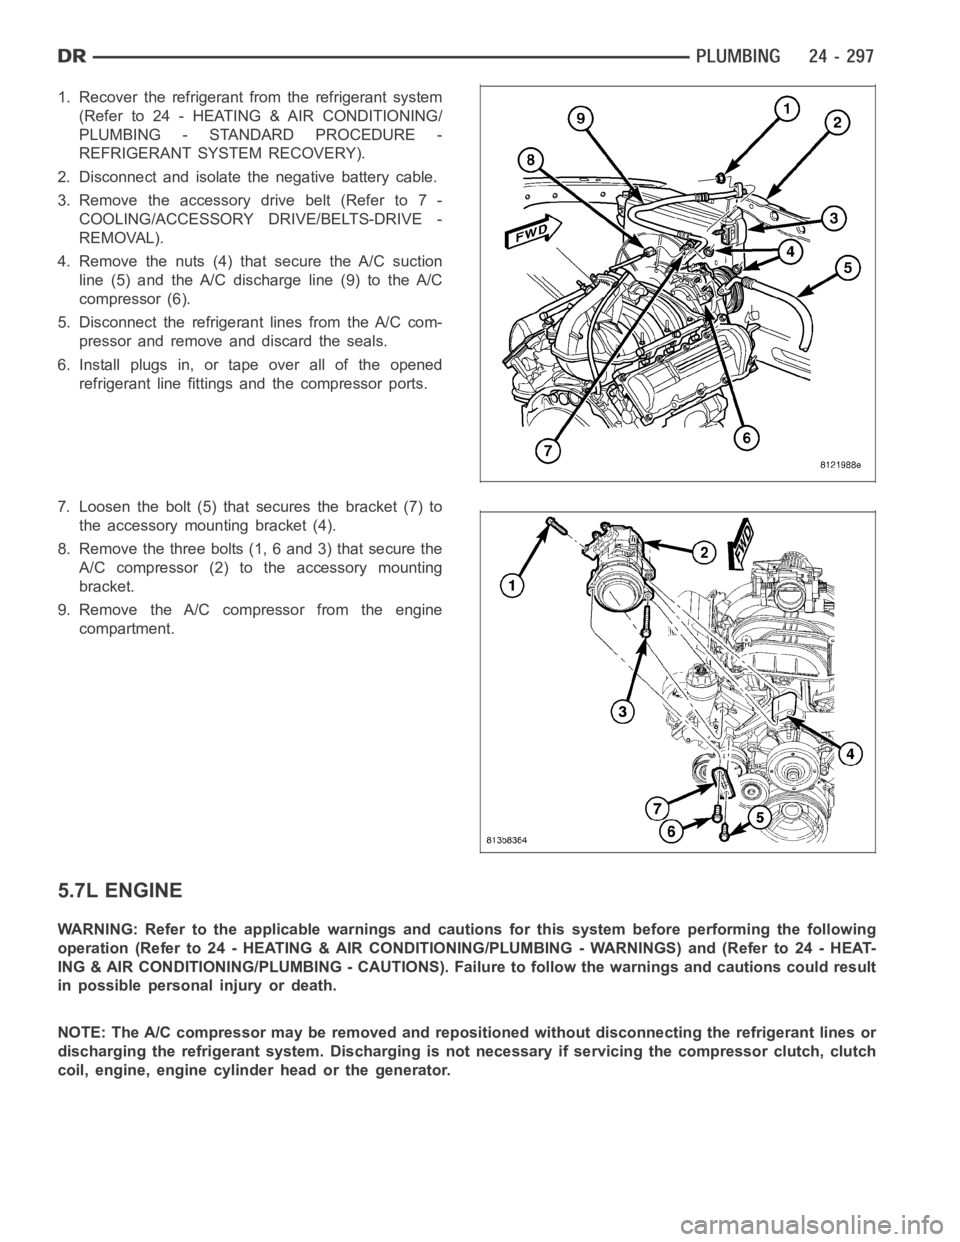
1. Recover the refrigerant from the refrigerant system
(Refer to 24 - HEATING & AIR CONDITIONING/
PLUMBING - STANDARD PROCEDURE -
REFRIGERANT SYSTEM RECOVERY).
2. Disconnect and isolate the negative battery cable.
3. Remove the accessory drive belt (Refer to 7 -
COOLING/ACCESSORY DRIVE/BELTS-DRIVE -
REMOVAL).
4. Remove the nuts (4) that secure the A/C suction
line (5) and the A/C discharge line (9) to the A/C
compressor (6).
5. Disconnect the refrigerant lines from the A/C com-
pressor and remove and discard the seals.
6. Install plugs in, or tape over all of the opened
refrigerant line fittings and the compressor ports.
7. Loosen the bolt (5) that secures the bracket (7) to
the accessory mounting bracket (4).
8. Remove the three bolts (1, 6 and 3) that secure the
A/C compressor (2) to the accessory mounting
bracket.
9. Remove the A/C compressor from the engine
compartment.
5.7L ENGINE
WARNING: Refer to the applicable warnings and cautions for this system before performing the following
operation (Refer to 24 - HEATING & AIR CONDITIONING/PLUMBING - WARNINGS) and (Refer to 24 - HEAT-
ING & AIR CONDITIONING/PLUMBING - CAUTIONS). Failure to follow the warnings and cautions could result
in possible personal injury or death.
NOTE: The A/C compressor may be removed and repositioned without disconnecting the refrigerant lines or
discharging the refrigerant system. Discharging is not necessary if servicing the compressor clutch, clutch
coil, engine, engine cylinder head or the generator.
Page 5139 of 5267
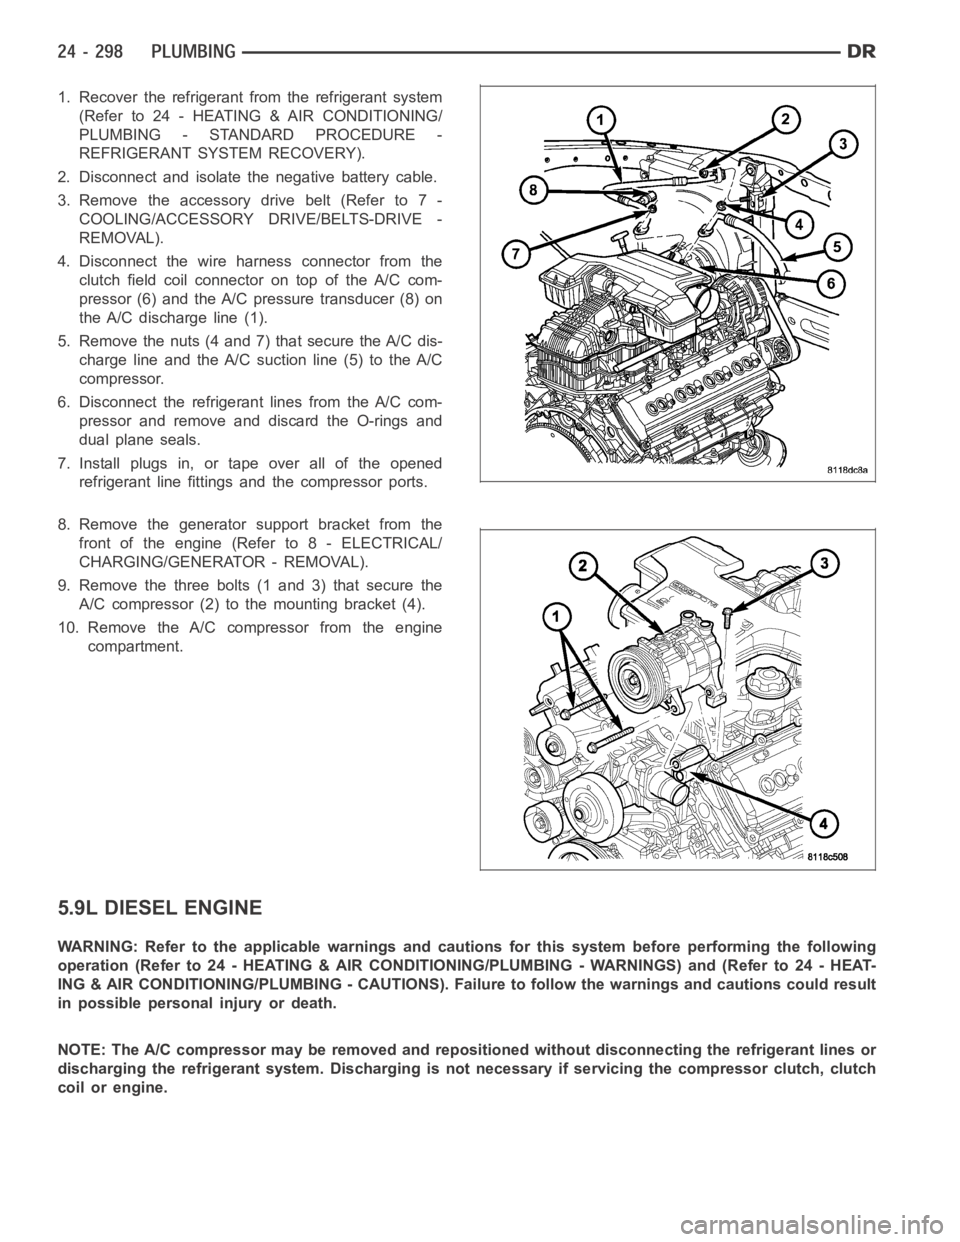
1. Recover the refrigerant from the refrigerant system
(Refer to 24 - HEATING & AIR CONDITIONING/
PLUMBING - STANDARD PROCEDURE -
REFRIGERANT SYSTEM RECOVERY).
2. Disconnect and isolate the negative battery cable.
3. Remove the accessory drive belt (Refer to 7 -
COOLING/ACCESSORY DRIVE/BELTS-DRIVE -
REMOVAL).
4. Disconnect the wire harness connector from the
clutch field coil connector on top of the A/C com-
pressor (6) and the A/C pressure transducer (8) on
the A/C discharge line (1).
5. Remove the nuts (4 and 7) that secure the A/C dis-
charge line and the A/C suction line (5) to the A/C
compressor.
6. Disconnect the refrigerant lines from the A/C com-
pressor and remove and discard the O-rings and
dual plane seals.
7. Install plugs in, or tape over all of the opened
refrigerant line fittings and the compressor ports.
8. Remove the generator support bracket from the
front of the engine (Refer to 8 - ELECTRICAL/
CHARGING/GENERATOR - REMOVAL).
9. Remove the three bolts (1 and 3) that secure the
A/C compressor (2) to the mounting bracket (4).
10. Remove the A/C compressor from the engine
compartment.
5.9L DIESEL ENGINE
WARNING: Refer to the applicable warnings and cautions for this system before performing the following
operation (Refer to 24 - HEATING & AIR CONDITIONING/PLUMBING - WARNINGS) and (Refer to 24 - HEAT-
ING & AIR CONDITIONING/PLUMBING - CAUTIONS). Failure to follow the warnings and cautions could result
in possible personal injury or death.
NOTE: The A/C compressor may be removed and repositioned without disconnecting the refrigerant lines or
discharging the refrigerant system. Discharging is not necessary if servicing the compressor clutch, clutch
coil or engine.
Page 5140 of 5267
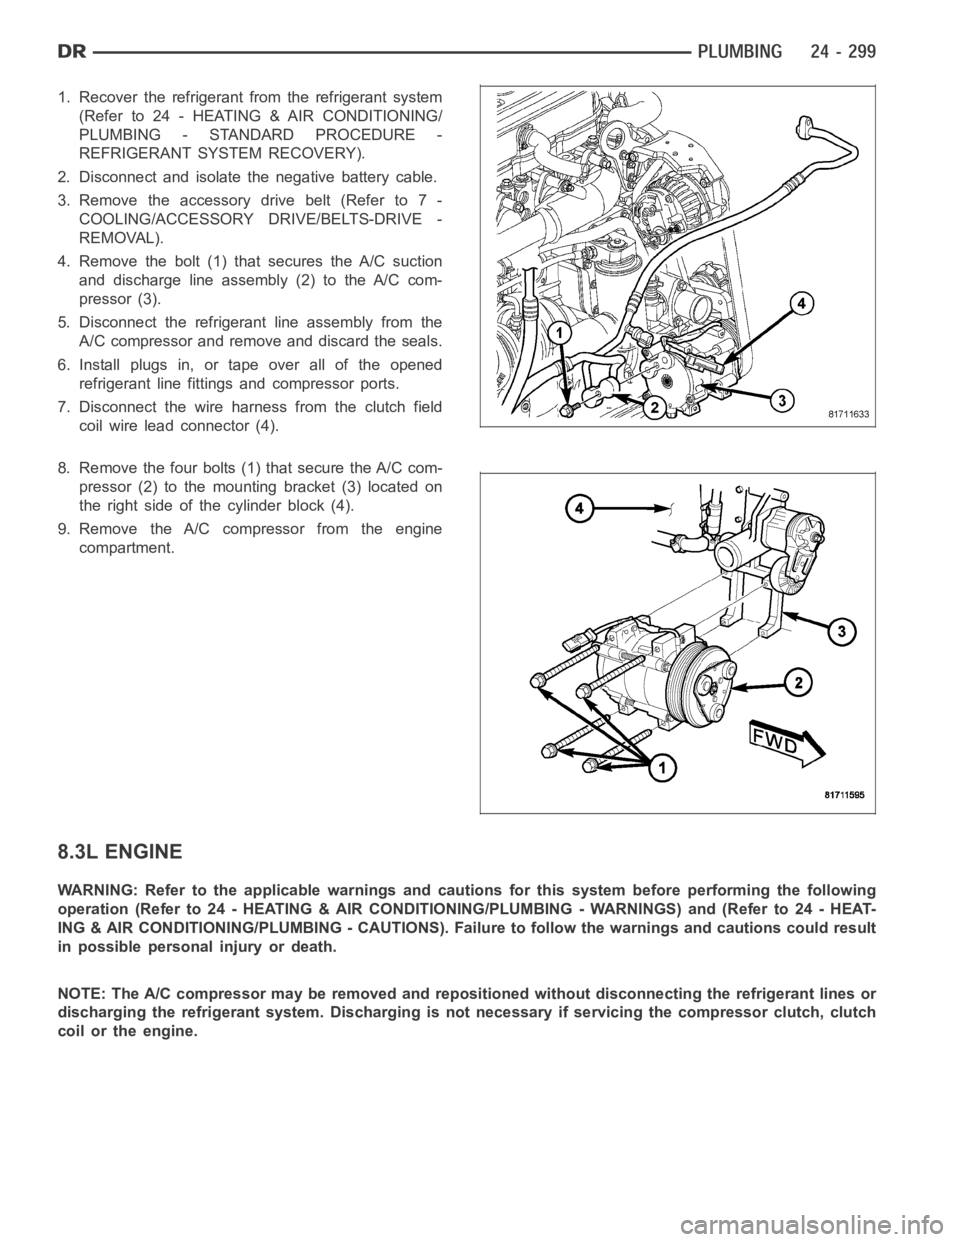
1. Recover the refrigerant from the refrigerant system
(Refer to 24 - HEATING & AIR CONDITIONING/
PLUMBING - STANDARD PROCEDURE -
REFRIGERANT SYSTEM RECOVERY).
2. Disconnect and isolate the negative battery cable.
3. Remove the accessory drive belt (Refer to 7 -
COOLING/ACCESSORY DRIVE/BELTS-DRIVE -
REMOVAL).
4. Remove the bolt (1) that secures the A/C suction
and discharge line assembly (2) to the A/C com-
pressor (3).
5. Disconnect the refrigerant line assembly from the
A/C compressor and remove and discard the seals.
6. Install plugs in, or tape over all of the opened
refrigerant line fittings and compressor ports.
7. Disconnect the wire harness from the clutch field
coil wire lead connector (4).
8. Remove the four bolts (1) that secure the A/C com-
pressor (2) to the mounting bracket (3) located on
the right side of the cylinder block (4).
9. Remove the A/C compressor from the engine
compartment.
8.3L ENGINE
WARNING: Refer to the applicable warnings and cautions for this system before performing the following
operation (Refer to 24 - HEATING & AIR CONDITIONING/PLUMBING - WARNINGS) and (Refer to 24 - HEAT-
ING & AIR CONDITIONING/PLUMBING - CAUTIONS). Failure to follow the warnings and cautions could result
in possible personal injury or death.
NOTE: The A/C compressor may be removed and repositioned without disconnecting the refrigerant lines or
discharging the refrigerant system. Discharging is not necessary if servicing the compressor clutch, clutch
coil or the engine.
Page 5141 of 5267
1. Recover the refrigerant from the refrigerant system
(Refer to 24 - HEATING & AIR CONDITIONING/
PLUMBING - STANDARD PROCEDURE -
REFRIGERANT SYSTEM RECOVERY).
2. Disconnect and isolate the negative battery cable.
3. Remove the accessory drive belt (Refer to 7 -
COOLING/ACCESSORY DRIVE/BELTS-DRIVE -
REMOVAL).
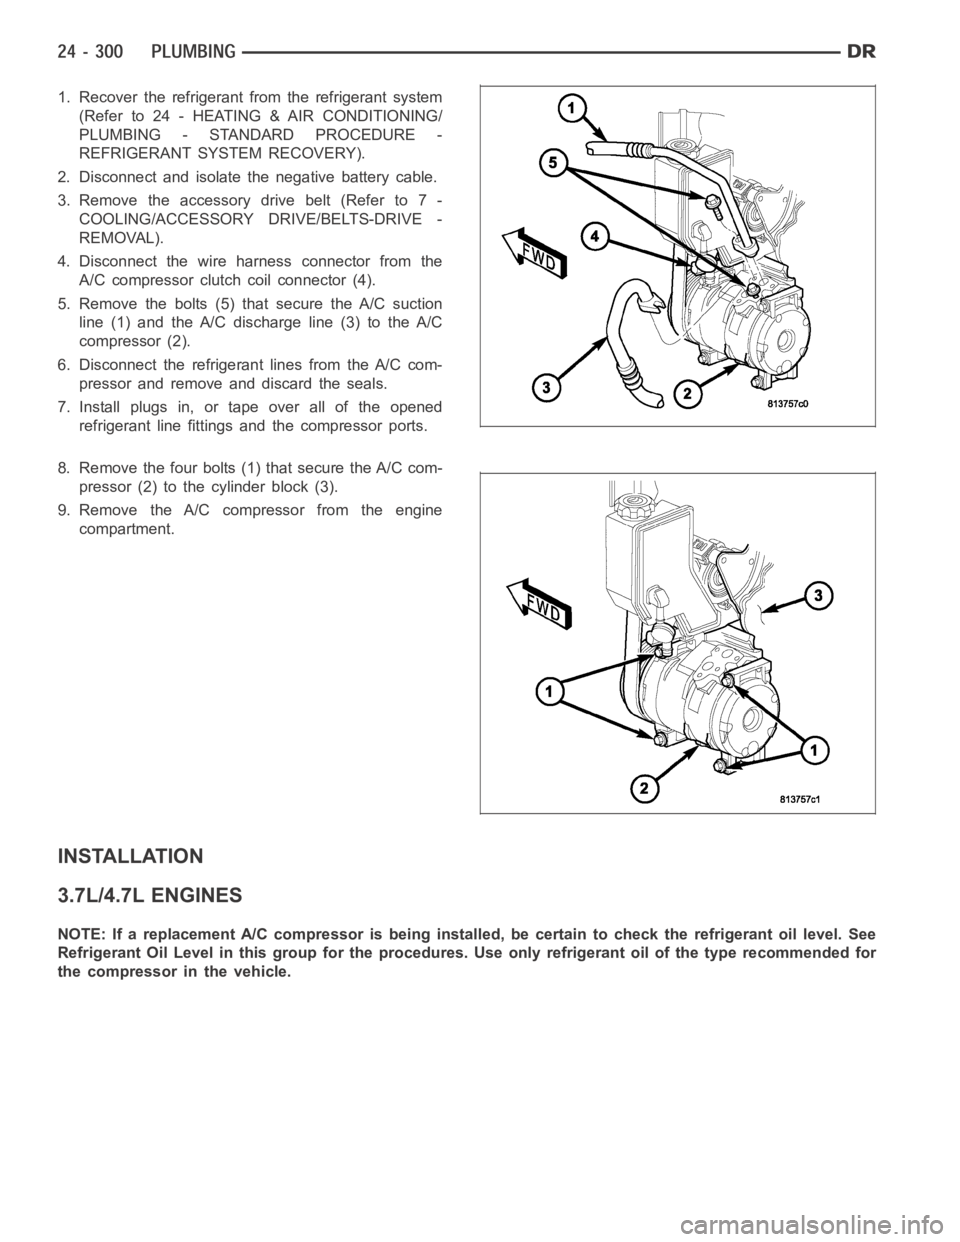
4. Disconnect the wire harness connector from the
A/C compressor clutch coil connector (4).
5. Remove the bolts (5) that secure the A/C suction
line (1) and the A/C discharge line (3) to the A/C
compressor (2).
6. Disconnect the refrigerant lines from the A/C com-
pressor and remove and discard the seals.
7. Install plugs in, or tape over all of the opened
refrigerant line fittings and the compressor ports.
8. Remove the four bolts (1) that secure the A/C com-
pressor (2) to the cylinder block (3).
9. Remove the A/C compressor from the engine
compartment.
INSTALLATION
3.7L/4.7L ENGINES
NOTE: If a replacement A/C compressor is being installed, be certain to check the refrigerant oil level. See
Refrigerant Oil Level in this group for the procedures. Use only refrigerant oil of the type recommended for
the compressor in the vehicle.
Page 5142 of 5267
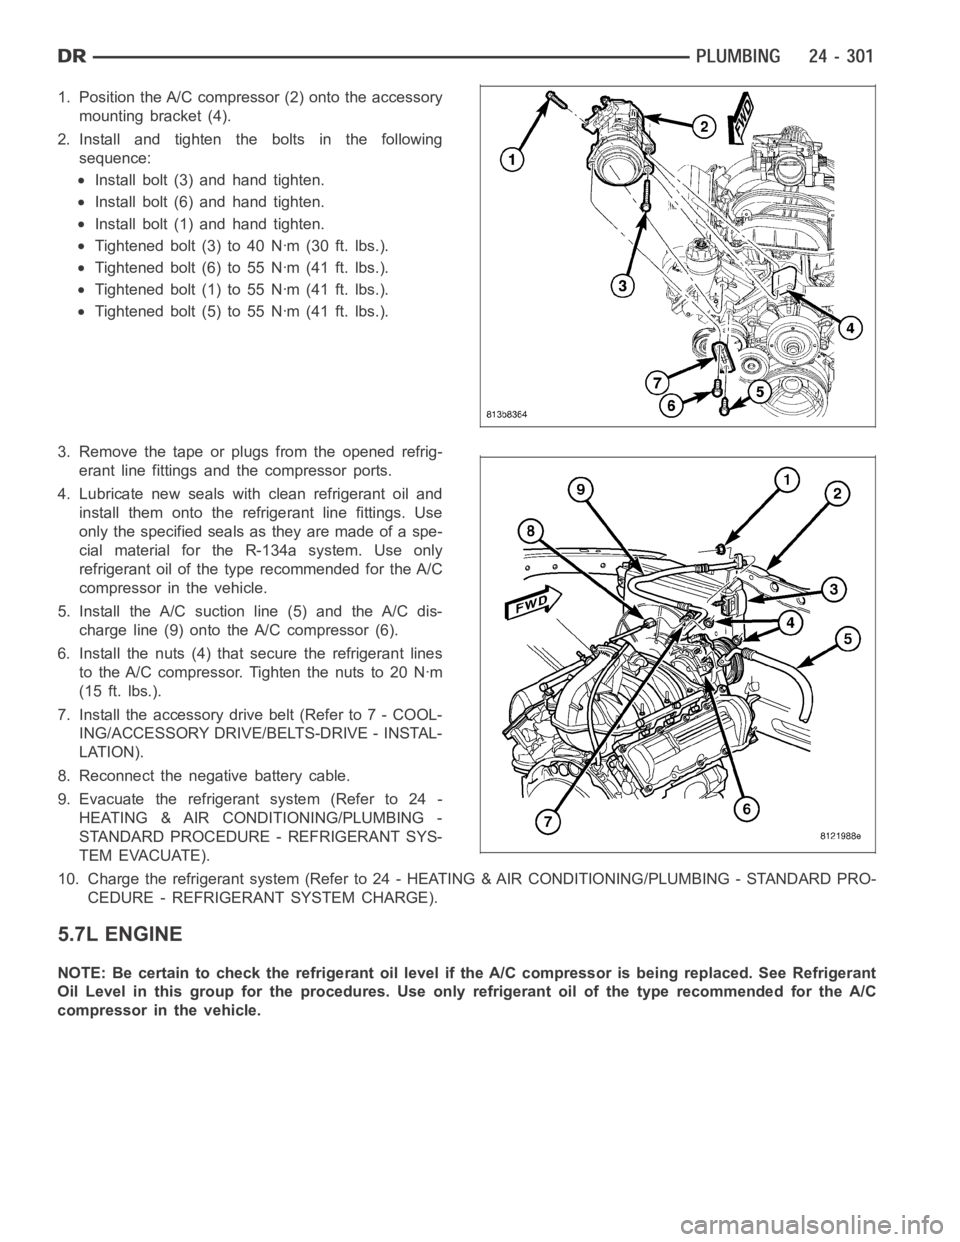
1. Position the A/C compressor (2) onto the accessory
mounting bracket (4).
2. Install and tighten the bolts in the following
sequence:
Install bolt (3) and hand tighten.
Install bolt (6) and hand tighten.
Install bolt (1) and hand tighten.
Tightened bolt (3) to 40 Nꞏm (30 ft. lbs.).
Tightened bolt (6) to 55 Nꞏm (41 ft. lbs.).
Tightened bolt (1) to 55 Nꞏm (41 ft. lbs.).
Tightened bolt (5) to 55 Nꞏm (41 ft. lbs.).
3. Remove the tape or plugs from the opened refrig-
erant line fittings and the compressor ports.
4. Lubricate new seals with clean refrigerant oil and
install them onto the refrigerant line fittings. Use
only the specified seals as they are made of a spe-
cial material for the R-134a system. Use only
refrigerant oil of the type recommended for the A/C
compressor in the vehicle.
5. Install the A/C suction line (5) and the A/C dis-
charge line (9) onto the A/C compressor (6).
6. Install the nuts (4) that secure the refrigerant lines
to the A/C compressor. Tighten the nuts to 20 Nꞏm
(15 ft. lbs.).
7. Install the accessory drive belt (Refer to 7 - COOL-
ING/ACCESSORY DRIVE/BELTS-DRIVE - INSTAL-
LATION).
8. Reconnect the negative battery cable.
9. Evacuate the refrigerant system (Refer to 24 -
HEATING & AIR CONDITIONING/PLUMBING -
STANDARD PROCEDURE - REFRIGERANT SYS-
TEM EVACUATE).
10. Charge the refrigerant system (Refer to 24 - HEATING & AIR CONDITIONING/PLUMBING - STANDARD PRO-
CEDURE - REFRIGERANT SYSTEM CHARGE).
5.7L ENGINE
NOTE: Be certain to check the refrigerant oil level if the A/C compressor isbeing replaced. See Refrigerant
Oil Level in this group for the procedures. Use only refrigerant oil of the type recommended for the A/C
compressor in the vehicle.
Page 5143 of 5267
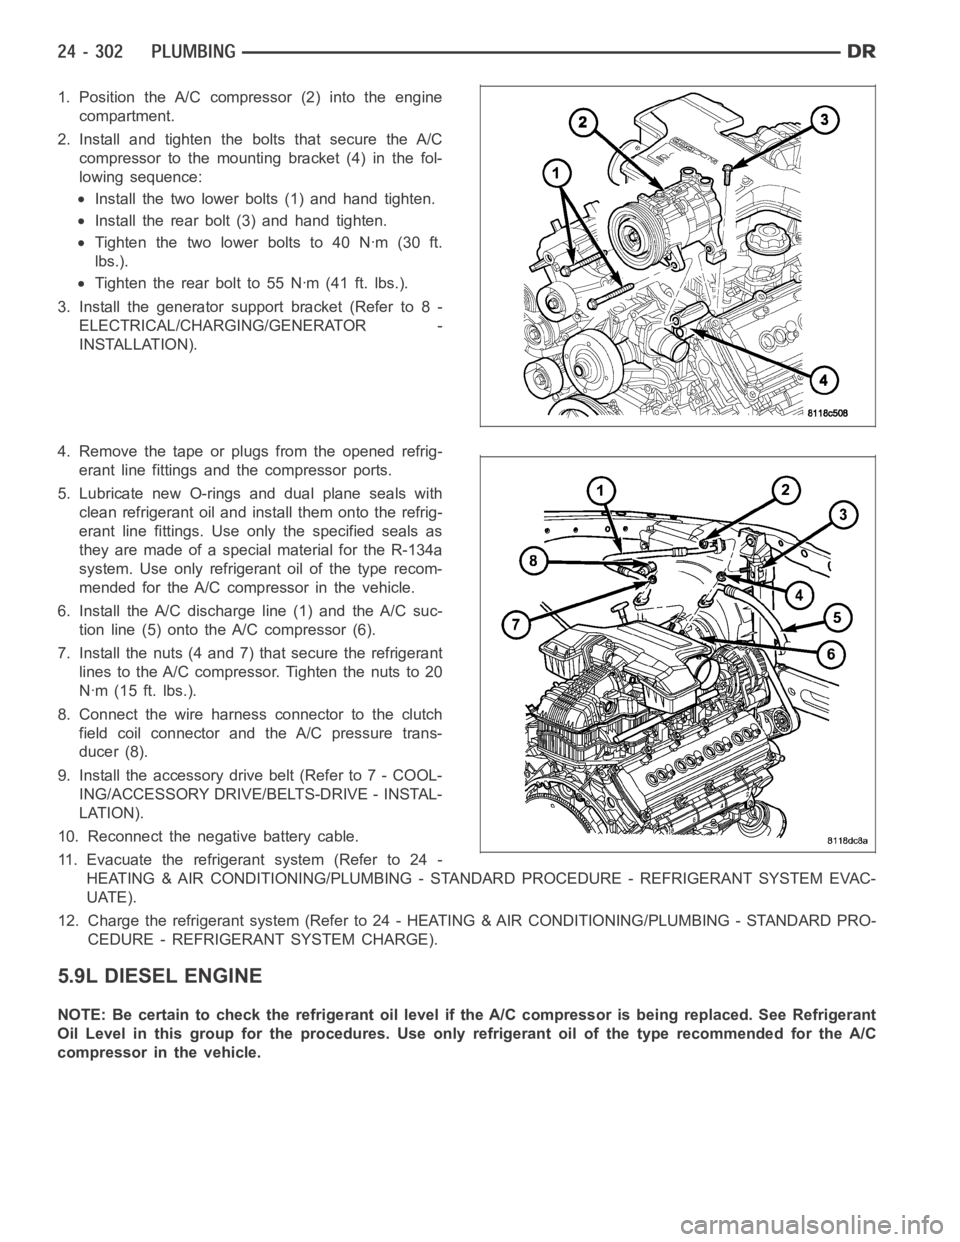
1. Position the A/C compressor (2) into the engine
compartment.
2. Install and tighten the bolts that secure the A/C
compressor to the mounting bracket (4) in the fol-
lowing sequence:
Install the two lower bolts (1) and hand tighten.
Install the rear bolt (3) and hand tighten.
Tightenthetwolowerboltsto40Nꞏm(30ft.
lbs.).
Tighten the rear bolt to 55 Nꞏm (41 ft. lbs.).
3. Install the generator support bracket (Refer to 8 -
ELECTRICAL/CHARGING/GENERATOR -
INSTALLATION).
4. Remove the tape or plugs from the opened refrig-
erant line fittings and the compressor ports.
5. Lubricate new O-rings and dual plane seals with
clean refrigerant oil and install them onto the refrig-
erant line fittings. Use only the specified seals as
they are made of a special material for the R-134a
system. Use only refrigerant oil of the type recom-
mended for the A/C compressor in the vehicle.
6. Install the A/C discharge line (1) and the A/C suc-
tion line (5) onto the A/C compressor (6).
7. Install the nuts (4 and 7) that secure the refrigerant
lines to the A/C compressor. Tighten the nuts to 20
Nꞏm (15 ft. lbs.).
8. Connect the wire harness connector to the clutch
field coil connector and the A/C pressure trans-
ducer (8).
9. Install the accessory drive belt (Refer to 7 - COOL-
ING/ACCESSORY DRIVE/BELTS-DRIVE - INSTAL-
LATION).
10. Reconnect the negative battery cable.
11. Evacuate the refrigerant system (Refer to 24 -
HEATING & AIR CONDITIONING/PLUMBING - STANDARD PROCEDURE - REFRIGERANT SYSTEM EVAC-
UATE).
12. Charge the refrigerant system (Refer to 24 - HEATING & AIR CONDITIONING/PLUMBING - STANDARD PRO-
CEDURE - REFRIGERANT SYSTEM CHARGE).
5.9L DIESEL ENGINE
NOTE: Be certain to check the refrigerant oil level if the A/C compressor isbeing replaced. See Refrigerant
Oil Level in this group for the procedures. Use only refrigerant oil of the type recommended for the A/C
compressor in the vehicle.