Page 1930 of 5267
ENGINE DATA PLATE
DESCRIPTION
The engine data plate contains specific information
that is helpful to servicing and obtaining parts for the
engine. The data plate is on the cylinder head cover.
Information that can be found on the data plate
includes:
Engine Part Number
Date of Engine Manufacture
Engine Serial Number
Control Parts List (CPL)
Engine Rated Horsepower
Engine Firing Order
Engine Displacement
Valve Lash Reset Specifications
If the engine data plate is missing or not legible, the engine serial numberis used for engine identification. The
engine serial number is stamped on the right side of the block, on top of the oil cooler cavity.
Page 1933 of 5267

CYLINDER HEAD
DESCRIPTION
The cylinder head is constructed of cast iron and is a one piece cross flow design with four valves per cylinder. The
arrangement of two intake and two exhaust valves per cylinder allows for a centrally located injector. The cylinder
head also includes an integral intake manifold, an integral thermostat housing, and a longitudal fuel return rifle,
which exits at the rear of the head. The 24 valve design also includes integrally cast valve guides and hardened
intake and exhaust valve seat inserts.
REMOVAL
1. Disconnect battery negative cables.
2. Raise vehicle on hoist.
3. Drain engine coolant.
4. Disconnect exhaust pipe from turbocharger elbow.
5. Remove turbocharger drain tube bolts at turbocharger. Cap off ports to prevent dirt or foreign material from enter-
ing.
6. Lower vehicle.
7. Disconnect air inlet temperature/pressure sensor.
8. Remove air cleaner housing and snorkel from the vehicle. Cap off turbocharger air inlet to prevent intrusion of
dirt or foreign material.
9. Disconnect cab heater core supply and return hoses from the cylinder head and heater pipe.
10. Disconnect turbocharger oil supply line at the turbocharger end. Cap off open ports to prevent intrusion of dirt
or foreign material.
11. Remove exhaust manifold-to-cylinder head bolts, spacers, heat shield, retention straps, and cab heater plumb-
ing. Remove exhaust manifold and turbocharger from the vehicle as an assembly.
12. Remove cooling fan/drive/shroud assembly. (Refer to 7 - COOLING/ENGINE/RADIATOR FAN - REMOVAL)
13. Remove accessory drive belt (Refer to 7 - COOLING/ACCESSORY DRIVE/DRIVE BELTS - REMOVAL).
14. Remove cooling fan support from cylinder block.
15. Remove upper generator bolt, loosen lower generator bolt, and rotate generator away from cylinder head.
16. Disconnect radiator upper hose from the thermostat housing.
17. Disconnect the Intake Air Temperature/Manifold Air Pressure, and Coolant Temperature sensor connectors.
18. Remove the engine harness to cylinder head attaching bolts and P-clipsat front of head.
19. Remove the intake air grid heater wires from the grid heater.
20. Remove engine oil level indicator tube attaching bolt at fuel filter housing bracket and inlet air connection..
21. Remove the charge air cooler-to-air inlet housing pipe.
22. Remove the engine wire harness attaching bolt and wire harness push-infastener from air inlet housing.
23. Remove the air inlet housing and intake grid heater from the intake manifold cover.
24. Remove the two grid heater harness-to-cylinder head attaching bolts at front of cylinder head.
NOTE: Extreme care should be used to keep dirt/debris from entering the fuel lines. Plastic caps should be
used on the ends of the fuel lines.
25.Remove the high pressure pump to fuel rail fuel line as follows:
a. Loosen fuel line nuts at fuel pump and at fuel rail.
b. Use a back-up wrench on the fitting at the fuel pump to keep it from loosening.
26. Remove the fuel rail to cylinder head fuel lines as follows:
a. Loosen No. 6 high pressure fuel line shield and position out of way.
b. Loosen the fuel line nuts at the fuel rail and at the cylinder head. Use a back-up wrench on HPC nut.
c. Remove the fuel line bracket bolts at the intake manifold cover.
Page 1937 of 5267
INSPECTION—PUSHRODS
Inspect the pushrod ball and socket for signs of scor-
ing. Check for cracks where the ball and the socket
are pressed into the tube.
Roll the pushrod on a flat work surface with the socket
end hanging off the edge. Replace any pushrod that
appears to be bent.
INSTALLATION
WARNING: THE OUTSIDE EDGE OF THE HEAD
GASKET IS VERY SHARP. WHEN HANDLING THE
NEW HEAD GASKET, USE CARE NOT TO INJURE
YOURSELF.
1. Install a new gasket with the part number side up,
and locate the gasket over the dowel sleeves.
2. Using an engine lifting crane, lower the cylinder
head onto the engine.
3. Lightly lubricate head bolts under bolt head and on
threads, with engine oil and install. Using the
sequence shown , tighten bolts in the following
steps:
a. Torqueboltsto70Nꞏm(52ft.lbs.).
b. Back off 360 degrees in sequence.
c. Torque bolts to 105 Nꞏm (77 ft. lbs.).
d. Re-check all bolts to 105 Nꞏm (77 ft. lbs.).
e. Tighten all bolts an additional
1⁄4turn (90°).
Page 1939 of 5267

d. Install fuel line brace bolts-to-intake manifold finger tight for fuellines#2thru#5.
e. Install fuel line brace nut to rear lift bracket stud, finger tight, for fuel line #6.
f. Hand tighten fuel pump to fuel rail line.
g. Torque fuel line nuts at cylinder head to 30 Nꞏm ( 22 ft. lbs.).
h. Torque fuel line nuts at fuel rail to 30 Nꞏm (22 ft. lbs.)
i. Usingabackupwrench,torquefuelpumptofuelraillineto37Nꞏm(27ft.lbs.). At injection pump.
j. Torque fuel pump to fuel rail line to 37 Nꞏm (27 ft. lbs.) at fuel rail.
k. Torque fuel drain banjo bolt at pressure limiting valve and front of fuelfilter housing to 24 Nꞏm (18 ft. lbs.).
l. Torque fuel line brace bolts to 24 Nꞏm (18 ft. lbs.).
m. Torque fuel line brace nut to 24 Nꞏm (18 ft. lbs.).
n. Torque rail bolts to 24 Nꞏm (18 ft. lbs.).
o. Connect fuel pressure sensor.
p. Torque fuel filter mounting bolts to 24 Nꞏm (18 ft. lbs.).
19. Reposition number 6 fuel line shield and torque to 43 Nꞏm (32 ft. lbs.).
20. Install the fuel filter to injection pump low pressure line. Inspect and replace sealing washers if necessary.
Torque banjo bolts to 24 Nꞏm (18 ft. lbs.).
21. Connect fuel return line at back of cylinder head hand tight.
22. Connect fuel return line at filter housing hand tight.
23. Torque banjo connections at cylinder head and fuel filter housing to 24Nꞏm (18 ft. lbs.)
24. Install bracket to rear of filter housing. Torque to 24 Nꞏm (18 ft. lbs.).
25. Using new gaskets, install the intake grid heater and air inlet housing. Torque bolts to 24 Nꞏm (18 ft. lbs.).
26. Install wire harness P-clip and push on clip to air inlet housing.
27. Connect engine oil level indicator tube at fuel filter housing and at air inlet housing.
28. Install the charge air cooler-to-air inlet housing duct assembly. Torque all clamps to 11 Nꞏm (100 in. lbs.).
29. Connect intake grid heater wires.
30. Secure engine harness to front of cylinder head with bolt at four locations.
31. Connect engine coolant temperature sensor connector.
32. Connect radiator upper hose to thermostat housing.
33. Rotate generator into position. Install upper bolt and torque upper and lower bolts.
34. Install wire harness push-on clip below bracket.
35. Install wire harness P-clip to top of bracket.
36. Install fan support and torque to 32 Nꞏm (24 ft. lbs.).
37. Install cooling fan/drive refer to (Refer to 7 - COOLING/ENGINE/RADIATOR FAN - INSTALLATION).
38. Install accessory drive belt (Refer to 7 - COOLING/ACCESSORY DRIVE/DRIVE BELTS - INSTALLATION).
39. Install exhaust manifold/turbocharger assembly, using new gaskets.Start all bolts/spacers by hand. Starting
from the center bolts out, Torque bolts to 43 Nꞏm (32 ft. lbs.), then retorque from the center out again.
40. Install exhaust manifold heat shield to exhaust manifold studs. Install retaining nuts.Torque to 24 Nꞏm (18 ft.
lbs.).
41. Install exhaust bolt retention straps across cylinders 5 & 6.
42. Using a new gasket, connect the turbocharger oil drain tube. Torque to 24Nꞏm(18ft.lbs.).
43. Perform the turbocharger pre-lube procedure. (Refer to 11 - EXHAUST SYSTEM/TURBOCHARGER SYSTEM/
TURBOCHARGER - INSTALLATION)
44. Connect the turbocharger oil supply line. Torque to 24 Nꞏm (18 ft. lbs.).
45. Install air cleaner housing and duct.
46. Connect air inlet temperature/pressure sensor.
47. Raise vehicle on hoist.
Page 1943 of 5267

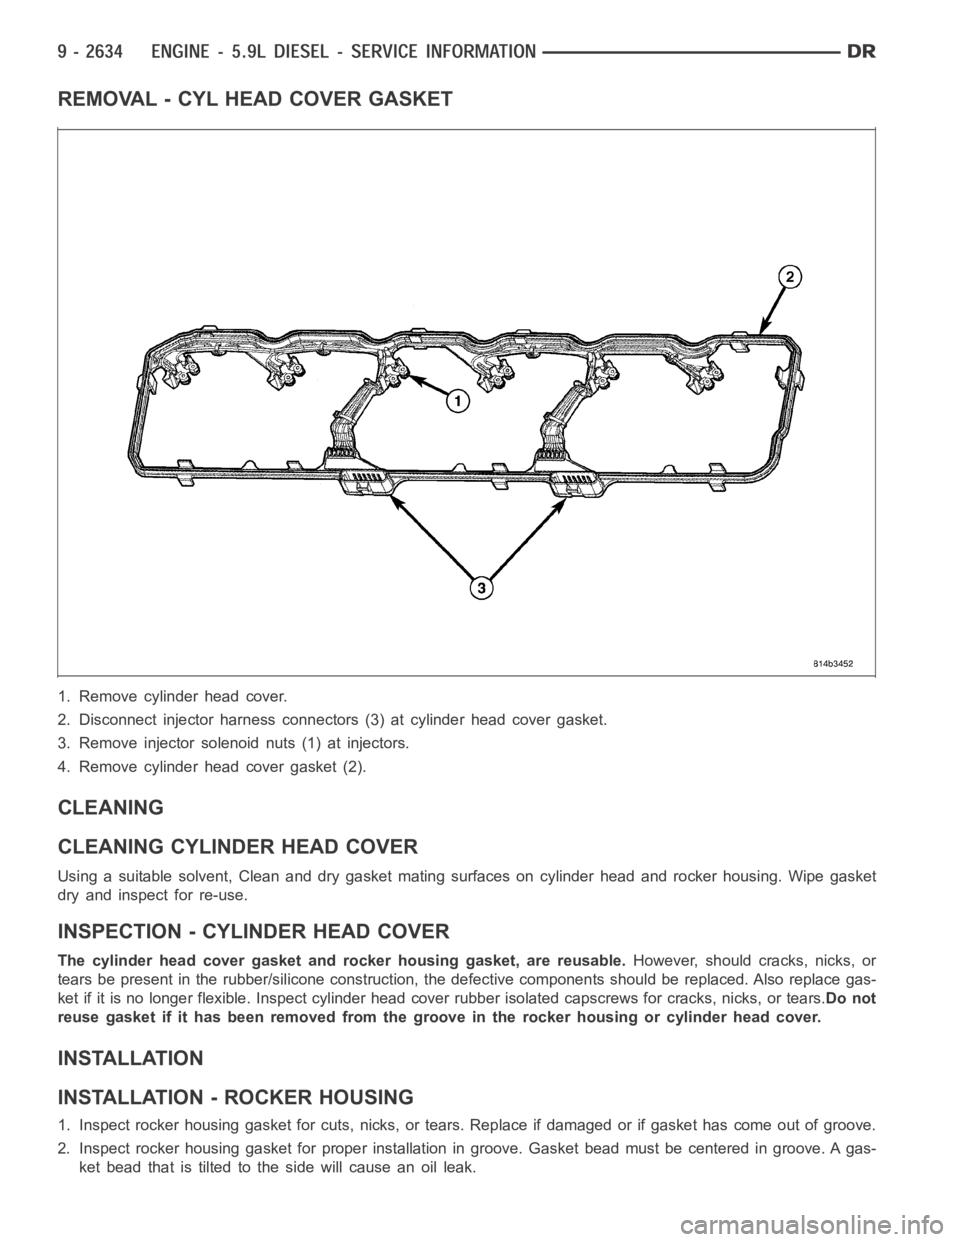
REMOVAL - CYL HEAD COVER GASKET
1. Remove cylinder head cover.
2. Disconnect injector harness connectors (3) at cylinder head cover gasket.
3. Remove injector solenoid nuts (1) at injectors.
4. Remove cylinder headcover gasket (2).
CLEANING
CLEANING CYLINDER HEAD COVER
Using a suitable solvent, Clean and dry gasket mating surfaces on cylinderhead and rocker housing. Wipe gasket
dry and inspect for re-use.
INSPECTION - CYLINDER HEAD COVER
The cylinder head cover gasket and rocker housing gasket, are reusable.However, should cracks, nicks, or
tears be present in the rubber/silicone construction, the defective components should be replaced. Also replace gas-
ket if it is no longer flexible. Inspect cylinder head cover rubber isolated capscrews for cracks, nicks, or tears.Do not
reuse gasket if it has been removed from the groove in the rocker housing or cylinder head cover.
INSTALLATION
INSTALLATION - ROCKER HOUSING
1. Inspect rocker housing gasket for cuts, nicks, or tears. Replace if damagedorifgaskethascomeoutofgroove.
2. Inspect rocker housing gasket for proper installation in groove. Gasket bead must be centered in groove. A gas-
ket bead that is tilted to the side will cause an oil leak.
Page 1944 of 5267
CAUTION: When installing rocker housing onto cylinder head, do not slide housing from side to side, The
gasket could fall out or be damaged.
3. Install the rocker housing. Carefully guide the rocker housing evenly down onto the cylinder head.
4. Install rocker housing bolts and tighten finger tight.
5. Torque bolts, working from center out, to 24 Nꞏm (18 ft. lbs.).
INSTALLATION - CYL HEAD COVER
NOTE: Gasket must be completely dry and free of oil before installation.
1. Position cylinder head cover (1) on top of cylinder head cover gasket (2).
2. Install bolts finger tight.
Page 1945 of 5267
3. Starting with the center bolt, torque bolts (1) to 24
Nꞏm ( 18 ft. lbs. ).
4. Install breather tube (3) to cylinder head cover (2).
5. Install breather drain tube (4) to cylinder head
cover (2).
INSTALLATION - CYL HEAD COVER GASKET
1. Clean oil from cylinder head cover gasket
2. Inspect cylinder head cover gasket for cuts or damage. Replace if damaged.
3. Place cylinder head cover gasket on top of rocker housing (2).
4. Install injector solenoid nuts (1) at injectors. Torque to 1.25 Nꞏm ( 11 in. lbs. ).
Page 1956 of 5267
ROCKER ARM
DESCRIPTION
The unique intake and exhaust rocker arms have their own rocker shafts and are lubricated by passages intersect-
ing the cylinder block main oil rifle. Crossheads are used, which allow each rocker arm to operate two valves.
The solid push rods are hardened at the rocker arm and tappet contact areas for superior strength and durability.
REMOVAL
1. Disconnect the battery negative cables.
2. Remove cylinder head cover (Refer to 9 - ENGINE/
CYLINDER HEAD/CYLINDER HEAD COVER(S) -
REMOVAL).
3. Remove the rocker arm/pedestal fasteners and
remove rocker arm (1) and pedestal (2) from cylin-
der head. Mark the arms and pedestals so they
can be installed in their original position.
CAUTION: When removing the rocker arms, the
sockets may come loose and fall into the engine.
Make sure they stay with the arm upon
removal/installation.