Page 4352 of 5267

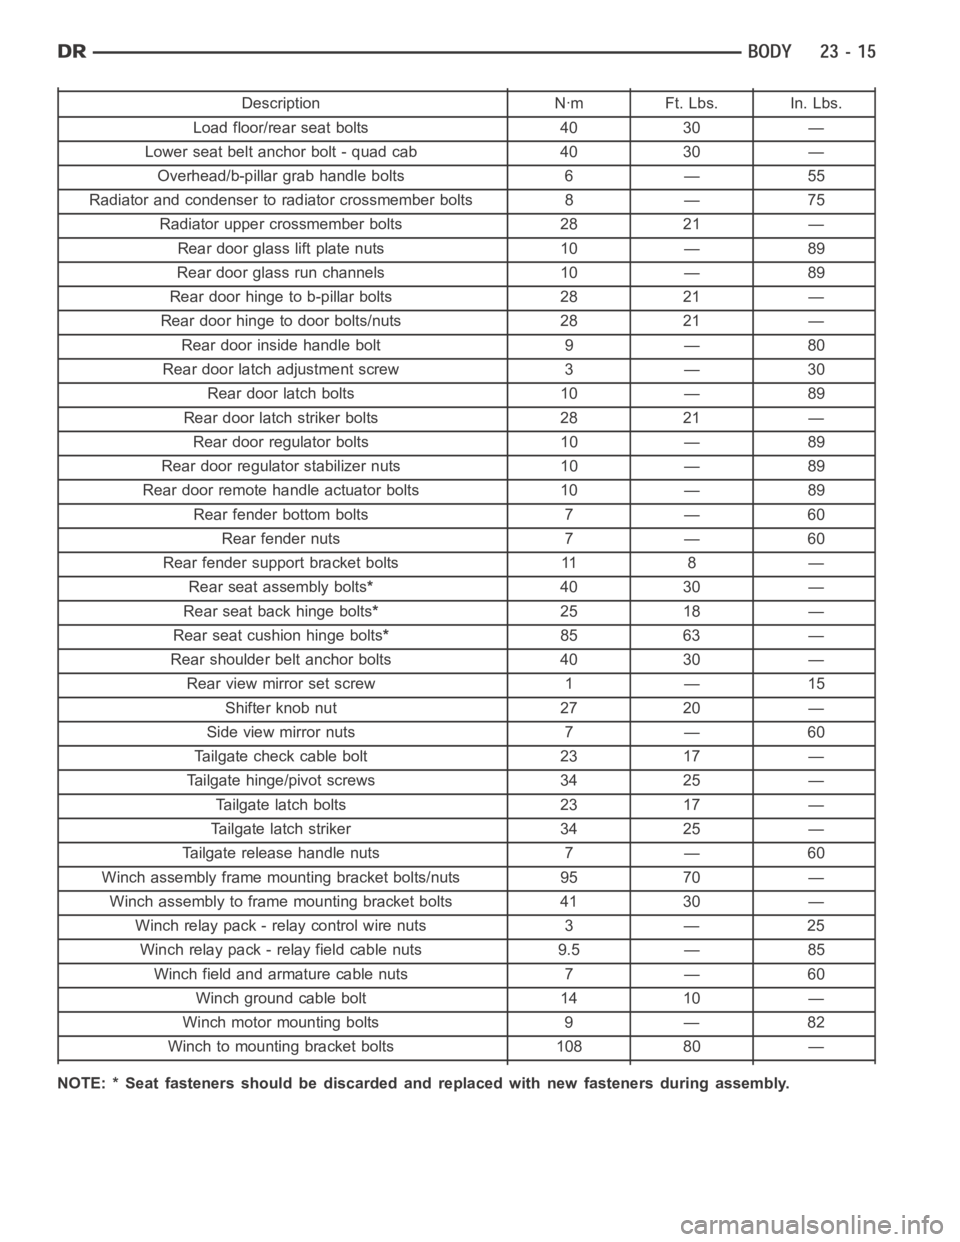
Description Nꞏm Ft. Lbs. In. Lbs.
Load floor/rear seat bolts 40 30 —
Lower seat belt anchor bolt - quad cab 40 30 —
Overhead/b-pillar grab handle bolts 6 — 55
Radiator and condenser to radiator crossmember bolts 8 — 75
Radiator upper crossmember bolts 28 21 —
Rear door glass lift plate nuts 10 — 89
Rear door glass run channels 10 — 89
Rear door hinge to b-pillar bolts 28 21 —
Rear door hinge to door bolts/nuts 28 21 —
Rear door inside handle bolt 9 — 80
Rear door latch adjustment screw 3 — 30
Rear door latch bolts 10 — 89
Rear door latch striker bolts 28 21 —
Rear door regulator bolts 10 — 89
Rear door regulatorstabilizer nuts 10 — 89
Rear door remote handle actuator bolts 10 — 89
Rear fender bottom bolts 7 — 60
Rear fender nuts 7 — 60
Rear fender support bracket bolts 11 8 —
Rear seat assembly bolts*40 30 —
Rear seat back hinge bolts*25 18 —
Rear seat cushion hinge bolts*85 63 —
Rear shoulder belt anchor bolts 40 30 —
Rear view mirror set screw 1 — 15
Shifter knob nut 27 20 —
Side view mirror nuts 7 — 60
Tailgate check cable bolt 23 17 —
Tailgate hinge/pivot screws 34 25 —
Tailgate latch bolts 23 17 —
Tailgate latch striker 34 25 —
Tailgate release handle nuts 7 — 60
Winch assembly frame mounting bracket bolts/nuts 95 70 —
Winch assembly to frame mounting bracket bolts 41 30 —
Winch relay pack - relay control wire nuts 3 — 25
Winch relay pack - relay field cable nuts 9.5 — 85
Winch field and armature cable nuts 7 — 60
Winch ground cable bolt 14 10 —
Winch motor mounting bolts 9 — 82
Winch to mounting bracket bolts 108 80 —
NOTE: * Seat fasteners should be discarded and replaced with new fastenersduring assembly.
Page 4657 of 5267

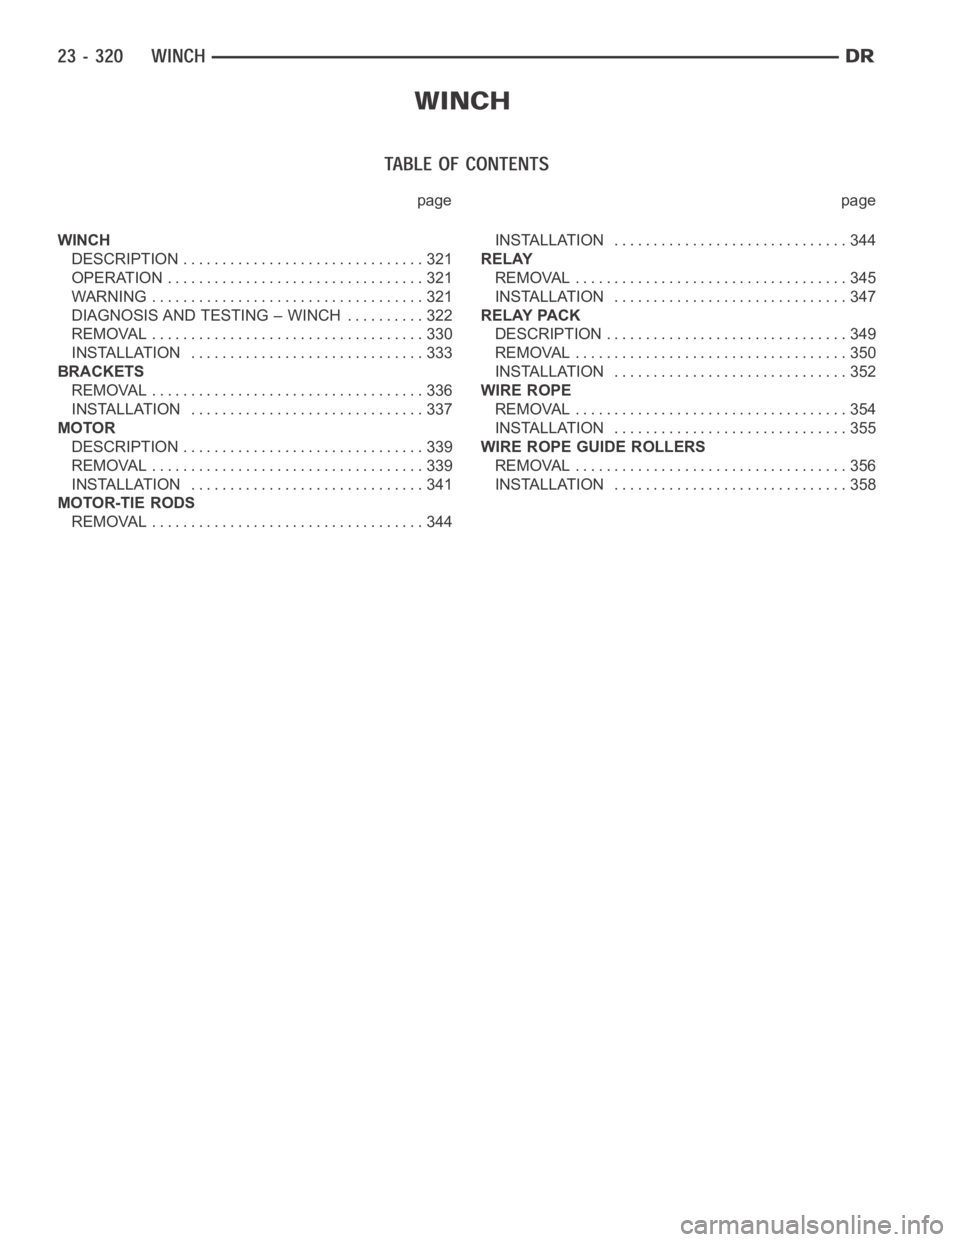
page page
WINCH
DESCRIPTION ............................... 321
OPERATION ................................. 321
WARNING ................................... 321
DIAGNOSIS AND TESTING – WINCH .......... 322
REMOVAL ................................... 330
INSTALLATION .............................. 333
BRACKETS
REMOVAL ................................... 336
INSTALLATION .............................. 337
MOTOR
DESCRIPTION ............................... 339
REMOVAL ................................... 339
INSTALLATION .............................. 341
MOTOR-TIE RODS
REMOVAL ................................... 344INSTALLATION .............................. 344
RELAY
REMOVAL ................................... 345
INSTALLATION .............................. 347
RELAY PACK
DESCRIPTION ............................... 349
REMOVAL ................................... 350
INSTALLATION .............................. 352
WIRE ROPE
REMOVAL ................................... 354
INSTALLATION .............................. 355
WIRE ROPE GUIDE ROLLERS
REMOVAL ................................... 356
INSTALLATION .............................. 358
Page 4661 of 5267

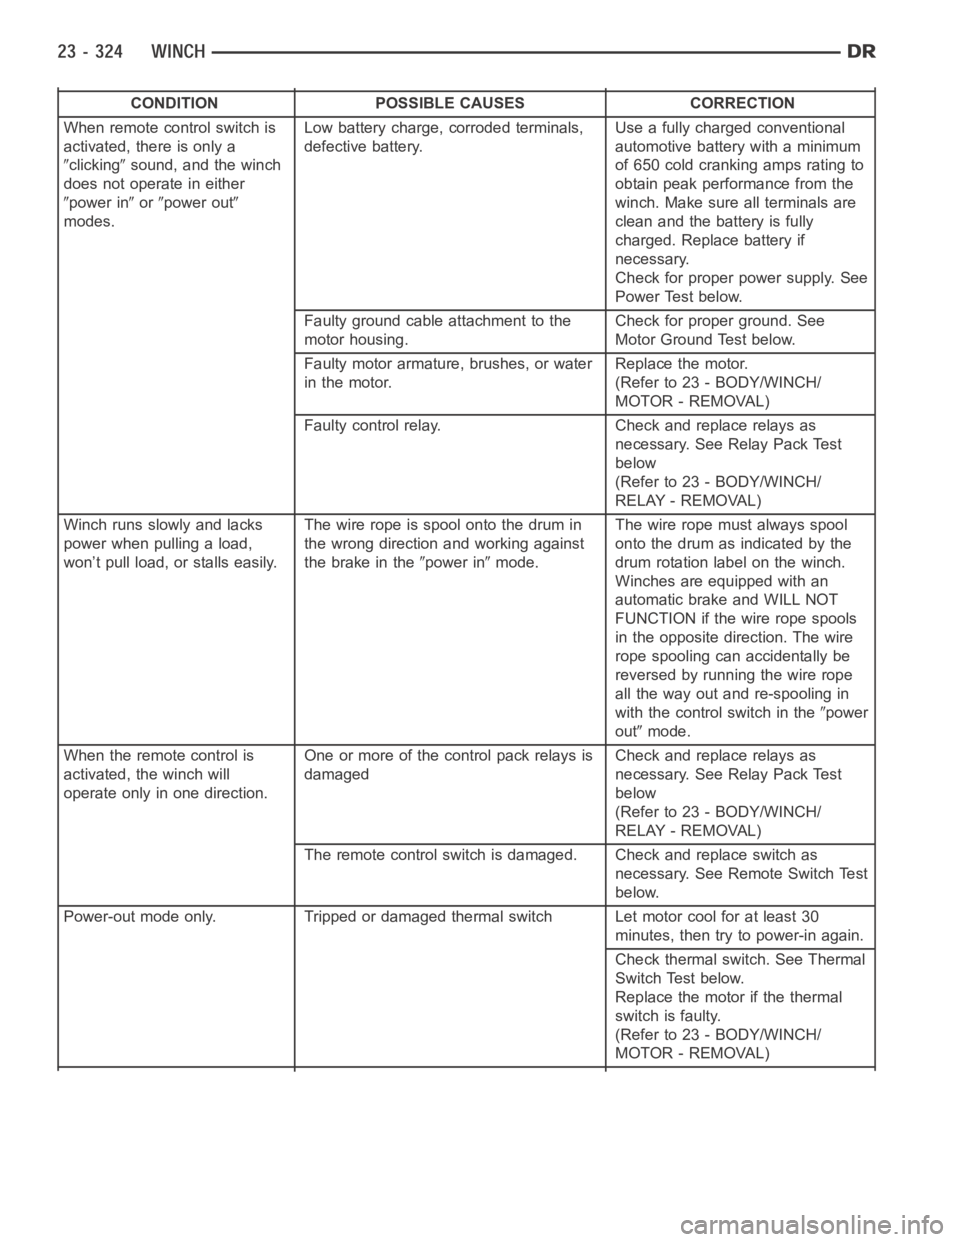
CONDITION POSSIBLE CAUSES CORRECTION
When remote control switch is
activated, there is only a
clickingsound, and the winch
does not operate in either
power inorpower out
modes.Low battery charge, corroded terminals,
defective battery.Use a fully charged conventional
automotive battery with a minimum
of650coldcrankingampsratingto
obtain peak performance from the
winch. Make sure all terminals are
clean and the battery is fully
charged. Replace battery if
necessary.
Check for proper power supply. See
Power Test below.
Faulty ground cable attachment to the
motor housing.Check for proper ground. See
Motor Ground Test below.
Faulty motor armature, brushes, or water
in the motor.Replace the motor.
(Refer to 23 - BODY/WINCH/
MOTOR - REMOVAL)
Faulty control relay. Check and replace relays as
necessary. See Relay Pack Test
below
(Refer to 23 - BODY/WINCH/
RELAY - REMOVAL)
Winchrunsslowlyandlacks
power when pulling a load,
won’t pull load, or stalls easily.Thewireropeisspoolontothedrumin
the wrong direction and working against
the brake in the
power inmode.The wire rope must always spool
onto the drum as indicated by the
drum rotation label on the winch.
Winches are equipped with an
automatic brake and WILL NOT
FUNCTION if the wire rope spools
intheoppositedirection.Thewire
rope spooling can accidentally be
reversed by running the wire rope
all the way out and re-spooling in
with the control switch in the
power
out
mode.
When the remote control is
activated, the winch will
operate only in one direction.One or more of the control pack relays is
damagedCheck and replace relays as
necessary. See Relay Pack Test
below
(Refer to 23 - BODY/WINCH/
RELAY - REMOVAL)
The remote control switch is damaged. Check and replace switch as
necessary. See Remote Switch Test
below.
Power-out mode only. Tripped or damaged thermal switch Let motor cool for atleast30
minutes, then try to power-in again.
Check thermal switch. See Thermal
Switch Test below.
Replace the motor if the thermal
switch is faulty.
(Refer to 23 - BODY/WINCH/
MOTOR - REMOVAL)
Page 4662 of 5267
CONDITION POSSIBLE CAUSES CORRECTION
When the remote control is
activated, the winch will not
operate and no “clicking” sound
is heard.Tripped or damaged Low Voltage
Interrupt (LVI)Use a fully charged conventional
automotive battery with a minimum
of650coldcrankingampsratingto
obtain peak performance from the
winch. Make sure all terminals are
clean and the battery is fully
charged. Replace battery if
necessary.
Check LVI. See Low Voltage
Interrupt (LVI) Test below.
Replace the relay pack if the LVI is
faulty.
(Refer to 23 - BODY/WINCH/
RELAY PACK - REMOVAL)
Relay Test
1. Disconnect the red (+) battery cable (1).
Page 4663 of 5267
2. Remove the winch assembly (2) as necessary to gain access to the relay pack and cover (Refer to 23 - BODY/
WINCH - REMOVAL).
3. Disconnect the three cables connected to the
motor on the studs marked F1 (2) , F2 (1) and A
(3).
4. Apply 12 volts to the small terminal (1) of relay #1
(2) and measure the resistance across the two
large studs.
Page 4664 of 5267
5. Apply 12 volts to the small terminal (1) of relay #2 (2) and measure the resistance across the two large studs.
6. Apply 12 volts to the small terminal (2) of relay #3
(1) and measure the resistance across the two
large studs.
7. Apply 12 volts to the small terminal (1) of relay #4
(2) and measure the resistance across the two
large studs.
8. If the resistance across any of the relays doesn’t
go from open to closed (megaohms to tenths) then
the relay is bad and needs to be replaced (Refer to
23 - BODY/WINCH/RELAY - REMOVAL).
Remote Switch Test
1. To check switch, follow the steps below to check for switch continuity.
Page 4666 of 5267

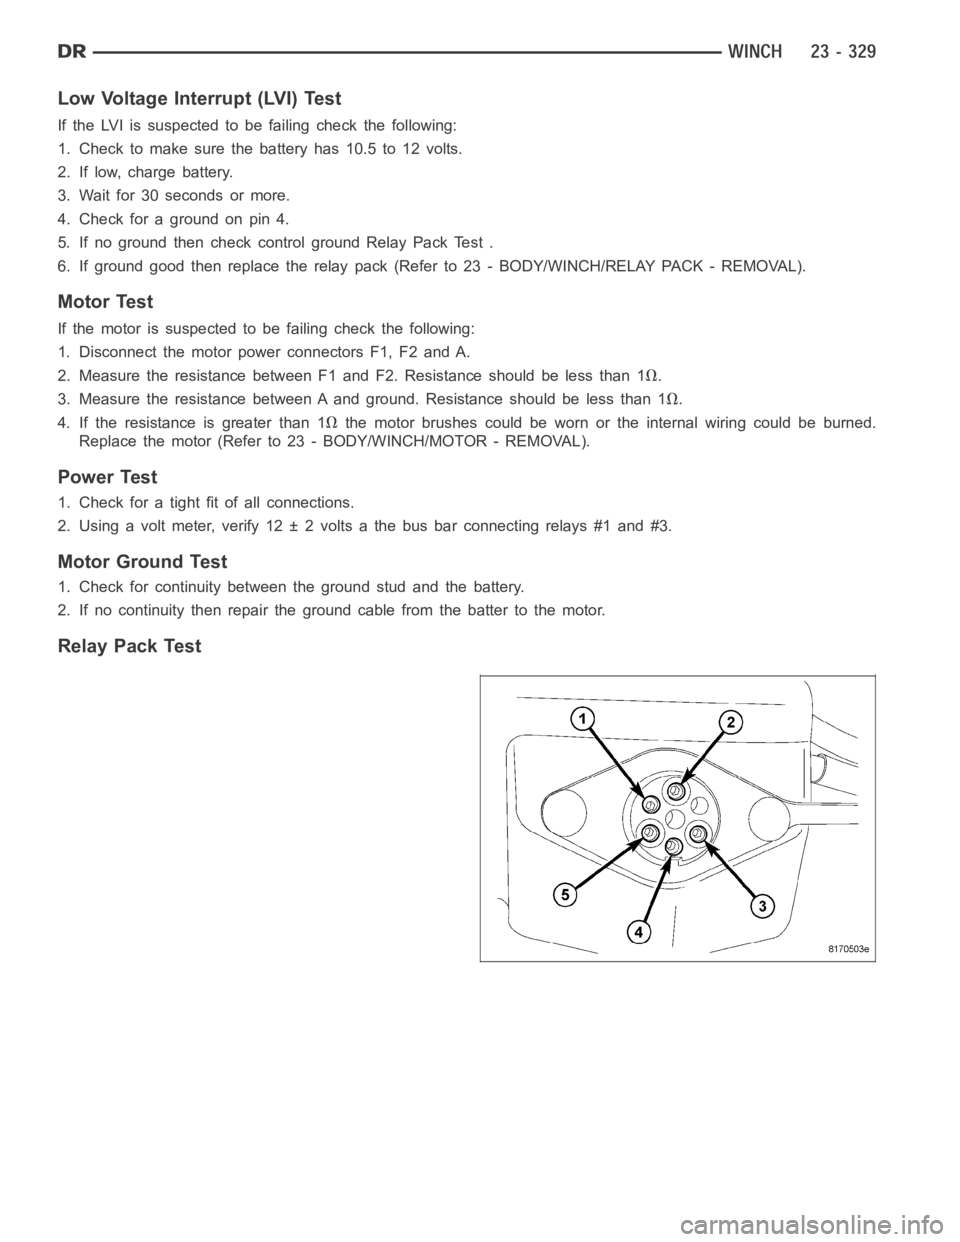
Low Voltage Interrupt (LVI) Test
If the LVI is suspected to be failing check the following:
1. Check to make sure the battery has 10.5 to 12 volts.
2. If low, charge battery.
3. Wait for 30 seconds or more.
4. Check for a ground on pin 4.
5. If no ground then check control ground Relay Pack Test .
6. If ground good then replace the relay pack (Refer to 23 - BODY/WINCH/RELAYPACK-REMOVAL).
Motor Test
If the motor is suspected to be failing check the following:
1. Disconnect the motor power connectors F1, F2 and A.
2. Measure the resistance between F1 and F2. Resistance should be less than1
.
3. Measure the resistance between A and ground. Resistance should be less than 1
.
4. If the resistance is greater than 1
the motor brushes could be worn or the internal wiring could be burned.
Replace the motor (Refer to 23 - BODY/WINCH/MOTOR - REMOVAL).
Power Test
1. Check for a tight fit of all connections.
2. Using a volt meter, verify 12 ± 2 volts a the bus bar connecting relays #1 and#3.
Motor Ground Test
1. Check for continuity between the ground stud and the battery.
2. If no continuity then repair the ground cable from the batter to the motor.
Relay Pack Test
Page 4667 of 5267
Measurement
between pinsResistance Voltage
Results Correction
(V)
“4” to “5” 2 - Yes Relay pack OK.
No 1. Check for any faulty relay or
motor electrical connections and
repair if necessary.
2. Check for a faulty relay and
replace as necessary. Refer to
Relay Test .
“4” to “2” 2 - Yes Relay pack OK.
No 1. Check for any faulty relay or
motor electrical connections and
repair if necessary.
2. Check for a faulty relay and
replace as necessary. Refer to
Relay Test .
“1” to “2”
100K - Yes Relay pack OK.
No Check for shorted Thermal Switch.
Refer to Thermal Switch Test .
“1” to “3” - 12 Yes Relay pack OK.
No 1. Check for any faulty relay or
motor electrical connections and
repair if necessary.
2. Check for faulty LVI, Refer to
Low Voltage Interrupt (LVI) Test .
REMOVAL
1. Disconnect and isolate battery negative (3) and
positive (1) cables.