Page 3075 of 5135

610CN±02
B65506
±
SEAT BELT FRONT SEAT BELT
61±7
AVENSIS REPAIR MANUAL (RM1018E)
REPLACEMENT
HINT:
�The installation is in the reverse order of the removal. However, when there is a special point concern-
ing the installation, it is indicated.
�Use the same procedures on the LH side as on the RH side.
1. DISCONNECT BATTERY NEGATIVE TERMINAL
2. REMOVE FRONT SEAT ASSEMBLY RH
3. REMOVE FRONT SEAT INNER BELT ASSY RH
4.REMOVE FRONT DOOR SCUFF PLATE RH (See page 76±36, 76±45, 76±54)
5.REMOVE REAR DOOR SCUFF PLATE RH (See page 76±36, 76±45, 76±54)
6. REMOVE FRONT DOOR WEATHERSTRIP RH
7. REMOVE REAR DOOR WEATHERSTRIP RH
8.REMOVE CENTER PILLAR GARNISH LOWER RH (See page 76±36, 76±45, 76±54)
9.REMOVE CENTER PILLAR GARNISH UPPER RH (See page 76±36, 76±45, 76±54) 10. REMOVE FRONT SEAT OUTER BELT ASSY RH
NOTICE:
�Removal operation concerning the seat belt with the
pretensioner must be started when 90 seconds or
more time has passed after the ignition switch is
turned OFF and the battery negative terminal is dis-
connected.
�Carefully read the notices for the ºpretensionerº in
the SRS airbag system section and the front seat out-
er belt assy section.
(a) Remove the nut and the outer belt on the shoulder anchor
side.
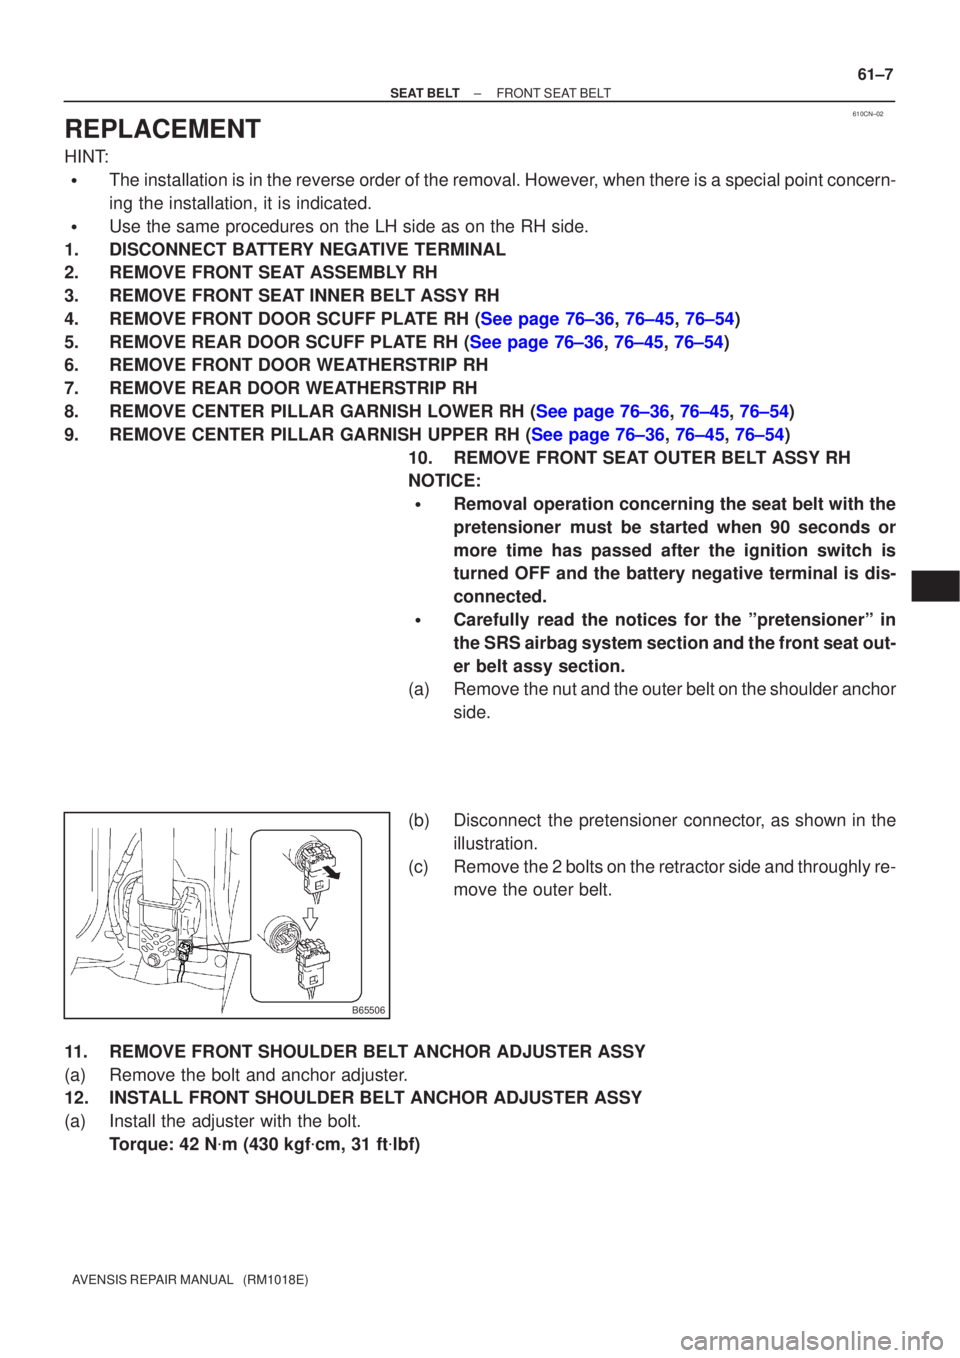
(b) Disconnect the pretensioner connector, as shown in the illustration.
(c) Remove the 2 bolts on the retractor side and throughly re- move the outer belt.
11. REMOVE FRONT SHOULDER BELT ANCHOR ADJUSTER ASSY
(a) Remove the bolt and anchor adjuster.
12. INSTALL FRONT SHOULDER BELT ANCHOR ADJUSTER ASSY
(a) Install the adjuster with the bolt. Torque: 42 N �m (430 kgf �cm, 31 ft �lbf)
Page 3079 of 5135

610CL±02
B69502
AA
Buckle Switch ON
1
3 2
4
B69502
AA
Buckle Switch OFF
1
3 2
4
B69852
3 2
1
4AA
Connect of Airbag
Seat Position Sensor12B
B
B69501
AA
Buckle Switch ON
B
B
3 21
4321
± SEAT BELTSEAT BELT WARNING SYSTEM
61±3
AVENSIS REPAIR MANUAL (RM1018E)
INSPECTION
1. Driver side:
INSPECT FRONT SEAT INNER BELT ASSY
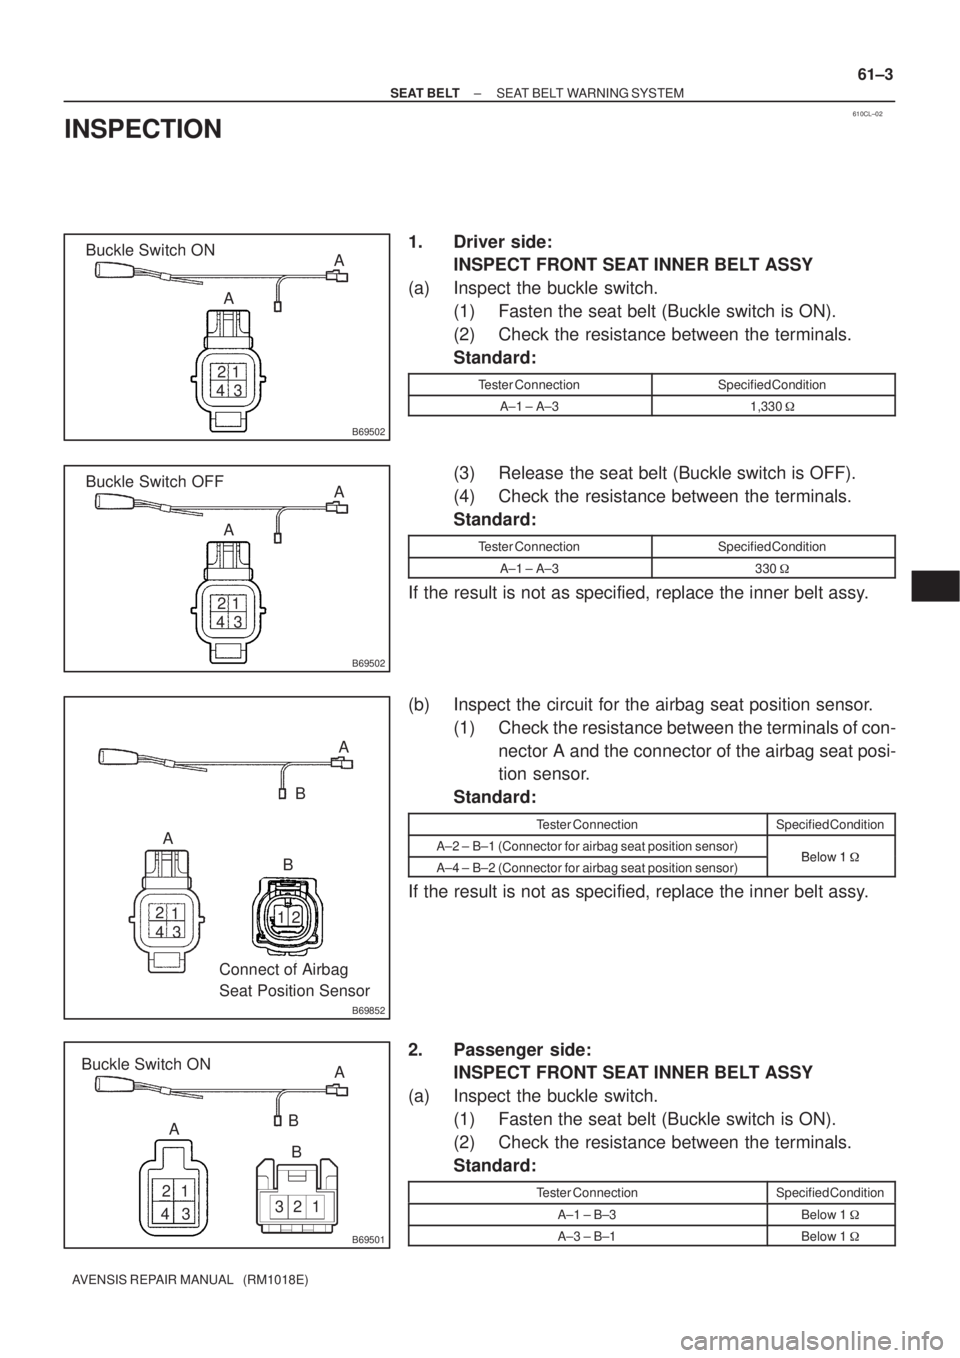
(a) Inspect the buckle switch.
(1) Fasten the seat belt (Buckle switch is ON).
(2) Check the resistance between the terminals.
Standard:
Tester ConnectionSpecified Condition
A±1 ± A±31,330 �
(3) Release the seat belt (Buckle switch is OFF).
(4) Check the resistance between the terminals.
Standard:
Tester ConnectionSpecified Condition
A±1 ± A±3330 �
If the result is not as specified, replace the inner belt assy.
(b) Inspect the circuit for the airbag seat position sensor.
(1) Check the resistance between the terminals of con-
nector A and the connector of the airbag seat posi-
tion sensor.
Standard:
Tester ConnectionSpecified Condition
A±2 ± B±1 (Connector for airbag seat position sensor)Below 1�A±4 ± B±2 (Connector for airbag seat position sensor)Below 1 �
If the result is not as specified, replace the inner belt assy.
2. Passenger side:
INSPECT FRONT SEAT INNER BELT ASSY
(a) Inspect the buckle switch.
(1) Fasten the seat belt (Buckle switch is ON).
(2) Check the resistance between the terminals.
Standard:
Tester ConnectionSpecified Condition
A±1 ± B±3Below 1 �
A±3 ± B±1Below 1 �
Page 3081 of 5135
610CK±02
61±2
±
SEAT BELT SEAT BELT WARNING SYSTEM
AVENSIS REPAIR MANUAL (RM1018E)
PROBLEM SYMPTOMS TABLE
SymptomSuspected AreaSee Page
Driver side seat belt warning lamp does not light up
1. Fuse
2. Combination meter
3. Airbag sensor assy center
4. Front seat inner belt assy LH
5. Wire harness�
71±21
60±62 61±3 �
Passenger side seat belt warning lamp does not light up
1. Fuse
2. Passenger side seat belt warning lamp assy
3. Front seat inner belt assy RH
4. Wire harness�
61±3
61±3 �
Page 3083 of 5135

600AB±04
H42640
60±70
±
SUPPLEMENTAL RESTRAINT SYSTEM SEAT POSITION AIR BAG SENSOR
AVENSIS REPAIR MANUAL (RM1018E)
REPLACEMENT
HINT:
Replacement procedure of the RH side is the same as that of the LH side.
1.PRECAUTION (See page 60±1)
2.DISCONNECT BATTERY NEGATIVE TERMINAL (See page 60±1)
3.REMOVE SEAT TRACK COVER LH (See page 72±16)
4.REMOVE SEAT TRACK BRACKET COVER INNER LH (See page 72±16)
5.REMOVE FRONT SEAT ASSY LH (See page 72±16) 6. REMOVE SEAT POSITION AIR BAG SENSOR
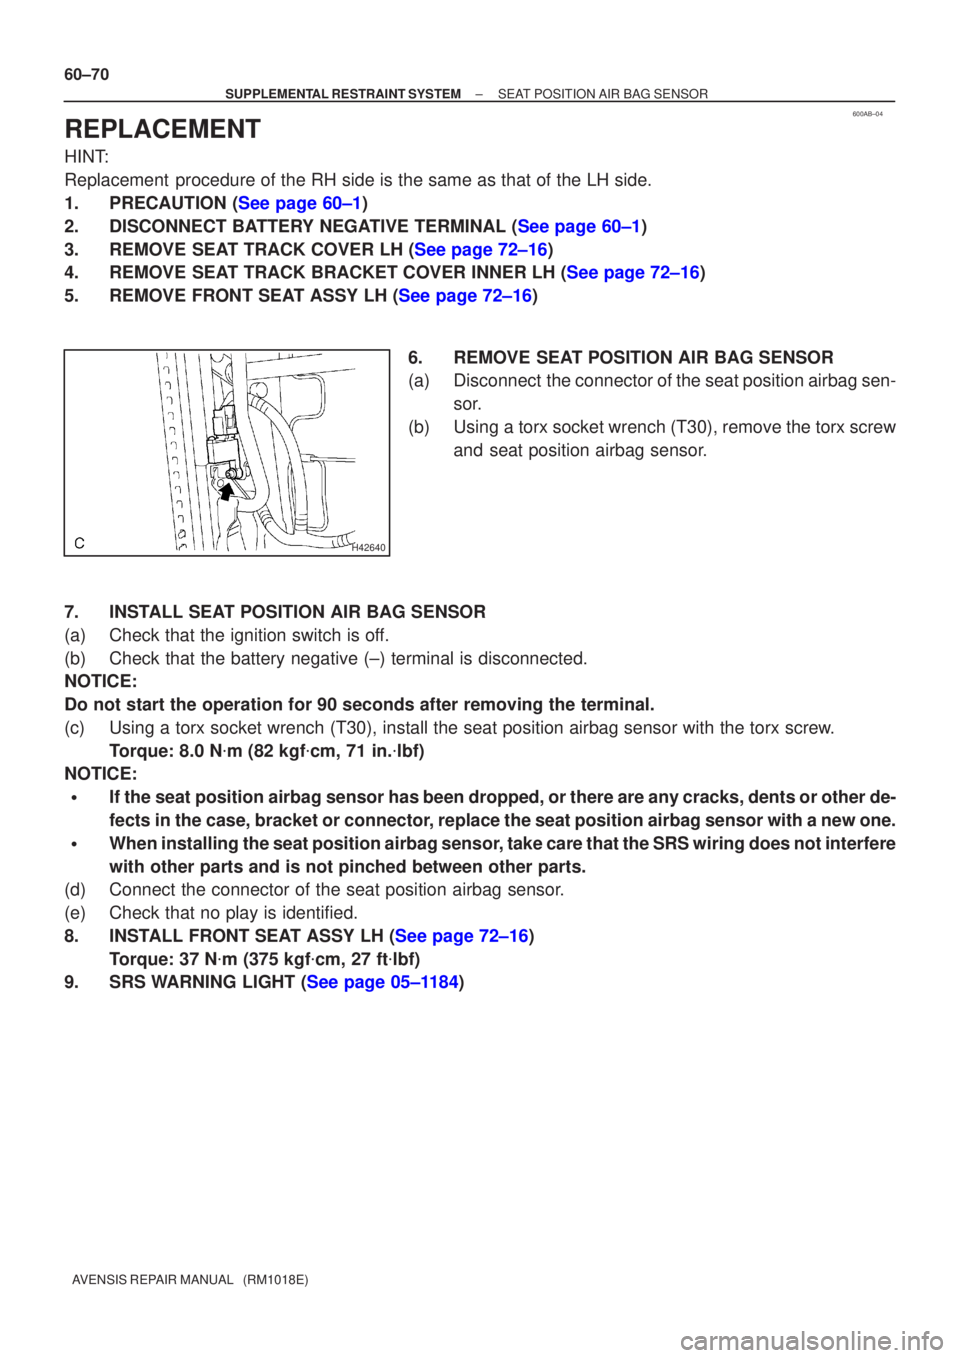
(a) Disconnect the connector of the seat position airbag sen-sor.
(b) Using a torx socket wrench (T30), remove the torx screw and seat position airbag sensor.
7. INSTALL SEAT POSITION AIR BAG SENSOR
(a) Check that the ignition switch is off.
(b) Check that the battery negative (±) terminal is disconnected.
NOTICE:
Do not start the operation for 90 seconds after removing the terminal.
(c) Using a torx socket wrench (T30), install the seat position airbag sen\
sor with the torx screw. Torque: 8.0 N �m (82 kgf �cm, 71 in. �lbf)
NOTICE:
�If the seat position airbag sensor has been dropped, or there are any cracks, dents or other de-
fects in the case, bracket or connector, replace the seat position airbag sensor with a new one.
�When installing the seat position airbag sensor, take care that the SRS wiring does not interfere
with other parts and is not pinched between other parts.
(d) Connect the connector of the seat position airbag sensor.
(e) Check that no play is identified.
8.INSTALL FRONT SEAT ASSY LH (See page 72±16)
Torque: 37 N �m (375 kgf �cm, 27 ft �lbf)
9.SRS WARNING LIGHT (See page 05±1184)
Page 3223 of 5135
B693482 Claws
(B)(B)
B660412 Clips 2 Claws
B660282 Clips
±
INSTRUMENT PANEL/METER INSTRUMENT PANEL SUB±ASSY LOWER
71±13
AVENSIS REPAIR MANUAL (RM1018E)
(b)Disengage the 2 claws (B) and remove the instrument
panel register assy No.1.
9.REMOVE INSTRUMENT PANEL REGISTER ASSY NO.2 10.REMOVE GLOVE COMPARTMENT DOOR ASSY
(a)Remove the screw.
(b)Deform the upper part of the glove compartment doorassy to release the stoppers.
(c)Pull the glove compartment door assy upward to remove
it.
11.REMOVE FRONT PILLAR GARNISH LH
(a)Disengage the 2 clips, and remove the front pillar garnish LH.
12.REMOVE FRONT PILLAR GARNISH RH
13.DISCONNECT PASSENGER AIRBAG CONNECTOR (See page 60±29)
Page 3231 of 5135
710FY±01
71±10
± INSTRUMENT PANEL/METERINSTRUMENT PANEL SUB±ASSY LOWER
AVENSIS REPAIR MANUAL (RM1018E)
INSTRUMENT PANEL SUB±ASSY LOWER
PRECAUTION
1. PRECAUTION FOR VEHICLE WITH SRS AIRBAG AND SEAT BELT PRETENSIONER
(a) Some operations in this section may affect the SRS airbags. Prior to performing the corresponding
operations, read the SRS airbag NOTICE.
Page 3233 of 5135
B66038
Heater to Register Duct No.2
Instrument Panel Lower Assy
Cowl Side Trim
Board RH
Front Door
Scuff Plate
RH
Floor Shift
Shift Lever
Knob Sub±assy Console Panel
Sub±assy Upper
Console Panel Sub±assy Lower
Console Box Assy RR Front Door
Scuff Plate LHCowl Side Trim
Board LH
Instrument Panel Airbag Assy
Console Rear End
Panel
Radio Receiver
Assembly w/ Bracket
Windshield
Wiper Switch Assy
Instrument Panel
Hole CoverHead lamp
Dimmer Switch Assy
Instrument Panel Under
Cover Sub±assy No.2
Horn Button Assy Steering Wheel Assy
Instrument Panel Under Cover
Sub±assy No.1
H
N´m (kgf´cm, ft´lbf) : Specified torqueM/T Transaxle: A/T Transaxle:
A/T Only:
M/T Only:
50 (510, 37)
8.8 (90, 78 in.´lbf)
orEF
D
B
Bor
EF
I
or
EF
or
EF
H
HH
H
H
HH
H
H
CC
CC
H
HConsole Panel
Sub±assy Upper
18 (184, 13)
18 (184, 13)
71±8
± INSTRUMENT PANEL/METERINSTRUMENT PANEL/METER
AVENSIS REPAIR MANUAL (RM1018E)
Page 3239 of 5135

710CM±02
±
INSTRUMENT PANEL/METER COMBINATION METER
71±1
AVENSIS REPAIR MANUAL (RM1018E)
COMBINATION METER
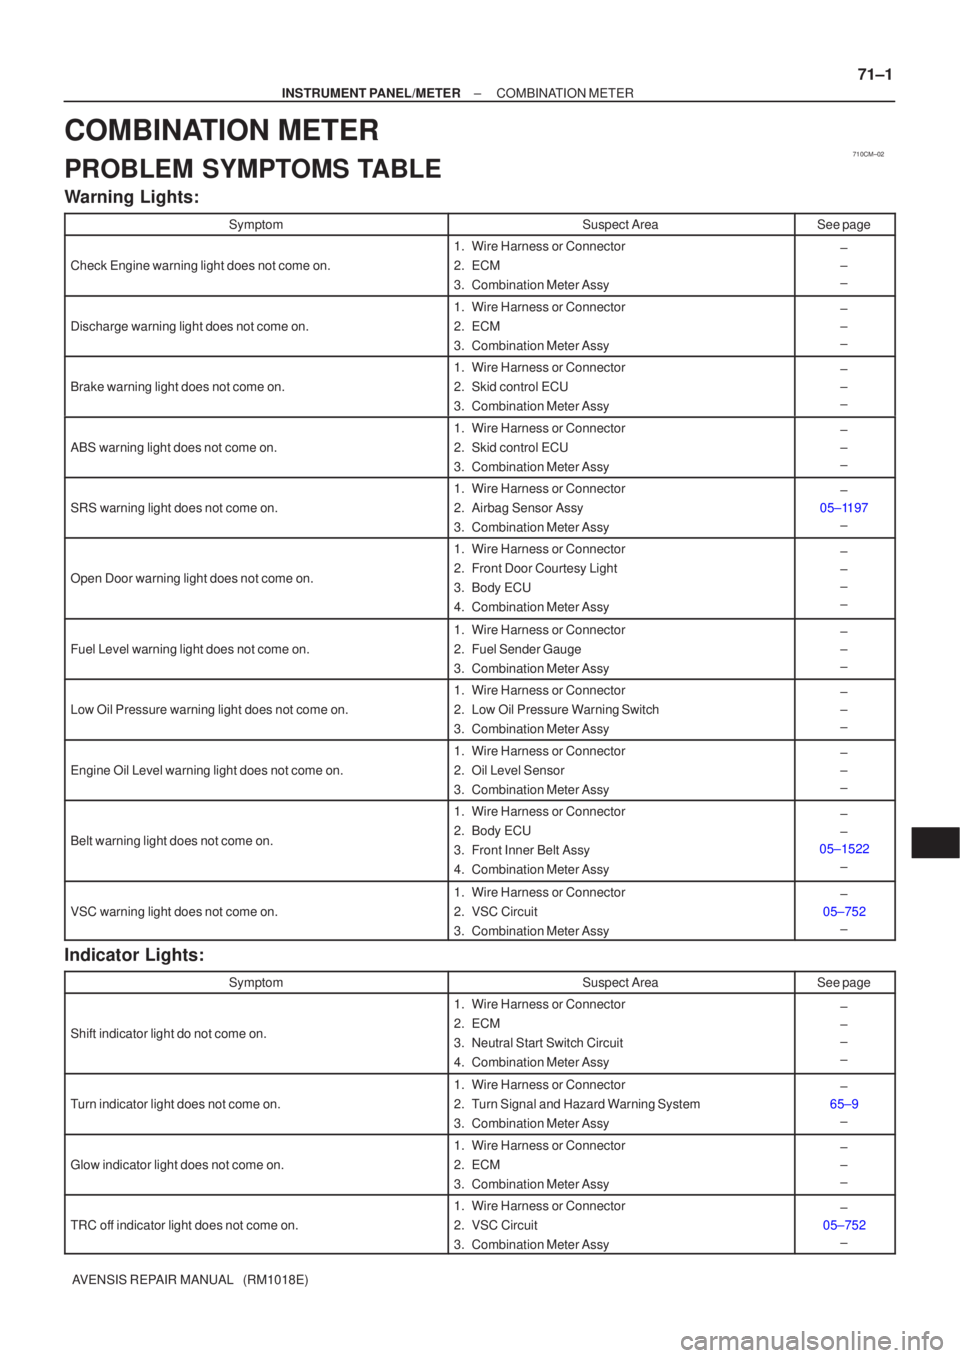
PROBLEM SYMPTOMS TABLE
Warning Lights:
SymptomSuspect AreaSee page
Check Engine warning light does not come on.
1.Wire Harness or Connector
2.ECM
3.Combination Meter Assy±
±
±
Discharge warning light does not come on.
1.Wire Harness or Connector
2.ECM
3.Combination Meter Assy±
±
±
Brake warning light does not come on.
1.Wire Harness or Connector
2.Skid control ECU
3.Combination Meter Assy±
±
±
ABS warning light does not come on.
1.Wire Harness or Connector
2.Skid control ECU
3.Combination Meter Assy±
±
±
SRS warning light does not come on.
1.Wire Harness or Connector
2.Airbag Sensor Assy
3.Combination Meter Assy±
05±1197 ±
Open Door warning light does not come on.
1.Wire Harness or Connector
2.Front Door Courtesy Light
3.Body ECU
4.Combination Meter Assy±
±
±
±
Fuel Level warning light does not come on.
1.Wire Harness or Connector
2.Fuel Sender Gauge
3.Combination Meter Assy±
±
±
Low Oil Pressure warning light does not come on.
1.Wire Harness or Connector
2.Low Oil Pressure Warning Switch
3.Combination Meter Assy±
±
±
Engine Oil Level warning light does not come on.
1.Wire Harness or Connector
2.Oil Level Sensor
3.Combination Meter Assy±
±
±
Belt warning light does not come on.
1.Wire Harness or Connector
2.Body ECU
3.Front Inner Belt Assy
4.Combination Meter Assy±
±
05±1522
±
VSC warning light does not come on.
1.Wire Harness or Connector
2.VSC Circuit
3.Combination Meter Assy±
05±752 ±
Indicator Lights:
SymptomSuspect AreaSee page
Shift indicator light do not come on.
1. Wire Harness or Connector
2. ECM
3. Neutral Start Switch Circuit
4. Combination Meter Assy±
±
±
±
Turn indicator light does not come on.
1. Wire Harness or Connector
2. Turn Signal and Hazard Warning System
3. Combination Meter Assy±
65±9 ±
Glow indicator light does not come on.
1. Wire Harness or Connector
2. ECM
3. Combination Meter Assy±
±
±
TRC off indicator light does not come on.
1. Wire Harness or Connector
2. VSC Circuit
3. Combination Meter Assy±
05±752 ±