Page 3279 of 5135
720J7±01
B70318
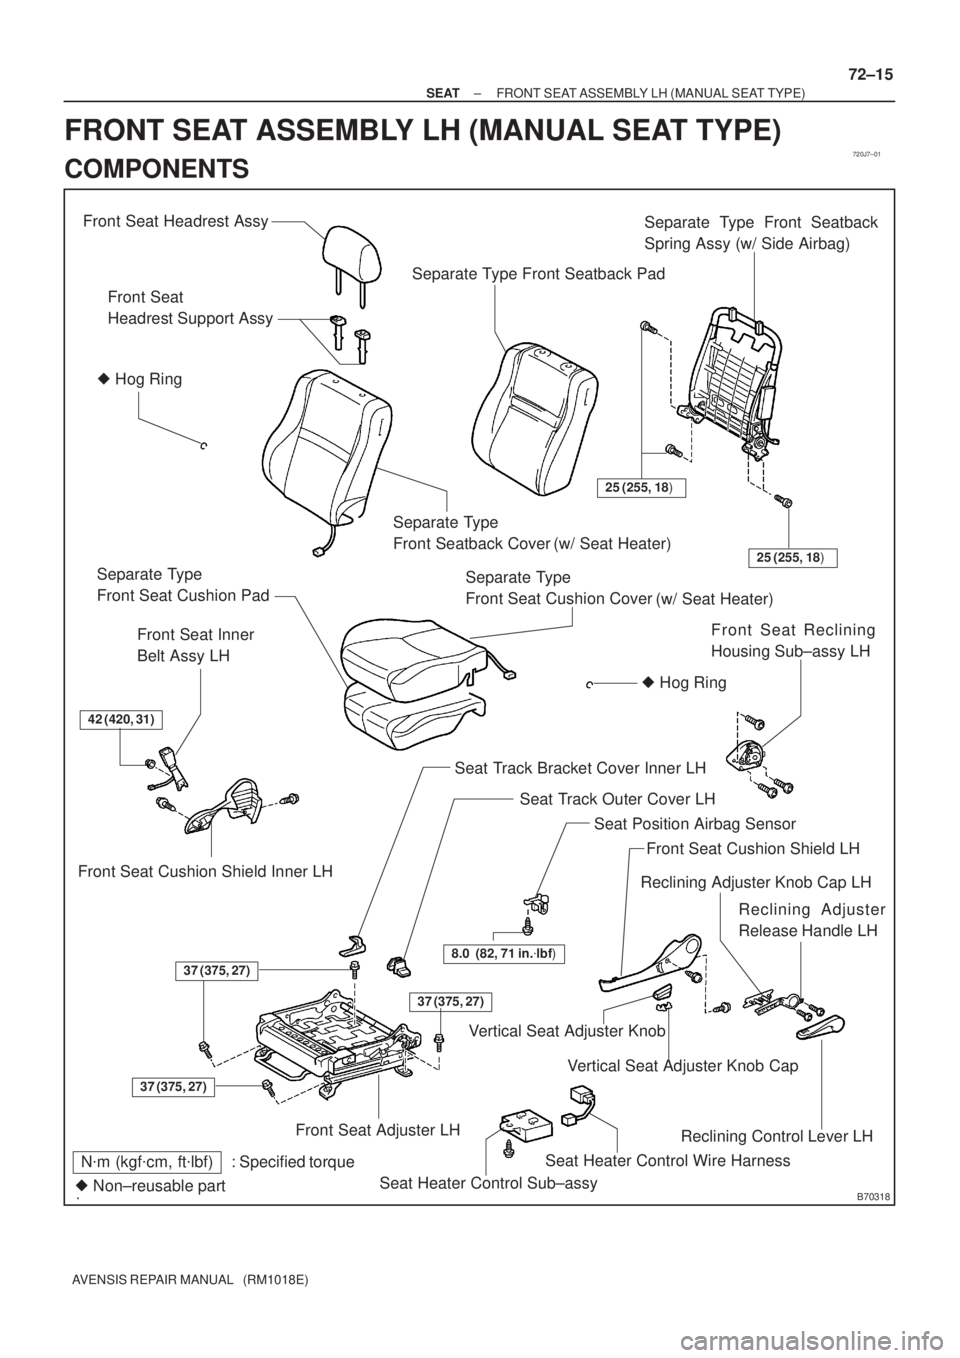
Front Seat Headrest Assy
Vertical Seat Adjuster KnobReclining Adjuster
Release Handle LH Front Seat Cushion Shield LH Front Seat Inner
Belt Assy LH
Front Seat Cushion Shield Inner LHSeparate Type
Front Seatback Cover (w/ Seat Heater)Separate Type Front Seatback
Spring Assy (w/ Side Airbag)
Separate Type
Front Seat Cushion Cover
(w/ Seat Heater) Separate Type
Front Seat Cushion PadSeparate Type Front Seatback Pad
N�m (kgf�cm, ft�lbf) : Specified torque
� Non±reusable partFront Seat
Headrest Support Assy
� Hog Ring � Hog Ring
37 (375, 27)
37 (375, 27)
42 (420, 31)
Front Seat Adjuster LHSeat Track Bracket Cover Inner LHFront Seat Reclining
Housing Sub±assy LH
Reclining Control Lever LH Reclining Adjuster Knob Cap LH
Vertical Seat Adjuster Knob Cap
25 (255, 18)
37 (375, 27)
25 (255, 18)
8.0 (82, 71 in.�lbf)
Seat Track Outer Cover LH
Seat Position Airbag Sensor
Seat Heater Control Sub±assy
Seat Heater Control Wire Harness
± SEATFRONT SEAT ASSEMBLY LH (MANUAL SEAT TYPE)
72±15
AVENSIS REPAIR MANUAL (RM1018E)
FRONT SEAT ASSEMBLY LH (MANUAL SEAT TYPE)
COMPONENTS
Page 3281 of 5135
B70317
Claw
Clip
B60977
72±12
± SEATFRONT SEAT ASSEMBLY LH (POWER SEAT TYPE)
AVENSIS REPAIR MANUAL (RM1018E)
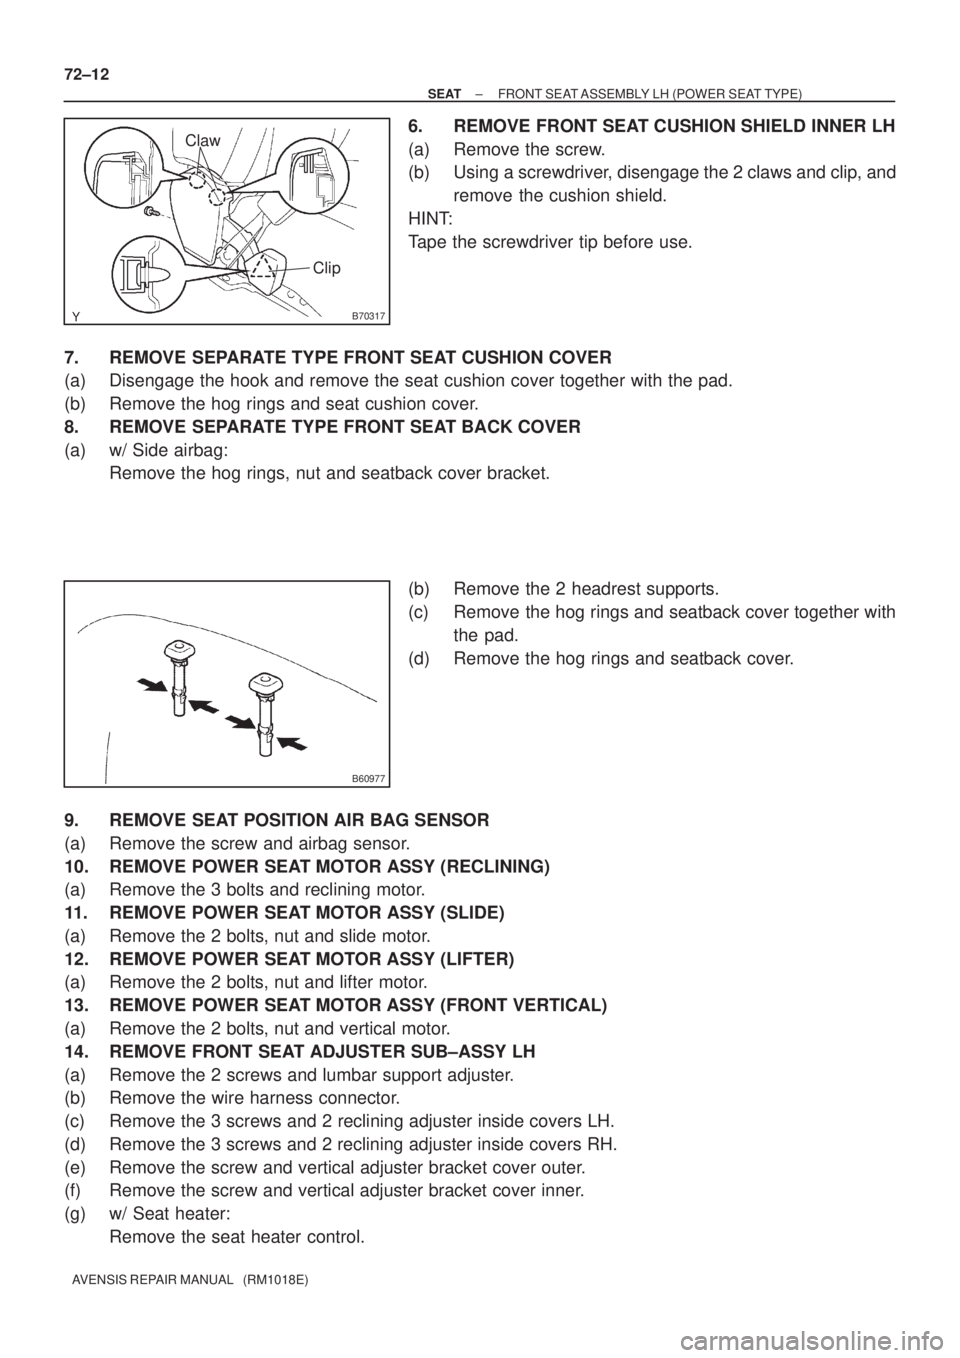
6. REMOVE FRONT SEAT CUSHION SHIELD INNER LH
(a) Remove the screw.
(b) Using a screwdriver, disengage the 2 claws and clip, and
remove the cushion shield.
HINT:
Tape the screwdriver tip before use.
7. REMOVE SEPARATE TYPE FRONT SEAT CUSHION COVER
(a) Disengage the hook and remove the seat cushion cover together with the pad.
(b) Remove the hog rings and seat cushion cover.
8. REMOVE SEPARATE TYPE FRONT SEAT BACK COVER
(a) w/ Side airbag:
Remove the hog rings, nut and seatback cover bracket.
(b) Remove the 2 headrest supports.
(c) Remove the hog rings and seatback cover together with
the pad.
(d) Remove the hog rings and seatback cover.
9. REMOVE SEAT POSITION AIR BAG SENSOR
(a) Remove the screw and airbag sensor.
10. REMOVE POWER SEAT MOTOR ASSY (RECLINING)
(a) Remove the 3 bolts and reclining motor.
11. REMOVE POWER SEAT MOTOR ASSY (SLIDE)
(a) Remove the 2 bolts, nut and slide motor.
12. REMOVE POWER SEAT MOTOR ASSY (LIFTER)
(a) Remove the 2 bolts, nut and lifter motor.
13. REMOVE POWER SEAT MOTOR ASSY (FRONT VERTICAL)
(a) Remove the 2 bolts, nut and vertical motor.
14. REMOVE FRONT SEAT ADJUSTER SUB±ASSY LH
(a) Remove the 2 screws and lumbar support adjuster.
(b) Remove the wire harness connector.
(c) Remove the 3 screws and 2 reclining adjuster inside covers LH.
(d) Remove the 3 screws and 2 reclining adjuster inside covers RH.
(e) Remove the screw and vertical adjuster bracket cover outer.
(f) Remove the screw and vertical adjuster bracket cover inner.
(g) w/ Seat heater:
Remove the seat heater control.
Page 3282 of 5135
B50126
Hog Ring Pliers
B65860
± SEATFRONT SEAT ASSEMBLY LH (POWER SEAT TYPE)
72±13
AVENSIS REPAIR MANUAL (RM1018E)
15. INSTALL POWER SEAT MOTOR ASSY (RECLINING)
(a) Install the reclining motor with the 3 bolts.
Torque: 4.5 N�m (46 kgf�cm, 40 in.�lbf)
16. INSTALL POWER SEAT MOTOR ASSY (SLIDE)
(a) Install the slide motor with the 2 bolts and nut.
Torque:
Bolt 4.0 N�m (41 kgf�cm, 35 in.�lbf)
Nut 3.5 N�m (36 kgf�cm, 31 in.�lbf)
17. INSTALL POWER SEAT MOTOR ASSY (LIFTER)
(a) Install the lifter motor with the 2 bolts and nut.
Torque:
Bolt 2.5 N�m (25 kgf�cm, 22 in.�lbf)
Nut 25 N�m (255 kgf�cm, 18 ft�lbf)
18. INSTALL POWER SEAT MOTOR ASSY (FRONT VERTICAL)
(a) Install the vertical motor with the 2 bolts and nut.
Torque:
Bolt 2.5 N�m (25 kgf�cm, 22 in.�lbf)
Nut 25 N�m (255 kgf�cm, 18 ft�lbf)
19. INSTALL SEAT POSITION AIR BAG SENSOR
(a) Install the airbag sensor with the screw.
Torque: 8.0 N�m (82 kgf�cm, 71 in.�lbf)
20. INSTALL SEPARATE TYPE FRONT SEAT BACK COVER
(a) Install the lumbar support adjuster with the 2 screws.
(b) Install the seatback pad.
(c) Cover the top of the seatback pad with the seatback cover.
(d) Install the 2 headrest supports.
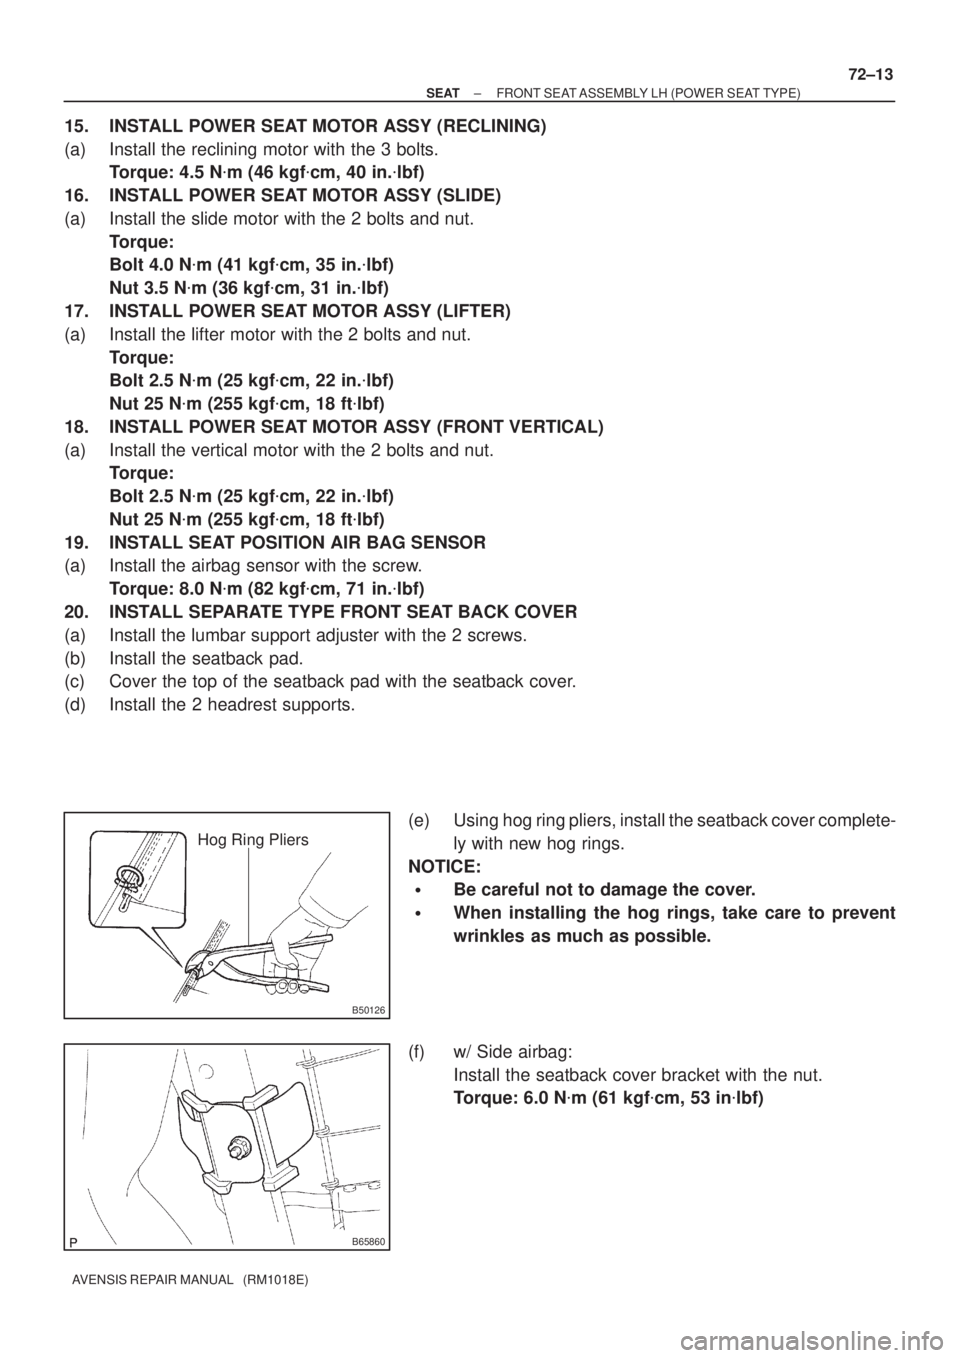
(e) Using hog ring pliers, install the seatback cover complete-
ly with new hog rings.
NOTICE:
�Be careful not to damage the cover.
�When installing the hog rings, take care to prevent
wrinkles as much as possible.
(f) w/ Side airbag:
Install the seatback cover bracket with the nut.
Torque: 6.0 N�m (61 kgf�cm, 53 in�lbf)
Page 3283 of 5135
B65611
Clamp
B50126
Hog Ring Pliers
72±14
±
SEAT FRONT SEAT ASSEMBLY LH (POWER SEAT TYPE)
AVENSIS REPAIR MANUAL (RM1018E)
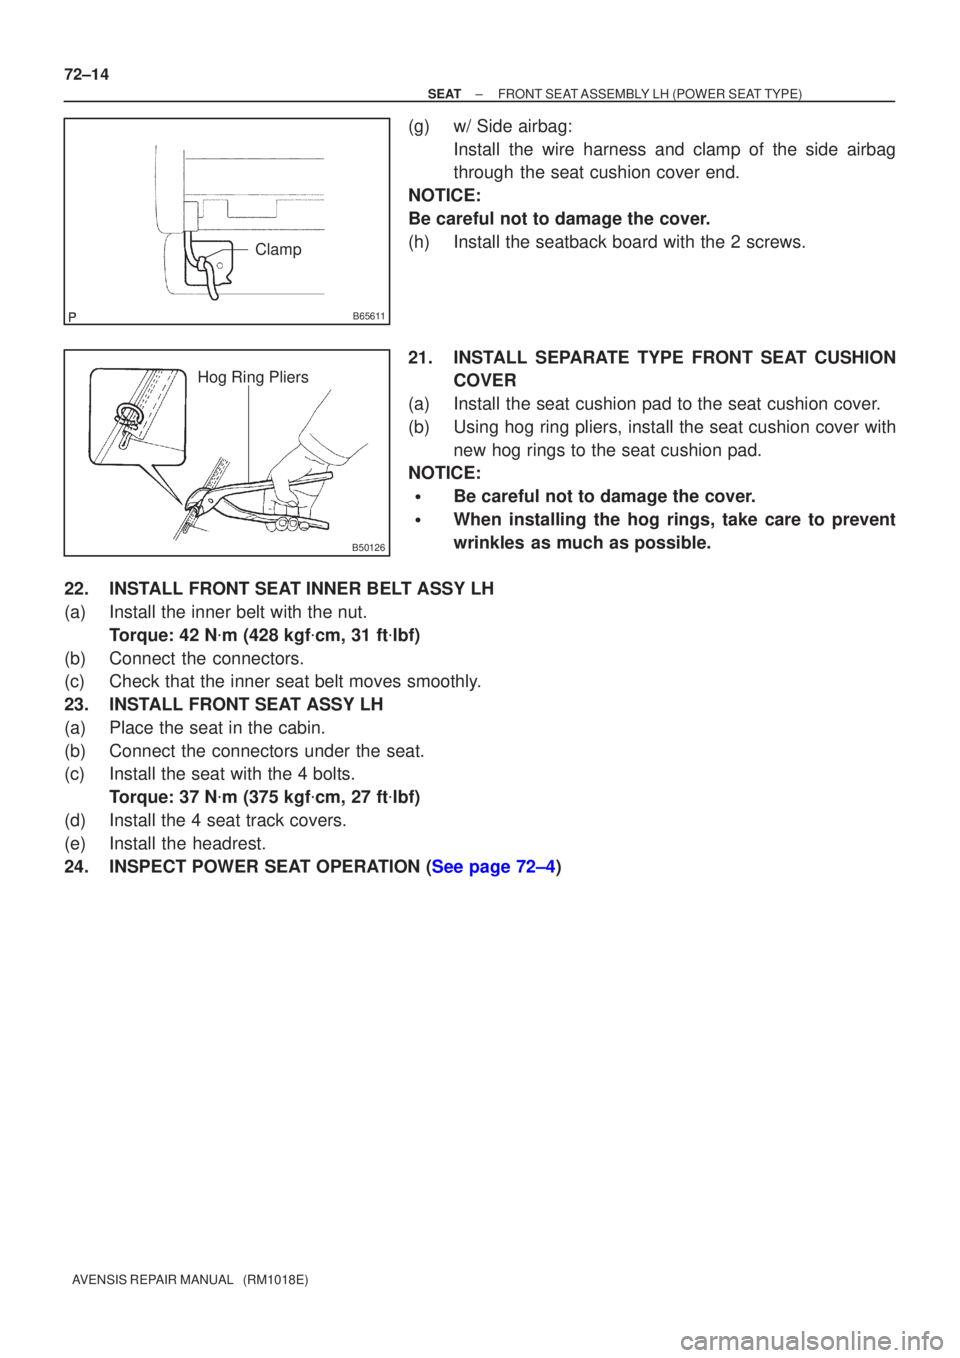
(g)w/ Side airbag: Install the wire harness and clamp of the side airbag
through the seat cushion cover end.
NOTICE:
Be careful not to damage the cover.
(h)Install the seatback board with the 2 screws.
21.INSTALL SEPARATE TYPE FRONT SEAT CUSHION COVER
(a)Install the seat cushion pad to the seat cushion cover.
(b)Using hog ring pliers, install the seat cushion cover with new hog rings to the seat cushion pad.
NOTICE:
�Be careful not to damage the cover.
�When installing the hog rings, take care to prevent
wrinkles as much as possible.
22.INSTALL FRONT SEAT INNER BELT ASSY LH
(a)Install the inner belt with the nut. Torque: 42 N �m (428 kgf �cm, 31 ft �lbf)
(b)Connect the connectors.
(c)Check that the inner seat belt moves smoothly.
23.INSTALL FRONT SEAT ASSY LH
(a)Place the seat in the cabin.
(b)Connect the connectors under the seat.
(c)Install the seat with the 4 bolts. Torque: 37 N �m (375 kgf �cm, 27 ft �lbf)
(d)Install the 4 seat track covers.
(e)Install the headrest.
24.INSPECT POWER SEAT OPERATION (See page 72±4)
Page 3284 of 5135
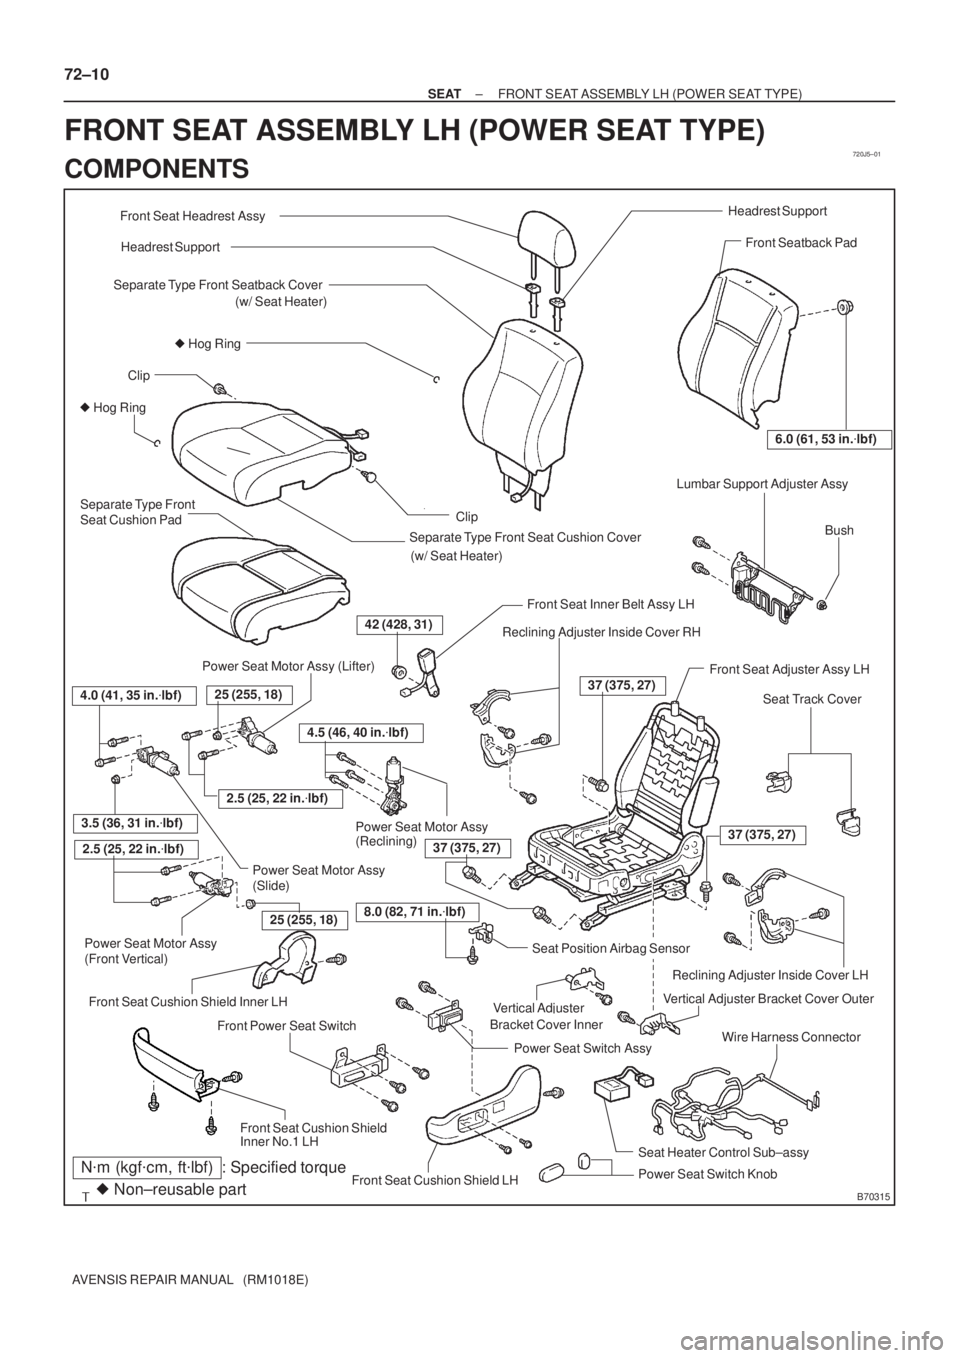
720J5±01
B70315
Headrest Support
Power Seat Switch Assy
Power Seat Switch Knob Front Seat Inner Belt Assy LH
Front Seat Headrest Assy
� Hog Ring
Separate Type Front Seatback Cover
� Hog Ring
Front Seatback Pad
Seat Cushion Pad
Reclining Adjuster Inside Cover RH
Reclining Adjuster Inside Cover LH
Vertical Adjuster Bracket Cover Outer
Wire Harness Connector
Front Seat Cushion Shield LHHeadrest Support
Lumbar Support Adjuster Assy
Seat Track Cover
42 (428, 31)
6.0 (61, 53 in.�lbf)
: Specified torqueN�m (kgf�cm, ft�lbf)
� Non±reusable part
Front Power Seat Switch
37 (375, 27) Clip
Clip
8.0 (82, 71 in.�lbf)
Seat Position Airbag Sensor
Bush
37 (375, 27)37 (375, 27)
Front Seat Cushion Shield Front Seat Cushion Shield Inner LH
4.5 (46, 40 in.�lbf)
4.0 (41, 35 in.�lbf)
2.5 (25, 22 in.�lbf)
2.5 (25, 22 in.�lbf)
25 (255, 18)
3.5 (36, 31 in.�lbf)
25 (255, 18) Power Seat Motor Assy (Lifter)
(Front Vertical)Power Seat Motor Assy
(Reclining)Power Seat Motor Assy
Power Seat Motor AssyFront Seat Adjuster Assy LH Separate Type Front Seat Cushion Cover Separate Type Front
Vertical Adjuster
Inner No.1 LH
(w/ Seat Heater)
(w/ Seat Heater)
Seat Heater Control Sub±assy
Bracket Cover Inner
(Slide)
72±10
± SEATFRONT SEAT ASSEMBLY LH (POWER SEAT TYPE)
AVENSIS REPAIR MANUAL (RM1018E)
FRONT SEAT ASSEMBLY LH (POWER SEAT TYPE)
COMPONENTS
Page 3417 of 5135
B66528
Clip
B65292
700 mm120 mm
Adhesive Tape
Adhesive Tape
Protective Cover
A79919
Claw
Claw
76±48
± EXTERIOR/INTERIOR TRIMROOF HEADLINING ASSY (LIFTBACK MODELS)
AVENSIS REPAIR MANUAL (RM1018E)
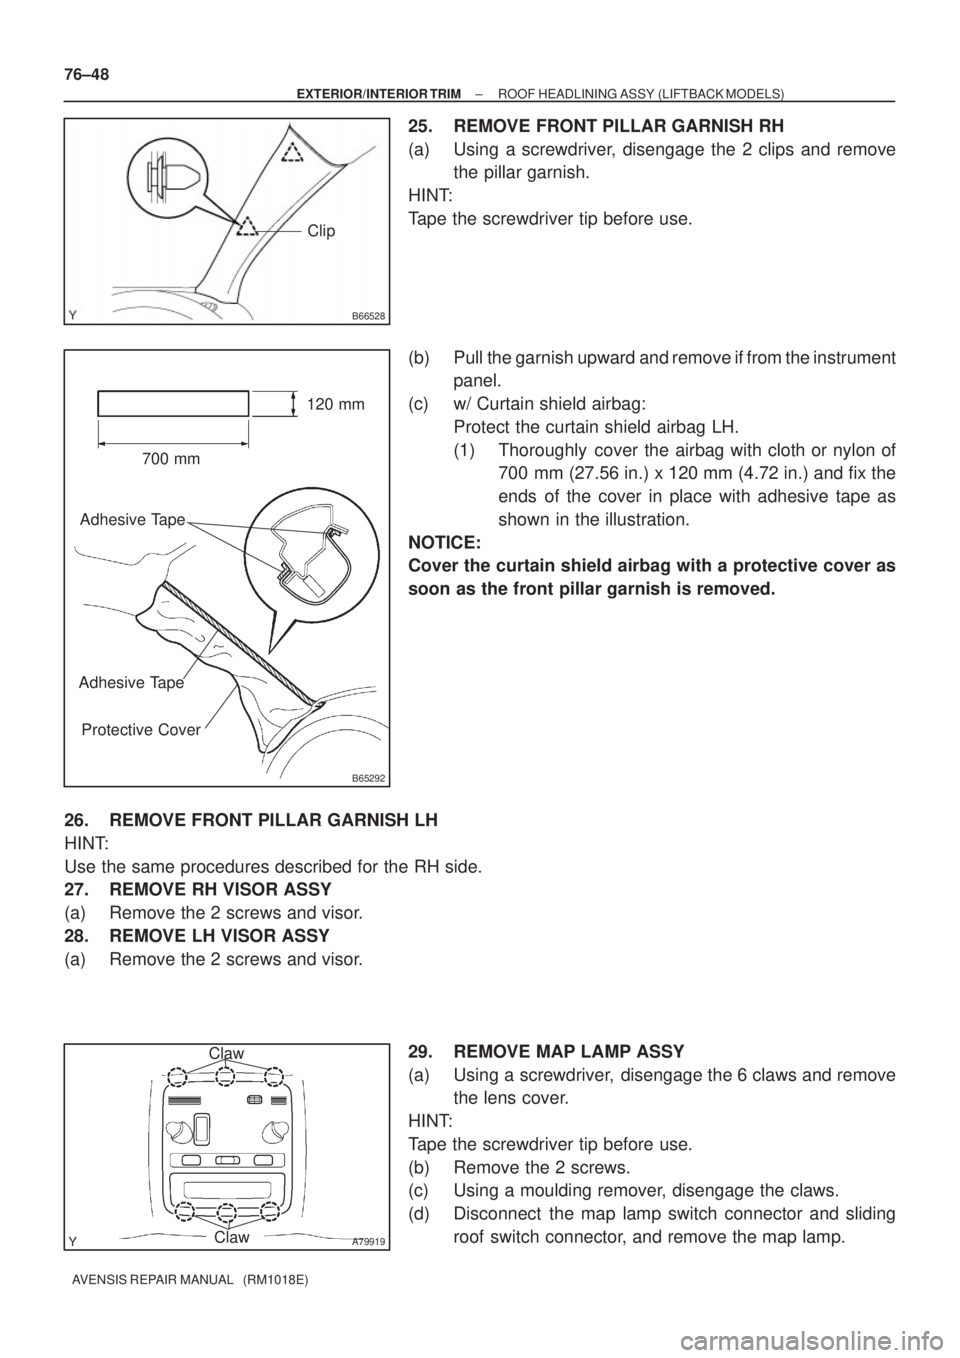
25. REMOVE FRONT PILLAR GARNISH RH
(a) Using a screwdriver, disengage the 2 clips and remove
the pillar garnish.
HINT:
Tape the screwdriver tip before use.
(b) Pull the garnish upward and remove if from the instrument
panel.
(c) w/ Curtain shield airbag:
Protect the curtain shield airbag LH.
(1) Thoroughly cover the airbag with cloth or nylon of
700 mm (27.56 in.) x 120 mm (4.72 in.) and fix the
ends of the cover in place with adhesive tape as
shown in the illustration.
NOTICE:
Cover the curtain shield airbag with a protective cover as
soon as the front pillar garnish is removed.
26. REMOVE FRONT PILLAR GARNISH LH
HINT:
Use the same procedures described for the RH side.
27. REMOVE RH VISOR ASSY
(a) Remove the 2 screws and visor.
28. REMOVE LH VISOR ASSY
(a) Remove the 2 screws and visor.
29. REMOVE MAP LAMP ASSY
(a) Using a screwdriver, disengage the 6 claws and remove
the lens cover.
HINT:
Tape the screwdriver tip before use.
(b) Remove the 2 screws.
(c) Using a moulding remover, disengage the claws.
(d) Disconnect the map lamp switch connector and sliding
roof switch connector, and remove the map lamp.
Page 3426 of 5135
B65292
700 mm120 mm
Adhesive Tape
Adhesive Tape
Protective Cover
A79919
Claw
Claw
B66541Claw
Claw
± EXTERIOR/INTERIOR TRIMROOF HEADLINING ASSY (SEDAN MODELS)
76±39
AVENSIS REPAIR MANUAL (RM1018E)
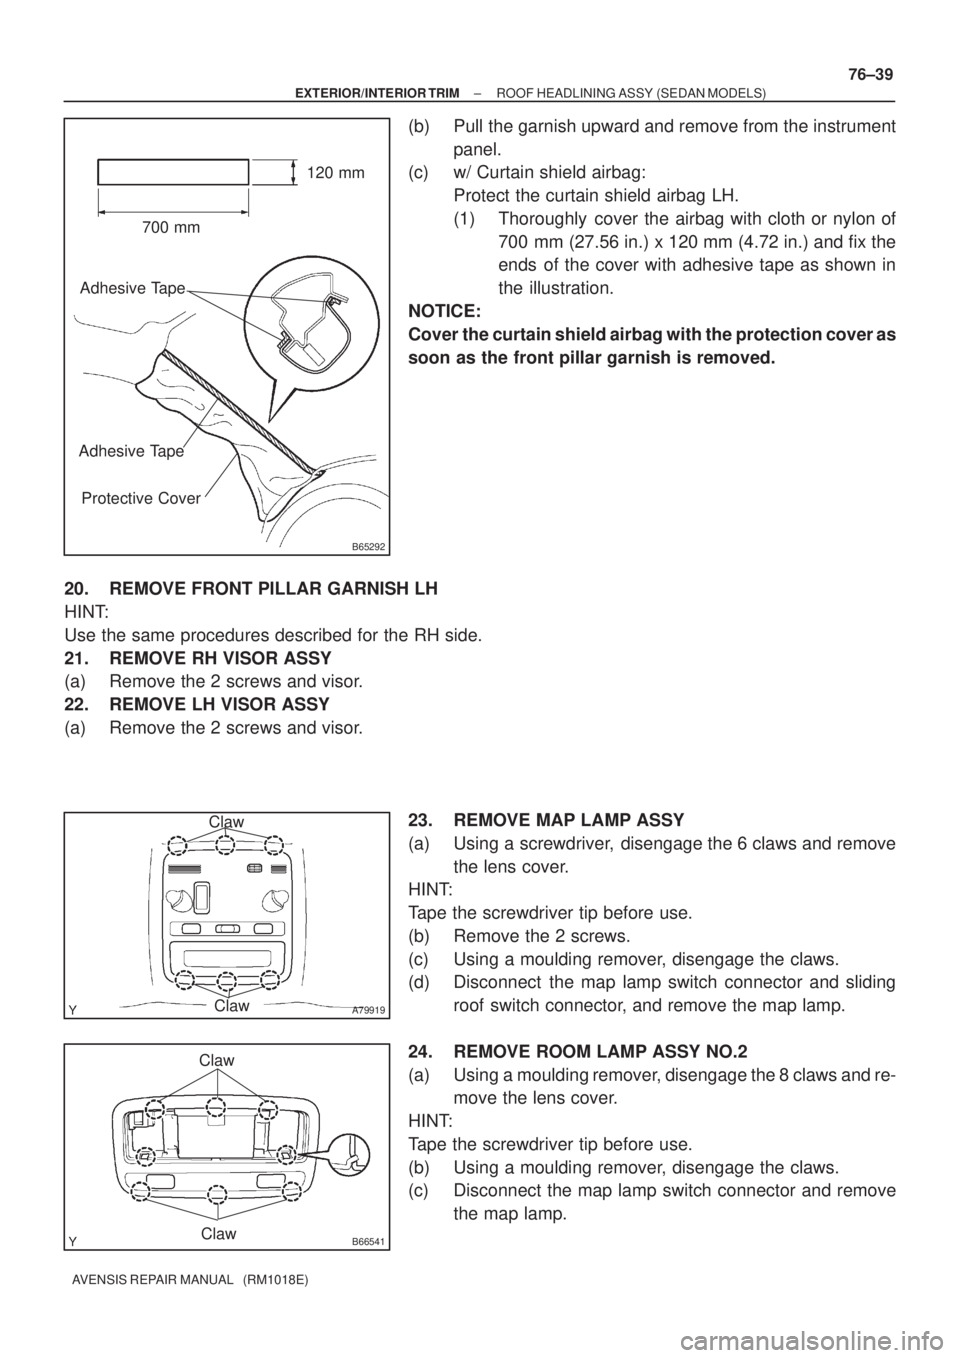
(b) Pull the garnish upward and remove from the instrument
panel.
(c) w/ Curtain shield airbag:
Protect the curtain shield airbag LH.
(1) Thoroughly cover the airbag with cloth or nylon of
700 mm (27.56 in.) x 120 mm (4.72 in.) and fix the
ends of the cover with adhesive tape as shown in
the illustration.
NOTICE:
Cover the curtain shield airbag with the protection cover as
soon as the front pillar garnish is removed.
20. REMOVE FRONT PILLAR GARNISH LH
HINT:
Use the same procedures described for the RH side.
21. REMOVE RH VISOR ASSY
(a) Remove the 2 screws and visor.
22. REMOVE LH VISOR ASSY
(a) Remove the 2 screws and visor.
23. REMOVE MAP LAMP ASSY
(a) Using a screwdriver, disengage the 6 claws and remove
the lens cover.
HINT:
Tape the screwdriver tip before use.
(b) Remove the 2 screws.
(c) Using a moulding remover, disengage the claws.
(d) Disconnect the map lamp switch connector and sliding
roof switch connector, and remove the map lamp.
24. REMOVE ROOM LAMP ASSY NO.2
(a) Using a moulding remover, disengage the 8 claws and re-
move the lens cover.
HINT:
Tape the screwdriver tip before use.
(b) Using a moulding remover, disengage the claws.
(c) Disconnect the map lamp switch connector and remove
the map lamp.
Page 3454 of 5135
B66528
Clip
B65292
700 mm120 mm
Adhesive Tape
Adhesive Tape
Protective Cover
76±58
± EXTERIOR/INTERIOR TRIMROOF HEADLINING ASSY (WAGON MODELS)
AVENSIS REPAIR MANUAL (RM1018E)
32. REMOVE REAR WINDOW SIDE GARNISH LH
HINT:
Use the same procedures described for the RH side.
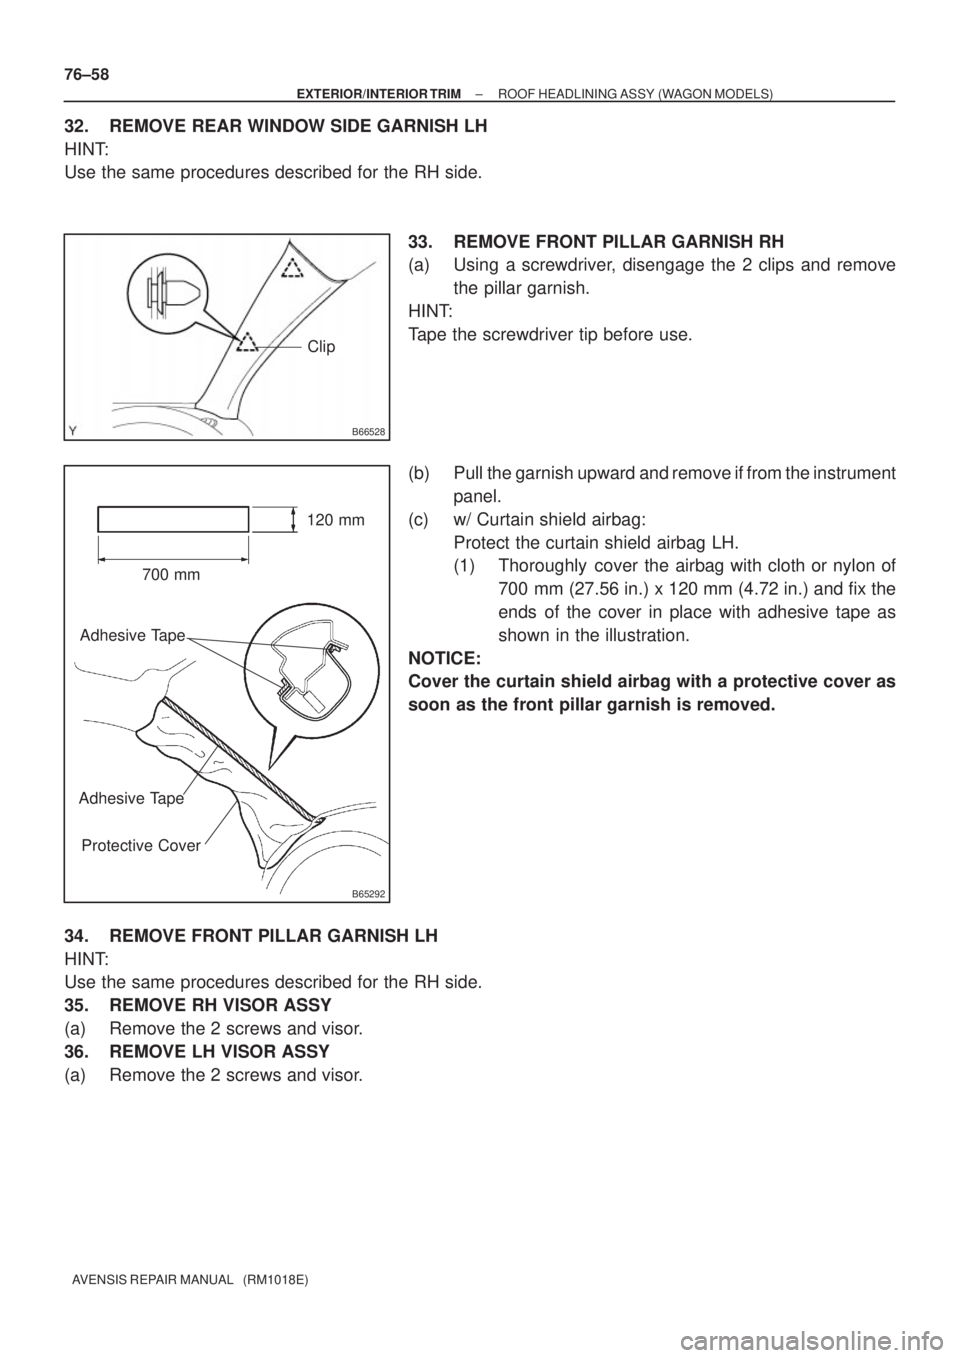
33. REMOVE FRONT PILLAR GARNISH RH
(a) Using a screwdriver, disengage the 2 clips and remove
the pillar garnish.
HINT:
Tape the screwdriver tip before use.
(b) Pull the garnish upward and remove if from the instrument
panel.
(c) w/ Curtain shield airbag:
Protect the curtain shield airbag LH.
(1) Thoroughly cover the airbag with cloth or nylon of
700 mm (27.56 in.) x 120 mm (4.72 in.) and fix the
ends of the cover in place with adhesive tape as
shown in the illustration.
NOTICE:
Cover the curtain shield airbag with a protective cover as
soon as the front pillar garnish is removed.
34. REMOVE FRONT PILLAR GARNISH LH
HINT:
Use the same procedures described for the RH side.
35. REMOVE RH VISOR ASSY
(a) Remove the 2 screws and visor.
36. REMOVE LH VISOR ASSY
(a) Remove the 2 screws and visor.