Page 2691 of 5135

400DN±02
AT0953
SST
AT3306
Hold
TurnLock
Free
D25367
Sample showing minimum amount of
powders in ATF
Actual Size
± AUTOMATIC TRANSMISSION / TRANSTORQUE CONVERTER CLUTCH AND DRIVE
PLATE (ATM)40±37
AVENSIS REPAIR MANUAL (RM1018E)
TORQUE CONVERTER CLUTCH AND DRIVE PLATE (ATM)
INSPECTION
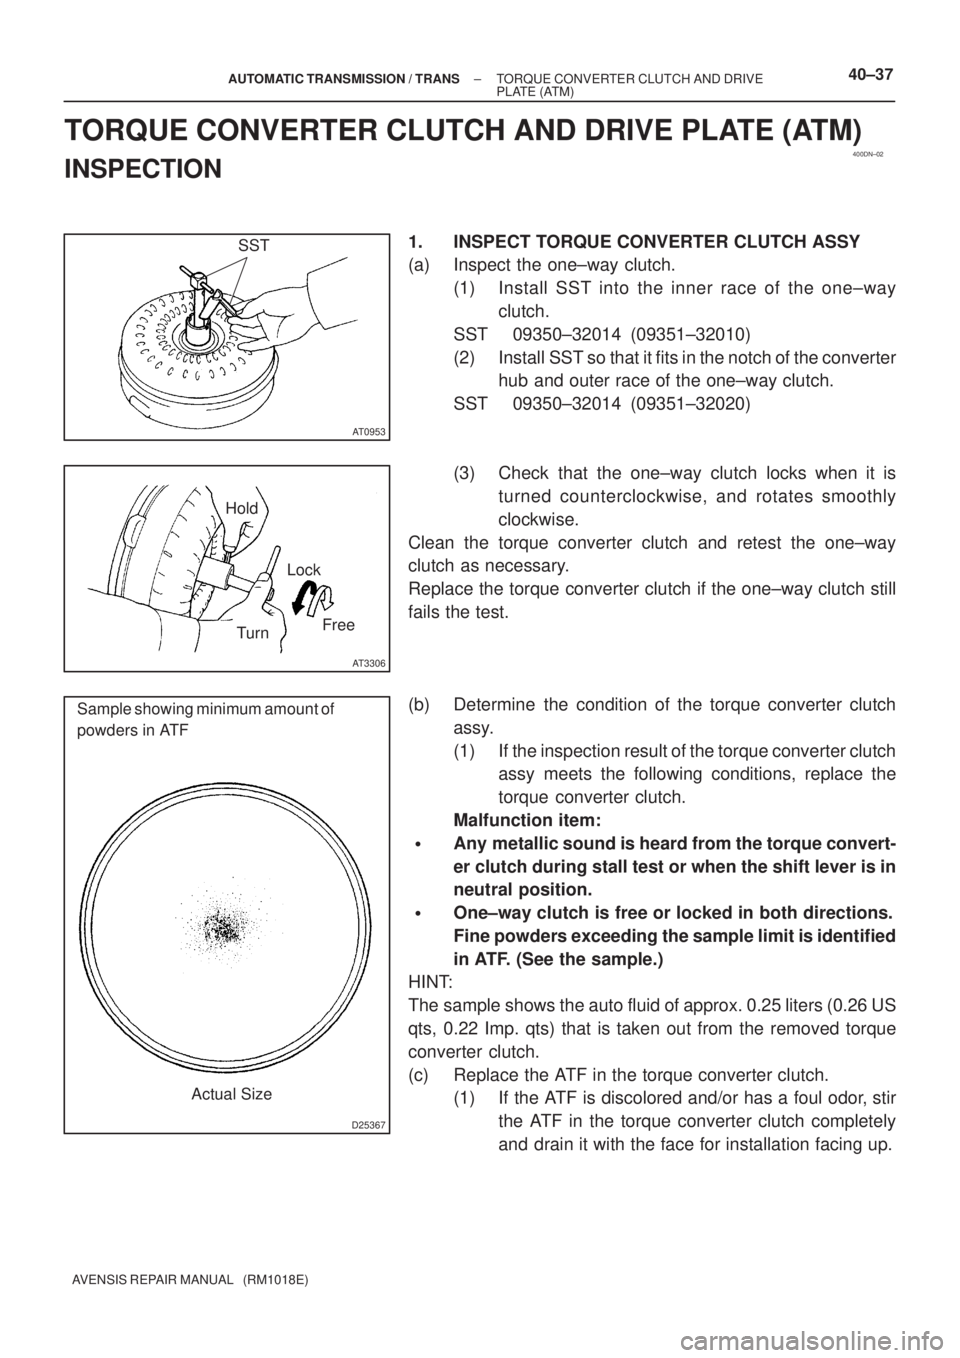
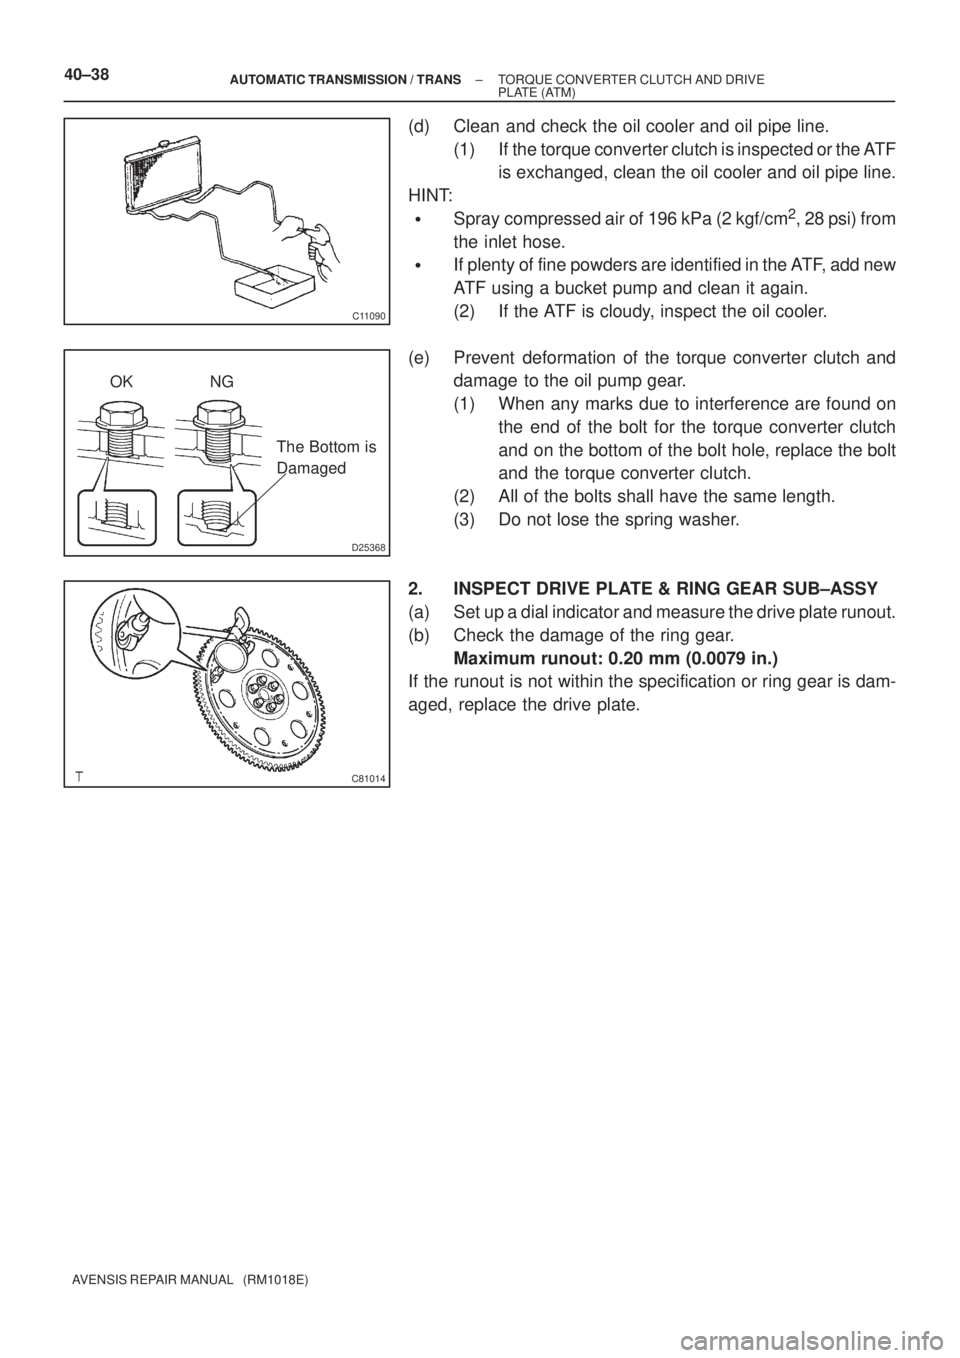
1. INSPECT TORQUE CONVERTER CLUTCH ASSY
(a) Inspect the one±way clutch.
(1) Install SST into the inner race of the one±way
clutch.
SST 09350±32014 (09351±32010)
(2) Install SST so that it fits in the notch of the converter
hub and outer race of the one±way clutch.
SST 09350±32014 (09351±32020)
(3) Check that the one±way clutch locks when it is
turned counterclockwise, and rotates smoothly
clockwise.
Clean the torque converter clutch and retest the one±way
clutch as necessary.
Replace the torque converter clutch if the one±way clutch still
fails the test.
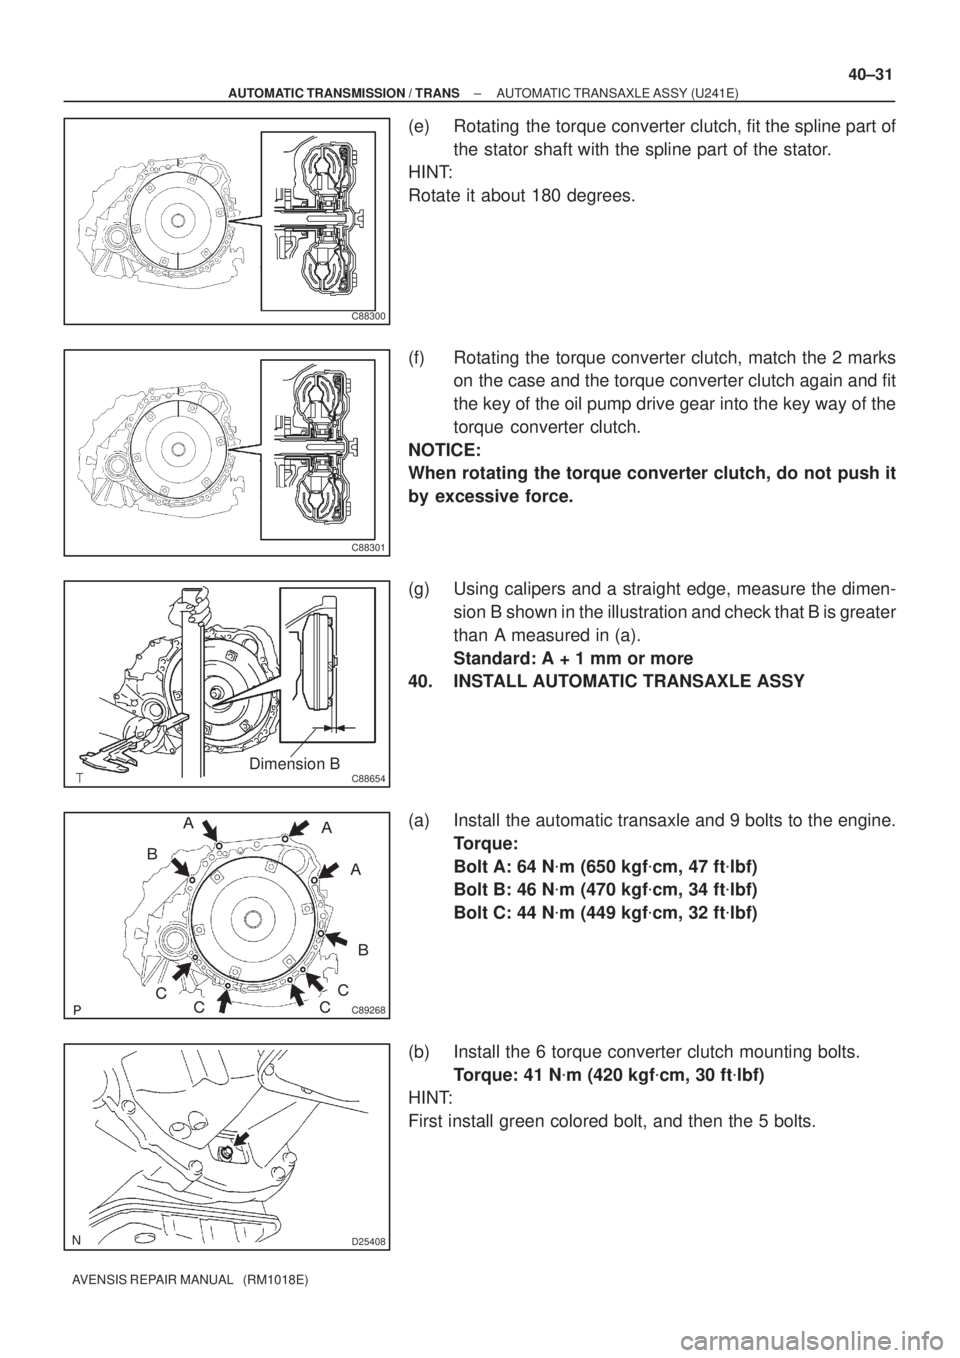
(b) Determine the condition of the torque converter clutch
assy.
(1) If the inspection result of the torque converter clutch
assy meets the following conditions, replace the
torque converter clutch.
Malfunction item:
�Any metallic sound is heard from the torque convert-
er clutch during stall test or when the shift lever is in
neutral position.
�One±way clutch is free or locked in both directions.
Fine powders exceeding the sample limit is identified
in ATF. (See the sample.)
HINT:
The sample shows the auto fluid of approx. 0.25 liters (0.26 US
qts, 0.22 Imp. qts) that is taken out from the removed torque
converter clutch.
(c) Replace the ATF in the torque converter clutch.
(1) If the ATF is discolored and/or has a foul odor, stir
the ATF in the torque converter clutch completely
and drain it with the face for installation facing up.
Page 2692 of 5135

C11090
D25368
OK NG
The Bottom is
Damaged
C81014
40±38± AUTOMATIC TRANSMISSION / TRANSTORQUE CONVERTER CLUTCH AND DRIVE
PLATE (ATM)
AVENSIS REPAIR MANUAL (RM1018E)
(d) Clean and check the oil cooler and oil pipe line.
(1) If the torque converter clutch is inspected or the ATF
is exchanged, clean the oil cooler and oil pipe line.
HINT:
�Spray compressed air of 196 kPa (2 kgf/cm2, 28 psi) from
the inlet hose.
�If plenty of fine powders are identified in the ATF, add new
ATF using a bucket pump and clean it again.
(2) If the ATF is cloudy, inspect the oil cooler.
(e) Prevent deformation of the torque converter clutch and
damage to the oil pump gear.
(1) When any marks due to interference are found on
the end of the bolt for the torque converter clutch
and on the bottom of the bolt hole, replace the bolt
and the torque converter clutch.
(2) All of the bolts shall have the same length.
(3) Do not lose the spring washer.
2. INSPECT DRIVE PLATE & RING GEAR SUB±ASSY
(a) Set up a dial indicator and measure the drive plate runout.
(b) Check the damage of the ring gear.
Maximum runout: 0.20 mm (0.0079 in.)
If the runout is not within the specification or ring gear is dam-
aged, replace the drive plate.
Page 2698 of 5135
�C83051
D25371
Key
C57914
C88330
40±30
±
AUTOMATIC TRANSMISSION / TRANS AUTOMATIC TRANSAXLE ASSY (U241E)
AVENSIS REPAIR MANUAL (RM1018E)
37. REMOVE TORQUE CONVERTER CLUTCH ASSY
38.INSPECT TORQUE CONVERTER CLUTCH ASSY (See page 40±37) SST 09350±32014 (09351±32010, 09351±32020)
39. INSTALL TORQUE CONVERTER CLUTCH ASSY
(a) Using vernier calipers, measure the dimension A be-tween the transaxle and the end surface of the drive plate.
(b) Set the key of the front oil pump drive gear at the top and put a mark on the housing.
(c) Put a mark on the torque converter clutch so that its groove can be clearly indicated.
(d) Match the 2 marks on the transaxle case and the torque converter clutch and fit the splined part of the input shaft
to the spline part of the turbine runner.
Page 2699 of 5135

C88300
C88301
C88654Dimension B
�
�
�
�
�
�
���C89268
D25408
± AUTOMATIC TRANSMISSION / TRANSAUTOMATIC TRANSAXLE ASSY (U241E)
40±31
AVENSIS REPAIR MANUAL (RM1018E)
(e) Rotating the torque converter clutch, fit the spline part of
the stator shaft with the spline part of the stator.
HINT:
Rotate it about 180 degrees.
(f) Rotating the torque converter clutch, match the 2 marks
on the case and the torque converter clutch again and fit
the key of the oil pump drive gear into the key way of the
torque converter clutch.
NOTICE:
When rotating the torque converter clutch, do not push it
by excessive force.
(g) Using calipers and a straight edge, measure the dimen-
sion B shown in the illustration and check that B is greater
than A measured in (a).
Standard: A + 1 mm or more
40. INSTALL AUTOMATIC TRANSAXLE ASSY
(a) Install the automatic transaxle and 9 bolts to the engine.
Torque:
Bolt A: 64 N�m (650 kgf�cm, 47 ft�lbf)
Bolt B: 46 N�m (470 kgf�cm, 34 ft�lbf)
Bolt C: 44 N�m (449 kgf�cm, 32 ft�lbf)
(b) Install the 6 torque converter clutch mounting bolts.
Torque: 41 N�m (420 kgf�cm, 30 ft�lbf)
HINT:
First install green colored bolt, and then the 5 bolts.
Page 2706 of 5135
D30356
x6
�Gasket
�Non±reusable Part: Specified torque
Torque Converter Clutch Assy
41 (420, 30)
Flywheel Housing
Under Cover
44 (449, 32)
46 (470, 34)
44 (449, 32)
Engine Under Cover RH
Engine Under Cover LH
Engine Mounting
Bracket FR
52 (530, 38)
64 (653, 47)
64 (653, 17)
45 (459, 33)
Engine Mounting Member Sub±Assy Center
96 (979, 71)
52 (530, 38)
52 (530, 38)64 (653, 47)
87 (887, 64)
Engine Mounting
Bracket RR
64 (653, 47)
Engine
Mounting
Insulator RR
Front Drive
Shaft Assy LH
Automatic Transaxle Assy
�Snap Ring
Gasket
Exhaust Pipe
Assy Front
52 (530, 38)64 (650, 47)
80 (815, 59)
Engine
Mounting
Insulator LH
52 (530, 38)64 (653, 47)
Engine Mounting
Bracket LH
Drain Plug
N�m (kgf�cm, ft�lbf)
46 (470, 34)
49 (500, 36)
�
Front Drive Shaft Assy RH
64 (650, 47)
64 (650, 47)
64 (650, 47)
40±24
± AUTOMATIC TRANSMISSION / TRANSAUTOMATIC TRANSAXLE ASSY (U241E)
AVENSIS REPAIR MANUAL (RM1018E)
Page 2712 of 5135
C91990
C67029
C63993
40±16
±
AUTOMATIC TRANSMISSION / TRANS AUTOMATIC TRANSAXLE ASSY (U341E)
AVENSIS REPAIR MANUAL (RM1018E)
36. REMOVE AUTOMATIC TRANSAXLE ASSY
(a) Turn the crankshaft to remove the 6 bolts while holding the crankshaft pulley bolt with a wrench.
(b) Remove the 6 bolts.
(c) Separate and remove the automatic transaxle.
37. REMOVE TORQUE CONVERTER CLUTCH ASSY
38.INSPECT TORQUE CONVERTER CLUTCH ASSY (See page 40±37) SST 09350±32014 (09351±32010, 09351±32020) 39. INSTALL TORQUE CONVERTER CLUTCH ASSY
(a) Install the torque converter clutch to the automatic trans-axle.
(b) Using vernier calipers, measure the dimension ºAº be- tween the trasaxle fitting part and the converter fitting part
of the drive plate.
Page 2720 of 5135
D30354
Front Drive Shaft Assy RH
�Snap Ring
Torque Converter Clutch Assy
x6
Flywheel Housing
Under Cover
Engine Under Cover RH
Engine Under Cover LH
Engine Mounting
Bracket FR
Engine Mounting Member Sub±assy Center Engine Mounting Bracket RR Drain Plug�GasketAutomatic Transaxle AssyFront Drive
Shaft Assy LH �Gasket
�Snap RingExhaust Pipe
Assy FrontEngine
Mounting
Insulator LH Engine Mounting
Bracket LH
�Non±reusable Part: Specified torqueEngine Mounting Insulator RR64 (653, 47)
80 (815, 59)
52 (530, 38)
64 (650, 47)
28 (285, 20)
46 (470, 34)
23 (235, 17)
52 (530, 38)
49 (500, 36)87 (887, 64)
64 (653, 47)
52 (530, 38)
64 (653, 17)
64 (653, 47)52 (530, 38)
52 (530, 38)
52 (530, 38)
96 (979, 71)45 (459, 33)
64 (653, 47)
N�m (kgf�cm.�ft�lbf)
40±10
± AUTOMATIC TRANSMISSION / TRANSAUTOMATIC TRANSAXLE ASSY (U341E)
AVENSIS REPAIR MANUAL (RM1018E)
Page 2755 of 5135
4206E±01
D30068
D30069
SST(s)
D30782
RHD Steering Position Type:
LHD Steering Position Type:
±
CLUTCH CLUTCH MASTER CYLINDER ASSY (MTM)
42±13
AVENSIS REPAIR MANUAL (RM1018E)
REPLACEMENT
1. DRAIN CLUTCH FLUID
2. REMOVE BRAKE MASTER CYLINDER SUB±ASSY (LHD STEERING POSITION TYPE)
(See page 32±13)
3.REMOVE BRAKE BOOSTER ASSY (LHD STEERING POSITION TYPE) (See page 32±19)
4. DISCONNECT CLUTCH RESERVOIR TUBE
(a) Loosen the clip and disconnect the clutch reservoir tubefrom the clutch master cylinder assy.
HINT:
Use a container to catch the fluid.
5. DISCONNECT CLUTCH MASTER CYLINDER TO FLEXIBLE HOSE TUBE
(a) Using SST(s), disconnect the flexible hose tube. SST 09023±00100
HINT:
Use a container to catch the fluid.
6. REMOVE CLUTCH MASTER CYLINDER PUSH ROD
CLEVIS W/HOLE PIN
(a) Remove the clip and hole pin.