Page 2764 of 5135
D30782
LHD Steering Position Type:
RHD Steering Position Type:MP Grease
±
CLUTCH CLUTCH PEDAL SUB±ASSY (MTM)
42±11
AVENSIS REPAIR MANUAL (RM1018E)
23. INSTALL CLUTCH MASTER CYLINDER PUSH ROD
CLEVIS W/HOLE PIN
(a) Apply MP grease to the contact surface of the hole pin
and clevis bush.
(b) Connect the clevis to the clutch pedal with the hole pin.
HINT:
�RHD steering position type:
Install the hole pin from the right side of the vehicle.
�LHD steering position type:
Install the hole pin from the left side of the vehicle.
(c) Install the clip to the hole pin.
24. INSTALL CLUTCH PEDAL SPRING
25.INSTALL COMBINATION METER ASSY (RHD STEERING POSITION TYPE) (See page 71±21)
26. INSTALL INSTRUMENT PANEL SUB±ASSY LOWER (LHD STEERING POSITION TYPE) (See page 71±11)
27.INSPECT AND ADJUST CLUTCH PEDAL SUB±ASSY (See page 42±2)
Page 2765 of 5135
4202T±02
D30054
LHD Steering Position Type:
w/o Turn Over:
Clutch Master Cylinder
Push Rod Clevis w/ Hole Pin
Clutch Pedal Bush
Clutch Master
Cylinder Push Rod
Clevis Bush
Clutch Pedal
Pad Clutch Pedal Bush
Clutch Pedal Sub±assy Clutch Pedal Support Sub±assyClip
19 (195, 14)
37 (375, 27)
12 (120, 9)
w/ Turn Over:
Turn Over Spring
Seat Compression Spring
MP Grease
N�m (kgf�cm, ft�lbf) : Specified torqueClutch Pedal Turn Over Bush
Clutch Pedal No.1 Cushion
19 (195, 14)
Clutch Master Cylinder
Push Rod Clevis w/ Hole PinClip
37 (375, 27)
Clutch Pedal Support Sub±assy12 (120, 9)
� Clutch Pedal Bush
Clutch Pedal Sub±assy
Clutch Master
Cylinder Push Rod
Clevis Bush
�
Clutch Pedal
Pad
Clutch Pedal No.1 Cushion
�Non±reusable partBush Clutch Pedal
Clutch Pedal Spring 1CD±FTV Engine Type:
Clutch Pedal Spring
Clutch Start Switch Assy
16 (160, 12)
Clutch Pedal Turn Over Bush
42±4
± CLUTCHCLUTCH PEDAL SUB±ASSY (MTM)
AVENSIS REPAIR MANUAL (RM1018E)
COMPONENTS
Page 2766 of 5135
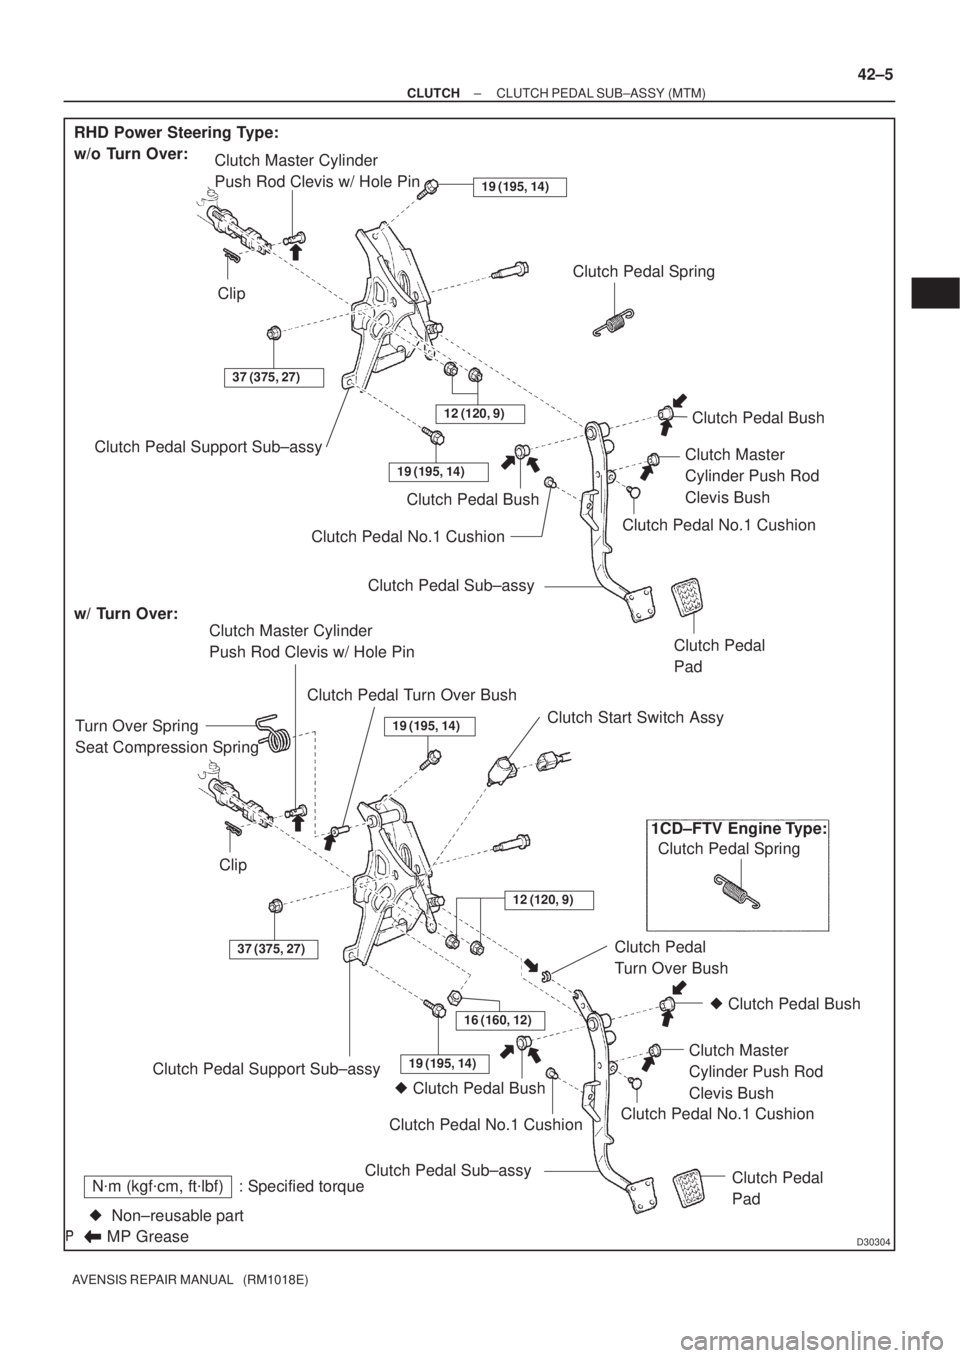
D30304
RHD Power Steering Type:
w/o Turn Over:
Clutch Master Cylinder
Push Rod Clevis w/ Hole Pin
Clutch Pedal SpringClutch Pedal Bush
Clutch Master
Cylinder Push Rod
Clevis Bush
Clutch Pedal
Pad Clutch Pedal Bush
Clutch Pedal Sub±assy Clip
19 (195, 14)
37 (375, 27)
12 (120, 9)
Clutch Pedal No.1 Cushion
w/ Turn Over:
MP Grease
N�m (kgf�cm, ft�lbf) : Specified torque
Clutch Master Cylinder
Push Rod Clevis w/ Hole Pin
Clip
37 (375, 27)
Turn Over Spring
Seat Compression Spring
Clutch Pedal Support Sub±assy
Clutch Master
Cylinder Push Rod
Clevis Bush
Clutch Pedal No.1 Cushion
Clutch Pedal
Pad Clutch Pedal No.1 CushionClutch Pedal Sub±assyClutch Pedal
Turn Over Bush
19 (195, 14)
�Non±reusable part� Clutch Pedal Bush� Clutch Pedal Bush Clutch Pedal Support Sub±assy
1CD±FTV Engine Type:
Clutch Pedal Spring
19 (195, 14)
Clutch Pedal Turn Over Bush
19 (195, 14)Clutch Start Switch Assy
12 (120, 9)
Clutch Pedal No.1 Cushion
16 (160, 12)
± CLUTCHCLUTCH PEDAL SUB±ASSY (MTM)
42±5
AVENSIS REPAIR MANUAL (RM1018E)
Page 2767 of 5135
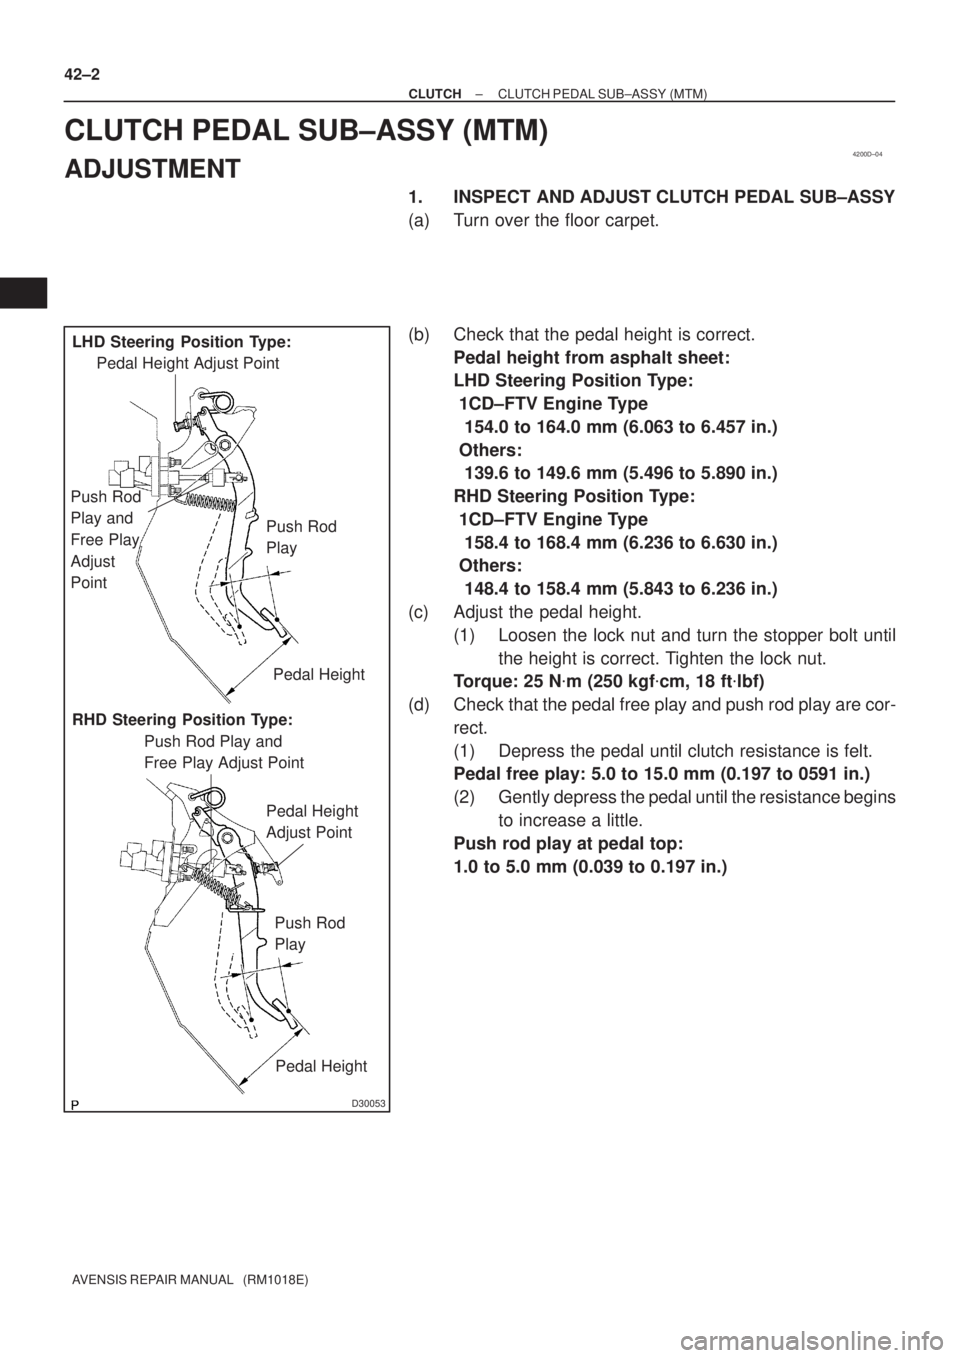
4200D±04
D30053
LHD Steering Position Type:
Pedal Height Adjust Point
Push Rod
Play and
Free Play
Adjust
PointPush Rod
Play
Pedal Height
RHD Steering Position Type:
Push Rod Play and
Free Play Adjust Point
Pedal Height
Adjust Point
Push Rod
Play
Pedal Height
42±2
± CLUTCHCLUTCH PEDAL SUB±ASSY (MTM)
AVENSIS REPAIR MANUAL (RM1018E)
CLUTCH PEDAL SUB±ASSY (MTM)
ADJUSTMENT
1. INSPECT AND ADJUST CLUTCH PEDAL SUB±ASSY
(a) Turn over the floor carpet.
(b) Check that the pedal height is correct.
Pedal height from asphalt sheet:
LHD Steering Position Type:
1CD±FTV Engine Type
154.0 to 164.0 mm (6.063 to 6.457 in.)
Others:
139.6 to 149.6 mm (5.496 to 5.890 in.)
RHD Steering Position Type:
1CD±FTV Engine Type
158.4 to 168.4 mm (6.236 to 6.630 in.)
Others:
148.4 to 158.4 mm (5.843 to 6.236 in.)
(c) Adjust the pedal height.
(1) Loosen the lock nut and turn the stopper bolt until
the height is correct. Tighten the lock nut.
Torque: 25 N�m (250 kgf�cm, 18 ft�lbf)
(d) Check that the pedal free play and push rod play are cor-
rect.
(1) Depress the pedal until clutch resistance is felt.
Pedal free play: 5.0 to 15.0 mm (0.197 to 0591 in.)
(2) Gently depress the pedal until the resistance begins
to increase a little.
Push rod play at pedal top:
1.0 to 5.0 mm (0.039 to 0.197 in.)
Page 2768 of 5135
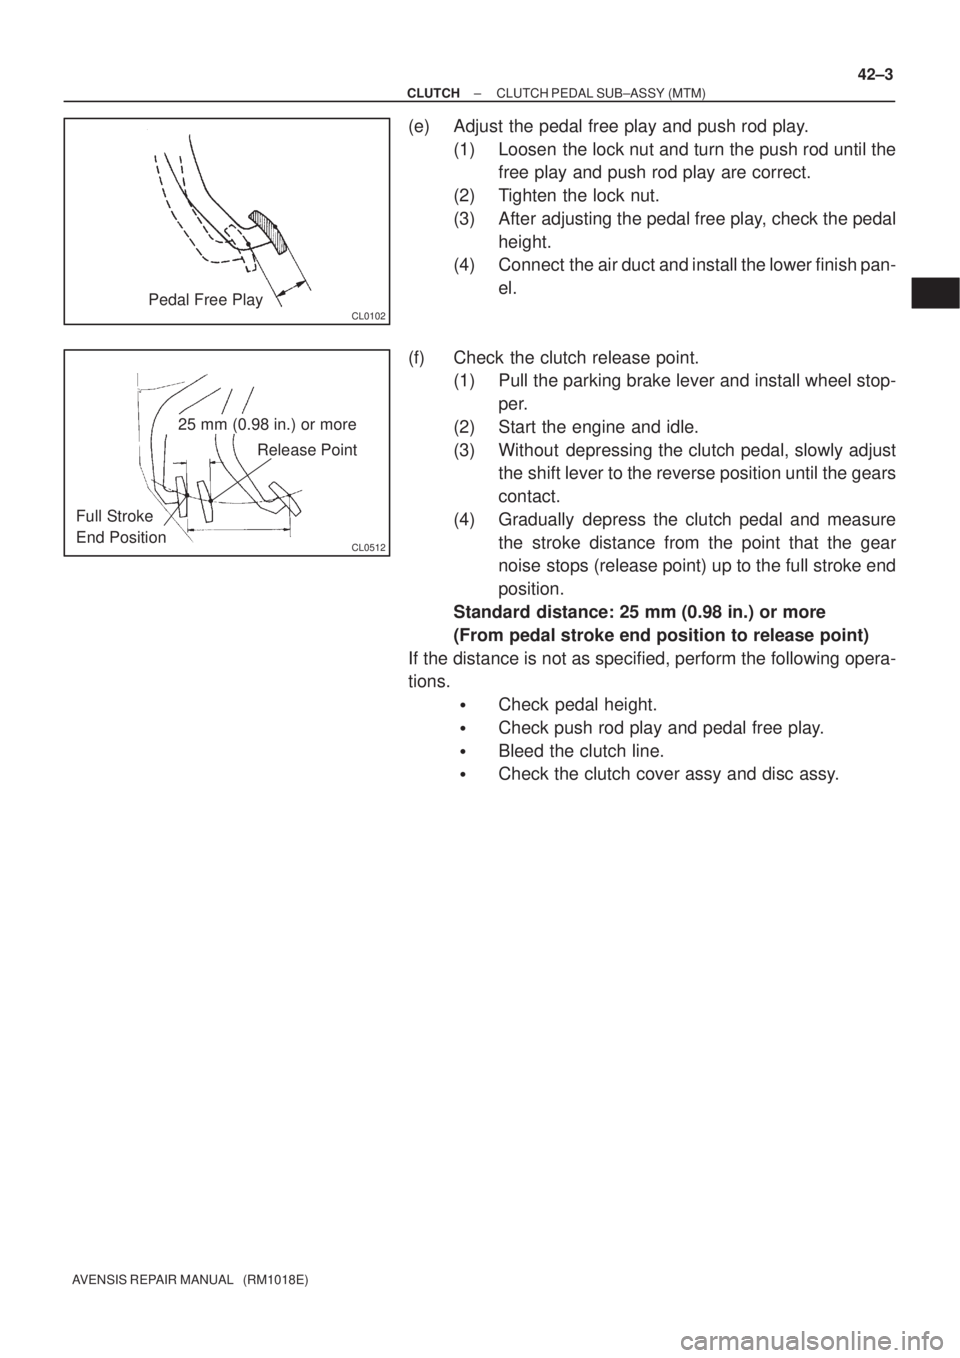
CL0102Pedal Free Play
CL0512
25 mm (0.98 in.) or more
Release Point
Full Stroke
End Position
± CLUTCHCLUTCH PEDAL SUB±ASSY (MTM)
42±3
AVENSIS REPAIR MANUAL (RM1018E)
(e) Adjust the pedal free play and push rod play.
(1) Loosen the lock nut and turn the push rod until the
free play and push rod play are correct.
(2) Tighten the lock nut.
(3) After adjusting the pedal free play, check the pedal
height.
(4) Connect the air duct and install the lower finish pan-
el.
(f) Check the clutch release point.
(1) Pull the parking brake lever and install wheel stop-
per.
(2) Start the engine and idle.
(3) Without depressing the clutch pedal, slowly adjust
the shift lever to the reverse position until the gears
contact.
(4) Gradually depress the clutch pedal and measure
the stroke distance from the point that the gear
noise stops (release point) up to the full stroke end
position.
Standard distance: 25 mm (0.98 in.) or more
(From pedal stroke end position to release point)
If the distance is not as specified, perform the following opera-
tions.
�Check pedal height.
�Check push rod play and pedal free play.
�Bleed the clutch line.
�Check the clutch cover assy and disc assy.
Page 2769 of 5135
4200B±04
±
CLUTCH CLUTCH SYSTEM (MTM)
42±1
AVENSIS REPAIR MANUAL (RM1018E)
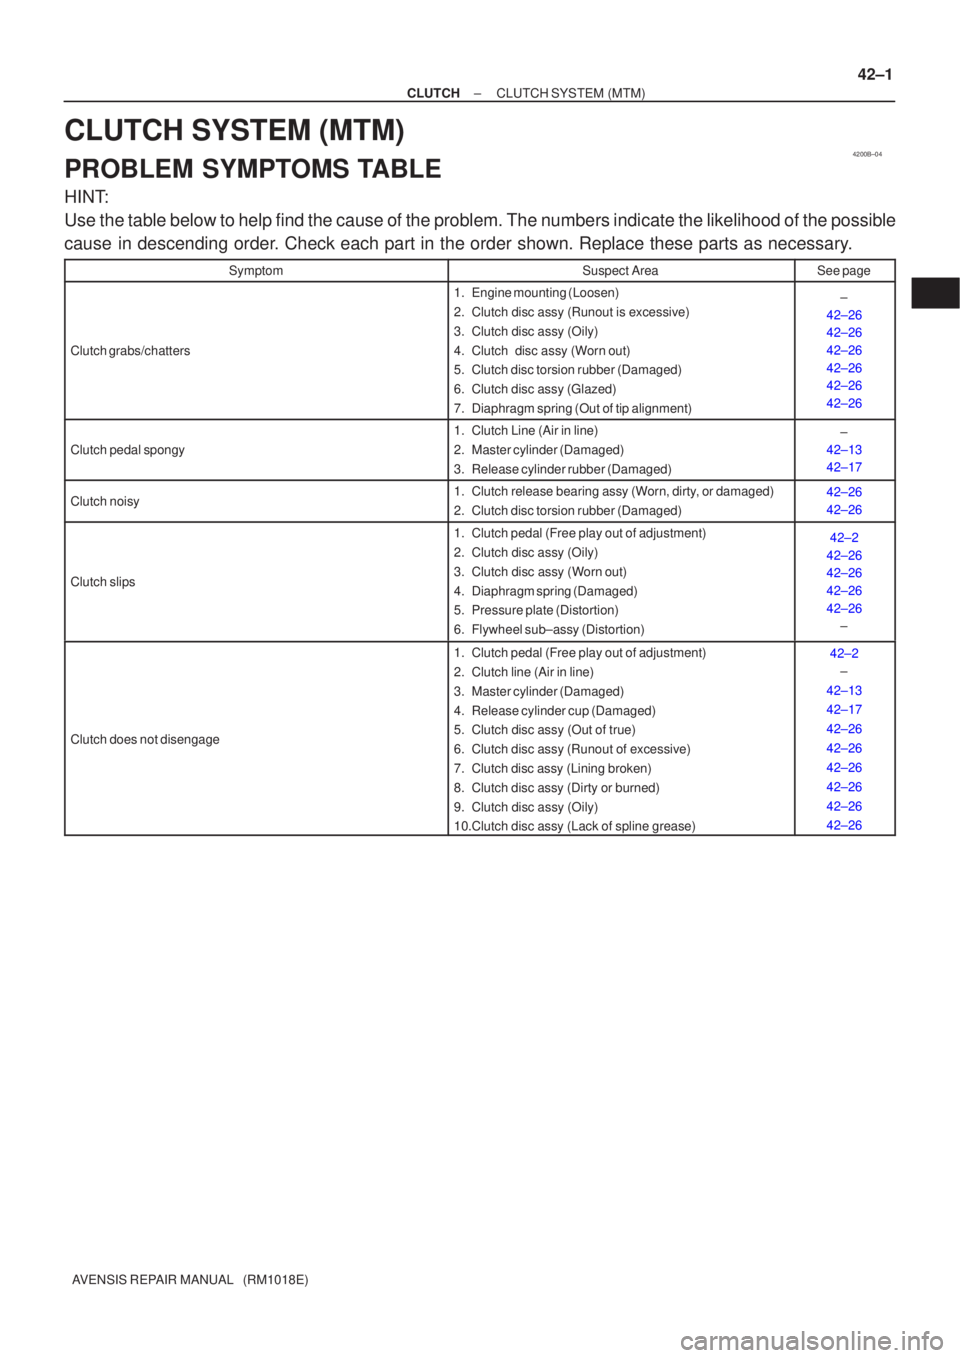
CLUTCH SYSTEM (MTM)
PROBLEM SYMPTOMS TABLE
HINT:
Use the table below to help find the cause of the problem. The numbers indi\
cate the likelihood of the possible
cause in descending order. Check each part in the order shown. Replace these parts as necessary.
SymptomSuspect AreaSee page
Clutch grabs/chatters
1. Engine mounting (Loosen)
2. Clutch disc assy (Runout is excessive)
3. Clutch disc assy (Oily)
4. Clutch disc assy (Worn out)
5. Clutch disc torsion rubber (Damaged)
6. Clutch disc assy (Glazed)
7. Diaphragm spring (Out of tip alignment)±
42±26
42±26
42±26
42±26
42±26
42±26
Clutch pedal spongy
1. Clutch Line (Air in line)
2. Master cylinder (Damaged)
3. Release cylinder rubber (Damaged)±
42±13
42±17
Clutch noisy1. Clutch release bearing assy (Worn, dirty, or damaged)
2. Clutch disc torsion rubber (Damaged)42±26
42±26
Clutch slips
1. Clutch pedal (Free play out of adjustment)
2. Clutch disc assy (Oily)
3. Clutch disc assy (Worn out)
4. Diaphragm spring (Damaged)
5. Pressure plate (Distortion)
6. Flywheel sub±assy (Distortion)42±2
42±26
42±26
42±26
42±26 ±
Clutch does not disengage
1. Clutch pedal (Free play out of adjustment)
2. Clutch line (Air in line)
3. Master cylinder (Damaged)
4. Release cylinder cup (Damaged)
5. Clutch disc assy (Out of true)
6. Clutch disc assy (Runout of excessive)
7. Clutch disc assy (Lining broken)
8. Clutch disc assy (Dirty or burned)
9. Clutch disc assy (Oily)
10.Clutch disc assy (Lack of spline grease)42±2
±
42±13
42±17
42±26
42±26
42±26
42±26
42±26
42±26
Page 2771 of 5135
D30815
D26905
G24412
G24413
41±34
±
MANUAL TRANSMISSION/TRANSAXLE MANUAL TRANSAXLE ASSY (1CD±FTV)
AVENSIS REPAIR MANUAL (RM1018E)
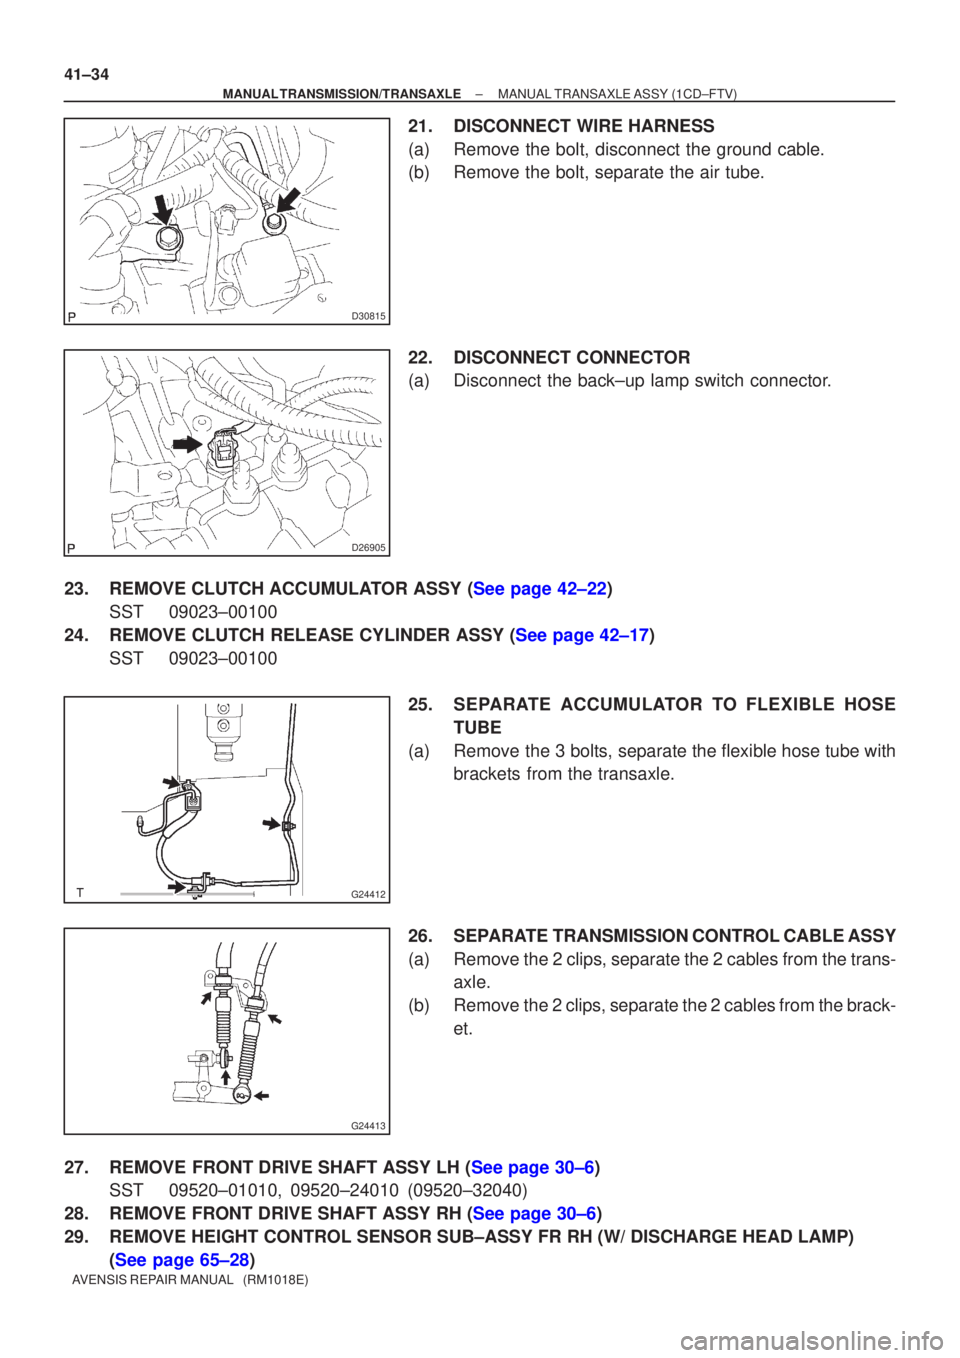
21. DISCONNECT WIRE HARNESS
(a) Remove the bolt, disconnect the ground cable.
(b) Remove the bolt, separate the air tube.
22. DISCONNECT CONNECTOR
(a) Disconnect the back±up lamp switch connector.
23.REMOVE CLUTCH ACCUMULATOR ASSY (See page 42±22) SST 09023±00100
24.REMOVE CLUTCH RELEASE CYLINDER ASSY (See page 42±17) SST 09023±00100
25. SEPARATE ACCUMULATOR TO FLEXIBLE HOSETUBE
(a) Remove the 3 bolts, separate the flexible hose tube with brackets from the transaxle.
26. SEPARATE TRANSMISSION CONTROL CABLE ASSY
(a) Remove the 2 clips, separate the 2 cables from the trans- axle.
(b) Remove the 2 clips, separate the 2 cables from the brack- et.
27.REMOVE FRONT DRIVE SHAFT ASSY LH (See page 30±6) SST 09520±01010, 09520±24010 (09520±32040)
28.REMOVE FRONT DRIVE SHAFT ASSY RH (See page 30±6)
29. REMOVE HEIGHT CONTROL SENSOR SUB±ASSY FR RH (W/ DISCHARGE HEAD LAMP)\
(See page 65±28)
Page 2774 of 5135
D30074
(a)
(b)
(a)
(b)
D30076
D26918
A
B
CD
E
D30073
D30072
A
A
A
A
B
A
± MANUAL TRANSMISSION/TRANSAXLEMANUAL TRANSAXLE ASSY (1CD±FTV)
41±37
AVENSIS REPAIR MANUAL (RM1018E)
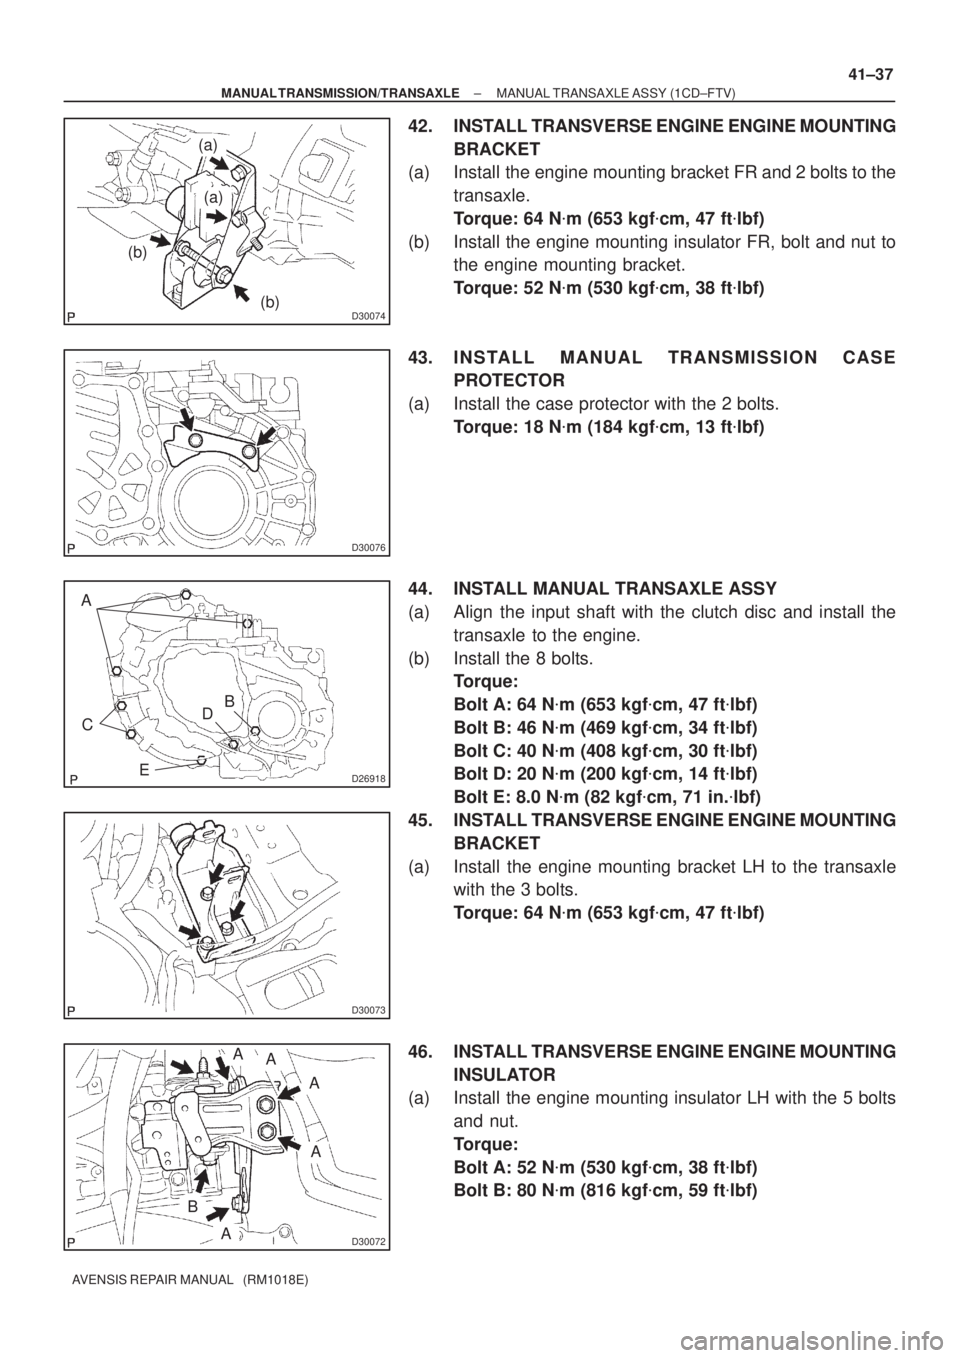
42. INSTALL TRANSVERSE ENGINE ENGINE MOUNTING
BRACKET
(a) Install the engine mounting bracket FR and 2 bolts to the
transaxle.
Torque: 64 N�m (653 kgf�cm, 47 ft�lbf)
(b) Install the engine mounting insulator FR, bolt and nut to
the engine mounting bracket.
Torque: 52 N�m (530 kgf�cm, 38 ft�lbf)
43. INSTALL MANUAL TRANSMISSION CASE
PROTECTOR
(a) Install the case protector with the 2 bolts.
Torque: 18 N�m (184 kgf�cm, 13 ft�lbf)
44. INSTALL MANUAL TRANSAXLE ASSY
(a) Align the input shaft with the clutch disc and install the
transaxle to the engine.
(b) Install the 8 bolts.
Torque:
Bolt A: 64 N�m (653 kgf�cm, 47 ft�lbf)
Bolt B: 46 N�m (469 kgf�cm, 34 ft�lbf)
Bolt C: 40 N�m (408 kgf�cm, 30 ft�lbf)
Bolt D: 20 N�m (200 kgf�cm, 14 ft�lbf)
Bolt E: 8.0 N�m (82 kgf�cm, 71 in.�lbf)
45. INSTALL TRANSVERSE ENGINE ENGINE MOUNTING
BRACKET
(a) Install the engine mounting bracket LH to the transaxle
with the 3 bolts.
Torque: 64 N�m (653 kgf�cm, 47 ft�lbf)
46. INSTALL TRANSVERSE ENGINE ENGINE MOUNTING
INSULATOR
(a) Install the engine mounting insulator LH with the 5 bolts
and nut.
Torque:
Bolt A: 52 N�m (530 kgf�cm, 38 ft�lbf)
Bolt B: 80 N�m (816 kgf�cm, 59 ft�lbf)