Page 1101 of 3171
DTC P0192, P0193 FRP SENSOR
EC-121
C
D
E
F
G
H
I
J
K
L
MA
EC
Diagnostic ProcedureEBS01KF5
1.CHECK GROUND CONNECTION
1. Turn ignition switch OFF.
2. Loosen and retighten three ground screws on the body.
Refer toEC-78, "
Ground Inspection".
OK or NG
OK >> GO TO 2.
NG >> Repair or replace ground connections.
2.CHECK FUEL RAIL PRESSURE SENSOR POWER SUPPLY CIRCUIT
1. Disconnect fuel rail pressure sensor (1) harness connector.
2. Turn ignition switch ON.
3. Check voltage between fuel rail pressure sensor terminal 1 and
ground with CONSULT-II or tester.
OK or NG
OK >> GO TO 3.
NG >> Repair open circuit or short to ground or short to power
in harness or connectors.
: Vehicle front
1. Body ground E21 2. ECM 3. Body ground E41
4. A/C high-pressure service valve 5. ABS actuator and electric unit
(control unit)6. Body ground E61
MBIB1218E
MBIB1202E
Voltage: Approximately 5.3V
MBIB1292E
Page 1102 of 3171

EC-122
DTC P0192, P0193 FRP SENSOR
3.CHECK FUEL RAIL PRESSURE SENSOR GROUND CIRCUIT FOR OPEN AND SHORT
1. Turn ignition switch OFF.
2. Disconnect ECM harness connector.
3. Check harness continuity between fuel rail pressure sensor terminal 3 and ECM terminal 68.
Refer to Wiring Diagram.
4. Also check harness for short to ground and short to power.
OK or NG
OK >> GO TO 4.
NG >> Repair open circuit or short to ground or short to power in harness or connectors.
4.CHECK FUEL RAIL PRESSURE SENSOR INPUT SIGNAL CIRCUIT FOR OPEN AND SHORT
1. Check harness continuity between ECM terminals 48, 49 and fuel rail pressure sensor terminal 2.
Refer to Wiring Diagram.
2. Also check harness for short to ground and short to power.
OK or NG
OK >> GO TO 5.
NG >> Repair open circuit or short to ground or short to power in harness connectors.
5.CHECK FUEL RAIL PRESSURE SENSOR
Refer toEC-122, "
Component Inspection".
OK or NG
OK >> GO TO 6.
NG >> Replace fuel rail.
6.CHECK INTERMITTENT INCIDENT
Refer toEC-70, "
TROUBLE DIAGNOSIS FOR INTERMITTENT INCIDENT".
>>INSPECTION END
Component InspectionEBS01KF6
FUEL RAIL PRESSURE SENSOR
1. Reconnect harness connector disconnected.
2. Start engine and warm it up to normal operating temperature.
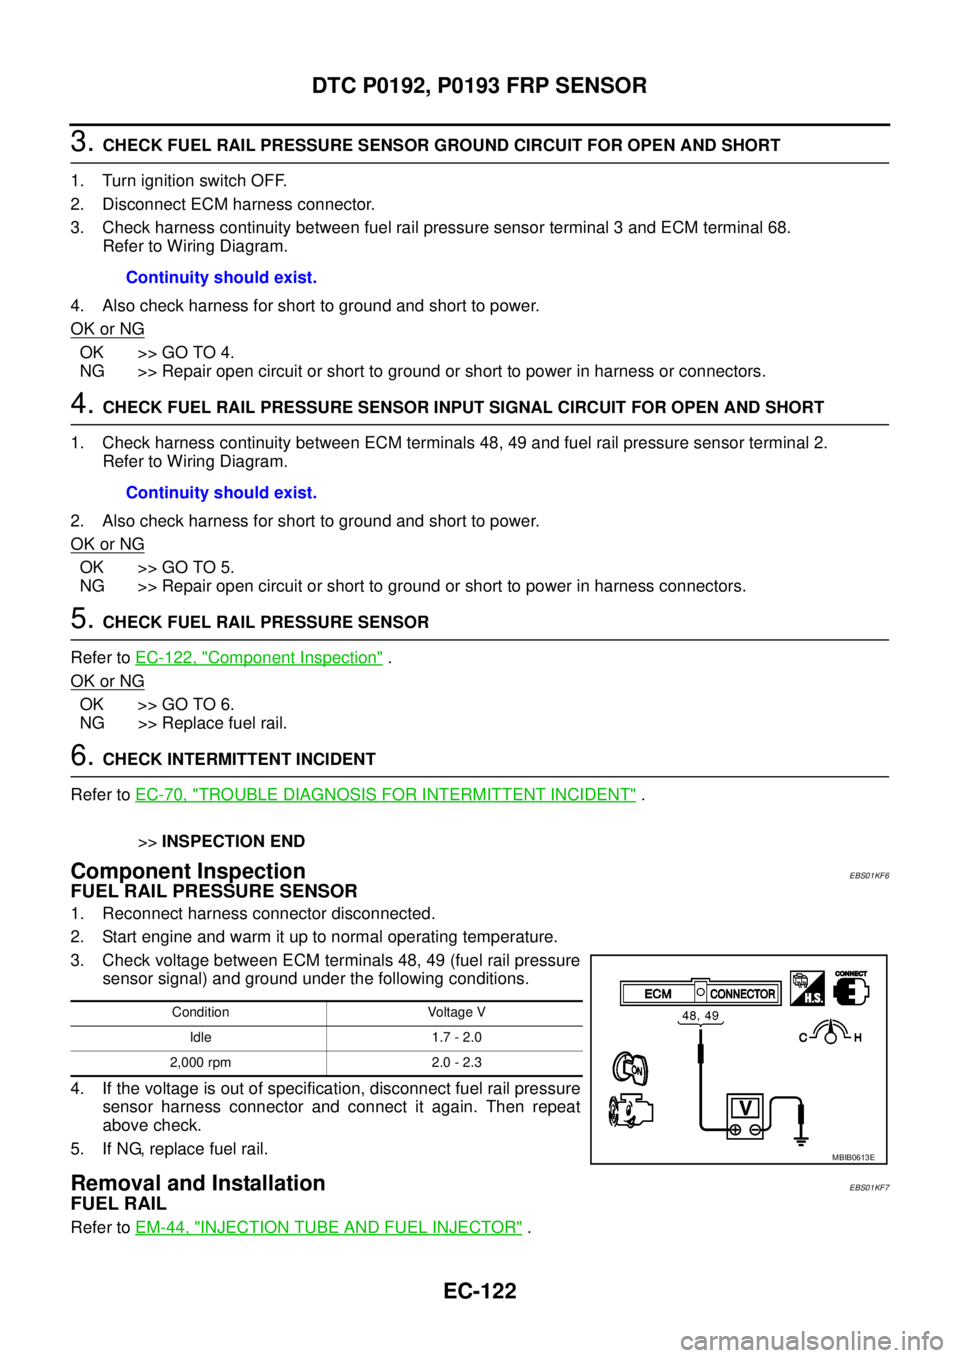
3. Check voltage between ECM terminals 48, 49 (fuel rail pressure
sensor signal) and ground under the following conditions.
4. If the voltage is out of specification, disconnect fuel rail pressure
sensor harness connector and connect it again. Then repeat
above check.
5. If NG, replace fuel rail.
Removal and InstallationEBS01KF7
FUEL RAIL
Refer toEM-44, "INJECTION TUBE AND FUEL INJECTOR". Continuity should exist.
Continuity should exist.
Condition Voltage V
Idle 1.7 - 2.0
2,000 rpm 2.0 - 2.3
MBIB0613E
Page 1112 of 3171

EC-132
DTC P0217 ENGINE OVER TEMPERATURE
DTC P0217 ENGINE OVER TEMPERATURE
PFP:21481
DescriptionEBS01KFK
SYSTEM DESCRIPTION
NOTE:
If DTC P0217 is displayed with DTC U1000, first perform the trouble diagnosis for DTC U1000. Refer to
EC-79, "
DTC U1000 CAN COMMUNICATION LINE".
Cooling Fan Control
*: This signal is sent to ECM through CAN communication line.
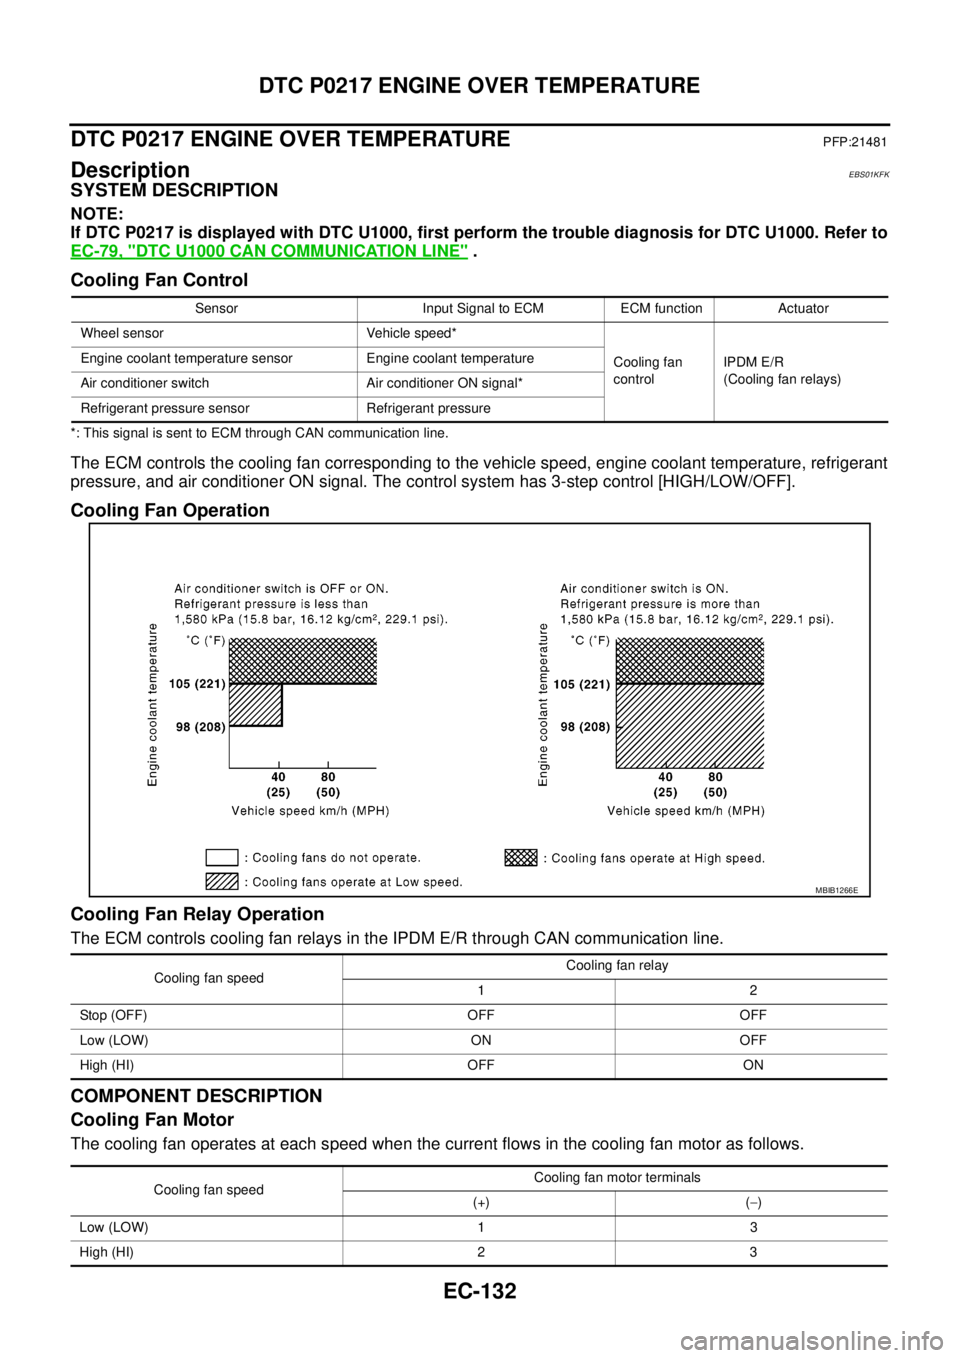
The ECM controls the cooling fan corresponding to the vehicle speed, engine coolant temperature, refrigerant
pressure, and air conditioner ON signal. The control system has 3-step control [HIGH/LOW/OFF].
Cooling Fan Operation
Cooling Fan Relay Operation
The ECM controls cooling fan relays in the IPDM E/R through CAN communication line.
COMPONENT DESCRIPTION
Cooling Fan Motor
The cooling fan operates at each speed when the current flows in the cooling fan motor as follows.
Sensor Input Signal to ECM ECM function Actuator
Wheel sensor Vehicle speed*
Cooling fan
controlIPDM E/R
(Cooling fan relays) Engine coolant temperature sensor Engine coolant temperature
Air conditioner switch Air conditioner ON signal*
Refrigerant pressure sensor Refrigerant pressure
MBIB1266E
Cooling fan speedCooling fan relay
12
Stop (OFF) OFF OFF
Low (LOW) ON OFF
High (HI) OFF ON
Cooling fan speedCooling fan motor terminals
(+) (-)
Low (LOW) 1 3
High (HI) 2 3
Page 1118 of 3171
EC-138
DTC P0217 ENGINE OVER TEMPERATURE
5.CHECK RESERVOIR TANK CAP
Apply pressure to cap with a tester and check reservoir tank cap
relief pressure.
Refer toCO-13, "
Checking Reservoir Tank Cap".
OK or NG
OK >> GO TO 6.
NG >> Replace reservoir tank cap.
6.CHECK COMPONENT PARTS
Check the following.
lThermostat. Refer toCO-23, "THERMOSTAT AND WATER PIPING".
lEngine coolant temperature sensor. Refer toEC-107, "Component Inspection".
OK or NG
OK >> GO TO 7.
NG >> Replace malfunctioning component.
7.CHECK MAIN 12 CAUSES
If the cause cannot be isolated, go toEC-140, "
Main 12 Causes of Overheating".
>>INSPECTION END
SLC755AC
Page 1122 of 3171

EC-142
DTC P0222, P0223 APP SENSOR
DTC P0222, P0223 APP SENSOR
PFP:18002
DescriptionEBS01KFS
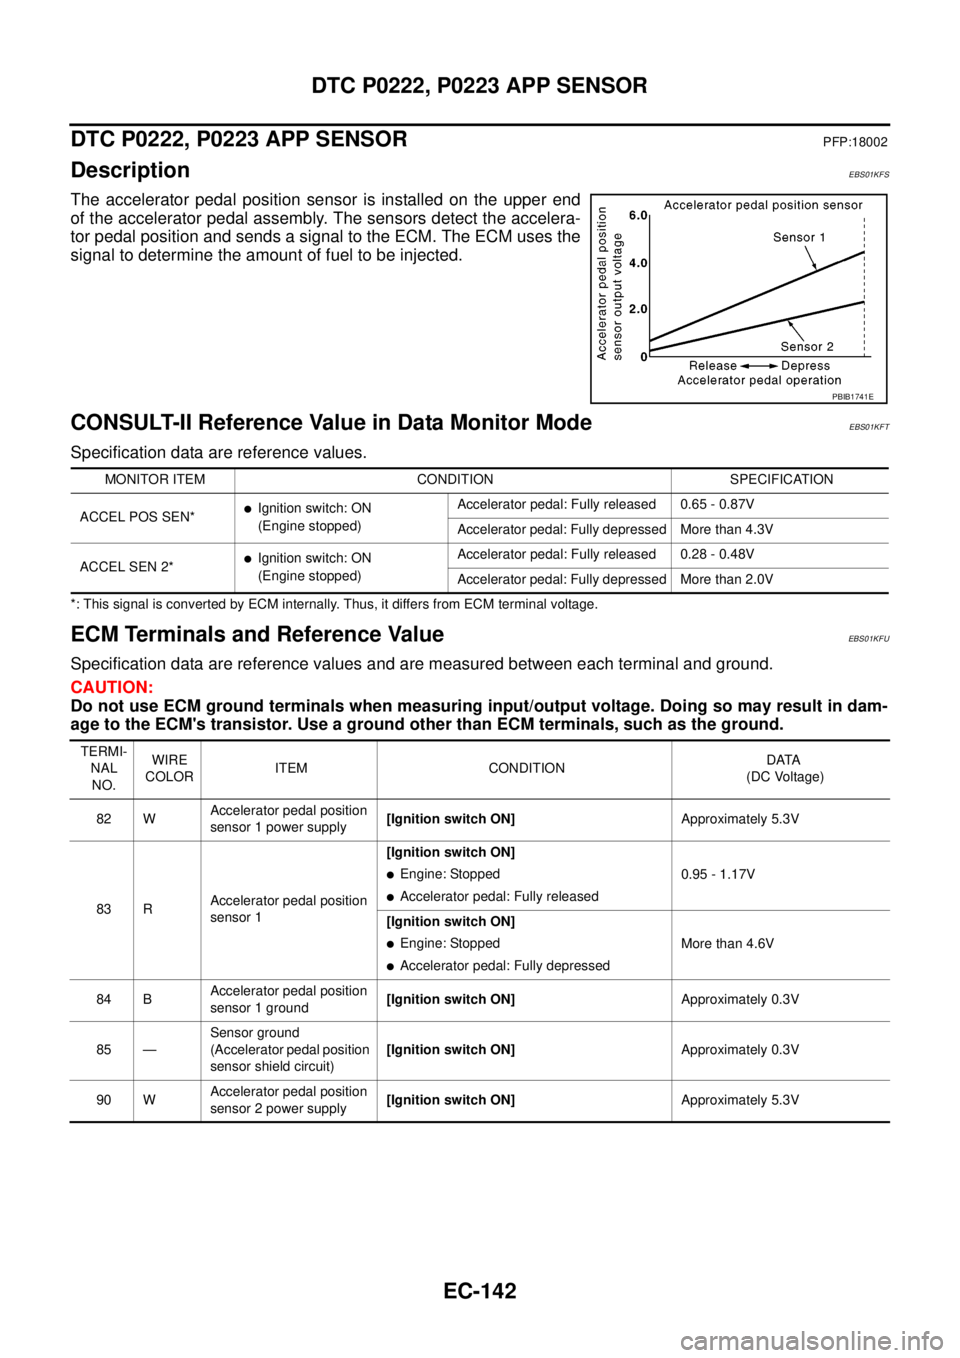
The accelerator pedal position sensor is installed on the upper end
of the accelerator pedal assembly. The sensors detect the accelera-
tor pedal position and sends a signal to the ECM. The ECM uses the
signal to determine the amount of fuel to be injected.
CONSULT-II Reference Value in Data Monitor ModeEBS01KFT
Specification data are reference values.
*: This signal is converted by ECM internally. Thus, it differs from ECM terminal voltage.
ECM Terminals and Reference ValueEBS01KFU
Specification data are reference values and are measured between each terminal and ground.
CAUTION:
Do not use ECM ground terminals when measuring input/output voltage. Doing so may result in dam-
age to the ECM's transistor. Use a ground other than ECM terminals, such as the ground.
PBIB1741E
MONITOR ITEM CONDITION SPECIFICATION
ACCEL POS SEN*
lIgnition switch: ON
(Engine stopped)Accelerator pedal: Fully released 0.65 - 0.87V
Accelerator pedal: Fully depressed More than 4.3V
ACCEL SEN 2*
lIgnition switch: ON
(Engine stopped)Accelerator pedal: Fully released 0.28 - 0.48V
Accelerator pedal: Fully depressed More than 2.0V
TERMI-
NAL
NO.WIRE
COLORITEM CONDITIONDATA
(DC Voltage)
82 WAccelerator pedal position
sensor 1 power supply[Ignition switch ON]Approximately 5.3V
83 RAccelerator pedal position
sensor 1[Ignition switch ON]
lEngine: Stopped
lAccelerator pedal: Fully released0.95 - 1.17V
[Ignition switch ON]
lEngine: Stopped
lAccelerator pedal: Fully depressedMore than 4.6V
84 BAccelerator pedal position
sensor 1 ground[Ignition switch ON]Approximately 0.3V
85 —Sensor ground
(Accelerator pedal position
sensor shield circuit)[Ignition switch ON]Approximately 0.3V
90 WAccelerator pedal position
sensor 2 power supply[Ignition switch ON]Approximately 5.3V
Page 1123 of 3171

DTC P0222, P0223 APP SENSOR
EC-143
C
D
E
F
G
H
I
J
K
L
MA
EC
On Board Diagnosis LogicEBS01KFV
The MI will not light up for these self-diagnoses.
NOTE:
If DTC P0222 or P0223 is displayed with DTC P0652 or P0653, first perform the trouble diagnosis for
DTC P0652 or P0653. Refer toEC-227, "
DTC P0652, P0653 SENSOR POWER SUPPLY".
DTC Confirmation ProcedureEBS01KFW
NOTE:
If DTC Confirmation Procedure has been previously conducted, always turn ignition switch OFF and wait at
least 10 seconds before conducting the next test.
WITH CONSULT-II
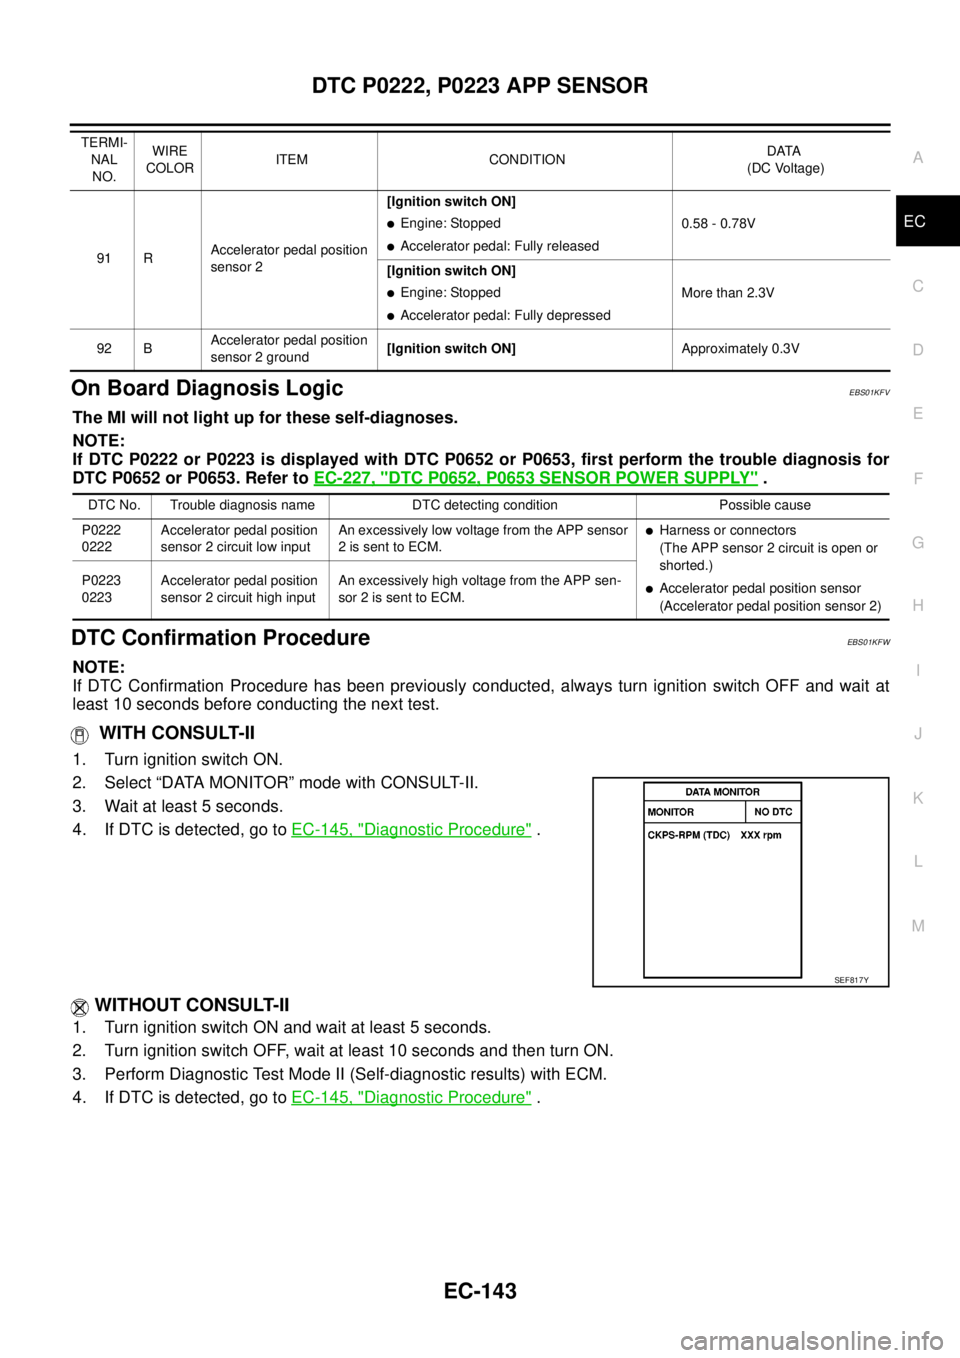
1. Turn ignition switch ON.
2. Select “DATA MONITOR” mode with CONSULT-II.
3. Wait at least 5 seconds.
4. If DTC is detected, go toEC-145, "
Diagnostic Procedure".
WITHOUT CONSULT-II
1. Turn ignition switch ON and wait at least 5 seconds.
2. Turn ignition switch OFF, wait at least 10 seconds and then turn ON.
3. Perform Diagnostic Test Mode II (Self-diagnostic results) with ECM.
4. If DTC is detected, go toEC-145, "
Diagnostic Procedure".
91 RAccelerator pedal position
sensor 2[Ignition switch ON]
lEngine: Stopped
lAccelerator pedal: Fully released0.58 - 0.78V
[Ignition switch ON]
lEngine: Stopped
lAccelerator pedal: Fully depressedMore than 2.3V
92 BAccelerator pedal position
sensor 2 ground[Ignition switch ON]Approximately 0.3V TERMI-
NAL
NO.WIRE
COLORITEM CONDITIONDATA
(DC Voltage)
DTC No. Trouble diagnosis name DTC detecting condition Possible cause
P0222
0222Accelerator pedal position
sensor 2 circuit low inputAn excessively low voltage from the APP sensor
2 is sent to ECM.
lHarness or connectors
(The APP sensor 2 circuit is open or
shorted.)
lAccelerator pedal position sensor
(Accelerator pedal position sensor 2) P0223
0223Accelerator pedal position
sensor 2 circuit high inputAn excessively high voltage from the APP sen-
sor 2 is sent to ECM.
SEF817Y
Page 1124 of 3171
EC-144
DTC P0222, P0223 APP SENSOR
Wiring Diagram
EBS01KFX
MBWA1043E
Page 1125 of 3171
DTC P0222, P0223 APP SENSOR
EC-145
C
D
E
F
G
H
I
J
K
L
MA
EC
Diagnostic ProcedureEBS01KFY
1.CHCEK GROUND CONNECTIONS
1. Turn ignition switch OFF.
2. Loosen and retighten three ground screws on the body.
Refer toEC-78, "
Ground Inspection".
OK or NG
OK >> GO TO 2.
NG >> Repair or replace ground connections.
2.CHECK APP SENSOR 2 POWER SUPPLY CIRCUIT
1. Disconnect accelerator pedal position (APP) sensor (1) harness
connector.
2. Turn ignition switch ON.
3. Check voltage between APP sensor terminal 1 and ground with
CONSULT-II or tester.
OK or NG
OK >> GO TO 3.
NG >> Repair open circuit or short to ground or short to power
in harness or connectors.
: Vehicle front
1. Body ground E21 2. ECM 3. Body ground E41
4. A/C high-pressure service valve 5. ABS actuator and electric unit
(control unit)6. Body ground E61
MBIB1218E
MBIB1201E
Voltage: Approximately 5.3V
PBIB2611E