Page 1653 of 3171

SERVICE INFORMATION FOR ELECTRICAL INCIDENT
GI-31
C
D
E
F
G
H
I
J
K
L
MB
GI
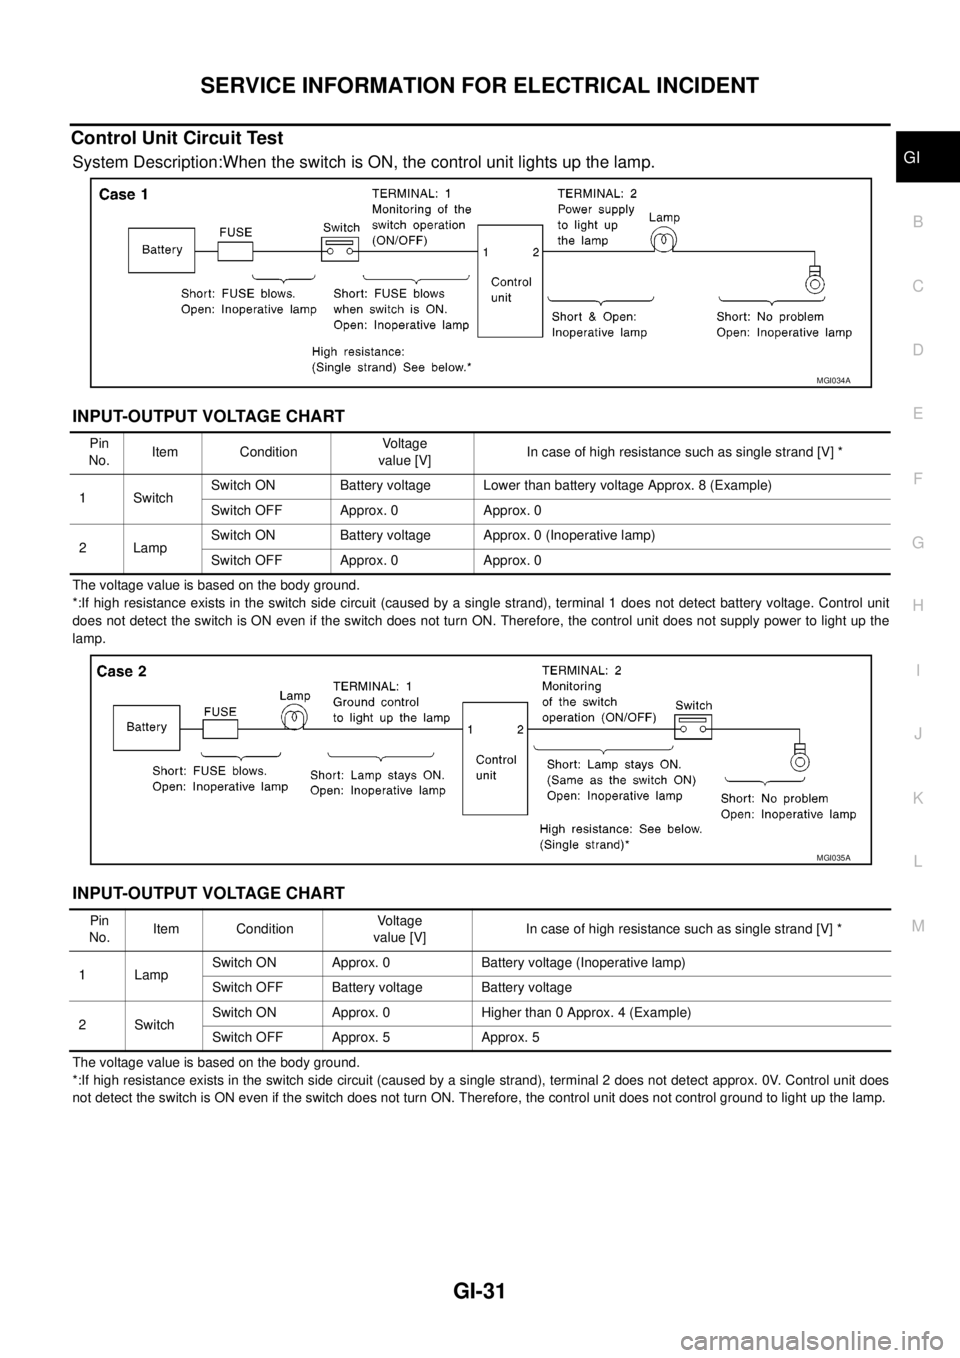
Control Unit Circuit Test
System Description:When the switch is ON, the control unit lights up the lamp.
INPUT-OUTPUT VOLTAGE CHART
The voltage value is based on the body ground.
*:If high resistance exists in the switch side circuit (caused by a single strand), terminal 1 does not detect battery voltage. Control unit
does not detect the switch is ON even if the switch does not turn ON. Therefore, the control unit does not supply power to light up the
lamp.
INPUT-OUTPUT VOLTAGE CHART
The voltage value is based on the body ground.
*:If high resistance exists in the switch side circuit (caused by a single strand), terminal 2 does not detect approx. 0V. Control unit does
not detect the switch is ON even if the switch does not turn ON. Therefore, the control unit does not control ground to light up the lamp.
MGI034A
Pin
No.Item ConditionVoltage
value [V]In case of high resistance such as single strand [V] *
1 SwitchSwitch ON Battery voltage Lower than battery voltage Approx. 8 (Example)
Switch OFF Approx. 0 Approx. 0
2LampSwitch ON Battery voltage Approx. 0 (Inoperative lamp)
Switch OFF Approx. 0 Approx. 0
MGI035A
Pin
No.Item ConditionVoltage
value [V]In case of high resistance such as single strand [V] *
1 LampSwitch ON Approx. 0 Battery voltage (Inoperative lamp)
Switch OFF Battery voltage Battery voltage
2SwitchSwitch ON Approx. 0 Higher than 0 Approx. 4 (Example)
Switch OFF Approx. 5 Approx. 5
Page 1654 of 3171

GI-32
SERVICE INFORMATION FOR ELECTRICAL INCIDENT
Control Units and Electrical Parts
EAS001H1
PRECAUTIONS
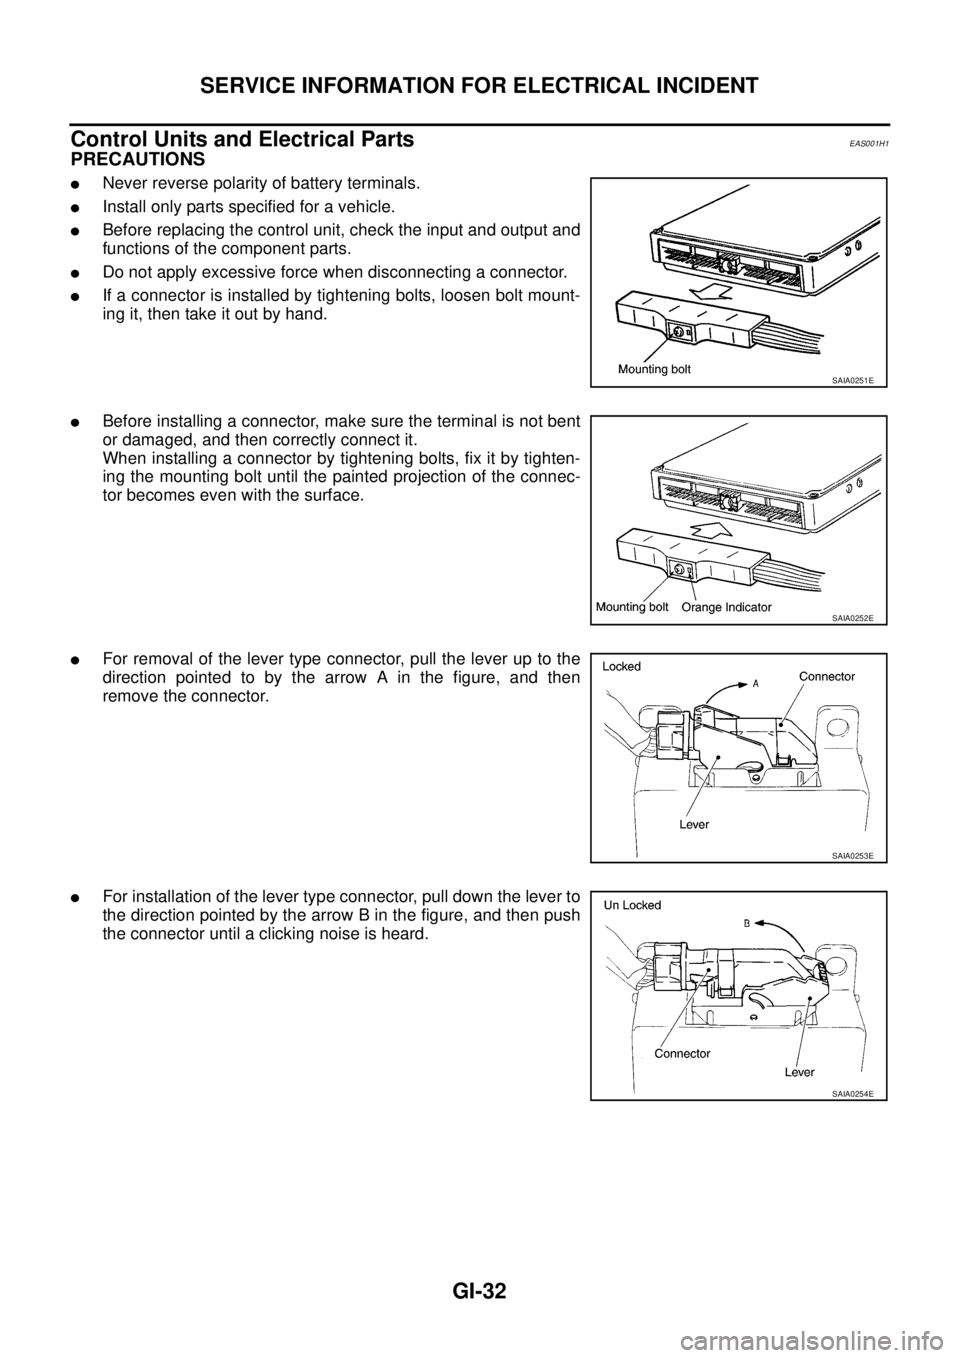
lNever reverse polarity of battery terminals.
lInstall only parts specified for a vehicle.
lBefore replacing the control unit, check the input and output and
functions of the component parts.
lDo not apply excessive force when disconnecting a connector.
lIf a connector is installed by tightening bolts, loosen bolt mount-
ing it, then take it out by hand.
lBefore installing a connector, make sure the terminal is not bent
or damaged, and then correctly connect it.
When installing a connector by tightening bolts, fix it by tighten-
ing the mounting bolt until the painted projection of the connec-
tor becomes even with the surface.
lFor removal of the lever type connector, pull the lever up to the
direction pointed to by the arrow A in the figure, and then
remove the connector.
lFor installation of the lever type connector, pull down the lever to
the direction pointed by the arrow B in the figure, and then push
the connector until a clicking noise is heard.
SAIA0251E
SAIA0252E
SAIA0253E
SAIA0254E
Page 1655 of 3171
SERVICE INFORMATION FOR ELECTRICAL INCIDENT
GI-33
C
D
E
F
G
H
I
J
K
L
MB
GI
lDo not apply excessive shock to the control unit by dropping or
hitting it.
lBe careful to prevent condensation in the control unit due to
rapid temperature changes and do not let water or rain get on it.
If water is found in the control unit, dry it fully and then install it in
the vehicle.
lBe careful not to let oil to get on the control unit connector.
lAvoid cleaning the control unit with volatile oil.
lDo not disassemble the control unit, and do not remove the
upper and lower covers.
lWhen using a DMM, be careful not to let test probes get close to
each other to prevent the power transistor in the control unit
from damaging battery voltage because of short circuiting.
lWhen checking input and output signals of the control unit, use
the specified check adapter.
SAIA0255E
SEF348N
Page 1656 of 3171
GI-34
CONTROL UNIT CONFIGURATION PROCEDURE
CONTROL UNIT CONFIGURATION PROCEDURE
PFP:00000
DescriptionEAS001HD
Perform configuration and other appurtenant work in accordance with the procedures in the table after replac-
ing control unit shown below.
Part Replacement procedure Reference TableEAS001HA
1. Find and select a wok item code from the part replacement procedure reference table below.
2. If the replaced units matched the code table, select a work item code in end of the row.
3. Proceed to the work procedure page. (Refer toGI-36, "
Work Procedure")
Page 1657 of 3171
CONTROL UNIT CONFIGURATION PROCEDURE
GI-35
C
D
E
F
G
H
I
J
K
L
MB
GI
´: replace unitPARTS REPLACEMENT ITEM
Work item
code
ECM BCMIntelligent Key
unitIntelligent KeySteering lock
unit
VIHCLE CONDITION
WITH NATS
WITH INTELLIGENT KEY SYSTEM
´´´´´A
´´´´—B
´´´—´A
´´´—— B
´´—´´B
´´—´—B
´´——´C
´´——— C
´—´´´D
´—´´—D
´—´—´E
´—´—— E
´——´´D
´——´—D
´———´F
´———— F
—´´´´B
—´´´—B
—´´—´B
—´´—— B
—´—´´B
—´—´—B
—´——´C
—´——— C
——´´´D
——´´—D
——´—´E
——´—— E
———´´D
———´—H
————´F
WITHOUT
INTELLIGENT
KEY SYSTEM
´´G
´—F
—´C
WITHOUT
NATS
´´I
´—J
—´K
Page 1658 of 3171

GI-36
CONTROL UNIT CONFIGURATION PROCEDURE
Work Procedure
EAS001HB
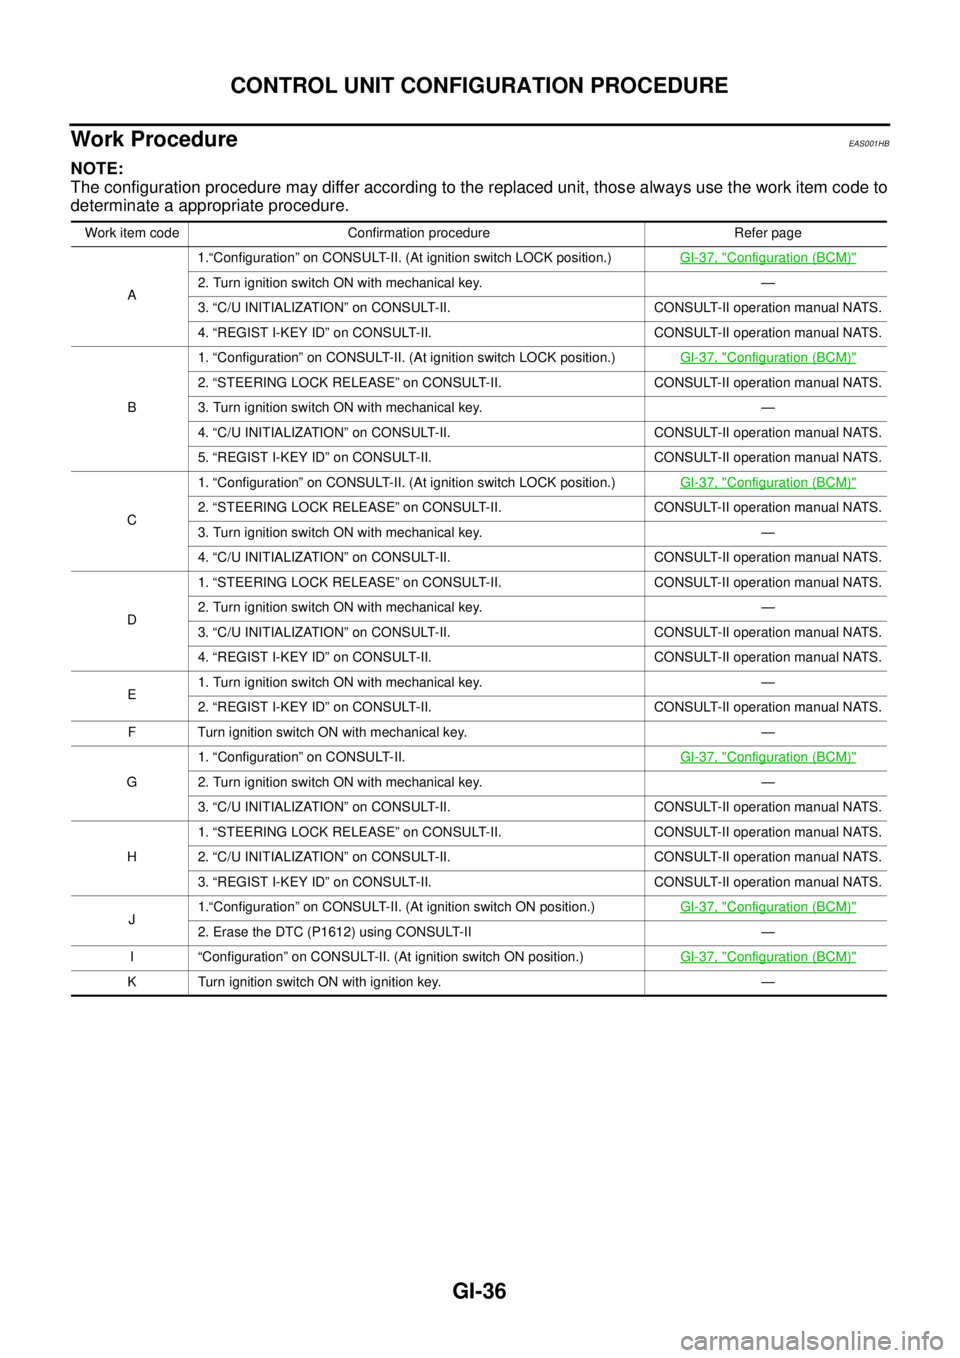
NOTE:
The configuration procedure may differ according to the replaced unit, those always use the work item code to
determinate a appropriate procedure.
Work item code Confirmation procedure Refer page
A1.“Configuration” on CONSULT-II. (At ignition switch LOCK position.)GI-37, "
Configuration (BCM)"
2. Turn ignition switch ON with mechanical key. —
3. “C/U INITIALIZATION” on CONSULT-II. CONSULT-II operation manual NATS.
4. “REGIST I-KEY ID” on CONSULT-II. CONSULT-II operation manual NATS.
B1. “Configuration” on CONSULT-II. (At ignition switch LOCK position.)GI-37, "
Configuration (BCM)"
2. “STEERING LOCK RELEASE” on CONSULT-II. CONSULT-II operation manual NATS.
3. Turn ignition switch ON with mechanical key. —
4. “C/U INITIALIZATION” on CONSULT-II. CONSULT-II operation manual NATS.
5. “REGIST I-KEY ID” on CONSULT-II. CONSULT-II operation manual NATS.
C1. “Configuration” on CONSULT-II. (At ignition switch LOCK position.)GI-37, "
Configuration (BCM)"
2. “STEERING LOCK RELEASE” on CONSULT-II. CONSULT-II operation manual NATS.
3. Turn ignition switch ON with mechanical key. —
4. “C/U INITIALIZATION” on CONSULT-II. CONSULT-II operation manual NATS.
D1. “STEERING LOCK RELEASE” on CONSULT-II. CONSULT-II operation manual NATS.
2. Turn ignition switch ON with mechanical key. —
3. “C/U INITIALIZATION” on CONSULT-II. CONSULT-II operation manual NATS.
4. “REGIST I-KEY ID” on CONSULT-II. CONSULT-II operation manual NATS.
E1. Turn ignition switch ON with mechanical key. —
2. “REGIST I-KEY ID” on CONSULT-II. CONSULT-II operation manual NATS.
F Turn ignition switch ON with mechanical key. —
G1. “Configuration” on CONSULT-II.GI-37, "
Configuration (BCM)"
2. Turn ignition switch ON with mechanical key. —
3. “C/U INITIALIZATION” on CONSULT-II. CONSULT-II operation manual NATS.
H1. “STEERING LOCK RELEASE” on CONSULT-II. CONSULT-II operation manual NATS.
2. “C/U INITIALIZATION” on CONSULT-II. CONSULT-II operation manual NATS.
3. “REGIST I-KEY ID” on CONSULT-II. CONSULT-II operation manual NATS.
J1.“Configuration” on CONSULT-II. (At ignition switch ON position.)GI-37, "
Configuration (BCM)"
2. Erase the DTC (P1612) using CONSULT-II —
I “Configuration” on CONSULT-II. (At ignition switch ON position.)GI-37, "
Configuration (BCM)"
K Turn ignition switch ON with ignition key. —
Page 1659 of 3171

CONTROL UNIT CONFIGURATION PROCEDURE
GI-37
C
D
E
F
G
H
I
J
K
L
MB
GI
Configuration (BCM)EAS001Q6
DESCRIPTION
CONFIGURATION has two functions as follows:
lREAD CONFIGURATION is the function to confirm vehicle configuration of current BCM.
lWRITE CONFIGURATION is the function to write vehicle configuration on BCM.
CAUTION:
lWhen replacing BCM, you must perform WRITE CONFIGURATION with CONSULT-II.
lComplete the procedure of WRITE CONFIGURATION in order.
lIf you set incorrect WRITE CONFIGURATION, incidents will occur.
lConfiguration is different for each vehicle model. Confirm configuration of each vehicle model.
READ CONFIGURATION PROCEDURE
CAUTION:
If CONSULT-II is used with no connection of CONSULT-II CONVERTER, malfunctions might be
detected in self-diagnosis depending on control unit which carry out CAN communication.
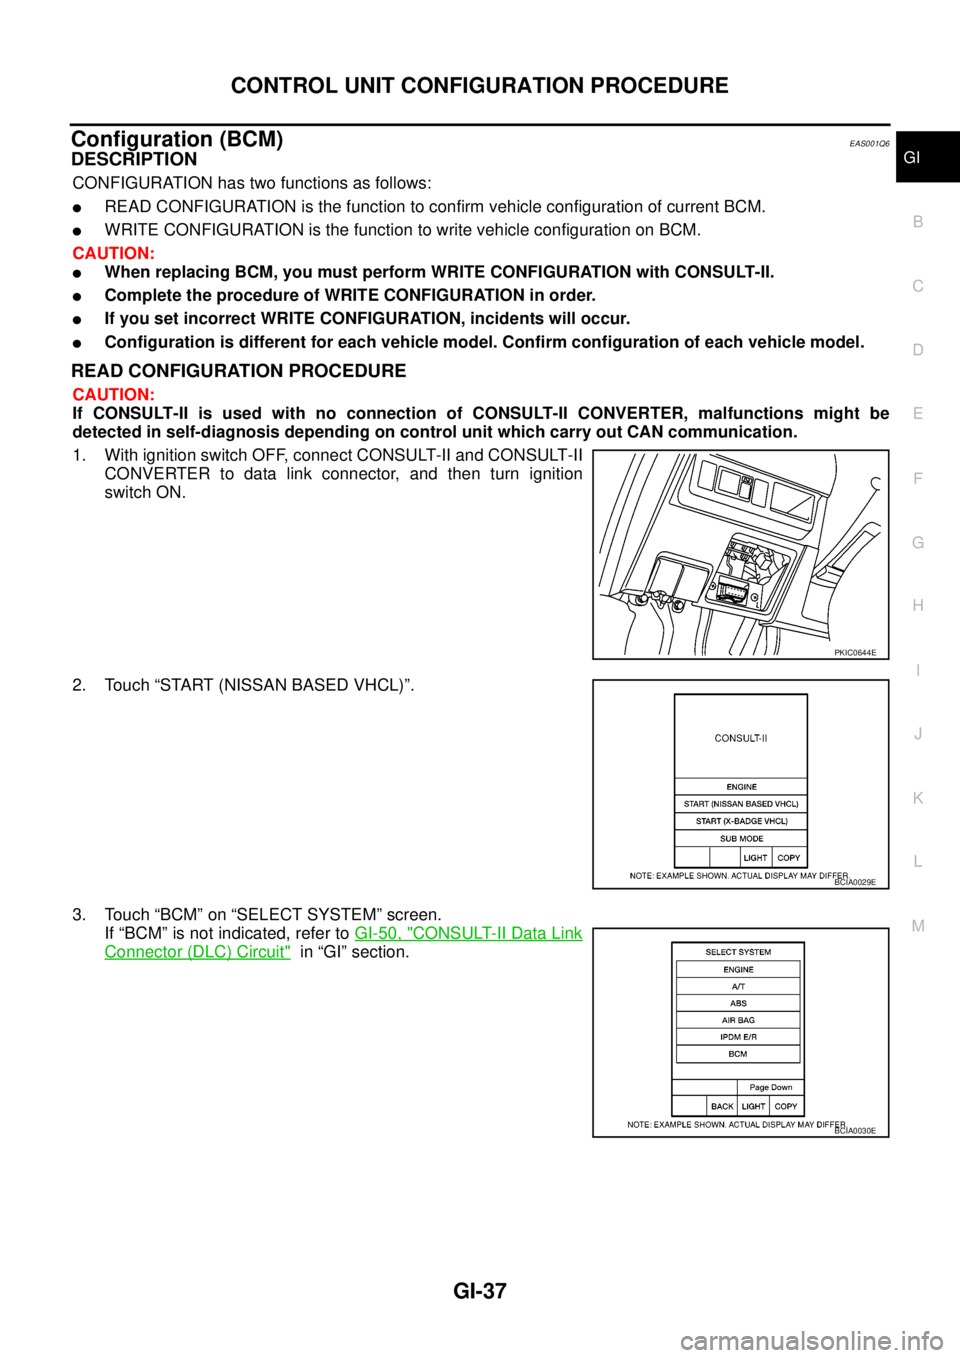
1. With ignition switch OFF, connect CONSULT-II and CONSULT-II
CONVERTER to data link connector, and then turn ignition
switch ON.
2. Touch “START (NISSAN BASED VHCL)”.
3. Touch “BCM” on “SELECT SYSTEM” screen.
If “BCM” is not indicated, refer toGI-50, "
CONSULT-II Data Link
Connector (DLC) Circuit"in “GI” section.
PKIC0644E
BCIA0029E
BCIA0030E
Page 1660 of 3171
GI-38
CONTROL UNIT CONFIGURATION PROCEDURE
4. Touch “BCM” on “SELECT TEST ITEM” screen.
5. Touch “CONFIGURATION” on “SELECT DIAG MODE” screen.
6. Touch “R51/D40 (SPEC1)” (for UK models) or “R51/D40
(SPEC2)” (except for UK models) and “OK” on “VEHICLE
SELECT” screen.
For canceling, touch “CANCEL” on “VEHICLE SELECT” screen.
7. Touch “READ CONFIGURATION” on “SELECT CONFIG ITEM”
screen.
8. Configuration of current BCM is printed out automatically. A listing of manual setting items and auto set-
ting items will be displayed. Auto setting items are preset and cannot be changed. Manual setting items
can be set by using “WRITE CONFIGURATION PROCEDURE”. Refer toGI-41, "
WRITE CONFIGURA-
TION PROCEDURE".
PKIA5226E
PKIB1959E
PKIC1790E
PKIC1791E