2005 NISSAN NAVARA control unit
[x] Cancel search: control unitPage 1669 of 3171

CONSULT-II CHECKING SYSTEM
GI-47
C
D
E
F
G
H
I
J
K
L
MB
GI
CONSULT-II CHECKING SYSTEMPFP:00000
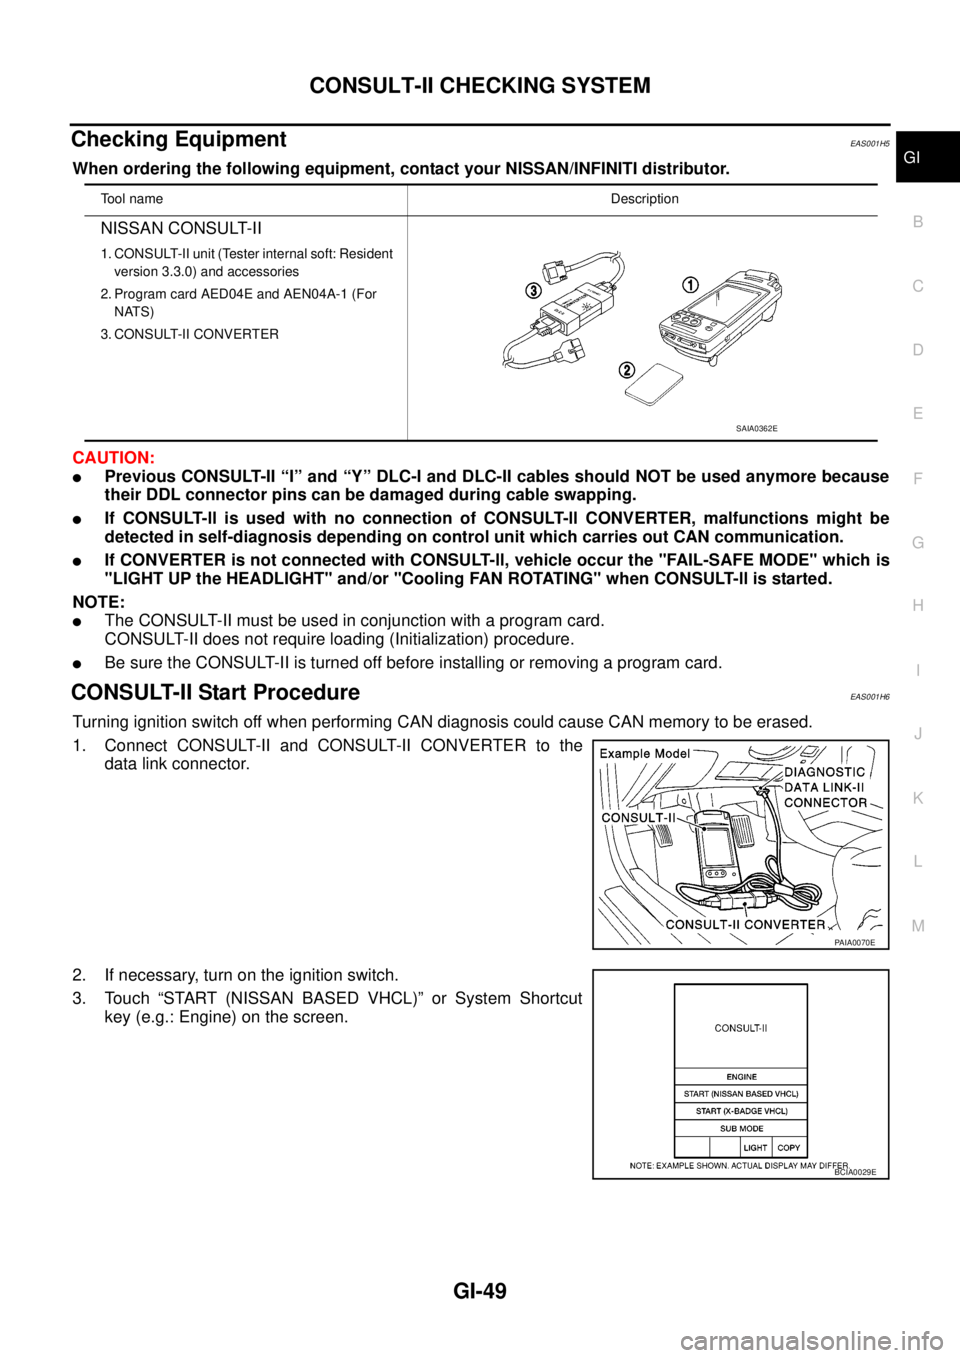
DescriptionEAS001H2
lCONSULT-II is a hand-held type tester. When it is connected with a diagnostic connector equipped on the
vehicle side, it will communicate with the control unit equipped in the vehicle and then enable various
kinds of diagnostic tests.
lRefer to “CONSULT-II Software Operation Manual” for more information.
Function and System ApplicationEAS001H3
x: Applicable
*: Nissan Anti-Theft SystemDiagnostic test
modeFunction
ENGINE
A/T
AIR BAG
ABS
ALL MODE AWD/4WD
BCM
IPDM E/R
MULTI AV
METER
NATS *
Work supportThis mode enables a technician to adjust some devices
faster and more accurately by following the indications
on CONSULT-II.x---´´--- -
Self-diagnostic
resultsSelf-diagnostic results can be read and erased quickly. x x x x x´´´´x
Trouble diagnostic
recordCurrent self-diagnostic results and all trouble diagnostic
records previously stored can be read.--x------ -
Data monitor Input/Output data in the ECU can be read. x x - x x´´´´-
CAN diagnosis
support monitorThe communication condition of CAN communication
line can be indicated.xx - xx´´´´-
Active testDiagnostic Test Mode in which CONSULT-II drives some
actuators apart from the ECU and also shifts some
parameters in a specified range.x- -x-´´-- -
DTC confirmationThe results of SRT (System Readiness Test) and the
self-diagnosis status/result can be confirmed.x----- - -- -
DTC work supportThe operating condition to confirm Diagnosis Trouble
Codes can be selected.-x------- -
ECM (ECU/TCM)
part numberECM (ECU/TCM) part number can be read. x x - x x´-´--
ECU discrimi-
nated No.Classification number of a replacement ECU can be read
to prevent an incorrect ECU from being installed.--x------ -
Function testThis mode can show results of self-diagnosis of ECU
with either “OK” or “NG”. For engines, more practical
tests regarding sensor/switches and/or actuators are
available.xxxx-- - - - -
Control unit initial-
izationAll registered ignition key IDs in NATS components can
be initialized and new IDs can be registered.------ - -- x
AV C O M M m o n i t o rIndicates the communication condition of AV communi-
cation.- ----- -´--
ConfigurationThe vehicle configuration can be read and written on
brand-new ECU- ----´--- -
Page 1671 of 3171

CONSULT-II CHECKING SYSTEM
GI-49
C
D
E
F
G
H
I
J
K
L
MB
GI
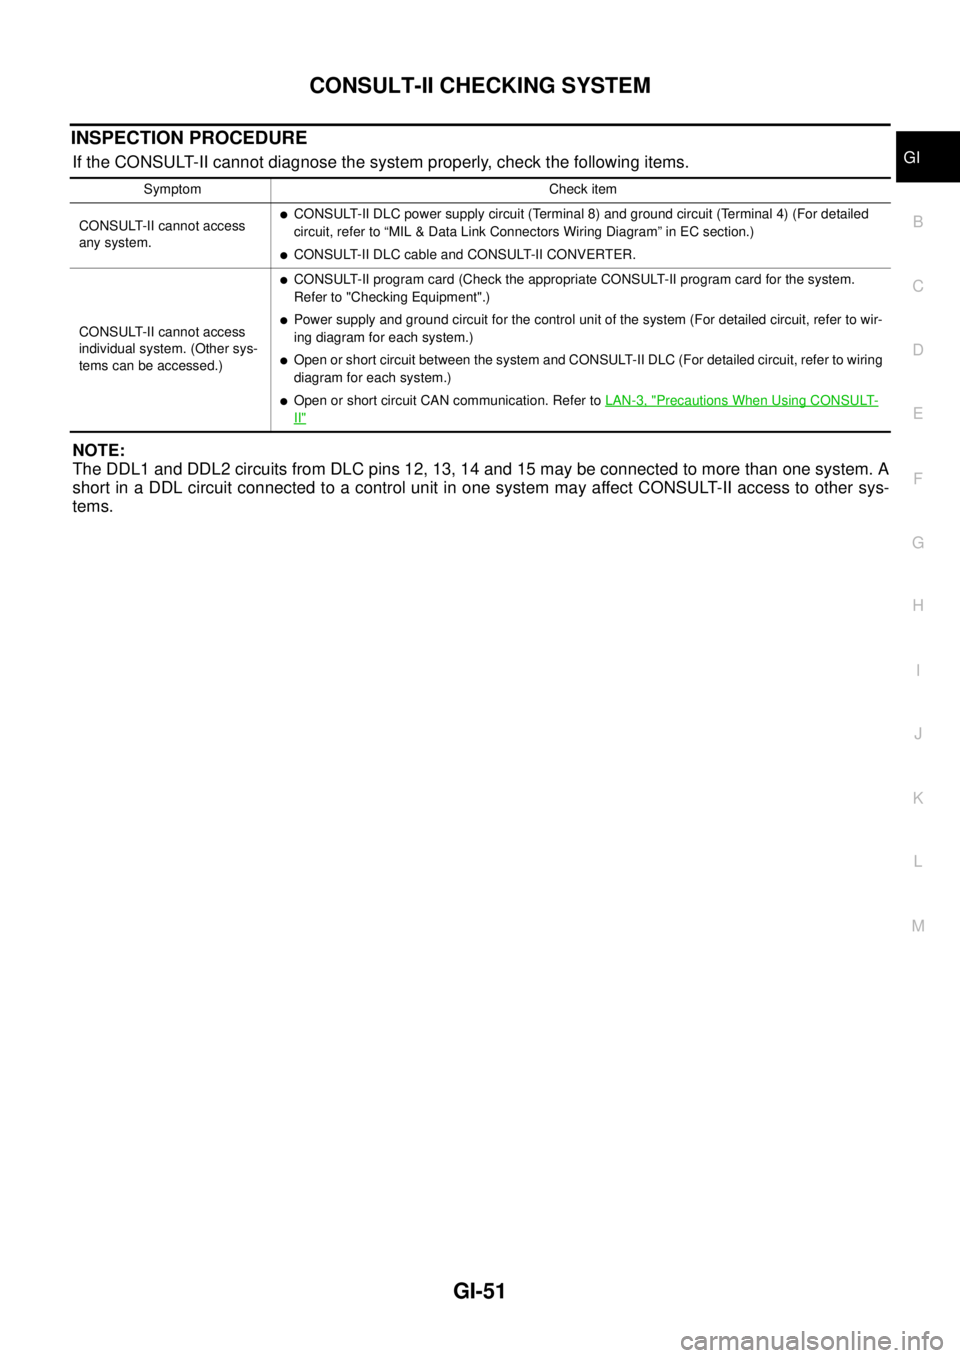
Checking EquipmentEAS001H5
When ordering the following equipment, contact your NISSAN/INFINITI distributor.
CAUTION:
lPrevious CONSULT-II “I” and “Y” DLC-I and DLC-II cables should NOT be used anymore because
their DDL connector pins can be damaged during cable swapping.
lIf CONSULT-ll is used with no connection of CONSULT-ll CONVERTER, malfunctions might be
detected in self-diagnosis depending on control unit which carries out CAN communication.
lIf CONVERTER is not connected with CONSULT-ll, vehicle occur the "FAIL-SAFE MODE" which is
"LIGHT UP the HEADLIGHT" and/or "Cooling FAN ROTATING" when CONSULT-ll is started.
NOTE:
lThe CONSULT-II must be used in conjunction with a program card.
CONSULT-II does not require loading (Initialization) procedure.
lBe sure the CONSULT-II is turned off before installing or removing a program card.
CONSULT-II Start ProcedureEAS001H6
Turning ignition switch off when performing CAN diagnosis could cause CAN memory to be erased.
1. Connect CONSULT-II and CONSULT-II CONVERTER to the
data link connector.
2. If necessary, turn on the ignition switch.
3. Touch “START (NISSAN BASED VHCL)” or System Shortcut
key (e.g.: Engine) on the screen.
Tool nameDescription
NISSAN CONSULT-II
1. CONSULT-II unit (Tester internal soft: Resident
version 3.3.0) and accessories
2. Program card AED04E and AEN04A-1 (For
NATS)
3. CONSULT-II CONVERTER
SAIA0362E
PAIA0070E
BCIA0029E
Page 1673 of 3171

CONSULT-II CHECKING SYSTEM
GI-51
C
D
E
F
G
H
I
J
K
L
MB
GI
INSPECTION PROCEDURE
If the CONSULT-II cannot diagnose the system properly, check the following items.
NOTE:
The DDL1 and DDL2 circuits from DLC pins 12, 13, 14 and 15 may be connected to more than one system. A
short in a DDL circuit connected to a control unit in one system may affect CONSULT-II access to other sys-
tems.
Symptom Check item
CONSULT-II cannot access
any system.
lCONSULT-II DLC power supply circuit (Terminal 8) and ground circuit (Terminal 4) (For detailed
circuit, refer to “MIL & Data Link Connectors Wiring Diagram” in EC section.)
lCONSULT-II DLC cable and CONSULT-II CONVERTER.
CONSULT-II cannot access
individual system. (Other sys-
tems can be accessed.)
lCONSULT-II program card (Check the appropriate CONSULT-II program card for the system.
Refer to "Checking Equipment".)
lPower supply and ground circuit for the control unit of the system (For detailed circuit, refer to wir-
ing diagram for each system.)
lOpen or short circuit between the system and CONSULT-II DLC (For detailed circuit, refer to wiring
diagram for each system.)
lOpen or short circuit CAN communication. Refer toLAN-3, "Precautions When Using CONSULT-
II"
Page 1683 of 3171

TERMINOLOGY
GI-61
C
D
E
F
G
H
I
J
K
L
MB
GI
TERMINOLOGYPFP:00011
ISO 15031-2 Terminology ListEAS001H9
All emission related terms used in this publication in accordance with ISO 15031-2 are listed. Accordingly, new
terms, new acronyms/abbreviations and old terms are listed in the following chart.
NEW TERMNEW ACRONYM /
ABBREVIATIONOLD TERM
Air cleaner ACL Air cleaner
Barometric pressure BARO ***
Barometric pressure sensor-BCDD BAROS-BCDD BCDD
Camshaft position CMP ***
Camshaft position sensor CMPS Crank angle sensor
Canister *** Canister
Carburetor CARB Carburetor
Charge air cooler CAC Intercooler
Closed loop CL Closed loop
Closed throttle position switch CTP switch Idle switch
Clutch pedal position switch CPP switch Clutch switch
Continuous fuel injection system CFI system ***
Continuous trap oxidizer system CTOX system ***
Crankshaft position CKP ***
Crankshaft position sensor CKPS ***
Data link connector DLC ***
Data link connector for CONSULT-II DLC for CONSULT-II Diagnostic connector for CONSULT-II
Diagnostic test mode DTM Diagnostic mode
Diagnostic test mode selector DTM selector Diagnostic mode selector
Diagnostic test mode I DTM I Mode I
Diagnostic test mode II DTM II Mode II
Diagnostic trouble code DTC Malfunction code
Direct fuel injection system DFI system ***
Distributor ignition system DI system Ignition timing control
Early fuel evaporation-mixture heater EFE-mixture heater Mixture heater
Early fuel evaporation system EFE system Mixture heater control
Electrically erasable programmable read
only memoryEEPROM ***
Electronic ignition system EI system Ignition timing control
Engine control EC ***
Engine control module ECM ECCS control unit
Engine coolant temperature ECT Engine temperature
Engine coolant temperature sensor ECTS Engine temperature sensor
Engine modification EM ***
Engine speed RPM Engine speed
Erasable programmable read only memory EPROM ***
Evaporative emission canister EVAP canister Canister
Evaporative emission system EVAP system Canister control solenoid valve
Exhaust gas recirculation valve EGR valve EGR valve
Page 1686 of 3171

GI-64
TERMINOLOGY
***: Not applicableTransmission control module TCM A/T control unit
Turbocharger TC Turbocharger
Vehicle speed sensor VSS Vehicle speed sensor
Volume air flow sensor VAFS Air flow meter
Warm up oxidation catalyst WU-OC Catalyst
Warm up oxidation catalytic converter sys-
temWU-OC system ***
Warm up three way catalyst WU-TWC Catalyst
Warm up three way catalytic converter sys-
temWU-TWC system ***
Wide open throttle position switch WOTP switch Full switchNEW TERMNEW ACRONYM /
ABBREVIATIONOLD TERM
Page 1693 of 3171

SQUEAK AND RATTLE TROUBLE DIAGNOSES
GW-7
C
D
E
F
G
H
J
K
L
MA
B
GW
FELT CLOTHTAPE
Used to insulate where movement does not occur. Ideal for instrument panel applications.
68370-4B000: 15´25 mm (0.59´0.98 in) pad/68239-13E00: 5 mm (0.20 in) wide tape roll
The following materials, not available through NISSAN Parts Department, can also be used to repair squeaks
and rattles.
UHMW(TEFLON) TAPE
Insulates where slight movement is present. Ideal for instrument panel applications.
SILICONE GREASE
Used in place of UHMW tape that will be visible or not fit.
Note: Will only last a few months.
SILICONE SPRAY
Use when grease cannot be applied.
DUCT TAPE
Usetoeliminatemovement.
CONFIRM THE REPAIR
Confirm that the cause of a noise is repaired by test driving the vehicle. Operate the vehicle under the same
conditions as when the noise originally occurred. Refer to the notes on the Diagnostic Worksheet.
Generic Squeak and Rattle TroubleshootingEIS00C03
Refer to Table of Contents for specific component removal and installation information.
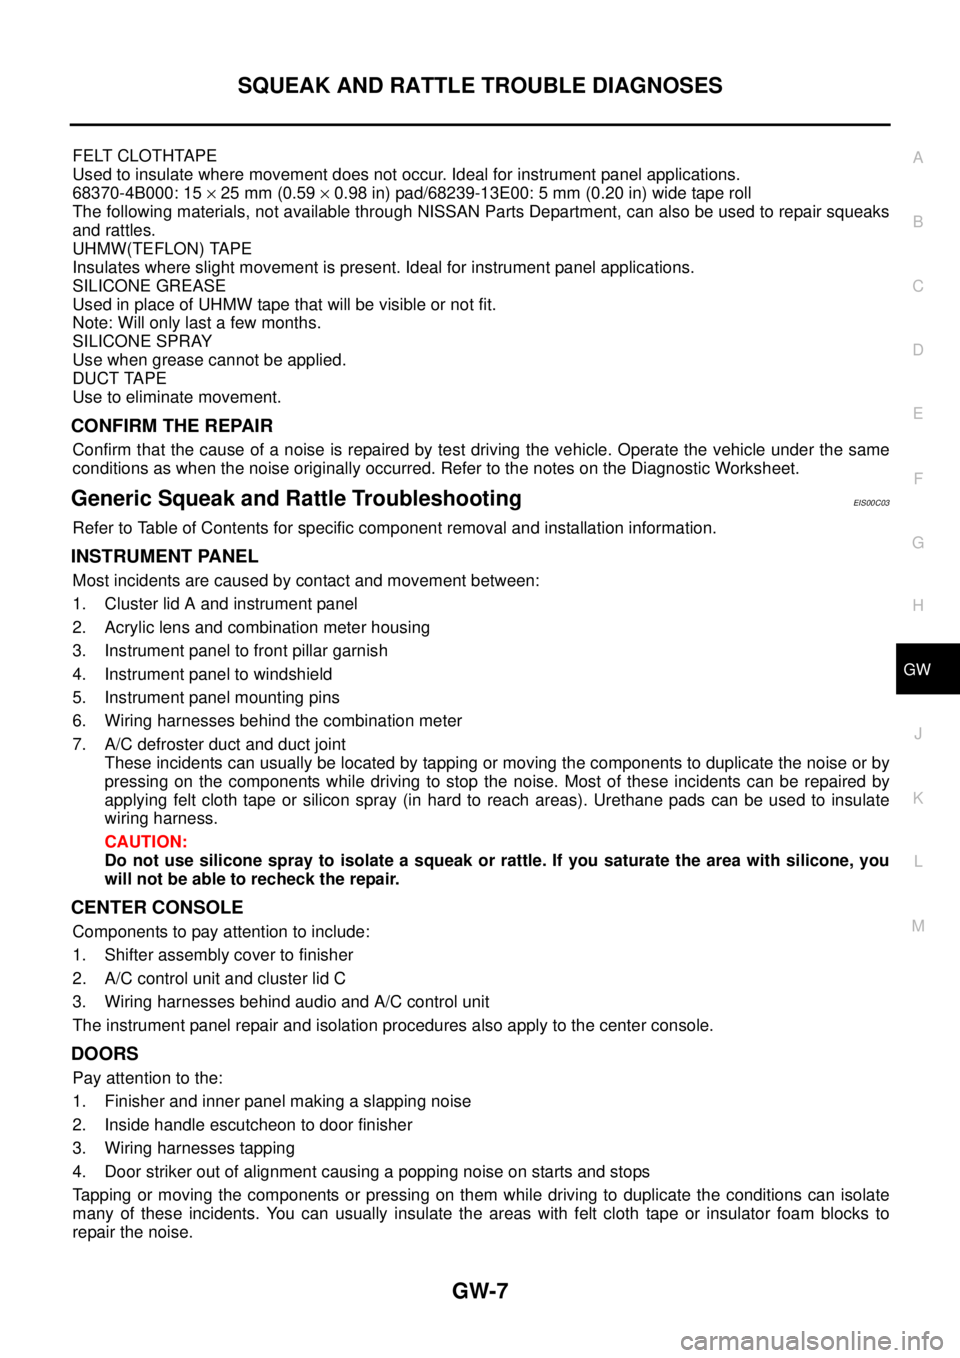
INSTRUMENT PANEL
Most incidents are caused by contact and movement between:
1. Cluster lid A and instrument panel
2. Acrylic lens and combination meter housing
3. Instrument panel to front pillar garnish
4. Instrument panel to windshield
5. Instrument panel mounting pins
6. Wiring harnesses behind the combination meter
7. A/C defroster duct and duct joint
These incidents can usually be located by tapping or moving the components to duplicate the noise or by
pressing on the components while driving to stop the noise. Most of these incidents can be repaired by
applying felt cloth tape or silicon spray (in hard to reach areas). Urethane pads can be used to insulate
wiring harness.
CAUTION:
Do not use silicone spray to isolate a squeak or rattle. If you saturate the area with silicone, you
will not be able to recheck the repair.
CENTER CONSOLE
Components to pay attention to include:
1. Shifter assembly cover to finisher
2. A/C control unit and cluster lid C
3. Wiring harnesses behind audio and A/C control unit
The instrument panel repair and isolation procedures also apply to the center console.
DOORS
Pay attention to the:
1. Finisher and inner panel making a slapping noise
2. Inside handle escutcheon to door finisher
3. Wiring harnesses tapping
4. Door striker out of alignment causing a popping noise on starts and stops
Tapping or moving the components or pressing on them while driving to duplicate the conditions can isolate
many of these incidents. You can usually insulate the areas with felt cloth tape or insulator foam blocks to
repair the noise.
Page 1701 of 3171

POWER WINDOW SYSTEM
GW-15
C
D
E
F
G
H
J
K
L
MA
B
GW
POWER WINDOW SYSTEMPFP:25401
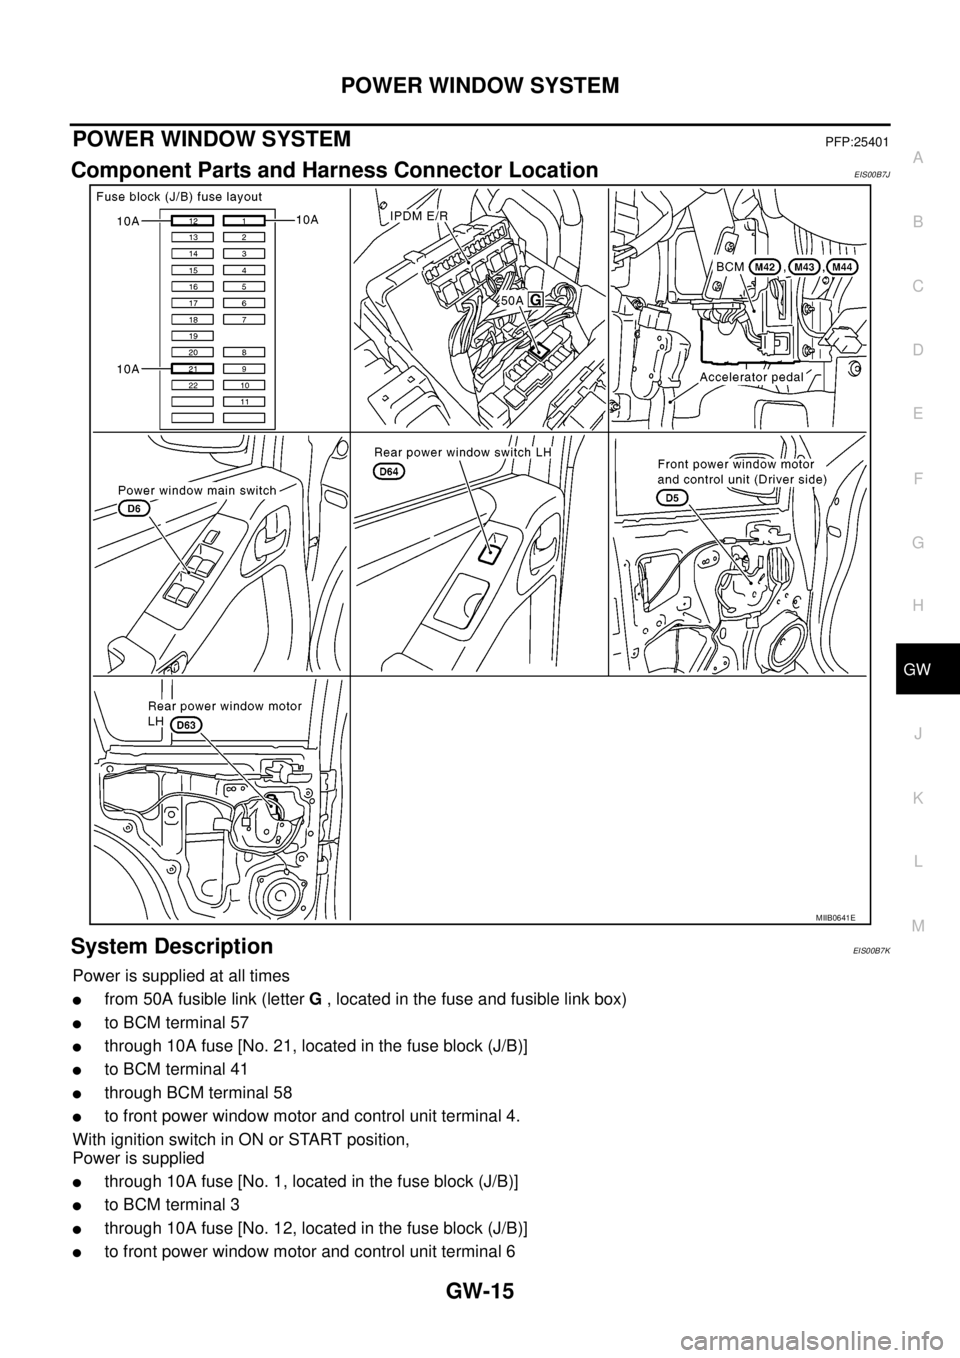
Component Parts and Harness Connector LocationEIS00B7J
System DescriptionEIS00B7K
Power is supplied at all times
lfrom 50A fusible link (letterG, located in the fuse and fusible link box)
lto BCM terminal 57
lthrough 10A fuse [No. 21, located in the fuse block (J/B)]
lto BCM terminal 41
lthrough BCM terminal 58
lto front power window motor and control unit terminal 4.
With ignition switch in ON or START position,
Power is supplied
lthrough 10A fuse [No. 1, located in the fuse block (J/B)]
lto BCM terminal 3
lthrough 10A fuse [No. 12, located in the fuse block (J/B)]
lto front power window motor and control unit terminal 6
MIIB0641E
Page 1702 of 3171

GW-16
POWER WINDOW SYSTEM
lthrough BCM terminal 53
lto power window main switch terminal 2
lto ftont power window switch (passenger side) terminal 1
lto rear power window switches LH and RH terminal 1 (with rear power window).
Ground is supplied
lto BCM terminal 55
lto front power window motor and control unit terminal 3
lto power window main switch terminal 3
lthrough body grounds M21, M80 and M83.
MANUAL OPERATION
Front Driver Side Door
WINDOW UP
When the driver side switch in the power window main switch is pressed in the up position,
Ground is supplied
lto front power window motor and control unit terminal 2
lthrough power window main switch terminal 4
lthrough power window main switch terminal 3
Then, the motor raises the window until the switch is released.
WINDOW DOWN
When the driver side switch in the power window main switch is pressed in the down position
Ground is supplied
lto front power window motor and control unit terminal 1
lthrough power window main switch terminal 5
lthrough power window main switch terminal 3
Then, the motor lowers the window until the switch is released.
Front Passenger Side Door
FRONT POWER WINDOW SWITCH (PASSENGER SIDE) OPERATION
WINDOW UP
When the front power window switch (passenger side) is operated in the up position
Power is supplied
lthrough front power window switch (passenger side) terminal 1 and 5
lto front power window motor (passenger side) terminal 2.
Ground is supplied
lto front power window motor (passenger side) terminal 1
lthrough front power window switch (passenger side) terminal 4 and 3
lthrough power window main switch terminal 7
Then, the motor raises the window until the switch is released.
WINDOW DOWN
When the front power window switch (passenger side) is opeataed in the down position
Power is supplied
lthrough front power window switch (passenger side) terminal 1 and 4
lto front power window motor (passenger side) terminal 1.
Ground is supplied
lto front power window motor (passenger side) terminal 2
lthrough front power window switch (passenger side) terminal 5 and 2
lthrough power window main switch terminal 6
Then, the motor lowers the window until the switch is released.
POWER WINDOW MAIN SWITCH OPERATION
WINDOW UP
When the passenger side switch in power window main switch is operated in the up position
Power is supplied