2005 NISSAN NAVARA SRS
[x] Cancel search: SRSPage 2966 of 3171

COLLISION DIAGNOSIS
SRS-57
C
D
E
F
G
I
J
K
L
MA
B
SRS
lAfter the work is completed, perform self-diagnosis to check that no malfunction is detected. Refer to
SRS-18, "
SRS Operation Check".
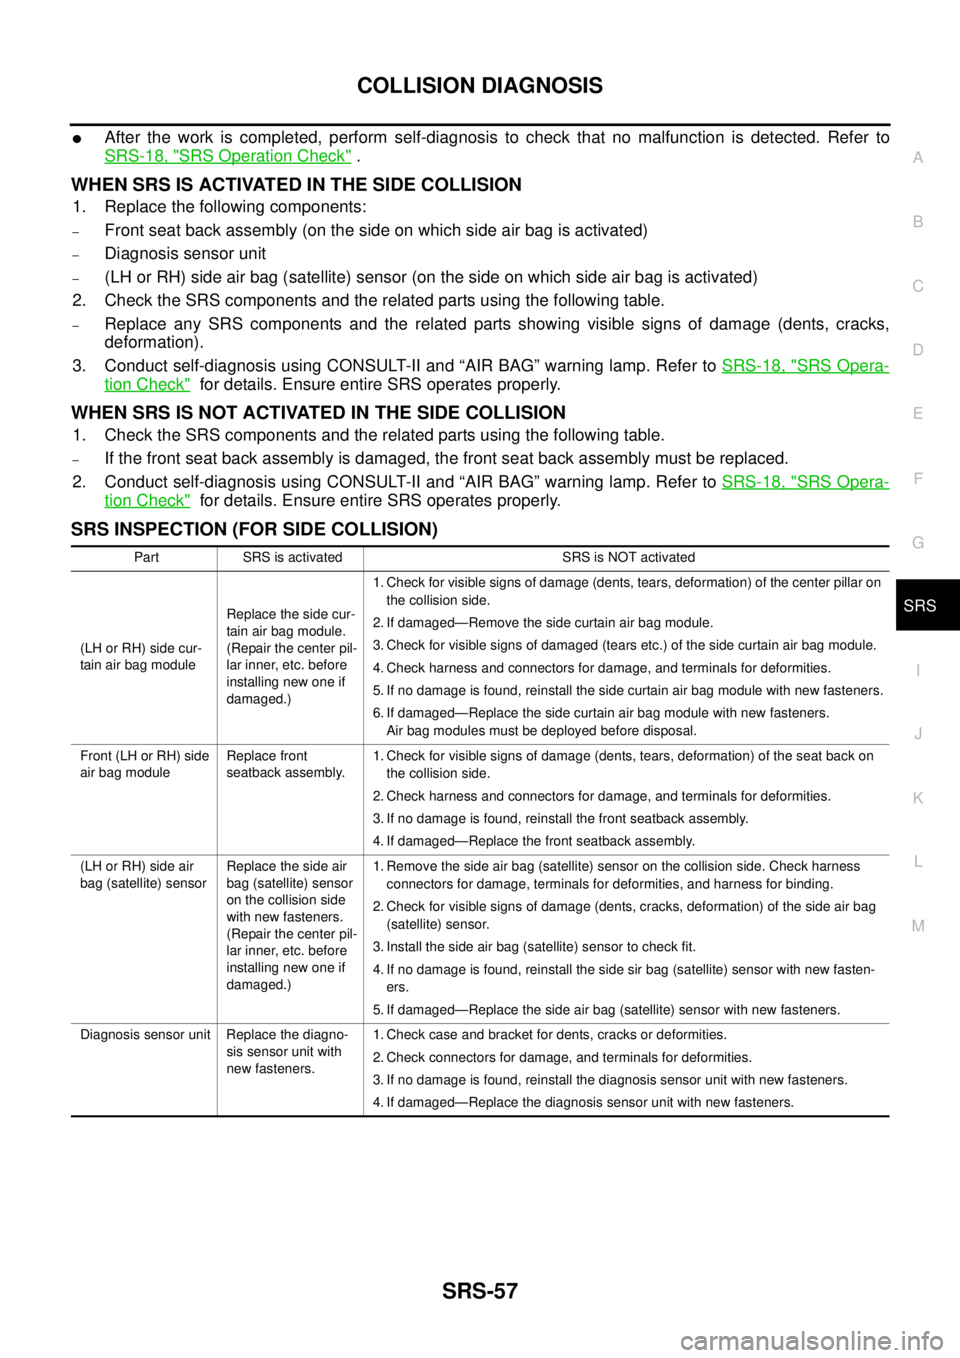
WHEN SRS IS ACTIVATED IN THE SIDE COLLISION
1. Replace the following components:
–Front seat back assembly (on the side on which side air bag is activated)
–Diagnosis sensor unit
–(LH or RH) side air bag (satellite) sensor (on the side on which side air bag is activated)
2. Check the SRS components and the related parts using the following table.
–Replace any SRS components and the related parts showing visible signs of damage (dents, cracks,
deformation).
3. Conduct self-diagnosis using CONSULT-II and “AIR BAG” warning lamp. Refer toSRS-18, "
SRS Opera-
tion Check"for details. Ensure entire SRS operates properly.
WHENSRSISNOTACTIVATEDINTHESIDECOLLISION
1. Check the SRS components and the related parts using the following table.
–If the front seat back assembly is damaged, the front seat back assembly must be replaced.
2. Conduct self-diagnosis using CONSULT-II and “AIR BAG” warning lamp. Refer toSRS-18, "
SRS Opera-
tion Check"for details. Ensure entire SRS operates properly.
SRS INSPECTION (FOR SIDE COLLISION)
Part SRS is activated SRS is NOT activated
(LH or RH) side cur-
tain air bag moduleReplace the side cur-
tain air bag module.
(Repair the center pil-
lar inner, etc. before
installing new one if
damaged.)1. Check for visible signs of damage (dents, tears, deformation) of the center pillar on
the collision side.
2. If damaged—Remove the side curtain air bag module.
3. Check for visible signs of damaged (tears etc.) of the side curtain air bag module.
4. Check harness and connectors for damage, and terminals for deformities.
5. If no damage is found, reinstall the side curtain air bag module with new fasteners.
6. If damaged—Replace the side curtain air bag module with new fasteners.
Air bag modules must be deployed before disposal.
Front (LH or RH) side
air bag moduleReplace front
seatback assembly.1. Check for visible signs of damage (dents, tears, deformation) of the seat back on
the collision side.
2. Check harness and connectors for damage, and terminals for deformities.
3. If no damage is found, reinstall the front seatback assembly.
4. If damaged—Replace the front seatback assembly.
(LH or RH) side air
bag (satellite) sensorReplace the side air
bag (satellite) sensor
on the collision side
with new fasteners.
(Repair the center pil-
lar inner, etc. before
installing new one if
damaged.)1. Remove the side air bag (satellite) sensor on the collision side. Check harness
connectors for damage, terminals for deformities, and harness for binding.
2. Check for visible signs of damage (dents, cracks, deformation) of the side air bag
(satellite) sensor.
3. Install the side air bag (satellite) sensor to check fit.
4. If no damage is found, reinstall the side sir bag (satellite) sensor with new fasten-
ers.
5. If damaged—Replace the side air bag (satellite) sensor with new fasteners.
Diagnosis sensor unit Replace the diagno-
sis sensor unit with
new fasteners.1. Check case and bracket for dents, cracks or deformities.
2. Check connectors for damage, and terminals for deformities.
3. If no damage is found, reinstall the diagnosis sensor unit with new fasteners.
4. If damaged—Replace the diagnosis sensor unit with new fasteners.
Page 2967 of 3171

SRS-58
COLLISION DIAGNOSIS
Seat belt pre-
tensioner assembly1. Check if the seat belt can be extended smoothly.
If the seat belt cannot be extended smoothly,
–Check for deformities of the center pillar inner.
–If the center pillar inner has no damage, Replace the seat belt pre-tensioner assembly.
2. Remove the seat belt pre-tensioner assembly on the collision side. Check harness cover and connectors
for damage, terminals for deformities, and harness for binding.
3. Check for visible signs of damage (dents, cracks, deformation) of the seat belt pre-tensioner assembly.
4. Check seat belt adjuster for damage.
5. If no damage is found, reinstall the seat belt pre-tensioner assembly.
6. If damaged—Replace the seat belt pre-tensioner assembly with new fasteners.
Seat belt pre-tensioners must be deployed before disposal.
Seat (with front side
air bag)Replace front
seatback assembly.1. Visually check the seat on the collision side.
2. Remove the seat on the collision side and check the following for damage and
deformities.
–Harness, connectors and terminals
–Frame and recliner (for front and rear seat), and also adjuster and slides (for front
seat)
3. If no damage is found, reinstall the seat.
4. If damaged—Replace the damaged seat parts using new fasteners. If the front
seat back is damaged, the front seat back assembly must be replaced.
Center inner pillar 1. Check the center inner pillar on the collision side for damage (dents, cracks, deformation).
2. If damaged—Repair the center inner pillar.
Trim/headlining 1. Check for visible signs of damage (dents, cracks, deformation) of the interior trim on the collision side.
2. If damaged—Replace the damaged trim parts. Part SRS is activated SRS is NOT activated
Page 2968 of 3171

TF-1
TRANSFER
D DRIVELINE/AXLE
CONTENTS
C
E
F
G
H
I
J
K
L
M
SECTIONTF
A
B
TF
TRANSFER
PRECAUTIONS .......................................................... 4
Precautions for Supplemental Restraint System
(SRS)“AIRBAG”and“SEATBELTPRE-TEN-
SIONER” .................................................................. 4
Precautions for Transfer Assembly and Transfer
Control Unit Replacement ........................................ 4
CHECK 4WD SHIFT INDICATOR PATTERN ....... 4
METHOD FOR ADJUSTMENT WITH 4WD
SHIFT SWITCH AT “2WD” .................................... 5
METHOD FOR ADJUSTMENT WITH 4WD
SHIFT SWITCH AT “4H” OR “4LO” ....................... 5
Precautions .............................................................. 6
Service Notice .......................................................... 6
Wiring Diagrams and Trouble Diagnosis .................. 7
PREPARATION ........................................................... 8
Special Service Tools ............................................... 8
Commercial Service Tools ...................................... 10
NOISE, VIBRATION AND HARSHNESS (NVH)
TROUBLESHOOTING ...............................................11
NVH Troubleshooting Chart .................................... 11
TRANSFER FLUID ................................................... 12
Replacement .......................................................... 12
DRAINING ........................................................... 12
FILLING ............................................................... 12
Inspection ............................................................... 12
FLUID LEAKAGE AND FLUID LEVEL ................ 12
4WD SYSTEM .......................................................... 13
Cross-Section View ................................................ 13
Power Transfer ....................................................... 14
POWER TRANSFER DIAGRAM ........................ 14
POWER TRANSFER FLOW ............................... 15
System Description ................................................ 15
TRANSFER CONTROL DEVICE ........................ 15
WAIT DETECTION SWITCH .............................. 15
4LO SWITCH ...................................................... 15
ATP SWITCH ...................................................... 15
TRANSFER CONTROL UNIT ............................. 15
TRANSFER SHIFT RELAY ................................. 15
TRANSFER SHUT OFF RELAY ......................... 15
4WD SHIFT SWITCH AND INDICATOR LAMP... 164WD WARNING LAMP ....................................... 17
ATP WARNING LAMP (A/T MODELS) ................ 17
System Diagram ..................................................... 18
COMPONENTS FUNCTION ............................... 18
CAN Communication .............................................. 19
SYSTEM DESCRIPTION .................................... 19
TROUBLE DIAGNOSIS ............................................ 20
How to Perform Trouble Diagnosis ......................... 20
BASIC CONCEPT ............................................... 20
Location of Electrical Parts ..................................... 21
A/T MODELS ....................................................... 21
M/T MODELS ...................................................... 22
Circuit Diagram ....................................................... 23
A/T MODELS ....................................................... 23
M/T MODELS ...................................................... 24
Wiring Diagram — T/F — ....................................... 25
A/T MODELS ....................................................... 25
M/T MODELS ...................................................... 31
Trouble Diagnosis Chart for Symptoms .................. 38
Transfer Control Unit Input/Output Signal Refer-
ence Values ............................................................ 38
TRANSFER CONTROL UNIT INSPECTION
TABLE ................................................................. 38
CONSULT-II Function (ALL MODE AWD/4WD) ..... 44
FUNCTION .......................................................... 44
CONSULT-II SETTING PROCEDURE ................ 44
SELF-DIAG RESULT MODE ............................... 45
DATA MONITOR MODE ...................................... 47
Self-Diagnostic Procedure ...................................... 49
SELF-DIAGNOSTIC PROCEDURE (WITH
CONSULT-II) ....................................................... 49
SELF-DIAGNOSTIC PROCEDURE (WITHOUT
CONSULT-II) ....................................................... 49
ERASE SELF-DIAGNOSIS ................................. 51
TROUBLE DIAGNOSIS FOR SYSTEM .................... 52
Power Supply Circuit For Transfer Control Unit ...... 52
CONSULT-II REFERENCE VALUE IN DATA
MONITOR MODE ................................................ 52
TRANSFER CONTROL UNIT TERMINALS AND
REFERENCE VALUE .......................................... 52
Page 2971 of 3171

TF-4
PRECAUTIONS
PRECAUTIONS
PFP:00001
Precautions for Supplemental Restraint System (SRS) “AIR BAG” and “SEAT
BELT PRE-TENSIONER”
EDS003ID
The Supplemental Restraint System such as “AIR BAG” and “SEAT BELT PRE-TENSIONER”, used along
with a front seat belt, helps to reduce the risk or severity of injury to the driver and front passenger for certain
types of collision. Information necessary to service the system safely is included in the SRS and SB section of
this Service Manual.
WARNING:
lTo avoid rendering the SRS inoperative, which could increase the risk of personal injury or death
in the event of a collision which would result in air bag inflation, all maintenance must be per-
formed by an authorized NISSAN/INFINITI dealer.
lImproper maintenance, including incorrect removal and installation of the SRS, can lead to per-
sonal injury caused by unintentional activation of the system. For removal of Spiral Cable and Air
Bag Module, see the SRS section.
lDo not use electrical test equipment on any circuit related to the SRS unless instructed to in this
Service Manual. SRS wiring harnesses can be identified by yellow and/or orange harnesses or
harness connectors.
Precautions for Transfer Assembly and Transfer Control Unit ReplacementEDS0031A
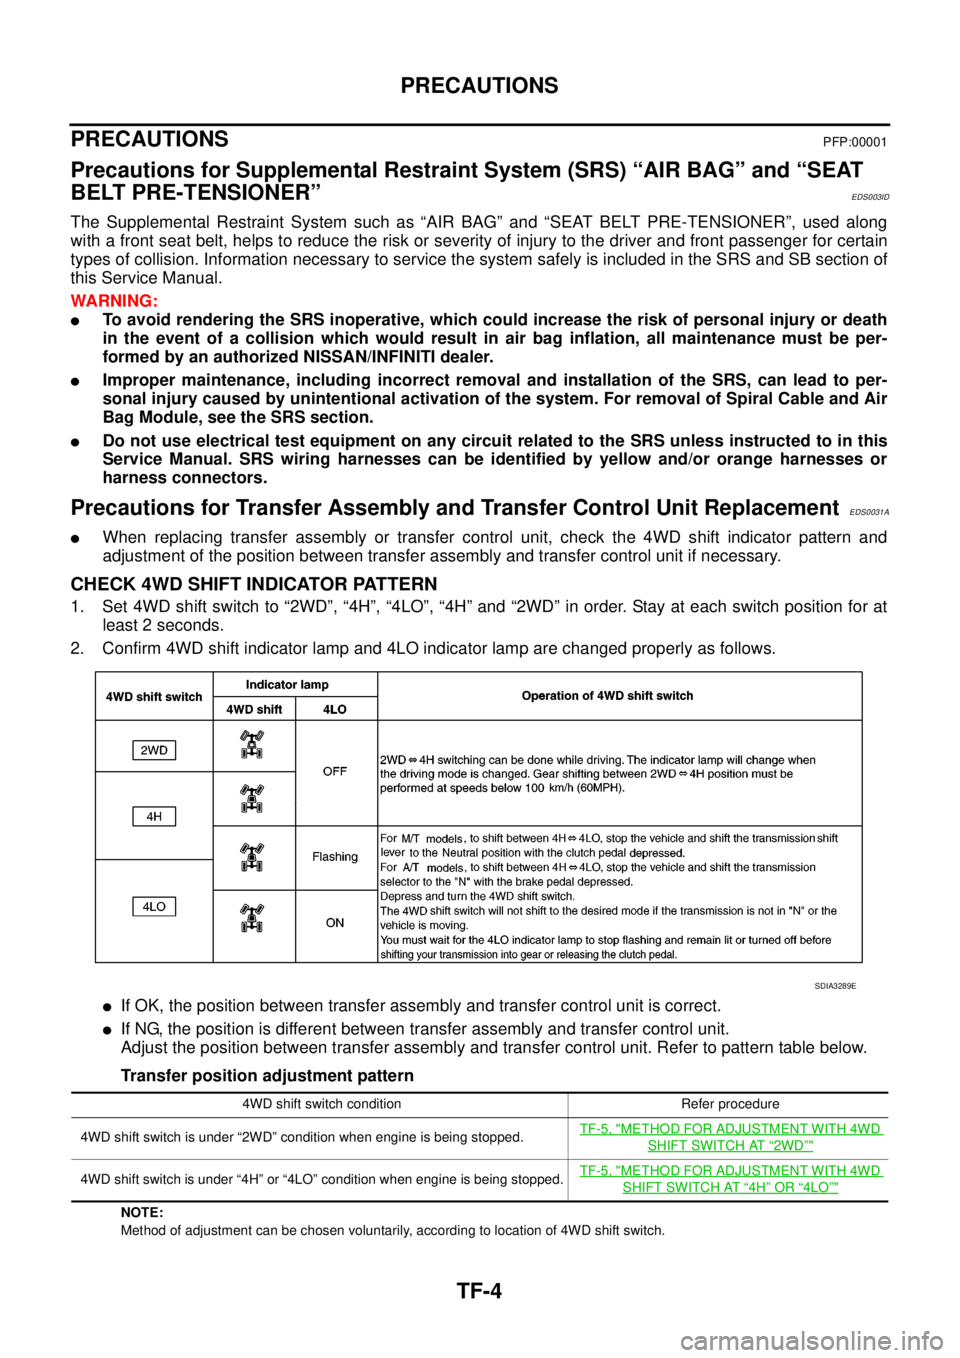
lWhen replacing transfer assembly or transfer control unit, check the 4WD shift indicator pattern and
adjustment of the position between transfer assembly and transfer control unit if necessary.
CHECK 4WD SHIFT INDICATOR PATTERN
1. Set 4WD shift switch to “2WD”, “4H”, “4LO”, “4H” and “2WD” in order. Stay at each switch position for at
least 2 seconds.
2. Confirm 4WD shift indicator lamp and 4LO indicator lamp are changed properly as follows.
lIf OK, the position between transfer assembly and transfer control unit is correct.
lIf NG, the position is different between transfer assembly and transfer control unit.
Adjust the position between transfer assembly and transfer control unit. Refer to pattern table below.
Transfer position adjustment pattern
NOTE:
Method of adjustment can be chosen voluntarily, according to location of 4WD shift switch.
SDIA3289E
4WD shift switch condition Refer procedure
4WD shift switch is under “2WD” condition when engine is being stopped.TF-5, "
METHOD FOR ADJUSTMENT WITH 4WD
SHIFT SWITCH AT“2WD”"
4WD shift switch is under “4H” or “4LO” condition when engine is being stopped.TF-5, "METHOD FOR ADJUSTMENT WITH 4WD
SHIFT SWITCH AT“4H”OR“4LO”"
Page 3112 of 3171

WW-1
WIPER, WASHER & HORN
K ELECTRICAL
CONTENTS
C
D
E
F
G
H
I
J
L
M
SECTIONWW
A
B
WW
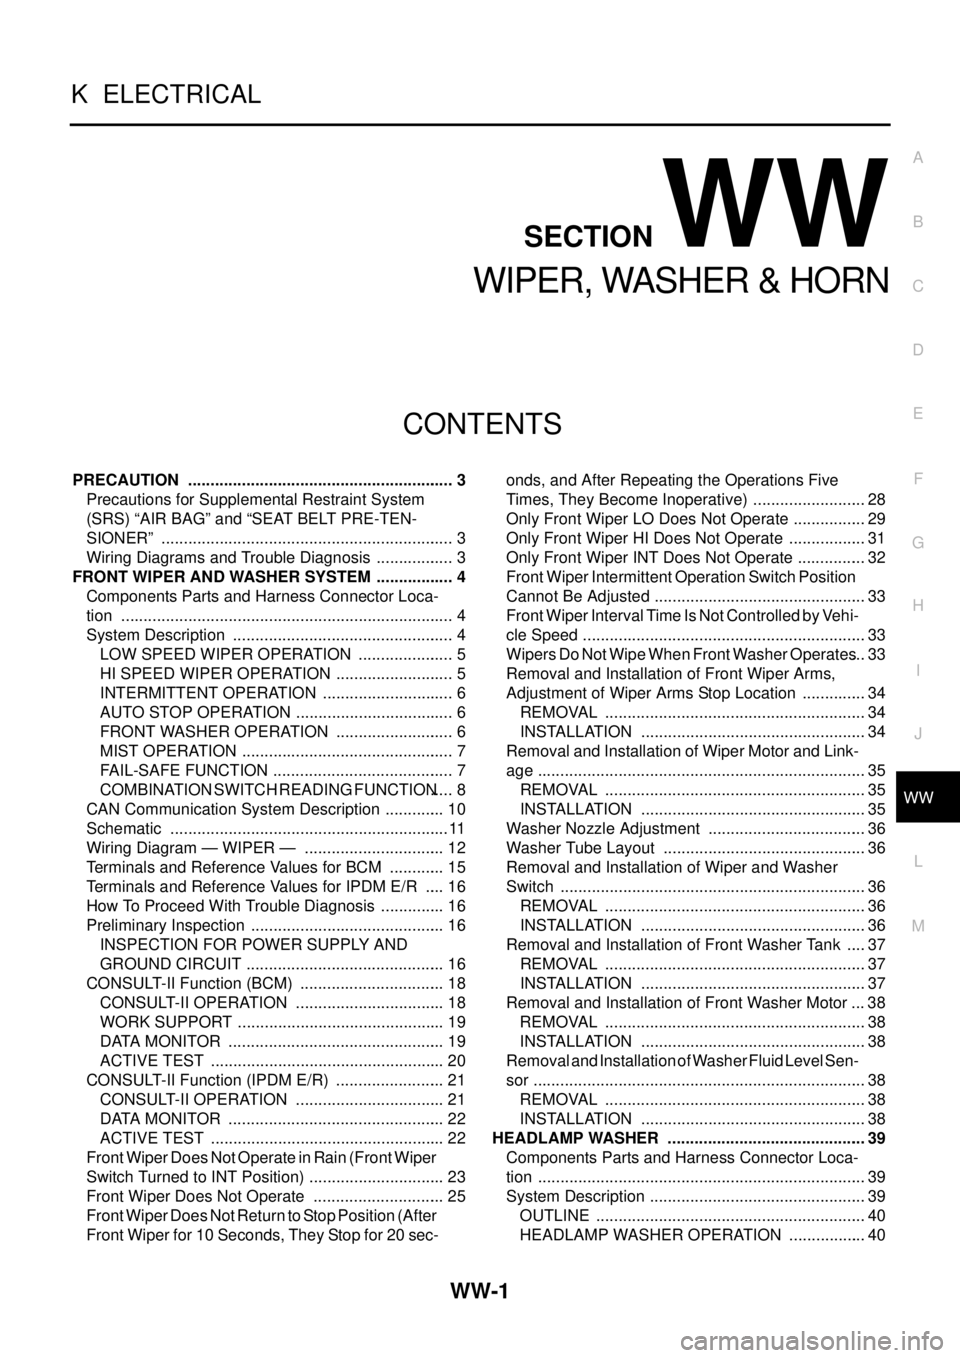
WIPER, WASHER & HORN
PRECAUTION ............................................................ 3
Precautions for Supplemental Restraint System
(SRS)“AIRBAG”and“SEATBELTPRE-TEN-
SIONER” .................................................................. 3
Wiring Diagrams and Trouble Diagnosis .................. 3
FRONT WIPER AND WASHER SYSTEM .................. 4
Components Parts and Harness Connector Loca-
tion ........................................................................... 4
System Description .................................................. 4
LOW SPEED WIPER OPERATION ...................... 5
HI SPEED WIPER OPERATION ........................... 5
INTERMITTENT OPERATION .............................. 6
AUTO STOP OPERATION .................................... 6
FRONT WASHER OPERATION ........................... 6
MIST OPERATION ................................................ 7
FAIL-SAFE FUNCTION ......................................... 7
COMBINATION SWITCH READING FUNCTION..... 8
CAN Communication System Description .............. 10
Schematic ............................................................... 11
Wiring Diagram — WIPER — ................................ 12
Terminals and Reference Values for BCM ............. 15
Terminals and Reference Values for IPDM E/R ..... 16
How To Proceed With Trouble Diagnosis ............... 16
Preliminary Inspection ............................................ 16
INSPECTION FOR POWER SUPPLY AND
GROUND CIRCUIT ............................................. 16
CONSULT-II Function (BCM) ................................. 18
CONSULT-II OPERATION .................................. 18
WORK SUPPORT ............................................... 19
DATA MONITOR ................................................. 19
ACTIVE TEST ..................................................... 20
CONSULT-II Function (IPDM E/R) ......................... 21
CONSULT-II OPERATION .................................. 21
DATA MONITOR ................................................. 22
ACTIVE TEST ..................................................... 22
Front Wiper Does Not Operate in Rain (Front Wiper
Switch Turned to INT Position) ............................... 23
Front Wiper Does Not Operate .............................. 25
Front Wiper Does Not Return to Stop Position (After
Front Wiper for 10 Seconds, They Stop for 20 sec-onds, and After Repeating the Operations Five
Times, They Become Inoperative) .......................... 28
Only Front Wiper LO Does Not Operate ................. 29
Only Front Wiper HI Does Not Operate .................. 31
Only Front Wiper INT Does Not Operate ................ 32
Front Wiper Intermittent Operation Switch Position
Cannot Be Adjusted ................................................ 33
Front Wiper Interval Time Is Not Controlled by Vehi-
cle Speed ................................................................ 33
Wipers Do Not Wipe When Front Washer Operates... 33
Removal and Installation of Front Wiper Arms,
Adjustment of Wiper Arms Stop Location ............... 34
REMOVAL ........................................................... 34
INSTALLATION ................................................... 34
Removal and Installation of Wiper Motor and Link-
age .......................................................................... 35
REMOVAL ........................................................... 35
INSTALLATION ................................................... 35
Washer Nozzle Adjustment .................................... 36
Washer Tube Layout .............................................. 36
Removal and Installation of Wiper and Washer
Switch ..................................................................... 36
REMOVAL ........................................................... 36
INSTALLATION ................................................... 36
Removal and Installation of Front Washer Tank ..... 37
REMOVAL ........................................................... 37
INSTALLATION ................................................... 37
Removal and Installation of Front Washer Motor ... 38
REMOVAL ........................................................... 38
INSTALLATION ................................................... 38
Removal and Installation of Washer Fluid Level Sen-
sor ........................................................................... 38
REMOVAL ........................................................... 38
INSTALLATION ................................................... 38
HEADLAMP WASHER ............................................. 39
Components Parts and Harness Connector Loca-
tion .......................................................................... 39
System Description ................................................. 39
OUTLINE ............................................................. 40
HEADLAMP WASHER OPERATION .................. 40
Page 3114 of 3171

PRECAUTION
WW-3
C
D
E
F
G
H
I
J
L
MA
B
WW
PRECAUTIONPFP:00011
Precautions for Supplemental Restraint System (SRS) “AIR BAG” and “SEAT
BELT PRE-TENSIONER”
EKS00N1N
The Supplemental Restraint System such as “AIR BAG” and “SEAT BELT PRE-TENSIONER”, used along
with a front seat belt, helps to reduce the risk or severity of injury to the driver and front passenger for certain
types of collision. Information necessary to service the system safely is included in the SRS and SB section of
this Service Manual.
WARNING:
lTo avoid rendering the SRS inoperative, which could increase the risk of personal injury or death
in the event of a collision which would result in air bag inflation, all maintenance must be per-
formed by an authorized NISSAN/INFINITI dealer.
lImproper maintenance, including incorrect removal and installation of the SRS, can lead to per-
sonal injury caused by unintentional activation of the system. For removal of Spiral Cable and Air
Bag Module, see the SRS section.
lDo not use electrical test equipment on any circuit related to the SRS unless instructed to in this
Service Manual. SRS wiring harnesses can be identified by yellow and/or orange harnesses or
harness connectors.
Wiring Diagrams and Trouble DiagnosisEKS00L9V
When you read wiring diagrams, refer to the following:
lRefer toGI-15, "HowtoReadWiringDiagrams".
lRefer toPG-4, "POWER SUPPLY ROUTING CIRCUIT".
When you perform trouble diagnosis, refer to the following:
lRefer toGI-11, "How to Follow Trouble Diagnoses".
lRefer toGI-24, "How to Perform Efficient Diagnosis for an Electrical Incident".