2004 SUBARU FORESTER sensor
[x] Cancel search: sensorPage 1707 of 2870

EN(H4DOTC)-77
ENGINE (DIAGNOSTIC)
List of Diagnostic Trouble Code (DTC)
P0507 Idle Control System RPM Higher
Than Expected
Code (DTC).>
P0508 Idle Control System Circuit Low
P0509 Idle Control System Circuit High
P0512 Starter Request Circuit
P0513 Incorrect Immobilizer Key
P0519 Idle Control System Malfunction
(Fail-Safe)
Code (DTC).>
P0545 Exhaust Gas Temperature Sensor
Circuit Low - Bank 1
Trouble Code (DTC).>
P0546 Exhaust Gas Temperature Sensor
Circuit High - Bank 1
Code (DTC).>
P0558 Generator Circuit Low Input
P0559 Generator Circuit High Input
P0600 Serial Communication Link
P0604 Internal Control Module Random
Access Memory (RAM) Error
nostic Trouble Code (DTC).>
P0691 Cooling Fan 1 Control Circuit Low
P0692 Cooling Fan 1 Control Circuit High
P0700 Transmission Control System (MIL
Request)
(DTC).>
P0851 Neutral Switch Input Circuit Low
Code (DTC).> or
Diagnostic Trouble Code (DTC).>
P0852 Neutral Switch Input Circuit High
Code (DTC).> or
Diagnostic Trouble Code (DTC).>
P1086 Tumble Generated Valve Position
Sensor 2 Circuit Low
tic Trouble Code (DTC).>
P1087 Tumble Generated Valve Position
Sensor 2 Circuit High
tic Trouble Code (DTC).>
P1088 Tumble Generated Valve Position
Sensor 1 Circuit Low
tic Trouble Code (DTC).> DTC Item NOTE
Page 1708 of 2870

EN(H4DOTC)-78
ENGINE (DIAGNOSTIC)
List of Diagnostic Trouble Code (DTC)
P1089 Tumble Generated Valve Position
Sensor 1 Circuit High
tic Trouble Code (DTC).>
P1090 Tumble Generated Valve System 1
(Valve Open)
Code (DTC).>
P1091 Tumble Generated Valve System 1
(Valve Close)
Code (DTC).>
P1092 Tumble Generated Valve System 2
(Valve Open)
Code (DTC).>
P1093 Tumble Generated Valve System 2
(Valve Close)
Code (DTC).>
P1094 Tumble Generated Valve Signal 1
Circuit Malfunction (Open)
Diagnostic Trouble Code (DTC).>
P1095 Tumble Generated Valve Signal 1
Circuit Malfunction (Short)
Diagnostic Trouble Code (DTC).>
P1096 Tumble Generated Valve Signal 2
Circuit Malfunction (Open)
Diagnostic Trouble Code (DTC).>
P1097 Tumble Generated Valve Signal 2
Circuit Malfunction (Short)
Diagnostic Trouble Code (DTC).>
P1110 Atmospheric Pressure Sensor Cir-
cuit Malfunction (Low Input)
Diagnostic Trouble Code (DTC).>
P1111 Atmospheric Pressure Sensor Cir-
cuit Malfunction (High Input)
Diagnostic Trouble Code (DTC).>
P1152 O
2 Sensor Circuit Range/Perfor-
mance (Low) (Bank 1 Sensor 1)
Diagnostic Trouble Code (DTC).>
P1153 O
2 Sensor Circuit Range/Perfor-
mance (High) (Bank 1 Sensor 1)
Diagnostic Trouble Code (DTC).>
P1301 Misfire Detected (High Tempera-
ture Exhaust Gas)
Code (DTC).>
P1312 Exhaust Gas Temperature Sensor
Malfunction
ble Code (DTC).>
P1518 Starter Switch Circuit Low Input
P1544 Exhaust Gas Temperature Too
High
P1560 Back-Up Voltage Circuit Malfunc-
tion
(DTC).>
P1570 ANTENNA
P1571 Reference Code Incompatibility
Page 1715 of 2870

EN(H4DOTC)-82
ENGINE (DIAGNOSTIC)
Diagnostic Procedure with Diagnostic Trouble Code (DTC)
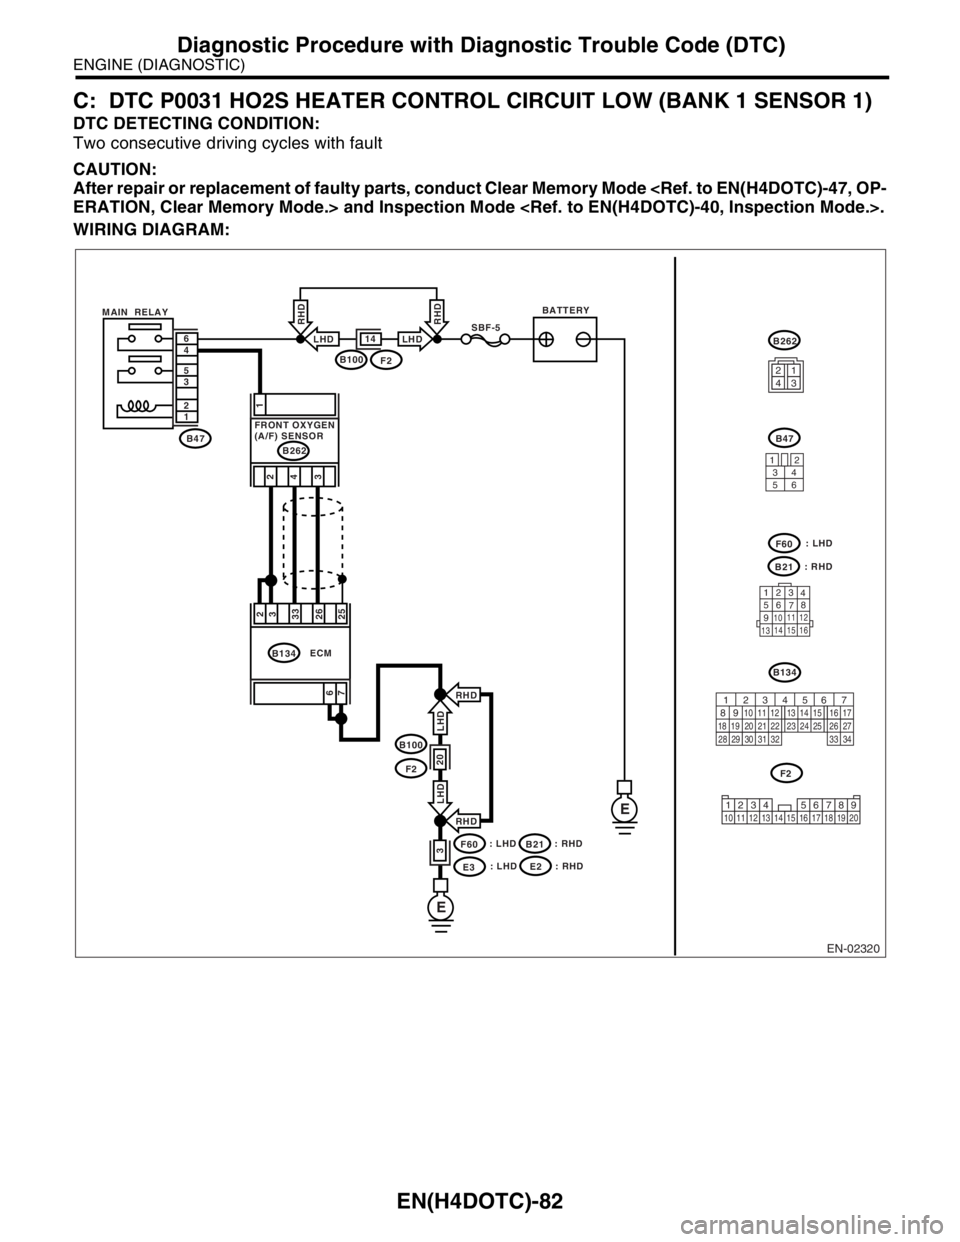
C: DTC P0031 HO2S HEATER CONTROL CIRCUIT LOW (BANK 1 SENSOR 1)
DTC DETECTING CONDITION:
Two consecutive driving cycles with fault
CAUTION:
After repair or replacement of faulty parts, conduct Clear Memory Mode
WIRING DIAGRAM:
EN-02320
BATTERYMAIN RELAYSBF-5
B47 1 2 3 5 4 6
E
E
B100F2
14LHD
RHD
LHD
RHD
B100
F2
F60
E3
20
3
RHD
RHD6
72
3
33
26
25
ECMB134
: LHD: LHD
B21: RHD: RHD
1
4 2
3
B262
FRONT OXYGEN
(A/F) SENSOR
3412
56
123
4
56
78
9
1011 12
1314 15 16
B21
F60
B47
B262
B134
F2
LHD LHD
1234
56 7
82 1
94 310
24 22 23 25 11 12 13 14 15
26 27
2816 17
18 19 20 21
33 34 29
32 30 31
1234 5678910 11 12 13 14 15 16 17 18 19 20
: LHDE2: RHD
Page 1716 of 2870

EN(H4DOTC)-83
ENGINE (DIAGNOSTIC)
Diagnostic Procedure with Diagnostic Trouble Code (DTC)
Step Check Yes No
1 CHECK HARNESS BETWEEN ECM AND
FRONT OXYGEN (A/F) SENSOR CONNEC-
TOR.
1) Start the engine, and warm-up the engine.
2) Turn the ignition switch to OFF.
3) Disconnect the connector from ECM and
front oxygen (A/F) sensor.
4) Measure the resistance of harness
between ECM and front oxygen (A/F) sensor
connector.
Connector & terminal
(B134)No. 2 — (B262)No. 2:
(B134)No. 3 — (B262)No. 2:Is the resistance less than 1
Ω?Go to step 2.Repair the open
circuit in harness
between ECM and
front oxygen (A/F)
sensor connector.
2 CHECK HARNESS BETWEEN ECM AND
FRONT OXYGEN (A/F) SENSOR CONNEC-
TOR.
Measure the resistance of harness between
ECM and front oxygen (A/F) sensor connector.
Connector & terminal
(B134) No. 33 — (B262) No. 4:
(B134) No. 26 — (B262) No. 3:Is the resistance less than 1
Ω?Go to step 3.Repair the open
circuit in harness
between ECM and
front oxygen (A/F)
sensor connector.
3 CHECK HARNESS BETWEEN ECM AND
FRONT OXYGEN (A/F) SENSOR CONNEC-
TOR.
Measure the resistance of harness between
main relay and front oxygen (A/F) sensor con-
nector.
Connector & terminal
(B47) No. 4 — (B262) No. 1:Is the resistance less than 1
Ω?Go to step 4.Repair the open
circuit in harness
between ECM and
front oxygen (A/F)
sensor connector.
4 CHECK FRONT OXYGEN (A/F) SENSOR.
Measure the resistance between front oxygen
(A/F) sensor connector terminals.
Te r m i n a l s
No. 2 — No. 1:Is the resistance less than 5
Ω?Go to step 5.Replace the front
oxygen (A/F) sen-
sor.
Front Oxygen (A/
F) Sensor.>
5 CHECK POOR CONTACT.
Check poor contact in ECM and front oxygen
(A/F) sensor connector. Is there poor contact in ECM or
front oxygen (A/F) sensor con-
nector?Repair the poor
contact in ECM
and front oxygen
(A/F) sensor.Replace the front
oxygen (A/F) sen-
sor.
Front Oxygen (A/
F) Sensor.>
Page 1717 of 2870

EN(H4DOTC)-84
ENGINE (DIAGNOSTIC)
Diagnostic Procedure with Diagnostic Trouble Code (DTC)
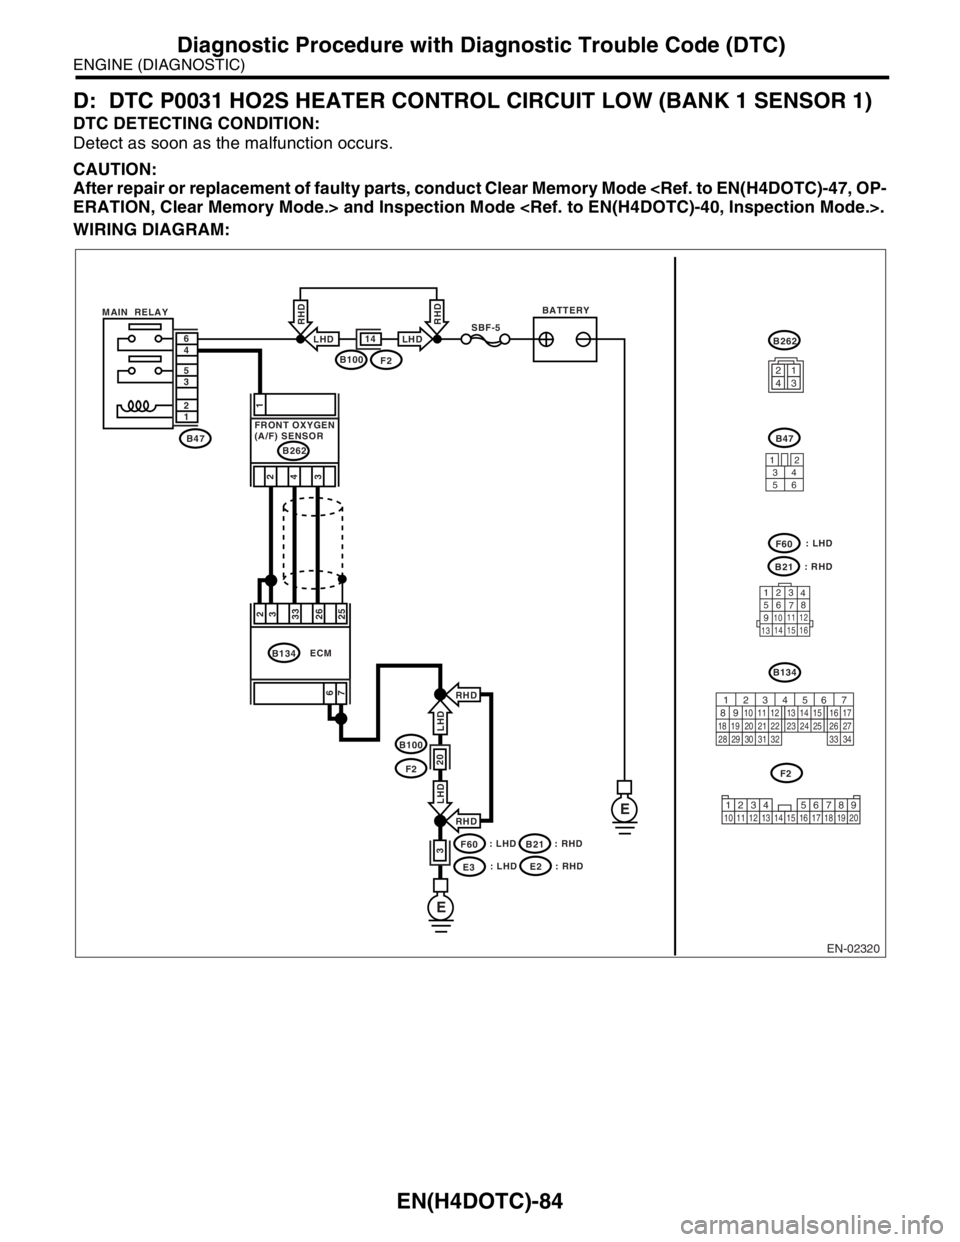
D: DTC P0031 HO2S HEATER CONTROL CIRCUIT LOW (BANK 1 SENSOR 1)
DTC DETECTING CONDITION:
Detect as soon as the malfunction occurs.
CAUTION:
After repair or replacement of faulty parts, conduct Clear Memory Mode
WIRING DIAGRAM:
EN-02320
BATTERYMAIN RELAYSBF-5
B47 1 2 3 5 4 6
E
E
B100F2
14LHD
RHD
LHD
RHD
B100
F2
F60
E3
20
3
RHD
RHD6
72
3
33
26
25
ECMB134
: LHD: LHD
B21: RHD: RHD
1
4 2
3
B262
FRONT OXYGEN
(A/F) SENSOR
3412
56
123
4
56
78
9
1011 12
1314 15 16
B21
F60
B47
B262
B134
F2
LHD LHD
1234
56 7
82 1
94 310
24 22 23 25 11 12 13 14 15
26 27
2816 17
18 19 20 21
33 34 29
32 30 31
1234 5678910 11 12 13 14 15 16 17 18 19 20
: LHDE2: RHD
Page 1718 of 2870

EN(H4DOTC)-85
ENGINE (DIAGNOSTIC)
Diagnostic Procedure with Diagnostic Trouble Code (DTC)
Step Check Yes No
1 CHECK POWER SUPPLY TO FRONT OXY-
GEN (A/F) SENSOR.
1) Turn the ignition switch to OFF.
2) Disconnect the connector from front oxygen
(A/F) sensor.
3) Turn the ignition switch to ON.
4) Measure the voltage between front oxygen
(A/F) sensor connector and engine ground.
Connector & terminal
(B262) No. 1 (+) — Engine ground (
−):Is the voltage more than 10 V? Go to step 2.Repair the power
supply line.
N
OTE:
In this case repair
the following:
Open circuit in
harness between
main relay and
front oxygen (A/F)
sensor
CHECK POOR
CONTACT OF
FRONT OXYGEN
(A/F) SENSOR.
Poor contact in
main relay connec-
tor
2 CHECK GROUND CIRCUIT FOR ECM.
Measure the resistance of harness between
ECM connector and chassis ground.
Connector & terminal
(B134) No. 6 — Chassis ground:
(B134) No. 7 — Chassis ground:Is the resistance less than 5
Ω?Go to step 3.Repair the har-
ness and connec-
tor.
N
OTE:
In this case repair
the following:
Open circuit in
harness between
ECM and engine
ground cable
Poor contact in
ECM connector.
Poor contact in
coupling connector
3 CHECK CURRENT DATA.
1) Start the engine.
2) Read the data of front oxygen (A/F) sensor
heater current using Subaru Select Monitor or
OBD-II general scan tool.
N
OTE:
Subaru Select Monitor
For detailed operation procedure, refer to
“READ CURRENT DATA SHOWN ON DIS-
PLAY FOR ENGINE”.
OBD-II general scan tool
For detailed operation procedures, refer to the
OBD-II General Scan Tool Operation Manual.Is the current more than 0.2 A? Repair poor con-
tact connector.
N
OTE:
In this case repair
the following:
Poor contact in
front oxygen (A/F)
sensor connector
Poor contact in
ECM connector.Go to step 4.
4 CHECK OUTPUT SIGNAL FROM ECM.
1) Start and idle the engine.
2) Measure the voltage between ECM con-
nector and chassis ground.
Connector & terminal
(B134) No. 2 (+) — Chassis ground (
−):Is the voltage less than 1 V? Go to step 6.Go to step 5.
5 CHECK OUTPUT SIGNAL FROM ECM.
Measure the voltage between ECM connector
and chassis ground.
Connector & terminal
(B134) No. 2 (+) — Chassis ground (
−):Does the voltage change by
shaking the harness and con-
nector of ECM while monitor-
ing the value with voltage
meter?Repair the poor
contact in ECM
connector.Go to step 6.
Page 1719 of 2870

EN(H4DOTC)-86
ENGINE (DIAGNOSTIC)
Diagnostic Procedure with Diagnostic Trouble Code (DTC)
6 CHECK OUTPUT SIGNAL FROM ECM.
Measure the voltage between ECM connector
and chassis ground.
Connector & terminal
(B134) No. 3 (+) — Chassis ground (
−):Is the voltage less than 1 V? Go to step 8.Go to step 7.
7 CHECK OUTPUT SIGNAL FROM ECM.
Measure the voltage between ECM connector
and chassis ground.
Connector & terminal
(B134) No. 3 (+) — Chassis ground (
−):Does the voltage change by
shaking the harness and con-
nector of ECM while monitor-
ing the value with voltage
meter?Repair the poor
contact in ECM
connector.Go to step 8.
8 CHECK FRONT OXYGEN (A/F) SENSOR.
1) Turn the ignition switch to OFF.
2) Measure the resistance between front oxy-
gen (A/F) sensor connector terminals.
Te r m i n a l s
No. 2 — No. 1:Is the resistance less than 10
Ω?Repair the har-
ness and connec-
tor.
N
OTE:
In this case repair
the following:
Open or ground
short circuit in har-
ness between front
oxygen (A/F) sen-
sor and ECM con-
nector
Poor contact in
front oxygen (A/F)
sensor connector
Poor contact in
ECM connector.Replace the front
oxygen (A/F) sen-
sor.
Front Oxygen (A/
F) Sensor.> Step Check Yes No
Page 1720 of 2870

EN(H4DOTC)-87
ENGINE (DIAGNOSTIC)
Diagnostic Procedure with Diagnostic Trouble Code (DTC)
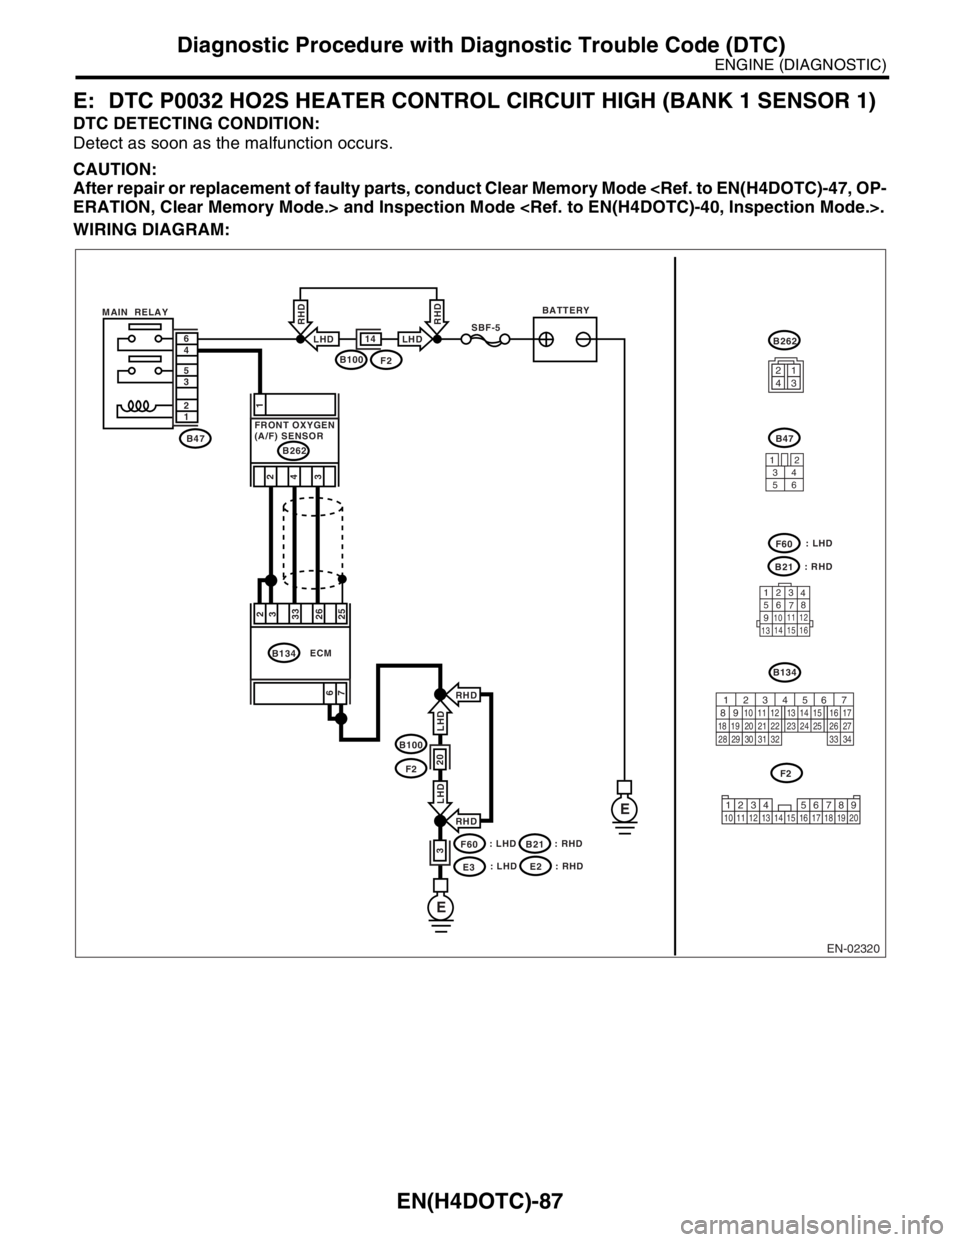
E: DTC P0032 HO2S HEATER CONTROL CIRCUIT HIGH (BANK 1 SENSOR 1)
DTC DETECTING CONDITION:
Detect as soon as the malfunction occurs.
CAUTION:
After repair or replacement of faulty parts, conduct Clear Memory Mode
WIRING DIAGRAM:
EN-02320
BATTERYMAIN RELAYSBF-5
B47 1 2 3 5 4 6
E
E
B100F2
14LHD
RHD
LHD
RHD
B100
F2
F60
E3
20
3
RHD
RHD6
72
3
33
26
25
ECMB134
: LHD: LHD
B21: RHD: RHD
1
4 2
3
B262
FRONT OXYGEN
(A/F) SENSOR
3412
56
123
4
56
78
9
1011 12
1314 15 16
B21
F60
B47
B262
B134
F2
LHD LHD
1234
56 7
82 1
94 310
24 22 23 25 11 12 13 14 15
26 27
2816 17
18 19 20 21
33 34 29
32 30 31
1234 5678910 11 12 13 14 15 16 17 18 19 20
: LHDE2: RHD