2004 SUBARU FORESTER manual transmission
[x] Cancel search: manual transmissionPage 678 of 2870
2004 Model Year
PDF Service Manual
GENERAL INFORMATION SECTION (Pub.No.G8080GE1)
ENGINE SECTION 1 (Pub.No.G8080GE2)
ENGINE SECTION 2 (Pub.No.G8080GE3)
ENGINE SECTION 3 (Pub.No.G8080GE4)
TRANSMISSION SECTION (Pub.No.G8080GE5)
CHASSIS SECTION (Pub.No.G8080GE6)
BODY SECTION (Pub.No.G8080GE7)
WIRING SYSTEM SECTION (Pub.No.G8080GE8)
Page 687 of 2870
HU-4
HOW TO USE THIS MANUAL
How to Use This Manual
4. SPECIFICATION
If necessary, specifications are also included.
5. INSPECTION
Inspections are included to be carried out before and after maintenance.
6. MAINTENANCE
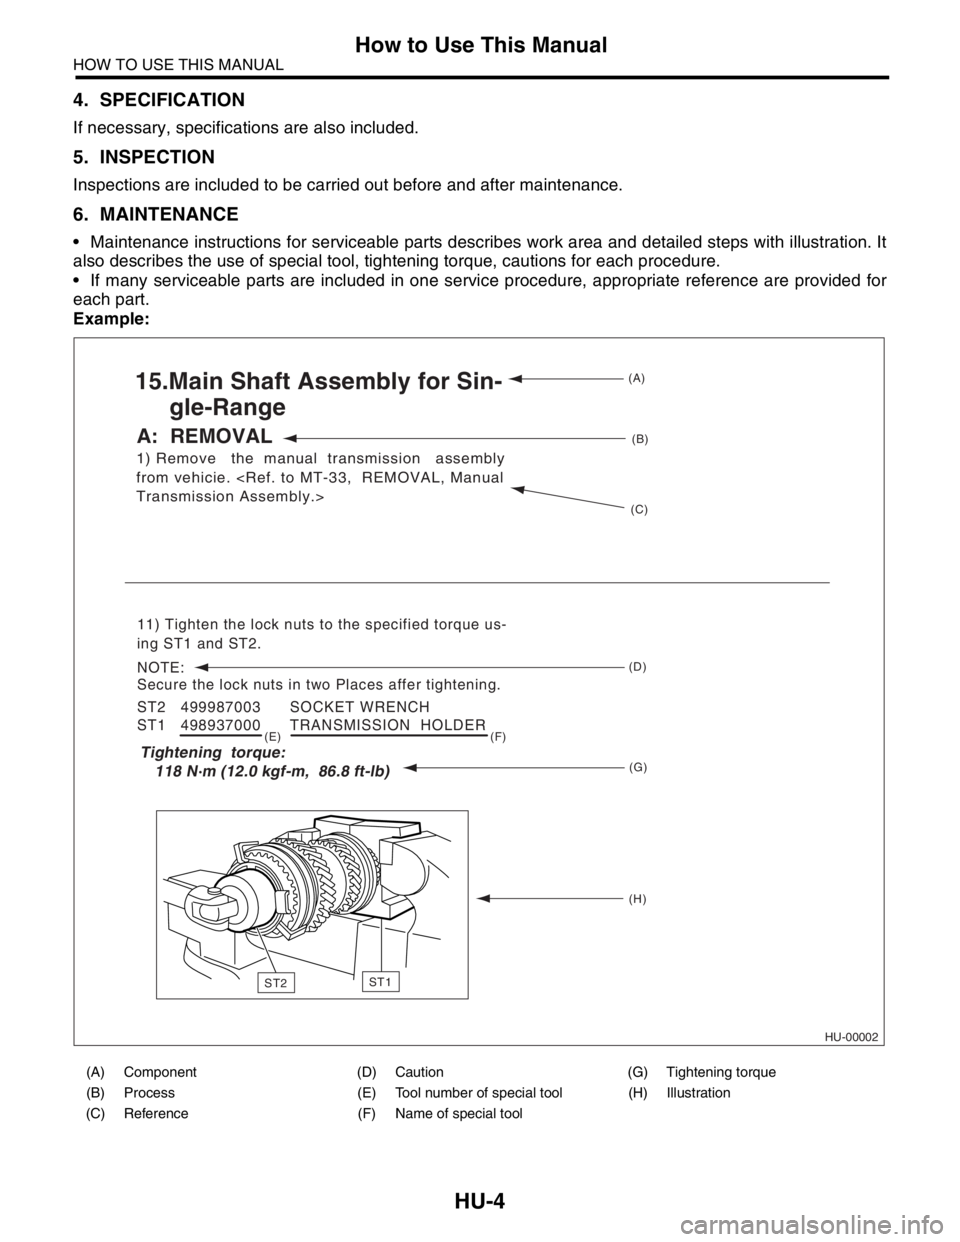
• Maintenance instructions for serviceable parts describes work area and detailed steps with illustration. It
also describes the use of special tool, tightening torque, cautions for each procedure.
If many serviceable parts are included in one service procedure, appropriate reference are provided for
each part.
Example:
(A) Component (D) Caution (G) Tightening torque
(B) Process (E) Tool number of special tool (H) Illustration
(C) Reference (F) Name of special tool
HU-00002
1) Remove the manual transmission assembly
from vehicie.
15.Main Shaft Assembly for Sin-
gle-Range
A: REMOVAL
11) Tighten the lock nuts to the specified torque us-
ing ST1 and ST2.
NOTE:
Secure the lock nuts in two Places affer tightening.
ST2 499987003 SOCKET WRENCH
ST1 498937000 TRANSMISSION HOLDER
(A)
(B)
(C)
(D)
(G) (E) (F)
(H)
Tightening torque:
118 N m (12.0 kgf-m, 86.8 ft-lb)
ST1ST2
Page 713 of 2870
![SUBARU FORESTER 2004 Service Repair Manual ID-4
IDENTIFICATION
Identification
2. MEANING OF V.I.N.
The meaning of the VIN is as follows:
Europe, Australia and General (Except GCC)
]JF1SG5LK44G002001[
The starting and ending brackets ( ][ ) a SUBARU FORESTER 2004 Service Repair Manual ID-4
IDENTIFICATION
Identification
2. MEANING OF V.I.N.
The meaning of the VIN is as follows:
Europe, Australia and General (Except GCC)
]JF1SG5LK44G002001[
The starting and ending brackets ( ][ ) a](/manual-img/17/57426/w960_57426-712.png)
ID-4
IDENTIFICATION
Identification
2. MEANING OF V.I.N.
The meaning of the VIN is as follows:
Europe, Australia and General (Except GCC)
]JF1SG5LK44G002001[
The starting and ending brackets ( ][ ) are stop marks.
GCC countries (Saudi Arabia, etc.)
]JF1SG93MX4J002001[
The starting and ending brackets ( ][ ) are stop marks.
Digits Code Meaning Details
1 to 3 JF1 Manufacturer body area JF1: Passengercar, FHI made
JF2: MPV, FHI made
4 S Car line S: FORESTER
5 G Body type G: Wagon
6 5 Displacement 5: 2.0L AWD
9: 2.5L AWD
7 L Steering position K: RHD (Right-hand drive)
L: LHD (Left-hand drive)
8 K Engine & transmission R: SOHC MPI 4-speed AT
K: SOHC MPI Full-time AWD 5-speed MT Dual range
D: DOHC Turbo Full-time AWD 5-speed MT
T: DOHC Turbo 4-speed D-AT
9 4 Drive type 3: Full-time AWD Single range
4: Full-time AWD Dual range
5: AWD AT
10 4 Model year 3: 2003MY
4: 2004MY
5: 2005MY
11 G Factory location G: FHI (Gunma)
12 to 17 002001 Serial number —
Digits Code Meaning Details
1 to 3 JF1 Manufacturer body area JF1: Passenger car, FHI made
4 S Car line S: FORESTER
5 G Body type G: Wagon
6 9 Displacement 9: 2.5L AWD
7 3 Grade 3: 2.5X
8 M Restraint M: Manual belts, dual airbag
9 X Check digit 0 — 9 & X
10 4 Model year 3: 2003MY
4: 2004MY
5: 2005MY
11 J Transmission type H: Full-time AWD 4-speed AT
J: Full-time AWD 5-speed MT dual range
12 to 17 002001 Serial number —
Page 718 of 2870
RM-3
RECOMMENDED MATERIAL
Recommended Materials
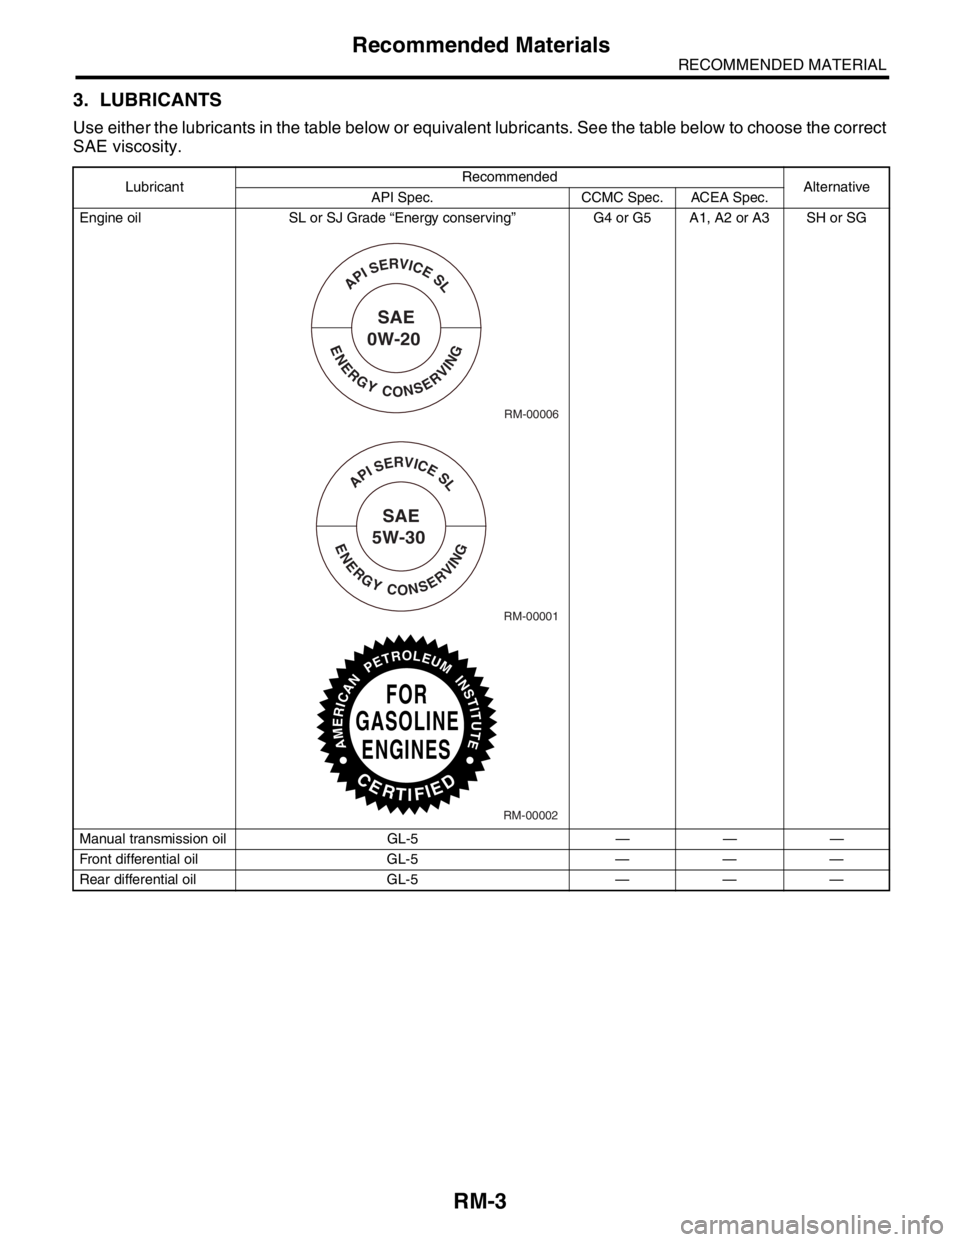
3. LUBRICANTS
Use either the lubricants in the table below or equivalent lubricants. See the table below to choose the correct
SAE viscosity.
LubricantRecommended
Alternative
API Spec. CCMC Spec. ACEA Spec.
Engine oil SL or SJ Grade “Energy conserving” G4 or G5 A1, A2 or A3 SH or SG
Manual transmission oil GL-5 — — —
Front differential oil GL-5 — — —
Rear differential oil GL-5 — — —
SAE
0W-20
NE
E
RG
G
YCONSERVIN
APISERVICESL
RM-00006
RM-00001
SAE
5W-30
NE
E
RG
G
YCONSERVIN
APISERVICESL
AMERICANPETROLEUMINSTITUTE
FOR
GASOLINE
ENGINES
CERTIFEID
RM-00002
Page 720 of 2870
RM-5
RECOMMENDED MATERIAL
Recommended Materials
4. FLUID
Use the fluids specified in the table below. Do not mix two different kinds or makes of fluid.
5. COOLANT
Use genuine coolant to protect the engine.
6. REFRIGERANT
Standard air conditioners on Subaru vehicles use HFC134a refrigerant. Do not mix it with other refrigerants.
Also, do not use any air compressor oil except for ZXL200PG.
7. GREASE
Use the grease and supplementary lubricants shown in the table below.
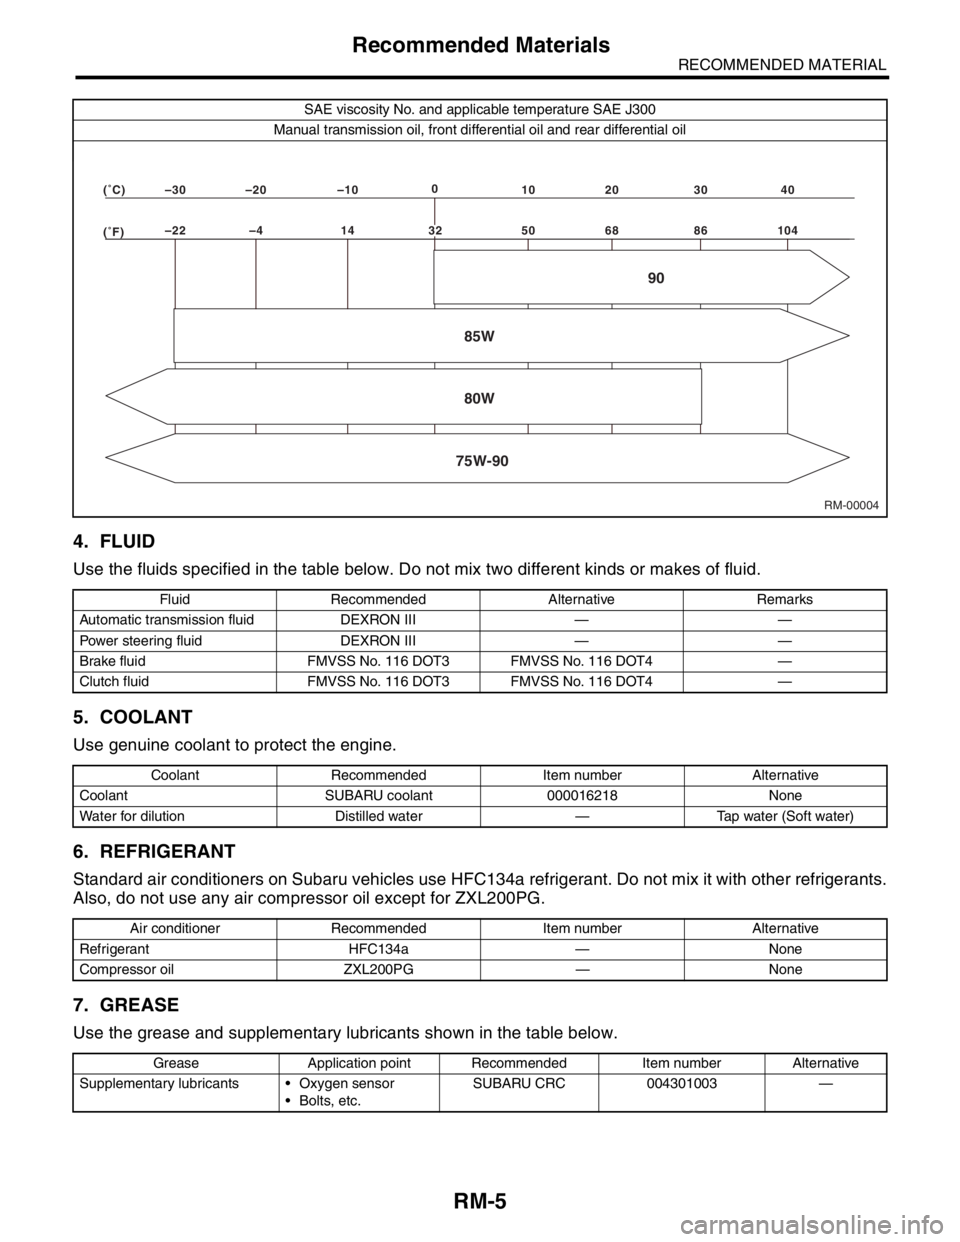
SAE viscosity No. and applicable temperature SAE J300
Manual transmission oil, front differential oil and rear differential oil
Fluid Recommended Alternative Remarks
Automatic transmission fluid DEXRON III — —
Power steering fluid DEXRON III — —
Brake fluid FMVSS No. 116 DOT3 FMVSS No. 116 DOT4 —
Clutch fluid FMVSS No. 116 DOT3 FMVSS No. 116 DOT4 —
Coolant Recommended Item number Alternative
Coolant SUBARU coolant 000016218 None
Water for dilution Distilled water — Tap water (Soft water)
Air conditioner Recommended Item number Alternative
Refrigerant HFC134a — None
Compressor oil ZXL200PG — None
Grease Application point Recommended Item number Alternative
Supplementary lubricants Oxygen sensor
Bolts, etc.SUBARU CRC 004301003 —
RM-00004 (�F)–22 –4 14 50 68 86 104 (�C)–30 –20 –100
10 20 30 40
85W
75W-9080W90
32
Page 726 of 2870

PI-3
PRE-DELIVERY INSPECTION
Pre-delivery Inspection
B: PDI PROCEDURE
Follow the procedures shown in the table below.
Static Checks Just After Vehicle Receipt
Step Check point
1. Appearance check (1) If the vehicle is covered with protective coating, visually check the vehicle
body for damage and dents. If the protective coating has been removed,
visually check the body paints for small areas of damage or stains.
(2) Visually check the glass and light lenses for any damage and cracks or
excessive gaps to the body sheet metal.
(3) Visually check the plated parts for any damage.
2. Tire check (1) Check the tires for damage, abnormal conditions, and dents on the
wheels.
(2) Check the tire air pressure.
3. Fuse installation If the vehicle is about to be delivered to the customer, attach a room light
fuse.
4. Connection of air conditioner harness If the vehicle is about to be delivered to the customer, connect the air condi-
tioner harness.
5. Check the doors for lock/unlock and open/close
operations.(1) Using the key, check if the door can be locked and unlocked normally.
(2) Open and close all doors to see that there are no abnormal conditions.
6. Operation check of double lock Check that the double lock operates normally.
7. Operation check of the child safety lock system. Check the child safety lock system operates normally.
8. Check the rear gate for lock/unlock and open/
close operations.(1) Check if the rear gate can be unlocked normally from the emergency
door.
(2) Open and close the rear gate to see that there are no abnormal condi-
tions.
(3) Operate the power door locking switch to check that the rear gate is
locked and unlocked normally.
9. Operation check of fuel lid opener lock release
leverOperate the fuel lid opener to check that the fuel lid is unlocked normally.
10. Accessory check Check that the following accessories are provided:
Owner’s manual
Warranty booklet
Service booklet
Spare key
Jack
Tool set
Spare tire
11. Operation check of hood lock release system Operate the hood lock release lever to check that the hood opens normally.
12. Battery Check the battery for any abnormal conditions such as rust and trace of bat-
tery fluid leaks.
13. Brake fluid Check the fluid amount.
14. Engine oil Check the oil amount.
15. Transmission fluid (1) Check the fluid amount.
(2) For AT, check the front differential oil.
16. AT front differential oil Check the AT front differential oil amount.
17. Coolant Check the coolant amount.
18. Clutch fluid Check the clutch fluid amount.
19. Window washer fluid Check the window washer fluid amount.
20. Hood latch check Check that the hood is closed and latched securely.
21. Keyless entry system Check that the keyless entry system operates normally.
22. Security system Check that the security system operates normally.
23. Seat (1) Check the seat surfaces for smears or dirt.
(2) Check the seat installation conditions and functionality.
24. Seat belt Check the seat belt installation conditions and functionality.
25. Wheel alignment Check that the wheel alignments are properly adjusted.
Page 761 of 2870
PM-24
PERIODIC MAINTENANCE SERVICE
Transmission Gear Oil
14.Transmission Gear Oil
A: REPLACEMENT
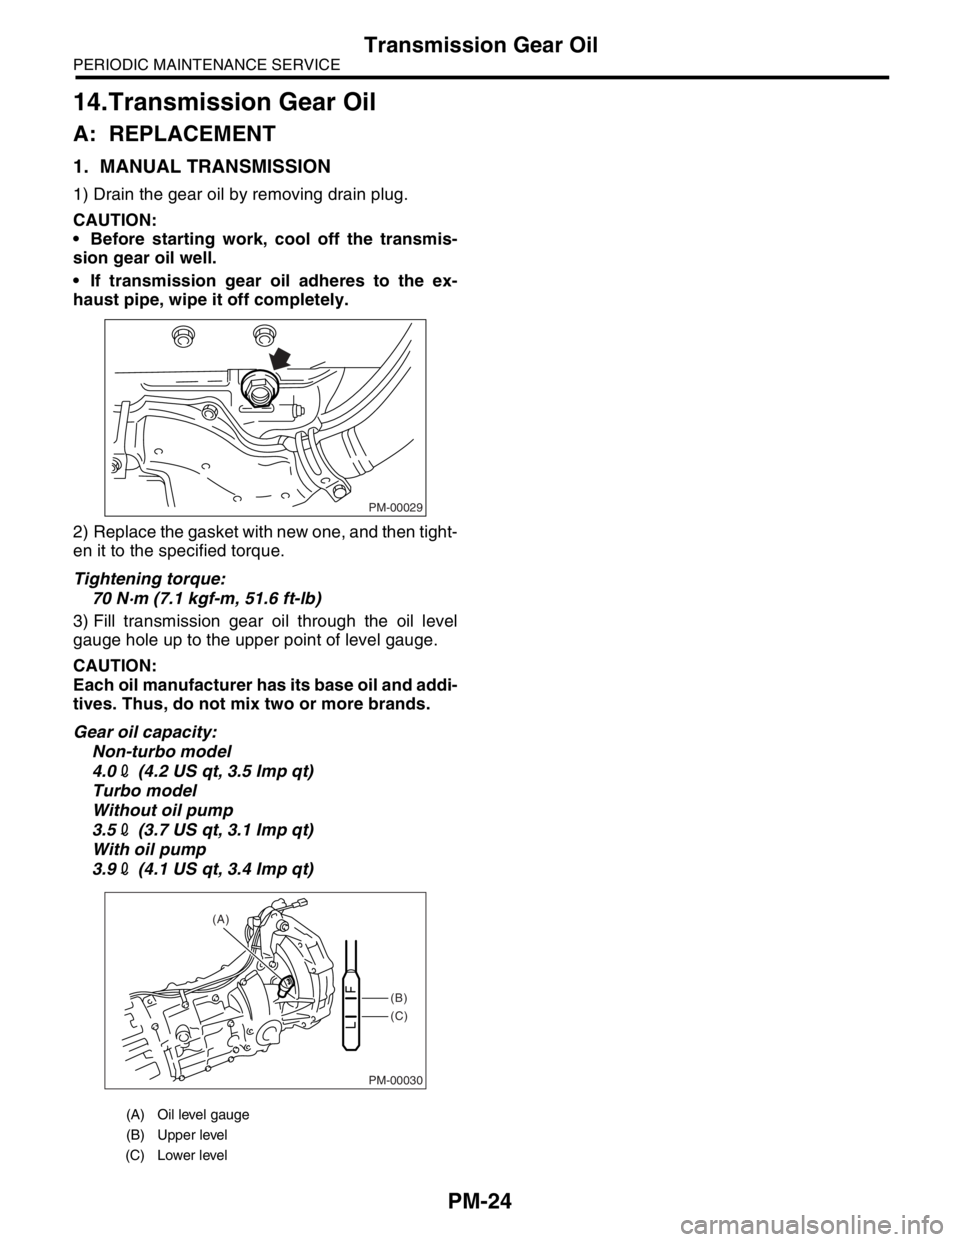
1. MANUAL TRANSMISSION
1) Drain the gear oil by removing drain plug.
CAUTION:
Before starting work, cool off the transmis-
sion gear oil well.
If transmission gear oil adheres to the ex-
haust pipe, wipe it off completely.
2) Replace the gasket with new one, and then tight-
en it to the specified torque.
Tightening torque:
70 N·m (7.1 kgf-m, 51.6 ft-lb)
3) Fill transmission gear oil through the oil level
gauge hole up to the upper point of level gauge.
CAUTION:
Each oil manufacturer has its base oil and addi-
tives. Thus, do not mix two or more brands.
Gear oil capacity:
Non-turbo model
4.02 (4.2 US qt, 3.5 Imp qt)
Turbo model
Without oil pump
3.52 (3.7 US qt, 3.1 Imp qt)
With oil pump
3.92 (4.1 US qt, 3.4 Imp qt)
(A) Oil level gauge
(B) Upper level
(C) Lower level
PM-00029
PM-00030
(B)
(C) (A)
Page 765 of 2870
PM-28
PERIODIC MAINTENANCE SERVICE
Front & Rear Differential Oil
17.Front & Rear Differential Oil
A: REPLACEMENT
1. FRONT DIFFERENTIAL (MT MODEL)
For MT model, manual transmission oil works as
differential oil to lubricate differential. Refer to
“Transmission Oil”.
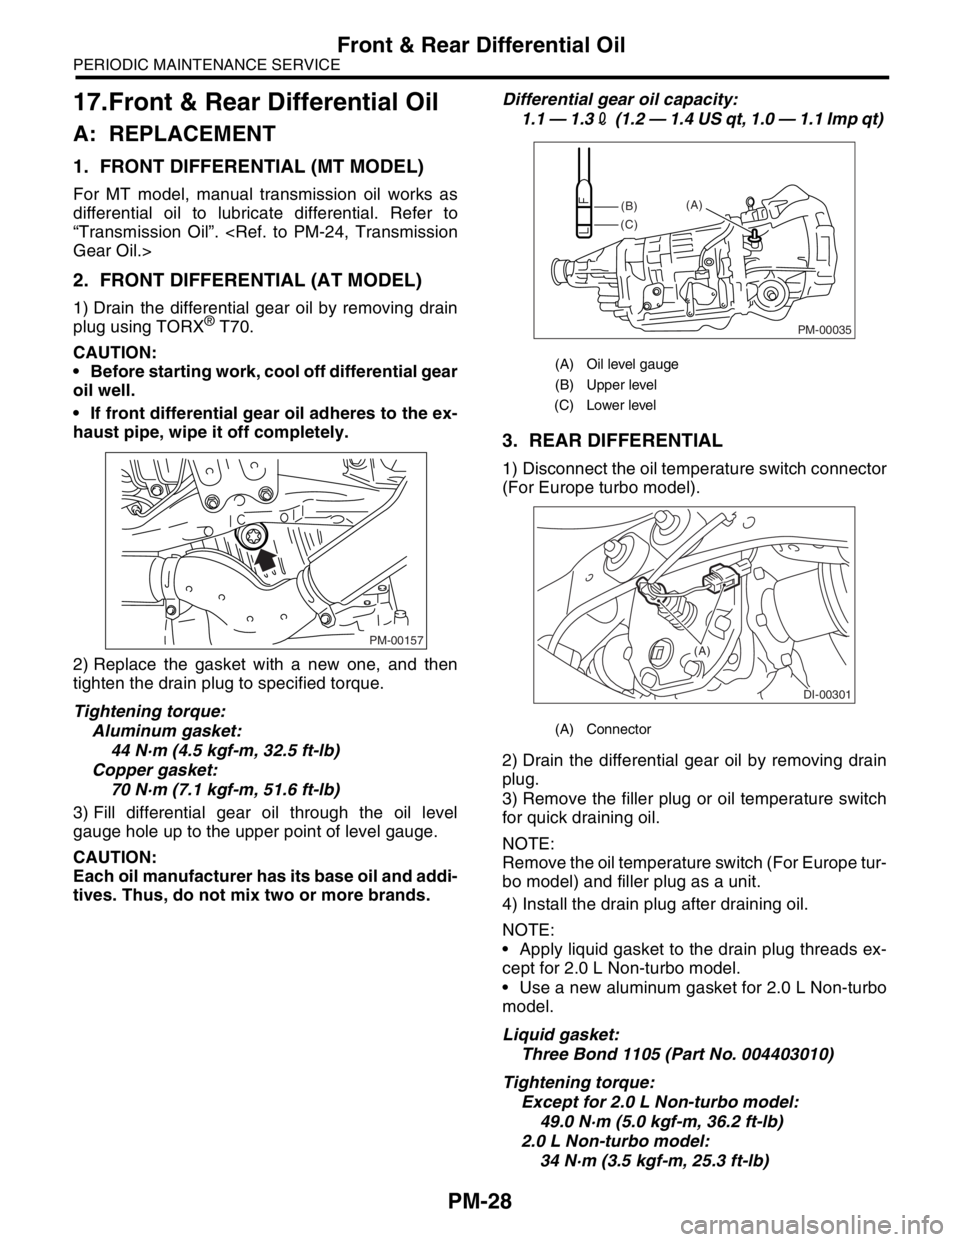
2. FRONT DIFFERENTIAL (AT MODEL)
1) Drain the differential gear oil by removing drain
plug using TORX® T70.
CAUTION:
Before starting work, cool off differential gear
oil well.
If front differential gear oil adheres to the ex-
haust pipe, wipe it off completely.
2) Replace the gasket with a new one, and then
tighten the drain plug to specified torque.
Tightening torque:
Aluminum gasket:
44 N·m (4.5 kgf-m, 32.5 ft-lb)
Copper gasket:
70 N·m (7.1 kgf-m, 51.6 ft-lb)
3) Fill differential gear oil through the oil level
gauge hole up to the upper point of level gauge.
CAUTION:
Each oil manufacturer has its base oil and addi-
tives. Thus, do not mix two or more brands.Differential gear oil capacity:
1.1 — 1.32 (1.2 — 1.4 US qt, 1.0 — 1.1 Imp qt)
3. REAR DIFFERENTIAL
1) Disconnect the oil temperature switch connector
(For Europe turbo model).
2) Drain the differential gear oil by removing drain
plug.
3) Remove the filler plug or oil temperature switch
for quick draining oil.
NOTE:
Remove the oil temperature switch (For Europe tur-
bo model) and filler plug as a unit.
4) Install the drain plug after draining oil.
NOTE:
Apply liquid gasket to the drain plug threads ex-
cept for 2.0 L Non-turbo model.
Use a new aluminum gasket for 2.0 L Non-turbo
model.
Liquid gasket:
Three Bond 1105 (Part No. 004403010)
Tightening torque:
Except for 2.0 L Non-turbo model:
49.0 N·m (5.0 kgf-m, 36.2 ft-lb)
2.0 L Non-turbo model:
34 N·m (3.5 kgf-m, 25.3 ft-lb)
PM-00157
(A) Oil level gauge
(B) Upper level
(C) Lower level
(A) Connector
PM-00035
(B)
(C)(A)
DI-00301
(A)