2004 SUBARU FORESTER cam sprocket wrench
[x] Cancel search: cam sprocket wrenchPage 750 of 2870
PM-13
PERIODIC MAINTENANCE SERVICE
Timing Belt
7. Timing Belt
A: REPLACEMENT
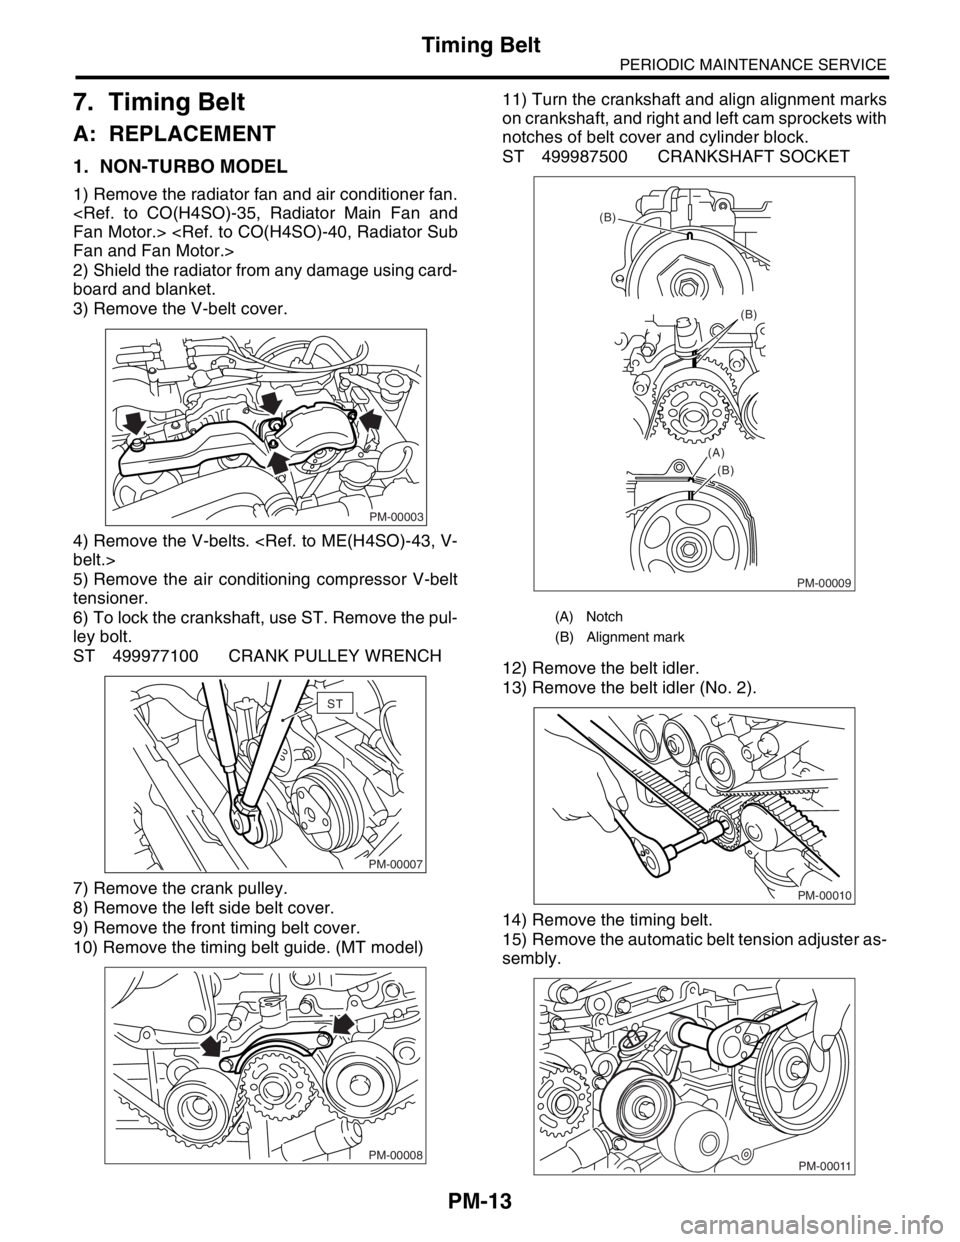
1. NON-TURBO MODEL
1) Remove the radiator fan and air conditioner fan.
2) Shield the radiator from any damage using card-
board and blanket.
3) Remove the V-belt cover.
4) Remove the V-belts.
5) Remove the air conditioning compressor V-belt
tensioner.
6) To lock the crankshaft, use ST. Remove the pul-
ley bolt.
ST 499977100 CRANK PULLEY WRENCH
7) Remove the crank pulley.
8) Remove the left side belt cover.
9) Remove the front timing belt cover.
10) Remove the timing belt guide. (MT model)11) Turn the crankshaft and align alignment marks
on crankshaft, and right and left cam sprockets with
notches of belt cover and cylinder block.
ST 499987500 CRANKSHAFT SOCKET
12) Remove the belt idler.
13) Remove the belt idler (No. 2).
14) Remove the timing belt.
15) Remove the automatic belt tension adjuster as-
sembly.
PM-00003
PM-00007
ST
PM-00008
(A) Notch
(B) Alignment mark
PM-00009
(B)
(B)
(B) (A)
PM-00010
PM-00011
Page 751 of 2870
PM-14
PERIODIC MAINTENANCE SERVICE
Timing Belt
16) Install in the reverse order of removal.
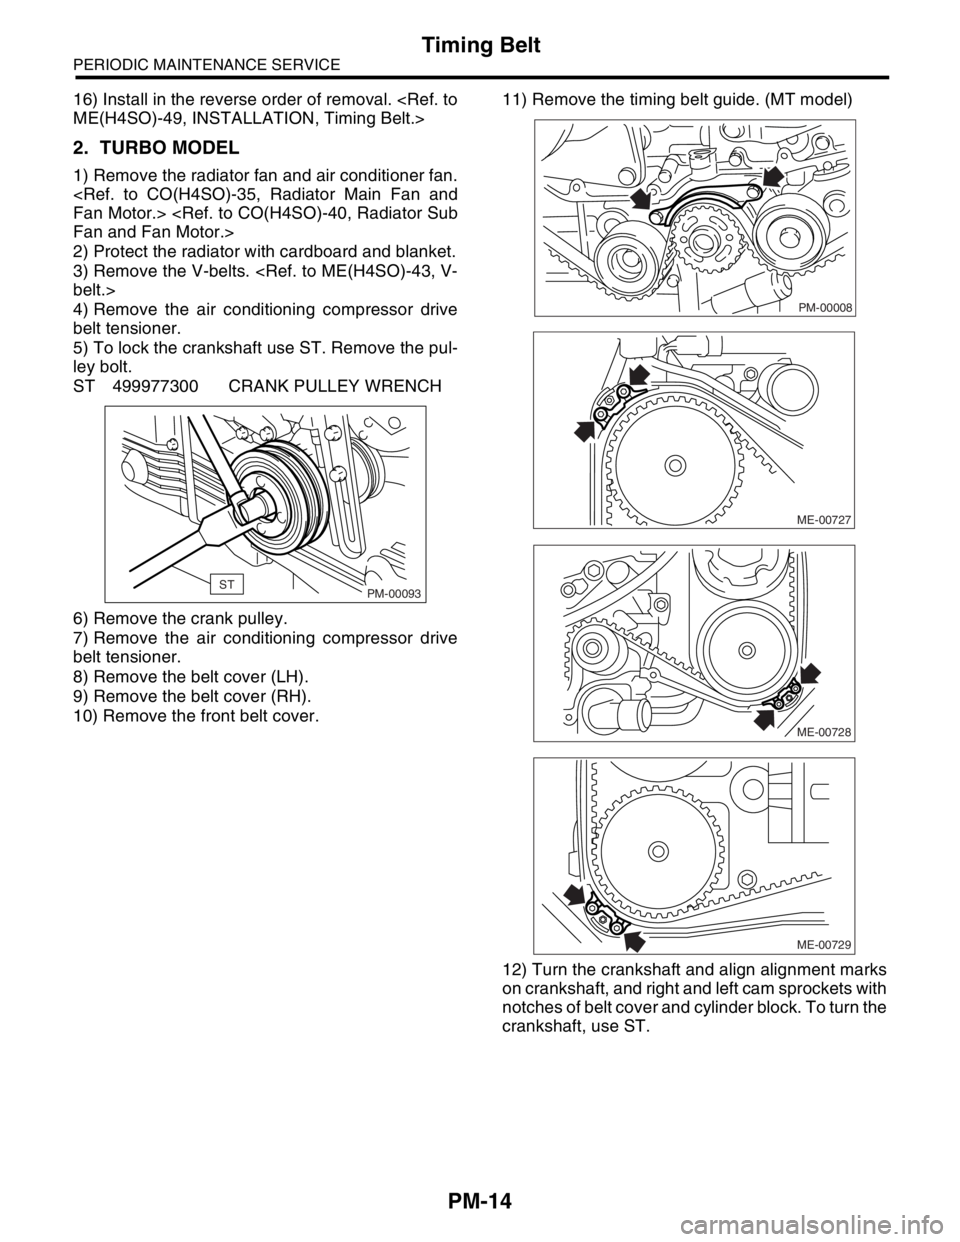
2. TURBO MODEL
1) Remove the radiator fan and air conditioner fan.
2) Protect the radiator with cardboard and blanket.
3) Remove the V-belts.
4) Remove the air conditioning compressor drive
belt tensioner.
5) To lock the crankshaft use ST. Remove the pul-
ley bolt.
ST 499977300 CRANK PULLEY WRENCH
6) Remove the crank pulley.
7) Remove the air conditioning compressor drive
belt tensioner.
8) Remove the belt cover (LH).
9) Remove the belt cover (RH).
10) Remove the front belt cover.11) Remove the timing belt guide. (MT model)
12) Turn the crankshaft and align alignment marks
on crankshaft, and right and left cam sprockets with
notches of belt cover and cylinder block. To turn the
crankshaft, use ST.
STPM-00093
PM-00008
ME-00727
ME-00728
ME-00729
Page 884 of 2870
ME(H4SO)-15
MECHANICAL
General Description
C: CAUTION
Wear working clothing, including a cap, protec-
tive goggles and protective shoes during operation.
Remove contamination including dirt and corro-
sion before removal, installation or disassembly.
Keep the disassembled parts in order and pro-
tect them from dust or dirt.
Before removal, installation or disassembly, be
sure to clarify the failure. Avoid unnecessary re-
moval, installation, disassembly and replacement.
Be careful not to burn yourself, because each
part in the vehicle is hot after running.
Be sure to tighten bolts and nuts to the specified
torque.
Place shop jacks or rigid racks at the specified
points.
Before disconnecting electrical connectors of
sensors or units, be sure to disconnect the ground
cable from battery.
All parts should be thoroughly cleaned, paying
special attention to the engine oil passages, pis-
tons and bearings. Rotating parts and sliding parts such as piston,
bearing and gear should be coated with oil prior to
assembly.
Be careful not to let oil, grease or coolant contact
the timing belt, clutch disc and flywheel.
All removed parts, if to be reused, should be re-
installed in the original positions and directions.
Bolts, nuts and washers should be replaced with
new ones as required.
Even if necessary inspections have been made
in advance, proceed with assembly work while
making rechecks.
Remove or install engine in an area where chain
hoists, lifting devices, etc. are available for ready
use.
Be sure not to damage coated surfaces of body
panels with tools, or not to stain seats and windows
with coolant or oil. Place a cover over fenders, as
required, for protection.
Prior to starting work, prepare the following:
Service tools, clean cloth, containers to catch cool-
ant and oil, wire ropes, chain hoist, transmission
jacks, etc.
Lift-up or lower the vehicle when necessary.
Make sure to support the correct positions.
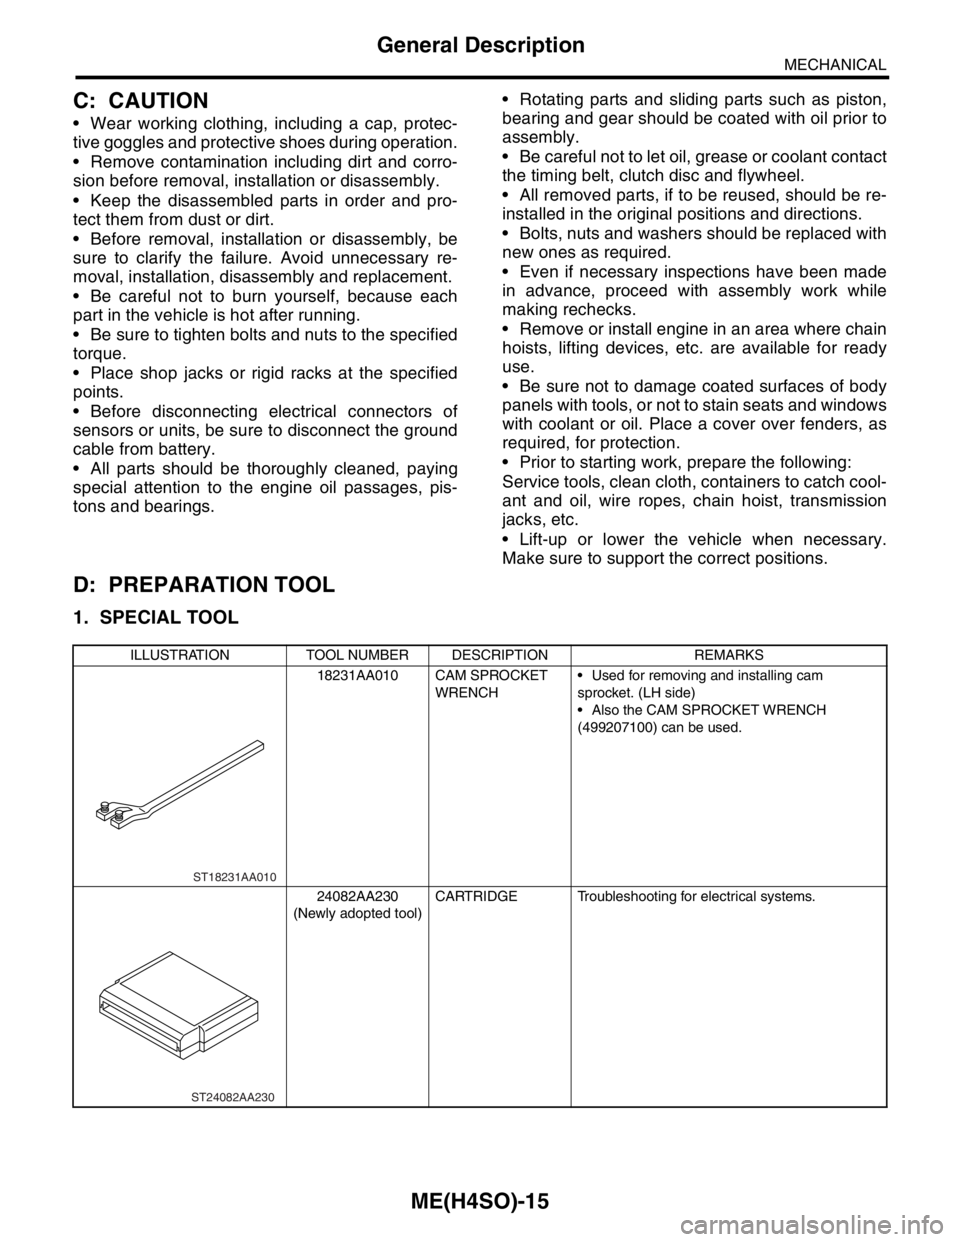
D: PREPARATION TOOL
1. SPECIAL TOOL
ILLUSTRATION TOOL NUMBER DESCRIPTION REMARKS
18231AA010 CAM SPROCKET
WRENCH Used for removing and installing cam
sprocket. (LH side)
Also the CAM SPROCKET WRENCH
(499207100) can be used.
24082AA230
(Newly adopted tool)CARTRIDGE Troubleshooting for electrical systems.
ST18231AA010
ST24082AA230
Page 889 of 2870
ME(H4SO)-20
MECHANICAL
General Description
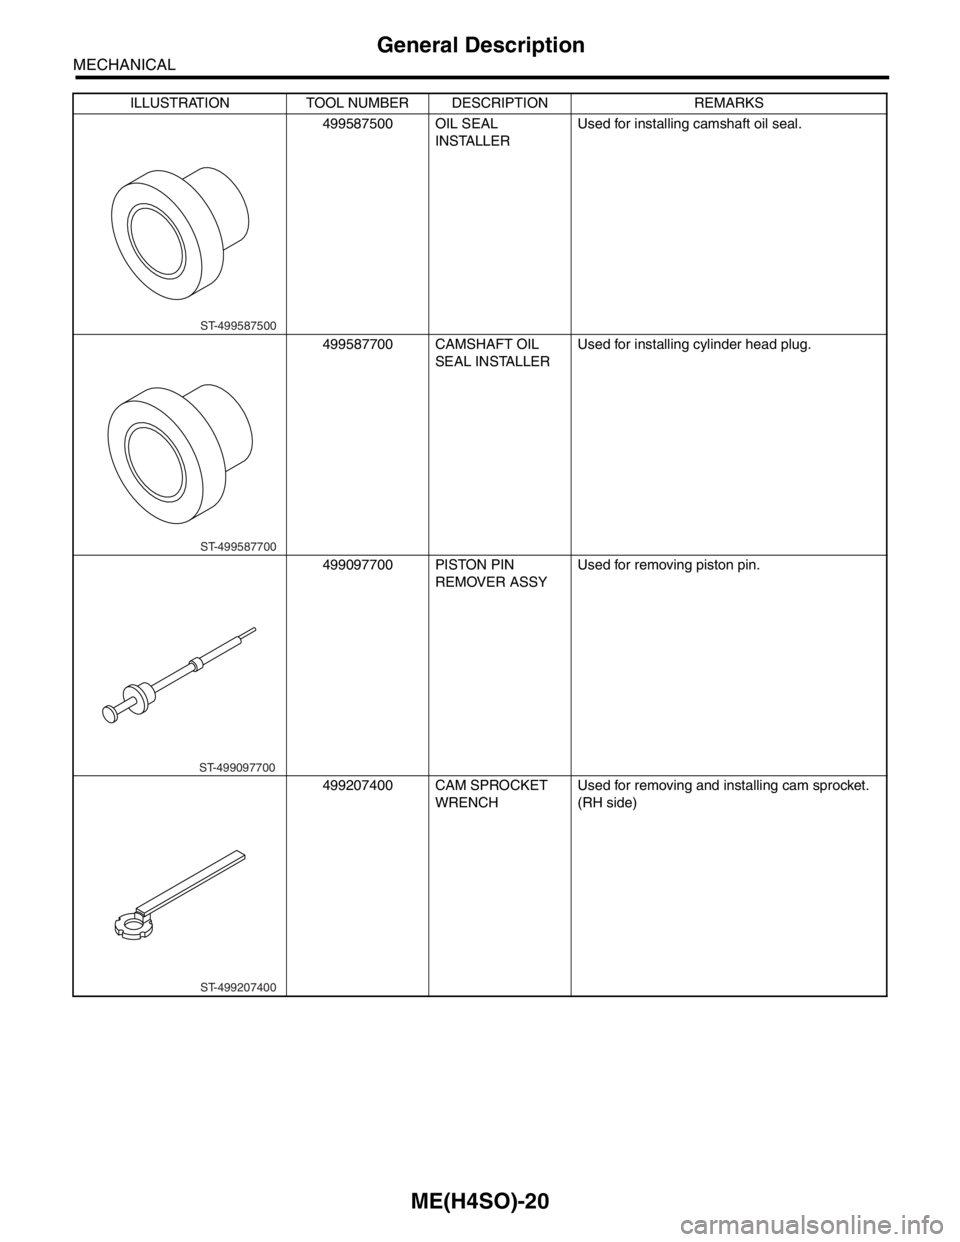
499587500 OIL SEAL
INSTALLERUsed for installing camshaft oil seal.
499587700 CAMSHAFT OIL
SEAL INSTALLERUsed for installing cylinder head plug.
499097700 PISTON PIN
REMOVER ASSYUsed for removing piston pin.
499207400 CAM SPROCKET
WRENCHUsed for removing and installing cam sprocket.
(RH side) ILLUSTRATION TOOL NUMBER DESCRIPTION REMARKS
ST-499587500
ST-499587700
ST-499097700
ST-499207400
Page 900 of 2870
ME(H4SO)-31
MECHANICAL
Valve Clearance
8. Valve Clearance
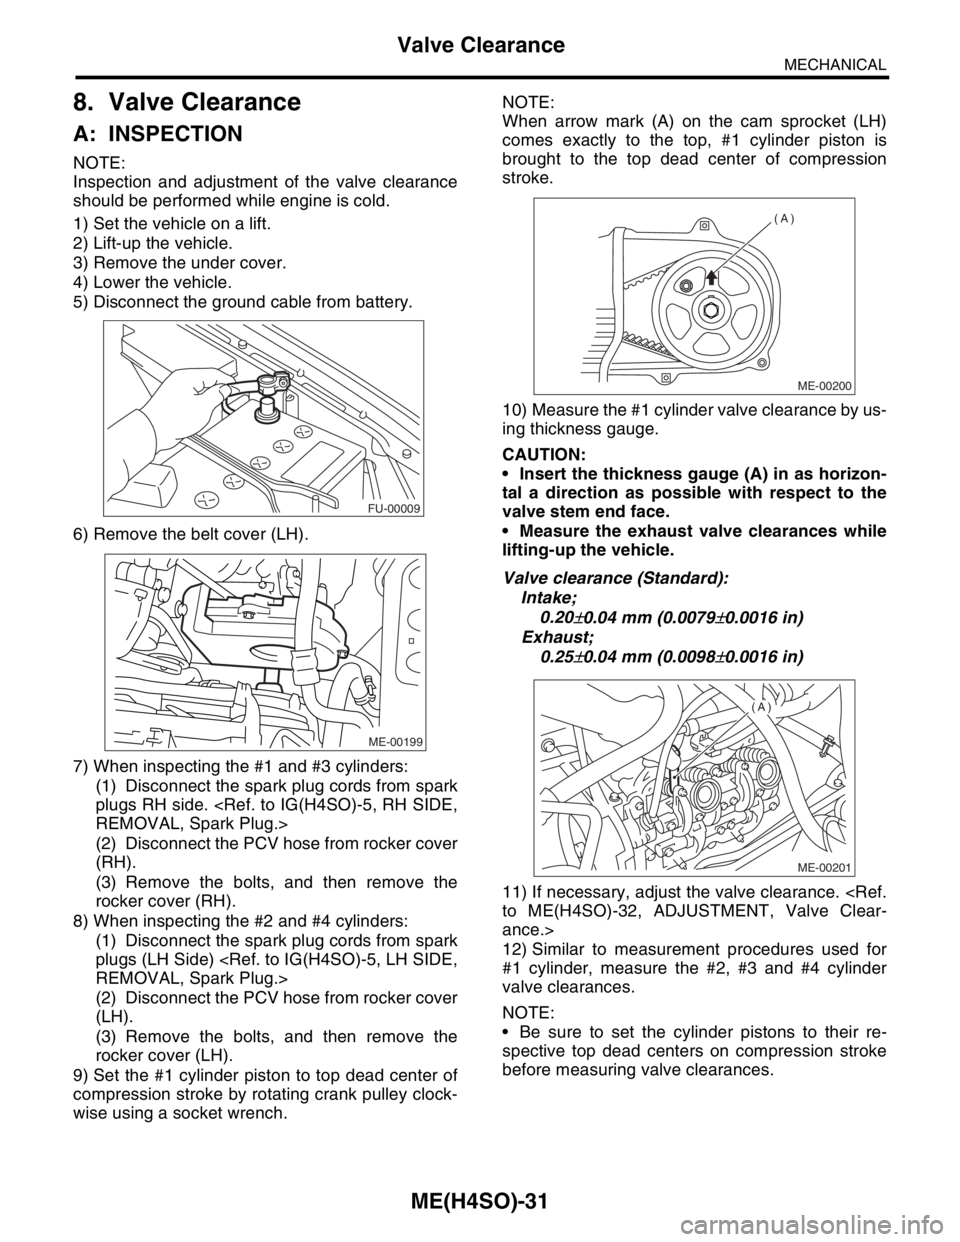
A: INSPECTION
NOTE:
Inspection and adjustment of the valve clearance
should be performed while engine is cold.
1) Set the vehicle on a lift.
2) Lift-up the vehicle.
3) Remove the under cover.
4) Lower the vehicle.
5) Disconnect the ground cable from battery.
6) Remove the belt cover (LH).
7) When inspecting the #1 and #3 cylinders:
(1) Disconnect the spark plug cords from spark
plugs RH side.
(2) Disconnect the PCV hose from rocker cover
(RH).
(3) Remove the bolts, and then remove the
rocker cover (RH).
8) When inspecting the #2 and #4 cylinders:
(1) Disconnect the spark plug cords from spark
plugs (LH Side)
(2) Disconnect the PCV hose from rocker cover
(LH).
(3) Remove the bolts, and then remove the
rocker cover (LH).
9) Set the #1 cylinder piston to top dead center of
compression stroke by rotating crank pulley clock-
wise using a socket wrench.NOTE:
When arrow mark (A) on the cam sprocket (LH)
comes exactly to the top, #1 cylinder piston is
brought to the top dead center of compression
stroke.
10) Measure the #1 cylinder valve clearance by us-
ing thickness gauge.
CAUTION:
Insert the thickness gauge (A) in as horizon-
tal a direction as possible with respect to the
valve stem end face.
Measure the exhaust valve clearances while
lifting-up the vehicle.
Valve clearance (Standard):
Intake;
0.20
±0.04 mm (0.0079±0.0016 in)
Exhaust;
0.25
±0.04 mm (0.0098±0.0016 in)
11) If necessary, adjust the valve clearance.
ance.>
12) Similar to measurement procedures used for
#1 cylinder, measure the #2, #3 and #4 cylinder
valve clearances.
NOTE:
Be sure to set the cylinder pistons to their re-
spective top dead centers on compression stroke
before measuring valve clearances.
FU-00009
ME-00199
ME-00200
(A)
ME-00201
(A)
Page 901 of 2870
ME(H4SO)-32
MECHANICAL
Valve Clearance
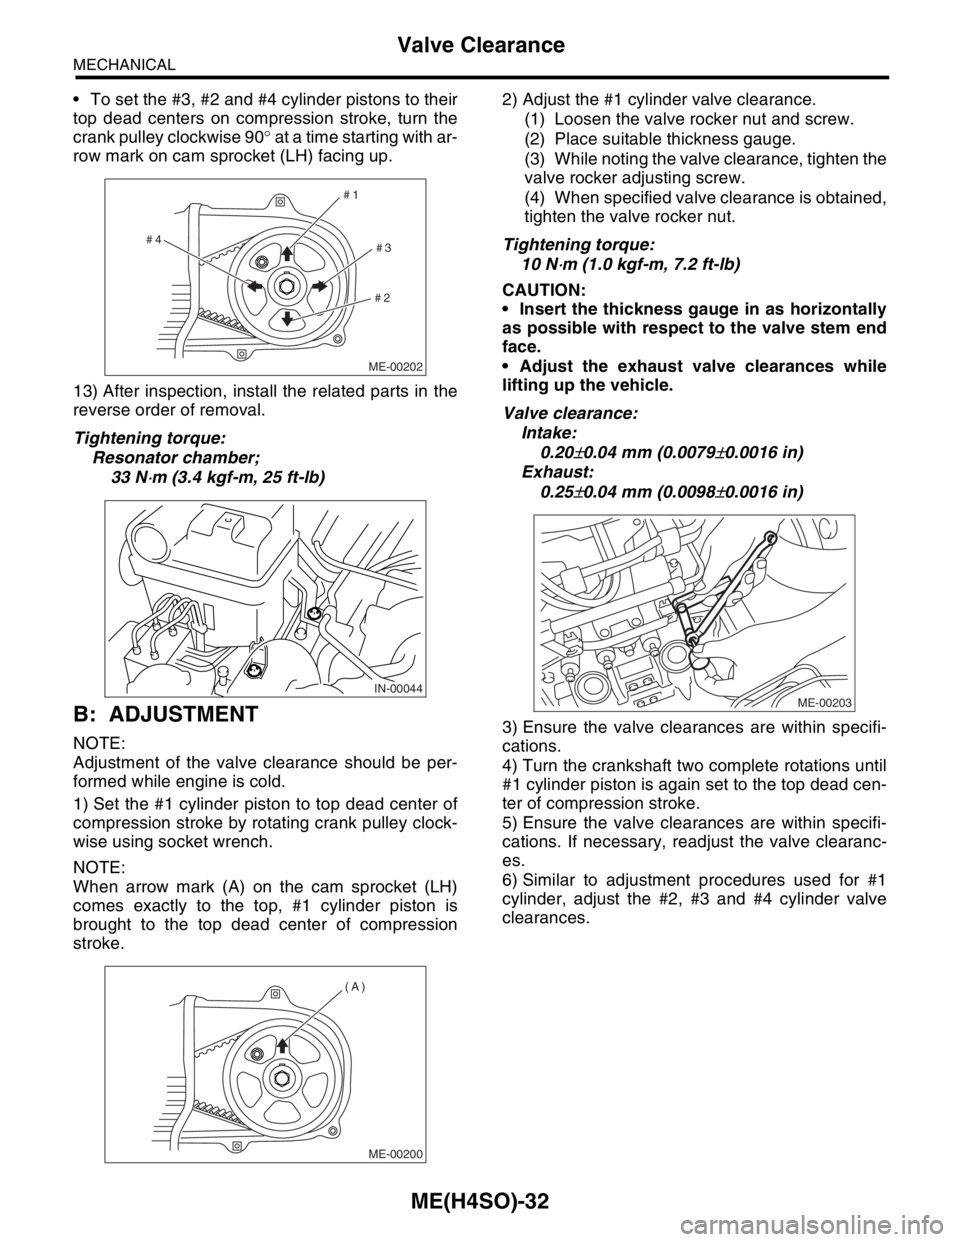
To set the #3, #2 and #4 cylinder pistons to their
top dead centers on compression stroke, turn the
crank pulley clockwise 90° at a time starting with ar-
row mark on cam sprocket (LH) facing up.
13) After inspection, install the related parts in the
reverse order of removal.
Tightening torque:
Resonator chamber;
33 N
⋅m (3.4 kgf-m, 25 ft-lb)
B: ADJUSTMENT
NOTE:
Adjustment of the valve clearance should be per-
formed while engine is cold.
1) Set the #1 cylinder piston to top dead center of
compression stroke by rotating crank pulley clock-
wise using socket wrench.
NOTE:
When arrow mark (A) on the cam sprocket (LH)
comes exactly to the top, #1 cylinder piston is
brought to the top dead center of compression
stroke.2) Adjust the #1 cylinder valve clearance.
(1) Loosen the valve rocker nut and screw.
(2) Place suitable thickness gauge.
(3) While noting the valve clearance, tighten the
valve rocker adjusting screw.
(4) When specified valve clearance is obtained,
tighten the valve rocker nut.
Tightening torque:
10 N
⋅m (1.0 kgf-m, 7.2 ft-lb)
CAUTION:
Insert the thickness gauge in as horizontally
as possible with respect to the valve stem end
face.
Adjust the exhaust valve clearances while
lifting up the vehicle.
Valve clearance:
Intake:
0.20
±0.04 mm (0.0079±0.0016 in)
Exhaust:
0.25
±0.04 mm (0.0098±0.0016 in)
3) Ensure the valve clearances are within specifi-
cations.
4) Turn the crankshaft two complete rotations until
#1 cylinder piston is again set to the top dead cen-
ter of compression stroke.
5) Ensure the valve clearances are within specifi-
cations. If necessary, readjust the valve clearanc-
es.
6) Similar to adjustment procedures used for #1
cylinder, adjust the #2, #3 and #4 cylinder valve
clearances.
ME-00202
#1
#2#3 #4
IN-00044
ME-00200
(A)
ME-00203
Page 919 of 2870
ME(H4SO)-50
MECHANICAL
Timing Belt
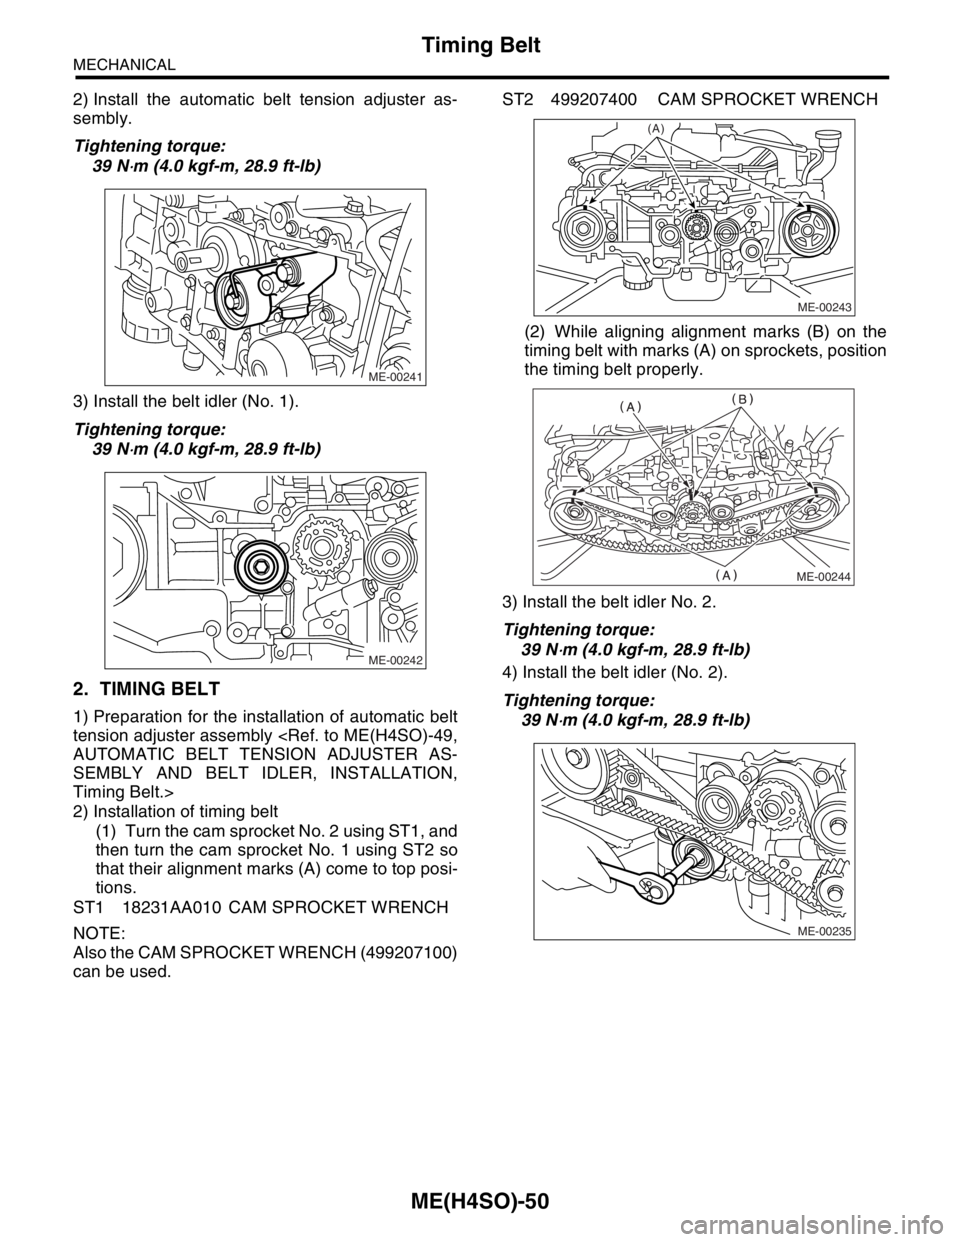
2) Install the automatic belt tension adjuster as-
sembly.
Tightening torque:
39 N
⋅m (4.0 kgf-m, 28.9 ft-lb)
3) Install the belt idler (No. 1).
Tightening torque:
39 N
⋅m (4.0 kgf-m, 28.9 ft-lb)
2. TIMING BELT
1) Preparation for the installation of automatic belt
tension adjuster assembly
SEMBLY AND BELT IDLER, INSTALLATION,
Timing Belt.>
2) Installation of timing belt
(1) Turn the cam sprocket No. 2 using ST1, and
then turn the cam sprocket No. 1 using ST2 so
that their alignment marks (A) come to top posi-
tions.
ST1 18231AA010 CAM SPROCKET WRENCH
NOTE:
Also the CAM SPROCKET WRENCH (499207100)
can be used.ST2 499207400 CAM SPROCKET WRENCH
(2) While aligning alignment marks (B) on the
timing belt with marks (A) on sprockets, position
the timing belt properly.
3) Install the belt idler No. 2.
Tightening torque:
39 N
⋅m (4.0 kgf-m, 28.9 ft-lb)
4) Install the belt idler (No. 2).
Tightening torque:
39 N
⋅m (4.0 kgf-m, 28.9 ft-lb)
ME-00241
ME-00242
ME-00243
(A)
ME-00244
ME-00235
Page 924 of 2870
ME(H4SO)-53
MECHANICAL
Cam Sprocket
16.Cam Sprocket
A: REMOVAL
1. REMOVAL
1) Remove the V-belt.
2) Remove the crank pulley.
3) Remove the belt cover.
4) Remove the timing belt assembly.
5) Remove the camshaft position sensor.
Sensor.>
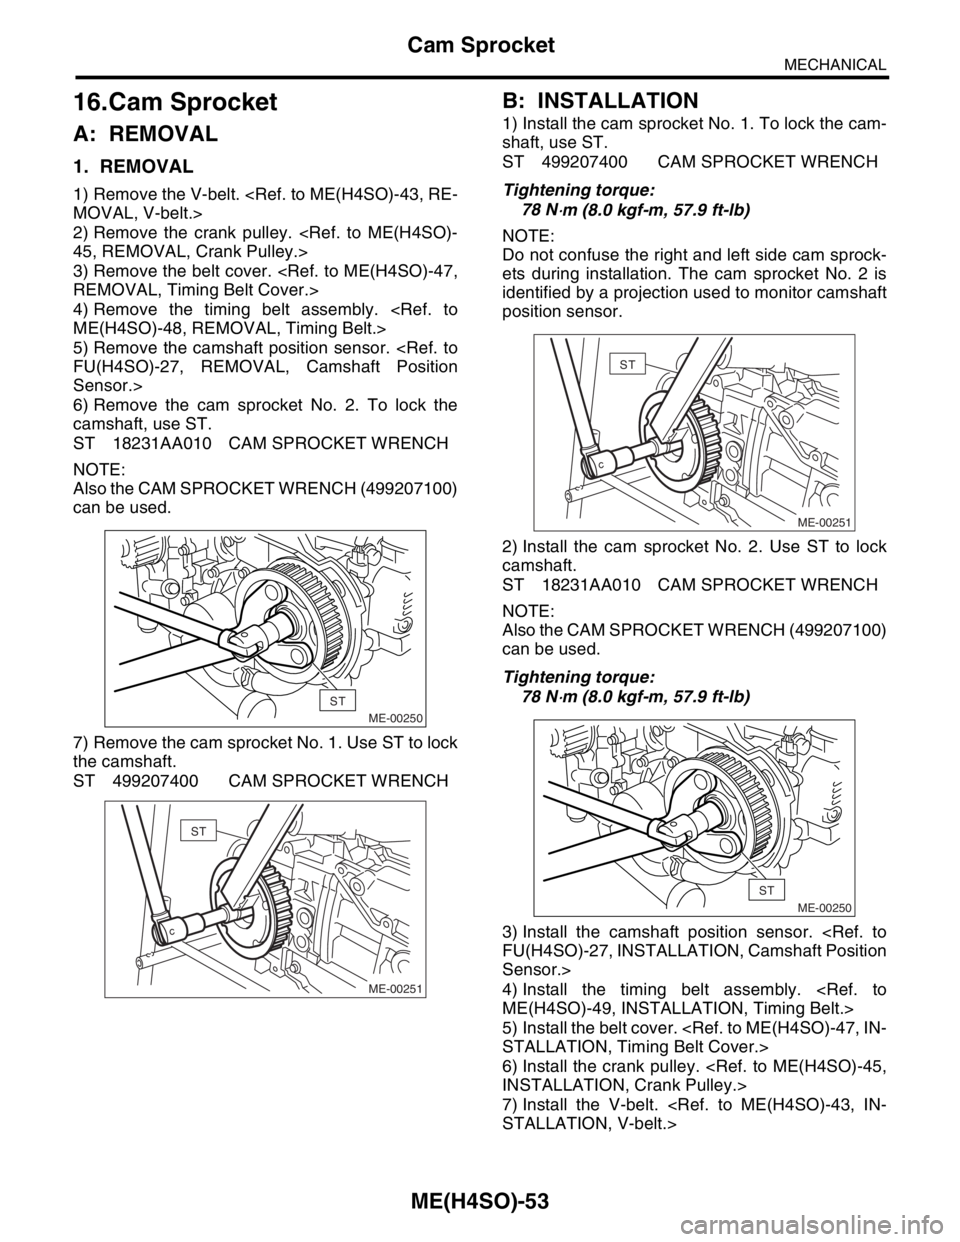
6) Remove the cam sprocket No. 2. To lock the
camshaft, use ST.
ST 18231AA010 CAM SPROCKET WRENCH
NOTE:
Also the CAM SPROCKET WRENCH (499207100)
can be used.
7) Remove the cam sprocket No. 1. Use ST to lock
the camshaft.
ST 499207400 CAM SPROCKET WRENCH
B: INSTALLATION
1) Install the cam sprocket No. 1. To lock the cam-
shaft, use ST.
ST 499207400 CAM SPROCKET WRENCH
Tightening torque:
78 N
⋅m (8.0 kgf-m, 57.9 ft-lb)
NOTE:
Do not confuse the right and left side cam sprock-
ets during installation. The cam sprocket No. 2 is
identified by a projection used to monitor camshaft
position sensor.
2) Install the cam sprocket No. 2. Use ST to lock
camshaft.
ST 18231AA010 CAM SPROCKET WRENCH
NOTE:
Also the CAM SPROCKET WRENCH (499207100)
can be used.
Tightening torque:
78 N
⋅m (8.0 kgf-m, 57.9 ft-lb)
3) Install the camshaft position sensor.
Sensor.>
4) Install the timing belt assembly.
5) Install the belt cover.
6) Install the crank pulley.
7) Install the V-belt.
ME-00250
ST
ME-00251
ST
ME-00251
ST
ME-00250
ST