Page 1050 of 2870
LU(H4SO)-22
LUBRICATION
Engine Oil Cooler
B: INSTALLATION
NOTE:
Engine oil cooler is equipped with turbo model only.
1) Install in the reverse order of removal.
2) Contact the knock pin (A) of adapter (1) to cylin-
der block rib (B) to install adapter (1).
3) Install the adapter (2).
4) Contact the engine oil cooler stopper (A) to
adapter (2) rib (B) to install engine oil cooler.
Tightening torque:
T1: 6.4 N
⋅m (0.7 kgf-m, 5.1 ft-lb)
T2: 44 N
⋅m (4.5 kgf-m, 33 ft-lb)
T3: 54 N
⋅m (5.5 kgf-m, 40 ft-lb)NOTE:
Always use a new O-ring.
C: INSPECTION
1) Check that the coolant passages are not
clogged using air blow method.
2) Check the mating surfaces of cylinder block, O-
ring groove and oil filter for damage.
LU-00042
(A)
(B)
LU-00043
(B)(A)
(A) Adapter (1)
(B) Adapter connector
(C) Adapter (2)
(D) Oil cooler
(E) Oil cooler connector
LU-00044
(A)
(B)
(C)
(D)
(E)
T1
T2
T3
Page 1051 of 2870

LU(H4SO)-23
LUBRICATION
Engine Oil Filter
8. Engine Oil Filter
A: REMOVAL
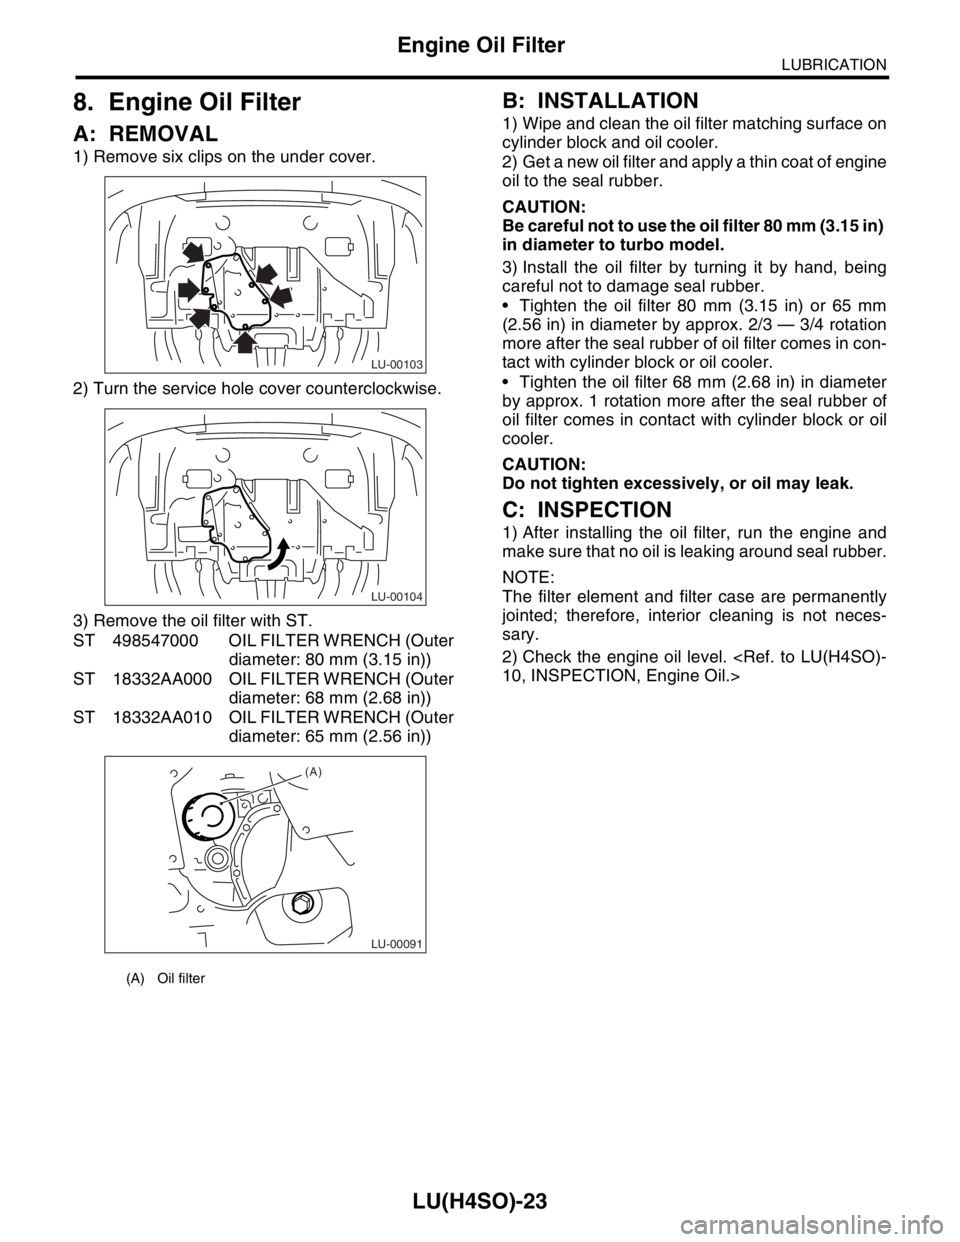
1) Remove six clips on the under cover.
2) Turn the service hole cover counterclockwise.
3) Remove the oil filter with ST.
ST 498547000 OIL FILTER WRENCH (Outer
diameter: 80 mm (3.15 in))
ST 18332AA000 OIL FILTER WRENCH (Outer
diameter: 68 mm (2.68 in))
ST 18332AA010 OIL FILTER WRENCH (Outer
diameter: 65 mm (2.56 in))
B: INSTALLATION
1) Wipe and clean the oil filter matching surface on
cylinder block and oil cooler.
2) Get a new oil filter and apply a thin coat of engine
oil to the seal rubber.
CAUTION:
Be careful not to use the oil filter 80 mm (3.15 in)
in diameter to turbo model.
3) Install the oil filter by turning it by hand, being
careful not to damage seal rubber.
Tighten the oil filter 80 mm (3.15 in) or 65 mm
(2.56 in) in diameter by approx. 2/3 — 3/4 rotation
more after the seal rubber of oil filter comes in con-
tact with cylinder block or oil cooler.
Tighten the oil filter 68 mm (2.68 in) in diameter
by approx. 1 rotation more after the seal rubber of
oil filter comes in contact with cylinder block or oil
cooler.
CAUTION:
Do not tighten excessively, or oil may leak.
C: INSPECTION
1) After installing the oil filter, run the engine and
make sure that no oil is leaking around seal rubber.
NOTE:
The filter element and filter case are permanently
jointed; therefore, interior cleaning is not neces-
sary.
2) Check the engine oil level.
10, INSPECTION, Engine Oil.>
(A) Oil filter
LU-00103
LU-00104
LU-00091
(A)
Page 1052 of 2870

LU(H4SO)-24
LUBRICATION
Engine Lubrication System Trouble in General
9. Engine Lubrication System Trouble in General
A: INSPECTION
Before performing diagnostics, make sure that the engine oil level is correct and no oil leakage exists.
Trouble Possible cause Corrective action
1. Warning light remains
on.1) Oil pressure switch
failureCracked diaphragm or oil leakage within switch Replace.
Broken spring or seized contacts Replace.
2) Low oil pressureClogged oil filter Replace.
Malfunction of oil by-pass valve of oil filter Clean or replace.
Malfunction of oil relief valve of oil pump Clean or replace.
Clogged oil passage Clean.
Excessive tip clearance and side clearance of oil
pump rotor and gearReplace.
Clogged oil strainer or broken pipe Clean or replace.
3) No oil pressureInsufficient engine oil Replenish.
Broken pipe of oil strainer Replace.
Stuck oil pump rotor Replace.
2. Warning light does
not go on.1) Malfunction of combination meter Replace.
2) Poor contact of switch contact points Replace.
3) Disconnection of wiring Repair.
3. Warning light flickers
momentarily.1) Poor contact at terminals Repair.
2) Defective wiring harness Repair.
3) Low oil pressureCheck for the same
possible causes as
listed in 1. — 2).
Page 1354 of 2870

EN(H4SO)-256
ENGINE (DIAGNOSTIC)
General Diagnostic Table
*1: Check ignition coil & ignitor ASSY and spark plug.
*2: Indicate the symptom occurring only in cold temperatures.
*3: Ensure the secure installation.
*4: Check fuel injector, fuel pressure regulator and fuel filter.
*5: Inspect air leak in air intake system.
*6: Adjust the accelerator cable.
2. AUTOMATIC TRANSMISSION
NOTE:
Check general diagnostics table with non-conformity symptom for automatic transmission.
4AT(H4SO)-2, Basic Diagnostic Procedure.>
6. Surging1) Intake manifold pressure sensor
2) Intake air temperature sensor
3) Manifold absolute pressure sensor
4) Engine coolant temperature sensor (*2)
5) Crankshaft position sensor (*3)
6) Camshaft position sensor (*3)
7) Fuel injection parts (*4)
8) Throttle position sensor
9) Fuel pump and fuel pump relay
7. Spark knock1) Intake manifold pressure sensor
2) Intake air temperature sensor
3) Manifold absolute pressure sensor
4) Engine coolant temperature sensor
5) Knock sensor
6) Fuel injection parts (*4)
7) Fuel pump and fuel pump relay
8. After burning in exhaust system1) Intake manifold pressure sensor
2) Intake air temperature sensor
3) Manifold absolute pressure sensor
4) Engine coolant temperature sensor (*2)
5) Fuel injection parts (*4)
6) Fuel pump and fuel pump relay Symptom Problem parts
Page 1473 of 2870
ME(H4DOTC)-17
MECHANICAL
General Description
(1) Oil pressure switch (15) AdapterTightening torque: N⋅m (kgf-m, ft-lb)
(2) Cylinder block (RH) (16) Oil coolerT1: 5 (0.5, 3.6)
(3) Service hole plug (17) Waster by-pass pipe T2: 6.4 (0.65, 4.7)
(4) Gasket (18) ConnectorT3: 10 (1.0, 7.2)
(5) Oil separator cover (19) Oil strainerT4: 25 (2.5, 18.1)
(6) Water by-pass pipe (20) GasketT5:
INSTALLATION, CYLINDER
BLOCK.> (7) Oil pump (21) Oil pan
(8) Front oil seal (22) Drain plug
(9) Rear oil seal (23) Metal gasketT6: 70 (7.1, 50.6)
(10) O-ring (24) Oil level gauge guideT7: First 12 (1.2, 8.7)
Second 12 (1.2, 8.7)
(11) Service hole cover (25) Oil filter
(12) Cylinder block (LH) (26) GasketT8: 16 (1.6, 11.6)
(13) Water pump (27) Water pump hoseT9: 44 (4.5, 33)
(14) Baffle plate (28) PlugT10: 25 (2.5, 18.1)
T11: 54 (5.3, 39)
T12: 45 (4.6, 33)
Page 1484 of 2870
ME(H4DOTC)-28
MECHANICAL
General Description
499977400 CRANK PULLEY
WRENCHUsed for stopping rotation of crank pulley when
loosening and tightening crank pulley bolts. (2.0
L model)
499977100 CRANK PULLEY
WRENCHUsed for stopping rotation of crank pulley when
loosening and tightening crank pulley bolts. (2.5
L model)
499987500 CRANKSHAFT
SOCKETUsed for rotating crankshaft.
18332AA000 OIL FILTER
WRENCHUsed for removing and installing the oil filter.
(Outer diameter: 68 mm (2.68 in)) ILLUSTRATION TOOL NUMBER DESCRIPTION REMARKS
ST-499977400
ST-499977100
ST-499987500
ST18332AA000
Page 1485 of 2870
ME(H4DOTC)-29
MECHANICAL
General Description
18332AA010 OIL FILTER
WRENCHUsed for removing and installing the oil filter.
(Outer diameter: 65 mm (2.56 in))
499587100 OIL SEAL
INSTALLERUsed for installing oil pump oil seal.
499587600 OIL SEAL
INSTALLERUsed for installing camshaft oil seal for DOHC
engine.
499597200 OIL SEAL GUIDE Used for installing camshaft oil seal for DOHC
engine.
Used with OIL SEAL GUIDE (499587600). ILLUSTRATION TOOL NUMBER DESCRIPTION REMARKS
ST18332AA010
ST-499587100
ST-499587600
ST-499597200
Page 1491 of 2870

ME(H4DOTC)-35
MECHANICAL
Engine Oil Pressure
6. Engine Oil Pressure
A: INSPECTION
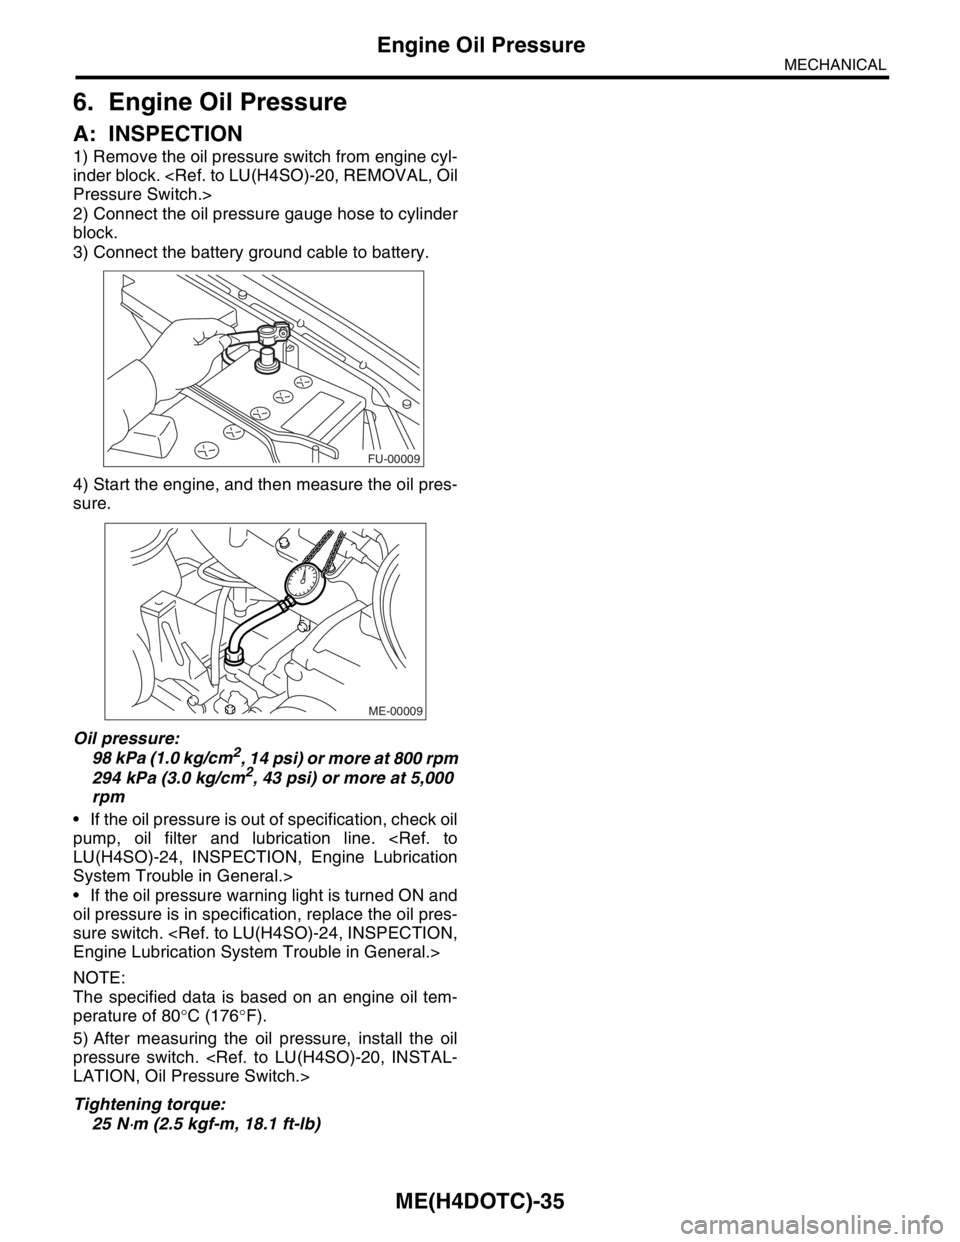
1) Remove the oil pressure switch from engine cyl-
inder block.
Pressure Switch.>
2) Connect the oil pressure gauge hose to cylinder
block.
3) Connect the battery ground cable to battery.
4) Start the engine, and then measure the oil pres-
sure.
Oil pressure:
98 kPa (1.0 kg/cm
2, 14 psi) or more at 800 rpm
294 kPa (3.0 kg/cm2, 43 psi) or more at 5,000
rpm
If the oil pressure is out of specification, check oil
pump, oil filter and lubrication line.
LU(H4SO)-24, INSPECTION, Engine Lubrication
System Trouble in General.>
If the oil pressure warning light is turned ON and
oil pressure is in specification, replace the oil pres-
sure switch.
Engine Lubrication System Trouble in General.>
NOTE:
The specified data is based on an engine oil tem-
perature of 80°C (176°F).
5) After measuring the oil pressure, install the oil
pressure switch.
LATION, Oil Pressure Switch.>
Tightening torque:
25 N
⋅m (2.5 kgf-m, 18.1 ft-lb)
FU-00009
ME-00009