Page 380 of 4264

5A-64 BRAKE CONTROL SYSTEM
DTC C0236 (Flash Code 36) Rear Left Wheel Speed Sensor Incorrect Signal
LTW35AMF000101
Step Action
Value(s) Yes No
1 Was the “Basic Diagnostic Flow Chart” performed?
- Go to Step 2 Go to Basic
Diagnostic
Flow Chart
2 1. Check for a poor connection at the rear left wheel
speed sensor harness connector.
2. Check installation condition for rear left wheel
speed sensor.
3. If a problem is found, repair as necessary.
Was a problem found?
- Verify repair Go to Step 3
3 1. Ignition “OFF,” disconnect the EHCU and rear left
wheel speed sensor.
2. Check the circuit between EHCU and rear left
wheel speed sensor. (short to ground, or short to
voltage.)
3. If a problem is found, repair as necessary.
Was a problem found?
- Verify repair Go to Step 4
4 1. Replace rear left wheel speed sensor.
2. Select “Display DTCs” with the Tech 2.
Note : Perform the various tests (actuator test, test
run, brake test, etc.) then observe the DTC with a
Tech2.
Are any DTCs stored? - Go to Step 5 Verify repair
Page 382 of 4264
5A-66 BRAKE CONTROL SYSTEM
DTC C0237 (Flash Code 37) Rear Left Wheel Speed Sensor Signal - Tooth
Chipping
LTW35AMF000101
Step Action
Value(s) Yes No
1 Was the “Basic Diagnostic Flow Chart” performed?
- Go to Step 2 Go to Basic
Diagnostic
Flow Chart
2 1. Check for a poor connection at the rear left wheel
speed sensor harness connector.
2. Check installation condition for rear left wheel
speed sensor.
3. If a problem is found, repair as necessary.
Was a problem found?
- Verify repair Go to Step 3
3 1. Check condition for sensor rotor at rear axle.
2. If a problem is found, repair as necessary.
Was a problem found?
- Verify repair Go to Step 4
4 1. Ignition “OFF,” disconnect the EHCU and rear left
wheel speed sensor.
2. Check the circuit between EHCU and rear left
wheel speed sensor. (short to ground, or short to
voltage.)
3. If a problem is found, repair as necessary.
Was a problem found?
- Verify repair Go to Step 5
Page 396 of 4264
5A-80 BRAKE CONTROL SYSTEM
DTC C0274 (Flash Code 74) ABS Operation Long Time
RTW45AMF000201
Step Action
Value(s) Yes No
1 Was the “Basic Diagnostic Flow Chart” performed?
- Go to Step 2 Go to Basic
Diagnostic
Flow Chart
2 Was the “Basic Inspection Procedure” performed?
- Go to Step 3 Go to Basic
Inspection
Procedure
3 1. Check for a poor connection at the wheel speed
sensor harness connector.
2. Check installation condition for wheel speed
sensor.
3. If a problem is found, repair as necessary.
Was a problem found? - Verify repair Go to Step 4
4 1. Check condition for sensor rotor.
2. If a problem is found, repair as necessary.
Was a problem found? - Verify repair Go to Step 5
5 1. Ignition “OFF,” disconnect the EHCU and wheel
speed sensor.
2. Check the circuit between EHCU and wheel speed
sensor.(short ground, or short to voltage.)
3. If a problem is found, repair as necessary.
Was a problem found? - Verify repair Go to Step 6
Page 405 of 4264

BRAKE CONTROL SYSTEM 5A-89
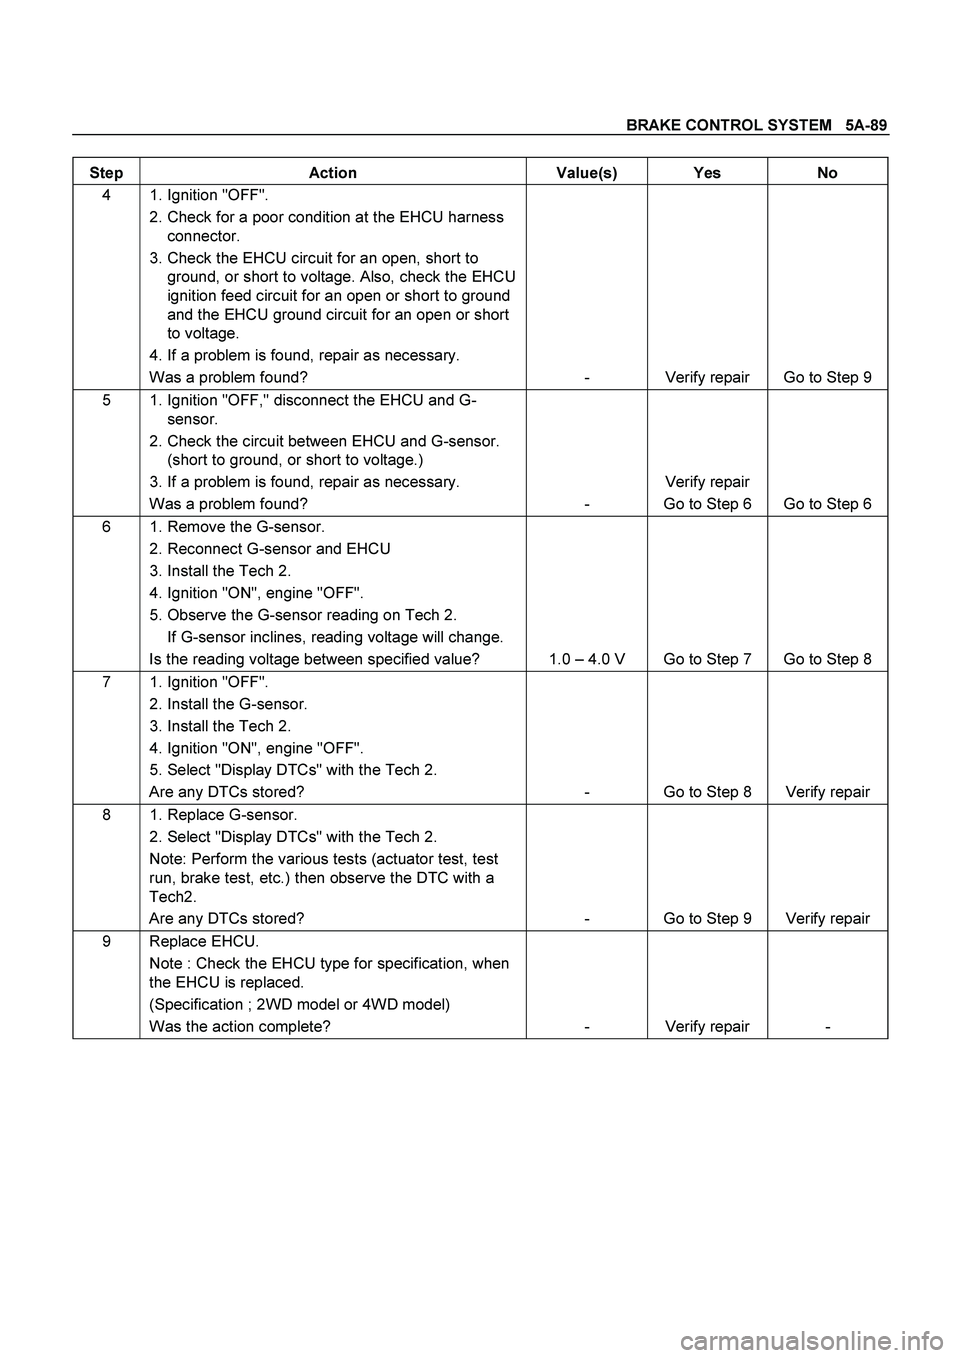
Step Action Value(s) Yes No
4 1. Ignition "OFF".
2. Check for a poor condition at the EHCU harness
connector.
3. Check the EHCU circuit for an open, short to
ground, or short to voltage. Also, check the EHCU
ignition feed circuit for an open or short to ground
and the EHCU ground circuit for an open or short
to voltage.
4. If a problem is found, repair as necessary.
Was a problem found? - Verify repair Go to Step 9
5 1. Ignition "OFF," disconnect the EHCU and G-
sensor.
2. Check the circuit between EHCU and G-sensor.
(short to ground, or short to voltage.)
3. If a problem is found, repair as necessary.
Was a problem found? - Verify repair
Go to Step 6 Go to Step 6
6 1. Remove the G-sensor.
2. Reconnect G-sensor and EHCU
3. Install the Tech 2.
4. Ignition "ON", engine "OFF".
5. Observe the G-sensor reading on Tech 2.
If G-sensor inclines, reading voltage will change.
Is the reading voltage between specified value? 1.0 – 4.0 V Go to Step 7 Go to Step 8
7 1. Ignition "OFF".
2. Install the G-sensor.
3. Install the Tech 2.
4. Ignition "ON", engine "OFF".
5. Select "Display DTCs" with the Tech 2.
Are any DTCs stored? - Go to Step 8 Verify repair
8 1. Replace G-sensor.
2. Select "Display DTCs" with the Tech 2.
Note: Perform the various tests (actuator test, test
run, brake test, etc.) then observe the DTC with a
Tech2.
Are any DTCs stored? - Go to Step 9 Verify repair
9 Replace EHCU.
Note : Check the EHCU type for specification, when
the EHCU is replaced.
(Specification ; 2WD model or 4WD model)
Was the action complete? - Verify repair -
Page 454 of 4264

5C-28 BRAKES
27. After the bleeding operation is completed on the each
individual wheel, check the level of the brake fluid in the
reservoir and replenish up to the “MAX" level as necessary.
28. Attach the reservoir cap.
29. Stop the engine.
05007-1
BRAKE LINE (HOSES AND PIPES)
�
Inspect all hoses and pipes for wear, bending, chafing,
cracks, dents, or any other damage.
Make necessary correction or parts replacement if these
abnormal conditions are found through inspection.
�
All hoses, pipes and joints can be damaged easily.
Do not allow the hose to become excessively twisted and
bent when working with then, and pay special attention to all
the brake lines not to damage them when repairing o
r
replacing other parts (axle, suspension, etc).
�
Inspection for leakage should be performed by depressing
the brake pedal fully.
If leakage is apparent at the circumference of joints,
retighten or replace these parts.
This procedure must be performed whenever brake lines
are installed.
�
After disconnecting the hoses and pipes, cap or tape the
openings to prevent entry of foreign material.
Page 466 of 4264

5C-40 BRAKES
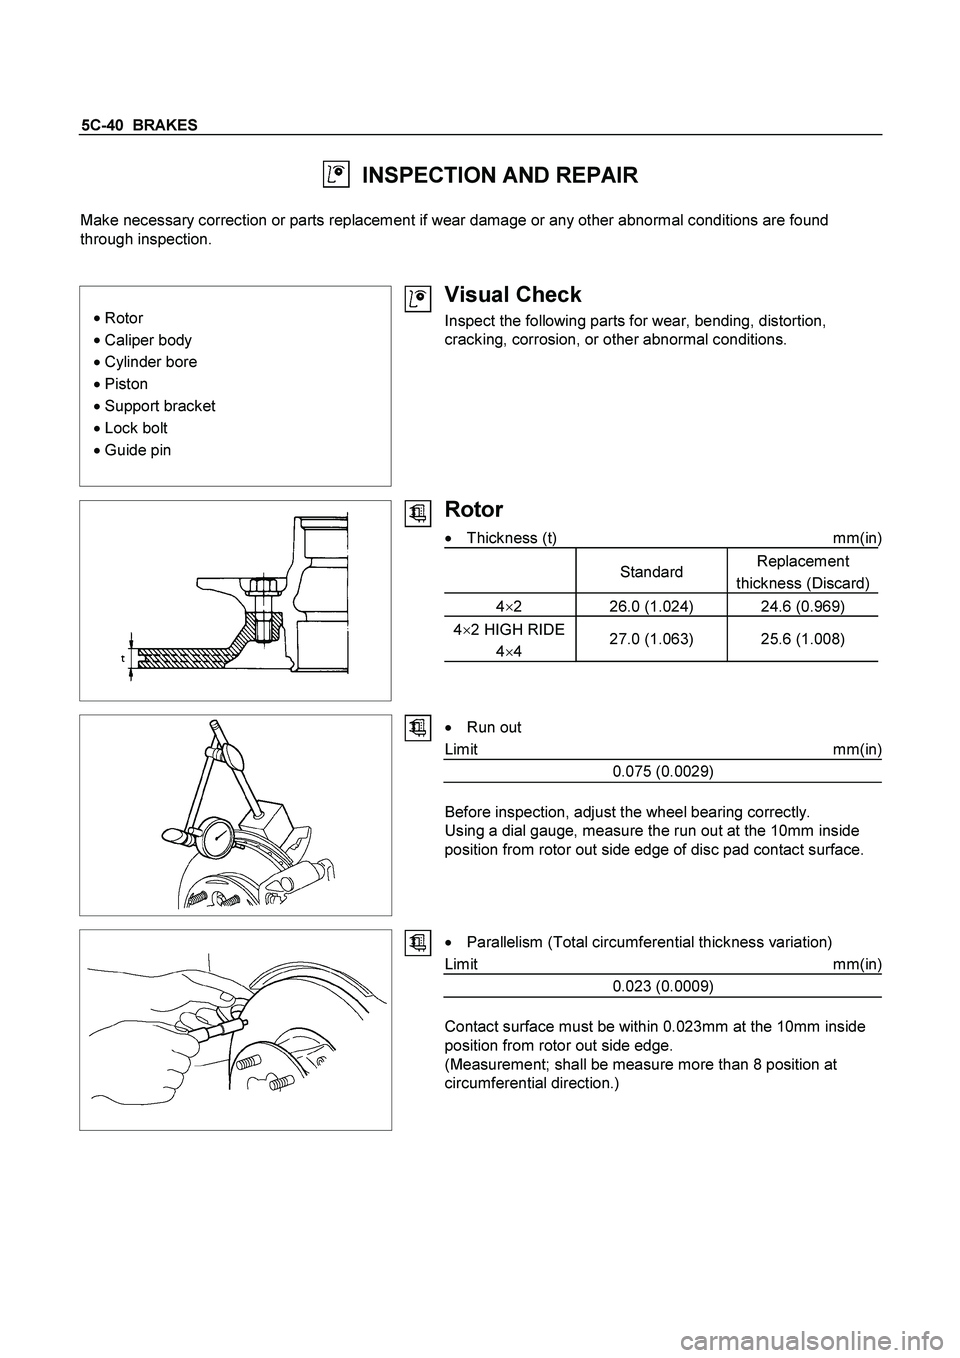
INSPECTION AND REPAIR
Make necessary correction or parts replacement if wear damage or any other abnormal conditions are found
through inspection.
�
Rotor
�
Caliper body
� Cylinder bore
�
Piston
�
Support bracket
�
Lock bolt
�
Guide pin
Visual Check
Inspect the following parts for wear, bending, distortion,
cracking, corrosion, or other abnormal conditions.
Rotor
� Thickness (t) mm(in)
Standard Replacement
thickness (Discard)
4�
2 26.0 (1.024) 24.6 (0.969)
4�
2 HIGH RIDE
4�4 27.0 (1.063) 25.6 (1.008)
� Run out
Limit mm(in)
0.075 (0.0029)
Before inspection, adjust the wheel bearing correctly.
Using a dial gauge, measure the run out at the 10mm inside
position from rotor out side edge of disc pad contact surface.
�
Parallelism (Total circumferential thickness variation)
Limit mm(in)
0.023 (0.0009)
Contact surface must be within 0.023mm at the 10mm inside
position from rotor out side edge.
(Measurement; shall be measure more than 8 position at
circumferential direction.)
Page 471 of 4264
BRAKES 5C-45
P1010008
Important Operations
4. Spring ; shoe hold
Push the shoe hold spring toward the brake shoe and hold it.
Rotate the spring to remove it from the shoe hold pin.
6. Spring ; shoe to shoe, lower
Slide the brake shoes and lower spring toward the ground.
Remove the lower spring.
INSPECTION AND REPAIR
Make necessary correction or parts replacement if wear damage or any other abnormal conditions are found
through inspection.
�
Brake drum
�
Back plate
�
Brake lining
�
Wheel cylinder body
�
Piston
� Piston cup
� Return spring
Visual check
Inspect the following parts for wear scuffs, scratches,
corrosion, stains, deterioration, or other abnormal conditions.
Thickness of the Brake Lining
Thickness mm(in)
standard (T) Limit (t)
4�
2 5.0 (0.197) 1.0 (0.039)
4�
2 HIGH RIDE
4�
4 5.0 (0.197) 1.0 (0.039)
Page 481 of 4264
BRAKES 5C-55
INSPECTION AND REPAIR
Make necessary correction or parts replacement if wear damage or any other abnormal conditions are found
through inspection.
�
Cylinder inside face
�
Piston
�
Piston cap
�
Piston cap spacer
�
Return port
� Return spring
Visual Check
Inspect the following parts for wear, distortion, cuts, nicks,
corrosion, or other abnormal conditions.
Return Port
Check the return port for obstructions and if necessary, clean
with a tag wire.
Blow away foreign matter with compressed air.
Primary Piston
After reassembly, push in the primary piston to see that returns
smoothly.
Repeat the test two or three times to see that brake fluid is
forced out from the front and rear outlets.