Page 1798 of 4500
Courtesy of TOYOTA MOTOR SALES, U.S.A., INC.
OK: GO TO ENGINE CONTROL SYSTEM (SEE REPLACEMENT
)
WIRING DIAGRAM
Fig. 55: Fuel Receiver Gauge Wiring Diagram
Courtesy of TOYOTA MOTOR SALES, U.S.A., INC.
INSPECTION PROCEDURE
1.PERFORM ACTIVE TEST BY HAND-HELD TESTER
a. Operate the hand-held tester according to the steps on the display and select the "ACTIVE TEST".
METER:
METER ACTIVE TEST REFERENCE
OK:
Needle indication is normal.
NG: REPLACE COMBINATION METER ASSY (SEE OVERHAUL
)
ItemTest DetailsDiagnostic Note
FUEL GAUGEOFF, EMPTY, 1/2, FULL-
Page 1799 of 4500
OK: GO TO NEXT STEP
2.READ VALUE OF HAND-HELD TESTER (FUEL GAUGE)
a. Operate the hand-held tester according to the steps on the display and select the "DATA LIST".
METER:
Fig. 56: Data List Reference Table (Meter)
Courtesy of TOYOTA MOTOR SALES, U.S.A., INC.
OK:
Fuel value signal displayed on the tester is almost the same as needle indication.
NG: REPLACE COMBINATION METER ASSY (SEE OVERHAUL
)
OK: GO TO NEXT STEP
3.READ VALUE OF HAND-HELD TESTER (FUEL GAUGE)
a. Operate the hand-held tester according to the steps on the display and select the "DATA LIST".
BODY No.4:
Fig. 57: Data List Reference Table (Body No.4)
Page 1800 of 4500

Courtesy of TOYOTA MOTOR SALES, U.S.A., INC.
OK:
Fuel value signal displayed on the tester is almost the same as needle indication.
NG: Go to step 4
OK: Go to step 4
REPLACE LUGGAGE ROOM JUNCTION BLOCK ASSY
OK:
Normal operation
NG: REPLACE COMBINATION METER ASSY (SEE OVERHAUL
)
OK: END
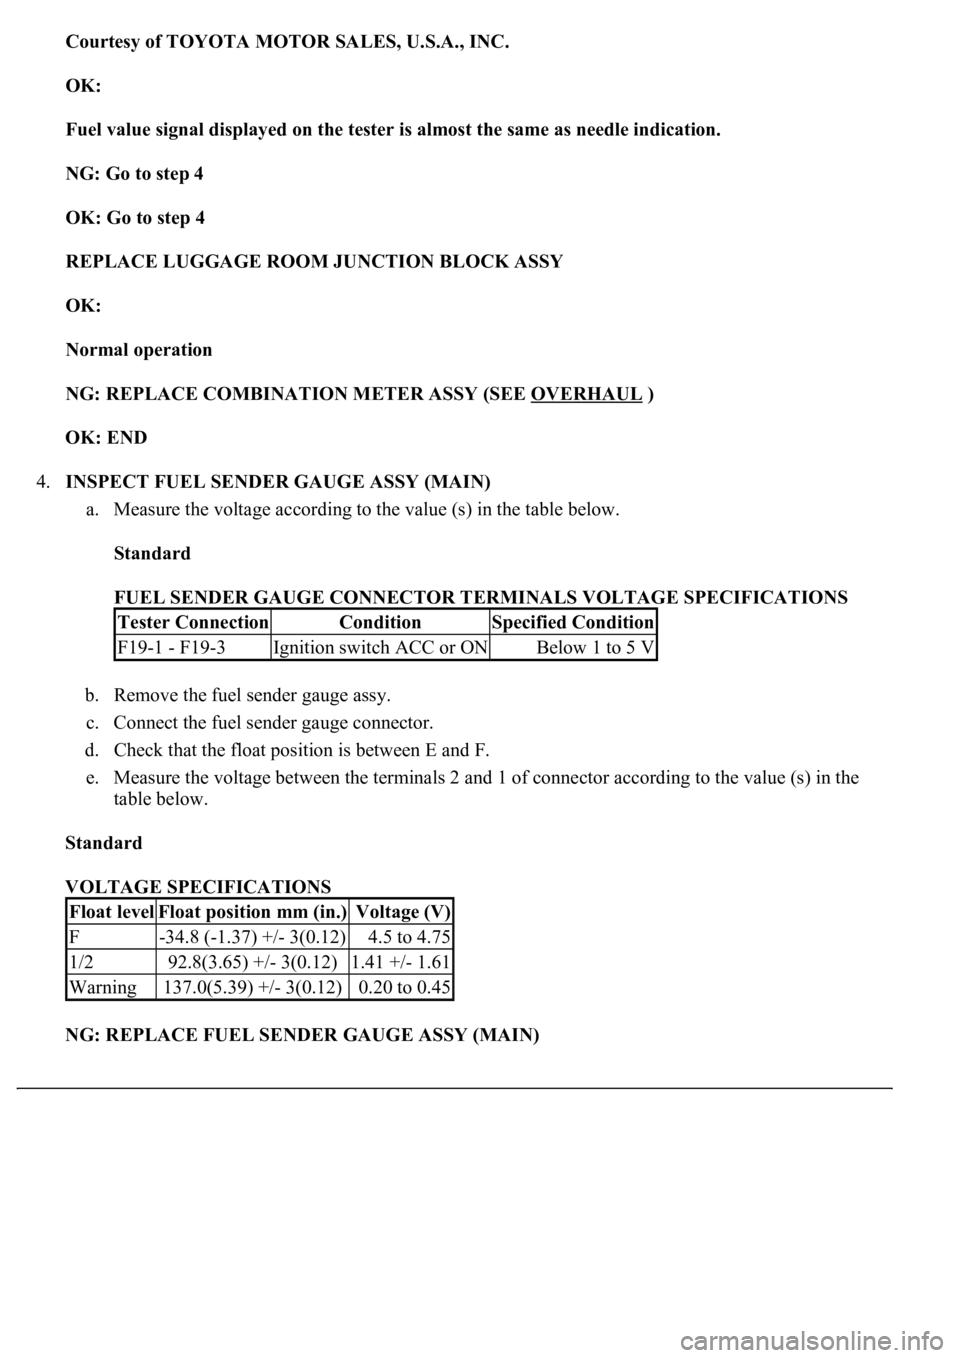
4.INSPECT FUEL SENDER GAUGE ASSY (MAIN)
a. Measure the voltage according to the value (s) in the table below.
Standard
FUEL SENDER GAUGE CONNECTOR TERMINALS VOLTAGE SPECIFICATIONS
b. Remove the fuel sender gauge assy.
c. Connect the fuel sender gauge connector.
d. Check that the float position is between E and F.
e. Measure the voltage between the terminals 2 and 1 of connector according to the value (s) in the
table below.
Standard
VOLTAGE SPECIFICATIONS
NG: REPLACE FUEL SENDER GAUGE ASSY (MAIN)
Tester ConnectionConditionSpecified Condition
F19-1 - F19-3Ignition switch ACC or ONBelow 1 to 5 V
Float levelFloat position mm (in.)Voltage (V)
F-34.8 (-1.37) +/- 3(0.12)4.5 to 4.75
1/292.8(3.65) +/- 3(0.12)1.41 +/- 1.61
Warning137.0(5.39) +/- 3(0.12)0.20 to 0.45
Page 1811 of 4500
OK:
Needle indication is normal.
NG: REPLACE COMBINATION METER ASSY (SEE OVERHAUL
)
OK: GO TO NEXT STEP
2.READ VALUE OF HAND-HELD TESTER (ENGINE COOLANT)
a. Operate the hand-held tester according to the steps on the display and select the "DATA LIST".
ENGINE:
DATA LIST REFERENCE
OK:
Coolant temperature displayed on the tester is between 80°C (176°F) and 95°C (203°F) after
warning up.
NG: GO TO ENGINE CONTROL SYSTEM (SEE REPLACEMENT
)
OK: GO TO NEXT STEP
3.REPLACE COMBINATION METER ASSY
OK:
Normal operation
NG: GO TO ENGINE CONTROL SYSTEM (SEE REPLACEMENT
)
OK: END
WIRING DIAGRAM
ItemTest DetailsDiagnostic Note
COOLANT TEMPLOW /NORMAL /HI-
ItemMeasurement Item/ Range
(Display)Normal ConditionDiagnostic Note
COOLANT
TEMPCoolant Temperature / Min.: -
40°C (-40°F), Max.: 140°C
(284 °F)After warming up: 80
to 95°C (176 to 203°
F)If the value is "-40°C (-40°F)" or
"140°C (284°F)", sensor circuit is
open or shorted.
Page 1812 of 4500
Fig. 65: Driver'S Seat Belt Warning Lamp Wiring Diagram
Courtesy of TOYOTA MOTOR SALES, U.S.A., INC.
INSPECTION PROCEDURE
HINT:
If there is an open in the ground circuit (Airbag sensor assy center), the airbag sensor assy center outputs DTCs.
Perform troubleshooting with the "Supplemental Restraint System" 05-1026.
1.PERFORM ACTIVE TEST BY HAND-HELD TESTER
a. Operate the hand-held tester according to the steps on the display and select the "ACTIVE TEST".
METER:
ACTIVE TEST REFERENCE
OK:
Switch condition (ON/OFF) can be switched by ACTIVE TEST.
NG: REPLACE COMBINATION METER ASSY (SEE OVERHAUL
)
OK: GO TO NEXT STEP
ItemTest DetailsDiagnostic Note
D-BELT
REMINDIndicat. Lamp D-SEAT BELT
(OFF/ON)Confirm that the vehicle is stopped and engine
idling
Page 1813 of 4500
2.READ VALUE OF HAND-HELD TESTER (DRIVER SEAT BELT)
a. Operate the hand-held tester according to the steps on the display and select the "DATA LIST".
SRS AIRBAG:
Fig. 66: SRS Airbag Data List Reference Chart
Courtesy of TOYOTA MOTOR SALES, U.S.A., INC.
OK:
Indicator lamp (ON/OFF) can be switched by actual operation.
NG: Go to step 3
OK: REPLACE COMBINATION METER ASSY (SEE OVERHAUL
)
3.INSPECT FRONT SEAT INNER BELT ASSY (DRIVER SIDE)
a. Disconnect the connector from the front seat inner belt assy (Driver Side).
b. Measure the resistance according to the value (s) in the table below.
Standard
RESISTANCE SPECIFICATIONS
NG: REPLACE FRONT SEAT INNER BELT ASSY (DRIVER SIDE)
Terminal NoConditionSpecified condition
B4-2 - B4-5Seat belt is fastenedApprox. 330 ohms
B4-2 - B4-5Seat belt is unfastenedApprox. 1,330 ohms
Page 1818 of 4500

PROCEED WITH TROUBLESHOOTING) and A/C system (see HOW TO PROCEED WITH
TROUBLESHOOTING ).
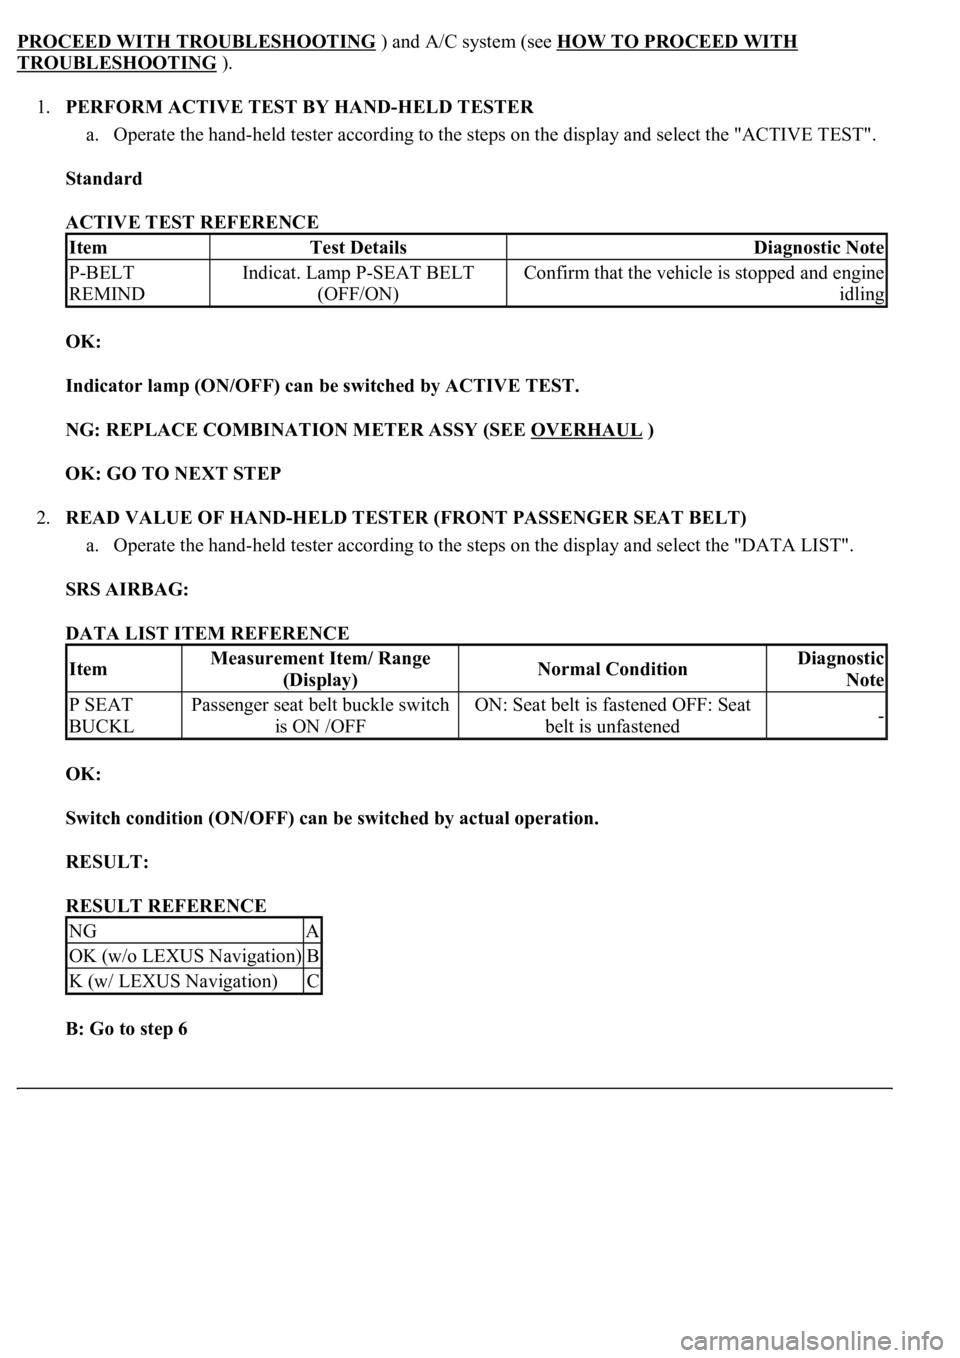
1.PERFORM ACTIVE TEST BY HAND-HELD TESTER
a. Operate the hand-held tester according to the steps on the display and select the "ACTIVE TEST".
Standard
ACTIVE TEST REFERENCE
OK:
Indicator lamp (ON/OFF) can be switched by ACTIVE TEST.
NG: REPLACE COMBINATION METER ASSY (SEE OVERHAUL
)
OK: GO TO NEXT STEP
2.READ VALUE OF HAND-HELD TESTER (FRONT PASSENGER SEAT BELT)
a. Operate the hand-held tester according to the steps on the display and select the "DATA LIST".
SRS AIRBAG:
DATA LIST ITEM REFERENCE
OK:
Switch condition (ON/OFF) can be switched by actual operation.
RESULT:
RESULT REFERENCE
B: Go to step 6
ItemTest DetailsDiagnostic Note
P-BELT
REMINDIndicat. Lamp P-SEAT BELT
(OFF/ON)Confirm that the vehicle is stopped and engine
idling
ItemMeasurement Item/ Range
(Display)Normal ConditionDiagnostic
Note
P SEAT
BUCKLPassenger seat belt buckle switch
is ON /OFFON: Seat belt is fastened OFF: Seat
belt is unfastened-
NGA
OK (w/o LEXUS Navigation)B
K (w/ LEXUS Navigation)C
Page 1823 of 4500
Fig. 73: Identifying B5 And A25 Connector Terminals
Courtesy of TOYOTA MOTOR SALES, U.S.A., INC.
NG: REPAIR OR REPLACE HARNESS OR CONNECTOR
OK: REPLACE AIRBAG SENSOR ASSY CENTER (SEE HOW TO PROCEED WITH
TROUBLESHOOTING )
6.INSPECT COMBINATION METER ASSY
a. Disconnect the clock assy connector.
b. Measure the voltage according to the value (s) in the table below.
Standard
VOLTAGE SPECIFICATIONS
NG: Go to step 8
Fig. 74: Identifying C12 Connector Terminals
Terminal NoConditionSpecified condition
C12-9 - Body groundIgnition switch ON, Passenger seat belt is unfastened10 to 14 V