Page 41 of 156

40
RAPID DEMISTING/DEFROST-
ING
The climate system is very useful for
accelerating the demisting, because it
dehumidifies the air. It is sufficient to
adjust the controls for the demisting
operation and activate the climate
control system, pressing the button √
.
Windscreen and side windows
1)
Air temperature knob: pointer in
the red sector (fully turned to the
right) on cold days or in the blue sec-
tor (fully turned to the left) on hot
days.
2)Fan knob: pointer at maximum
speed.
3)Air distribution knob: pointer at
-.
4)Air recirculation switched off,
pointer at -
U.
When the windscreen and the win-
dows have been demisted adjust the
controls to keep the windows as clear
as possible.
Rear window
Press the button
(.
As soon as the rear window is
demisted, we suggest switching off the
device.
VENTILATION
1)
Central and side vents: fully open.
2) Air temperature knob: pointer in
the blue sector.
3) Fan knob: pointer set at the speed
required.
4) Air distribution knob: pointer at
O.
5)Air recirculation pointer: at -
U, equal to air intake from outside.
RECIRCULATION
When the pointer is at T, only in-
ternal air recirculation is activated.
IMPORTANTIn conditions of very
high external air temperature, the re-
circulation operation accelerates the
air cooling. Then, this function is par-
ticularly useful when the outside air
is heavily polluted (in a traffic jam, tun-
nel, etc.). You are advised against us-
ing this function for long periods how-
ever, especially if there are a lot of
people in the car.
IMPORTANTDo not use the re-
circulation function during cold/wet
weather as this will increase the like-
lihood of the windows misting up.
20-63 03/03/2003 06:02 PM Page 40
Page 42 of 156
41
STEERING COL-
UMN STALKS
RIGHT -HAND STALK
This stalk groups together the out-
side lights and direction indicators.
Parking lights can only be switched
on when the ignition key is at
MAR.
When the parking lights are turned
on, the instrument panel and the var-
ious controls located on the dash-
board light up.
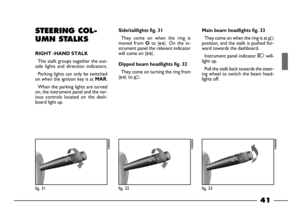
Side/taillights fig. 31
They come on when the ring is
moved from
Oto 3. On the in-
strument panel the relevant indicator
will come on
3.
Dipped beam headlights fig. 32
They come on turning the ring from
3to 2.
Main beam headlights fig. 33
They come on when the ring is at 2position, and the stalk is pushed for-
ward towards the dashboard.
Instrument panel indicator
1will-
light up.
Pull the stalk back towards the steer-
ing wheel to switch the beam head-
lights off.
fig. 32
P4E02025
fig. 33
P4E02026
fig. 31
P4E02024
20-63 03/03/2003 06:02 PM Page 41
Page 43 of 156

42
fig. 36
P4E01686
To flash head lights fig. 34
Pull the stalk towards the steering
wheel (temporary position).
Direction indicators fig. 35
Move the stalk as follows:
downwards - to switch the right-
hand indicators on;
upwards - to switch the left-hand
indicators on.
Instrument panel warning light
y
will flash.
The direction indicators will auto-
matically be switched off when the
steering wheel is straightened.
If you want the indicator to flash
briefly to show that you are about to
change lane, move the stalk up or
down without clicking into position.
When you let it go it will return to its
original position.
LEFT-HAND STALK
This stalk groups together all the
washer/wiper controls.
Windscreen washer/wiper
fig. 36
The device will only work when the
ignition key is at
MAR.
A- Windscreen wiper off.
B- Flick wipe.
C- Slow continuous wipe.
D- Fast continuous wipe.
E- Temporary continuous wipe:
when released the stalk returns to po-
sition
Aand automatically stops the
windscreen wiper.
fig. 35
P4E02028
fig. 34
P4E02027
20-63 03/03/2003 06:02 PM Page 42
Page 44 of 156
43
Pull the stalk towards the steering
wheel
fig. 37 to operate the wind-
screen washer.
The use of hazard lights
is governed by the High-
way Code of the country
you are in. Keep to the rules
CONTROLS
HAZARD LIGHTS fig. 39
Press switchA, regardless of the po-
sition of the ignition key.
The symbol
Aon the switch will flash
when the device is on.
Press the switch again to switch the
lights off.
fig. 37
P4E01687
fig. 38
P4E01688
fig. 39
P4E02286
Rear window wiper/washer
fig. 38
This function can only be used when
the ignition key is at
MAR.
Controls:
1)turn the control from Oto ' ';
2)When you push the stalk for-
wards (temporary position), the rear
window washer will send a jet of flu-
id onto the window and the wiper will
be operated at the same time. The de-
vice will be switched off when the stalk
is released.
20-63 03/03/2003 06:02 PM Page 43
Page 45 of 156

44
fig. 41
P4E02029
fig. 40
P4E02287
CONTROLS
fig. 40
The buttons located above the cen-
tral air vents.
The controls can only be operated
when the ignition key is at
MAR.
When a function is activated the LED
on the respective button will light up.
Press the button again to switch the
control off.
Heated rear window
Button A: to switch on /off the ther-
mal rear window.
Rear fog light
Button B: These lights can only be
switched on when the dipped beam
headlights or the front foglights are
switched on.
Fog lights
ButtonB: These lights can only be
switched on when the parking lights
are on.
Climate control system
Button C: to switch on/off the air
conditioner.
FUEL CUT-OFF SWITCH
fig. 41
This is a safety cut-off switch which
comes into operation in the case of an
accident to block the supply of fuel
thereby stopping the engine.
If, after an accident, you
can smell petrol or see
that the fuel feed system
is leaking, to avoid the risk of fire,
do not reset the switch.
If you cannot see any fuel leaks and
the car is in a fit state to continue its
20-63 03/03/2003 06:03 PM Page 44
Page 46 of 156
45
Never drive with the
glove compartment flap
open: it could injure the
person sitting in the passenger
seat in the event of an accident.
journey, press button A-fig. 41 to re-
activate the fuel supply system.
After the crash, remember to turn
the ignition key to
STOPto prevent
the battery running down.
INTERIOR EQUIP-
MENT
GLOVE COMPARTMENT
fig. 42
Pull handle Ato open.You will find indents
A-fig. 43on the
flap for arranging a cup or can, when
the car is stationary.
fig. 42
P4E02030
fig. 43
P4E02031
20-63 03/03/2003 06:03 PM Page 45
Page 47 of 156
Warning. The cigar lighter
gets very hot. Be careful how
you handle it and make sure
it is not used by children: Danger of
fire or burns.
46
CIGAR LIGHTER fig. 45
It works only with the ignition key at
MAR.
Press the button
Aof the cigar
lighter; it will return to the original po-
sition after approximately 15 seconds.
The cigar lighter is ready for use.
fig. 45
P4E02032
fig. 44
P4E01399
FRONT CEILING LIGHT
fig. 44
The ceiling light can achieve the fol-
lowing positions:
– ceiling light lights up on pressing
ONregardless of the doors being
open or closed;
– ceiling light automatically comes on
when a front door is opened when the
glass is an intermediate position;
– In the OFF position the light re-
mains switched off, always.
IMPORTANT Always make sure
the cigar lighter does in fact pop out
after it has been pushed in.
20-63 03/03/2003 06:03 PM Page 46
Page 48 of 156
Do not use the ashtray
as a waste paper basket:
the paper could catch fire
if it comes in contact with a cig-
arette butt.
47
ASHTRAY
For the front seats fig. 46
Open flap Apulling it backwards.
The ashtray can be removed.
fig. 46
P4E02033
For the rear seats fig. 47
For the rear seats, there is a foldaway
ashtray on the side panel.
To use it, turn it towards the direc-
tion shown by the arrow.
To remove the ashtray, press on the
retaining tab.
fig. 47
P4E01624
fig. 48
P4E02034
SUNVISORS
These are positioned to the sides of
the rearview mirror. They can be
swung up or down or pivoted side-
ways.
On the back of the driver’s sun visor
there is a document-pocket, and a
courtesy mirror is fitted on the back
of the passenger’s sunvisor
fig. 48.
20-63 03/03/2003 06:03 PM Page 47