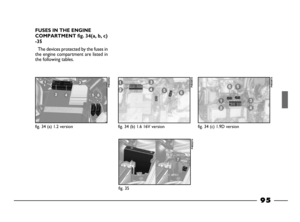
Page 97 of 156

96
Componentfuse N. Ampere Location
7
8
8
7
17
18
4
5
14
8
7
15
9
15
12
20
1
13
2
6
11
3
10
19
19
8
16
15
22
610A
10A
10A
10A
10A
10A
10A
10A
10A
10A
10A
15A
15A
15A
10A
10A
20A
20A
25A
10A
30A
25A
20A
30A
30A
10A
10A
15A
10A
60AFig. 33
Fig. 33
Fig. 33
Fig. 33
Fig. 33
Fig. 33
Fig. 33
Fig. 33
Fig. 33
Fig. 33
Fig. 33
Fig. 33
Fig. 33
Fig. 33
Fig. 33
Fig. 33
Fig. 33
Fig. 33
Fig. 33
Fig. 33
Fig. 33
Fig. 33
Fig. 33
Fig. 33
Fig. 33
Fig. 33
Fig. 33
Fig. 33
Fig. 33
Fig. 34 (a)Left front side light
Right front side light
Left tail light
Right tail light
Left dipped beam headlight
Right dipped beam headlight
Left main beam headlight
Right main beam headlight
Brake lights
Left number plate light
Right number plate light
Reversing lights
Foglights
Direction indicator lights
Hazard lights
Ceiling light
Windscreen/rear window wiper
Horn
Electric front window winder
Rear foglight
Heated rear window
Electric rear window winder
Central door locking system
Internal fan
Cigar lighter (power supply)
Cigar lighter (illumination)
Climate control system
Airbag
ABS
ABS (1.2 version)
80-103 03/03/2003 06:49 PM Page 96
Page 98 of 156

6
7
15
20
8
15
7
1
1
1
2
2
2
3
3
3
3
4
4
5
5
6
7
21
24
25
26
27
28
2960A
60A
15A
10A
10A
15A
10A
30A
30A
30A
40A
40A
40A
50A
50A
50A
60A
60A
60A
40A
40A
40A
15A
-
-
-
10A
15A
20A
30A
Componentfuse N. Ampere Location
Fig. 34 (b)
Fig. 34 (c)
Fig. 33
Fig. 33
Fig. 33
Fig. 33
Fig. 33
Fig. 34 (a)
Fig. 34 (b)
Fig. 34 (c)
Fig. 34 (a)
Fig. 34 (b)
Fig. 34 (c)
Fig. 34 (a)
Fig. 34 (b)
Fig. 34 (c)
Fig. 34 (a)
Fig. 34 (b)
Fig. 34 (c)
Fig. 34 (a)
Fig. 34 (b)
Fig. 34 (c)
Fig 35
Fig 33
Fig 33
Fig 33
Fig 33
Fig 33
Fig 33
Fig 33
97
C
ABS (1,6 16V version)
ABS (1,9 D version)
Clock (power supply under key)
Clock (power supply not under key)
Clock (illumination)
Instrument panel power supply
Control illumination
Fuel pump/injection system (1.2 version)
Fuel pump/injection system (1.6 16v version)
Fuel pump/injection system (1.9 D version)
Ignition switch (1.2 version)
Ignition switch (1.6 16v version)
Ignition switch (1.9 D version)
General power supply of the servicces (1.2 version)
General power supply of the servicces (1.6 16v version)
General power supply of the servicces (1.9 D version)
General power supply of the servicces (1.2 version)
General power supply of the servicces (1.6 16v version)
General power supply of the servicces (1.9 D version)
Engine cooling fan (1.2 version)
Engine cooling fan (1.6 16v version)
Engine cooling fan (1.9 D version)
Lambda Sensor
Available
Available
Available
Spare fuse
Spare fuse
Spare fuse
Spare fuse
80-103 03/03/2003 06:49 PM Page 97
Page 99 of 156

98
IF THE BATTERY
IS FLAT
First of all, read the “Car mainte-
nance” chapter for the steps to be tak-
en to avoid the battery running down
and to ensure it has a long life.
JUMP STARTING
See “Jump starting” in this chapter.
RECHARGING THE BATTERY
You are advised to recharge the bat-
tery slowly for a period of approxi-
mately 24 hours at a low amperage.
Charging for too long could damage
the battery.
Proceed as follows:
1) Disconnect the electrical system
from the battery terminals.
2)Connect the charger cables to the
battery terminals.
3)Turn on the charger.
4)When you have finished, turn the
charger off before disconnecting the
battery.
5)Reconnect the cables to the bat-
tery terminals. Make sure the polari-
ty is correct.
Under no circumstances
should a battery charger
be used to start the en-
gine: it could damage the elec-
tronic systems and in particular
the ignition and injection control
units. The liquid in the battery
is poisonous and corro-
sive. Do not let it touch
the skin or eyes. Recharging the
battery should be done in a well-
ventilated area away from naked
flames or possible sources of
sparks: explosion and fire risk.Do not attempt to
recharge a frozen bat-
tery. Thaw it first other-
wise it could explode. If the bat-
tery froze, make sure that the in-
ternal elements are not broken
(short-circuit risk) and that the
casing is not cracked (risk of
spilling the poisonous and corro-
sive fluid).
80-103 03/03/2003 06:49 PM Page 98
Page 100 of 156

99
Cars fitted with an en-
gine/gearbox guard cannot
be lifted from the front.
IF THE CAR
NEEDS TO BE
RAISED
WITH THE JACK
See “If a Tyre is Punctured”, in this
chapter.
WITH A SHOP JACK
Front end
The car may only be raised by plac-
ing the jack arm under the gearbox/dif-
ferential, inserting a wooden or rub-
ber block as shown in
fig. 36.
The jack should only be
used to change a wheel
on the car for which it
was designed. It should not be
put to other uses or emplyoed to
rise other models. Under no cir-
cumstances should it be used
when carrying out repairs under
the car.
An incorrectly posi-
tioned jack may cause the
car to fall.
Do not use the jack to
lift loads exceeding that
indicated on the label at-
tached to the jack itself.
Please note:
– the jack requires no adjustments;
– the jack cannot be repaired. If it
breaks it must be replaced with a new
jack;
– no other tool, except for the han-
dle shown in this chapter, can be fit-
ted to the jack.
fig. 36
P4E01338
80-103 03/03/2003 06:49 PM Page 99
Page 101 of 156
100
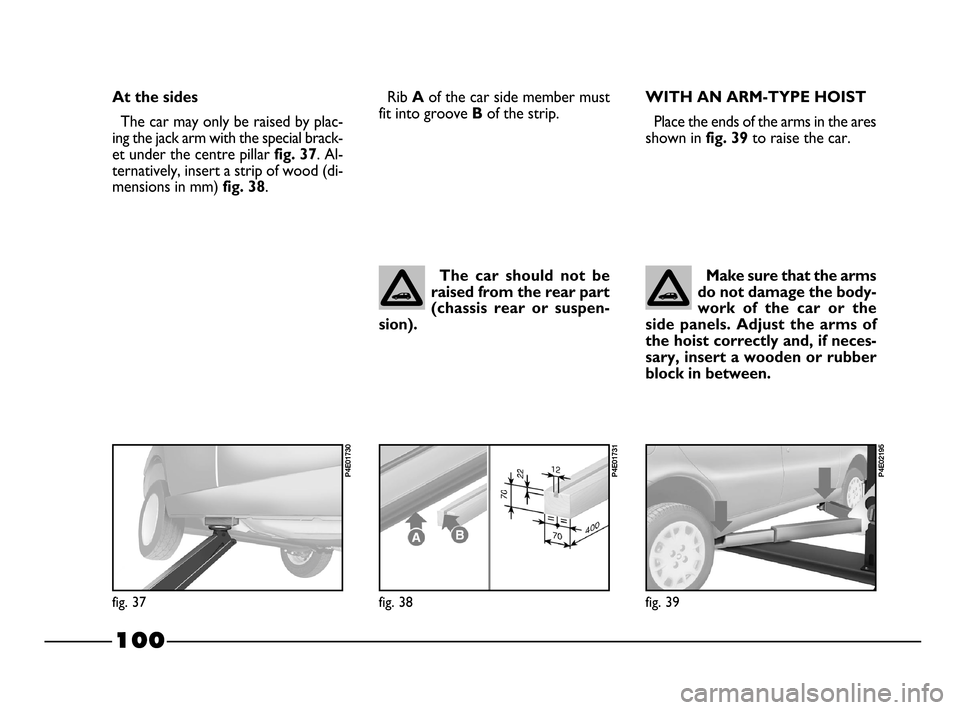
WITH AN ARM-TYPE HOIST
Place the ends of the arms in the ares
shown in
fig. 39to raise the car.
Make sure that the arms
do not damage the body-
work of the car or the
side panels. Adjust the arms of
the hoist correctly and, if neces-
sary, insert a wooden or rubber
block in between.
fig. 39
P4E02195
fig. 38
P4E01731
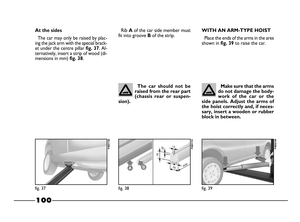
Rib Aof the car side member must
fit into groove
B of the strip.
The car should not be
raised from the rear part
(chassis rear or suspen-
sion).
fig. 37
P4E01730
At the sides
The car may only be raised by plac-
ing the jack arm with the special brack-
et under the centre pillar
fig. 37. Al-
ternatively, insert a strip of wood (di-
mensions in mm)
fig. 38.
80-103 03/03/2003 06:49 PM Page 100
Page 102 of 156

101
Do not tow the car by
using flexible elements
(metallic cables, ropes or
strings); only the use of a rigid
bar, with the ends supplied with
adequate joints, is allowed. Make
sure to fix the joint to the car in
order not to damage the near el-
ements.
Before starting to tow, turn the
ignition key to MAR and then to
STOP. Do not remove the key. If
the key is removed, the steering
lock engages automatically which
prevents the wheels being turned.
While the car is being towed
with the engine off, remember
that the brake pedal and steering
will require more effort as you no
longer have the benefit of the
brake booster and the power
steering.
The towing vehicle must be dri-
ven as evenly and softly as possi-
ble to prevent counterblows.IF THE CAR
NEEDS TO BE
TOWED
The tow hitch is supplied as standard
with the car. It is in the tool kit at-
tached to the spare wheel.
To fasten the tow hitch:
1)Take the tow ring.
2) Remove the cover from the rear
bumper
fig. 40or from the front
bumper
fig. 41by lever with a screw-
driver in the point shown by the ar-
row.
fig. 40
P4E02196
fig. 41
P4E02197
When towing the car,
you must comply with the
specific traffic regulations
regarding the tow hitch and how
to tow on the road.
3)Fasten the ring on the threaded
pin, rear
fig. 40or front fig. 41.
80-103 03/03/2003 06:49 PM Page 101
Page 103 of 156

102
IF ANYONE IS INJURED
– Never leave the injured person
alone. The obligation to provide as-
sistance exists even for those not di-
rectly involved in the accident.
– Do not congregate around the in-
jured person.
– Reassure the injured person that
help is on its way and will arrive soon.
Stay close by to calm him/her down in
case of panic.
– Unfasten or cut seat belts holding
injured parties.
– Do not give an injured person any-
thing to drink.
– Do not move an injured person un-
less the following situation arise.
– Pull out the injured person from
the car only if there is a risk of it catch-
ing fire, sinking in water or is likely to
fall over a cliff or etc. Do not pull
his/her arms or legs, do not bend the
head and, as far as possible, keep the
body horizontal.
IF AN ACCIDENT
OCCURS
– It is important to keep calm.
– If you are not directly involved in
the accident, stop at least ten metres
away from the accident.
– If you are on a motorway, stop
without obstructing the emergency
lane with your car.
– Turn off the engine and turn on the
hazard lights.
– At night, illuminate the scene of the
accident with your headlights.
– Act carefully, you must not risk be-
ing run over.
– If the doors are blocked, do not at-
tempt to smash the windscreen to get
out of the car. It is made of layered
glass and is very hard. Side and rear
windows are much more easily bro-
ken.
– Mark the accident by putting the
red triangle at the regulatory distance
from the car where it can be clearly
seen. – Call for rescue making the infor-
mation you give as accurate as you
can. On the motorway use the special
column-mounted emergency phones.
– In pile-ups on the motorway, par-
ticularly when the visibility is bad,
there is a high risk of other vehicles
running into those already stopped.
Get out of the car immediately and
take refuge behind the guard-rail.
– Remove the ignition keys from the
vehicles involved.
– If you can smell petrol or other
chemicals, do not smoke and make
sure all cigarettes are extinguished.
– Use a fire extinguisher, blanket
sand or earth to put out fires, how-
ever small they may be. Never use wa-
ter
80-103 03/03/2003 06:49 PM Page 102
Page 104 of 156
103
fig. 42
P4E01906
FIRST-AID KIT
The first-aid kit must at least containfig. 42:
– sterile gauze for covering and
cleansing wounds;
– bandages of different widths; elas-
tic in nature
– antiseptic plasters of different sizes;
(water proof in nature)
– a reel of plaster; elastic in nature
– a packet of cotton wool;
– a bottle of disinfectant;
– a packet of paper handkerchiefs;
– a pair of scissor with rounded tips;
– a pair of tweezers;
– two haemostatic loops.
– a tube of antiseptic cream contain-
ing 0.5% centrimide B.P. in a non
greasy base.It is a good idea to keep a fire extin-
guisher and blanket in the car in addi-
tion to the first-aid kit.
The first-aid kits are also available in
the Lineaccessori Fiat.
80-103 03/03/2003 06:49 PM Page 103