Page 81 of 156

IN AN EMERGENCY
People who find themselves in an emergency situ-
ation need immediate and concrete help.
The following pages have been written to help you
if the need arises.
As you will see, a host of little snags have been taken
into account and, for each of them, the measures you
yourself can take are suggested. If the problems are
more serious however, you should have the car seen
at a Fiat Dealership.
With regard to this, we would like to remind you
that, in addition to the Owners Handbook you have
also been provided with the Warranty Booklet
where you will find details of all the services Fiat can
provide should you find yourself in difficulty.
We nevertheless recommend you read these
pages. If in need you will be able to find the informa-
tion you require much more quickly.
In addition to this you have also been provided
with 24 hours service assistance booklet, where in
you can find nearest contact number and address for
24 hour service assistance.JUMP STARTING ...................................................... PAGE 81
BUMP STARTING .................................................... PAGE 82
IF A TYRE IS PUNCTURED .................................. PAGE 82
IF A BULB BURNS OUT ........................................ PAGE 86
IF AN EXTERIOR LIGHT BURNS OUT ............ PAGE 88
IF AN INTERIOR LIGHT BURNS OUT ............. PAGE 92
IF A FUSE BLOWS ................................................... PAGE 93
IF THE BATTERY IS FLAT ..................................... PAGE 98
IF THE CAR NEEDS TO BE RAISED .................. PAGE 99
IF THE CAR NEEDS TO BE TOWED ................. PAGE 101
IF AN ACCIDENT OCCURS ................................. PAGE 102
80
80-103 03/03/2003 06:49 PM Page 80
Page 82 of 156

81
JUMP STARTING
If the battery is flat, you can use an-
other battery to start the engine. Its ca-
pacity must be the same or slightly
greater than the flat battery (see “Tech-
nical Specifications”).
Proceed as follows
fig. 1:
1)Connect positive terminals +of
the two batteries with a jump lead.
2)With a second lead, connect the
negative terminal (
–) of the auxiliary
battery and to an earth point E
on the
engine or the gearbox of the car to be
started.
IMPORTANTDo not directly
connect the negative terminals of the
two batteries: sparks could ignite the
flammable gas from the battery.
3)Start the engine.
4)When the engine has been start-
ed, remove the leads reversing the or-
der above.
If the engine fails to start after a few
attempts, do not keep turning the key
but have the car seen to at a
Fiat
Dealership
.
fig. 1
P4E01470
This starting procedure
must be carried out by
expert personnel; if it is
not done correctly it can cause
very intense electrical discharges.
In addition, the fluid contained in
the battery is poisonous and cor-
rosive. Avoid contact with skin
and eyes. You are also advised
not to put naked flames or light-
ed cigarettes near the battery
and not to cause sparks.
Under no circumstances
should a battery charger
be used for the emer-
gency procedure: it could dam-
age the electronic systems and in
particular the ignition and injec-
tion control units.
To avoid damages to the
car electric system, care-
fully follow the instruc-
tions of the cable manufacturer.
The cables must have a sufficient
diameter and must be enough
long to allow that the cars touch
each other.
80-103 03/03/2003 06:49 PM Page 81
Page 83 of 156

82
BUMP STARTING IF A TYRE IS
PUNCTURED
Follow the instructions on this and
the following pages to use the jack and
spare wheel correctly.
Remember that until
the engine has started the
brake booster and power
steering systems will not work
and a greater effort will therefore
be required to depress the brake
pedal or turn the steering wheel.
An incorrectly posi-
tioned jack may cause the
car to fall.
Do not use the jack to lift loads
exceeding that indicated on the
label attached to the jack itself.
The jack should only be used to
change a wheel on the car for
which it is designed. It should not
be put to other uses or employed
to raise other models of cars. Un-
der no circumstances should it be
used when carrying out repairs
under the car.
Do not lubricate the bolt
threads before fitting them back:
they could come loose.
Never start the engine,
when the car is raised on
a jack. Never tamper with
the inflation valve. Never place
tools between the rim and tyre.
Check the tyre and spare wheel
pressure regularly. The tyre in-
flation pressure is shown in the
“Technical specifications” chap-
ter.
Never bump start the
engine (by pushing, tow-
ing or coasting downhill).
This could cause fuel to flow in-
to the catalytic exhaust system
and damage it beyond repair.
If the car is fitted with al-
loy rims, a specific spare
wheel is provided. It is dif-
ferent from the one provided for
the cars fitted with steel rims. In
the event of successive purchase
of alloy rims, replacing the steel
rims, we suggest you to keep at
disposal 4 genuine bolts, which
will be used only with the spare
wheel. Danger of damaging the
wheel hubs
80-103 03/03/2003 06:49 PM Page 82
Page 84 of 156

83
1. STOP THE CAR
– Stop the car in a position that is not
dangerous for oncoming traffic where
you can change the wheel safely. The
ground should be flat and adequately
firm. If you have to change the wheel
at night, choose a lit area if possible.
– Turn the engine off and pull up the
handbrake.
– Engage first or reverse gear.
– Alert other drivers that the car is
stationary in compliance with local
regulations: hazard warning lights,
warning triangle etc.
Any passenger should get out and
wait as far away as possible from the
dangers of traffic.
If the road is sloping or bumpy, place
wedges or other suitable material un-
der the wheels to prevent the car from
moving.
2. TAKE OUT THE TOOLS,
JACK AND SPARE WHEEL
They are in the boot.
The tool bag is secured to the inter-
nal boot wall by proper belts,
fig. 2;
to take it out, lift the adhesive strip of
the belts. The bag contains: the jack
A-
fig. 3
, the jack operating handle B, the
wheel bolt wrench
C, the tow hitch D
and the screwdriver E.
fig. 2
P4E02373
fig. 4
P4E02375
fig. 3
P4E02374
– Lift the carpet covered flap.
– Loosen the fastener
A-fig. 4and
take the spare wheel.
80-103 03/03/2003 06:49 PM Page 83
Page 85 of 156
 Warn anyone nearby that the car
is about to be lifted. They must stay
clear and not touch the car until it is
back on the ground.
6)Fit the operating handle on the
jack and turn it until the wheel")
5) Warn anyone nearby that the car
is about to be lifted. They must stay
clear and not touch the car until it is
back on the ground.
6)Fit the operating handle on the
jack and turn it until the wheel to be
changed lifts a few centimetres off the
ground. When turning the jack handle
make sure that it can be used easily
and take care not to scrape your hand
against the ground› . The moving parts
of the jack (screw and joints) may al-
so cause injury if touched. Clean off
any grease.
7)Unscrew the 4 wheel bolts and
remove the wheel.
8) Ensure that the housing for the
wheel bolts on the spare wheel are
clean and free from dirt, which could
cause the wheel bolts to come loose.
Fit the spare wheel, in order that the
holes
A-fig. 6coincide with the rele-
vant pins
B.
9) Fasten one bolt A-fig. 7near the
inflation valve
B.
fig. 6
P4E01642
fig. 5
P4E02376
84
Please note:
– the jack weighs 2.900 kg;
– the jack requires no adjustments;
– the jack cannot be repaired. If it
breaks it must be replaced with a new
jack;
– No tool with the exception of the
handle can be fitted on the jack.
3. CHANGE THE WHEEL
1)
Loosen the bolts on the wheel to
be changed by approximately one turn.
2) If the wheel to be changed has a
light-alloy rim, rock the car a few times
from the roof so as to loosen the rim
from the hub if necessary.
3) Turn the jack handle so that the
jack opens partially.
4)Arrange the jack at the Osymbol
B-fig. 5 near the wheel to be changed
and make sure that the groove
Aon
the jack fits well into the sidemember
C.
80-103 03/03/2003 06:49 PM Page 84
Page 86 of 156
Fit the wheel cup in order that
the biggest hole
A-fig. 8is aligned with
the bolt fixing the wheel. When fitting
the wheel cup make sure that the sym-
bol
Y, printed on the internal part of
t")
85
10)Fit the wheel cup in order that
the biggest hole
A-fig. 8is aligned with
the bolt fixing the wheel. When fitting
the wheel cup make sure that the sym-
bol
Y, printed on the internal part of
the cup, is aligned with the inflation
valve.
11)Fit the last three bolts and tight-
en them using the wrench provided,
fig. 9.
12)Wind down the jack to lower
the vehicle and remove the jack.
13)Fasten bolts completely, work-
ing in a criss-cross fashion as shown in
fig. 10. Tightening torque: 86 Nm.
14)Arrange the punctured tyre in
the spare wheel compartment and se-
cure it with the locking device
A-fig.
11
.
fig. 7
P4E01754
15)Lower the carpet.
16)Put back the jack, the operating
handle and the wheel bolt wrench in-
to the tool bag.
17)Secure the tool bag to the in-
ternal boot wall with the relevant re-
taining belts.
fig. 8
P4E02176
fig. 9
P4E02377
IMPORTANT As soon as possible:
have the punctured tyre repaired and
mount it on the car thus limiting the
distance travelled with the spare
wheel.
IMPORTANT Check the inflation
pressure of the tyres and the spare
wheel regularly.
fig. 10
P4E02178
fig. 11
P4E02375
80-103 03/03/2003 06:49 PM Page 85
Page 87 of 156

86
IF A BULB BURNS OUT
Modifications or repairs
to the electrical system
carried out incorrectly
and without bearing the features
of the system in mind can cause
malfunctions with the risk of fire.
You should have the
bulbs replaced at a Fiat
Dealership. The correct
operation and direction of the
headlights is essential for safety
and is governed by the highway
code.Only touch the metal
part when handling halo-
gen bulbs. If the transpar-
ent bulb is touched it reduces the
intensity of the light emitted and
can also reduce the life of the
bulb. If you touch the bulb acci-
dentally, rub it with a cloth moist-
ened with alcohol and leave it to
dry.
GENERAL INSTRUCTIONS
When a light is not working, check
that it has not fused before changing the
bulb.
For the location of the fuses, refer to
“If a fuse blows” in this chapter.
Before replacing a bulb that does not
work, check that the contacts are not
oxidised.
Halogen bulbs contain
pressurised gas which, if
broken, may cause small
fragments of glass to be project-
ed outwards.
Burnt-out bulbs must be replaced
with ones of the same type. Bulbs with
low power offer low illumination,
bulbs with too much power absorb
too much energy.
Always check the height of the head-
light beam after changing a bulb.
TYPES OF BULBS
Several types of bulbs are installed in
the car
fig. 12:
A. Glass bulbs
Clipped into position. Pull to remove.
B. Bayonet connection bulbs
Remove from the bulb holder by
pressing the bulb and rotating it anti-
clockwise.
C. Cylindrical bulbs
Remove by pulling away from termi-
nals.
D-E. Halogen bulbs
To remove bulb, loosen the fixing
spring from the relevant seat.
80-103 03/03/2003 06:49 PM Page 86
Page 88 of 156
87
fig. 12
P4E01417
Bulbs Reference Type Powera fig. 12
Dipped beam
Main beam
Front parking/tail lights
Front direction indicators
Rear direction indicators
Front foglights
Rear parking/tail lights
Stop
Reversing light
Number plate light
Front ceiling lightE H7 55W
D H1 55W
A W5W 5W
B PY21W21W
B P21W21W
D H3 55W
B P21/5W21/5W
B P21/5W21/5W
B P21W21W
C W5W 5W
C C10W10W
80-103 03/03/2003 06:49 PM Page 87
 1
1 2
2 3
3 4
4 5
5 6
6 7
7 8
8 9
9 10
10 11
11 12
12 13
13 14
14 15
15 16
16 17
17 18
18 19
19 20
20 21
21 22
22 23
23 24
24 25
25 26
26 27
27 28
28 29
29 30
30 31
31 32
32 33
33 34
34 35
35 36
36 37
37 38
38 39
39 40
40 41
41 42
42 43
43 44
44 45
45 46
46 47
47 48
48 49
49 50
50 51
51 52
52 53
53 54
54 55
55 56
56 57
57 58
58 59
59 60
60 61
61 62
62 63
63 64
64 65
65 66
66 67
67 68
68 69
69 70
70 71
71 72
72 73
73 74
74 75
75 76
76 77
77 78
78 79
79 80
80 81
81 82
82 83
83 84
84 85
85 86
86 87
87 88
88 89
89 90
90 91
91 92
92 93
93 94
94 95
95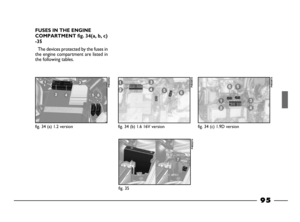 96
96 97
97 98
98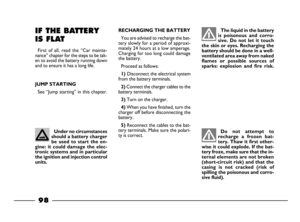 99
99 100
100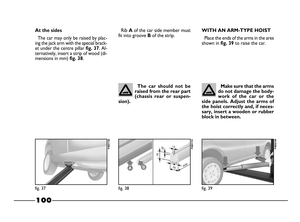 101
101 102
102 103
103 104
104 105
105 106
106 107
107 108
108 109
109 110
110 111
111 112
112 113
113 114
114 115
115 116
116 117
117 118
118 119
119 120
120 121
121 122
122 123
123 124
124 125
125 126
126 127
127 128
128 129
129 130
130 131
131 132
132 133
133 134
134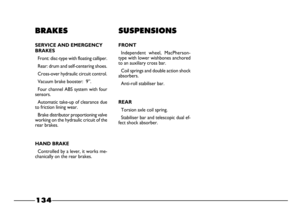 135
135 136
136 137
137 138
138 139
139 140
140 141
141 142
142 143
143 144
144 145
145 146
146 147
147 148
148 149
149 150
150 151
151 152
152 153
153 154
154 155
155