Page 17 of 156

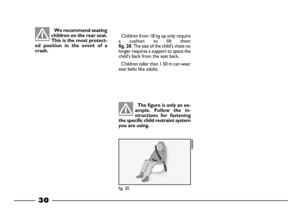
16
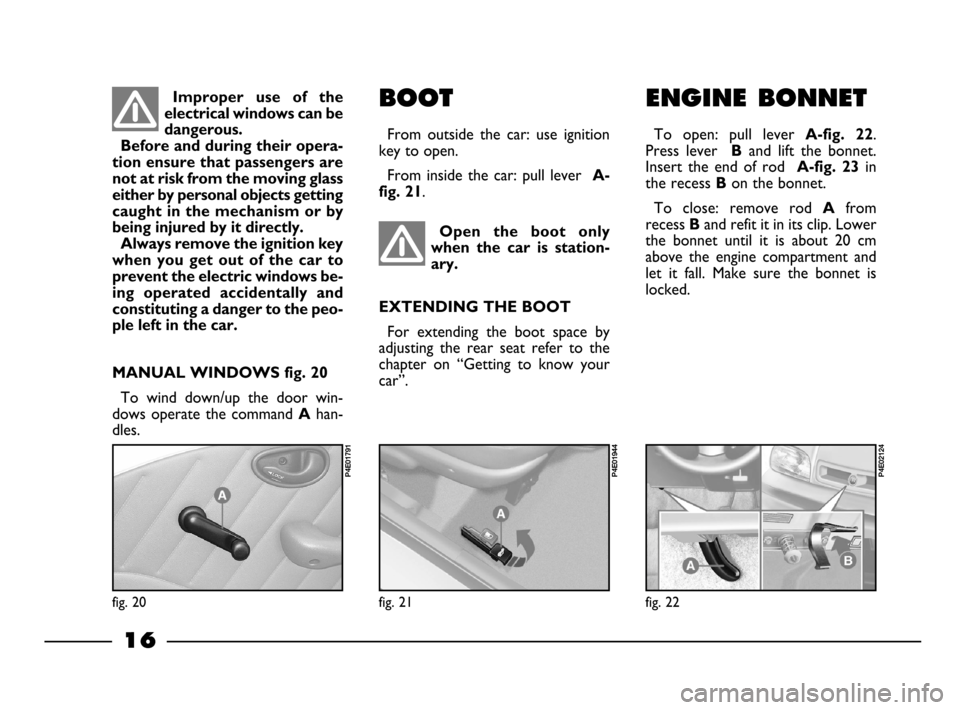
ENGINE BONNET
To open: pull lever A-fig. 22.
Press lever
Band lift the bonnet.
Insert the end of rod
A-fig. 23in
the recess
Bon the bonnet.
To close: remove rod
Afrom
recess
Band refit it in its clip. Lower
the bonnet until it is about 20 cm
above the engine compartment and
let it fall. Make sure the bonnet is
locked.
fig. 22
P4E02124
Open the boot only
when the car is station-
ary.
EXTENDING THE BOOT
For extending the boot space by
adjusting the rear seat refer to the
chapter on “Getting to know your
car”.
fig. 21
P4E01944
BOOT
From outside the car: use ignition
key to open.
From inside the car: pull lever
A-
fig. 21
.
Improper use of the
electrical windows can be
dangerous.
Before and during their opera-
tion ensure that passengers are
not at risk from the moving glass
either by personal objects getting
caught in the mechanism or by
being injured by it directly.
Always remove the ignition key
when you get out of the car to
prevent the electric windows be-
ing operated accidentally and
constituting a danger to the peo-
ple left in the car.
fig. 20
P4E01791
MANUAL WINDOWS fig. 20
To wind down/up the door win-
dows operate the command
Ahan-
dles.
1-19 03/03/2003 05:44 PM Page 16
Page 18 of 156
17
DOORS
Turn the keyfig. 24:
1- door locked.
2- door unlocked
Pull the handle to open.
From inside:
– to open - pull handle
A-fig. 25;
– safety lock - with the door closed
press the lever
A.
It is possible to insert the safety
lock with open door only on the pas-
senger side on versions without cen-
tralized locking.
fig. 24
P4E01367
fig. 25
P4E02015
CENTRAL DOOR LOCKING
SYSTEM
To lock/unlock all the doors at the
same time:
– from outside the car, turn the key
in the lock;
– from inside the car, with closed
door, press (to lock) or pull(to
unlock) one of the front door open-
ing lever.
The bonnet should be
opened only when the
car is stationary.
fig. 23
P4E01365
1-19 03/03/2003 05:44 PM Page 17
Page 19 of 156
18
AT THE FILLING
STATION
Refuel the car with unleaded fuel
only with octane-number (R.O.N.)
equal to 87.
Lift the lever
A-fig. 27to unlock
the access door of fuel tank plug.
fig. 27
P4E01945
When refueling, position the plug in
the adequate seat on the door, as
shown in
fig. 28.
CHILD SAFETY LOCK
(rear doors)
This ensures that the rear doors
cannot be opened from inside the
car.
With the head of the ignition key
turn the device
A-fig. 26.
Position
1 - activated device.
Position
2 - deactivated device (a
little yellow mark certificates the
occurred connection).
fig. 26
P4E01612
1-19 03/03/2003 05:44 PM Page 18
Page 20 of 156
19
Ideally, refuel the car
before the reserve warn-
ing light illuminates.
Driving in fuel shortage condi-
tions can cause irregular supply
with negative effects on the
exhaust and catalytic system.
A damaged catalytic
convertor means harm-
ful emissions and conse-
quent environment pollution.NEVER go close to the
tank filler with naked
flames or lit cigarettes:
Also avoid going too close to
the fuel tank filler area, to avoid
inhaling harmful vapours.
NEVER fill leaded fuel
in the car (even in an
emergency) as the cat-
alytic muffler will get irre-
barably damaged.
1-19 03/03/2003 05:44 PM Page 19
Page 21 of 156

GETTING TO KNOW YOUR CAR
You should read this chapter sitting comfortably in
your new Fiat Palio. This way you can see the parts
described in the handbook at a glance and immediate-
ly check out what you have just read for yourself.
You will quickly become familiar with your Fiat Palio,
and its control and other features. Later, when you start
the engine and join the traffic, you will make a host of
other pleasant discoveries.INSTRUMENTS ......................................................... PAGE 33
WARNING LIGHTS ................................................ PAGE 35
HEATING/
CLIMATE CONTROL SYSTEM ............................ PAGE 37
MANUAL CLIMATE CONTROL SYSTEM ....... PAGE 38
STEERING COLUMN STALKS ............................. PAGE 41
CONTROLS ............................................................... PAGE 43
INTERIOR EQUIPMENT ........................................ PAGE 45
DOORS ........................................................................ PAGE 48
BOOT .......................................................................... PAGE 51
BONNET .................................................................... PAGE 54
HEADLIGHTS ............................................................ PAGE 56
ABS ............................................................................... PAGE 56
AIR BAG ...................................................................... PAGE 58
SOUND SYSTEM ....................................................... PAGE 60
AT THE FILLING STATION ................................. PAGE 62
PROTECTING THE ENVIRONMENT ............... PAGE 63
20
KEYS ............................................................................. PAGE 21
IGNITION SWITCH ............................................... PAGE 21
INDIVIDUAL SETTINGS ........................................ PAGE 22
SEAT BELTS ............................................................... PAGE 24
TRANSPORTING CHILDREN IN SAFETY ...... PAGE 29
PRETENSIONER ....................................................... PAGE 32
20-63 03/03/2003 06:02 PM Page 20
Page 22 of 156

21
IGNITION
SWITCH
The key can turn to 4 different po-
sitions
fig. 2:
–
STOP: engine switched off, ex-
tractable key, steering column lock.
Some electrical devices (e.g. door cen-
tralized lock etc.) remain operational.
–
MAR: ride position. All electrical
devices are operational.
–
AVV: engine starting.
–
PARK: engine switched-off, park-
ing lights switched on, extractable key,
steering column lock. To turn the key
in
PARK position, press the button
A.
In the event of a break-
in (e.g. attempted theft),
have the car checked at a
Fiat Dealership prior to driving
again.
fig. 1
P4E02062
KEYS
Two keys are provided with the car
& (
fig. 1) they are used for:
– the ignition;
– the front doors;
– the boot door.
Together with the keys, a self-stick
label is supplied. On this label is re-
ported the number to be quoted to
Fiat Dealershipwhen ordering du-
plicate keys.
fig. 2
P4E02017
When getting out of the
car, always remove the
key, to avoid someone ac-
cidentally activating the controls.
Remember to engage the hand
brake, ensuring complete lockup
of the car, engage gear and leave
the wheels steered. If the car is
parked on a very sloping road, we
recommend you lock the wheels
also with a wedge or a stone.
Never leave children alone in an
unattended car.
20-63 03/03/2003 06:02 PM Page 21
Page 23 of 156

Once you have released the lever,
check that the seat is firmly locked in
the runners by trying to move it back
and forth. Failure to lock the seat in
place could result the seat moving sud-
denly and the driver losing control of
the car.
Adjusting the reclining seat
back
Turn knob B-fig. 3until the back
reaches the reclination you desire.
Do not remove the seats
nor carry out mainte-
nance and/or repair oper-
ations on them. Improper oper-
ations can compromise safety de-
vice operation. Always go to a Fi-
at Dealership.
22
Moving the seat backwards or
forwards
Lift the lever A-fig. 3and push the
seat forwards or backwards; you are
in the correct position for driving
when your hands are resting on the
steering wheel rim and your arms are
slightly bent.
Only make adjustments
when the car is station-
ary.
STEERING COLUMN LOCK
Engagement:
After turning the key
to position STOP or PARK remove it
and turn the steering wheel till it locks .
To release: Gently move the steer-
ing wheel from side to side as you turn
the ignition key to
MAR.
Never remove the igni-
tion key while the car is
moving. The steering
wheel will automatically lock as
soon as you turn it. This also ap-
plies when the car is being towed.
INDIVIDUAL SET-
TINGS
FRONT SEATS fig. 3
fig. 3
P4E01989
20-63 03/03/2003 06:02 PM Page 22
Page 24 of 156
23
HEAD RESTS
Front seats fig. 4
To improve passenger safety, the
height of the head restraints can be ad-
justed. They lock into place automat-
ically.
fig. 4
P4E01603
Remember that the
head restraints should be
adjusted to support the
back of your head and not your
neck. Only if they are in this po-
sition will they be able to provide
effective protection in the event
of a rear-end shunt.
DRIVING MIRROR fig. 6
This mirror can be adjusted. Move
lever
Ato shift the mirror to the fol-
lowing positions:
1)anti glare position;
2) standard position.
fig. 6
P4E01375
20-63 03/03/2003 06:02 PM Page 23