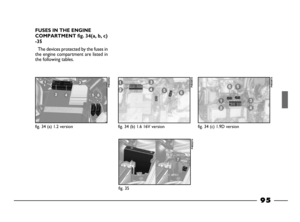
Page 49 of 156
48
fig. 51
P4E02035
Opening/locking the rear doors
from the inside
To open: pull leverA-fig. 51. The
door will open if the child safety lock
A-fig. 52 is not engaged.
To lock: close the doors and press
lever
A.
Manual locking/opening from
front door inside
To open: pull leverA-fig. 50.
Locking: close the door and press
lever
A. In this way the rear door
locking is obtained (central locking
versions).
fig. 50
P4E02015
fig. 49
P4E01367
Before opening a door,
make sure this can be
done in safety.
DOORS
SIDE DOORS
Manual unlocking from the out-
side
Turn the key to 2-fig. 49and pull the
handle upwards.
Manual locking from the out-
side
Turn the key to position 1.
20-63 03/03/2003 06:03 PM Page 48
Page 50 of 156

49
This device should al-
ways be used when trans-
porting children. Child safety lock
This ensures that the rear doors can-
not be opened from inside the vehicle.
Engage by inserting the tip of the ig-
nition key in
A-fig. 52 and turning it.
Position
1 - unlocked.
Position
2 - locked (a yellow little
mark certificates the engagement).
The device will be engaged even if
the doors are unlocked electrically.
fig. 52
P4E01612
fig. 53
P4E02011
ELECTRIC WINDOW
WINDERS
Front electric windows fig. 53
The electric windows are controlled
by two buttons located on the inside
handle of the driver’s door. They work
when the ignition key is at
MAR:
A- front left-hand window;
B- front right-hand window.
There is a button, located inside the
handle of the passenger’s door, to
control the relevant electric window.
Press the button to lower the win-
dows and pull to close.
CENTRAL DOOR LOCKING
SYSTEM
From outside
When the doors are closed, insert
and turn the key in the lock of one of
the front doors.
From inside
When the doors are closed, press
(to lock) or pull (to unlock) one of the
front door opening levers.
Operating the lever
A-fig. 51of the
rear doors, you lock/unlock the only
door interested.
IMPORTANTIf one of the doors
is not shut properly or there is a fail-
ure in the system, the central locking
feature will be not engaged and after
a few attempts the device is cut out
for about 2 minutes. During these 2
minutes, the doors can be locked or
unlocked manually without the elec-
trical system coming to play. After 2
minutes, the control unit is ready to
receive commands.
If the reason for the malfunction has
been removed, the device will start to
work properly again. If not it will cut
out once more.
20-63 03/03/2003 06:03 PM Page 49
Page 51 of 156

50
Do not keep the switch
pressed when the window
is completely wound up
or down.
Improper use of the
electrical windows can be
dangerous.
Before and during their opera-
tion ensure that no passengers
are at risk from the moving glass
either by personal objects getting
caught in the mechanism or by
being injured by it directly.
Always remove the ignition key
when you get out of the car to
prevent the electric windows be-
ing operated accidentally and
constituting a danger to the peo-
ple left in the car.
fig. 54
P4E02012
Rear electric windows
Inside the handle of each door there
is a button
A-fig. 54to activate the
relevant window.
Press the switch to lower the win-
dow.
Pull the switch to raise the window.
Additional buttons to control the rear
windows from the front seats are lo-
cated near the gear lever on the cen-
tral console:
B - rear left-hand window button;
C - rear right-hand window button;
D - rear door enable button (the
lights in the rear window buttons will
go out when the window winders are
disabled).
Manual window winders fig. 55
Use the appropriate handleA to
wind the window up or down.
fig. 55
P4E01791
20-63 03/03/2003 06:03 PM Page 50
Page 52 of 156
51
When using the boot,
make sure the load you
are carrying does not ex-
ceed the permitted weight (see
the chapter “Technical Specifi-
cations”). Also make sure the
items in the boot are arranged
properly to prevent them being
thrown forwards and injuring pas-
sengers should you brake sharply.BOOT
OPENING/CLOSING
THE BOOT
TAILGATE
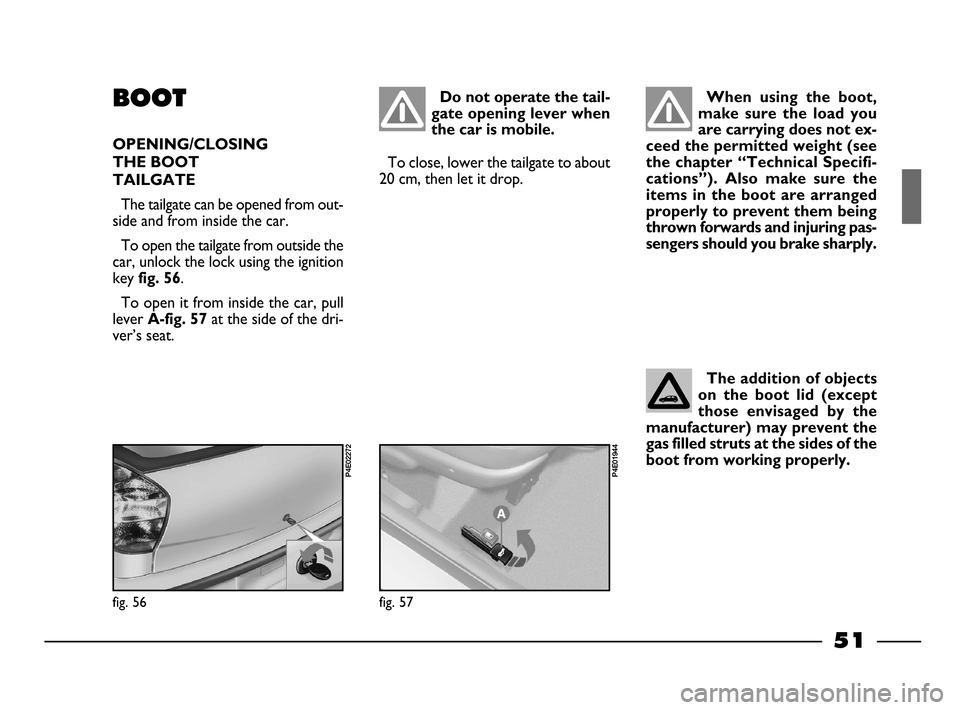
The tailgate can be opened from out-
side and from inside the car.
To open the tailgate from outside the
car, unlock the lock using the ignition
key
fig. 56.
To open it from inside the car, pull
lever
A-fig. 57at the side of the dri-
ver’s seat.
Do not operate the tail-
gate opening lever when
the car is mobile.
To close, lower the tailgate to about
20 cm, then let it drop.
fig. 56
P4E02272
fig. 57
P4E01944
The addition of objects
on the boot lid (except
those envisaged by the
manufacturer) may prevent the
gas filled struts at the sides of the
boot from working properly.
20-63 03/03/2003 06:03 PM Page 51
Page 53 of 156
52
To return the seat to normal
position
1)
Tip the entire seat backwards.
2) Tip the seat back backwards. Pass
the belts to the side and fasten the seat
back to the retainers. Make sure it is
fastened.
INCREASING THE LUGGAGE
SPACE AREA
1)
Release the seat back by means of
the side levers
A-fig. 58in the direc-
tion of the arrow.
2) Tip forward the seat back, by lat-
erally passing the seat belts, up to rest
it on the rear cushion
fig. 59.
3) Then tip forward the complete
rear seat back
fig. 60, in order to ob-
tain an only loading surface with the
boot floor.
fig. 58
P4E01746
fig. 59
P4E01993
fig. 60
P4E01994
fig. 61
P4E01749
20-63 03/03/2003 06:03 PM Page 52
Page 54 of 156
53
If you want to carry a
can of petrol as a reserve,
adhere to the laws in
force. Not following precautions
increases the risk of fire in the
event of an accident. To remove the
parcel shelf
1)
Free the upper extremities A-fig.
61
of the two tie rods, withdrawing
the eyelets from the pins.
2)Free the cover pins A-fig. 62
from their seats Band remove it.
After removing, the cover can be
transversally positioned between the
front seat backs and the tipped chush-
ion of the rear seat.
IMPORTANT If the load in the
boot is fairly heavy and you are trav-
elling at night, check and adjust the
height of the dipped beam headlights
(see“ Headlights” paragraph in this
chapter).
Heavy loads which are
not securely anchored
could seriously injure pas-
sengers in the event of an acci-
dent.
We suggest you do not
drive with the tailgate
open, as the exhaust gas-
es can come inside the car via the
boot.
fig. 62
P4E01750
20-63 03/03/2003 06:03 PM Page 53
Page 55 of 156
54
When the engine is run-
ning, do not put hands
near moving elements.
Be very careful that scarves, ties
or loose clothing do not acciden-
tally get caught in moving parts;
this can be extremely dangerous.BONNET
To open the bonnet:
1) Pull lever A-fig. 63.
fig. 64
P4E02273
fig. 65
P4E01365
Before lifting the bonnet
check that the wind-
screen wiper arms are
not raised from the windscreen.
Important. Improper
positioning of the support
rod could cause the bon-
net fall violently.
This should only be done
when the car is station-
ary.
2)Press lever A-fig. 64.
3)Lift the bonnet and release the
support rod
A-fig. 65from its clip.
4)Insert the end of the rod in its re-
cess
Bon the bonnet.
fig. 63
P4E02037
20-63 03/03/2003 06:03 PM Page 54
Page 56 of 156

55
To close the bonnet:
1) Hold the bonnet up with one hand
and with the other remove the rod
A-
fig. 65
from the recess Band replace
it in its clip.
2)Lower the bonnet until it is about
20 cm above the engine compartment.
3) Let it fall: the bonnet closes au-
tomatically.
ROOF RACK
Move the door weather strips aside
in the points shown in
fig. 66to reach
the fasteners.
When the engine is hot,
be very careful not to burn
yourself when operating
inside the engine compartment.
Keep your hands away from the
electric fan as it may switch on at
any time, even with the key re-
moved from the ignition switch.
Wait until the engine cools down.
Always make sure the
bonnet is closed properly
so it will not open whilst
the car is moving.
After travelling a few
kilometers, check that
the securing screws are
tight.
Never exceed the per-
mitted weight (see
“Technical specifications”
chapter).
Be careful not to dam-
age the objects on the
roof rack opening the tail-
gate.
20-63 03/03/2003 06:03 PM Page 55