Page 233 of 1690
A56277
NE± NE+
A57060
NE± NE+
B16200
10±58
± ENGINE CONTROL SYSTEMECD SYSTEM (1CD±FTV)
AVENSIS REPAIR MANUAL (RM1018E)
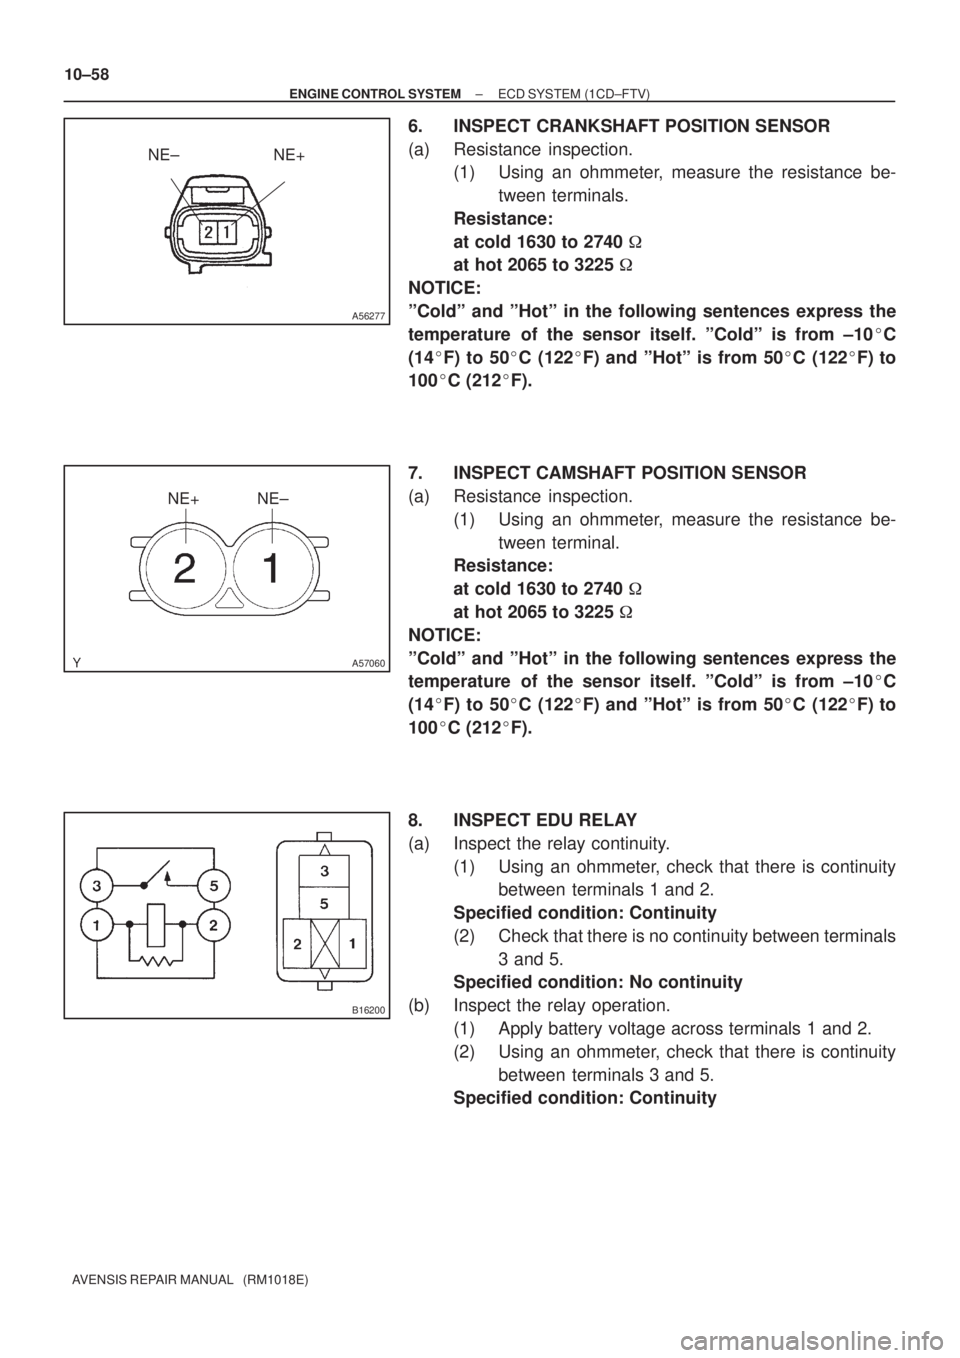
6. INSPECT CRANKSHAFT POSITION SENSOR
(a) Resistance inspection.
(1) Using an ohmmeter, measure the resistance be-
tween terminals.
Resistance:
at cold 1630 to 2740 �
at hot 2065 to 3225 �
NOTICE:
ºColdº and ºHotº in the following sentences express the
temperature of the sensor itself. ºColdº is from ±10�C
(14�F) to 50�C (122�F) and ºHotº is from 50�C (122�F) to
100�C (212�F).
7. INSPECT CAMSHAFT POSITION SENSOR
(a) Resistance inspection.
(1) Using an ohmmeter, measure the resistance be-
tween terminal.
Resistance:
at cold 1630 to 2740 �
at hot 2065 to 3225 �
NOTICE:
ºColdº and ºHotº in the following sentences express the
temperature of the sensor itself. ºColdº is from ±10�C
(14�F) to 50�C (122�F) and ºHotº is from 50�C (122�F) to
100�C (212�F).
8. INSPECT EDU RELAY
(a) Inspect the relay continuity.
(1) Using an ohmmeter, check that there is continuity
between terminals 1 and 2.
Specified condition: Continuity
(2) Check that there is no continuity between terminals
3 and 5.
Specified condition: No continuity
(b) Inspect the relay operation.
(1) Apply battery voltage across terminals 1 and 2.
(2) Using an ohmmeter, check that there is continuity
between terminals 3 and 5.
Specified condition: Continuity
Page 234 of 1690
B16200
A31135
± ENGINE CONTROL SYSTEMECD SYSTEM (1CD±FTV)
10±59
AVENSIS REPAIR MANUAL (RM1018E)
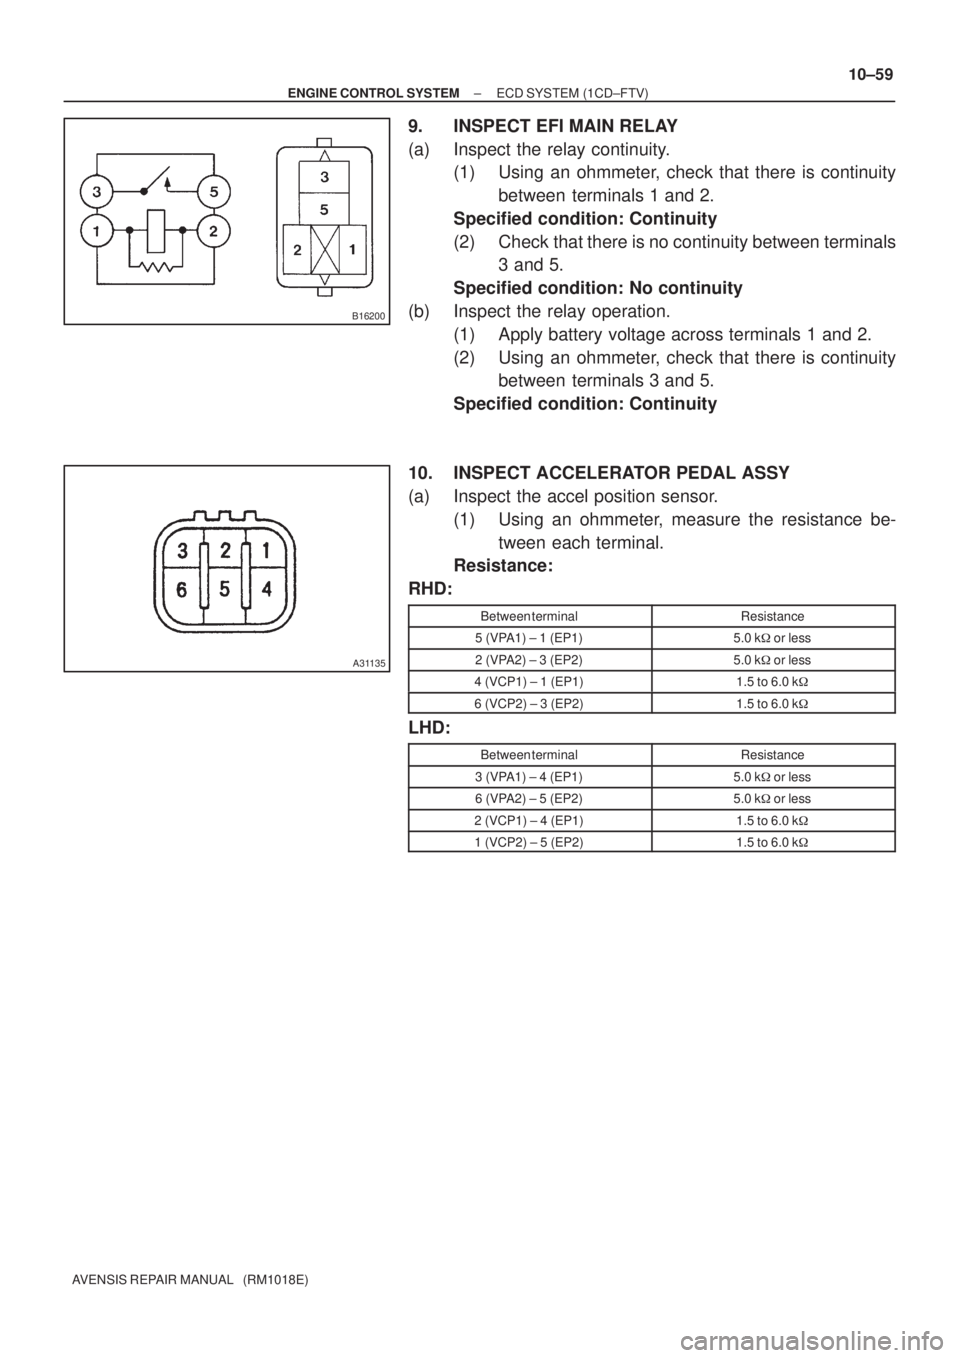
9. INSPECT EFI MAIN RELAY
(a) Inspect the relay continuity.
(1) Using an ohmmeter, check that there is continuity
between terminals 1 and 2.
Specified condition: Continuity
(2) Check that there is no continuity between terminals
3 and 5.
Specified condition: No continuity
(b) Inspect the relay operation.
(1) Apply battery voltage across terminals 1 and 2.
(2) Using an ohmmeter, check that there is continuity
between terminals 3 and 5.
Specified condition: Continuity
10. INSPECT ACCELERATOR PEDAL ASSY
(a) Inspect the accel position sensor.
(1) Using an ohmmeter, measure the resistance be-
tween each terminal.
Resistance:
RHD:
Between terminalResistance
5 (VPA1) ± 1 (EP1)5.0 k�or less
2 (VPA2) ± 3 (EP2)5.0 k�or less
4 (VCP1) ± 1 (EP1)1.5 to 6.0 k�
6 (VCP2) ± 3 (EP2)1.5 to 6.0 k�
LHD:
Between terminalResistance
3 (VPA1) ± 4 (EP1)5.0 k�or less
6 (VPA2) ± 5 (EP2)5.0 k�or less
2 (VCP1) ± 4 (EP1)1.5 to 6.0 k�
1 (VCP2) ± 5 (EP2)1.5 to 6.0 k�
Page 235 of 1690
100EZ±02
A75903
Air
A53763
VG
EVG
10±54
±
ENGINE CONTROL SYSTEM ECD SYSTEM(1CD±FTV)
AVENSIS REPAIR MANUAL (RM1018E)
ECD SYSTEM(1CD±FTV)
ON±VEHICLE INSPECTION
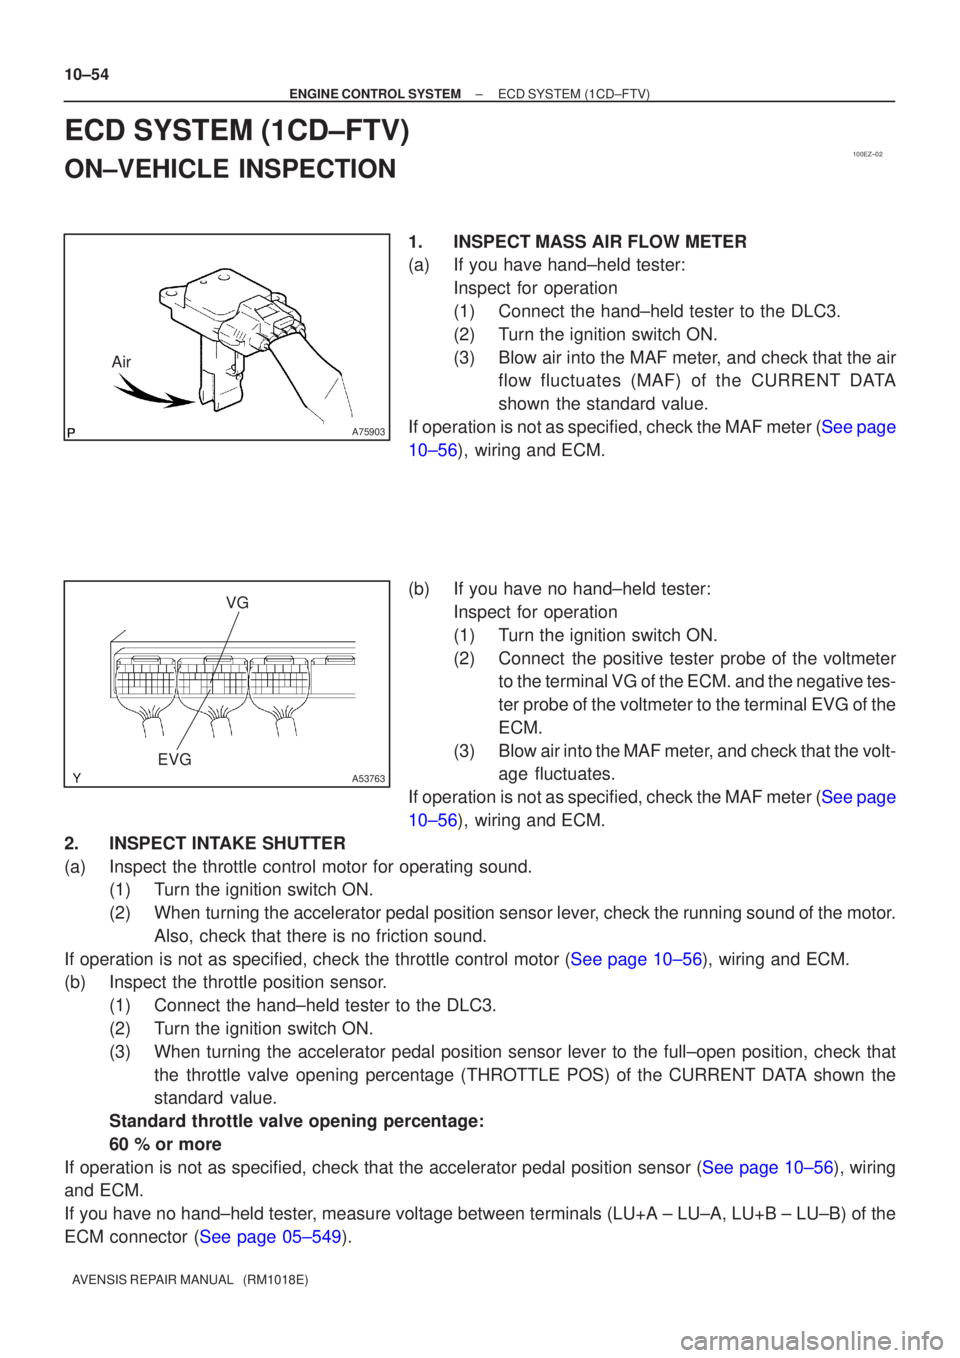
1.INSPECTMASS AIR FLOW METER
(a)If you have hand±held tester: Inspect for operation
(1)Connect the hand±held tester to the DLC3.
(2)Turn the ignition switch ON.
(3)Blow air into the MAF meter, and check that the airflow fluctuates (MAF ) of the CURRENT DATA
shown the standard value.
If operation is not as specified, check the MAF meter (See page
10±56), wiring and ECM.
(b)If you have no hand±held tester: Inspect for operation
(1)Turn the ignition switch ON.
(2)Connect the positive tester probe of the voltmeterto the terminal VG of the ECM. and the negative tes-
ter probe of the voltmeter to the terminal EVG of the
ECM.
(3)Blow air into the MAF meter, and check that the volt- age fluctuates.
If operation is not as specified, check the MAF meter (See page
10±56), wiring and ECM.
2.INSPECT INTAKE SHUTTER
(a)Inspect the throttle control motor for operating sound. (1)Turn the ignition switch ON.
(2)When turning the accelerator pedal position sensor lever, check the running sound of the motor.
Also, check that there is no friction sound.
If operation is not as specified, check the throttle control motor (See page 10±56), wiring and ECM.
(b)Inspect the throttle position sensor. (1)Connect the hand±held tester to the DLC3.
(2)Turn the ignition switch ON.
(3)When turning the accelerator pedal position sensor lever to the full±\
open position, check thatthe throttle valve opening percentage (THROTTLE POS) of the CURRENT DATA shown the
standard value.
Standard throttle valve opening percentage:
60 % or more
If operation is not as specified, check that the accelerator pedal positio\
n sensor (See page 10±56), wiring
and ECM.
If you have no hand±held tester, measure voltage between terminals (LU+A ± LU±A, LU+B ± LU±\
B) of the
ECM connector (See page 05±549).
Page 236 of 1690
±
ENGINE CONTROL SYSTEM ECD SYSTEM(1CD±FTV)
10±55
AVENSIS REPAIR MANUAL (RM1018E)
(c)Inspect the air assist system.
(1)Start the engine and check that the CHKENG does not light up.
(2)Allow the engine to warm up to normal operating temperature.
(3)Turn the A/C compressor ON to OFF, and check the idle speed.
Idle speed (Transmission in neutral): 800 � 50 rpm
NOTICE:
Perform inspection under condition without electrical load.
(d)After checking the above (b) to (d), perform the driving test and check that there is no sense of incon- gruity.
3.INSPECT ACCELERATOR PEDAL POSITION SENSOR
(a)Connect the hand±held tester to the DLC3.
(b)Turn the ignition switch ON.
(c)Check that the voltage (ACCEL POS) of the CURRENT DATA shown the standard value. Accelerator pedal released: 0.5 to 1.1 V
Accelerator pedal depress: 2.6 to 4.5 V
(d)Check that the voltage (ACCEL POS #2) of the CURRENT DATA shown the standard value.
Accelerator pedal released: 1.2 to 2.0 V
Accelerator pedal depress: 3.4 to 5.3 V
If you have no hand±held tester, measure voltage between terminals (VPA1 ± EP1, VPA2 ± EP2) of the ECM
connector (See page 05±549).
Page 247 of 1690
10±36
±
ENGINE CONTROL SYSTEM KNOCK SENSOR(1AZ±FE)
AVENSIS REPAIR MANUAL (RM1018E)
18.INSTALL INTAKE MANIFOLD INSULATOR NO.1
19.INSTALL INTAKE MANIFOLD
(a)Install a new gasket to the intake manifold.
(b)Install the intake manifold with the 5 bolts and 2 nuts. Torque: 30 N �m (306 kgf �cm, 22 ft �lbf)
(c)Install the wire harness clamp.
(d)Connect the union to connector tube hose.
20.CONNECT HEATER INLET WATER HOSE
21.INSTALL CHARCOAL CANISTER ASSY
22.INSTALL VARIABLE RESISTOR (LHD STEERING POSITION TYPE, LEADED GASOLINE) Torque: 5.0 N �m (51 kgf �cm, 44 in. �lbf)
23.INSTALL FUEL DELIVERY PIPE SUB±ASSY (See page 11±26)
24.CONNECT FUEL TUBE SUB±ASSY (See page 11±26)
25.INSTALL THROTTLE BODY ASSY (See page 10±26)
26.INSTALL ACCELERATOR CONTROL CABLE ASSY (See page 10±26)
27. INSTALL AIR CLEANER CAP SUB±ASSY
28.ADD ENGINE COOLANT (See page 16±19)
29.CHECK FOR ENGINE COOLANT LEAKS (See page 16±13)
30.CHECK FOR FUEL LEAKS (See page 11±19)
31.INSTALL ENGINE COVER SUB±ASSY NO.1 (See page 10±26)
32. INSTALL ENGINE ROOM COVER SIDE
33. INSTALL RADIATOR SUPPORT OPENING COVER
Page 254 of 1690
10±36
±
ENGINE CONTROL SYSTEM KNOCK SENSOR(1AZ±FE)
AVENSIS REPAIR MANUAL (RM1018E)
18.INSTALL INTAKE MANIFOLD INSULATOR NO.1
19.INSTALL INTAKE MANIFOLD
(a)Install a new gasket to the intake manifold.
(b)Install the intake manifold with the 5 bolts and 2 nuts. Torque: 30 N �m (306 kgf �cm, 22 ft �lbf)
(c)Install the wire harness clamp.
(d)Connect the union to connector tube hose.
20.CONNECT HEATER INLET WATER HOSE
21.INSTALL CHARCOAL CANISTER ASSY
22.INSTALL VARIABLE RESISTOR (LHD STEERING POSITION TYPE, LEADED GASOLINE) Torque: 5.0 N �m (51 kgf �cm, 44 in. �lbf)
23.INSTALL FUEL DELIVERY PIPE SUB±ASSY (See page 11±26)
24.CONNECT FUEL TUBE SUB±ASSY (See page 11±26)
25.INSTALL THROTTLE BODY ASSY (See page 10±26)
26.INSTALL ACCELERATOR CONTROL CABLE ASSY (See page 10±26)
27. INSTALL AIR CLEANER CAP SUB±ASSY
28.ADD ENGINE COOLANT (See page 16±19)
29.CHECK FOR ENGINE COOLANT LEAKS (See page 16±13)
30.CHECK FOR FUEL LEAKS (See page 11±19)
31.INSTALL ENGINE COVER SUB±ASSY NO.1 (See page 10±26)
32. INSTALL ENGINE ROOM COVER SIDE
33. INSTALL RADIATOR SUPPORT OPENING COVER
Page 260 of 1690
100FA±01
A79596
A78436
10�
10 � Upper
Engine
Front
10±52
±
ENGINE CONTROL SYSTEM KNOCK SENSOR(1AZ±FSE)
AVENSIS REPAIR MANUAL (RM1018E)
REPLACEMENT
1.DISCHARGE FUEL SYSTEM PRESSURE (See page 11±30)
2.REMOVE RADIATOR SUPPORT OPENING COVER (See page 18±16)
3.REMOVE ENGINE ROOM COVER SIDE (See page 18±17)
4.REMOVE ENGINE COVER SUB±ASSY NO.1 (See page 10±44)
5.DRAIN ENGINE COOLANT (See page 16±31)
6.REMOVE AIR CLEANER CAP SUB±ASSY (See page 10±44)
7.REMOVE THROTTLE BODY ASSY (See page 10±44)
8.REMOVE CHARCOAL CANISTER ASSY
9.REMOVE ENGINE COVER BRACKET (See page 11±52)
10.REMOVE FUEL PUMP ASSY (See page 11±52)
11.REMOVE INTAKE MANIFOLD (See page 11±42)
12.REMOVE SURGE TANK STAY NO.1 (See page 11±42)
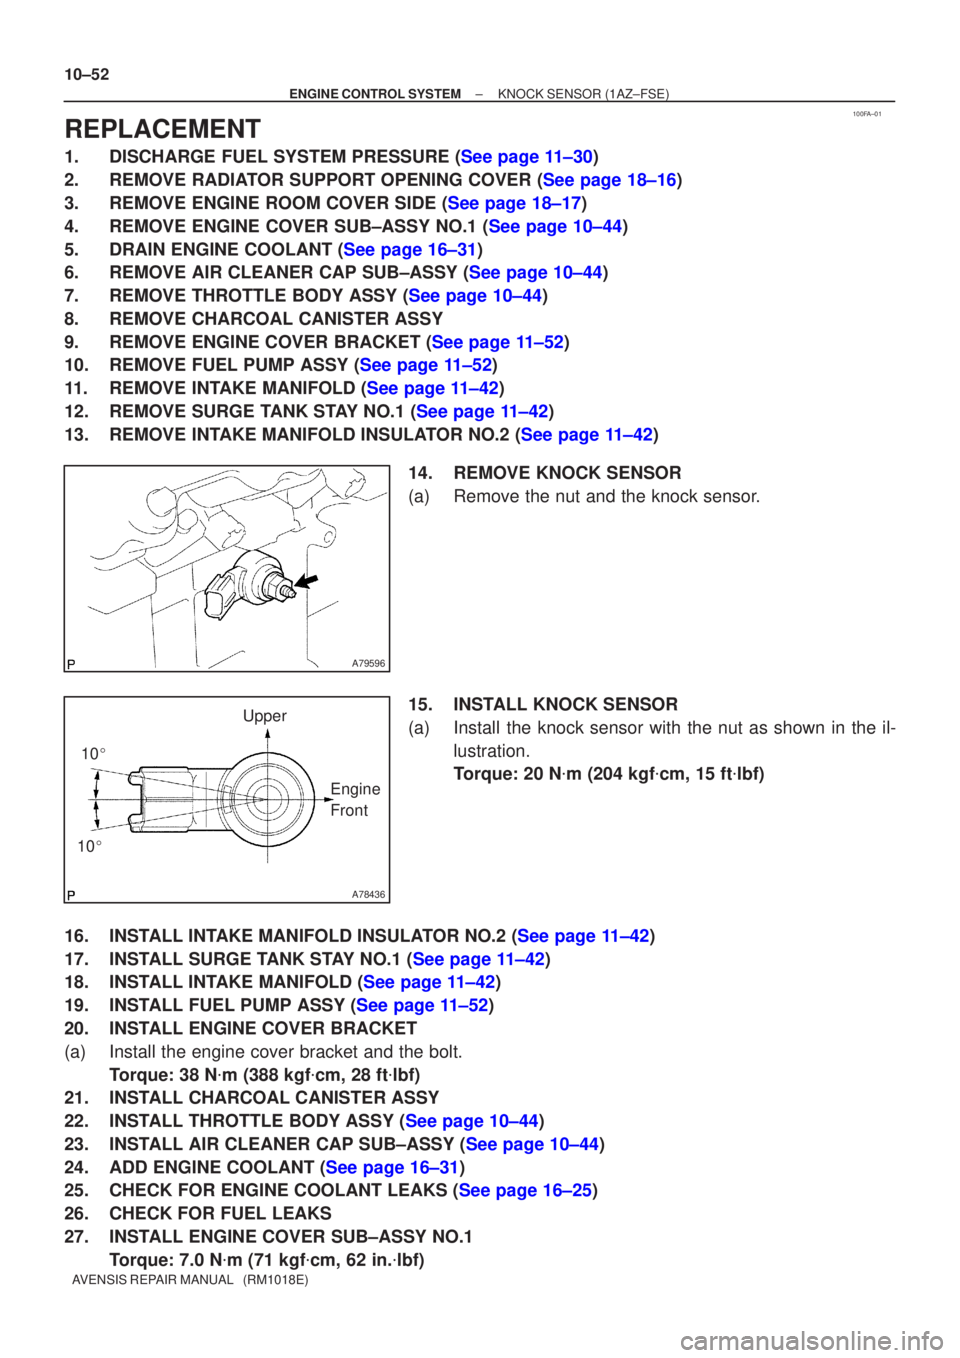
13.REMOVE INTAKE MANIFOLD INSULATOR NO.2 (See page 11±42) 14.REMOVE KNOCK SENSOR
(a)Remove the nut and the knock sensor.
15.INSTALL KNOCK SENSOR
(a)Install the knock sensor with the nut as shown in the il-lustration.
Torque: 20 N �m (204 kgf �cm, 15 ft �lbf)
16.INSTALL INTAKE MANIFOLD INSULATOR NO.2 (See page 11±42)
17.INSTALL SURGE TANK STAY NO.1 (See page 11±42)
18.INSTALL INTAKE MANIFOLD (See page 11±42)
19.INSTALL FUEL PUMP ASSY (See page 11±52)
20. INSTALL ENGINE COVER BRACKET
(a) Install the engine cover bracket and the bolt. Torque: 38 N �m (388 kgf �cm, 28 ft �lbf)
21. INSTALL CHARCOAL CANISTER ASSY
22.INSTALL THROTTLE BODY ASSY (See page 10±44)
23.INSTALL AIR CLEANER CAP SUB±ASSY (See page 10±44)
24.ADD ENGINE COOLANT (See page 16±31)
25.CHECK FOR ENGINE COOLANT LEAKS (See page 16±25)
26. CHECK FOR FUEL LEAKS
27. INSTALL ENGINE COVER SUB±ASSY NO.1
Torque: 7.0 N �m (71 kgf �cm, 62 in. �lbf)
Page 263 of 1690
100G7±02
321 4 5
±20
020 40 60
80100 0.1 0.2 0.3 0.51 235 1020 30
TEMPERATURE�C(�F)
RESISTANCE k�
(±4) (32) (80) (140)(104) (212)(176)
Air
E2
THAVG
E2G+B
A50378
12
Valve
A50377
B09641
10±20
± ENGINE CONTROL SYSTEMSFI SYSTEM (1AZ±FE)
AVENSIS REPAIR MANUAL (RM1018E)
INSPECTION
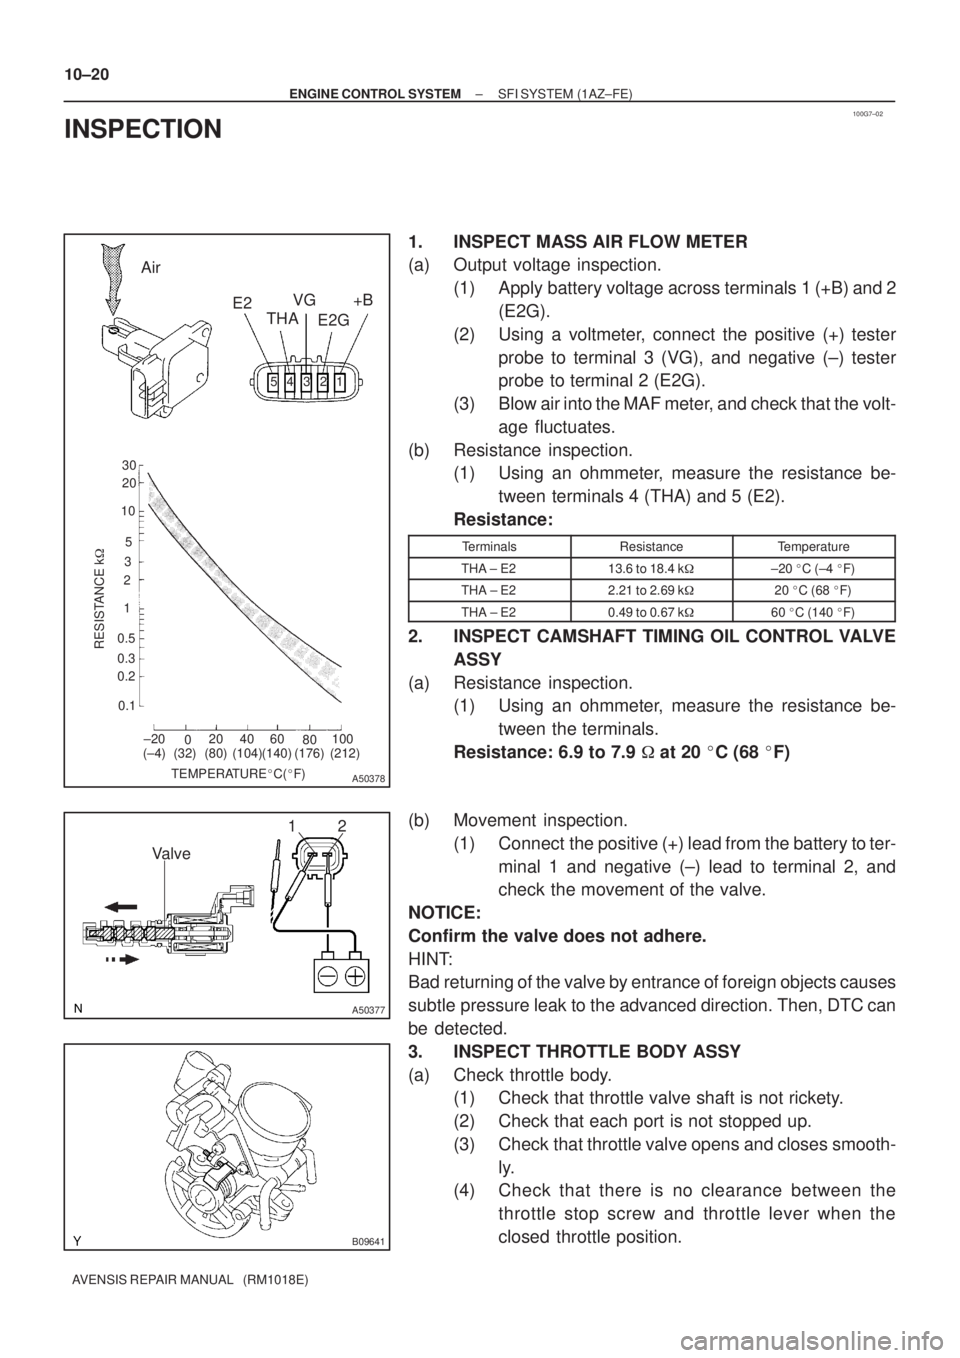
1. INSPECT MASS AIR FLOW METER
(a) Output voltage inspection.
(1) Apply battery voltage across terminals 1 (+B) and 2
(E2G).
(2) Using a voltmeter, connect the positive (+) tester
probe to terminal 3 (VG), and negative (±) tester
probe to terminal 2 (E2G).
(3) Blow air into the MAF meter, and check that the volt-
age fluctuates.
(b) Resistance inspection.
(1) Using an ohmmeter, measure the resistance be-
tween terminals 4 (THA) and 5 (E2).
Resistance:
TerminalsResistanceTemperature
THA ± E213.6 to 18.4 k�±20 �C (±4 �F)
THA ± E22.21 to 2.69 k�20 �C (68 �F)
THA ± E20.49 to 0.67 k�60 �C (140 �F)
2. INSPECT CAMSHAFT TIMING OIL CONTROL VALVE
ASSY
(a) Resistance inspection.
(1) Using an ohmmeter, measure the resistance be-
tween the terminals.
Resistance: 6.9 to 7.9 � at 20 �C (68 �F)
(b) Movement inspection.
(1) Connect the positive (+) lead from the battery to ter-
minal 1 and negative (±) lead to terminal 2, and
check the movement of the valve.
NOTICE:
Confirm the valve does not adhere.
HINT:
Bad returning of the valve by entrance of foreign objects causes
subtle pressure leak to the advanced direction. Then, DTC can
be detected.
3. INSPECT THROTTLE BODY ASSY
(a) Check throttle body.
(1) Check that throttle valve shaft is not rickety.
(2) Check that each port is not stopped up.
(3) Check that throttle valve opens and closes smooth-
ly.
(4) Check that there is no clearance between the
throttle stop screw and throttle lever when the
closed throttle position.