Page 3591 of 4323
H16683
H16684
5 Clips BO±30
± BODYBACK DOOR
3583 Author�: Date�:
2005 SEQUOIA (RM1146U)
(c) Using a screwdriver, remove the back door lock protector.
HINT:
Tape the screwdriver tip before use.
(d) Remove the 3 bolts and back door lock.
Torque: 8.0 N´m (82 kgf´cm, 71 in.´lbf)
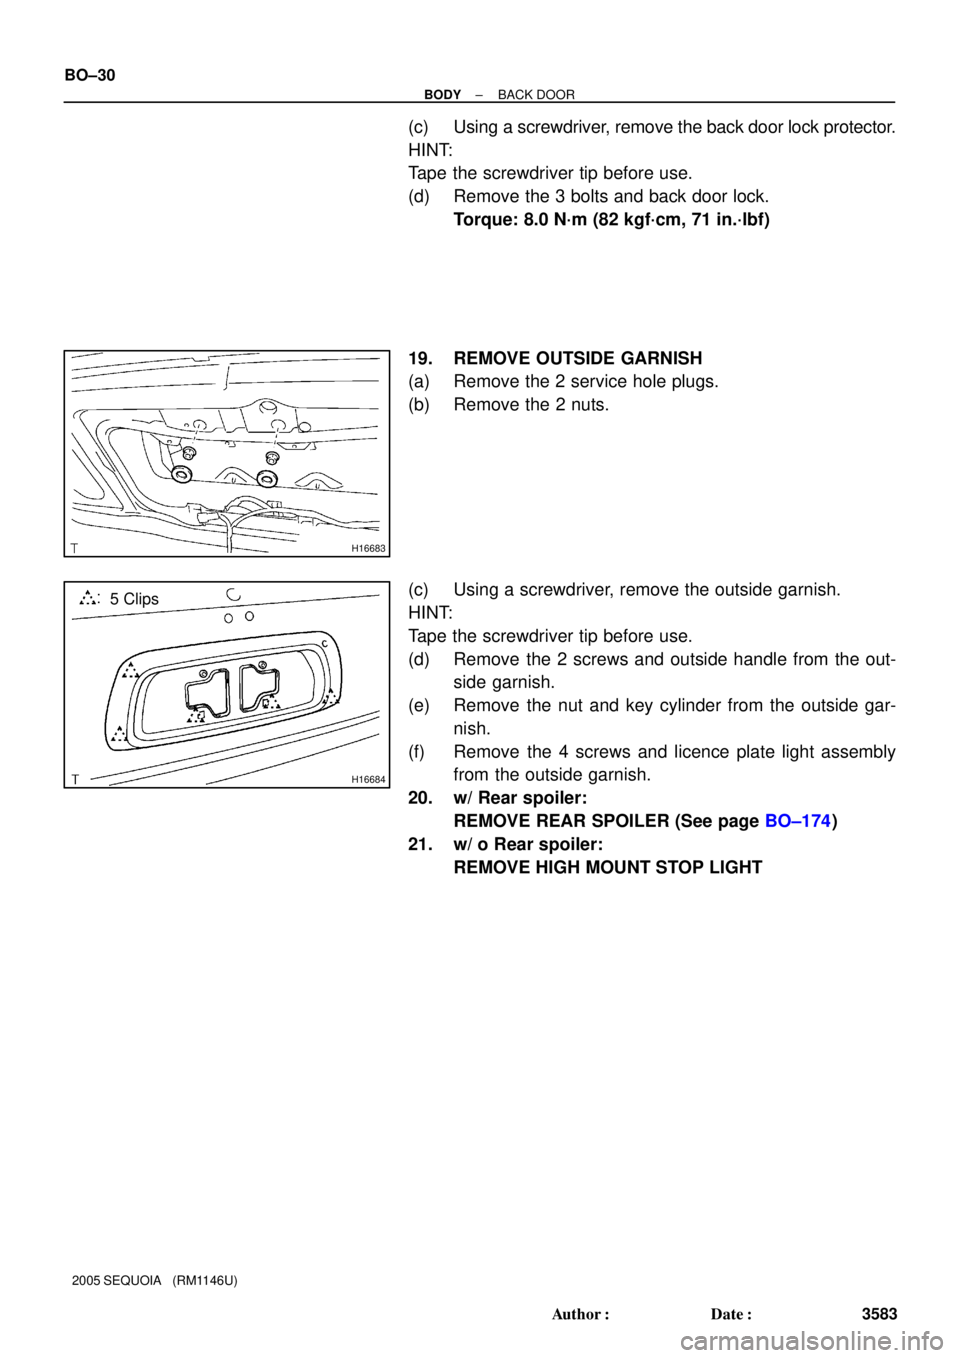
19. REMOVE OUTSIDE GARNISH
(a) Remove the 2 service hole plugs.
(b) Remove the 2 nuts.
(c) Using a screwdriver, remove the outside garnish.
HINT:
Tape the screwdriver tip before use.
(d) Remove the 2 screws and outside handle from the out-
side garnish.
(e) Remove the nut and key cylinder from the outside gar-
nish.
(f) Remove the 4 screws and licence plate light assembly
from the outside garnish.
20. w/ Rear spoiler:
REMOVE REAR SPOILER (See page BO±174)
21. w/ o Rear spoiler:
REMOVE HIGH MOUNT STOP LIGHT
Page 3594 of 4323

± BODYBACK DOOR STAY
BO±33
3586 Author�: Date�:
2005 SEQUOIA (RM1146U)
BACK DOOR STAY
REPLACEMENT
1. REMOVE BACK DOOR STAY
(a) Slide the clip, then remove the ba")
BO45X±01
H17899
150 mm (5.91 in.)
± BODYBACK DOOR STAY
BO±33
3586 Author�: Date�:
2005 SEQUOIA (RM1146U)
BACK DOOR STAY
REPLACEMENT
1. REMOVE BACK DOOR STAY
(a) Slide the clip, then remove the back door stay from the
back door.
HINT:
While supporting the back door with your hand, remove the
back door stay.
(b) Slide the clip, then remove the bolts and back door stay
from the body.
2. IF NECESSARY, REPLACE BACK DOOR STAY
NOTICE:
When handling the back door stay.
�Do not disassemble the back door stay because the
cylinder is filled with pressurized gas.
�If the back door stay is to be replaced, drill a 2.0 ± 3.0
mm (0.079 ± 0.118 in.) hole in the bottom of the back
door stay as shown in the illustration to completely
release the high±pressure gas before disposing of it.
�When drilling, chips may fly out so work carefully.
�The gas is colorless, odorless and non±toxic.
�When working, handle the back door stay carefully.
Never score or scratch the exposed part of the piston
rod, and never allow paint or oil to get on it.
�Do not turn the piston rod and cylinder with the back
door stay fully extended.
3. INSTALL BACK DOOR STAY
(a) Install the bolts and back door stay to the body.
Torque: 19 N´m (195 kgf´cm, 14 ft´lbf)
(b) Install the bolts and back door stay to the back door.
Torque: 19 N´m (195 kgf´cm, 14 ft´lbf)
Page 3735 of 4323
BO47W±01
H16756
Service Hole Plug
Rear Trim Rear Spoiler
Service Hole PlugHigh Mounted
Stop Light
N´m (kgf´cm, ft´lbf) : Specified torque
12 (120, 8)
12 (120, 8)
12 (120, 8)
12 (120, 8)
BO±174
± BODYSPOILER
3727 Author�: Date�:
2005 SEQUOIA (RM1146U)
SPOILER
COMPONENTS
Page 3736 of 4323

AIR CONDITIONING SYSTEM
PRECAUTION
1. DO NOT HANDLE")
AC2810
AC1JS±06
AC2811
N11084
Wrong Okay
HI LO HILO
± AIR CONDITIONINGAIR CONDITIONING SYSTEM
AC±1
3728 Author�: Date�:
2005 SEQUOIA (RM1146U)
AIR CONDITIONING SYSTEM
PRECAUTION
1. DO NOT HANDLE REFRIGERANT IN AN ENCLOSED
AREA OR NEAR AN OPEN FLAME
2. ALWAYS WEAR EYE PROTECTION
3. BE CAREFUL NOT TO GET LIQUID REFRIGERANT IN
YOUR EYES OR ON YOUR SKIN
If liquid refrigerant gets in your eyes or on your skin.
(a) Wash the area with lots of cool water.
CAUTION:
Do not rub your eyes or skin.
(b) Apply clean petroleum jelly to the skin.
(c) Go immediately to a physician or hospital for professional
treatment.
4. NEVER HEAT CONTAINER OR EXPOSE IT TO OPEN
FLAME
5. BE CAREFUL NOT TO DROP CONTAINER OR NOT TO
APPLY PHYSICAL SHOCKS TO IT
6. DO NOT OPERATE COMPRESSOR WITHOUT
ENOUGH REFRIGERANT IN REFRIGERATION SYS-
TEM
If there is not enough refrigerant in the refrigerant system, oil lu-
brication will be insufficient and compressor burnout may occur.
Necessary care should be taken to avoid this.
7. DO NOT OPEN PRESSURE MANIFOLD VALVE WHILE
COMPRESSOR IS OPERATING
If the high pressure valve is opened, refrigerant flows in the re-
verse direction and could cause the charging cylinder to rup-
ture, so open and close only the low pressure valve.
8. BE CAREFUL NOT TO OVERCHARGE SYSTEM WITH
REFRIGERANT
If refrigerant is overcharged, it causes problems such as insuffi-
cient cooling, poor fuel economy, engine overheating, etc.
Page 3742 of 4323

I22614
Condition: Insufficient cooling
Single A/C:
Dual A/C:
I22614
Condition: Insufficient cooling
Single A/C:
Dual A/C:
NOTE: These indications
are shown when the refrig-
eration system has been
opened and the refrigerant
has been charged without
vacuum purging.
± AIR CONDITIONINGAIR CONDITIONING SYSTEM
AC±7
3734 Author�: Date�:
2005 SEQUOIA (RM1146U)
(6) Refrigerant overcharged or insufficient cooling of
condenser
Symptom seen in
refrigeration systemProbable causeDiagnosisRemedy
� Pressure too high on both low
and high pressure sides
� No air bubbles seen through the
sight glass even when the engine
rpm is lowered� Unable to develop sufficient per-
formance due to excessive refrig-
erant
� Insufficient cooling of condenser� Excessive refrigerant in
cycle"refrigerant overcharged
� Condenser cooling
insufficient"condenser fins
clogged or cooling fan faulty
(1) Clean condenser
(2) Check cooling fan with fluid
coupling operation
(3) If (1) and (2) are in normal
state, check amount of refrigerant
and charge proper amount of re-
frigerant
(7) Air present in refrigeration system
Symptom seen in
refrigeration systemProbable causeDiagnosisRemedy
� Pressure too high on both low
and high pressure sides
� The low pressure piping hot to
the touch
� Bubbles seen in sight glass
Air in refrigeration system
� Air present in refrigeration sys-
tem
� Insufficient vacuum purging
(1) Check compressor oil to see if
it is dirty or insufficient
(2) Evacuate air and charge new
refrigerant
Page 3762 of 4323
I06919
Disconnect the tube
by hand
Screwdriver
Tube
I06878
Connect Wrong
Gap
I21374
± AIR CONDITIONINGCOOLING UNIT
AC±27
3754 Author�: Date�:
2005 SEQUOIA (RM1146U)
NOTICE:
�Do not use tools like a screwdriver to remove the
tube.
�Cap the openings immediately to keep moisture or
dirt out of the system.
HINT:
At the time of reassembly, refer to the following:
�Lubricate 4 new O±rings with compressor oil and install
them to the tubes.
�After connection, check the claw of the piping clamp is se-
curely engaged.
3. REMOVE CONSOLE UPPER PANEL
4. REMOVE REAR CONSOLE BOX
5. REMOVE FRONT CONSOLE BOX
6. REMOVE GLOVE COMPARTMENT PARTS
7. REMOVE LOWER NO. 2 FINISH PANEL
8. REMOVE LOWER LH FINISH PANEL
9. REMOVE LOWER COVER (See page BO±89)
10. REMOVE NO. 4 HEATER TO REGISTER DUCT
11. REMOVE COOLING UNIT
(a) Disconnect the connectors.
(b) Remove the 3 screws and the bolt, then the cooling unit.
Page 3763 of 4323

DISASSEMBLY
1. REMOVE BLOWER MOTOR LINEAR CONTROLLER
Remove the 2 screws and blower motor l")
AC3GY±02
I21421
I21422
AC±28
± AIR CONDITIONINGCOOLING UNIT
3755 Author�: Date�:
2005 SEQUOIA (RM1146U)
DISASSEMBLY
1. REMOVE BLOWER MOTOR LINEAR CONTROLLER
Remove the 2 screws and blower motor linear controller.
2. SEPARATE UPPER AND LOWER UNIT CASES
(a) Disconnect the connector clamp of the thermistor from
the upper unit case.
(b) Using a knife, cut off each packing.
(c) Remove the clip, 6 screws, and grommet.
(d) Separate the upper and lower unit cases, then pull out the
thermistor from the evaporator.
3. REMOVE EVAPORATOR FROM LOWER UNIT CASE
HINT:
At the time of reassembly, refer to the following:
If the evaporator is replaced, add compressor oil to the com-
pressor.
Add 40 to 50 cc (1.4 to 1.7 fl.oz.)
Compressor oil: ND±OIL 8 or equivalent
4. REMOVE EXPANSION VALVE
Using a hexagon wrench (5.0 mm (0.20 in.)), remove the 2 bolts
and separate the expansion valve, evaporator and tubes.
Torque: 5.4 N´m (55 kgf´cm, 48 in.´lbf)
HINT:
At the time of reassembly, refer to the following item:
Lubricate 4 new O±rings with compressor oil and install them
to the tubes and valve.
Page 3775 of 4323

REMOVAL
1. DISCHARGE REFRIGERANT FROM REFRIGERATION
SYSTEM
HINT:
At the time of installat")
AC3H9±02
I21380
I21381
AC±40
± AIR CONDITIONINGREAR A/C UNIT
3767 Author�: Date�:
2005 SEQUOIA (RM1146U)
REMOVAL
1. DISCHARGE REFRIGERANT FROM REFRIGERATION
SYSTEM
HINT:
At the time of installation, refer to the following item:
�Evacuate air from the refrigeration system.
�Charge the system with refrigerant and inspect for leak-
age of refrigerant.
Specified amount:
Dual A/C: 1050 ± 50 g (37.03 ± 1.76 oz.)
2. DRAIN ENGINE COOLANT FROM RADIATOR
HINT:
It is not necessary to drain out all coolant.
3. REMOVE REAR SEAT OUTER BELT FLOOR AN-
CHORS
4. REMOVE BACK DOOR SCUFF PLATE
5. REMOVE REAR DOOR SCUFF PLATE RH
6. REMOVE UPPER BACK DOOR GARNISH
7. REMOVE REAR WINDOW SIDE GARNISH RH
8. REMOVE REAR QUARTER TRIM PANEL RH
9. REMOVE QUARTER PILLAR GARNISH RH
10. DISCONNECT LIQUID AND SUCTION TUBES
Remove the 2 bolts and disconnect both tubes.
Torque: 5.4 N´m (55 kgf´cm, 48 in.´lbf)
NOTICE:
Cap the openings immediately to keep moisture or dirt out
of the system.
HINT:
At the time of installation, refer to the following:
Lubricate 2 new O±rings with compressor oil and install them
to the tubes.
11. DISCONNECT WATER HOSES FROM HEATER PIPES
(a) Grip the claws of the hose clip and slide the hose clip
along the hose.
(b) Disconnect the water hoses.
 : Specified torque
12 (120, 8)
12 (120, 8)
12 (120, 8)
12 (120, 8)
BO±174
�")
