Page 3778 of 4323
I21387
Nut A:
Nut B:
I21392
I21391
± AIR CONDITIONINGREAR A/C UNIT
AC±43
3770 Author�: Date�:
2005 SEQUOIA (RM1146U)
NOTICE:
Cap the openings immediately to keep moisture or dirt out
of the system.
HINT:
At the time of installation, refer to the following:
Lubricate 2 new O±rings with compressor oil and install them
to the tube and valve.
(d) Remove the holder and disconnect the heat sensing
tube.
(e) Loosen the 2 nuts and remove the expansion valve.
Torque:
Nut A: 13 N´m (135 kgf´cm, 10 ft´lbf)
Nut B: 22 N´m (235 kgf´cm, 16 ft´lbf)
HINT:
At the time of installation, refer to the following:
Lubricate 2 new O±rings with compressor oil and install them
to the expansion valve.
7. REMOVE EVAPORATOR
(a) Remove the 8 screws and cover.
(b) Pull out the evaporator.
8. REMOVE AIR OUTLET SERVOMOTOR
(a) Using a screwdriver, release the claw and remove the
plate.
HINT:
Tape the screwdriver tip before use.
(b) Remove the 3 screws and servomotor.
Page 3789 of 4323

COMPRESSOR AND MAGNETIC
CLUTCH
ON±VEHICLE INSPECTION
1. SET MANIF")
AC1KZ±05
I21361
3
3
I21362
12
AC±54
± AIR CONDITIONINGCOMPRESSOR AND MAGNETIC CLUTCH
3781 Author�: Date�:
2005 SEQUOIA (RM1146U)
COMPRESSOR AND MAGNETIC
CLUTCH
ON±VEHICLE INSPECTION
1. SET MANIFOLD GAUGE SET (See page AC±18)
2. START ENGINE
3. INSPECT COMPRESSOR FOR METALLIC SOUND
Check if a metallic sound can be heard from the compressor
when the A/C switch is on.
If a metallic sound cannot be heard, replace the compressor as-
sembly.
4. INSPECT REFRIGERANT PRESSURE
(See page AC±3)
5. STOP ENGINE
6. INSPECT VISUALLY FOR LEAKAGE OF REFRIGER-
ANT FROM SAFETY SEAL
Using a gas leak detector, check for leakage of refrigerant.
If there is any leakage, replace the compressor assembly.
7. REMOVE MANIFOLD GAUGE SET
(See page AC±19)
8. CHECK FOR LEAKAGE OF GREASE FROM CLUTCH
BEARING
9. CHECK FOR SIGNS OF OIL ON PRESSURE PLATE
If necessary, repair or replace.
10. INSPECT MAGNETIC CLUTCH BEARING FOR NOISE
(a) Start the engine.
(b) Check if abnormal noise is heard from near the compres-
sor when the A/C switch is OFF.
If abnormal noise is being emitted, replace the magnetic clutch.
11. INSPECT MAGNETIC CLUTCH OPERATION
(a) Disconnect the connector.
(b) Connect the positive (+) lead from the battery to terminal
3 and the negative (±) lead to body ground.
(c) Check that the magnetic clutch is energized.
If operation is not as specified, replace the magnetic clutch.
12. INSPECT COMPRESSOR LOCK SENSOR RESIS-
TANCE
(a) Disconnect the connector.
(b) Measure the resistance between terminals 1 and 2.
Standard resistance:
165 to 205 W at 20°C (68°F)
If resistance is not as specified, replace the compressor.
Page 3796 of 4323

INSTALLATION
1. INSTALL COMPRESSOR
(a) Install the compressor with the cooler bracket w")
AC3HF±02
± AIR CONDITIONINGCOMPRESSOR AND MAGNETIC CLUTCH
AC±61
3788 Author�: Date�:
2005 SEQUOIA (RM1146U)
INSTALLATION
1. INSTALL COMPRESSOR
(a) Install the compressor with the cooler bracket with the 3 bolts and nut.
Torque:
Bolt: 47 N´m (480 kgf´cm, 35 in.´lbf)
Nut: 25 N´m (255 kgf´cm, 18 in.´lbf)
(b) Connect the connector.
2. CONNECT DISCHARGE AND SUCTION HOSES
Connect both hoses with the 2 nuts.
Torque: 10 N´m (100 kgf´cm, 7 in.´lbf)
NOTICE:
Hoses should be connected immediately after the caps have been removed.
HINT:
Lubricate 2 new O±rings with compressor oil and install them to the hoses.
3. INSTALL AND CHECK DRIVE BELT (See page AC±17, AC±15)
4. CONNECT CABLE TO NEGATIVE BATTERY TERMINAL
5. EVACUATE AIR FROM REFRIGERATION SYSTEM
6. CHARGE SYSTEM WITH REFRIGERANT
Specified amount:
Single A/C: 750 ± 50g (26.45 ± 1.76 oz.)
Dual A/C: 1050 ± 50g (37.03 ± 1.76 oz.)
7. INSPECT FOR LEAKAGE OF REFRIGERANT
Using a gas leak detector, check for leakage of refrigerant.
If there is leakage, check the tightening torque at the joints.
8. PERFORM INITIALIZATION (See page IN±20)
Some systems need initialization when disconnecting the cable from the negative battery terminal.
Page 3798 of 4323

REMOVAL
1. DISCHARGE REFRIGERANT FROM REFRIGERATION
SYSTEM
HINT:
At the time of the installatio")
AC3HH±02
I21364
I21451
± AIR CONDITIONINGRECEIVER
AC±63
3790 Author�: Date�:
2005 SEQUOIA (RM1146U)
REMOVAL
1. DISCHARGE REFRIGERANT FROM REFRIGERATION
SYSTEM
HINT:
At the time of the installation, refer to the following:
�Evacuate air from the refrigeration system.
�Charge the system with refrigerant and inspect for leak-
age of refrigerant.
Specified amount:
Single A/C : 750 ± 50 g (26.45 ± 1.76 oz.)
Dual A/C: 1050 ± 50 g (37.03 ± 1.76 oz.)
2. DISCONNECT 2 LIQUID TUBES FROM RECEIVER
Remove the 2 bolts and disconnect both tubes.
Torque: 5.4 N´m (55 kgf´cm, 48 in.´lbf)
NOTICE:
Cap the openings immediately to keep moisture or dirt out
of the system.
HINT:
At the time of the installation, refer to the following:
Lubricate 2 new O±rings with compressor oil and install them
to the tubes.
3. REMOVE RECEIVER
(a) Remove the 2 bolts and receiver.
HINT:
At the time of the installation, refer to the following:
If the receiver is replaced, add compressor oil to the compres-
sor.
Add 20 cc (0.71 fl.oz.)
Compressor oil: ND±OIL 8 or equivalent
(b) Remove the 2 bolts and holder.
Page 3801 of 4323
AC1L6±06
I21368
Discharge Hose Condenser
Liquid Tube� O±Ring
Condenser Fan
N´m (kgf´cm, in´lbf)
: Specified torque
� Non±reusable part
� O±Ring
Bracket
Wire Harness
Bracket Receiver
Liquid Tube
� O±Ring
Liquid
Tube� O±Ring
� O±Ring
Condenser
HornHood Lock
Horn
A/T
Oil Cooler
5.4 (55, 48)
� O±Ring5.4 (55, 48)
5.4 (55, 48)
5.4 (55, 48)
5.4 (55, 48)
AC±66
± AIR CONDITIONINGCONDENSER
3793 Author�: Date�:
2005 SEQUOIA (RM1146U)
COMPONENTS
Page 3802 of 4323
AC3HJ±02
I21365
I21366
± AIR CONDITIONINGCONDENSER
AC±67
3794 Author�: Date�:
2005 SEQUOIA (RM1146U)
REMOVAL
1. DISCHARGE REFRIGERANT FROM REFRIGERATION
SYSTEM
HINT:
At the time of installation, refer to the following:
�Evacuate air from the refrigeration system.
�Charge the system with refrigerant and inspect for leak-
age of refrigerant.
Specified amount:
Single A/C: 750 ± 50 g (26.45 ± 1.76 oz.)
Dual A/C: 1050 ± 50 g (37.03 ± 1.76 oz.)
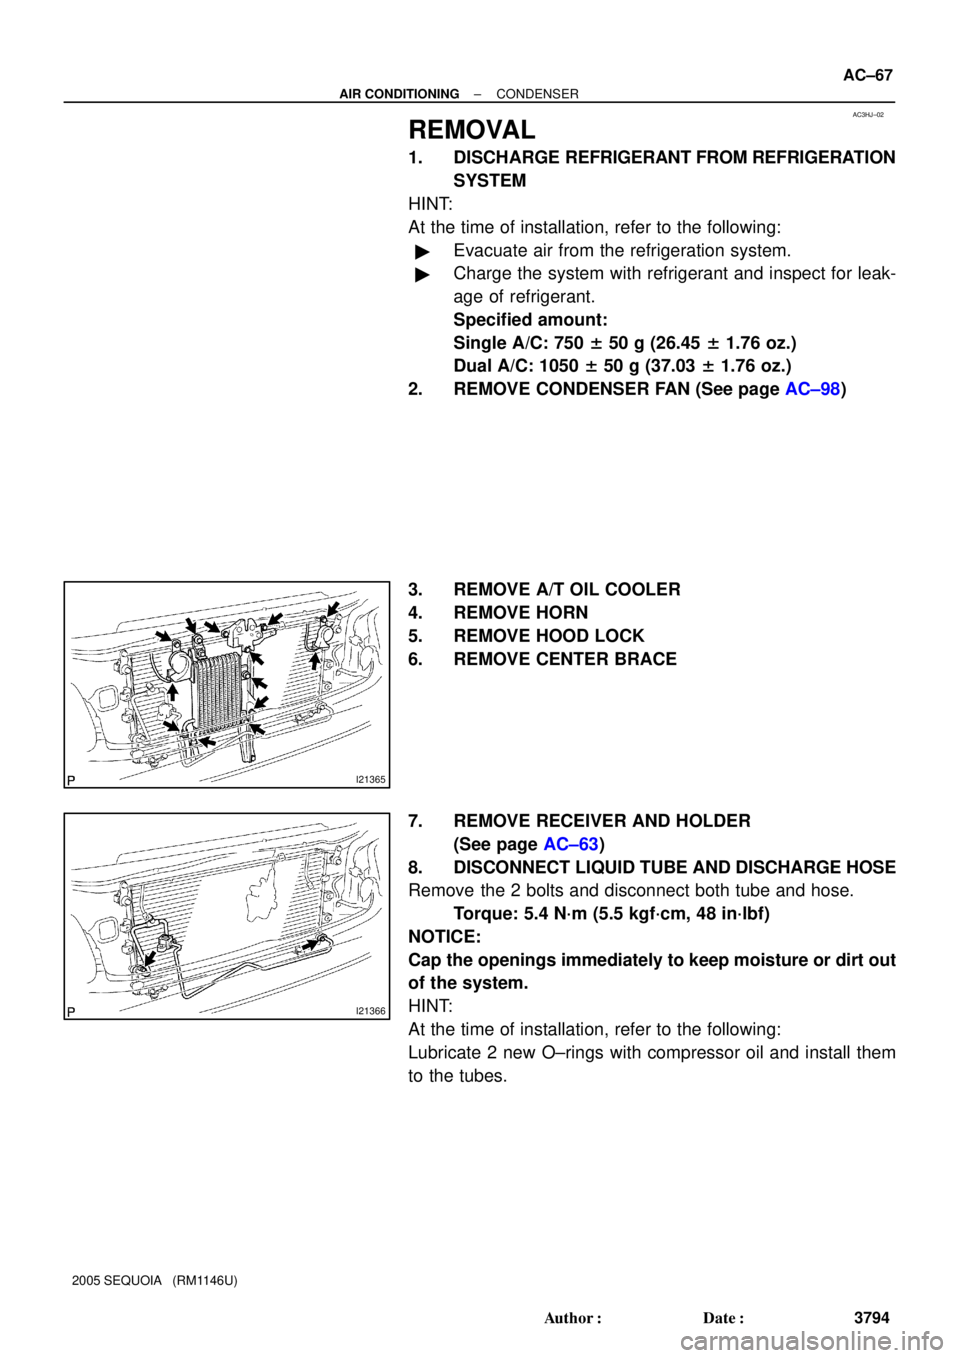
2. REMOVE CONDENSER FAN (See page AC±98)
3. REMOVE A/T OIL COOLER
4. REMOVE HORN
5. REMOVE HOOD LOCK
6. REMOVE CENTER BRACE
7. REMOVE RECEIVER AND HOLDER
(See page AC±63)
8. DISCONNECT LIQUID TUBE AND DISCHARGE HOSE
Remove the 2 bolts and disconnect both tube and hose.
Torque: 5.4 N´m (5.5 kgf´cm, 48 in´lbf)
NOTICE:
Cap the openings immediately to keep moisture or dirt out
of the system.
HINT:
At the time of installation, refer to the following:
Lubricate 2 new O±rings with compressor oil and install them
to the tubes.
Page 3803 of 4323
I21367
AC±68
± AIR CONDITIONINGCONDENSER
3795 Author�: Date�:
2005 SEQUOIA (RM1146U)
9. REMOVE CONDENSER
(a) Remove the 2 bolts.
(b) Pull the condenser forward and then upward.
HINT:
At the time of installation, refer to the following:
If the condenser is replaced, add compressor oil to the com-
pressor.
Add 40 to 50 cc (1.4 to 1.7 fl.oz.)
Compressor oil: ND±OIL 8 or equivalent
Page 3806 of 4323

REMOVAL
1. DISCHARGE REFRIGERANT FROM REFRIGERATION
SYSTEM
HINT:
At the time of ins")
AC3I9±02
I21380
I21383
± AIR CONDITIONINGREAR A/C EVAPORATOR
AC±71
3798 Author�: Date�:
2005 SEQUOIA (RM1146U)
REMOVAL
1. DISCHARGE REFRIGERANT FROM REFRIGERATION
SYSTEM
HINT:
At the time of installation, refer to the following:
�Evacuate air from the refrigeration system.
�Charge the system with refrigerant and inspect for leak-
age of refrigerant.
Specified amount:
Dual A/C: 1050 ± 50 g (37.03 ± 1.76 oz.)
2. DRAIN ENGINE COOLANT FROM RADIATOR
HINT:
It is not necessary to drain out all coolant.
3. REMOVE REAR SEAT OUTER BELT FLOOR AN-
CHORS
4. REMOVE BACKDOOR SCUFF PLATE
5. REMOVE REAR DOOR SCUFF PLATE RH
6. REMOVE UPPER BACK DOOR GARNISH
7. REMOVE REAR WINDOW SIDE GARNISH RH
8. REMOVE REAR QUARTER TRIM PANEL RH
9. REMOVE QUARTER PILLAR GARNISH RH
10. DISCONNECT LIQUID AND SUCTION TUBES
Remove the 2 bolts and disconnect both tubes.
Torque: 5.4 N´m (55 kgf´cm, 48 in.´lbf)
NOTICE:
Cap the openings immediately to keep moisture or dirt out
of the system.
HINT:
At the time of installation, refer to the following:
Lubricate 2 new O±rings with compressor oil and install them
to the tubes.
11. REMOVE AIR DUCT
(a) Remove the 3 clips and cover.
(b) Remove the 2 air ducts.
(c) Disconnect the connectors and wire harness clamps.