Page 2917 of 4323
AT130±01
± AUTOMATIC TRANSMISSION (A750E, A750F)AUTOMATIC TRANSMISSION SYSTEM
AT±1
2909 Author�: Date�:
2005 SEQUOIA (RM1146U)
AUTOMATIC TRANSMISSION SYSTEM
PRECAUTION
NOTICE:
When disconnecting the battery terminal, initialize the following system after the terminal is recon-
nected.
System NameSee Page
Back Door Power Window Control SystemBE±77
Page 2920 of 4323
D13867
AT132±01
OR0004
SST
OR0005
SST
AT±4
± AUTOMATIC TRANSMISSION (A750E, A750F)EXTENSION HOUSING OIL SEAL (A750E)
2912 Author�: Date�:
2005 SEQUOIA (RM1146U)
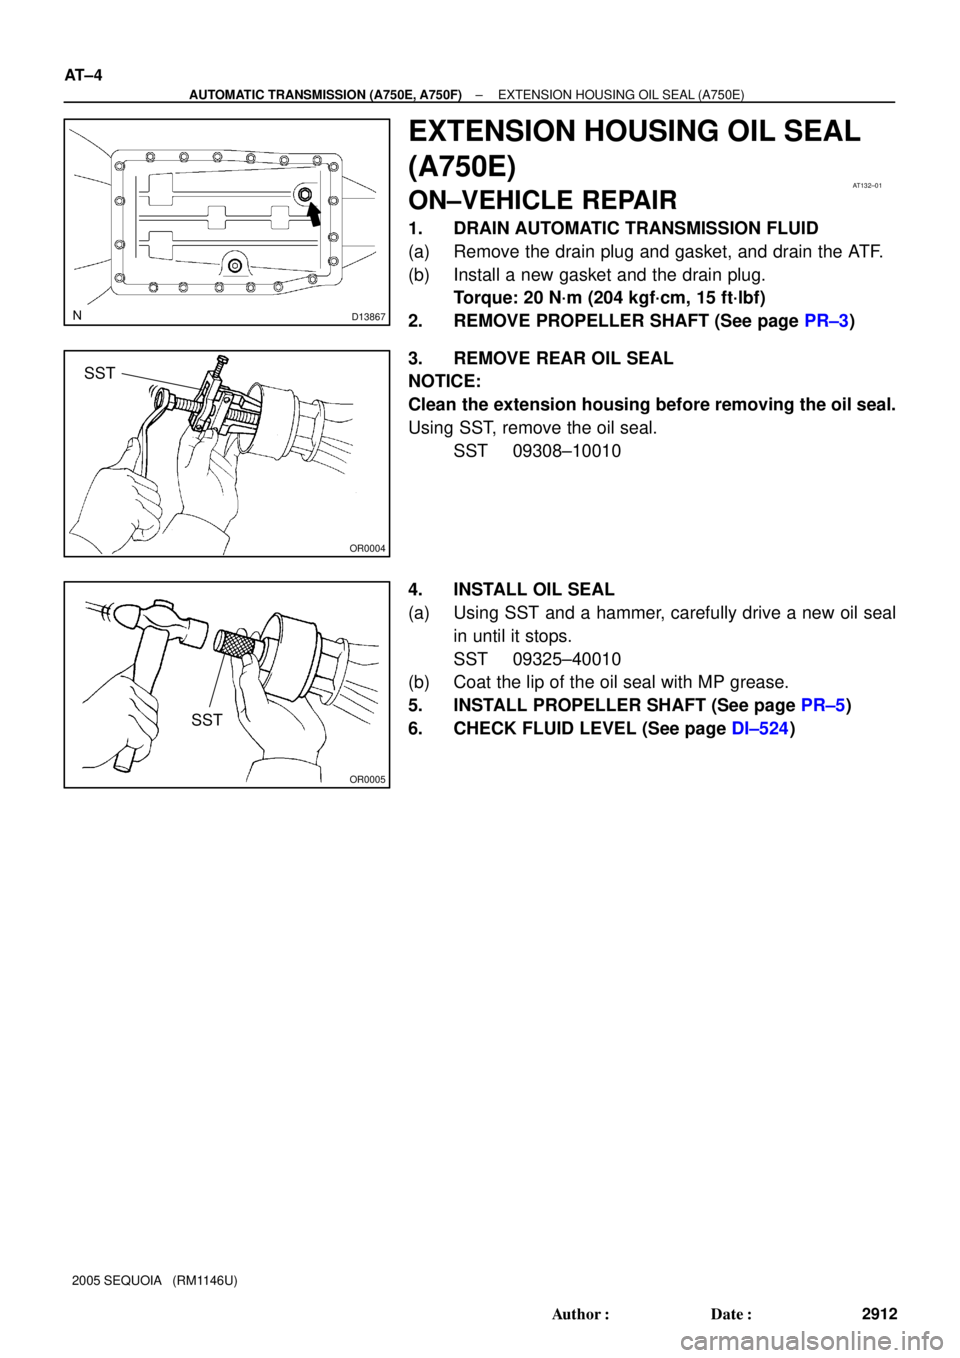
EXTENSION HOUSING OIL SEAL
(A750E)
ON±VEHICLE REPAIR
1. DRAIN AUTOMATIC TRANSMISSION FLUID
(a) Remove the drain plug and gasket, and drain the ATF.
(b) Install a new gasket and the drain plug.
Torque: 20 N´m (204 kgf´cm, 15 ft´lbf)
2. REMOVE PROPELLER SHAFT (See page PR±3)
3. REMOVE REAR OIL SEAL
NOTICE:
Clean the extension housing before removing the oil seal.
Using SST, remove the oil seal.
SST 09308±10010
4. INSTALL OIL SEAL
(a) Using SST and a hammer, carefully drive a new oil seal
in until it stops.
SST 09325±40010
(b) Coat the lip of the oil seal with MP grease.
5. INSTALL PROPELLER SHAFT (See page PR±5)
6. CHECK FLUID LEVEL (See page DI±524)
Page 2923 of 4323
ATF TEMPERATURE SENSOR
AT±7
2915 Author�: Date�:
2005 SEQUOI")
D13867
AT134±01
D12704
Orange
Blue
Clamp
ClampBolt
Bolt
D12739
D12704
Orange
Blue
Clamp
Clamp
A B
± AUTOMATIC TRANSMISSION (A750E, A750F)ATF TEMPERATURE SENSOR
AT±7
2915 Author�: Date�:
2005 SEQUOIA (RM1146U)
ATF TEMPERATURE SENSOR
ON±VEHICLE REPAIR
1. DRAIN AUTOMATIC TRANSMISSION FLUID
(a) Remove the drain plug and gasket, and drain the ATF.
(b) Install a new gasket and the drain plug.
Torque: 20 N´m (204 kgf´cm, 15 ft´lbf)
2. REMOVE OIL PAN (See page AT±10)
3. REMOVE OIL STRAINER (See page AT±10)
4. REMOVE ATF TEMPERATURE SENSOR
(a) Disconnect the 7 solenoid valve connectors.
(b) Remove the 2 bolts, clamps and ATF temperature sen-
sors.
(c) Disconnect the transmission wire connector.
(d) Remove the bolt and the transmission wire harness.
5. INSTALL ATF TEMPERATURE SENSOR
(a) Install the transmission wire harness.
(b) Install the bolt.
Torque: 5.4 N´m (55 kgf´cm, 48 in.´lbf)
(c) Connect the transmission wire connector.
(d) Connect the 7 solenoid valve connectors.
(e) Install the 2 ATF temperature sensors and clamps to the
valve body with the 2 bolts.
HINT:
In order to install the ATF temperature sensors properly, check
the wire harness color prior to installation.
Torque:
A: 11 N´m (112 kgf´cm, 8 ft´lbf)
B: 10 N´m (100 kgf´cm, 7 ft´lbf)
Bolt length:
Bolt A: 36 mm (1.42 in.)
Bolt B: 12 mm (0.47 in.)
Sensor wire harness:
Wire harnessColor
for linear controlOrange
for oil temp. warning lampBlue
6. INSTALL OIL STRAINER (See page AT±10)
Page 2924 of 4323
D13866
AT±8
± AUTOMATIC TRANSMISSION (A750E, A750F)ATF TEMPERATURE SENSOR
2916 Author�: Date�:
2005 SEQUOIA (RM1146U)
7. INSTALL OIL PAN
HINT:
Remove any packing material, and be careful not to spill oil on
the contacting surfaces of the transmission case and the oil
pan.
Using a new gasket, install the oil pan with the 20 bolts.
Torque: 4.4 N´m (45 kgf´cm, 39 in´lbf)
8. FILL WITH ATF AND CHECK ATF LEVEL
(a) Remove the refill plug (See page DI±524).
(b) Fill with new fluid through the refill hole.
Fluid type: Toyota genuine ATF WS
Page 2925 of 4323
AT135±01
D12667
Lock Washer
± AUTOMATIC TRANSMISSION (A750E, A750F)PARK/NEUTRAL POSITION (PNP) SWITCH
AT±9
2917 Author�: Date�:
2005 SEQUOIA (RM1146U)
PARK/NEUTRAL POSITION (PNP)
SWITCH
ON±VEHICLE REPAIR
1. DISCONNECT PARK/NEUTRAL POSITION SWITCH
CONNECTOR
2. REMOVE PARK/NEUTRAL POSITION SWITCH
(a) Pry off the lock washer and remove the nut.
(b) Remove the bolt and park/neutral position switch.
3. INSTALL PARK/NEUTRAL POSITION SWITCH
(a) Install the park/neutral position switch with the bolt.
Torque: 13 N´m (130 kgf´cm, 10 ft´lbf)
(b) Install a new lock washer and the nut.
Torque: 6.9 N´m (70 kgf´cm, 61 in.´lbf)
(c) Bend the claws on the lock washer to stake the nut.
(d) Adjust the park/neutral position switch
(See page DI±524).
4. CONNECT PARK/NEUTRAL POSITION SWITCH CON-
NECTOR
Page 2929 of 4323
± AUTOMATIC TRANSMISSION (A750E, A750F)VALVE BODY ASSEMBLY
AT±13
2921 Author�: Date�:
2005 SEQUOIA (RM1146U)
13. FILL WITH ATF AND CHECK ATF LEVEL
(a) Remove the refill plug (See page DI±524).
(b) Fill with new fluid through the refill hole.
Fluid type: Toyota genuine ATF WS
Page 2930 of 4323
AT137±01
D12708
D12709
D12710
D12708
AT±14
± AUTOMATIC TRANSMISSION (A750E, A750F)PARKING LOCK PAWL
2922 Author�: Date�:
2005 SEQUOIA (RM1146U)
PARKING LOCK PAWL
ON±VEHICLE REPAIR
1. REMOVE VALVE BODY (See page AT±10)
2. REMOVE PARKING LOCK PAWL BRACKET
Remove the 3 bolts and parking lock pawl bracket.
3. REMOVE PARKING LOCK ROD
4. REMOVE SPRING FROM PARKING LOCK PAWL
SHAFT
5. REMOVE PARKING LOCK PAWL AND SHAFT
6. INSTALL PARKING LOCK PAWL AND SHAFT
7. INSTALL SPRING TO PARKING LOCK PAWL SHAFT
8. INSTALL PARKING LOCK PAWL BRACKET
Install the parking lock pawl bracket with the 3 bolts.
HINT:
�Push the lock rod fully forward.
�Check that the parking lock pawl operates smoothly.
Torque: 7.4 N´m (75 kgf´cm, 65 in.´lbf)
9. INSTALL VALVE BODY (See page AT±10)
Page 2933 of 4323
AT13A±01
± AUTOMATIC TRANSMISSION (A750E, A750F)AIR COOLED OIL COOLER
AT±17
2925 Author�: Date�:
2005 SEQUOIA (RM1146U)
INSTALLATION
Installation is in the reverse order of removal (See page AT±16).
HINT:
After installation, check fluid level (See page DI±524).