2000 DODGE NEON brake fluid
[x] Cancel search: brake fluidPage 155 of 1285
junction block. A label on the underside of the PDC
cover identifies the locations of the ABS fuses.
(2) Inspect the 25-way electrical connector at the
CAB for damaged, spread, or backed-out wiring ter-
minals. Verify that the 25-way connector is fully
inserted in the socket of the CAB. Be sure that wires
are not stretched tight or pulled out of the connector.
(3) Verify that all the wheel speed sensor connec-
tions are secure.
(4) Look for poor mating of connector halves or ter-
minals not fully seated in the connector body.
(5)
Check for improperly formed or damaged termi-
nals. All connector terminals in a suspect circuit should
be carefully reformed to increase contact tension.
(6) Look for poor terminal-to-wire connections.
This requires removing the terminal from the connec-
tor body to inspect it.
(7) Verify pin presence in the connector assembly
(8) Check for proper ground connections. Check all
ground connections for signs of corrosion, loose fas-
teners, or other potential defects. Refer to the wiring
diagrams for ground locations.
(9) Look for problems with the main power sources
of the vehicle. Inspect the battery, generator, ignition
circuits and other related relays and fuses.
If a visual check does not find the cause of the
problem, operate the car in an attempt to duplicate
the condition and record any trouble codes.
Most failures of the ABS disable the ABS function
for the entire ignition cycle even if the fault clears
before key-off. There are some failure conditions,
however, that allow ABS operation to resume during
the ignition cycle in which the trouble occurred even
if the trouble conditions are no longer present.
The following trouble conditions may result in
intermittent illumination of the amber ABS warning
lamp.
²Low system voltage. If Low System Voltage is
detected by the CAB, the CAB will turn on the ABS
Warning Lamp until normal system voltage is
achieved. Once normal voltage is seen at the CAB,
normal operation resumes.
²High system voltage. If high system voltage is
detected by the CAB, the CAB will turn on the
Amber ABS Warning Lamp until normal system volt-
age is achieved. Once normal voltage is again
detected by the CAB, normal ABS operation resumes.
Additional possible causes that may result in the
illumination of the amber ABS warning lamp are as
follows:
²Any condition that interrupts electrical current
to the CAB may cause the amber ABS warning lamp
to turn on intermittently.
²If PCI communication between the body control-
ler and the CAB is interrupted, the body controller
can turn on the amber ABS warning lamp.
TONE WHEEL
Tone wheels can cause erratic wheel speed sensor
signals. Inspect tone wheels for the following possible
causes:
²missing, chipped, or broken teeth
²contact with the wheel speed sensor
²wheel speed sensor to tone wheel alignment
²wheel speed sensor to tone wheel clearance
²excessive tone wheel runout
²tone wheel loose on its mounting surface
If a front tone wheel is found to need replacement,
the drive shaft must be replaced. No attempt should
be made to replace just the tone wheel. Refer to the
DIFFERENTIAL AND DRIVELINE group in this
service manual for removal and installation.
If a rear tone wheel is found to need replacement,
the rear hub and bearing must be replaced. No
attempt should be made to replace just the tone
wheel. Refer to the SUSPENSION group in this ser-
vice manual for removal and installation.
If wheel speed sensor to tone wheel contact is evi-
dent, determine the cause and correct it before
replacing the wheel speed sensor or tone wheel.
Check the gap between the speed sensor head and
the tone wheel to ensure it is within specifications.
Refer to SPECIFICATIONS in this section of the ser-
vice manual for the minimum and maximum wheel
speed sensor to tone wheel clearance.
Excessive wheel speed sensor runout can cause
erratic wheel speed sensor signals. Refer to SPECI-
FICATIONS in this section of the service manual for
the maximum allowed tone wheel runout. If tone
wheel runout is excessive, determine if it is caused
by a defect in the driveshaft assembly or hub and
bearing. Replace as necessary.
Tone wheels are pressed onto their mounting sur-
faces and should not rotate independently from the
mounting surface. Replacement of the front drive-
shaft or rear hub and bearing is necessary.
BRAKE FLUID CONTAMINATION
Indications of fluid contamination are swollen or
deteriorated rubber parts. Swelling indicates the
presence of petroleum in the brake fluid.
To test for contamination, put a small amount of
drained brake fluid in clear glass jar. If the fluid sep-
arates into layers, there is mineral oil or other fluid
contamination of the brake fluid.
If the brake fluid is contaminated, drain and thor-
oughly flush the brake system. Replace all the rubber
parts or components containing rubber coming into
contact with the brake fluid including: the master
cylinder; proportioning valves; caliper seals; wheel
cylinder seals; ABS hydraulic control unit; and all
hydraulic fluid hoses.
5 - 76 BRAKESPL
DIAGNOSIS AND TESTING (Continued)
Page 156 of 1285
SERVICE PROCEDURES
BRAKE FLUID LEVEL CHECKING
CAUTION: Use only Mopar brake fluid or an equiv-
alent from a tightly sealed container. Brake fluid
must conform to DOT 3 specifications. Do not use
petroleum-based fluid because seal damage in the
brake system will result.
Refer to SERVICE PROCEDURES in the BASE
BRAKE SYSTEM section in this group for the proper
procedure to check and adjust the brake fluid level in
the master cylinder fluid reservoir.
ANTILOCK BRAKE SYSTEM BLEEDING
The base brake's hydraulic system must be bled
anytime air enters the hydraulic system. The ABS
though, particularly the ICU (HCU), should only be
bled when the HCU is replaced or removed from the
vehicle. The ABS must always be bled anytime it is
suspected that the HCU has ingested air. Under
most circumstances that require the bleeding of the
brakes hydraulic system, only the base brake
hydraulic system needs to be bled.
It is important to note that excessive air in the
brake system will cause a soft or spongy feeling
brake pedal.
During the brake bleeding procedure, be sure the
brake fluid level remains close to the FULL level in
the master cylinder fluid reservoir. Check the fluid
level periodically during the bleeding procedure and
add DOT 3 brake fluid as required.
The ABS must be bled as two independent braking
systems. The non-ABS portion of the brake system
with ABS is to be bled the same as any non-ABS sys-
tem.
The ABS portion of the brake system must be bled
separately. Use the following procedure to properly
bleed the brake hydraulic system including the ABS.
BLEEDING
When bleeding the ABS system, the following
bleeding sequence must be followed to insure com-
plete and adequate bleeding.
(1) Make sure all hydraulic fluid lines are installed
and properly torqued.
(2) Connect the DRB scan tool to the diagnostics
connector. The diagnostic connector is located under
the lower steering column cover to the left of the
steering column.
(3) Using the DRB, check to make sure the CAB
does not have any fault codes stored. If it does, clear
them using the DRB.WARNING: WHEN BLEEDING THE BRAKE SYSTEM
WEAR SAFETY GLASSES. A CLEAR BLEED TUBE
MUST BE ATTACHED TO THE BLEEDER SCREWS
AND SUBMERGED IN A CLEAR CONTAINER FILLED
PART WAY WITH CLEAN BRAKE FLUID. DIRECT
THE FLOW OF BRAKE FLUID AWAY FROM YOUR-
SELF AND THE PAINTED SURFACES OF THE VEHI-
CLE. BRAKE FLUID AT HIGH PRESSURE MAY
COME OUT OF THE BLEEDER SCREWS WHEN
OPENED.
(4) Bleed the base brake system using the stan-
dard pressure or manual bleeding procedure as out-
lined in SERVICE PROCEDURES in the BASE
BRAKE SYSTEM section at the beginning of this
group.
(5) Using the DRB, select ANTILOCK BRAKES,
followed by MISCELLANEOUS, then BLEED
BRAKES. Follow the instructions displayed. When
the scan tool displays TEST COMPLETED, discon-
nect the scan tool and proceed.
(6) Bleed the base brake system a second time.
Check brake fluid level in the reservoir periodically
to prevent emptying, causing air to enter the hydrau-
lic system.
(7) Fill the master cylinder reservoir to the full
level.
(8) Test drive the vehicle to be sure the brakes are
operating correctly and that the brake pedal does not
feel spongy.
MASTER CYLINDER BLEEDING
(1) Clamp the master cylinder in a vise.
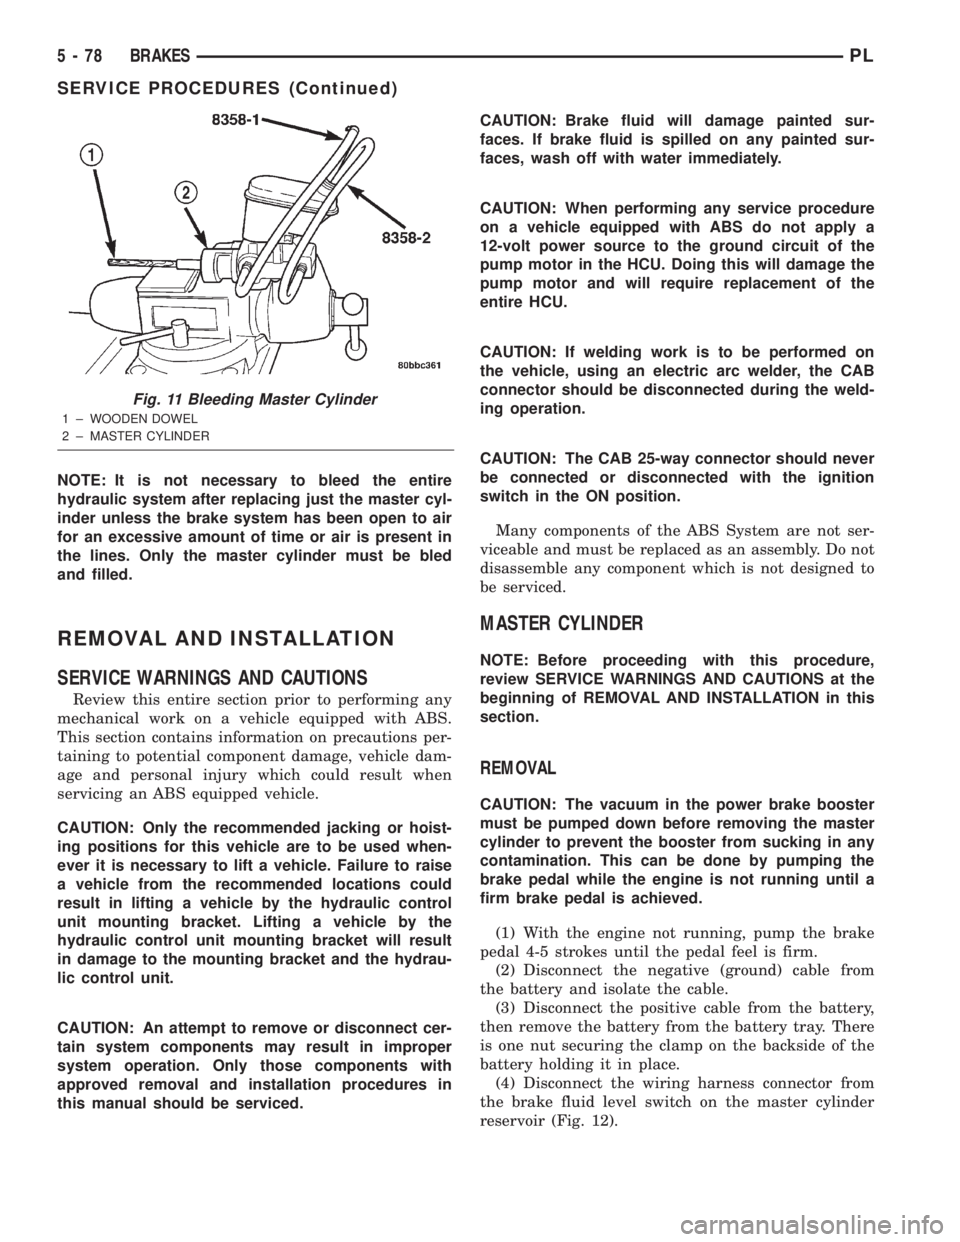
(2) Attach Master Cylinder Bleed Tube, Special
Tool 8358-1, to the primary port of the master cylin-
der and tighten in place (Fig. 11). Attach Master Cyl-
inder Bleed Tube, Special Tool 8358-2, to the
secondary port of the master cylinder and tighten in
place. Position the other end of the tubes into the
master cylinder reservoir so their outlets are below
the surface of the brake fluid in the reservoir when
filled.
(3) Fill the brake fluid reservoir with Mopart
brake fluid, or an equivalent conforming to DOT 3
specifications.
(4) Using a wooden dowel as a pushrod (Fig. 11),
press the pistons inward slowly applying brake pres-
sure, then release the pressure, allowing the pistons
to return to the released position. Repeat this several
times until all air bubbles are expelled out of the
tubes and master cylinder bore.
(5) Remove the bleed tubes from the master cylin-
der and plug the outlet ports.
(6) Install the fill cap on the reservoir.
(7) Remove the master cylinder from the vise.
PLBRAKES 5 - 77
Page 157 of 1285
NOTE: It is not necessary to bleed the entire
hydraulic system after replacing just the master cyl-
inder unless the brake system has been open to air
for an excessive amount of time or air is present in
the lines. Only the master cylinder must be bled
and filled.
REMOVAL AND INSTALLATION
SERVICE WARNINGS AND CAUTIONS
Review this entire section prior to performing any
mechanical work on a vehicle equipped with ABS.
This section contains information on precautions per-
taining to potential component damage, vehicle dam-
age and personal injury which could result when
servicing an ABS equipped vehicle.
CAUTION: Only the recommended jacking or hoist-
ing positions for this vehicle are to be used when-
ever it is necessary to lift a vehicle. Failure to raise
a vehicle from the recommended locations could
result in lifting a vehicle by the hydraulic control
unit mounting bracket. Lifting a vehicle by the
hydraulic control unit mounting bracket will result
in damage to the mounting bracket and the hydrau-
lic control unit.
CAUTION: An attempt to remove or disconnect cer-
tain system components may result in improper
system operation. Only those components with
approved removal and installation procedures in
this manual should be serviced.CAUTION: Brake fluid will damage painted sur-
faces. If brake fluid is spilled on any painted sur-
faces, wash off with water immediately.
CAUTION: When performing any service procedure
on a vehicle equipped with ABS do not apply a
12-volt power source to the ground circuit of the
pump motor in the HCU. Doing this will damage the
pump motor and will require replacement of the
entire HCU.
CAUTION: If welding work is to be performed on
the vehicle, using an electric arc welder, the CAB
connector should be disconnected during the weld-
ing operation.
CAUTION: The CAB 25-way connector should never
be connected or disconnected with the ignition
switch in the ON position.
Many components of the ABS System are not ser-
viceable and must be replaced as an assembly. Do not
disassemble any component which is not designed to
be serviced.
MASTER CYLINDER
NOTE: Before proceeding with this procedure,
review SERVICE WARNINGS AND CAUTIONS at the
beginning of REMOVAL AND INSTALLATION in this
section.
REMOVAL
CAUTION: The vacuum in the power brake booster
must be pumped down before removing the master
cylinder to prevent the booster from sucking in any
contamination. This can be done by pumping the
brake pedal while the engine is not running until a
firm brake pedal is achieved.
(1) With the engine not running, pump the brake
pedal 4-5 strokes until the pedal feel is firm.
(2) Disconnect the negative (ground) cable from
the battery and isolate the cable.
(3) Disconnect the positive cable from the battery,
then remove the battery from the battery tray. There
is one nut securing the clamp on the backside of the
battery holding it in place.
(4) Disconnect the wiring harness connector from
the brake fluid level switch on the master cylinder
reservoir (Fig. 12).
Fig. 11 Bleeding Master Cylinder
1 ± WOODEN DOWEL
2 ± MASTER CYLINDER
5 - 78 BRAKESPL
SERVICE PROCEDURES (Continued)
Page 158 of 1285
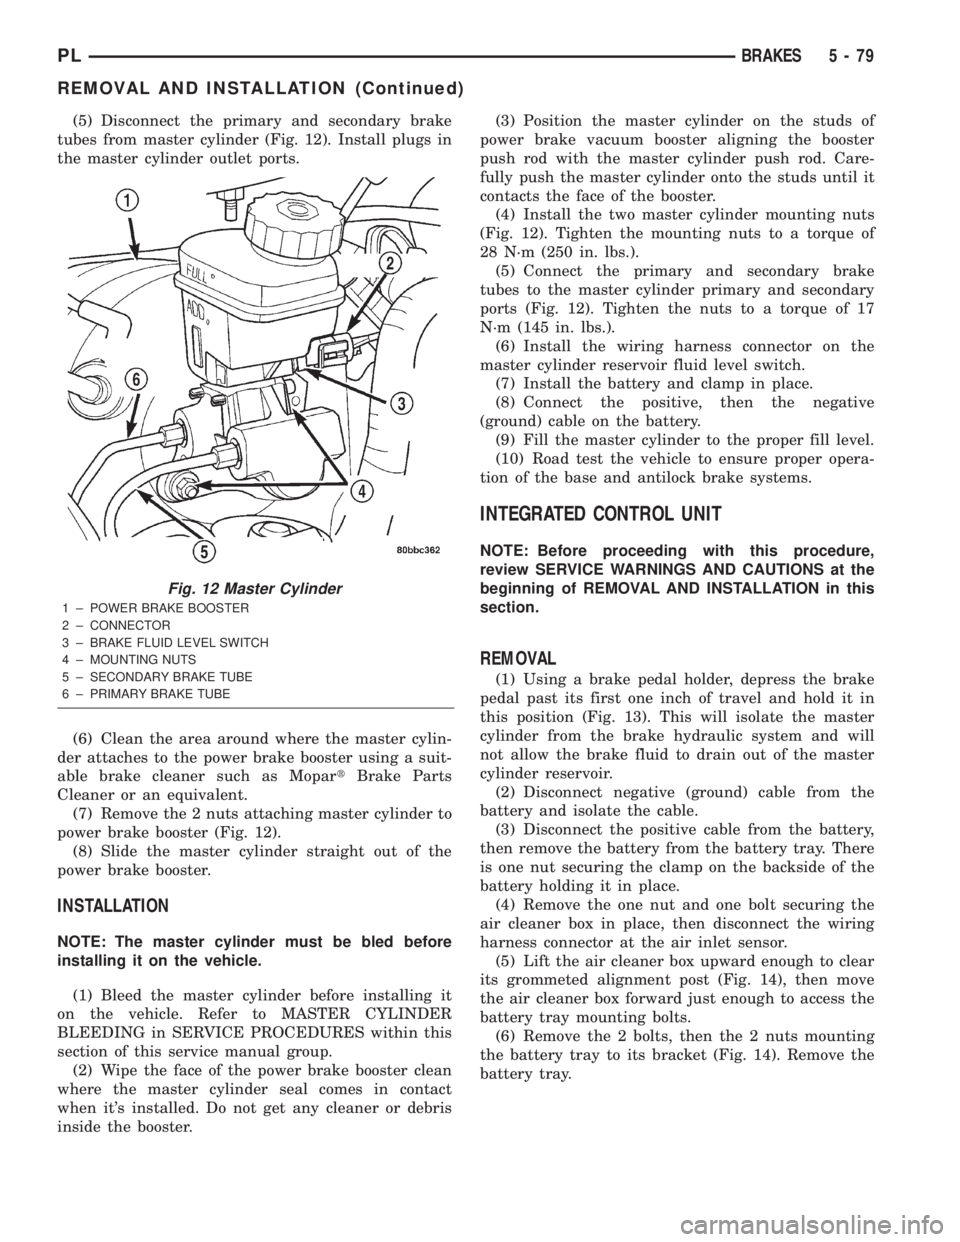
(5) Disconnect the primary and secondary brake
tubes from master cylinder (Fig. 12). Install plugs in
the master cylinder outlet ports.
(6) Clean the area around where the master cylin-
der attaches to the power brake booster using a suit-
able brake cleaner such as MopartBrake Parts
Cleaner or an equivalent.
(7) Remove the 2 nuts attaching master cylinder to
power brake booster (Fig. 12).
(8) Slide the master cylinder straight out of the
power brake booster.
INSTALLATION
NOTE: The master cylinder must be bled before
installing it on the vehicle.
(1) Bleed the master cylinder before installing it
on the vehicle. Refer to MASTER CYLINDER
BLEEDING in SERVICE PROCEDURES within this
section of this service manual group.
(2) Wipe the face of the power brake booster clean
where the master cylinder seal comes in contact
when it's installed. Do not get any cleaner or debris
inside the booster.(3) Position the master cylinder on the studs of
power brake vacuum booster aligning the booster
push rod with the master cylinder push rod. Care-
fully push the master cylinder onto the studs until it
contacts the face of the booster.
(4) Install the two master cylinder mounting nuts
(Fig. 12). Tighten the mounting nuts to a torque of
28 N´m (250 in. lbs.).
(5) Connect the primary and secondary brake
tubes to the master cylinder primary and secondary
ports (Fig. 12). Tighten the nuts to a torque of 17
N´m (145 in. lbs.).
(6) Install the wiring harness connector on the
master cylinder reservoir fluid level switch.
(7) Install the battery and clamp in place.
(8) Connect the positive, then the negative
(ground) cable on the battery.
(9) Fill the master cylinder to the proper fill level.
(10) Road test the vehicle to ensure proper opera-
tion of the base and antilock brake systems.
INTEGRATED CONTROL UNIT
NOTE: Before proceeding with this procedure,
review SERVICE WARNINGS AND CAUTIONS at the
beginning of REMOVAL AND INSTALLATION in this
section.
REMOVAL
(1) Using a brake pedal holder, depress the brake
pedal past its first one inch of travel and hold it in
this position (Fig. 13). This will isolate the master
cylinder from the brake hydraulic system and will
not allow the brake fluid to drain out of the master
cylinder reservoir.
(2) Disconnect negative (ground) cable from the
battery and isolate the cable.
(3) Disconnect the positive cable from the battery,
then remove the battery from the battery tray. There
is one nut securing the clamp on the backside of the
battery holding it in place.
(4) Remove the one nut and one bolt securing the
air cleaner box in place, then disconnect the wiring
harness connector at the air inlet sensor.
(5) Lift the air cleaner box upward enough to clear
its grommeted alignment post (Fig. 14), then move
the air cleaner box forward just enough to access the
battery tray mounting bolts.
(6) Remove the 2 bolts, then the 2 nuts mounting
the battery tray to its bracket (Fig. 14). Remove the
battery tray.
Fig. 12 Master Cylinder
1 ± POWER BRAKE BOOSTER
2 ± CONNECTOR
3 ± BRAKE FLUID LEVEL SWITCH
4 ± MOUNTING NUTS
5 ± SECONDARY BRAKE TUBE
6 ± PRIMARY BRAKE TUBE
PLBRAKES 5 - 79
REMOVAL AND INSTALLATION (Continued)
Page 893 of 1285
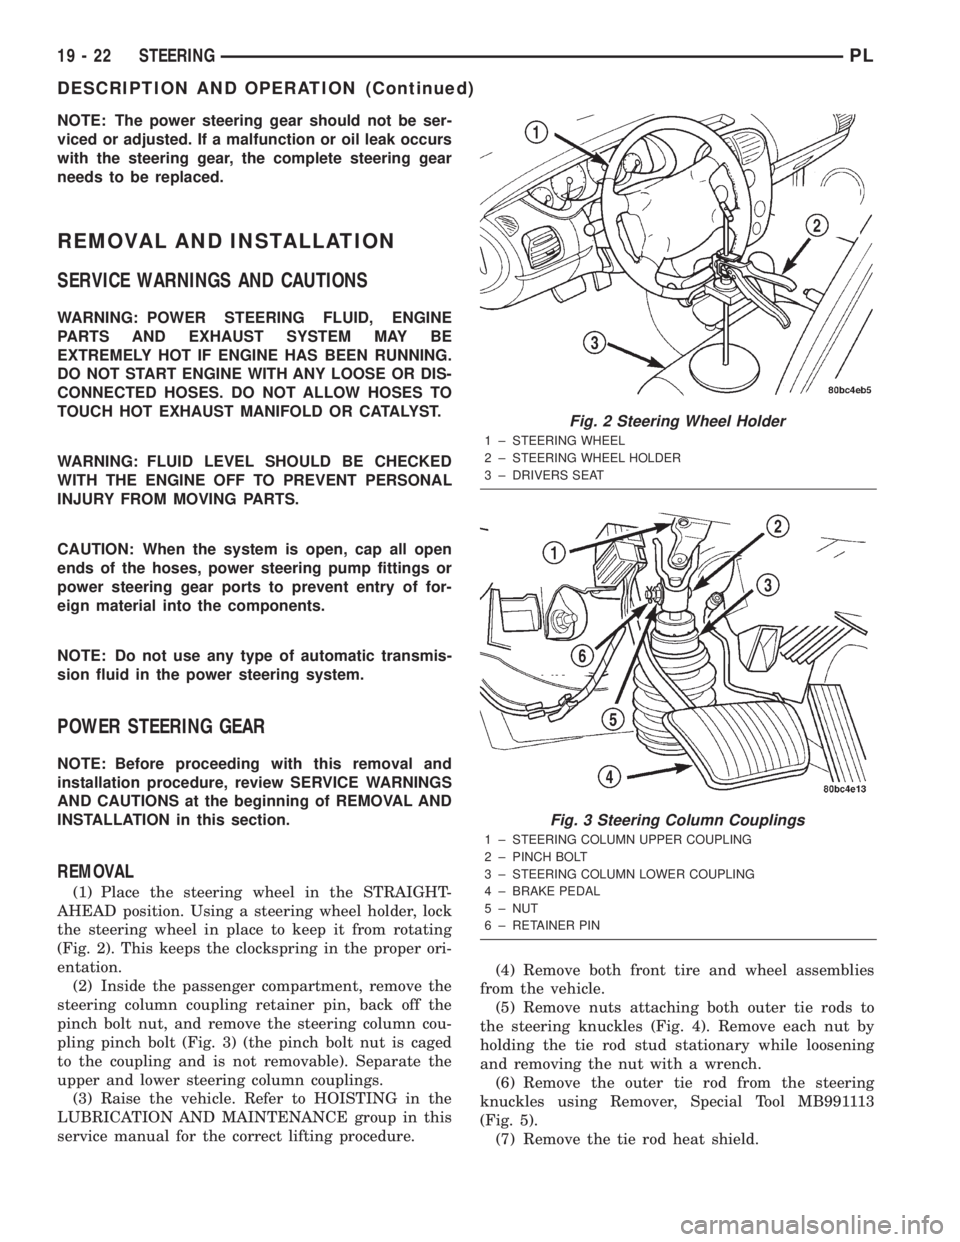
NOTE: The power steering gear should not be ser-
viced or adjusted. If a malfunction or oil leak occurs
with the steering gear, the complete steering gear
needs to be replaced.
REMOVAL AND INSTALLATION
SERVICE WARNINGS AND CAUTIONS
WARNING: POWER STEERING FLUID, ENGINE
PARTS AND EXHAUST SYSTEM MAY BE
EXTREMELY HOT IF ENGINE HAS BEEN RUNNING.
DO NOT START ENGINE WITH ANY LOOSE OR DIS-
CONNECTED HOSES. DO NOT ALLOW HOSES TO
TOUCH HOT EXHAUST MANIFOLD OR CATALYST.
WARNING: FLUID LEVEL SHOULD BE CHECKED
WITH THE ENGINE OFF TO PREVENT PERSONAL
INJURY FROM MOVING PARTS.
CAUTION: When the system is open, cap all open
ends of the hoses, power steering pump fittings or
power steering gear ports to prevent entry of for-
eign material into the components.
NOTE: Do not use any type of automatic transmis-
sion fluid in the power steering system.
POWER STEERING GEAR
NOTE: Before proceeding with this removal and
installation procedure, review SERVICE WARNINGS
AND CAUTIONS at the beginning of REMOVAL AND
INSTALLATION in this section.
REMOVAL
(1) Place the steering wheel in the STRAIGHT-
AHEAD position. Using a steering wheel holder, lock
the steering wheel in place to keep it from rotating
(Fig. 2). This keeps the clockspring in the proper ori-
entation.
(2) Inside the passenger compartment, remove the
steering column coupling retainer pin, back off the
pinch bolt nut, and remove the steering column cou-
pling pinch bolt (Fig. 3) (the pinch bolt nut is caged
to the coupling and is not removable). Separate the
upper and lower steering column couplings.
(3) Raise the vehicle. Refer to HOISTING in the
LUBRICATION AND MAINTENANCE group in this
service manual for the correct lifting procedure.(4) Remove both front tire and wheel assemblies
from the vehicle.
(5) Remove nuts attaching both outer tie rods to
the steering knuckles (Fig. 4). Remove each nut by
holding the tie rod stud stationary while loosening
and removing the nut with a wrench.
(6) Remove the outer tie rod from the steering
knuckles using Remover, Special Tool MB991113
(Fig. 5).
(7) Remove the tie rod heat shield.
Fig. 2 Steering Wheel Holder
1 ± STEERING WHEEL
2 ± STEERING WHEEL HOLDER
3 ± DRIVERS SEAT
Fig. 3 Steering Column Couplings
1 ± STEERING COLUMN UPPER COUPLING
2 ± PINCH BOLT
3 ± STEERING COLUMN LOWER COUPLING
4 ± BRAKE PEDAL
5 ± NUT
6 ± RETAINER PIN
19 - 22 STEERINGPL
DESCRIPTION AND OPERATION (Continued)
Page 909 of 1285
(25) Turn the key to OFF and remove the scan tool
from the vehicle.
(26) Test the operation of the horn, wipers and any
other functions that are steering column operated. If
applicable, reset the radio and the clock.
(27) If the steering column is a tilt column, verify
the tilt mechanism operates properly.
(28) Road test the vehicle to ensure proper opera-
tion of the steering system and the speed control sys-
tem.
STEERING COLUMN LOWER COUPLING
NOTE: Before proceeding with this removal and
installation procedure, review SERVICE WARNINGS
AND CAUTIONS at the beginning of REMOVAL AND
INSTALLATION in this section and in STEERING
GEAR.
REMOVAL
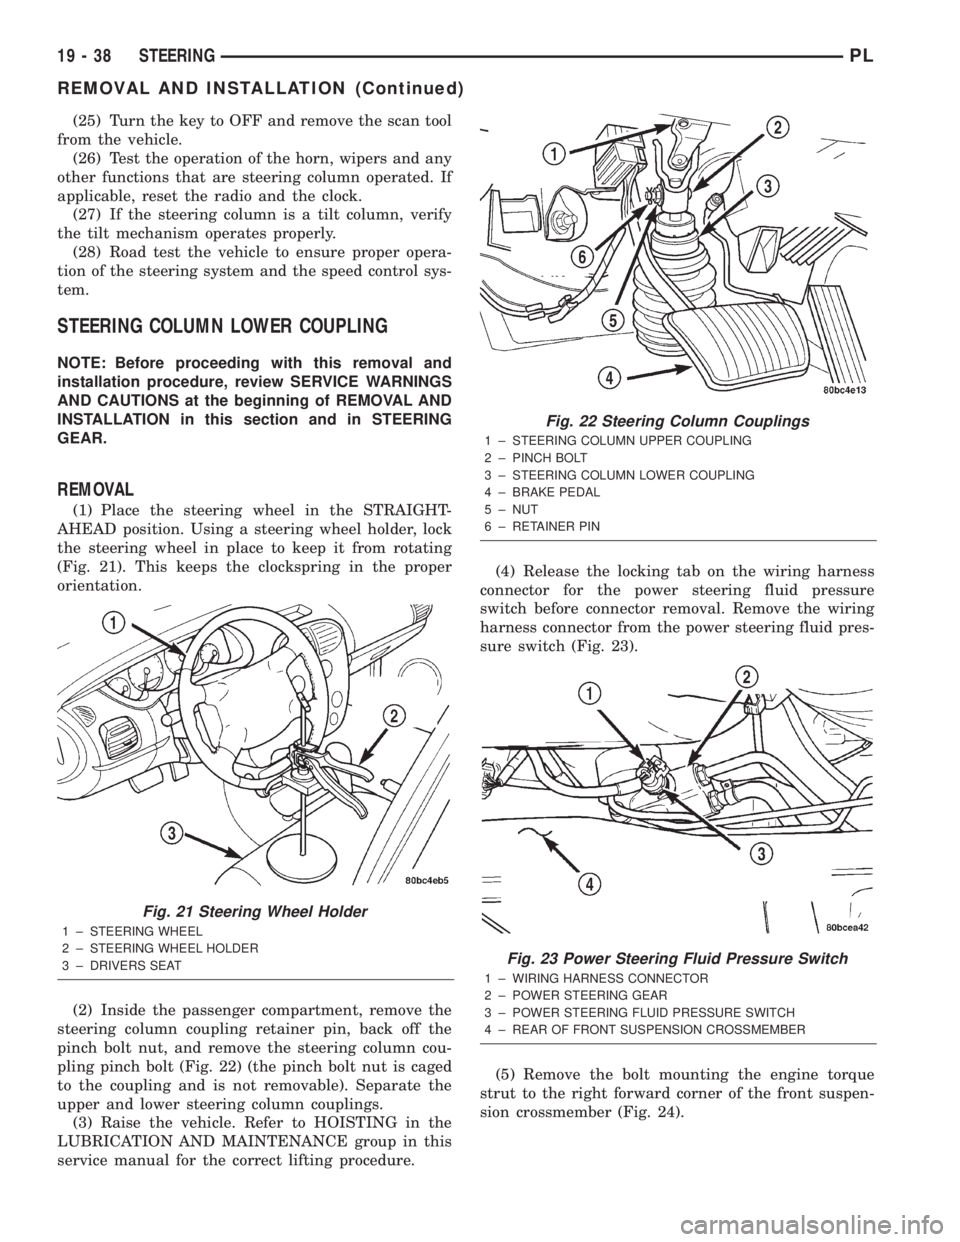
(1) Place the steering wheel in the STRAIGHT-
AHEAD position. Using a steering wheel holder, lock
the steering wheel in place to keep it from rotating
(Fig. 21). This keeps the clockspring in the proper
orientation.
(2) Inside the passenger compartment, remove the
steering column coupling retainer pin, back off the
pinch bolt nut, and remove the steering column cou-
pling pinch bolt (Fig. 22) (the pinch bolt nut is caged
to the coupling and is not removable). Separate the
upper and lower steering column couplings.
(3) Raise the vehicle. Refer to HOISTING in the
LUBRICATION AND MAINTENANCE group in this
service manual for the correct lifting procedure.(4) Release the locking tab on the wiring harness
connector for the power steering fluid pressure
switch before connector removal. Remove the wiring
harness connector from the power steering fluid pres-
sure switch (Fig. 23).
(5) Remove the bolt mounting the engine torque
strut to the right forward corner of the front suspen-
sion crossmember (Fig. 24).
Fig. 21 Steering Wheel Holder
1 ± STEERING WHEEL
2 ± STEERING WHEEL HOLDER
3 ± DRIVERS SEAT
Fig. 22 Steering Column Couplings
1 ± STEERING COLUMN UPPER COUPLING
2 ± PINCH BOLT
3 ± STEERING COLUMN LOWER COUPLING
4 ± BRAKE PEDAL
5 ± NUT
6 ± RETAINER PIN
Fig. 23 Power Steering Fluid Pressure Switch
1 ± WIRING HARNESS CONNECTOR
2 ± POWER STEERING GEAR
3 ± POWER STEERING FLUID PRESSURE SWITCH
4 ± REAR OF FRONT SUSPENSION CROSSMEMBER
19 - 38 STEERINGPL
REMOVAL AND INSTALLATION (Continued)
Page 914 of 1285
TRANSAXLE
TABLE OF CONTENTS
page page
NV T350 (A-578) MANUAL TRANSAXLE........ 131TH AUTOMATIC TRANSAXLE.............. 54
NV T350 (A-578) MANUAL TRANSAXLE
TABLE OF CONTENTS
page page
GENERAL INFORMATION
NV T350 (A578) MANUAL TRANSAXLE.........1
TRANSAXLE IDENTIFICATION................2
FLUID REQUIREMENTS....................2
SPECIAL ADDITIVES.......................2
SEALANTS..............................2
GEAR RATIOS............................2
GEARSHIFT PATTERN......................3
DIAGNOSIS AND TESTING
COMMON PROBLEM CAUSES...............3
HARD SHIFTING..........................3
NOISY OPERATION........................3
SLIPS OUT OF GEAR......................3
LOW LUBRICANT LEVEL....................4
FLUID LEAKS............................4
CLUTCH PROBLEMS.......................4
SERVICE PROCEDURES
FLUID DRAIN AND FILL.....................4
REMOVAL AND INSTALLATION
GEARSHIFT KNOB........................4
GEARSHIFT BOOT........................5
GEARSHIFT CABLE ASSEMBLY..............6
GEARSHIFT MECHANISM REPLACEMENT......9
VEHICLE SPEED SENSOR AND DRIVE
PINION...............................11
BACK-UP LAMP SWITCH...................12CROSSOVER LEVER......................12
SELECTOR LEVER.......................12
AXLE SHAFT SEALS......................13
SHIFT SHAFT SEALS......................13
TRANSAXLE............................14
DISASSEMBLY AND ASSEMBLY
TRANSAXLE............................18
INPUT SHAFT...........................31
OUTPUT SHAFT.........................36
DIFFERENTIAL..........................36
SYNCHRONIZER.........................41
SHIFT RAILS OVERHAUL..................42
TRANSAXLE CASE OVERHAUL..............42
CLEANING AND INSPECTION
TRANSAXLE............................48
SYNCHRONIZER.........................48
ADJUSTMENTS
GEARSHIFT CROSSOVER CABLE...........49
BEARING ADJUSTMENT PROCEDURE........50
DIFFERENTIAL BEARING PRELOAD
ADJUSTMENT..........................50
SPECIFICATIONS
NV T350 (A-578) SPECIFICATIONS...........51
SPECIAL TOOLS
NV T350 (A-578) MANUAL TRANSAXLE........52
GENERAL INFORMATION
NV T350 (A578) MANUAL TRANSAXLE
The NV T350 (A-578) transaxle is a fully synchro-
nized (except reverse), constant-mesh transaxle. The
transaxle case is constructed of die-cast aluminum,
and is a two-piece design (bell housing case half and
rear housing case half) with a steel end plate bearing
cover. All forward gears are in constant-mesh witheach other, which eliminates the need to move gears
together for engagement. This feature improves
response and eliminates gear ªclashº noises. The
reverse idler gear is supported and rotates on a spin-
dle idler shaft. Depending on application, a reverse
gear brake/blocking ring is available on some units
for shifting ease.
The NV T350 (A-578) transaxle also incorporates an
open differential, which converts power from the output
shaft pinion gear to the differential ring gear. The dif-
PLTRANSAXLE 21 - 1
Page 915 of 1285
ferential case transfers torque from the ring gear to the
drive axles by means of differential side gears.
The NV T350 (A-578) transaxle internal components
can only be serviced by separating the case halves.
CAUTION: The transaxle output shaft is serviced as
a unit. No disassembly and reassembly is possible.
Damage to the transaxle may result.
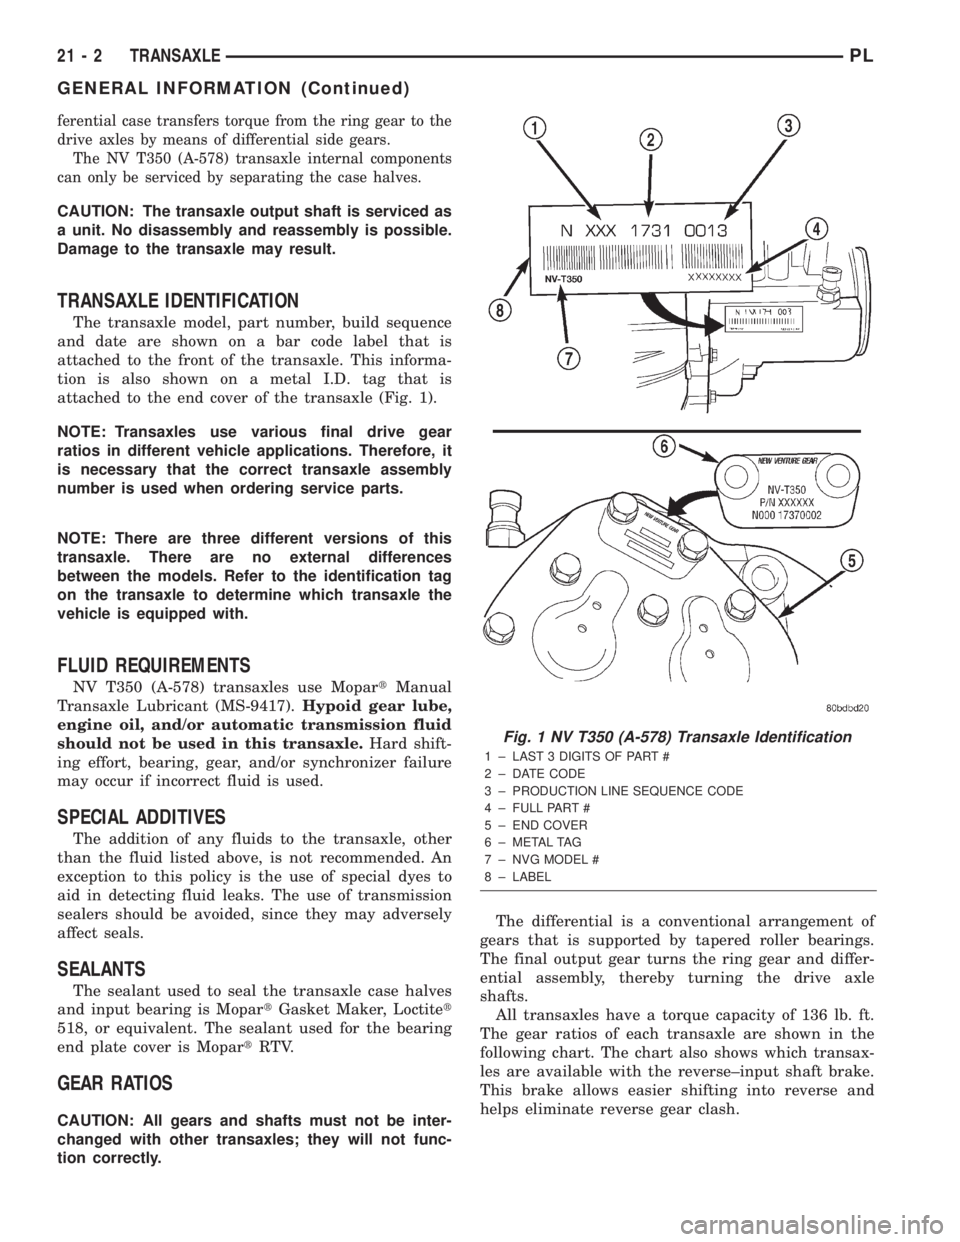
TRANSAXLE IDENTIFICATION
The transaxle model, part number, build sequence
and date are shown on a bar code label that is
attached to the front of the transaxle. This informa-
tion is also shown on a metal I.D. tag that is
attached to the end cover of the transaxle (Fig. 1).
NOTE: Transaxles use various final drive gear
ratios in different vehicle applications. Therefore, it
is necessary that the correct transaxle assembly
number is used when ordering service parts.
NOTE: There are three different versions of this
transaxle. There are no external differences
between the models. Refer to the identification tag
on the transaxle to determine which transaxle the
vehicle is equipped with.
FLUID REQUIREMENTS
NV T350 (A-578) transaxles use MopartManual
Transaxle Lubricant (MS-9417).Hypoid gear lube,
engine oil, and/or automatic transmission fluid
should not be used in this transaxle.Hard shift-
ing effort, bearing, gear, and/or synchronizer failure
may occur if incorrect fluid is used.
SPECIAL ADDITIVES
The addition of any fluids to the transaxle, other
than the fluid listed above, is not recommended. An
exception to this policy is the use of special dyes to
aid in detecting fluid leaks. The use of transmission
sealers should be avoided, since they may adversely
affect seals.
SEALANTS
The sealant used to seal the transaxle case halves
and input bearing is MopartGasket Maker, Loctitet
518, or equivalent. The sealant used for the bearing
end plate cover is MopartRTV.
GEAR RATIOS
CAUTION: All gears and shafts must not be inter-
changed with other transaxles; they will not func-
tion correctly.The differential is a conventional arrangement of
gears that is supported by tapered roller bearings.
The final output gear turns the ring gear and differ-
ential assembly, thereby turning the drive axle
shafts.
All transaxles have a torque capacity of 136 lb. ft.
The gear ratios of each transaxle are shown in the
following chart. The chart also shows which transax-
les are available with the reverse±input shaft brake.
This brake allows easier shifting into reverse and
helps eliminate reverse gear clash.
Fig. 1 NV T350 (A-578) Transaxle Identification
1 ± LAST 3 DIGITS OF PART #
2 ± DATE CODE
3 ± PRODUCTION LINE SEQUENCE CODE
4 ± FULL PART #
5 ± END COVER
6 ± METAL TAG
7 ± NVG MODEL #
8 ± LABEL
21 - 2 TRANSAXLEPL
GENERAL INFORMATION (Continued)