2000 DODGE NEON flat tire
[x] Cancel search: flat tirePage 10 of 1285

FLAT TOWING WITH TOW BAR
²3-speed automatic transaxle vehicles can be flat
towed at speeds not to exceed 40 km/h (25 mph) for
not more than 25 km (15 miles). The steering column
must be unlocked and gear selector in neutral.
²5-speed manual transaxle vehicles can be flat
towed at any legal highway speed for extended dis-
tances. The gear selector must be in the neutral posi-
tion.
TOWING ± FRONT WHEEL LIFT
DaimlerChrysler Corporation recommends that a
vehicle be towed with the front end lifted, whenever
possible.
TOWING ± REAR WHEEL LIFT
If a vehicle cannot be towed with the front wheels
lifted, the rear wheels can be lifted provided the fol-
lowing guide lines are observed.
CAUTION: Do not use steering column lock to
secure steering wheel during towing operation.
²Unlock steering column and secure steering
wheel in straight ahead position with a clamp device
designed for towing.
²Verify that front drive line and steering compo-
nents are in good condition.
²5-speed manual transaxle vehicles can be towed
at any legal highway speed for extended distances.
The gear selector must be in the neutral position.
²3-speed automatic transaxle vehicles can be
towed at speeds not to exceed 40 km/h (25 mph) for
not more than 25 km (15 miles). The gear selector
must be in the neutral position.
HOISTING RECOMMENDATIONS
Refer to Owner's Manual provided with vehicle for
proper emergency jacking procedures.
WARNING: THE HOISTING AND JACK LIFTING
POINTS PROVIDED ARE FOR A COMPLETE VEHI-
CLE. WHEN THE ENGINE OR REAR SUSPENSION
IS REMOVED FROM A VEHICLE, THE CENTER OF
GRAVITY IS ALTERED MAKING SOME HOISTING
CONDITIONS UNSTABLE. PROPERLY SUPPORT OR
SECURE VEHICLE TO HOISTING DEVICE WHEN
THESE CONDITIONS EXIST.
CAUTION: Do not position hoisting device on sus-
pension components, damage to vehicle can result.Do not attempt to raise one entire side of the
vehicle by placing a floor jack midway between the
front and rear wheels. This practice may result in
permanent damage to the body.
FLOOR JACK
When properly positioned, a floor jack can be used
to lift a PL vehicle (Fig. 3). Support the vehicle in the
raised position with jack stands.
A floor jack or any lifting device, must never be
used on any part of the underbody other then the
described areas.
HOIST
A vehicle can be lifted with:
²A single-post, frame-contact hoist.
²A twin-post, chassis hoist.
²A ramp-type, drive-on hoist.
NOTE: When a frame-contact type hoist is used,
verify that the lifting pads are positioned properly
(Fig. 3).
Fig. 3 Hoisting and Jacking Points
1 Frame Contract Lift (Single Post)
Chassis Lift (Dual Post)
Outboard Lift (Dual Post)
Floor Jack
2 Drive On Lift
PLLUBRICATION AND MAINTENANCE 0 - 9
SERVICE PROCEDURES (Continued)
Page 15 of 1285
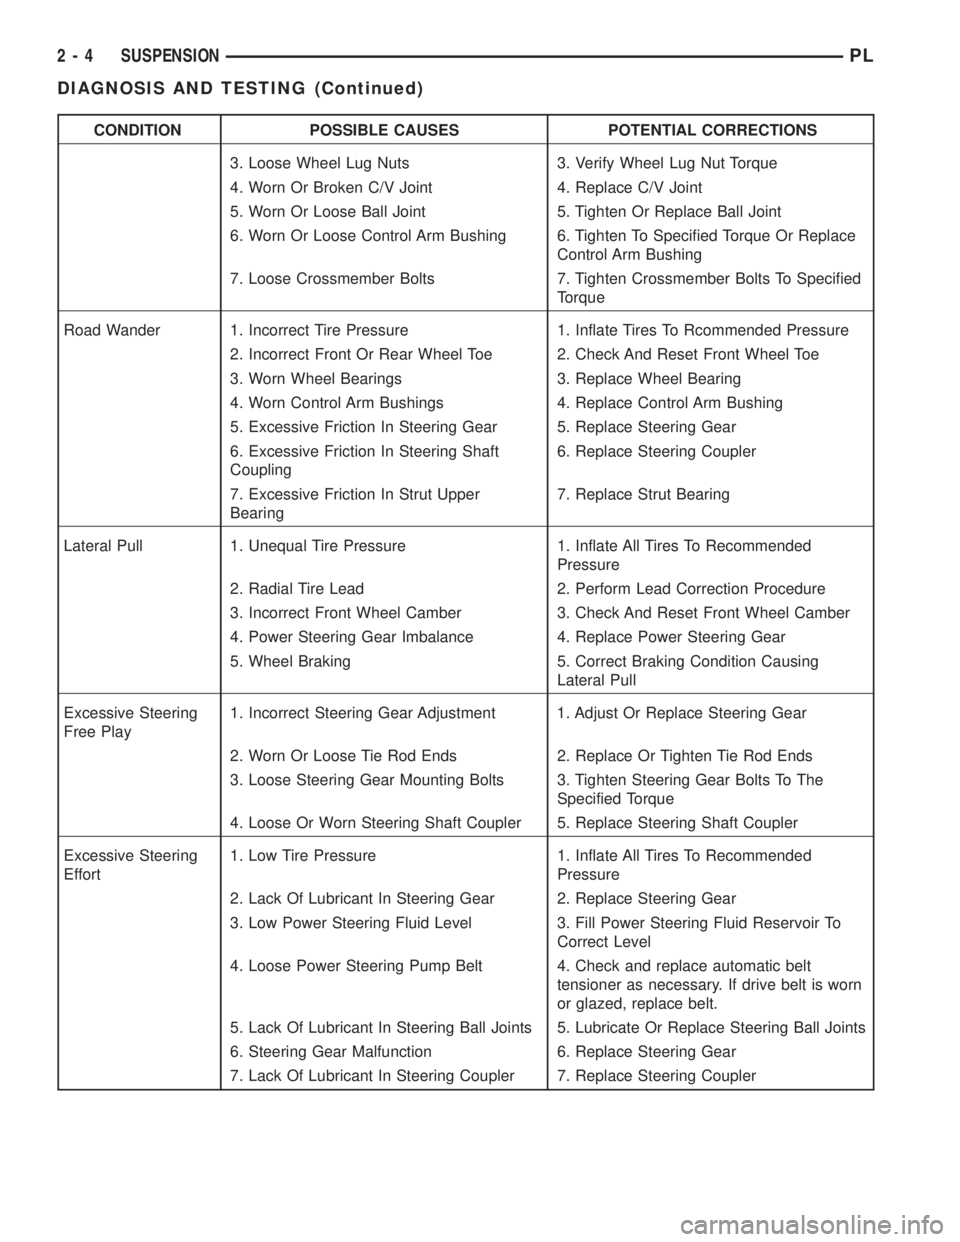
CONDITION POSSIBLE CAUSES POTENTIAL CORRECTIONS
3. Loose Wheel Lug Nuts 3. Verify Wheel Lug Nut Torque
4. Worn Or Broken C/V Joint 4. Replace C/V Joint
5. Worn Or Loose Ball Joint 5. Tighten Or Replace Ball Joint
6. Worn Or Loose Control Arm Bushing 6. Tighten To Specified Torque Or Replace
Control Arm Bushing
7. Loose Crossmember Bolts 7. Tighten Crossmember Bolts To Specified
Torque
Road Wander 1. Incorrect Tire Pressure 1. Inflate Tires To Rcommended Pressure
2. Incorrect Front Or Rear Wheel Toe 2. Check And Reset Front Wheel Toe
3. Worn Wheel Bearings 3. Replace Wheel Bearing
4. Worn Control Arm Bushings 4. Replace Control Arm Bushing
5. Excessive Friction In Steering Gear 5. Replace Steering Gear
6. Excessive Friction In Steering Shaft
Coupling6. Replace Steering Coupler
7. Excessive Friction In Strut Upper
Bearing7. Replace Strut Bearing
Lateral Pull 1. Unequal Tire Pressure 1. Inflate All Tires To Recommended
Pressure
2. Radial Tire Lead 2. Perform Lead Correction Procedure
3. Incorrect Front Wheel Camber 3. Check And Reset Front Wheel Camber
4. Power Steering Gear Imbalance 4. Replace Power Steering Gear
5. Wheel Braking 5. Correct Braking Condition Causing
Lateral Pull
Excessive Steering
Free Play1. Incorrect Steering Gear Adjustment 1. Adjust Or Replace Steering Gear
2. Worn Or Loose Tie Rod Ends 2. Replace Or Tighten Tie Rod Ends
3. Loose Steering Gear Mounting Bolts 3. Tighten Steering Gear Bolts To The
Specified Torque
4. Loose Or Worn Steering Shaft Coupler 5. Replace Steering Shaft Coupler
Excessive Steering
Effort1. Low Tire Pressure 1. Inflate All Tires To Recommended
Pressure
2. Lack Of Lubricant In Steering Gear 2. Replace Steering Gear
3. Low Power Steering Fluid Level 3. Fill Power Steering Fluid Reservoir To
Correct Level
4. Loose Power Steering Pump Belt 4. Check and replace automatic belt
tensioner as necessary. If drive belt is worn
or glazed, replace belt.
5. Lack Of Lubricant In Steering Ball Joints 5. Lubricate Or Replace Steering Ball Joints
6. Steering Gear Malfunction 6. Replace Steering Gear
7. Lack Of Lubricant In Steering Coupler 7. Replace Steering Coupler
2 - 4 SUSPENSIONPL
DIAGNOSIS AND TESTING (Continued)
Page 16 of 1285
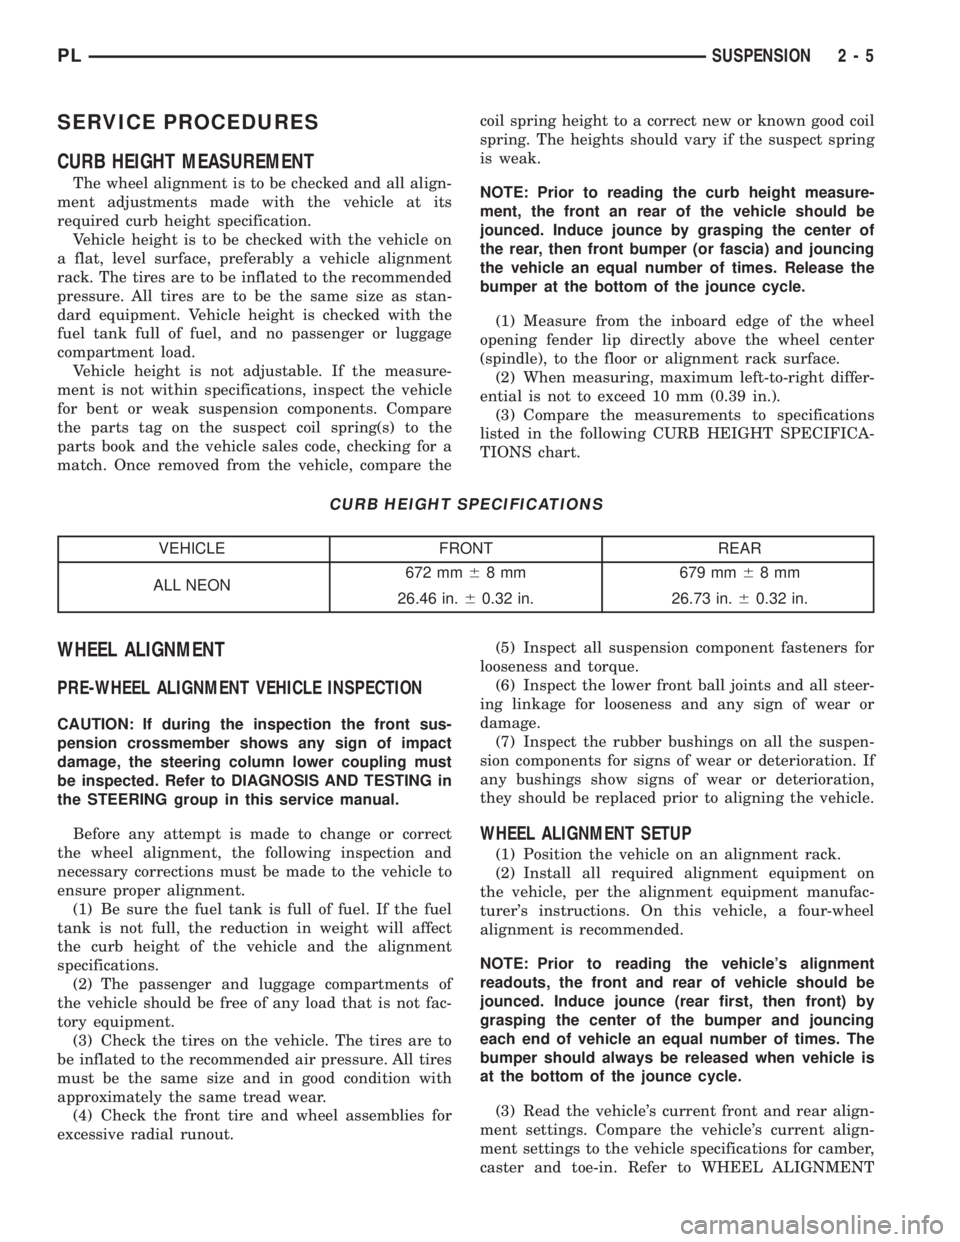
SERVICE PROCEDURES
CURB HEIGHT MEASUREMENT
The wheel alignment is to be checked and all align-
ment adjustments made with the vehicle at its
required curb height specification.
Vehicle height is to be checked with the vehicle on
a flat, level surface, preferably a vehicle alignment
rack. The tires are to be inflated to the recommended
pressure. All tires are to be the same size as stan-
dard equipment. Vehicle height is checked with the
fuel tank full of fuel, and no passenger or luggage
compartment load.
Vehicle height is not adjustable. If the measure-
ment is not within specifications, inspect the vehicle
for bent or weak suspension components. Compare
the parts tag on the suspect coil spring(s) to the
parts book and the vehicle sales code, checking for a
match. Once removed from the vehicle, compare thecoil spring height to a correct new or known good coil
spring. The heights should vary if the suspect spring
is weak.
NOTE: Prior to reading the curb height measure-
ment, the front an rear of the vehicle should be
jounced. Induce jounce by grasping the center of
the rear, then front bumper (or fascia) and jouncing
the vehicle an equal number of times. Release the
bumper at the bottom of the jounce cycle.
(1) Measure from the inboard edge of the wheel
opening fender lip directly above the wheel center
(spindle), to the floor or alignment rack surface.
(2) When measuring, maximum left-to-right differ-
ential is not to exceed 10 mm (0.39 in.).
(3) Compare the measurements to specifications
listed in the following CURB HEIGHT SPECIFICA-
TIONS chart.
CURB HEIGHT SPECIFICATIONS
VEHICLE FRONT REAR
ALL NEON672 mm68 mm 679 mm68mm
26.46 in.60.32 in. 26.73 in.60.32 in.
WHEEL ALIGNMENT
PRE-WHEEL ALIGNMENT VEHICLE INSPECTION
CAUTION: If during the inspection the front sus-
pension crossmember shows any sign of impact
damage, the steering column lower coupling must
be inspected. Refer to DIAGNOSIS AND TESTING in
the STEERING group in this service manual.
Before any attempt is made to change or correct
the wheel alignment, the following inspection and
necessary corrections must be made to the vehicle to
ensure proper alignment.
(1) Be sure the fuel tank is full of fuel. If the fuel
tank is not full, the reduction in weight will affect
the curb height of the vehicle and the alignment
specifications.
(2) The passenger and luggage compartments of
the vehicle should be free of any load that is not fac-
tory equipment.
(3) Check the tires on the vehicle. The tires are to
be inflated to the recommended air pressure. All tires
must be the same size and in good condition with
approximately the same tread wear.
(4) Check the front tire and wheel assemblies for
excessive radial runout.(5) Inspect all suspension component fasteners for
looseness and torque.
(6) Inspect the lower front ball joints and all steer-
ing linkage for looseness and any sign of wear or
damage.
(7) Inspect the rubber bushings on all the suspen-
sion components for signs of wear or deterioration. If
any bushings show signs of wear or deterioration,
they should be replaced prior to aligning the vehicle.
WHEEL ALIGNMENT SETUP
(1) Position the vehicle on an alignment rack.
(2) Install all required alignment equipment on
the vehicle, per the alignment equipment manufac-
turer's instructions. On this vehicle, a four-wheel
alignment is recommended.
NOTE: Prior to reading the vehicle's alignment
readouts, the front and rear of vehicle should be
jounced. Induce jounce (rear first, then front) by
grasping the center of the bumper and jouncing
each end of vehicle an equal number of times. The
bumper should always be released when vehicle is
at the bottom of the jounce cycle.
(3) Read the vehicle's current front and rear align-
ment settings. Compare the vehicle's current align-
ment settings to the vehicle specifications for camber,
caster and toe-in. Refer to WHEEL ALIGNMENT
PLSUSPENSION 2 - 5
Page 32 of 1285
(4) Lower the vehicle.
NOTE: It may be necessary to put the vehicle on a
platform hoist or alignment rack to gain access to
the stabilizer bar mounting bolts with the vehicle at
curb height.
(5) Tighten each stabilizer bar link by holding the
upper retainer/nut with a wrench and turning the
link bolt. Tighten each link bolt to a torque of 23
N´m (200 in. lbs.).
(6) Tighten the stabilizer bar cushion retainer
bolts to a torque of 28 N´m (250 in. lbs.).
WHEEL MOUNTING STUD (FRONT)
NOTE: Before proceeding with this procedure,
review SERVICE WARNINGS AND CAUTIONS at the
beginning of REMOVAL AND INSTALLATION in this
section.
Use the following procedure to remove and install
one of five studs on one wheel hub.
REMOVAL
(1) Raise the vehicle. Refer to HOISTING in the
LUBRICATION AND MAINTENANCE group for the
proper lifting procedure.
(2) Remove the front tire and wheel assembly.
(3) Remove the two guide pin bolts securing the
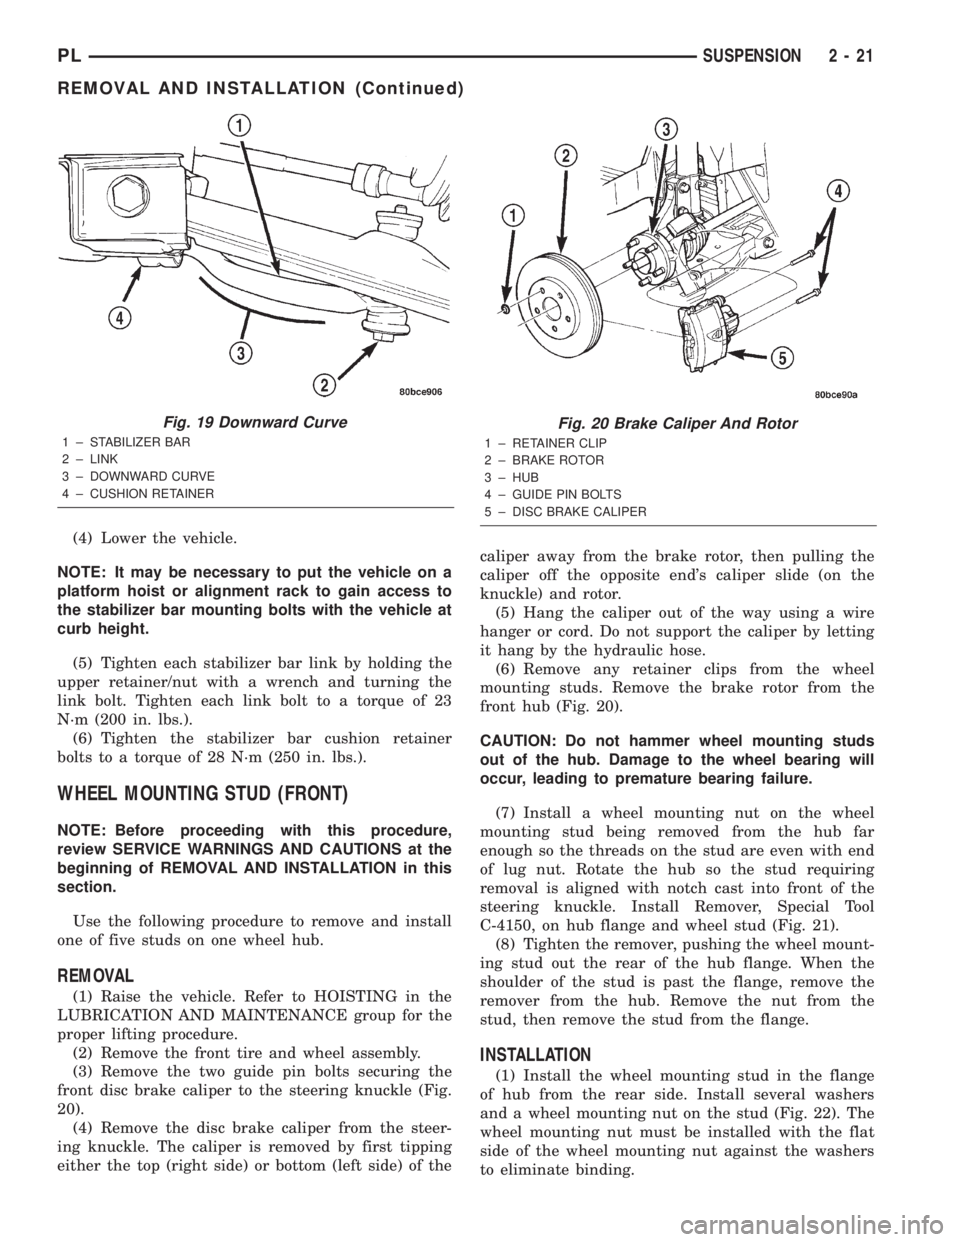
front disc brake caliper to the steering knuckle (Fig.
20).
(4) Remove the disc brake caliper from the steer-
ing knuckle. The caliper is removed by first tipping
either the top (right side) or bottom (left side) of thecaliper away from the brake rotor, then pulling the
caliper off the opposite end's caliper slide (on the
knuckle) and rotor.
(5) Hang the caliper out of the way using a wire
hanger or cord. Do not support the caliper by letting
it hang by the hydraulic hose.
(6) Remove any retainer clips from the wheel
mounting studs. Remove the brake rotor from the
front hub (Fig. 20).
CAUTION: Do not hammer wheel mounting studs
out of the hub. Damage to the wheel bearing will
occur, leading to premature bearing failure.
(7) Install a wheel mounting nut on the wheel
mounting stud being removed from the hub far
enough so the threads on the stud are even with end
of lug nut. Rotate the hub so the stud requiring
removal is aligned with notch cast into front of the
steering knuckle. Install Remover, Special Tool
C-4150, on hub flange and wheel stud (Fig. 21).
(8) Tighten the remover, pushing the wheel mount-
ing stud out the rear of the hub flange. When the
shoulder of the stud is past the flange, remove the
remover from the hub. Remove the nut from the
stud, then remove the stud from the flange.
INSTALLATION
(1) Install the wheel mounting stud in the flange
of hub from the rear side. Install several washers
and a wheel mounting nut on the stud (Fig. 22). The
wheel mounting nut must be installed with the flat
side of the wheel mounting nut against the washers
to eliminate binding.
Fig. 19 Downward Curve
1 ± STABILIZER BAR
2 ± LINK
3 ± DOWNWARD CURVE
4 ± CUSHION RETAINER
Fig. 20 Brake Caliper And Rotor
1 ± RETAINER CLIP
2 ± BRAKE ROTOR
3 ± HUB
4 ± GUIDE PIN BOLTS
5 ± DISC BRAKE CALIPER
PLSUSPENSION 2 - 21
REMOVAL AND INSTALLATION (Continued)
Page 55 of 1285
the front side. Install the nut, but do not completely
tighten it at this time. The nut will need to be tight-
ened when the vehicle is at curb height.
(4) Install the rear bayonet bushing on the tension
strut. Be sure the stepped area of the bushing is
squarely seated into the hole in the knuckle.
(5) Install the rear tension strut retainer, then the
nut. To completely install the nut, place a wrench on
the flat formed into the tension strut and tighten the
nut (Fig. 12). Tighten the nut to a torque of 95 N´m
(70 ft. lbs.).
(6) If vehicle is equipped with rear drum brakes,
install the brake support plate on the knuckle and
attach it using it's four mounting bolts (Fig. 9).
Tighten the mounting bolts to a torque of 75 N´m (55
ft. lbs.).
(7) If the vehicle is equipped with rear disc brakes,
install the disc brake adapter on the knuckle and
attach it using it's four mounting bolts (Fig. 10).
Tighten the mounting bolts to a torque of 75 N´m (55
ft. lbs.).
(8) Install the hub and bearing on the knuckle's
spindle, then install a new retaining nut (Fig. 7). Do
not reuse the original nut. Tighten the nut to a
torque of 217 N´m (160 ft. lbs.).
(9) Install the dust cap on the end of the hub and
bearing (Fig. 7).
(10) If the vehicle is equipped with rear disc
brakes (Fig. 7), install the brake rotor and disc brake
caliper on the knuckle. Install the two guide pin bolts
securing the front disc brake caliper to the steering
knuckle. Tighten the guide pin bolts to a torque of 22
N´m (192 in. lbs.).
(11) If the vehicle is equipped with rear drum
brakes, install the screw securing the brake hose
bracket to the rear of the strut assembly (Fig. 5).
Tighten the screw to a torque of 31 N´m (275 in. lbs.).
(12) If the vehicle is equipped with the antilock
brake system (ABS), install the screw securing the
ABS wheel speed sensor bracket to the rear of the
strut assembly (Fig. 6). Tighten the mounting screw
to a torque of 13 N´m (120 in. lbs.).
(13) Install the tire and wheel assembly. Tighten
the wheel mounting nuts in proper sequence until all
nuts are torqued to half specification. Repeat the
tightening sequence, this time, to full specified
torque of 135 N´m (100 ft. lbs.).
(14) Lower the vehicle to ground level.
(15) Tighten the lateral arm-to-knuckle mounting
bolt nut to a torque of 95 N´m (70 ft. lbs.).
(16) Set the rear toe on the vehicle to the required
specification if necessary. Refer to WHEEL ALIGN-
MENT in this service manual group.HUB AND BEARING (REAR)
NOTE: Before proceeding with this procedure,
review SERVICE WARNINGS AND CAUTIONS at the
beginning of REMOVAL AND INSTALLATION in this
section.
REMOVAL
(1) Raise the vehicle. Refer to HOISTING in the
LUBRICATION AND MAINTENANCE group for the
proper lifting procedure.
(2) Remove the rear wheel and tire assembly from
the vehicle.
(3) If the vehicle is equipped with rear drum
brakes, remove any retainer clips from the wheel
mounting studs, then pull the brake drum off the
hub and bearing.
(4) If the vehicle is equipped with rear disc brakes
(Fig. 7), perform the following:
²Remove the two guide pin bolts securing the
front disc brake caliper to the steering knuckle.
²Remove the disc brake caliper from the knuckle
and brake rotor.
²Hang the caliper out of the way using a wire
hanger or cord. Do not support the caliper by letting
it hang by the hydraulic hose.
²Remove any retainer clips from the wheel
mounting studs, then pull the brake rotor off the hub
and bearing.
(5) Remove the dust cap from the hub and bearing
assembly (Fig. 7).
(6) Remove the retaining nut, then the hub and
bearing from the knuckle's spindle (Fig. 7).
INSTALLATION
(1) Install the hub and bearing on the knuckle's
spindle, then install a new retaining nut (Fig. 7). Do
not reuse the original nut. Tighten the nut to a
torque of 217 N´m (160 ft. lbs.).
(2) Install the dust cap on the end of the hub and
bearing (Fig. 7).
(3) If the vehicle is equipped with rear disc brakes
(Fig. 7), install the brake rotor and disc brake caliper
on the knuckle. Install the two guide pin bolts secur-
ing the front disc brake caliper to the steering
knuckle. Tighten the guide pin bolts to a torque of 22
N´m (192 in. lbs.).
(4) Install the tire and wheel assembly. Tighten
the wheel mounting nuts in proper sequence until all
nuts are torqued to half specification. Repeat the
tightening sequence, this time, to full specified
torque of 135 N´m (100 ft. lbs.).
(5) Lower the vehicle to ground level.
2 - 44 SUSPENSIONPL
REMOVAL AND INSTALLATION (Continued)
Page 57 of 1285
(10) With suspension at curb height, tighten the
lateral arm mounting bolt nut at the crossmember to
88 N´m (65 ft. lbs.).
(11) Set the rear toe on the vehicle to the required
specification as necessary. Refer to WHEEL ALIGN-
MENT in this service manual group.
TENSION STRUT
NOTE: Before proceeding with this procedure,
review SERVICE WARNINGS AND CAUTIONS at the
beginning of REMOVAL AND INSTALLATION in this
section.
REMOVAL
(1) Raise the vehicle. Refer to HOISTING in the
LUBRICATION AND MAINTENANCE group for the
proper lifting procedure.
(2) Remove the rear wheel and tire assembly from
the vehicle.
(3) Disconnect the tension strut from the knuckle.
To do this, first hold the tension strut from turning
by using a wrench on the flat on the tension strut
and then remove the nut from the rear of the tension
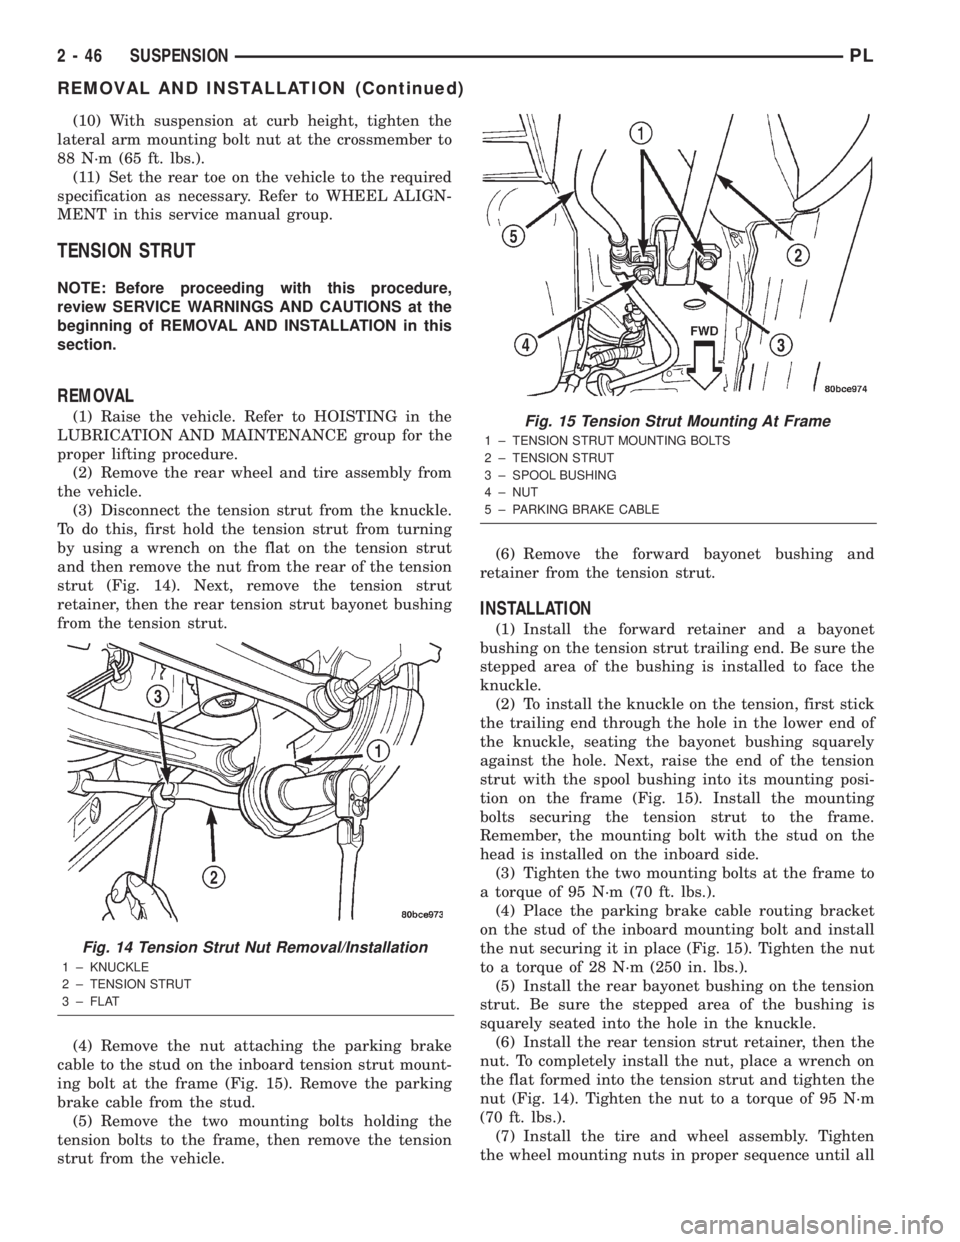
strut (Fig. 14). Next, remove the tension strut
retainer, then the rear tension strut bayonet bushing
from the tension strut.
(4) Remove the nut attaching the parking brake
cable to the stud on the inboard tension strut mount-
ing bolt at the frame (Fig. 15). Remove the parking
brake cable from the stud.
(5) Remove the two mounting bolts holding the
tension bolts to the frame, then remove the tension
strut from the vehicle.(6) Remove the forward bayonet bushing and
retainer from the tension strut.
INSTALLATION
(1) Install the forward retainer and a bayonet
bushing on the tension strut trailing end. Be sure the
stepped area of the bushing is installed to face the
knuckle.
(2) To install the knuckle on the tension, first stick
the trailing end through the hole in the lower end of
the knuckle, seating the bayonet bushing squarely
against the hole. Next, raise the end of the tension
strut with the spool bushing into its mounting posi-
tion on the frame (Fig. 15). Install the mounting
bolts securing the tension strut to the frame.
Remember, the mounting bolt with the stud on the
head is installed on the inboard side.
(3) Tighten the two mounting bolts at the frame to
a torque of 95 N´m (70 ft. lbs.).
(4) Place the parking brake cable routing bracket
on the stud of the inboard mounting bolt and install
the nut securing it in place (Fig. 15). Tighten the nut
to a torque of 28 N´m (250 in. lbs.).
(5) Install the rear bayonet bushing on the tension
strut. Be sure the stepped area of the bushing is
squarely seated into the hole in the knuckle.
(6) Install the rear tension strut retainer, then the
nut. To completely install the nut, place a wrench on
the flat formed into the tension strut and tighten the
nut (Fig. 14). Tighten the nut to a torque of 95 N´m
(70 ft. lbs.).
(7) Install the tire and wheel assembly. Tighten
the wheel mounting nuts in proper sequence until all
Fig. 14 Tension Strut Nut Removal/Installation
1 ± KNUCKLE
2 ± TENSION STRUT
3 ± FLAT
Fig. 15 Tension Strut Mounting At Frame
1 ± TENSION STRUT MOUNTING BOLTS
2 ± TENSION STRUT
3 ± SPOOL BUSHING
4 ± NUT
5 ± PARKING BRAKE CABLE
2 - 46 SUSPENSIONPL
REMOVAL AND INSTALLATION (Continued)
Page 58 of 1285
nuts are torqued to half specification. Repeat the
tightening sequence, this time, to full specified
torque of 135 N´m (100 ft. lbs.).
(8) Lower the vehicle to ground level.
(9) Set the rear toe on the vehicle to the required
specification if necessary. Refer to WHEEL ALIGN-
MENT in this service manual group.
STABILIZER BAR (REAR)
NOTE: Before proceeding with this procedure,
review SERVICE WARNINGS AND CAUTIONS at the
beginning of REMOVAL AND INSTALLATION in this
section.
REMOVAL
(1) Raise the vehicle. Refer to HOISTING in the
LUBRICATION AND MAINTENANCE group for the
proper lifting procedure.
(2) Remove both rear wheel and tire assemblies
from the vehicle.
(3) Remove the nut from the end of each rear sta-
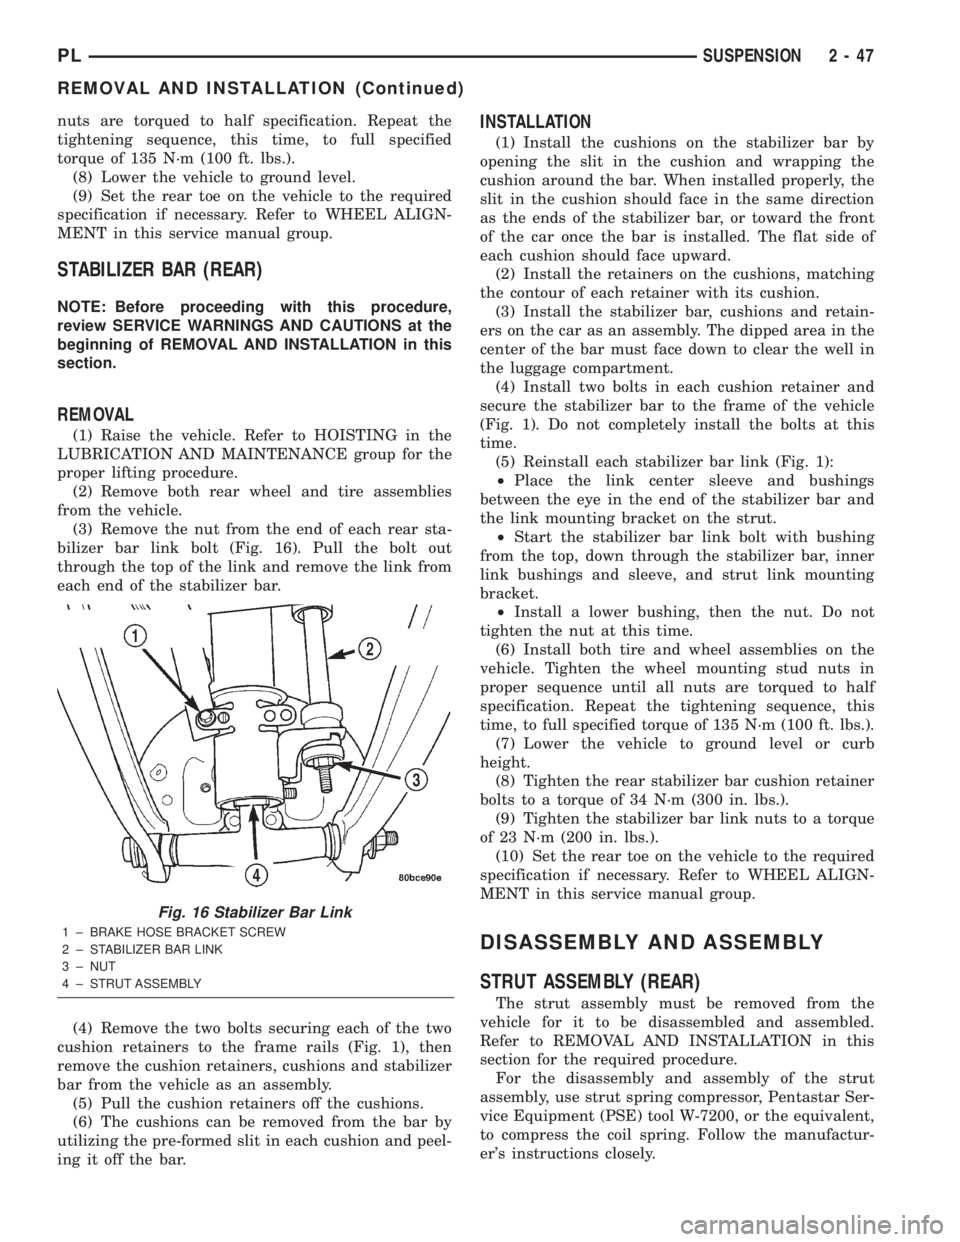
bilizer bar link bolt (Fig. 16). Pull the bolt out
through the top of the link and remove the link from
each end of the stabilizer bar.
(4) Remove the two bolts securing each of the two
cushion retainers to the frame rails (Fig. 1), then
remove the cushion retainers, cushions and stabilizer
bar from the vehicle as an assembly.
(5) Pull the cushion retainers off the cushions.
(6) The cushions can be removed from the bar by
utilizing the pre-formed slit in each cushion and peel-
ing it off the bar.
INSTALLATION
(1) Install the cushions on the stabilizer bar by
opening the slit in the cushion and wrapping the
cushion around the bar. When installed properly, the
slit in the cushion should face in the same direction
as the ends of the stabilizer bar, or toward the front
of the car once the bar is installed. The flat side of
each cushion should face upward.
(2) Install the retainers on the cushions, matching
the contour of each retainer with its cushion.
(3) Install the stabilizer bar, cushions and retain-
ers on the car as an assembly. The dipped area in the
center of the bar must face down to clear the well in
the luggage compartment.
(4) Install two bolts in each cushion retainer and
secure the stabilizer bar to the frame of the vehicle
(Fig. 1). Do not completely install the bolts at this
time.
(5) Reinstall each stabilizer bar link (Fig. 1):
²Place the link center sleeve and bushings
between the eye in the end of the stabilizer bar and
the link mounting bracket on the strut.
²Start the stabilizer bar link bolt with bushing
from the top, down through the stabilizer bar, inner
link bushings and sleeve, and strut link mounting
bracket.
²Install a lower bushing, then the nut. Do not
tighten the nut at this time.
(6) Install both tire and wheel assemblies on the
vehicle. Tighten the wheel mounting stud nuts in
proper sequence until all nuts are torqued to half
specification. Repeat the tightening sequence, this
time, to full specified torque of 135 N´m (100 ft. lbs.).
(7) Lower the vehicle to ground level or curb
height.
(8) Tighten the rear stabilizer bar cushion retainer
bolts to a torque of 34 N´m (300 in. lbs.).
(9) Tighten the stabilizer bar link nuts to a torque
of 23 N´m (200 in. lbs.).
(10) Set the rear toe on the vehicle to the required
specification if necessary. Refer to WHEEL ALIGN-
MENT in this service manual group.
DISASSEMBLY AND ASSEMBLY
STRUT ASSEMBLY (REAR)
The strut assembly must be removed from the
vehicle for it to be disassembled and assembled.
Refer to REMOVAL AND INSTALLATION in this
section for the required procedure.
For the disassembly and assembly of the strut
assembly, use strut spring compressor, Pentastar Ser-
vice Equipment (PSE) tool W-7200, or the equivalent,
to compress the coil spring. Follow the manufactur-
er's instructions closely.
Fig. 16 Stabilizer Bar Link
1 ± BRAKE HOSE BRACKET SCREW
2 ± STABILIZER BAR LINK
3 ± NUT
4 ± STRUT ASSEMBLY
PLSUSPENSION 2 - 47
REMOVAL AND INSTALLATION (Continued)
Page 104 of 1285
(10) If the vehicle is equipped with antilock
brakes, carefully push the power brake booster for-
ward until the booster contacts the ABS ICU mount-
ing bracket.
(11) If the vehicle does not have antilock brakes,
carefully push the power brake booster forward one
to two inches being careful not to stretch the brake
lines from the master cylinder to the brakes.
(12) Remove the two nuts fastening the brake
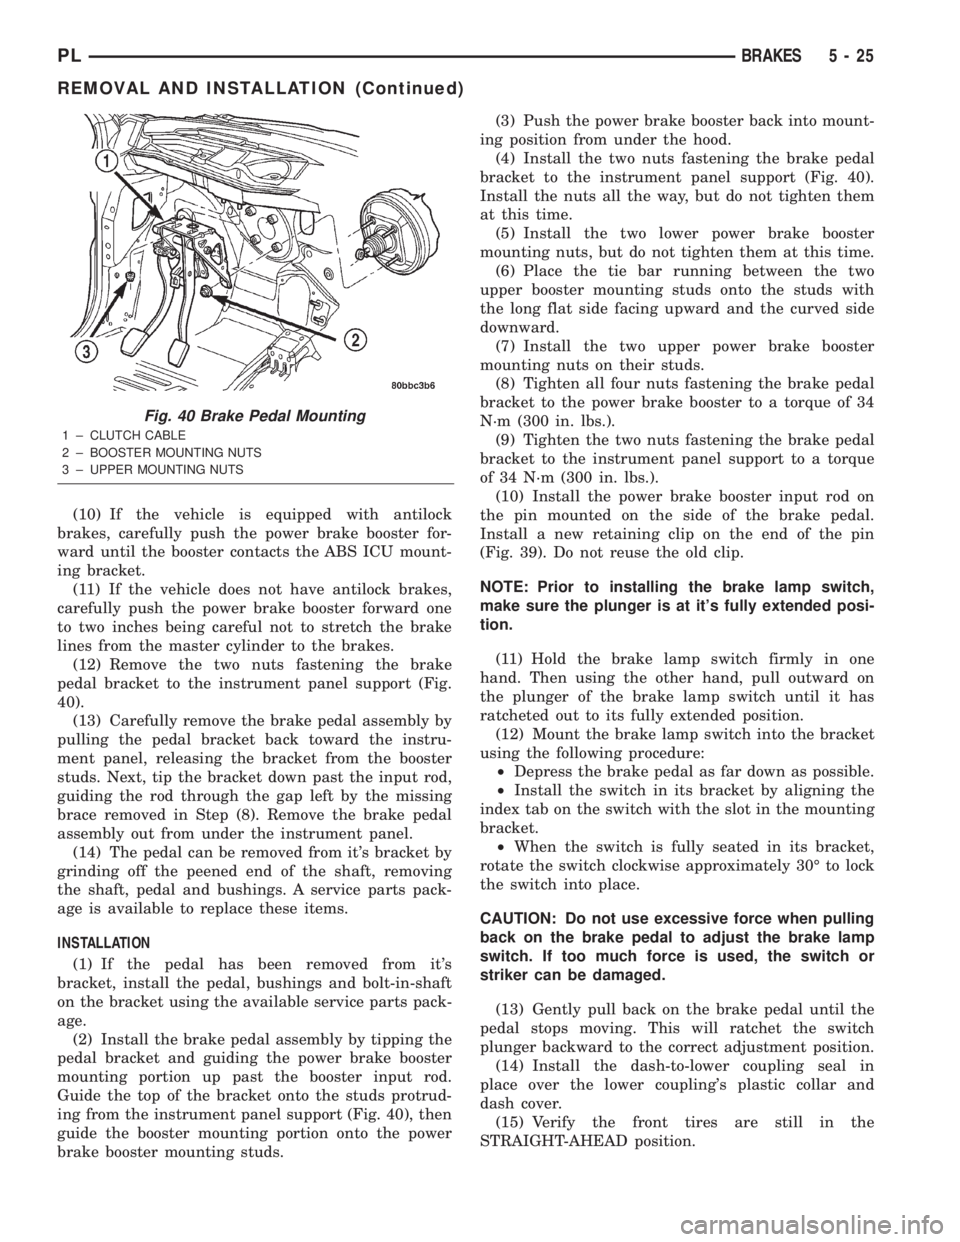
pedal bracket to the instrument panel support (Fig.
40).
(13) Carefully remove the brake pedal assembly by
pulling the pedal bracket back toward the instru-
ment panel, releasing the bracket from the booster
studs. Next, tip the bracket down past the input rod,
guiding the rod through the gap left by the missing
brace removed in Step (8). Remove the brake pedal
assembly out from under the instrument panel.
(14) The pedal can be removed from it's bracket by
grinding off the peened end of the shaft, removing
the shaft, pedal and bushings. A service parts pack-
age is available to replace these items.
INSTALLATION
(1) If the pedal has been removed from it's
bracket, install the pedal, bushings and bolt-in-shaft
on the bracket using the available service parts pack-
age.
(2) Install the brake pedal assembly by tipping the
pedal bracket and guiding the power brake booster
mounting portion up past the booster input rod.
Guide the top of the bracket onto the studs protrud-
ing from the instrument panel support (Fig. 40), then
guide the booster mounting portion onto the power
brake booster mounting studs.(3) Push the power brake booster back into mount-
ing position from under the hood.
(4) Install the two nuts fastening the brake pedal
bracket to the instrument panel support (Fig. 40).
Install the nuts all the way, but do not tighten them
at this time.
(5) Install the two lower power brake booster
mounting nuts, but do not tighten them at this time.
(6) Place the tie bar running between the two
upper booster mounting studs onto the studs with
the long flat side facing upward and the curved side
downward.
(7) Install the two upper power brake booster
mounting nuts on their studs.
(8) Tighten all four nuts fastening the brake pedal
bracket to the power brake booster to a torque of 34
N´m (300 in. lbs.).
(9) Tighten the two nuts fastening the brake pedal
bracket to the instrument panel support to a torque
of 34 N´m (300 in. lbs.).
(10) Install the power brake booster input rod on
the pin mounted on the side of the brake pedal.
Install a new retaining clip on the end of the pin
(Fig. 39). Do not reuse the old clip.
NOTE: Prior to installing the brake lamp switch,
make sure the plunger is at it's fully extended posi-
tion.
(11) Hold the brake lamp switch firmly in one
hand. Then using the other hand, pull outward on
the plunger of the brake lamp switch until it has
ratcheted out to its fully extended position.
(12) Mount the brake lamp switch into the bracket
using the following procedure:
²Depress the brake pedal as far down as possible.
²Install the switch in its bracket by aligning the
index tab on the switch with the slot in the mounting
bracket.
²When the switch is fully seated in its bracket,
rotate the switch clockwise approximately 30É to lock
the switch into place.
CAUTION: Do not use excessive force when pulling
back on the brake pedal to adjust the brake lamp
switch. If too much force is used, the switch or
striker can be damaged.
(13) Gently pull back on the brake pedal until the
pedal stops moving. This will ratchet the switch
plunger backward to the correct adjustment position.
(14) Install the dash-to-lower coupling seal in
place over the lower coupling's plastic collar and
dash cover.
(15) Verify the front tires are still in the
STRAIGHT-AHEAD position.
Fig. 40 Brake Pedal Mounting
1 ± CLUTCH CABLE
2 ± BOOSTER MOUNTING NUTS
3 ± UPPER MOUNTING NUTS
PLBRAKES 5 - 25
REMOVAL AND INSTALLATION (Continued)