2000 DODGE NEON keyless
[x] Cancel search: keylessPage 215 of 1285
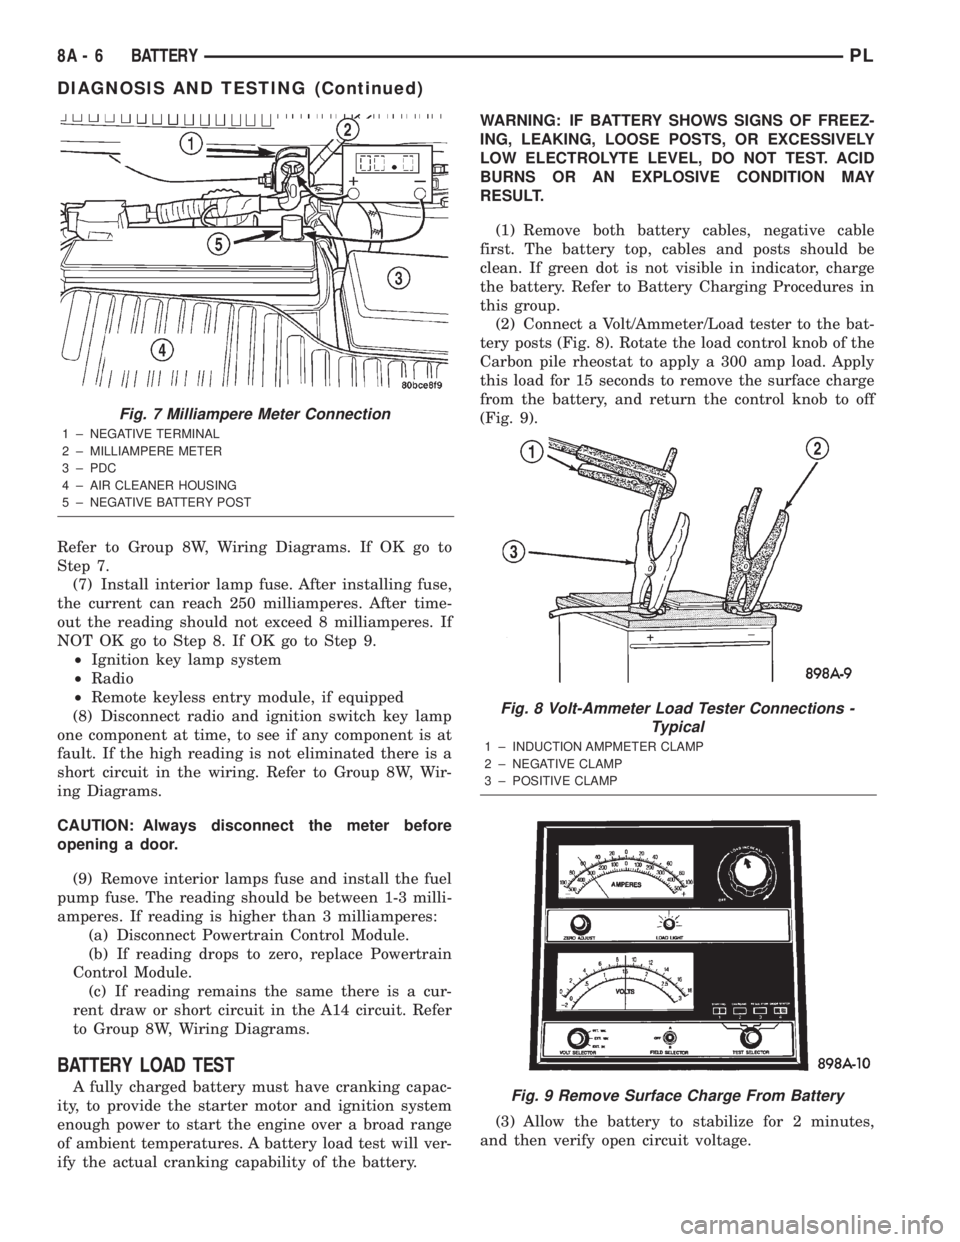
Refer to Group 8W, Wiring Diagrams. If OK go to
Step 7.
(7) Install interior lamp fuse. After installing fuse,
the current can reach 250 milliamperes. After time-
out the reading should not exceed 8 milliamperes. If
NOT OK go to Step 8. If OK go to Step 9.
²Ignition key lamp system
²Radio
²Remote keyless entry module, if equipped
(8) Disconnect radio and ignition switch key lamp
one component at time, to see if any component is at
fault. If the high reading is not eliminated there is a
short circuit in the wiring. Refer to Group 8W, Wir-
ing Diagrams.
CAUTION: Always disconnect the meter before
opening a door.
(9) Remove interior lamps fuse and install the fuel
pump fuse. The reading should be between 1-3 milli-
amperes. If reading is higher than 3 milliamperes:
(a) Disconnect Powertrain Control Module.
(b) If reading drops to zero, replace Powertrain
Control Module.
(c) If reading remains the same there is a cur-
rent draw or short circuit in the A14 circuit. Refer
to Group 8W, Wiring Diagrams.
BATTERY LOAD TEST
A fully charged battery must have cranking capac-
ity, to provide the starter motor and ignition system
enough power to start the engine over a broad range
of ambient temperatures. A battery load test will ver-
ify the actual cranking capability of the battery.WARNING: IF BATTERY SHOWS SIGNS OF FREEZ-
ING, LEAKING, LOOSE POSTS, OR EXCESSIVELY
LOW ELECTROLYTE LEVEL, DO NOT TEST. ACID
BURNS OR AN EXPLOSIVE CONDITION MAY
RESULT.
(1) Remove both battery cables, negative cable
first. The battery top, cables and posts should be
clean. If green dot is not visible in indicator, charge
the battery. Refer to Battery Charging Procedures in
this group.
(2) Connect a Volt/Ammeter/Load tester to the bat-
tery posts (Fig. 8). Rotate the load control knob of the
Carbon pile rheostat to apply a 300 amp load. Apply
this load for 15 seconds to remove the surface charge
from the battery, and return the control knob to off
(Fig. 9).
(3) Allow the battery to stabilize for 2 minutes,
and then verify open circuit voltage.
Fig. 7 Milliampere Meter Connection
1 ± NEGATIVE TERMINAL
2 ± MILLIAMPERE METER
3 ± PDC
4 ± AIR CLEANER HOUSING
5 ± NEGATIVE BATTERY POST
Fig. 8 Volt-Ammeter Load Tester Connections -
Typical
1 ± INDUCTION AMPMETER CLAMP
2 ± NEGATIVE CLAMP
3 ± POSITIVE CLAMP
Fig. 9 Remove Surface Charge From Battery
8A - 6 BATTERYPL
DIAGNOSIS AND TESTING (Continued)
Page 251 of 1285
MULTIPLE/INDIVIDUAL GAUGES INOPERATIVE
Test speedometer, tachometer and other gauges for
malfunction:
(1) Remove the cluster. Refer to Cluster Removal
and Installation.
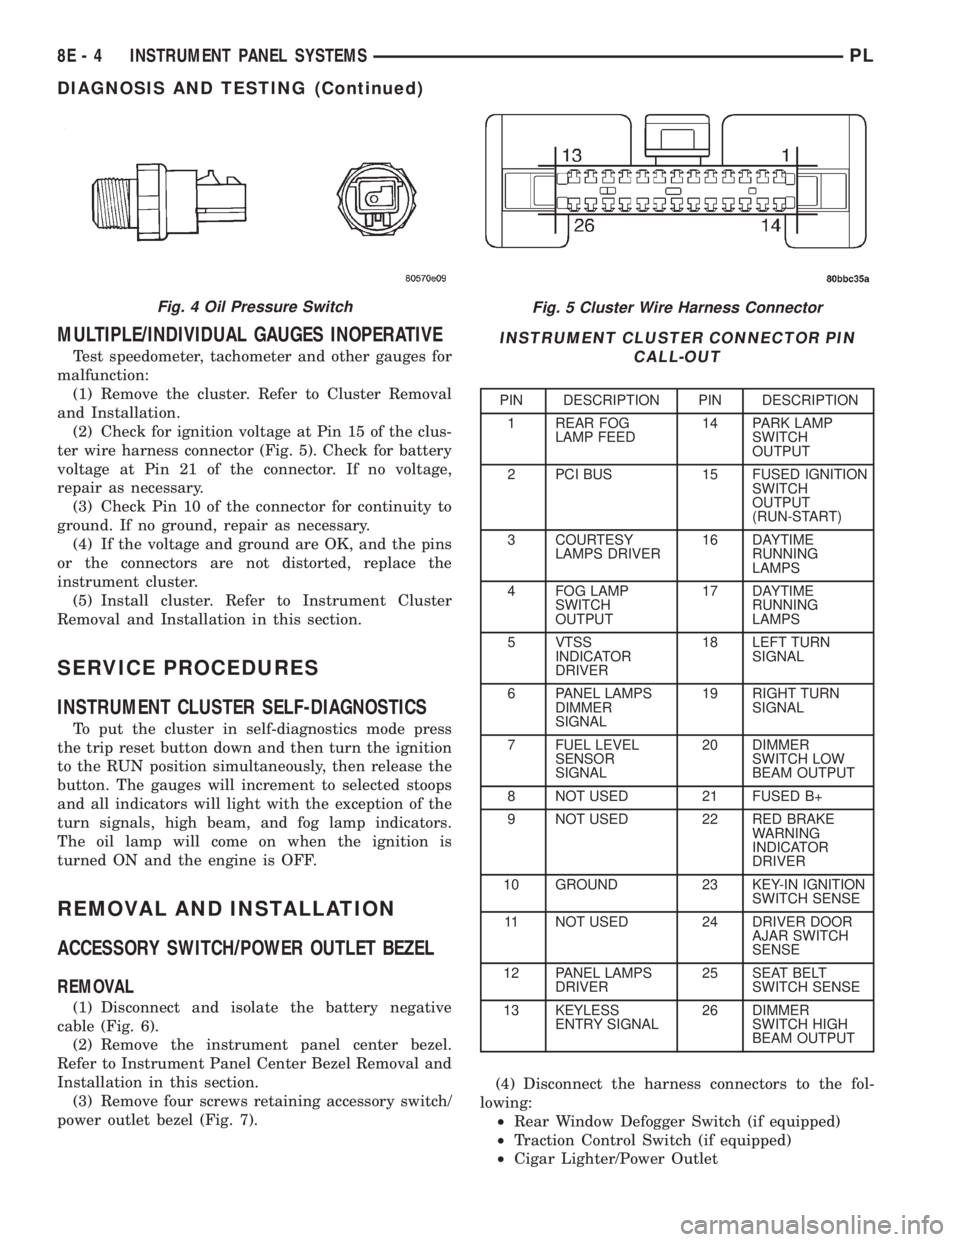
(2) Check for ignition voltage at Pin 15 of the clus-
ter wire harness connector (Fig. 5). Check for battery
voltage at Pin 21 of the connector. If no voltage,
repair as necessary.
(3) Check Pin 10 of the connector for continuity to
ground. If no ground, repair as necessary.
(4) If the voltage and ground are OK, and the pins
or the connectors are not distorted, replace the
instrument cluster.
(5) Install cluster. Refer to Instrument Cluster
Removal and Installation in this section.
SERVICE PROCEDURES
INSTRUMENT CLUSTER SELF-DIAGNOSTICS
To put the cluster in self-diagnostics mode press
the trip reset button down and then turn the ignition
to the RUN position simultaneously, then release the
button. The gauges will increment to selected stoops
and all indicators will light with the exception of the
turn signals, high beam, and fog lamp indicators.
The oil lamp will come on when the ignition is
turned ON and the engine is OFF.
REMOVAL AND INSTALLATION
ACCESSORY SWITCH/POWER OUTLET BEZEL
REMOVAL
(1) Disconnect and isolate the battery negative
cable (Fig. 6).
(2) Remove the instrument panel center bezel.
Refer to Instrument Panel Center Bezel Removal and
Installation in this section.
(3) Remove four screws retaining accessory switch/
power outlet bezel (Fig. 7).(4) Disconnect the harness connectors to the fol-
lowing:
²Rear Window Defogger Switch (if equipped)
²Traction Control Switch (if equipped)
²Cigar Lighter/Power Outlet
Fig. 5 Cluster Wire Harness Connector
INSTRUMENT CLUSTER CONNECTOR PIN
CALL-OUT
PIN DESCRIPTION PIN DESCRIPTION
1 REAR FOG
LAMP FEED14 PARK LAMP
SWITCH
OUTPUT
2 PCI BUS 15 FUSED IGNITION
SWITCH
OUTPUT
(RUN-START)
3 COURTESY
LAMPS DRIVER16 DAYTIME
RUNNING
LAMPS
4 FOG LAMP
SWITCH
OUTPUT17 DAYTIME
RUNNING
LAMPS
5 VTSS
INDICATOR
DRIVER18 LEFT TURN
SIGNAL
6 PANEL LAMPS
DIMMER
SIGNAL19 RIGHT TURN
SIGNAL
7 FUEL LEVEL
SENSOR
SIGNAL20 DIMMER
SWITCH LOW
BEAM OUTPUT
8 NOT USED 21 FUSED B+
9 NOT USED 22 RED BRAKE
WARNING
INDICATOR
DRIVER
10 GROUND 23 KEY-IN IGNITION
SWITCH SENSE
11 NOT USED 24 DRIVER DOOR
AJAR SWITCH
SENSE
12 PANEL LAMPS
DRIVER25 SEAT BELT
SWITCH SENSE
13 KEYLESS
ENTRY SIGNAL26 DIMMER
SWITCH HIGH
BEAM OUTPUT
Fig. 4 Oil Pressure Switch
8E - 4 INSTRUMENT PANEL SYSTEMSPL
DIAGNOSIS AND TESTING (Continued)
Page 364 of 1285
POWER LOCK SYSTEMS
TABLE OF CONTENTS
page page
POWER DOOR LOCKS...................... 1REMOTE KEYLESS ENTRY (RKE).............. 4
POWER DOOR LOCKS
TABLE OF CONTENTS
page page
DESCRIPTION AND OPERATION
INTRODUCTION..........................1
POWER DOOR LOCKS.....................2
CHILD PROTECTION LOCKS................2
DOOR LOCK INHIBIT.......................2
DIAGNOSIS AND TESTING
DOOR LOCK MOTOR......................2
DOOR LOCK SWITCH......................2SERVICE PROCEDURES
DOUBLE ACTIVATION UNLOCK...............3
ROLLING DOOR LOCKS....................3
REMOVAL AND INSTALLATION
DOOR LOCK MOTOR/LATCH.................3
DOOR LOCK SWITCH......................3
REMOTE KEYLESS ENTRY (RKE) MODULE.....3
DESCRIPTION AND OPERATION
INTRODUCTION
All doors can be locked or unlocked electrically by
operating the switch on either front door panel.
When the door lock switch is activated the Remote
Keyless Entry Module provides power to the door
lock motors through relays internal to the module.
The Remote Keyless Entry (RKE) Module also con-
trols the Vehicle Theft Security System (VTSS).
All doors can be locked or unlocked mechanically
and independently with their respective locking
knobs. The front doors can also be unlocked by actu-
ation of the inside remote door handle.
The RKE Module has three modes of operation
including customer usage mode, dealer lot storage
mode, and shipping mode. The customer usage mode
provides full functionality of the module and is the
mode in which the RKE module should be operating
when used by the customer. Dealer lot storage mode
and shipping modes are reduced power modes meant
to extend vehicle battery life during shipping and
storage in the dealer lot. Dealer lot storage mode pro-
vides limited VTSS and power door lock functions,
but disables the Remote Keyless Entry (RKE) func-
tions. This mode is intended to be used when the
vehicle is on the dealer lot to provide VTSS coverageof the vehicle while minimizing battery drain. Ship-
ping mode disables all normal functions (i.e. power
door locks, RKE, and VTSS) of the module, and is
intended to be used when the vehicle is shipped from
the assembly plant.
NOTE: The dealer must remove the module from
ªShip Modeº and place the RKE Module into either
the ªDealer Lotº storage or ªCustomer Usageº
modes of operation after receiving the vehicle from
the assembly plant. Refer to Group 8Q-Vehicle
Theft/Security Systems, Switching Operating
Modes/Configuring a New Module under Service
Procedures.
CENTRAL LOCKING/UNLOCKING
The door locks can be locked or unlocked electri-
cally via the exterior door key cylinders to provide
the central locking/unlocking feature. The central
locking/unlocking feature incorporates a customer
programmable ``Double activation unlockº feature
which operates in the following manner: When
enabled, the first turn of the key cylinder to the
UNLOCK position (toward the front of the vehicle)
will mechanically unlock the door whose key cylinder
is being turned. A second turn of the key cylinder to
the UNLOCK position (within five seconds of the
PLPOWER LOCK SYSTEMS 8P - 1
Page 365 of 1285
first turn) will cause all vehicle doors to unlock elec-
trically. When this feature is disabled, all vehicle
doors will be unlocked electrically upon the first turn
of a key cylinder to the UNLOCK position. The vehi-
cle is locked electrically by turning the key cylinder
to the LOCK position once, regardless of the state of
the double activation unlock feature.
POWER DOOR LOCKS
The Remote Keyless Entry (RKE) Module actuates
the power door lock relays when a door lock switch is
activated. If the door lock switch is pressed for longer
than eight consecutive seconds, the RKE module will
de-energize the door lock motors.
The system includes the rolling door locking fea-
ture. The vehicle is shipped with the system enabled.
When the system is disabled the door locks will work
by use of the door lock switches and the Remote Key-
less Entry system only. When the rolling door lock
system is enabled, the RKE module will automati-
cally lock all the vehicle doors when all of the follow-
ing conditions are met:
²All doors are closed
²The vehicle speed exceeds 15 +/- 1 mph.
²The throttle position sensor tip-in is greater
than 10 +/- 2 degrees.
The RKE module will automatically re-lock all
doors if the above conditions are met and if any of
the doors become ajar and then closed again.
The enabling/disabling of the rolling door lock fea-
ture is customer programmable, as well as program-
mable with the DRB IIItscan tool.
The power lock motors are also equipped with a
thermal protection system which prevents the motors
from burning out. The motors may chatter if they are
continuously activated.
CHILD PROTECTION LOCKS
The child protection locks are on the rear doors
only. The lock, when engaged, will disable the inside
door handle from opening the door. The lock is part
of the latch/lock assembly. The lock is engaged by
moving a lever that is located on the rearward inside
edge of the door.
DOOR LOCK INHIBIT
With the key in the ignition switch and the driver
door open, the Remote Keyless Entry (RKE) Modulewill ignore the command to lock the power door locks
via the interior driver door lock switch. Once the key
is removed, or the driver door is closed, the RKE
module will allow the power door locks to lock via the
interior door lock switches.
DIAGNOSIS AND TESTING
DOOR LOCK MOTOR
(1) Make certain battery is in normal condition
and fuses powering the RKE module aren't blown
before circuits are tested.
(2) To determine which motor is faulty, check each
individual door for electrical lock and unlock or dis-
connect the motor connectors one at a time, while
operating the door lock switch.
(3) In the event that none of the motors work, the
problem maybe caused by a shorted motor, a bad
switch or a bad relay internal to the RKE module.
Disconnecting a defective motor will allow the others
to work.
(4) To test an individual door lock motor, discon-
nect the electrical connector from the motor.
(5) To lock the door, connect a 12 volt power source
to one pin of the lock motor and a ground wire to the
other pin.
(6) To unlock the door, reverse the wire connec-
tions at the motor pin terminals.
(7) If these results are NOT obtained, replace the
motor.
DOOR LOCK SWITCH
(1) Remove the switch from its mounting location,
and disconnect from vehicle wiring harness. Refer to
Door Lock Switch Removal and Installation in this
section.
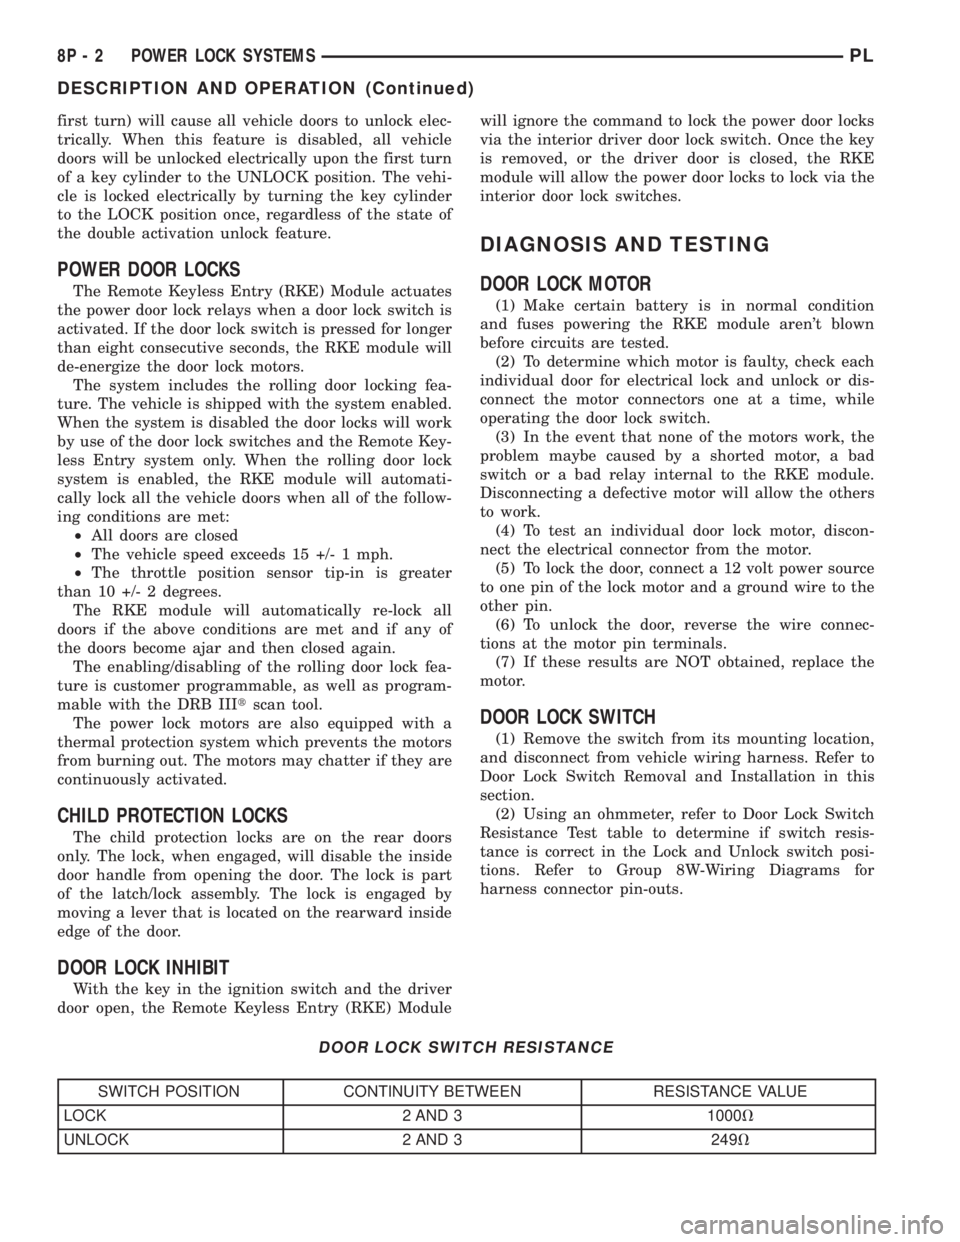
(2) Using an ohmmeter, refer to Door Lock Switch
Resistance Test table to determine if switch resis-
tance is correct in the Lock and Unlock switch posi-
tions. Refer to Group 8W-Wiring Diagrams for
harness connector pin-outs.
DOOR LOCK SWITCH RESISTANCE
SWITCH POSITION CONTINUITY BETWEEN RESISTANCE VALUE
LOCK 2 AND 3 1000V
UNLOCK 2 AND 3 249V
8P - 2 POWER LOCK SYSTEMSPL
DESCRIPTION AND OPERATION (Continued)
Page 366 of 1285
SERVICE PROCEDURES
DOUBLE ACTIVATION UNLOCK
The toggling of the double activation unlock fea-
ture (between enabled and disabled) can be per-
formed with the use of the DRB IIItscan tool, or by
the customer.
DRB lllTPROGRAMMING
When using the DRB IIItscan tool, select:
(1) ªTheft Alarmº
(2) ªVTSSº
(3) ªMiscellaneousº
and then the desired function.
CUSTOMER PROGRAMMING
(1) Open the driver door, sit in the driver seat, and
close the driver door.
(2) Turn the ignition switch to the RUN position
(without starting the vehicle) and then back to OFF.
Repeat this step three additional times (for a total of
four key ON/OFF cycles).
(3) Within ten seconds of switching the ignition
switch to the OFF position for the last time (at the
end of the fourth cycle in the above step), press the
driver interior door lock switch to UNLOCK.
(4) A single chime will be heard to verify that the
customer programmable toggle of the double activa-
tion unlock was successfully completed.
NOTE: When toggling the double activation unlock
feature (customer programmable), the toggle that
happens will be from the last state of the double
activation unlock. If the double activation unlock
feature was enabled, after the toggle process, it will
now be disabled and vice versa. There is no telltale
to inform you of which state the double activation
unlock feature is in.
ROLLING DOOR LOCKS
The toggling of the rolling door lock feature
(between enabled and disabled) can be performed
with the use of the DRB IIItscan tool or by the cus-
tomer.
DRB lllTPROGRAMMING
When using the DRB IIItscan tool, select:
(1) ªTheft Alarmº
(2) ªVTSSº(3) ªMiscellaneousº
and then the desired function.
CUSTOMER PROGRAMMING
(1) Open the driver door, sit in the driver seat, and
close the driver door.
(2) Turn the ignition switch to the RUN position
(without starting the vehicle) and then back to OFF.
Repeat this step three additional times (for a total of
four key ON/OFF cycles).
(3) Within ten seconds of switching the ignition
switch to the OFF position for the last time (at the
end of the fourth cycle in the above step), press the
driver interior door lock switch to LOCK.
(4) A single chime will be heard to verify that the
customer programmable toggle of the rolling door
locks was successfully completed.
NOTE: When toggling the rolling door locks (cus-
tomer programmable), the toggle that happens will
be from the last state of the rolling door locks. If
the rolling door locks were enabled, after the toggle
process, they will now be disabled and vice versa.
There is no telltale to inform you of which state the
rolling door locks are in.
REMOVAL AND INSTALLATION
DOOR LOCK MOTOR/LATCH
Refer to Group 23-Body, Front Door Latch Removal
and Installation.
DOOR LOCK SWITCH
REMOVAL
(1) Remove front door trim panel, refer to Group
23-Body, for Front Door Trim Panel Removal and
Installation.
(2) Disconnect wire connector.
(3) Remove two attaching screws.
(4) Remove the switch.
INSTALLATION
For installation, reverse the above procedures.
REMOTE KEYLESS ENTRY (RKE) MODULE
Refer to RKE Module Removal and Installation
under Remote Keyless Entry in this section.
PLPOWER LOCK SYSTEMS 8P - 3
Page 367 of 1285

REMOTE KEYLESS ENTRY (RKE)
TABLE OF CONTENTS
page page
DESCRIPTION AND OPERATION
INTRODUCTION..........................4
REMOTE KEYLESS ENTRY SYSTEM..........5
REMOTE KEYLESS ENTRY TRANSMITTER.....5
HORN CHIRP TOGGLE.....................5
DIAGNOSIS AND TESTING
REMOTE KEYLESS ENTRY MODULE..........5
DECKLID RELEASE SOLENOID...............5
SERVICE PROCEDURES
HORN CHIRP TOGGLE.....................5SWITCHING OPERATING MODES/
CONFIGURING A NEW MODULE............6
TRANSMITTER PROGRAMMING..............6
REMOVAL AND INSTALLATION
DECK LID RELEASE SOLENOID..............6
REMOTE KEYLESS ENTRY MODULE..........6
SPECIFICATIONS
TRANSMITTER BATTERY...................7
TRANSMITTER RANGE.....................7
DESCRIPTION AND OPERATION
INTRODUCTION
The system allows locking and unlocking of vehicle
door(s), deck lid release, and panic by remote control
using a hand held radio frequency transmitter (Fig.
1). The module must be in the customer usage mode
of operation for the remote keyless entry system to
function.
The receiver may receive signals from up to four
transmitters. Each transmitter has its own code, and
the code is programmed and stored into RKE module
memory. If a transmitter is replaced or additional
transmitters are added, the codes for all units have
to be reprogrammed into the RKE module memory. If
a receiver module is replaced, the transmitter codes
must be stored in the new receiver memory (by per-
forming the steps for programming transmitters).The RKE module is capable of retaining all transmit-
ter codes when power is removed from the module.
Operation of the Remote Keyless Entry system
works in a similar manner to the central locking/un-
locking feature. With the double activation unlock
feature enabled, the first press of the transmitter
UNLOCK button will electrically unlock the driver
door, and a second press of the UNLOCK button
(within five seconds of the first) will unlock all vehi-
cle doors. With the double activation feature dis-
abled, all vehicle doors will unlock upon the first
press of the transmitter UNLOCK button. The vehi-
cle is locked electrically by pressing the transmitter
LOCK button once, regardless of the state of the dou-
ble activation unlock feature. The vehicle is shipped
with the double activation unlock feature enabled.
The deck lid can be unlatched manually via the
key cylinder from outside the vehicle, or by depress-
ing the deck lid release button on the RKE transmit-
ter twice (within five seconds).
The RKE module has three modes of operation
including customer usage mode, dealer lot storage
mode, and shipping mode. The customer usage mode
provides full functionality of the module and is the
mode in which the RKE module should be operating
when used by the customer. Dealer lot storage mode
and shipping modes are reduced power modes meant
to extend vehicle battery life during shipping and
storage in the dealer lot. Dealer lot storage mode pro-
vides limited VTSS and power door lock functions,
but disables the Remote Keyless Entry (RKE) func-
tions. This mode is intended to be used when the
vehicle is on the dealer lot to provide VTSS coverage
of the vehicle while minimizing battery drain. Ship-
ping mode disables all normal functions (i.e. power
door locks, RKE, and VTSS) of the module, and is
intended to be used when the vehicle is shipped from
the assembly plant.
Fig. 1 Remote Keyless Entry (Key Fob) Transmitter
1 ± BATTERIES
8P - 4 POWER LOCK SYSTEMSPL
Page 368 of 1285
NOTE: The dealer must remove the module from
ªShip Modeº and place the RKE Module into either
the ªDealer Lotº storage or ªCustomer Usageº
modes of operation after receiving the vehicle from
the assembly plant. Refer to Group 8Q-Vehicle
Theft/Security Systems, Switching Operating
Modes/Configuring a New Module under Service
Procedures.
REMOTE KEYLESS ENTRY SYSTEM
The system allows locking and unlock of vehicle
door(s) and deck lid by remote control using a hand
held radio frequency (RF) transmitter. The vehicle
speed must be less than five miles per hour before
the deck lid can be unlatched with the transmitter.
The receiver may receive signals from four transmit-
ters. Each transmitter has its own code and the code
has been stored in memory. If the transmitter is
replaced or other transmitters are added, the code for
each unit must be learned.
REMOTE KEYLESS ENTRY TRANSMITTER
The transmitter has four buttons for operation
(Fig. 1). They are LOCK, UNLOCK, DECK LID
RELEASE, and PANIC.
²The UNLOCK button will unlock the driver door
and enable illuminated entry. Pushing and releasing
the button once will unlock the driver door. Pushing
and releasing the button two times within a five sec-
ond period will unlock all doors (double unlock acti-
vation enabled).
²Upon pressing the LOCK button, the horn will
sound a short chirp (if enabled) and flash the park
lamps to notify that the all door lock signal was
received and acted upon. Illuminated entry is can-
celled and the interior lamps are faded to off.
²Pushing and releasing the DECK LID
RELEASE button twice within a five second period
will actuate the decklid release solenoid, causing the
deck lid to be slightly ajar. If so desired, the decklid
may be set to release after one button push by the
dealer. For procedures on programming with the
DRB IIItscan tool, refer to the proper Body Diagnos-
tic Procedures Manual.
²Pushing the PANIC button will cause the panic
alarm to sound for three minutes, until the panic
button is pressed a second time, or until the vehicle
reaches a speed of 15 mph.
HORN CHIRP TOGGLE
Once the transmitters have been programmed, the
horn chirp can be enabled/disabled by sending the
horn chirp toggle operation code to the RKE Module.
This can be done using a DRB IIItscan tool or by
the customer. The horn chirp will enter the oppositestate of its current programmed state by receiving
this operation code. The RKE module is responsible
for keeping track of the horn chirp status.
DIAGNOSIS AND TESTING
REMOTE KEYLESS ENTRY MODULE
For procedures on diagnosing and testing the RKE
Module's RKE functions, refer to the proper Body
Diagnostic Procedures Manual.
DECKLID RELEASE SOLENOID
(1) Confirm operation of RKE transmitter(s) by
actuating Lock and Unlock functions.
(2) Confirm lead is connected to deck lid release
solenoid.
(3) Unplug lead, and use an ohmmeter to verify
continuity of connection between pin 2 of the harness
connector and ground. Refer to Group 8W-Wiring
Diagrams for Connector Pin-Outs.
(4) Connect test light to pin 1 of the harness con-
nector and actuate decklid release button on trans-
mitter. Refer to Group 8W-Wiring Diagrams for
Connector Pin-Outs.
(5) If test light comes on, the wiring circuit
between the RKE module and the solenoid is func-
tional, and the decklid solenoid should be replaced.
(6) If test light does not come on, refer to the
proper Body Diagnostic Procedures Manual for fur-
ther troubleshooting information.
SERVICE PROCEDURES
HORN CHIRP TOGGLE
The toggling of the horn chirp (between enabled
and disabled) can be performed with the use of the
DRB IIItscan tool or by the customer.
DRB lllTPROGRAMMING
When using the DRB IIItscan tool, select:
(1) ªTheft Alarmº
(2) ªVTSSº
(3) ªMiscellaneousº
and then the desired function.
CUSTOMER PROGRAMMING
Using a transmitter programmed to the RKE Mod-
ule, the status of the horn chirp may be toggled by
the customer.
NOTE: The RKE Module is responsible for keeping
track of the horn chirp status; thus this procedure
does not need to be repeated for each transmitter
programmed to the system.
PLPOWER LOCK SYSTEMS 8P - 5
DESCRIPTION AND OPERATION (Continued)
Page 369 of 1285
(1) With the ignition switch in RUN position, press
and hold the transmitter Unlock button (Fig. 1) for a
minimum of 4 seconds to a maximum of 10 seconds.
(2) Within the 4-10 second range, depress the
transmitter Lock button (Fig. 1). A chime will be
heard to indicate a successful toggle, at which time
the buttons may be released.
SWITCHING OPERATING MODES/
CONFIGURING A NEW MODULE
Refer to Group 8Q-Vehicle Theft/Security Systems,
Switching Operating Modes/Configuring A New Mod-
ule under Service Procedures.
TRANSMITTER PROGRAMMING
The Remote Keyless Entry transmitters can be
programmed with the use of the DRB IIItscan tool
or by the customer.
DRB lllTPROGRAMMING
When using the DRB IIItscan tool, select:
(1) ªTheft Alarmº
(2) ªVTSSº
(3) ªMiscellaneousº
and then the desired function.
CUSTOMER PROGRAMMING
For a customer to be able to program RKE trans-
mitters themselves, at least one RKE transmitter
must be programmed already. This procedure is to
add additional transmitters. If all transmitters are
lost, the DRB IIItscan tool must be used to program
the new transmitters.
(1) With the ignition switch in RUN position, press
and hold the transmitter Unlock button (Fig. 1) for a
minimum of 4 seconds to a maximum of 10 seconds.
(2) Within the 4-10 second range, depress the
transmitter Lock button (Fig. 1). A chime will be
heard to indicate successful toggle, at which time the
buttons may be released.
(3) Turn the ignition switch off to exist transmitter
programming mode.
REMOVAL AND INSTALLATION
DECK LID RELEASE SOLENOID
REMOVAL
(1) Disconnect and isolate the battery negative
cable (Fig. 2).
(2) Raise deck lid to the full up position.
(3) Unplug connector from solenoid.
(4) Remove two solenoid mounting screws.
(5) Remove solenoid from vehicle.
INSTALLATION
For installation, reverse the above procedures.
Adjust the deck lid latch and striker so that the deck
lid latches with a moderate slam, and so that the
deck lid releases properly whenever the power deck
lid release is activated.
REMOTE KEYLESS ENTRY MODULE
REMOVAL
(1) Disconnect and isolate the battery negative
cable (Fig. 2).
(2) Remove the instrument panel top cover. Refer
to Group 8E-Instrument Panel and Systems, Instru-
ment Pane Top Cover Removal and Installation.
(3) Remove the two screws holding the RKE mod-
ule to the instrument panel assembly (Fig. 3).
(4) Slide locking tab of the wiring connector side-
ways to unlock tab, and remove connector from RKE
module.
(5) Remove RKE module from vehicle.
NOTE: When replacing a faulty RKE Module, the
replacement module must be configured with the
DRB lllTscan tool for proper operation. Refer to
Group 8Q-Vehicle Theft/Security Systems, Switch-
ing Operating Modes/Configuring a New Module
under Service Procedures. Additionally, all transmit-
ters must be reprogrammed to the new RKE mod-
ule.
Fig. 2 Battery Negative Cable Remove/Install
1 ± NEGATIVE CABLE
2 ± NEGATIVE BATTERY POST
8P - 6 POWER LOCK SYSTEMSPL
SERVICE PROCEDURES (Continued)