2000 DODGE NEON torque
[x] Cancel search: torquePage 789 of 1285
CYLINDER BORE INSPECTION
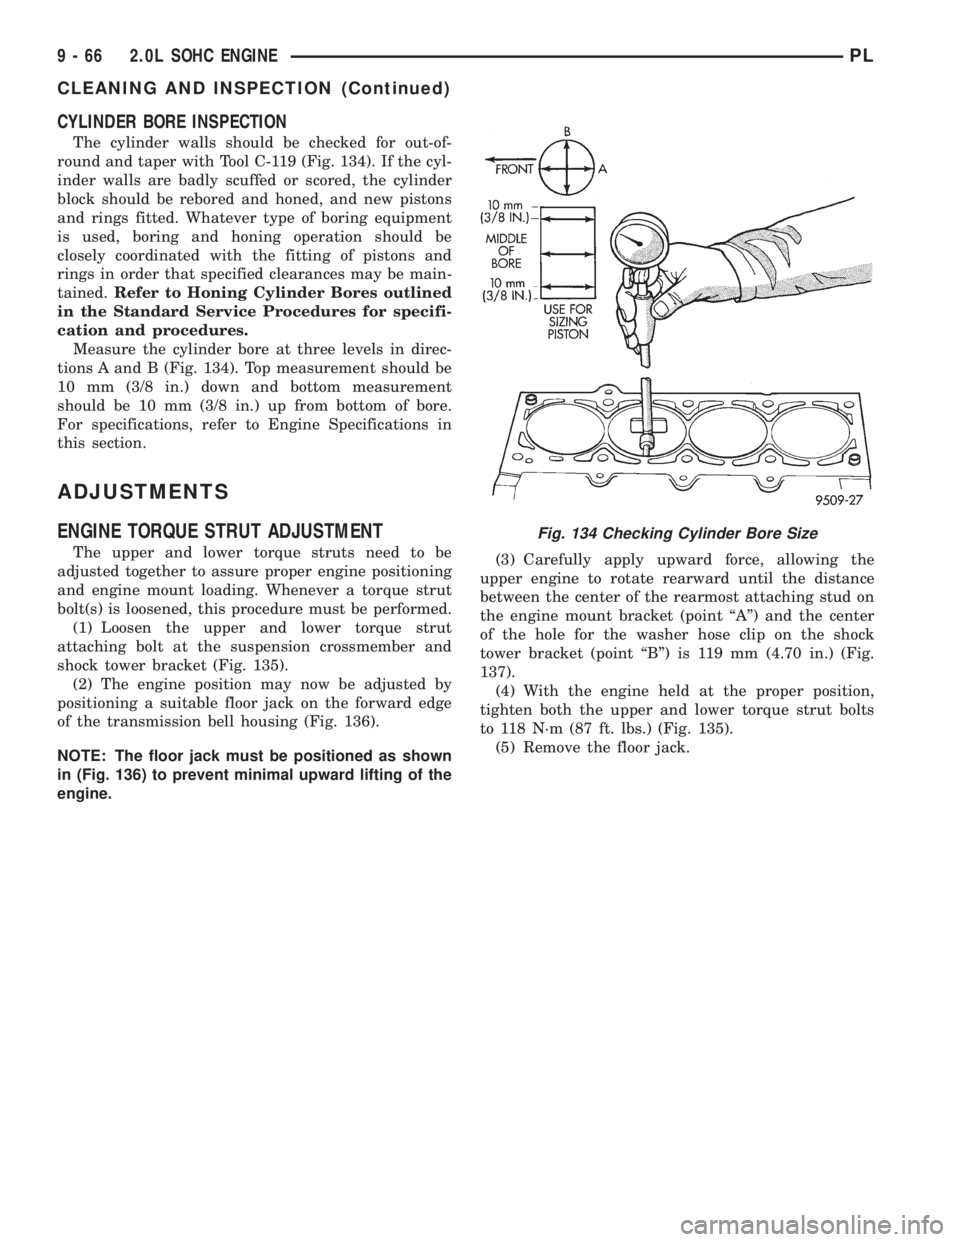
The cylinder walls should be checked for out-of-
round and taper with Tool C-119 (Fig. 134). If the cyl-
inder walls are badly scuffed or scored, the cylinder
block should be rebored and honed, and new pistons
and rings fitted. Whatever type of boring equipment
is used, boring and honing operation should be
closely coordinated with the fitting of pistons and
rings in order that specified clearances may be main-
tained.Refer to Honing Cylinder Bores outlined
in the Standard Service Procedures for specifi-
cation and procedures.
Measure the cylinder bore at three levels in direc-
tions A and B (Fig. 134). Top measurement should be
10 mm (3/8 in.) down and bottom measurement
should be 10 mm (3/8 in.) up from bottom of bore.
For specifications, refer to Engine Specifications in
this section.
ADJUSTMENTS
ENGINE TORQUE STRUT ADJUSTMENT
The upper and lower torque struts need to be
adjusted together to assure proper engine positioning
and engine mount loading. Whenever a torque strut
bolt(s) is loosened, this procedure must be performed.
(1) Loosen the upper and lower torque strut
attaching bolt at the suspension crossmember and
shock tower bracket (Fig. 135).
(2) The engine position may now be adjusted by
positioning a suitable floor jack on the forward edge
of the transmission bell housing (Fig. 136).
NOTE: The floor jack must be positioned as shown
in (Fig. 136) to prevent minimal upward lifting of the
engine.(3) Carefully apply upward force, allowing the
upper engine to rotate rearward until the distance
between the center of the rearmost attaching stud on
the engine mount bracket (point ªAº) and the center
of the hole for the washer hose clip on the shock
tower bracket (point ªBº) is 119 mm (4.70 in.) (Fig.
137).
(4) With the engine held at the proper position,
tighten both the upper and lower torque strut bolts
to 118 N´m (87 ft. lbs.) (Fig. 135).
(5) Remove the floor jack.
Fig. 134 Checking Cylinder Bore Size
9 - 66 2.0L SOHC ENGINEPL
CLEANING AND INSPECTION (Continued)
Page 790 of 1285
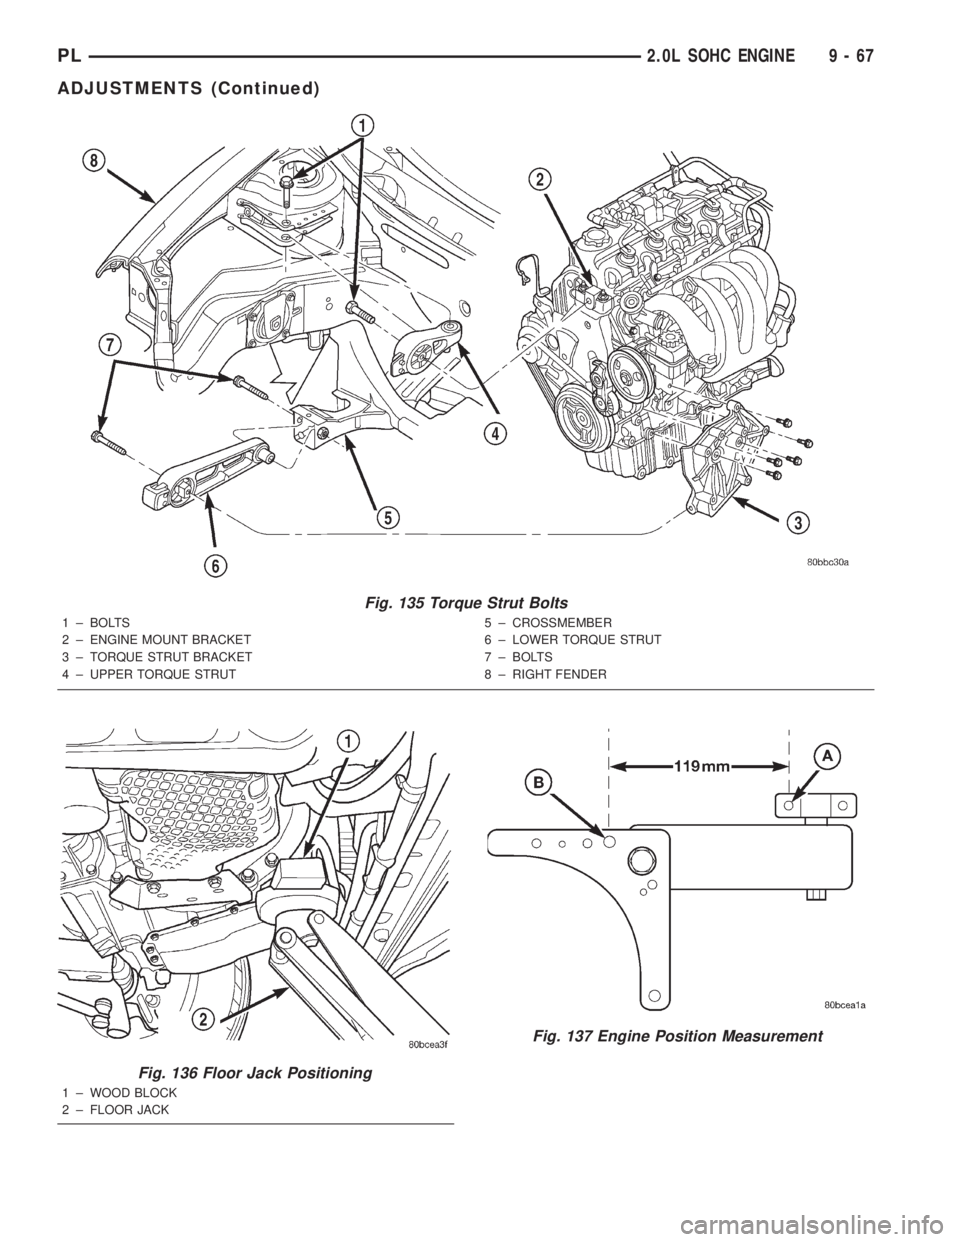
Fig. 135 Torque Strut Bolts
1 ± BOLTS
2 ± ENGINE MOUNT BRACKET
3 ± TORQUE STRUT BRACKET
4 ± UPPER TORQUE STRUT5 ± CROSSMEMBER
6 ± LOWER TORQUE STRUT
7 ± BOLTS
8 ± RIGHT FENDER
Fig. 136 Floor Jack Positioning
1 ± WOOD BLOCK
2 ± FLOOR JACK
Fig. 137 Engine Position Measurement
PL2.0L SOHC ENGINE 9 - 67
ADJUSTMENTS (Continued)
Page 794 of 1285
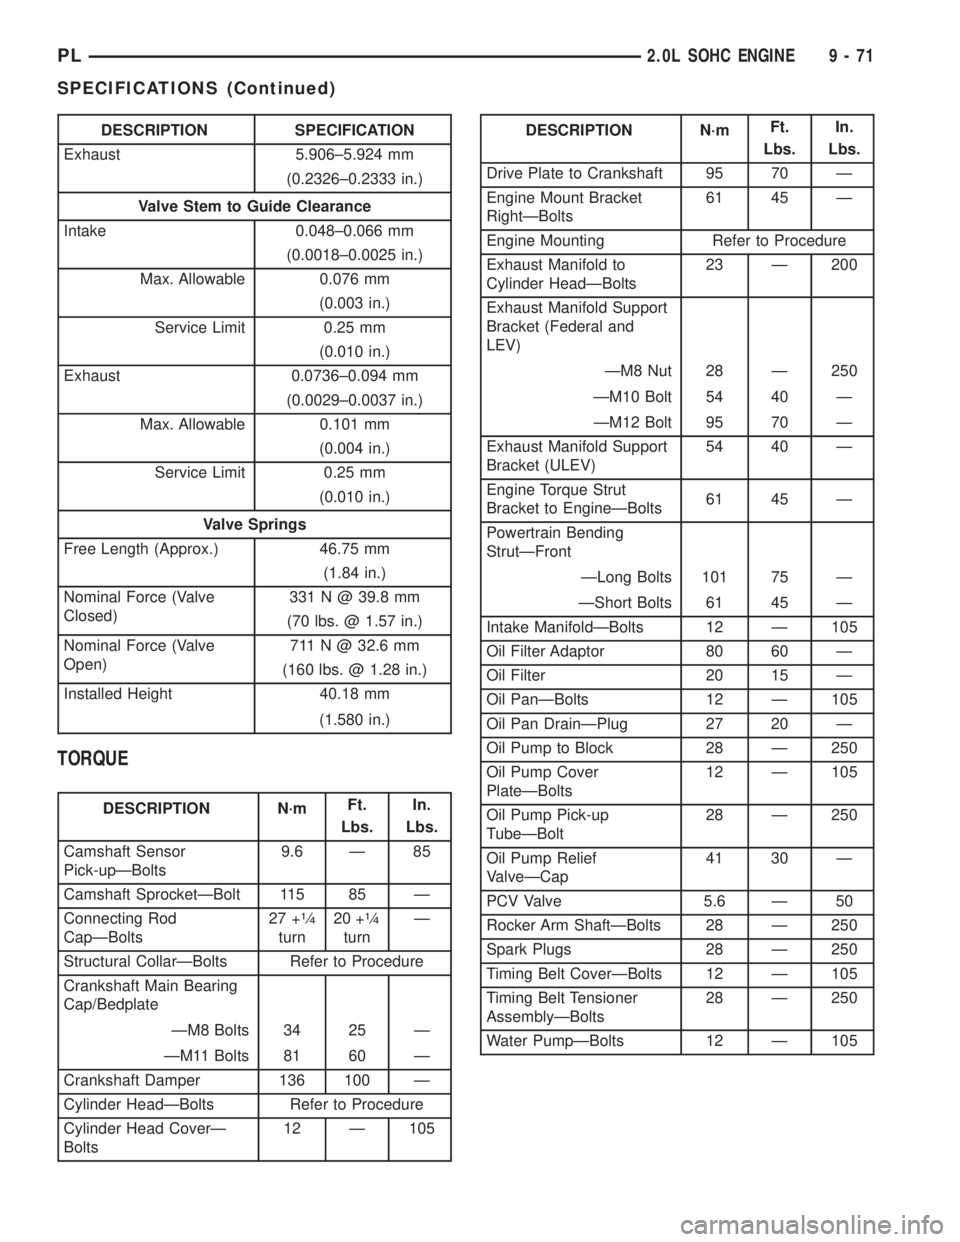
DESCRIPTION SPECIFICATION
Exhaust 5.906±5.924 mm
(0.2326±0.2333 in.)
Valve Stem to Guide Clearance
Intake 0.048±0.066 mm
(0.0018±0.0025 in.)
Max. Allowable 0.076 mm
(0.003 in.)
Service Limit 0.25 mm
(0.010 in.)
Exhaust 0.0736±0.094 mm
(0.0029±0.0037 in.)
Max. Allowable 0.101 mm
(0.004 in.)
Service Limit 0.25 mm
(0.010 in.)
Valve Springs
Free Length (Approx.) 46.75 mm
(1.84 in.)
Nominal Force (Valve
Closed)331 N @ 39.8 mm
(70 lbs. @ 1.57 in.)
Nominal Force (Valve
Open)711 N @ 32.6 mm
(160 lbs. @ 1.28 in.)
Installed Height 40.18 mm
(1.580 in.)
TORQUE
DESCRIPTION N´mFt.
Lbs.In.
Lbs.
Camshaft Sensor
Pick-upÐBolts9.6 Ð 85
Camshaft SprocketÐBolt 115 85 Ð
Connecting Rod
CapÐBolts27 +
1¤4
turn20 +
1¤4
turnÐ
Structural CollarÐBolts Refer to Procedure
Crankshaft Main Bearing
Cap/Bedplate
ÐM8 Bolts 34 25 Ð
ÐM11 Bolts 81 60 Ð
Crankshaft Damper 136 100 Ð
Cylinder HeadÐBolts Refer to Procedure
Cylinder Head CoverÐ
Bolts12 Ð 105
DESCRIPTION N´mFt.
Lbs.In.
Lbs.
Drive Plate to Crankshaft 95 70 Ð
Engine Mount Bracket
RightÐBolts61 45 Ð
Engine Mounting Refer to Procedure
Exhaust Manifold to
Cylinder HeadÐBolts23 Ð 200
Exhaust Manifold Support
Bracket (Federal and
LEV)
ÐM8 Nut 28 Ð 250
ÐM10 Bolt 54 40 Ð
ÐM12 Bolt 95 70 Ð
Exhaust Manifold Support
Bracket (ULEV)54 40 Ð
Engine Torque Strut
Bracket to EngineÐBolts61 45 Ð
Powertrain Bending
StrutÐFront
ÐLong Bolts 101 75 Ð
ÐShort Bolts 61 45 Ð
Intake ManifoldÐBolts 12 Ð 105
Oil Filter Adaptor 80 60 Ð
Oil Filter 20 15 Ð
Oil PanÐBolts 12 Ð 105
Oil Pan DrainÐPlug 27 20 Ð
Oil Pump to Block 28 Ð 250
Oil Pump Cover
PlateÐBolts12 Ð 105
Oil Pump Pick-up
TubeÐBolt28 Ð 250
Oil Pump Relief
ValveÐCap41 30 Ð
PCV Valve 5.6 Ð 50
Rocker Arm ShaftÐBolts 28 Ð 250
Spark Plugs 28 Ð 250
Timing Belt CoverÐBolts 12 Ð 105
Timing Belt Tensioner
AssemblyÐBolts28 Ð 250
Water PumpÐBolts 12 Ð 105
PL2.0L SOHC ENGINE 9 - 71
SPECIFICATIONS (Continued)
Page 798 of 1285
EXHAUST SYSTEM
TABLE OF CONTENTS
page page
DESCRIPTION AND OPERATION
EXHAUST SYSTEM........................1
EXHAUST FLEX-JOINT COUPLING............1
CATALYTIC CONVERTER....................1
EXHAUST HEAT SHIELDS..................3
DIAGNOSIS AND TESTING
EXHAUST SYSTEM DIAGNOSIS CHART.......4
REMOVAL AND INSTALLATION
EXHAUST PIPE AND MUFFLER..............4CATALYTIC CONVERTER....................7
CLEANING AND INSPECTION
EXHAUST SYSTEM........................8
ADJUSTMENTS
EXHAUST SYSTEM ALIGNMENT.............8
SPECIFICATIONS
TORQUE SPECIFICATION CHART.............8
DESCRIPTION AND OPERATION
EXHAUST SYSTEM
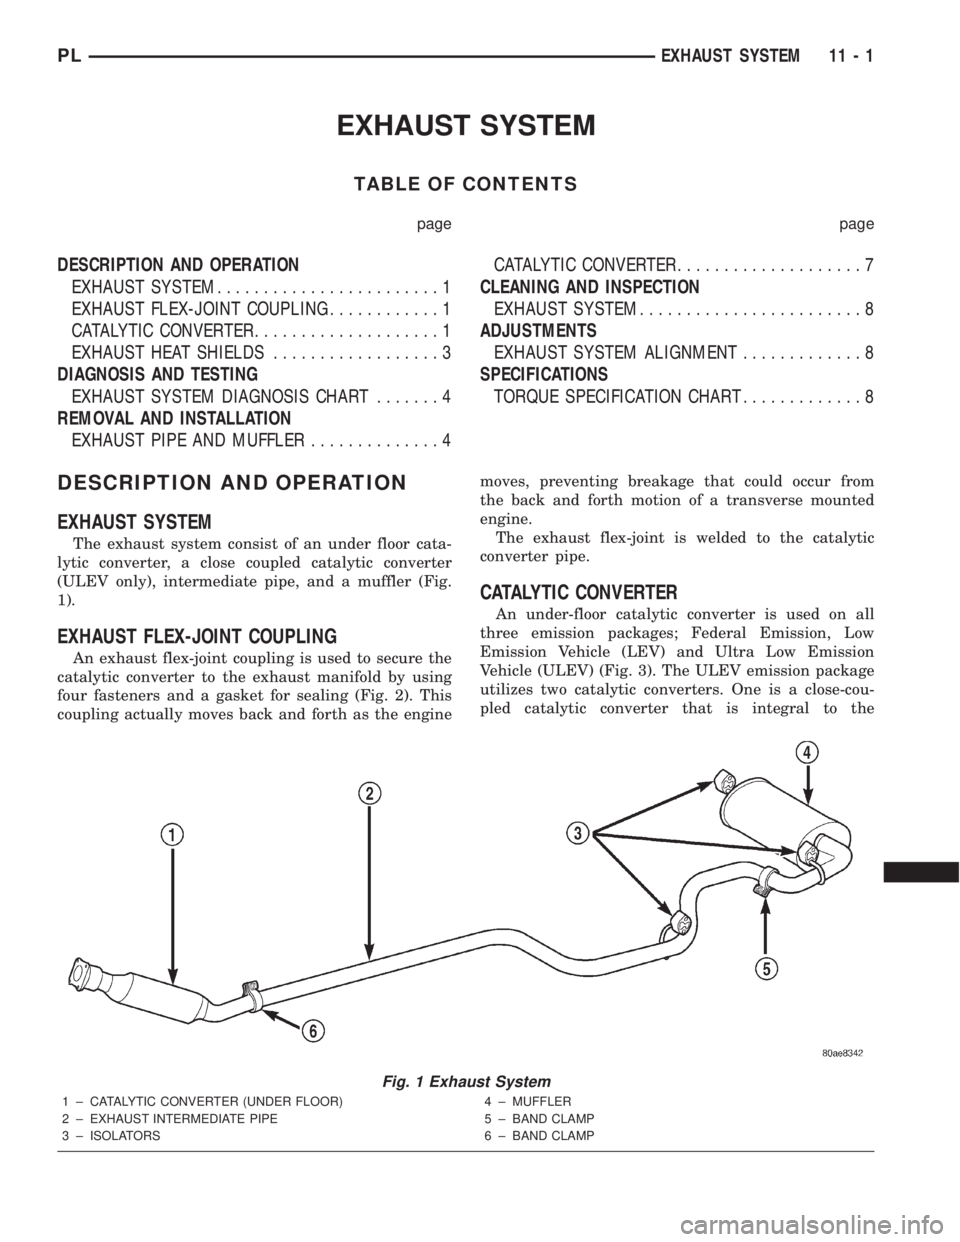
The exhaust system consist of an under floor cata-
lytic converter, a close coupled catalytic converter
(ULEV only), intermediate pipe, and a muffler (Fig.
1).
EXHAUST FLEX-JOINT COUPLING
An exhaust flex-joint coupling is used to secure the
catalytic converter to the exhaust manifold by using
four fasteners and a gasket for sealing (Fig. 2). This
coupling actually moves back and forth as the enginemoves, preventing breakage that could occur from
the back and forth motion of a transverse mounted
engine.
The exhaust flex-joint is welded to the catalytic
converter pipe.
CATALYTIC CONVERTER
An under-floor catalytic converter is used on all
three emission packages; Federal Emission, Low
Emission Vehicle (LEV) and Ultra Low Emission
Vehicle (ULEV) (Fig. 3). The ULEV emission package
utilizes two catalytic converters. One is a close-cou-
pled catalytic converter that is integral to the
Fig. 1 Exhaust System
1 ± CATALYTIC CONVERTER (UNDER FLOOR)
2 ± EXHAUST INTERMEDIATE PIPE
3 ± ISOLATORS4 ± MUFFLER
5 ± BAND CLAMP
6 ± BAND CLAMP
PLEXHAUST SYSTEM 11 - 1
Page 802 of 1285
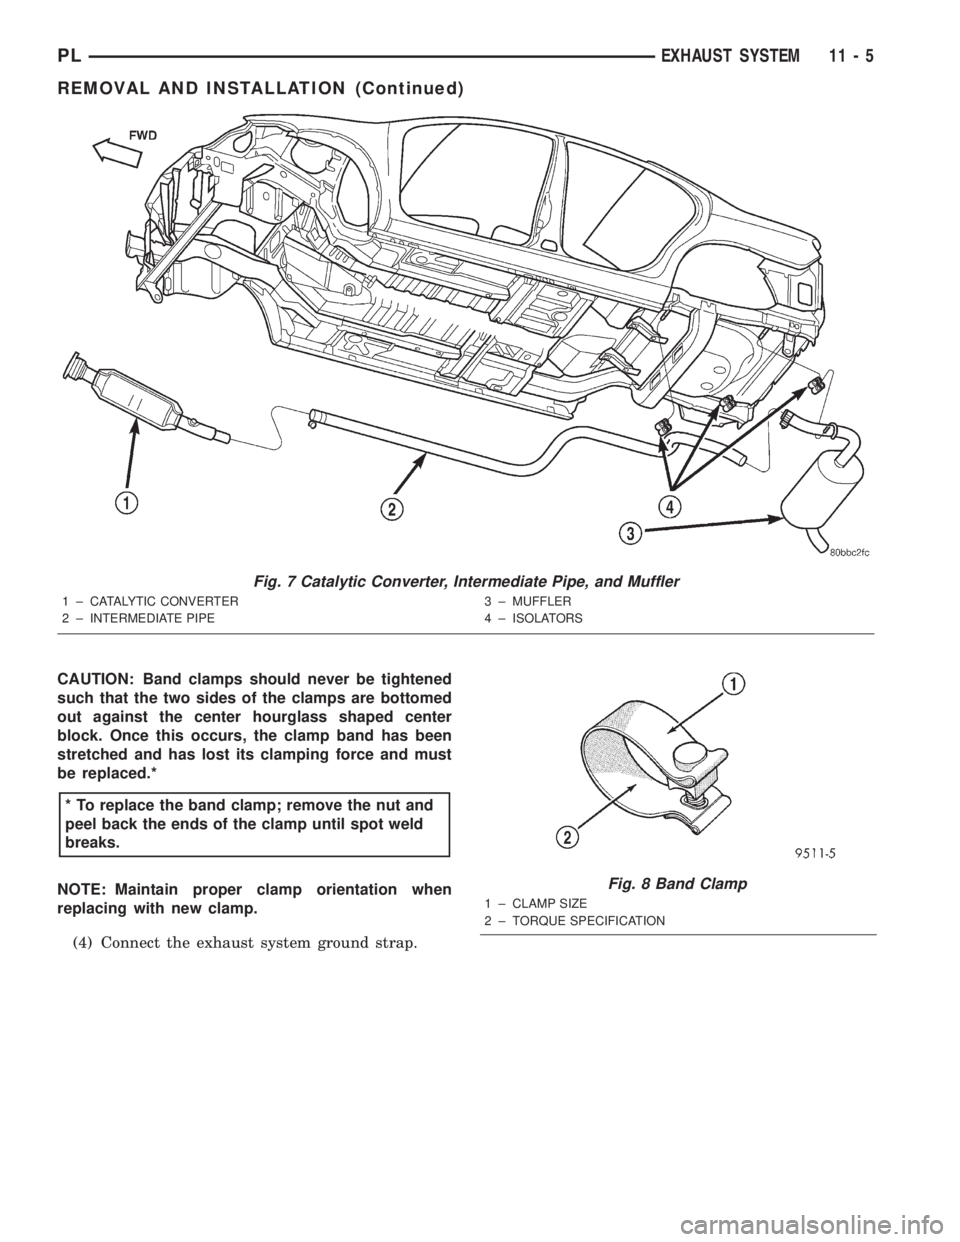
CAUTION: Band clamps should never be tightened
such that the two sides of the clamps are bottomed
out against the center hourglass shaped center
block. Once this occurs, the clamp band has been
stretched and has lost its clamping force and must
be replaced.*
NOTE: Maintain proper clamp orientation when
replacing with new clamp.
(4) Connect the exhaust system ground strap.
Fig. 7 Catalytic Converter, Intermediate Pipe, and Muffler
1 ± CATALYTIC CONVERTER
2 ± INTERMEDIATE PIPE3 ± MUFFLER
4 ± ISOLATORS
* To replace the band clamp; remove the nut and
peel back the ends of the clamp until spot weld
breaks.
Fig. 8 Band Clamp
1 ± CLAMP SIZE
2 ± TORQUE SPECIFICATION
PLEXHAUST SYSTEM 11 - 5
REMOVAL AND INSTALLATION (Continued)
Page 805 of 1285
(2) Install exhaust manifold support bracket (Fed-
eral and LEV only). Tighten M10 bolt to 54 N´m (40
ft. lbs.), M12 bolt to 95 N´m (70 ft. lbs.), and nut to
28 N´m (250 in. lbs.).
(3) Install bolt attaching manifold support bracket
to the heat shield (Federal and LEV only). Tighten
bolt to 28 N´m (250 in. lbs.).
(4) Assemble muffler and exhaust pipe to catalytic
converter. Install muffler and pipe support isolators
to the underbody.
(5) Tighten the catalytic converter to exhaust man-
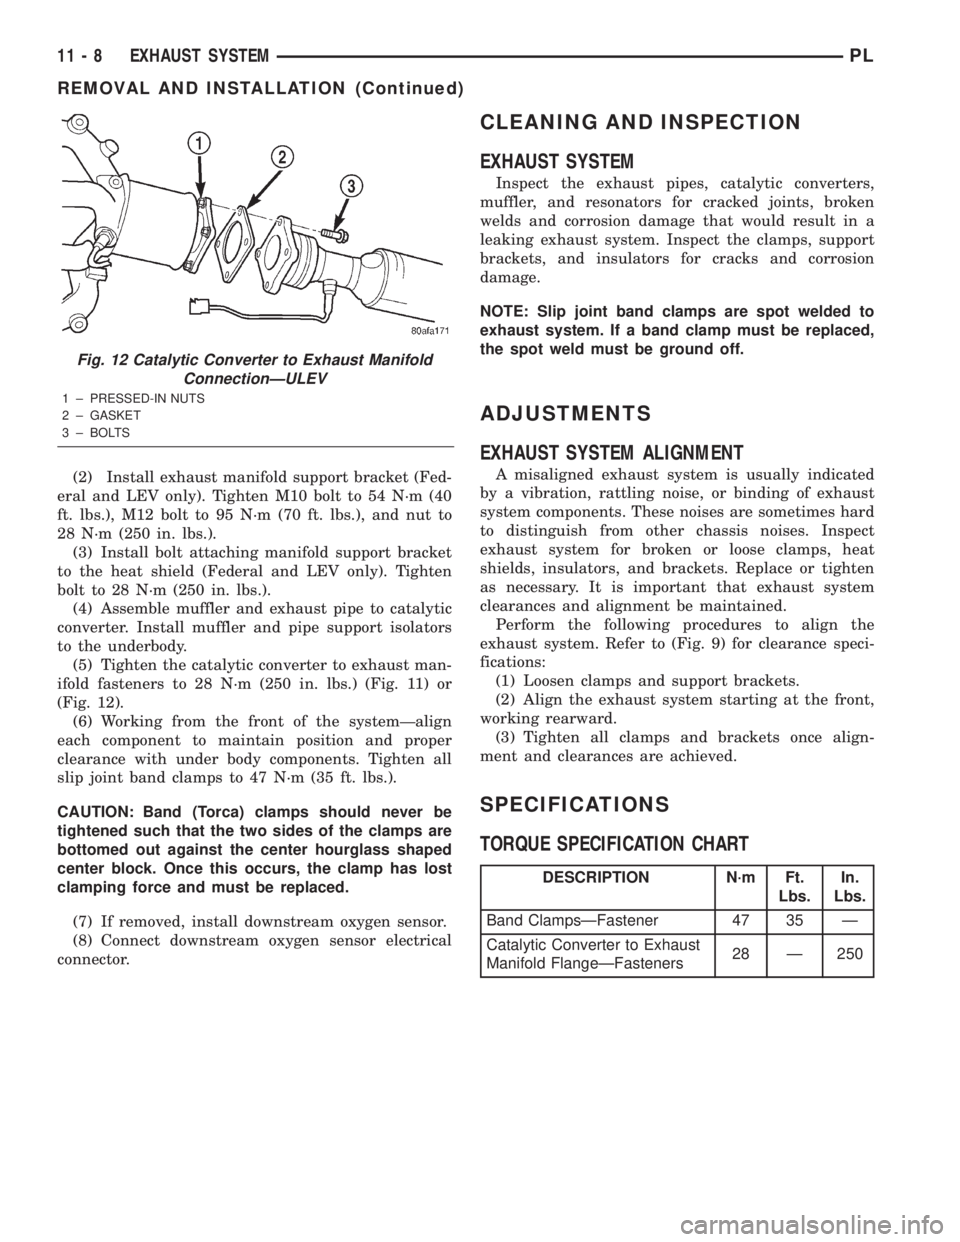
ifold fasteners to 28 N´m (250 in. lbs.) (Fig. 11) or
(Fig. 12).
(6) Working from the front of the systemÐalign
each component to maintain position and proper
clearance with under body components. Tighten all
slip joint band clamps to 47 N´m (35 ft. lbs.).
CAUTION: Band (Torca) clamps should never be
tightened such that the two sides of the clamps are
bottomed out against the center hourglass shaped
center block. Once this occurs, the clamp has lost
clamping force and must be replaced.
(7) If removed, install downstream oxygen sensor.
(8) Connect downstream oxygen sensor electrical
connector.
CLEANING AND INSPECTION
EXHAUST SYSTEM
Inspect the exhaust pipes, catalytic converters,
muffler, and resonators for cracked joints, broken
welds and corrosion damage that would result in a
leaking exhaust system. Inspect the clamps, support
brackets, and insulators for cracks and corrosion
damage.
NOTE: Slip joint band clamps are spot welded to
exhaust system. If a band clamp must be replaced,
the spot weld must be ground off.
ADJUSTMENTS
EXHAUST SYSTEM ALIGNMENT
A misaligned exhaust system is usually indicated
by a vibration, rattling noise, or binding of exhaust
system components. These noises are sometimes hard
to distinguish from other chassis noises. Inspect
exhaust system for broken or loose clamps, heat
shields, insulators, and brackets. Replace or tighten
as necessary. It is important that exhaust system
clearances and alignment be maintained.
Perform the following procedures to align the
exhaust system. Refer to (Fig. 9) for clearance speci-
fications:
(1) Loosen clamps and support brackets.
(2) Align the exhaust system starting at the front,
working rearward.
(3) Tighten all clamps and brackets once align-
ment and clearances are achieved.
SPECIFICATIONS
TORQUE SPECIFICATION CHART
Fig. 12 Catalytic Converter to Exhaust Manifold
ConnectionÐULEV
1 ± PRESSED-IN NUTS
2 ± GASKET
3 ± BOLTS
DESCRIPTION N´m Ft.
Lbs.In.
Lbs.
Band ClampsÐFastener 47 35 Ð
Catalytic Converter to Exhaust
Manifold FlangeÐFasteners28 Ð 250
11 - 8 EXHAUST SYSTEMPL
REMOVAL AND INSTALLATION (Continued)
Page 810 of 1285
FRAMES
TABLE OF CONTENTS
page page
DESCRIPTION AND OPERATION
FRONT SUSPENSION......................5
REMOVAL AND INSTALLATION
FRONT SUSPENSION CROSSMEMBER........5SPECIFICATIONS
FRAME DIMENSIONS......................9
STRUCTURAL DIMENSIONS................13
TORQUE SPECIFICATIONS.................15
DESCRIPTION AND OPERATION
FRONT SUSPENSION
The front suspension crossmember must be prop-
erly installed to achieve design camber, caster set-
tings and wheel stagger. The crossmember can be
installed out of position on the frame rails due to its
design. Bolts and cage nuts hold the rear of the
crossmember to the frame torque boxes. Bolts and
J-nuts hold the front of the crossmember to the
frame rails. No designed in locating device is used to
position the crossmember in the vehicle. Before
removing the crossmember mark the frame torque
box around the rear mounting location to aid instal-
lation. A crossmember that is removed during service
must be installed in the same position from which it
was removed. To verify that crossmember is in the
proper position, refer to the dimensions provided.
Front end dimensions are gauged from the principal
locating point (PLP) holes located under the frame
torque boxes rearward of the front wheels. After
removal and installation of the crossmember is per-
formed, verify that front suspension alignment is
within specifications. If camber, caster settings and
wheel stagger is not within specifications, loosen and
reposition crossmember to bring suspension within
specifications. Refer to Group 2, Front Suspension for
additional information.
REMOVAL AND INSTALLATION
FRONT SUSPENSION CROSSMEMBER
CAUTION: If the front suspension crossmember is
being replaced due to collision damage, inspect the
steering column lower coupling for damage. Refer
to STEERING COLUMN in the STEERING service
manual group for the procedure.
REMOVAL
(1) Raise the vehicle. Refer to HOISTING in the
LUBRICATION AND MAINTENANCE group in this
service manual for the correct lifting procedure.
(2) Remove both front tire and wheel assemblies
from the vehicle.
(3) Remove both stabilizer bar links from the vehi-
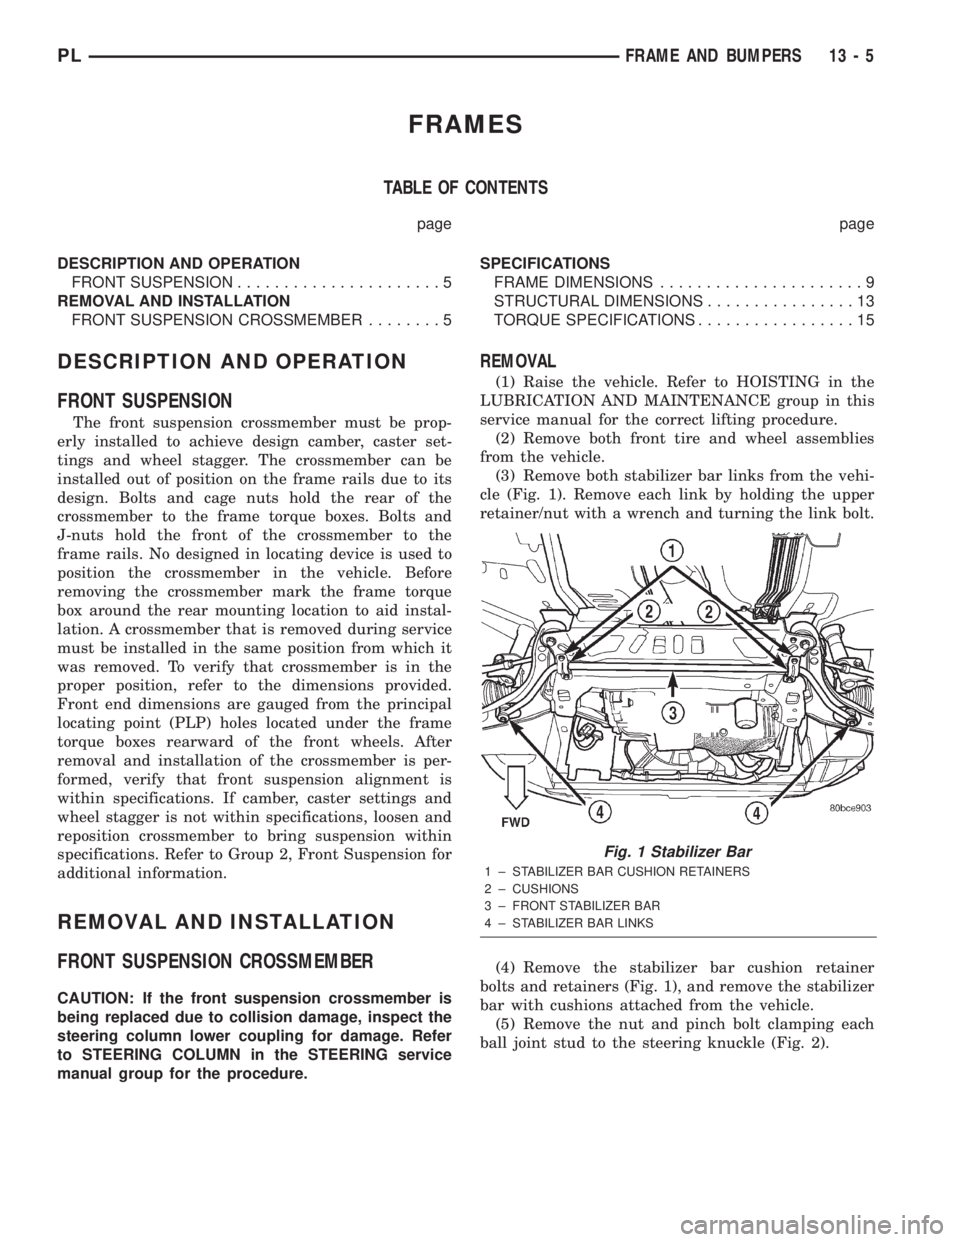
cle (Fig. 1). Remove each link by holding the upper
retainer/nut with a wrench and turning the link bolt.
(4) Remove the stabilizer bar cushion retainer
bolts and retainers (Fig. 1), and remove the stabilizer
bar with cushions attached from the vehicle.
(5) Remove the nut and pinch bolt clamping each
ball joint stud to the steering knuckle (Fig. 2).
Fig. 1 Stabilizer Bar
1 ± STABILIZER BAR CUSHION RETAINERS
2 ± CUSHIONS
3 ± FRONT STABILIZER BAR
4 ± STABILIZER BAR LINKS
PLFRAME AND BUMPERS 13 - 5
Page 811 of 1285
CAUTION: After removing the steering knuckle from
the ball joint stud, do not pull outward on the knuckle.
Pulling the steering knuckle outward at this point can
separate the inner C/V joint on the driveshaft. Refer to
FRONT DRIVESHAFTS in the DIFFERENTIAL AND
DRIVELINE group for further information.
NOTE: Use caution when separating the ball joint
stud from the steering knuckle, so the ball joint seal
does not get cut.
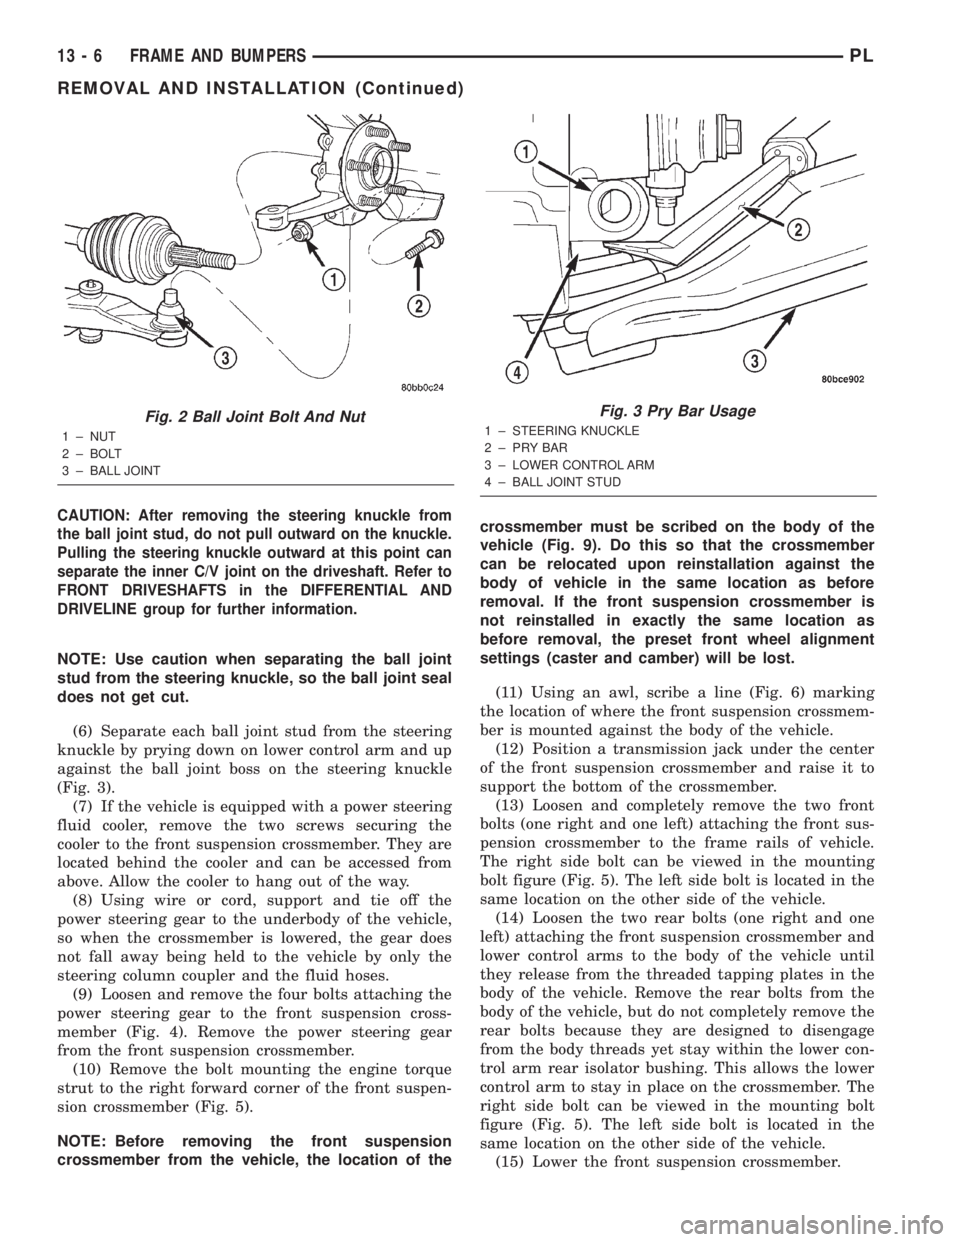
(6) Separate each ball joint stud from the steering
knuckle by prying down on lower control arm and up
against the ball joint boss on the steering knuckle
(Fig. 3).
(7) If the vehicle is equipped with a power steering
fluid cooler, remove the two screws securing the
cooler to the front suspension crossmember. They are
located behind the cooler and can be accessed from
above. Allow the cooler to hang out of the way.
(8) Using wire or cord, support and tie off the
power steering gear to the underbody of the vehicle,
so when the crossmember is lowered, the gear does
not fall away being held to the vehicle by only the
steering column coupler and the fluid hoses.
(9) Loosen and remove the four bolts attaching the
power steering gear to the front suspension cross-
member (Fig. 4). Remove the power steering gear
from the front suspension crossmember.
(10) Remove the bolt mounting the engine torque
strut to the right forward corner of the front suspen-
sion crossmember (Fig. 5).
NOTE: Before removing the front suspension
crossmember from the vehicle, the location of thecrossmember must be scribed on the body of the
vehicle (Fig. 9). Do this so that the crossmember
can be relocated upon reinstallation against the
body of vehicle in the same location as before
removal. If the front suspension crossmember is
not reinstalled in exactly the same location as
before removal, the preset front wheel alignment
settings (caster and camber) will be lost.
(11) Using an awl, scribe a line (Fig. 6) marking
the location of where the front suspension crossmem-
ber is mounted against the body of the vehicle.
(12) Position a transmission jack under the center
of the front suspension crossmember and raise it to
support the bottom of the crossmember.
(13) Loosen and completely remove the two front
bolts (one right and one left) attaching the front sus-
pension crossmember to the frame rails of vehicle.
The right side bolt can be viewed in the mounting
bolt figure (Fig. 5). The left side bolt is located in the
same location on the other side of the vehicle.
(14) Loosen the two rear bolts (one right and one
left) attaching the front suspension crossmember and
lower control arms to the body of the vehicle until
they release from the threaded tapping plates in the
body of the vehicle. Remove the rear bolts from the
body of the vehicle, but do not completely remove the
rear bolts because they are designed to disengage
from the body threads yet stay within the lower con-
trol arm rear isolator bushing. This allows the lower
control arm to stay in place on the crossmember. The
right side bolt can be viewed in the mounting bolt
figure (Fig. 5). The left side bolt is located in the
same location on the other side of the vehicle.
(15) Lower the front suspension crossmember.
Fig. 2 Ball Joint Bolt And Nut
1 ± NUT
2 ± BOLT
3 ± BALL JOINT
Fig. 3 Pry Bar Usage
1 ± STEERING KNUCKLE
2±PRYBAR
3 ± LOWER CONTROL ARM
4 ± BALL JOINT STUD
13 - 6 FRAME AND BUMPERSPL
REMOVAL AND INSTALLATION (Continued)