2000 DODGE NEON torque
[x] Cancel search: torquePage 736 of 1285
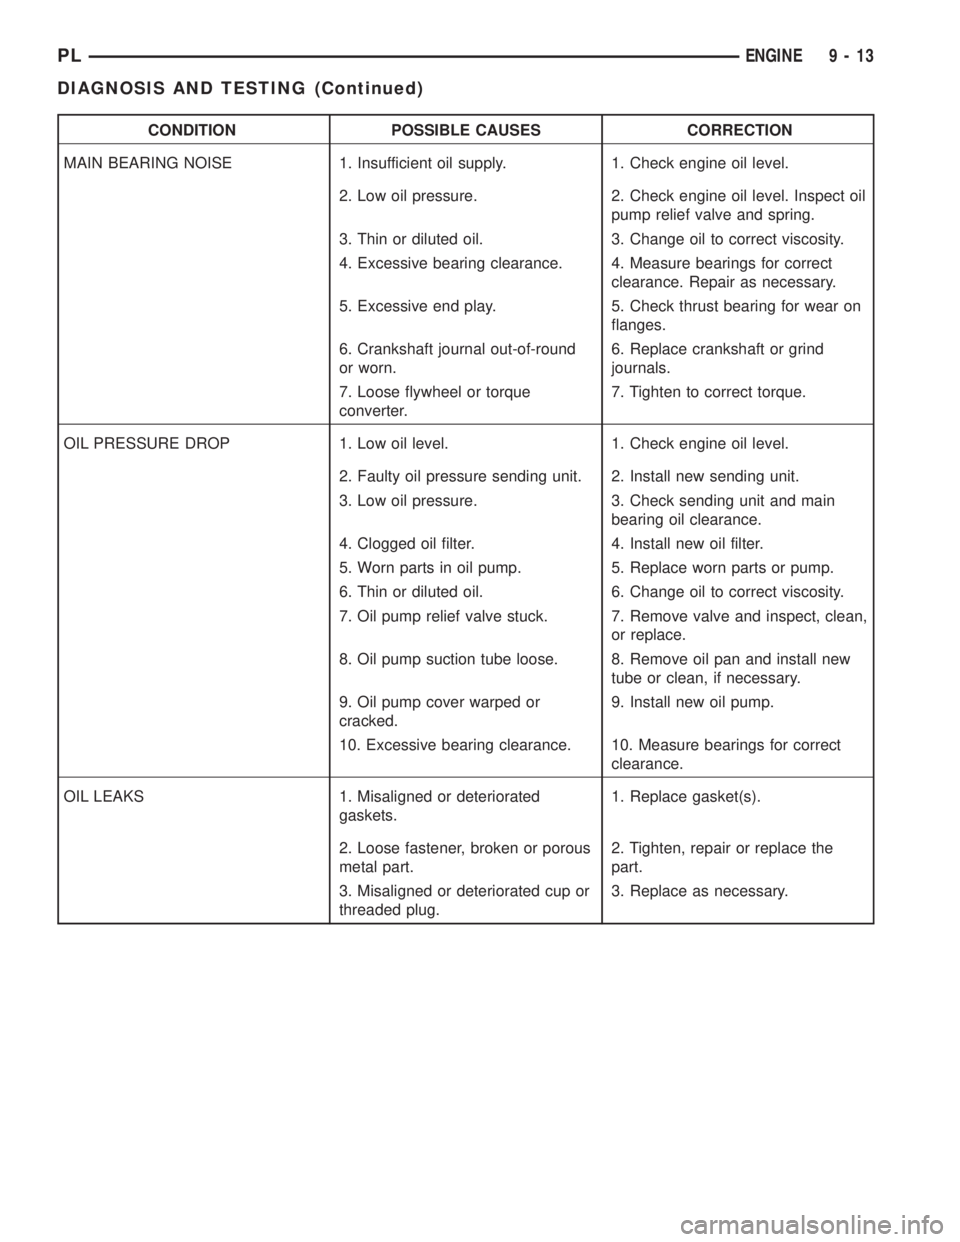
CONDITION POSSIBLE CAUSES CORRECTION
MAIN BEARING NOISE 1. Insufficient oil supply. 1. Check engine oil level.
2. Low oil pressure. 2. Check engine oil level. Inspect oil
pump relief valve and spring.
3. Thin or diluted oil. 3. Change oil to correct viscosity.
4. Excessive bearing clearance. 4. Measure bearings for correct
clearance. Repair as necessary.
5. Excessive end play. 5. Check thrust bearing for wear on
flanges.
6. Crankshaft journal out-of-round
or worn.6. Replace crankshaft or grind
journals.
7. Loose flywheel or torque
converter.7. Tighten to correct torque.
OIL PRESSURE DROP 1. Low oil level. 1. Check engine oil level.
2. Faulty oil pressure sending unit. 2. Install new sending unit.
3. Low oil pressure. 3. Check sending unit and main
bearing oil clearance.
4. Clogged oil filter. 4. Install new oil filter.
5. Worn parts in oil pump. 5. Replace worn parts or pump.
6. Thin or diluted oil. 6. Change oil to correct viscosity.
7. Oil pump relief valve stuck. 7. Remove valve and inspect, clean,
or replace.
8. Oil pump suction tube loose. 8. Remove oil pan and install new
tube or clean, if necessary.
9. Oil pump cover warped or
cracked.9. Install new oil pump.
10. Excessive bearing clearance. 10. Measure bearings for correct
clearance.
OIL LEAKS 1. Misaligned or deteriorated
gaskets.1. Replace gasket(s).
2. Loose fastener, broken or porous
metal part.2. Tighten, repair or replace the
part.
3. Misaligned or deteriorated cup or
threaded plug.3. Replace as necessary.
PLENGINE 9 - 13
DIAGNOSIS AND TESTING (Continued)
Page 738 of 1285
2.0L SOHC ENGINE
TABLE OF CONTENTS
page page
DESCRIPTION AND OPERATION
ENGINE IDENTIFICATION..................15
ENGINE COMPONENTS...................15
ENGINE LUBRICATION SYSTEM.............17
DIAGNOSIS AND TESTING
CHECKING ENGINE OIL PRESSURE..........18
SERVICE PROCEDURES
CYLINDER BORE AND PISTON SIZING........18
FITTING PISTON RINGS...................19
FITTING CONNECTING RODS...............19
FITTING CRANKSHAFT BEARINGS...........19
CRANKSHAFT END PLAY..................20
REMOVAL AND INSTALLATION
TORQUE STRUTS........................20
ENGINE MOUNTÐLEFT...................21
ENGINE MOUNTÐRIGHT..................23
ENGINE MOUNT BRACKETÐRIGHT..........24
STRUCTURAL COLLAR....................25
ENGINE ASSEMBLY.......................25
INTAKE MANIFOLD.......................28
EXHAUST MANIFOLD.....................30
CYLINDER HEAD COVER..................31
SPARK PLUG TUBE SEALS.................32
SPARK PLUG TUBE.......................33
CAMSHAFT.............................33
ROCKER ARM/HYDRAULIC LASH ADJUSTER . . . 34
VALVE SEALS AND SPRINGSÐIN VEHICLE....36
CYLINDER HEAD.........................37
CRANKSHAFT DAMPER...................40
TIMING BELT COVERS....................41TIMING BELT............................43
TIMING BELT TENSIONER..................46
CAMSHAFT OIL SEAL.....................46
OILPAN................................47
CRANKSHAFT OIL SEALÐFRONT............48
CRANKSHAFT OIL SEALÐREAR.............50
DRIVE PLATE...........................51
CRANKSHAFT...........................52
OIL FILTER ADAPTER.....................55
OILFILTER .............................55
OIL PUMP..............................55
PISTON AND CONNECTING ROD............57
DISASSEMBLY AND ASSEMBLY
OIL PUMP..............................60
VALVE SERVICE WITH THE CYLINDER HEAD
REMOVED............................60
CLEANING AND INSPECTION
INTAKE MANIFOLD.......................63
EXHAUST MANIFOLD.....................63
CYLINDER HEAD AND CAMSHAFT
JOURNALS............................63
OIL PUMP..............................64
CYLINDER BLOCK AND BORE..............65
ADJUSTMENTS
ENGINE TORQUE STRUT ADJUSTMENT......66
SPECIFICATIONS
2.0L SOHC ENGINE.......................68
TORQUE...............................71
SPECIAL TOOLS
2.0L SOHC ENGINE.......................72
DESCRIPTION AND OPERATION
ENGINE IDENTIFICATION
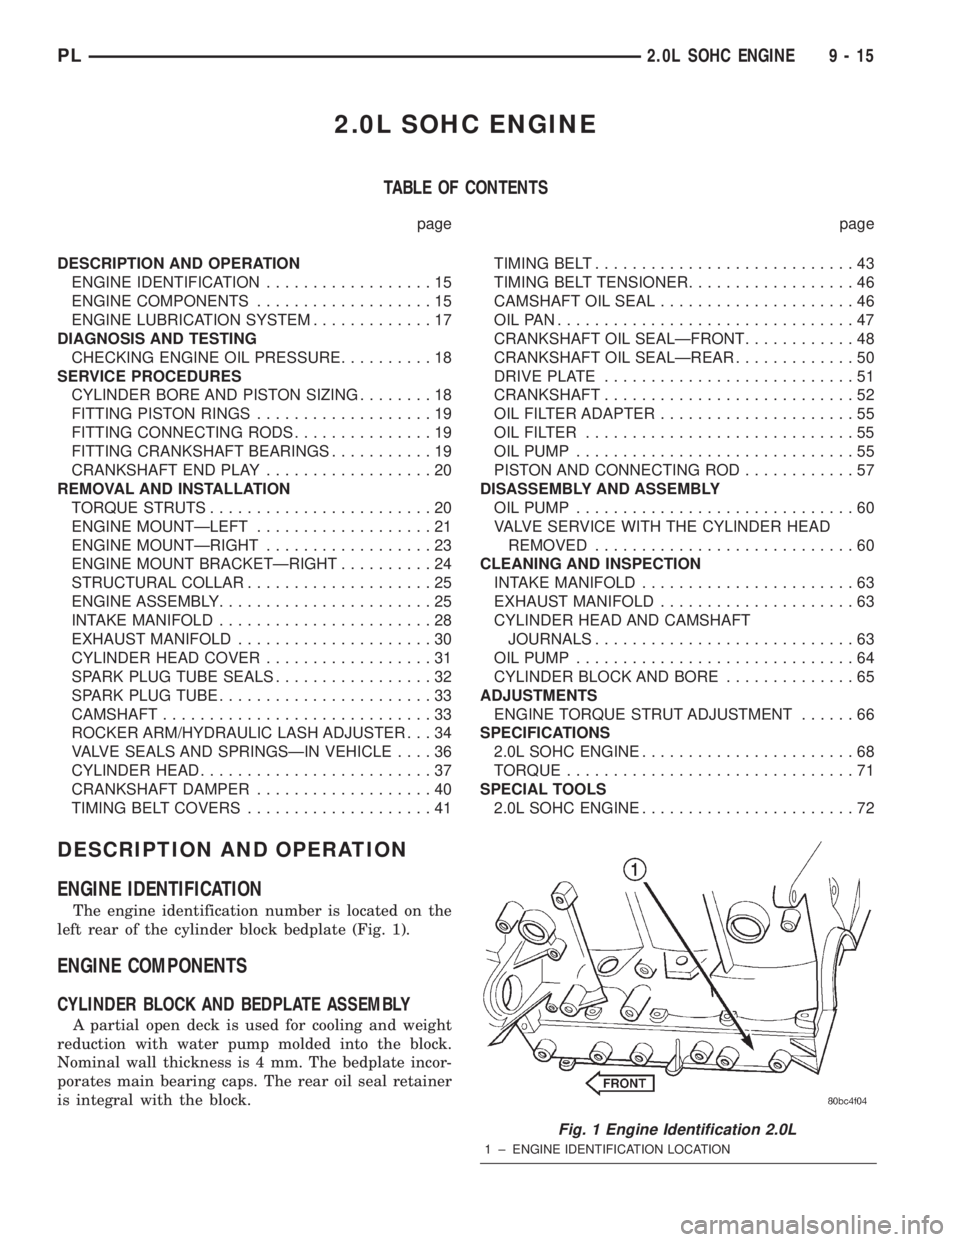
The engine identification number is located on the
left rear of the cylinder block bedplate (Fig. 1).
ENGINE COMPONENTS
CYLINDER BLOCK AND BEDPLATE ASSEMBLY
A partial open deck is used for cooling and weight
reduction with water pump molded into the block.
Nominal wall thickness is 4 mm. The bedplate incor-
porates main bearing caps. The rear oil seal retainer
is integral with the block.
Fig. 1 Engine Identification 2.0L
1 ± ENGINE IDENTIFICATION LOCATION
PL2.0L SOHC ENGINE 9 - 15
Page 739 of 1285
CRANKSHAFT
A nodular cast iron crankshaft is used. The engine
has five main bearings. The number three main is
flanged to control thrust. The mains and connecting
rod journals have undercut fillet radiuses that are
deep rolled for added strength. To optimize bearing
loading, eight counterweights are used. Hydrody-
namic seals provide end sealing, where the crank-
shaft exits the block. Anaerobic gasket material is
used for parting line sealing. A sintered iron timing
belt sprocket is mounted on the crankshaft nose. This
sprocket transmits crankshaft movement, via timing
belt to the camshaft sprocket providing timed valve
actuation.
PISTONS
The engineDOES NOThave provision for a free
wheeling valve train. Non free wheeling valve train
means, in the event of a broken timing belt pistons
will contact the valves. The engine uses pressed-in
piston pins to attach forged powdered metal connect-
ing rods. The connecting rods are a cracked cap
design and are not repairable. Hex head cap screw
are used to provide alignment and durability in the
assembly. Pistons and connecting rods are serviced as
an assembly.
PISTON RINGS
The piston rings include a molybdenum faced top
ring for reliable compression sealing and a taper
faced intermediate ring for additional cylinder pres-
sure control. Oil Control Ring Package consist of two
steel rails and an expander spacer.
CYLINDER HEAD
The aluminum cylinder head features a Single
Over Head Camshaft (SOHC), four-valves per cylin-
der, cross flow design. The valves are arranged in
two inline banks, with the two intake per cylinder
facing toward the radiator. The exhaust valves facing
toward the dash panel. Rocker arm shafts mount
directly to the cylinder head. It incorporates powder
metal valve guides and seats. The hollow rocker arm
shafts supplies oil to the hydraulic lash adjusters,
camshaft and valve mechanisms.
CAMSHAFT
The nodular iron camshaft has five bearing jour-
nals and three cam lobes per cylinder. Provision for a
cam position sensor is provided on the camshaft at
the rear of cylinder head which also acts as thrust
plate. A hydrodynamic oil seal is used for oil control
at the front of the camshaft.
VALVES
Four valves per cylinder are actuated by roller
rocker arms/hydraulic lash adjusters assemblies
which pivot on rocker arm shafts. All valves have
chrome plated valve stems. Viton rubber valve stem
seals are integral with spring seats. Valve springs,
spring retainers, and locks are conventional design.
INTAKE MANIFOLD
The intake manifold is a molded plastic composi-
tion, attached to the cylinder head with five fasten-
ers. This long branch design enhances low and mid-
range torque.
EXHAUST MANIFOLD
The exhaust manifold is made of nodular cast iron
for strength and high temperatures. Exhaust gasses
exit the manifold into an articulated joint connection
and exhaust pipe.
COMPONENT REPLACEMENT
If any of the following parts have been changed or
replaced:
²Camshaft
²Camshaft Position Sensor
²Camshaft Position Sensor Target Magnet
²Cylinder Block
²Cylinder Head
²Water Pump
²Powertrain Control Module (PCM)
²Timing Belt and Timing Belt Tensioner
The camshaft and crankshaft timing relearn proce-
dure must be performed. Refer to the component
Removal and Installation procedure in this section.
9 - 16 2.0L SOHC ENGINEPL
DESCRIPTION AND OPERATION (Continued)
Page 742 of 1285
NOTE: Pistons and cylinder bores should be mea-
sured at normal room temperature, 21ÉC (70ÉF).
FITTING PISTON RINGS
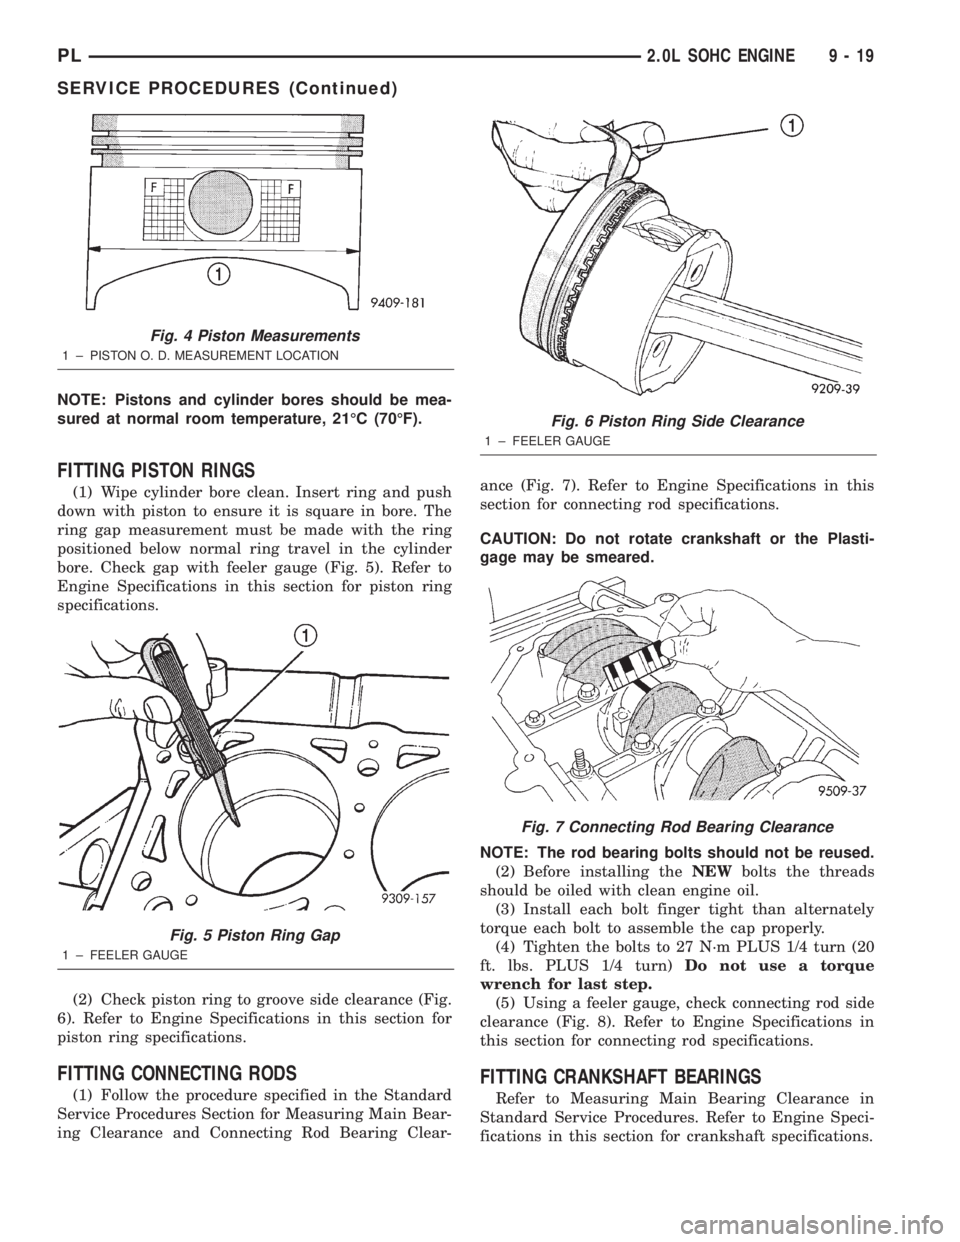
(1) Wipe cylinder bore clean. Insert ring and push
down with piston to ensure it is square in bore. The
ring gap measurement must be made with the ring
positioned below normal ring travel in the cylinder
bore. Check gap with feeler gauge (Fig. 5). Refer to
Engine Specifications in this section for piston ring
specifications.
(2) Check piston ring to groove side clearance (Fig.
6). Refer to Engine Specifications in this section for
piston ring specifications.
FITTING CONNECTING RODS
(1) Follow the procedure specified in the Standard
Service Procedures Section for Measuring Main Bear-
ing Clearance and Connecting Rod Bearing Clear-ance (Fig. 7). Refer to Engine Specifications in this
section for connecting rod specifications.
CAUTION: Do not rotate crankshaft or the Plasti-
gage may be smeared.
NOTE: The rod bearing bolts should not be reused.
(2) Before installing theNEWbolts the threads
should be oiled with clean engine oil.
(3) Install each bolt finger tight than alternately
torque each bolt to assemble the cap properly.
(4) Tighten the bolts to 27 N´m PLUS 1/4 turn (20
ft. lbs. PLUS 1/4 turn)Do not use a torque
wrench for last step.
(5) Using a feeler gauge, check connecting rod side
clearance (Fig. 8). Refer to Engine Specifications in
this section for connecting rod specifications.
FITTING CRANKSHAFT BEARINGS
Refer to Measuring Main Bearing Clearance in
Standard Service Procedures. Refer to Engine Speci-
fications in this section for crankshaft specifications.
Fig. 4 Piston Measurements
1 ± PISTON O. D. MEASUREMENT LOCATION
Fig. 5 Piston Ring Gap
1 ± FEELER GAUGE
Fig. 6 Piston Ring Side Clearance
1 ± FEELER GAUGE
Fig. 7 Connecting Rod Bearing Clearance
PL2.0L SOHC ENGINE 9 - 19
SERVICE PROCEDURES (Continued)
Page 743 of 1285
CRANKSHAFT END PLAY
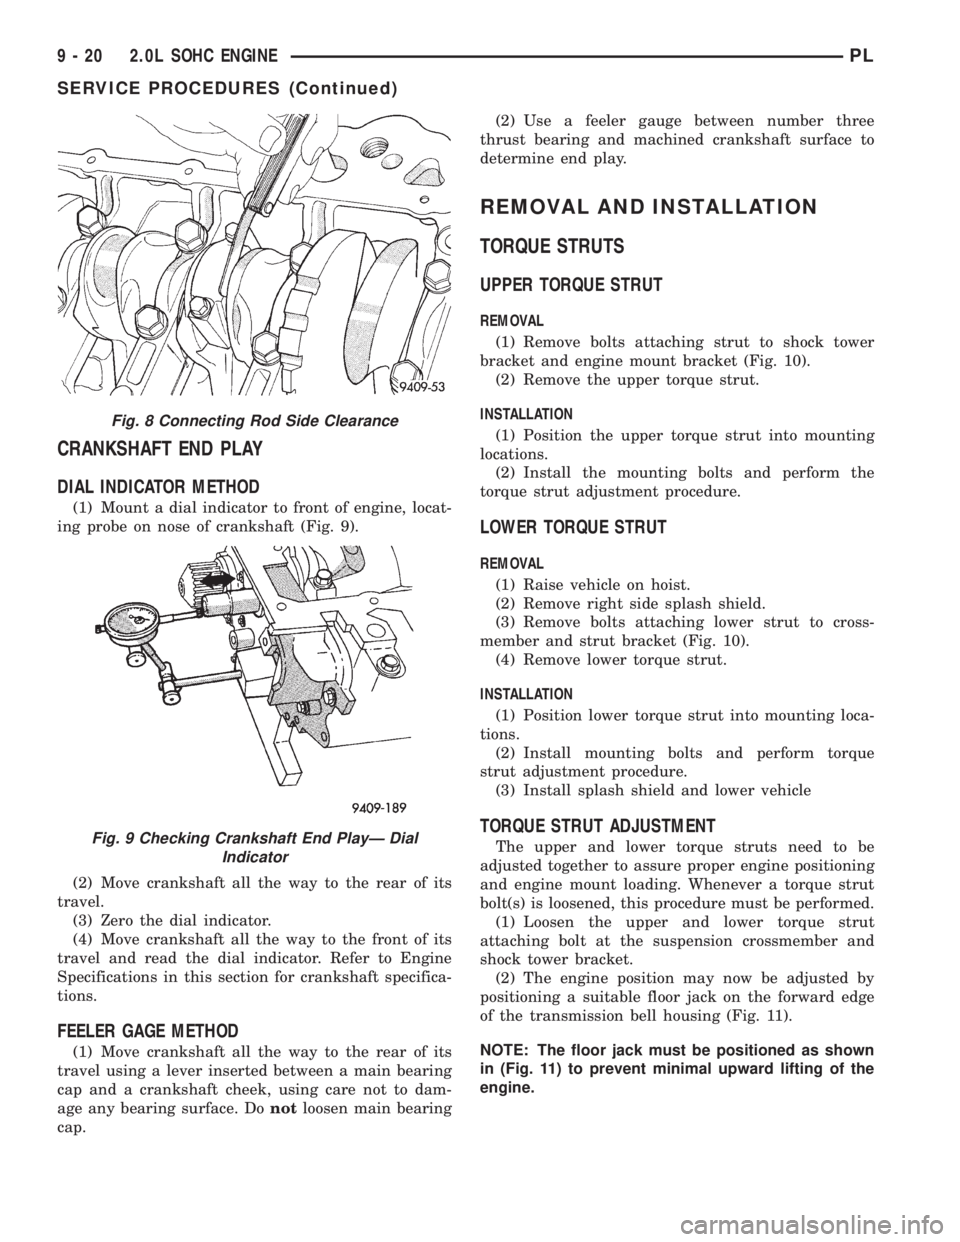
DIAL INDICATOR METHOD
(1) Mount a dial indicator to front of engine, locat-
ing probe on nose of crankshaft (Fig. 9).
(2) Move crankshaft all the way to the rear of its
travel.
(3) Zero the dial indicator.
(4) Move crankshaft all the way to the front of its
travel and read the dial indicator. Refer to Engine
Specifications in this section for crankshaft specifica-
tions.
FEELER GAGE METHOD
(1) Move crankshaft all the way to the rear of its
travel using a lever inserted between a main bearing
cap and a crankshaft cheek, using care not to dam-
age any bearing surface. Donotloosen main bearing
cap.(2) Use a feeler gauge between number three
thrust bearing and machined crankshaft surface to
determine end play.
REMOVAL AND INSTALLATION
TORQUE STRUTS
UPPER TORQUE STRUT
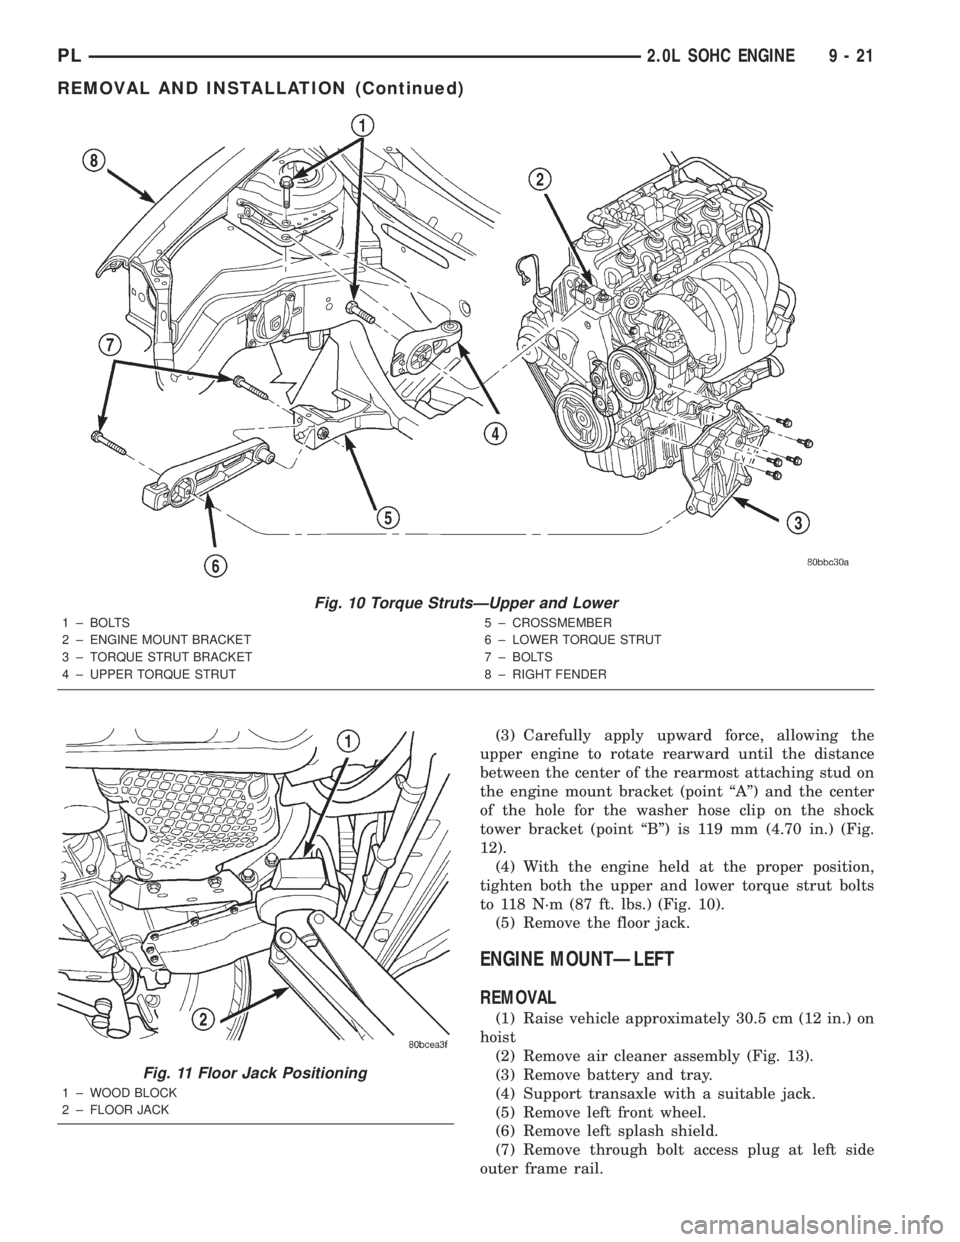
REMOVAL
(1) Remove bolts attaching strut to shock tower
bracket and engine mount bracket (Fig. 10).
(2) Remove the upper torque strut.
INSTALLATION
(1) Position the upper torque strut into mounting
locations.
(2) Install the mounting bolts and perform the
torque strut adjustment procedure.
LOWER TORQUE STRUT
REMOVAL
(1) Raise vehicle on hoist.
(2) Remove right side splash shield.
(3) Remove bolts attaching lower strut to cross-
member and strut bracket (Fig. 10).
(4) Remove lower torque strut.
INSTALLATION
(1) Position lower torque strut into mounting loca-
tions.
(2) Install mounting bolts and perform torque
strut adjustment procedure.
(3) Install splash shield and lower vehicle
TORQUE STRUT ADJUSTMENT
The upper and lower torque struts need to be
adjusted together to assure proper engine positioning
and engine mount loading. Whenever a torque strut
bolt(s) is loosened, this procedure must be performed.
(1) Loosen the upper and lower torque strut
attaching bolt at the suspension crossmember and
shock tower bracket.
(2) The engine position may now be adjusted by
positioning a suitable floor jack on the forward edge
of the transmission bell housing (Fig. 11).
NOTE: The floor jack must be positioned as shown
in (Fig. 11) to prevent minimal upward lifting of the
engine.
Fig. 8 Connecting Rod Side Clearance
Fig. 9 Checking Crankshaft End PlayÐ Dial
Indicator
9 - 20 2.0L SOHC ENGINEPL
SERVICE PROCEDURES (Continued)
Page 744 of 1285
(3) Carefully apply upward force, allowing the
upper engine to rotate rearward until the distance
between the center of the rearmost attaching stud on
the engine mount bracket (point ªAº) and the center
of the hole for the washer hose clip on the shock
tower bracket (point ªBº) is 119 mm (4.70 in.) (Fig.
12).
(4) With the engine held at the proper position,
tighten both the upper and lower torque strut bolts
to 118 N´m (87 ft. lbs.) (Fig. 10).
(5) Remove the floor jack.
ENGINE MOUNTÐLEFT
REMOVAL
(1) Raise vehicle approximately 30.5 cm (12 in.) on
hoist
(2) Remove air cleaner assembly (Fig. 13).
(3) Remove battery and tray.
(4) Support transaxle with a suitable jack.
(5) Remove left front wheel.
(6) Remove left splash shield.
(7) Remove through bolt access plug at left side
outer frame rail.
Fig. 10 Torque StrutsÐUpper and Lower
1 ± BOLTS
2 ± ENGINE MOUNT BRACKET
3 ± TORQUE STRUT BRACKET
4 ± UPPER TORQUE STRUT5 ± CROSSMEMBER
6 ± LOWER TORQUE STRUT
7 ± BOLTS
8 ± RIGHT FENDER
Fig. 11 Floor Jack Positioning
1 ± WOOD BLOCK
2 ± FLOOR JACK
PL2.0L SOHC ENGINE 9 - 21
REMOVAL AND INSTALLATION (Continued)
Page 746 of 1285
(9) Install air cleaner assembly (Fig. 13).
(10) Lower vehicle.
ENGINE MOUNTÐRIGHT
REMOVAL
(1) Remove accessory drive belts. Refer to Group 7,
Cooling System for procedure.
(2) Remove crankshaft damper. Refer to procedure
in this section.
(3) Remove upper and lower engine torque struts.
Refer to procedure in this section.
(4) Support engine with a suitable jack.
(5) Remove bolt access cover and bolt attaching
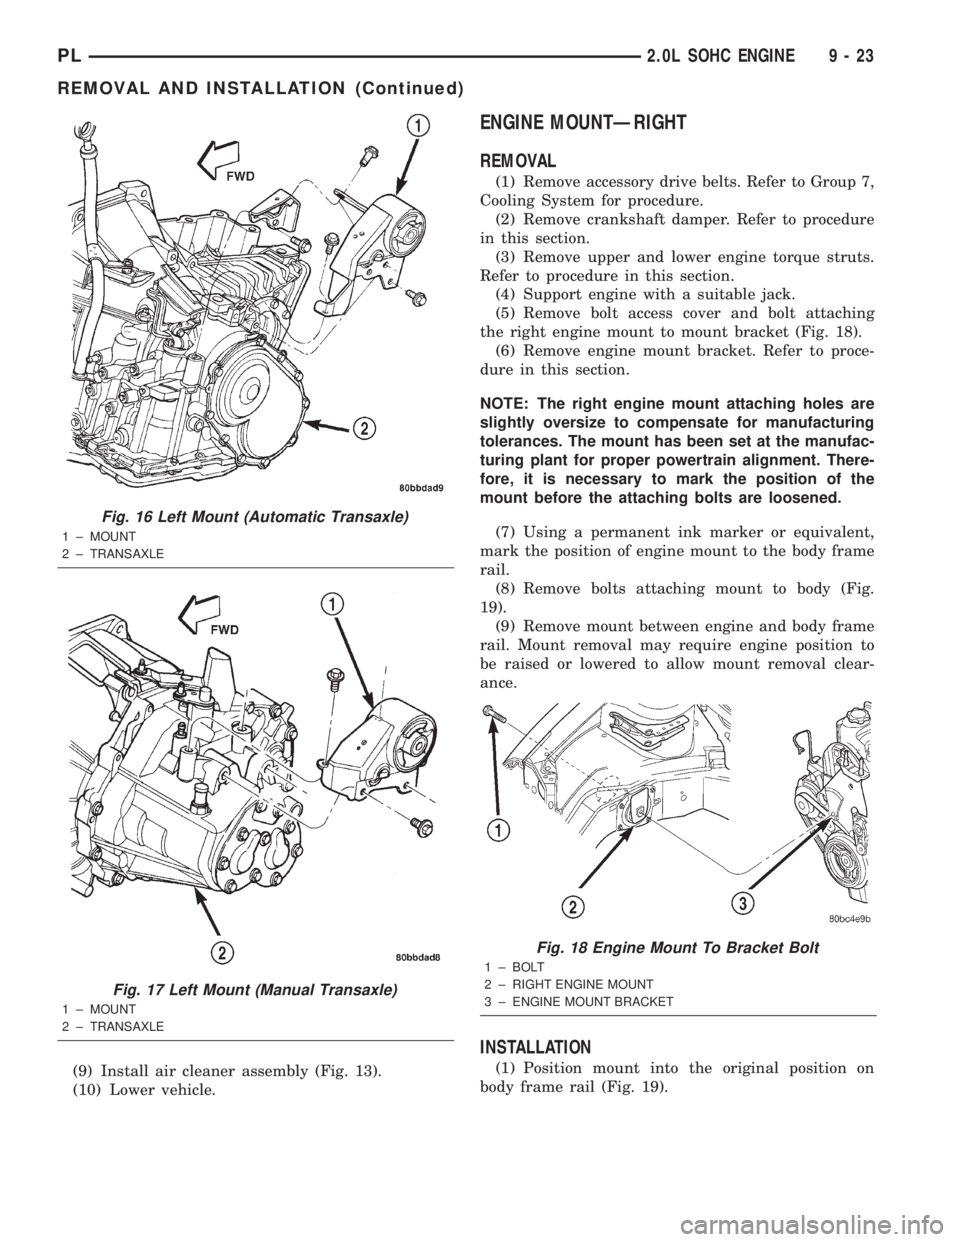
the right engine mount to mount bracket (Fig. 18).
(6) Remove engine mount bracket. Refer to proce-
dure in this section.
NOTE: The right engine mount attaching holes are
slightly oversize to compensate for manufacturing
tolerances. The mount has been set at the manufac-
turing plant for proper powertrain alignment. There-
fore, it is necessary to mark the position of the
mount before the attaching bolts are loosened.
(7) Using a permanent ink marker or equivalent,
mark the position of engine mount to the body frame
rail.
(8) Remove bolts attaching mount to body (Fig.
19).
(9) Remove mount between engine and body frame
rail. Mount removal may require engine position to
be raised or lowered to allow mount removal clear-
ance.
INSTALLATION
(1) Position mount into the original position on
body frame rail (Fig. 19).
Fig. 16 Left Mount (Automatic Transaxle)
1 ± MOUNT
2 ± TRANSAXLE
Fig. 17 Left Mount (Manual Transaxle)
1 ± MOUNT
2 ± TRANSAXLE
Fig. 18 Engine Mount To Bracket Bolt
1 ± BOLT
2 ± RIGHT ENGINE MOUNT
3 ± ENGINE MOUNT BRACKET
PL2.0L SOHC ENGINE 9 - 23
REMOVAL AND INSTALLATION (Continued)
Page 747 of 1285
NOTE: Engine mount must be installed in the orig-
inal position on body frame rail. If mount was not
marked or frame rail was replaced, perform the fol-
lowing procedure.
(2) Perform the following procedure if mount posi-
tion was not previously marked or the frame rail was
replaced:
a. Insert new mount loosely in frame rail.
b. Align the four holes in the mount with the mat-
ing holes in the rail such that the holes are concen-
tric (frame rail holes centered in the mount holes).
c. Using a permanent ink marker or equivalent,
mark the position of engine mount to the body frame
rail while maintaining mounting hole concentricity.
(3) Ensure the mount maintains originally marked
position and install mount bolts. Tighten bolts to 28
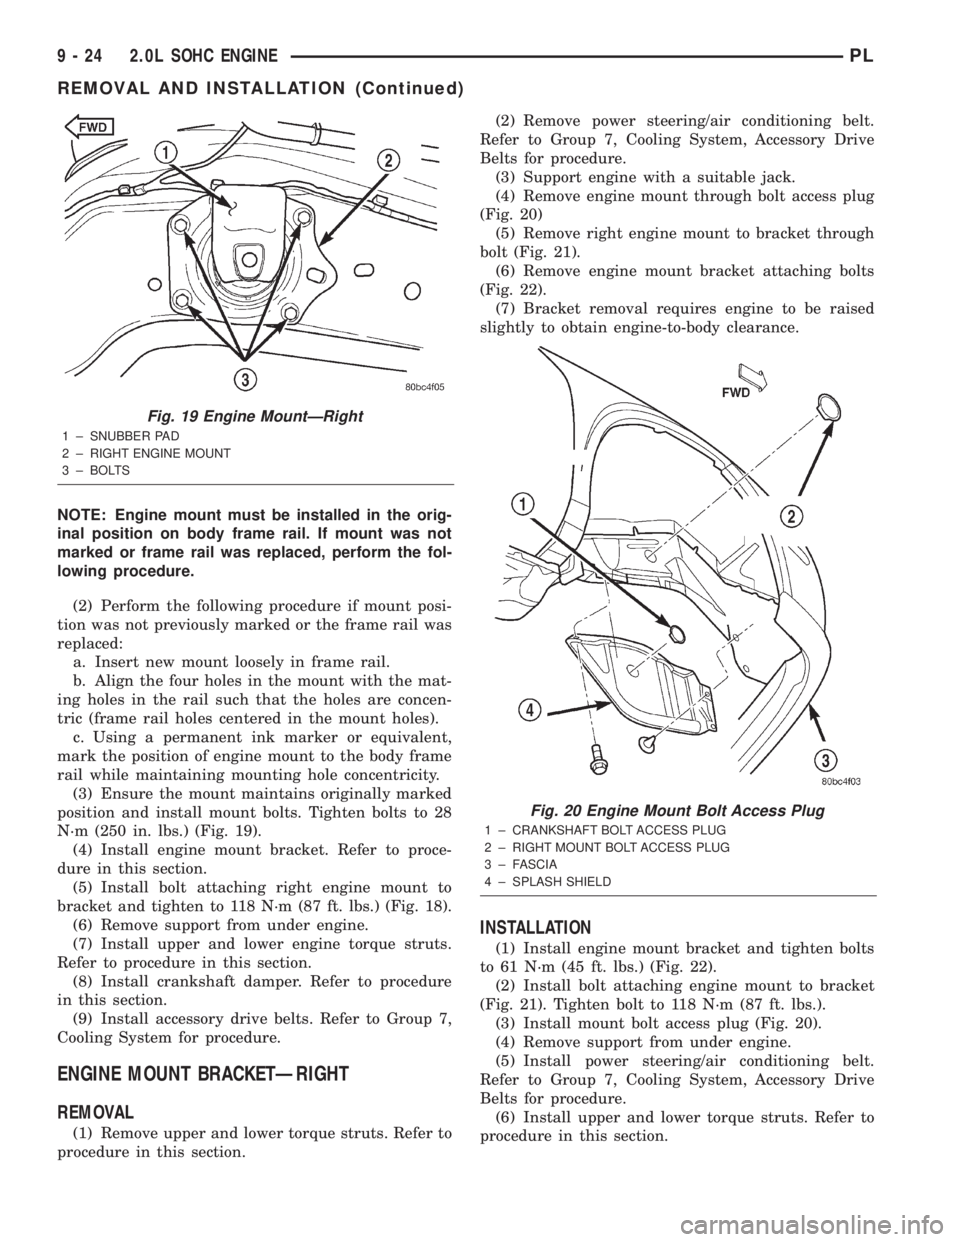
N´m (250 in. lbs.) (Fig. 19).
(4) Install engine mount bracket. Refer to proce-
dure in this section.
(5) Install bolt attaching right engine mount to
bracket and tighten to 118 N´m (87 ft. lbs.) (Fig. 18).
(6) Remove support from under engine.
(7) Install upper and lower engine torque struts.
Refer to procedure in this section.
(8) Install crankshaft damper. Refer to procedure
in this section.
(9) Install accessory drive belts. Refer to Group 7,
Cooling System for procedure.
ENGINE MOUNT BRACKETÐRIGHT
REMOVAL
(1) Remove upper and lower torque struts. Refer to
procedure in this section.(2) Remove power steering/air conditioning belt.
Refer to Group 7, Cooling System, Accessory Drive
Belts for procedure.
(3) Support engine with a suitable jack.
(4) Remove engine mount through bolt access plug
(Fig. 20)
(5) Remove right engine mount to bracket through
bolt (Fig. 21).
(6) Remove engine mount bracket attaching bolts
(Fig. 22).
(7) Bracket removal requires engine to be raised
slightly to obtain engine-to-body clearance.
INSTALLATION
(1) Install engine mount bracket and tighten bolts
to 61 N´m (45 ft. lbs.) (Fig. 22).
(2) Install bolt attaching engine mount to bracket
(Fig. 21). Tighten bolt to 118 N´m (87 ft. lbs.).
(3) Install mount bolt access plug (Fig. 20).
(4) Remove support from under engine.
(5) Install power steering/air conditioning belt.
Refer to Group 7, Cooling System, Accessory Drive
Belts for procedure.
(6) Install upper and lower torque struts. Refer to
procedure in this section.
Fig. 19 Engine MountÐRight
1 ± SNUBBER PAD
2 ± RIGHT ENGINE MOUNT
3 ± BOLTS
Fig. 20 Engine Mount Bolt Access Plug
1 ± CRANKSHAFT BOLT ACCESS PLUG
2 ± RIGHT MOUNT BOLT ACCESS PLUG
3 ± FASCIA
4 ± SPLASH SHIELD
9 - 24 2.0L SOHC ENGINEPL
REMOVAL AND INSTALLATION (Continued)