2000 DODGE NEON rear view mirror
[x] Cancel search: rear view mirrorPage 214 of 1285
be checked. To determine if a high current draw con-
dition exists first check the vehicle with a test lamp.
(1) Verify that all electrical accessories are OFF.
²Remove key from ignition switch
²Turn off all lights
²Trunk lid is closed
²Engine compartment hood lamp is disconnected
or lamp removed
²Map lamp on rear view mirror
²Glove box door is closed
²Sun visor vanity lights are OFF
²All doors are closed
²Allow the ignition key lamp system to time out
in approximately 30 seconds, if equipped.
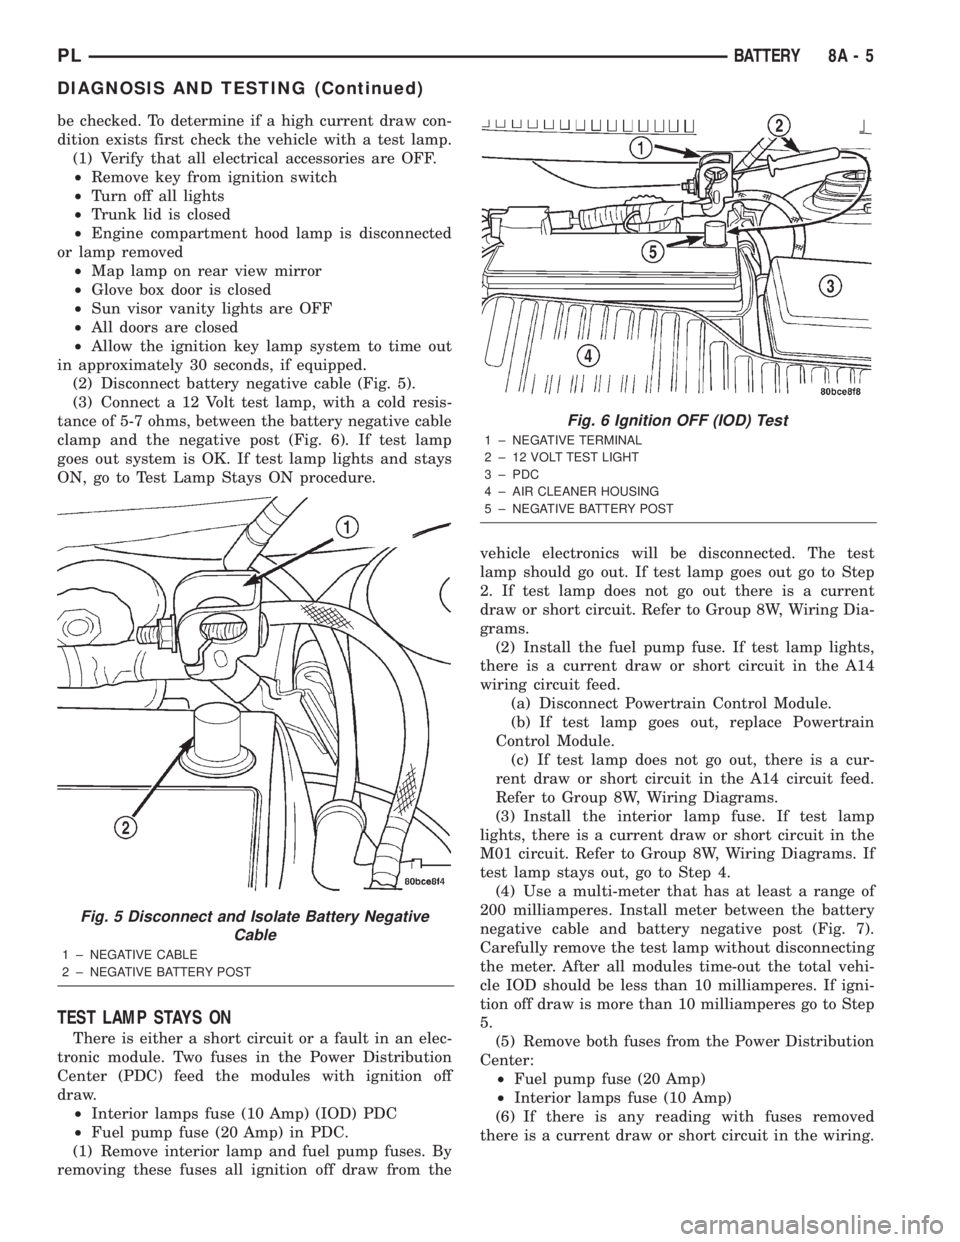
(2) Disconnect battery negative cable (Fig. 5).
(3) Connect a 12 Volt test lamp, with a cold resis-
tance of 5-7 ohms, between the battery negative cable
clamp and the negative post (Fig. 6). If test lamp
goes out system is OK. If test lamp lights and stays
ON, go to Test Lamp Stays ON procedure.
TEST LAMP STAYS ON
There is either a short circuit or a fault in an elec-
tronic module. Two fuses in the Power Distribution
Center (PDC) feed the modules with ignition off
draw.
²Interior lamps fuse (10 Amp) (IOD) PDC
²Fuel pump fuse (20 Amp) in PDC.
(1) Remove interior lamp and fuel pump fuses. By
removing these fuses all ignition off draw from thevehicle electronics will be disconnected. The test
lamp should go out. If test lamp goes out go to Step
2. If test lamp does not go out there is a current
draw or short circuit. Refer to Group 8W, Wiring Dia-
grams.
(2) Install the fuel pump fuse. If test lamp lights,
there is a current draw or short circuit in the A14
wiring circuit feed.
(a) Disconnect Powertrain Control Module.
(b) If test lamp goes out, replace Powertrain
Control Module.
(c) If test lamp does not go out, there is a cur-
rent draw or short circuit in the A14 circuit feed.
Refer to Group 8W, Wiring Diagrams.
(3) Install the interior lamp fuse. If test lamp
lights, there is a current draw or short circuit in the
M01 circuit. Refer to Group 8W, Wiring Diagrams. If
test lamp stays out, go to Step 4.
(4) Use a multi-meter that has at least a range of
200 milliamperes. Install meter between the battery
negative cable and battery negative post (Fig. 7).
Carefully remove the test lamp without disconnecting
the meter. After all modules time-out the total vehi-
cle IOD should be less than 10 milliamperes. If igni-
tion off draw is more than 10 milliamperes go to Step
5.
(5) Remove both fuses from the Power Distribution
Center:
²Fuel pump fuse (20 Amp)
²Interior lamps fuse (10 Amp)
(6) If there is any reading with fuses removed
there is a current draw or short circuit in the wiring.
Fig. 5 Disconnect and Isolate Battery Negative
Cable
1 ± NEGATIVE CABLE
2 ± NEGATIVE BATTERY POST
Fig. 6 Ignition OFF (IOD) Test
1 ± NEGATIVE TERMINAL
2 ± 12 VOLT TEST LIGHT
3 ± PDC
4 ± AIR CLEANER HOUSING
5 ± NEGATIVE BATTERY POST
PLBATTERY 8A - 5
DIAGNOSIS AND TESTING (Continued)
Page 255 of 1285
(19) Disconnect one left side harness connector at
top left of instrument panel for vanity and rear view
mirrors.
(20) Pull off the hvac control head knobs.
(21) Remove two screws retaining the top front of
the center bezel.
(22) Using a trim stick, gently pry out on the
instrument panel center bezel and remove.
(23) Remove the two retaining screws to the hvac
control head.
(24) Disconnect the one instrument panel wire
harness connector.
(25) Disconnect the one vacuum harness connector.
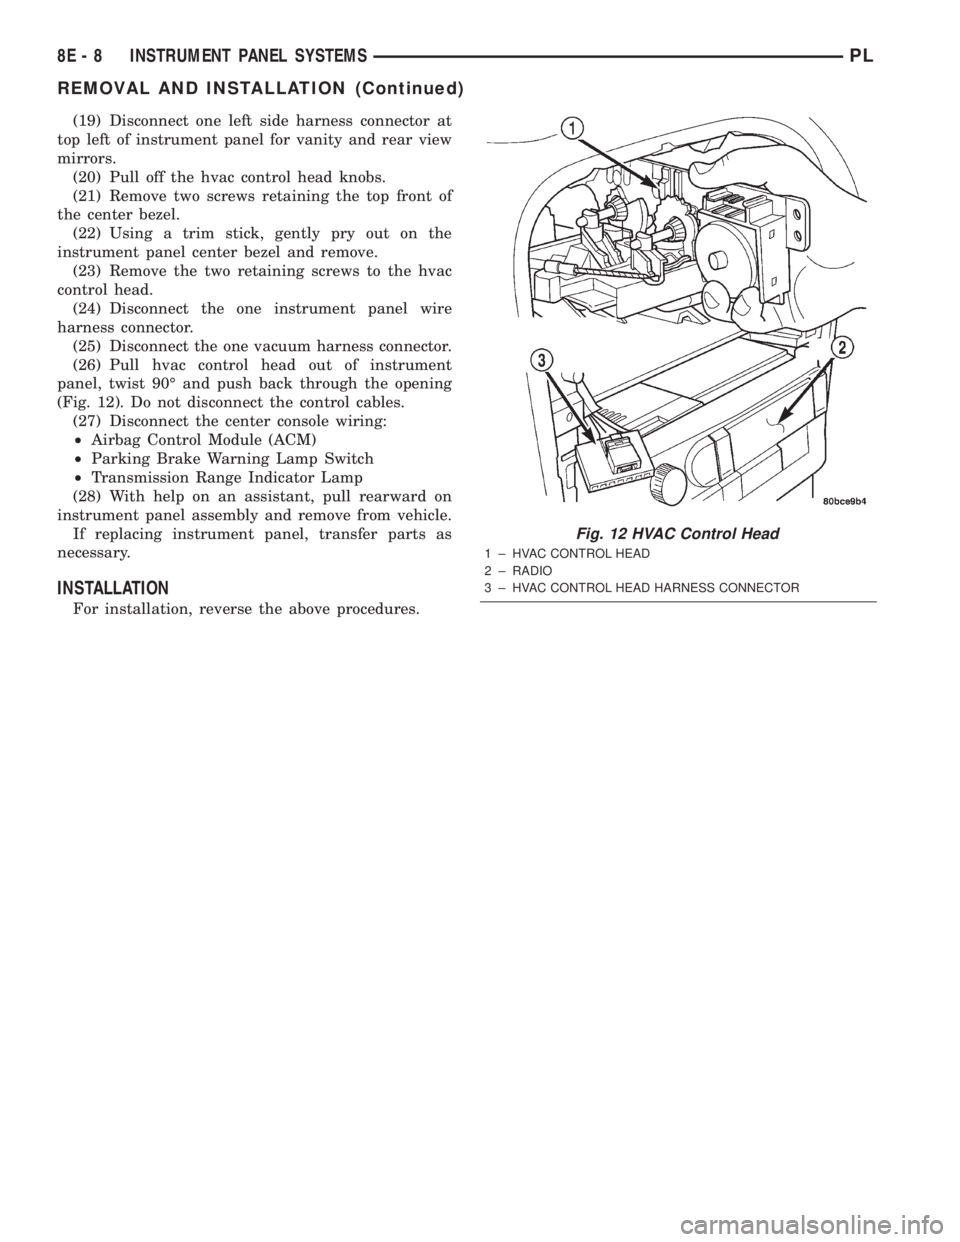
(26) Pull hvac control head out of instrument
panel, twist 90É and push back through the opening
(Fig. 12). Do not disconnect the control cables.
(27) Disconnect the center console wiring:
²Airbag Control Module (ACM)
²Parking Brake Warning Lamp Switch
²Transmission Range Indicator Lamp
(28) With help on an assistant, pull rearward on
instrument panel assembly and remove from vehicle.
If replacing instrument panel, transfer parts as
necessary.
INSTALLATION
For installation, reverse the above procedures.
Fig. 12 HVAC Control Head
1 ± HVAC CONTROL HEAD
2 ± RADIO
3 ± HVAC CONTROL HEAD HARNESS CONNECTOR
8E - 8 INSTRUMENT PANEL SYSTEMSPL
REMOVAL AND INSTALLATION (Continued)
Page 1121 of 1285
STATIONARY GLASS
TABLE OF CONTENTS
page page
DESCRIPTION AND OPERATION
SAFETY PRECAUTIONS....................4
REMOVAL AND INSTALLATION
WINDSHIELD.............................4REAR WINDOW...........................6
DESCRIPTION AND OPERATION
SAFETY PRECAUTIONS
WARNING: DO NOT OPERATE THE VEHICLE
WITHIN 24 HOURS OF WINDSHIELD INSTALLATION.
IT TAKES AT LEAST 24 HOURS FOR URETHANE
ADHESIVE TO CURE. IF IT IS NOT CURED, THE
WINDSHIELD MAY NOT PERFORM PROPERLY IN
AN ACCIDENT.
URETHANE ADHESIVES ARE APPLIED AS A SYS-
TEM. USE GLASS CLEANER, GLASS PREP SOL-
VENT, GLASS PRIMER, PVC (VINYL) PRIMER AND
PINCH WELD (FENCE) PRIMER PROVIDED BY THE
ADHESIVE MANUFACTURER. IF NOT, STRUCTURAL
INTEGRITY COULD BE COMPROMISED.
CHRYSLER DOES NOT RECOMMEND GLASS
ADHESIVE BY BRAND. TECHNICIANS SHOULD
REVIEW PRODUCT LABELS AND TECHNICAL DATA
SHEETS, AND USE ONLY ADHESIVES THAT THEIR
MANUFACTURES WARRANT WILL RESTORE A
VEHICLE TO THE REQUIREMENTS OF FMVSS 212.
TECHNICIANS SHOULD ALSO INSURE THAT PRIM-
ERS AND CLEANERS ARE COMPATIBLE WITH THE
PARTICULAR ADHESIVE USED.
BE SURE TO REFER TO THE URETHANE MANU-
FACTURER'S DIRECTIONS FOR CURING TIME
SPECIFICATIONS, AND DO NOT USE ADHESIVE
AFTER ITS EXPIRATION DATE.
VAPORS THAT ARE EMITTED FROM THE URE-
THANE ADHESIVE OR PRIMER COULD CAUSE
PERSONAL INJURY. USE THEM IN A WELL-VENTI-
LATED AREA.
SKIN CONTACT WITH URETHANE ADHESIVE
SHOULD BE AVOIDED. PERSONAL INJURY MAY
RESULT.
ALWAYS WEAR EYE AND HAND PROTECTION
WHEN WORKING WITH GLASS.
CAUTION: Protect all painted and trimmed surfaces
from coming in contact with urethane or primers.
Be careful not to damage painted surfaces when
removing moldings or cutting urethane around
windshield.It is difficult to salvage a windshield during the
removal operation. The windshield is part of the
structural support for the roof. The urethane bonding
used to secure the windshield to the fence is difficult
to cut or clean from any surface. If the moldings are
set in urethane, it would also be unlikely they could
be salvaged. Before removing the windshield, check
the availability of the windshield and moldings from
the parts supplier.
REMOVAL AND INSTALLATION
WINDSHIELD
The urethane adhesive holding the windshield to
the opening pinch weld (fence) can be cut using a
sharp cold knife from the exterior of the vehicle.
Using the cold knife method is effective if the wind-
shield is already broken. If the glass must be sal-
vaged, cutting the urethane adhesive from the
interior of the vehicle using a reciprocating or oscil-
lating power knife is recommended.
RECOMMENDED TOOLS AND ADHESIVE
POWER KNIFE
²FeintPower Cutout Knife
²EqualizertMagnum, Interior Auto Glass Cut
Out Knife
ADHESIVE, PRIMER AND CLEANER
The following urethane adhesive systems are OEM
certified and conform to the FMVSS 212 windshield
retention standard and the FMVSS 216 roof crush
standard.
WINDSHIELD REMOVAL ± EXTERIOR METHOD
(1) Remove inside rear view mirror.
(2) Remove windshield wiper arms.
(3) Remove cowl cover.
23 - 4 BODYPL
Page 1122 of 1285
(4) Place protective covers over instrument panel
and hood.
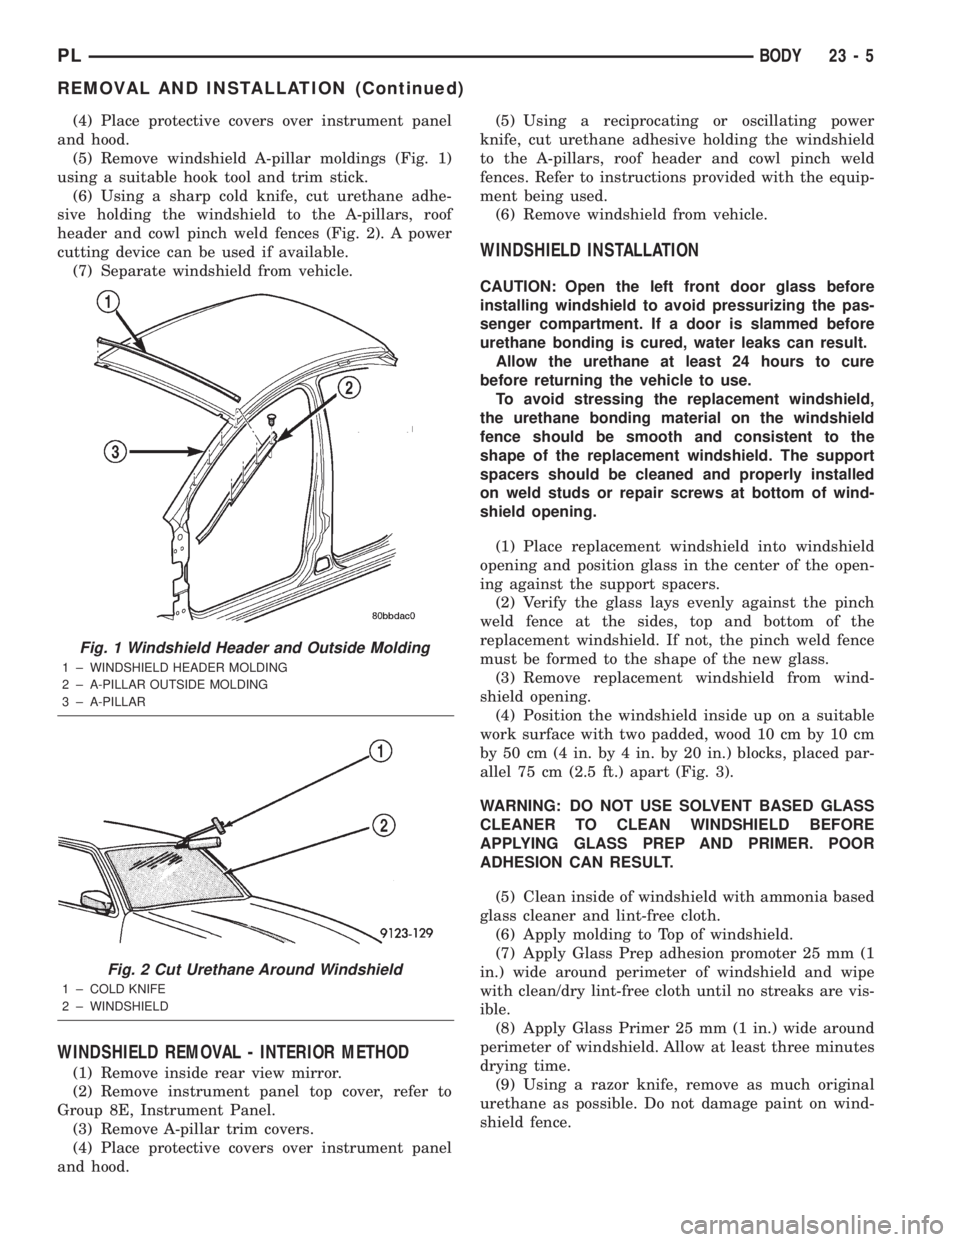
(5) Remove windshield A-pillar moldings (Fig. 1)
using a suitable hook tool and trim stick.
(6) Using a sharp cold knife, cut urethane adhe-
sive holding the windshield to the A-pillars, roof
header and cowl pinch weld fences (Fig. 2). A power
cutting device can be used if available.
(7) Separate windshield from vehicle.
WINDSHIELD REMOVAL - INTERIOR METHOD
(1) Remove inside rear view mirror.
(2) Remove instrument panel top cover, refer to
Group 8E, Instrument Panel.
(3) Remove A-pillar trim covers.
(4) Place protective covers over instrument panel
and hood.(5) Using a reciprocating or oscillating power
knife, cut urethane adhesive holding the windshield
to the A-pillars, roof header and cowl pinch weld
fences. Refer to instructions provided with the equip-
ment being used.
(6) Remove windshield from vehicle.
WINDSHIELD INSTALLATION
CAUTION: Open the left front door glass before
installing windshield to avoid pressurizing the pas-
senger compartment. If a door is slammed before
urethane bonding is cured, water leaks can result.
Allow the urethane at least 24 hours to cure
before returning the vehicle to use.
To avoid stressing the replacement windshield,
the urethane bonding material on the windshield
fence should be smooth and consistent to the
shape of the replacement windshield. The support
spacers should be cleaned and properly installed
on weld studs or repair screws at bottom of wind-
shield opening.
(1) Place replacement windshield into windshield
opening and position glass in the center of the open-
ing against the support spacers.
(2) Verify the glass lays evenly against the pinch
weld fence at the sides, top and bottom of the
replacement windshield. If not, the pinch weld fence
must be formed to the shape of the new glass.
(3) Remove replacement windshield from wind-
shield opening.
(4) Position the windshield inside up on a suitable
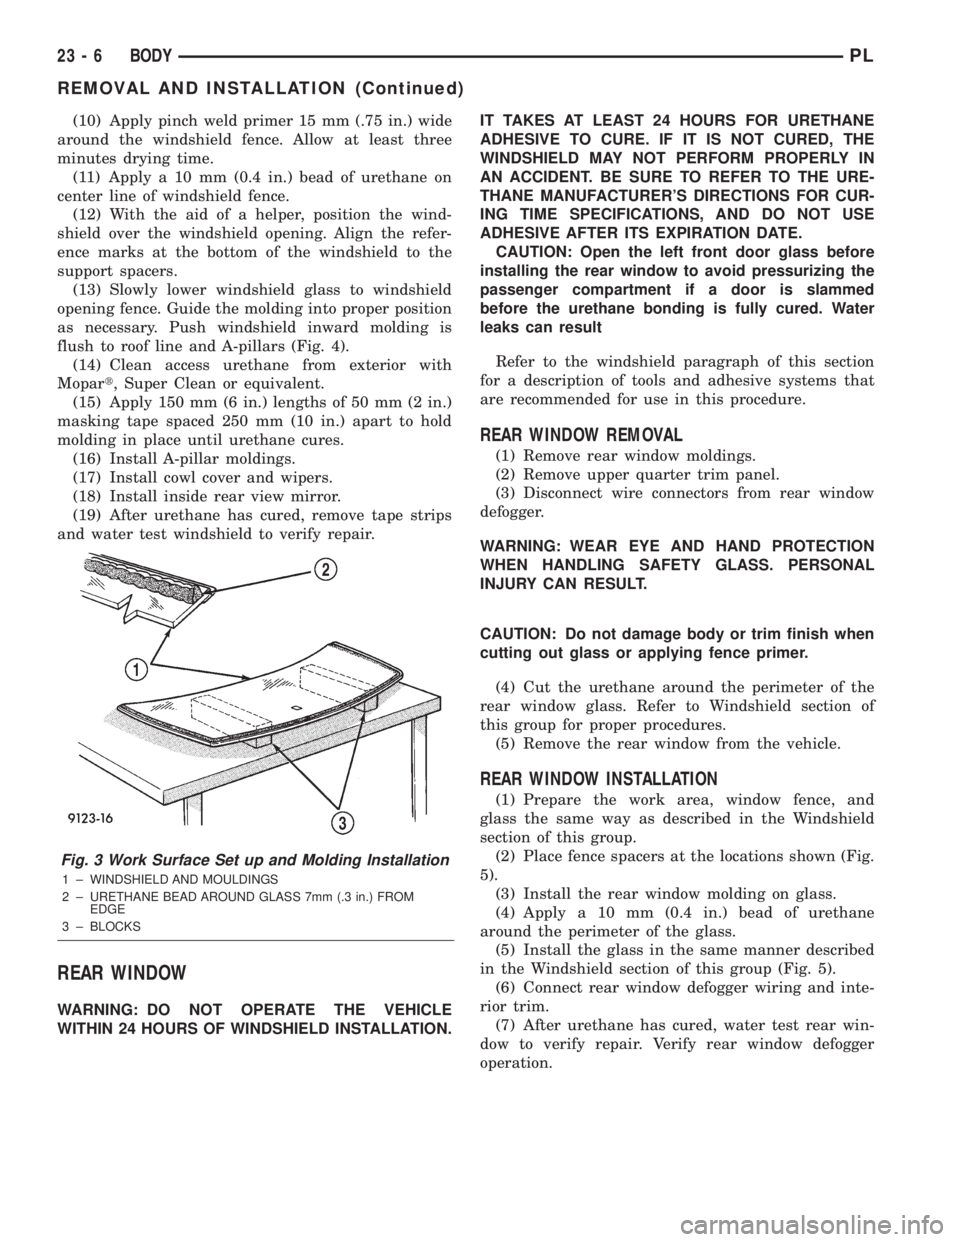
work surface with two padded, wood 10 cm by 10 cm
by 50 cm (4 in. by 4 in. by 20 in.) blocks, placed par-
allel 75 cm (2.5 ft.) apart (Fig. 3).
WARNING: DO NOT USE SOLVENT BASED GLASS
CLEANER TO CLEAN WINDSHIELD BEFORE
APPLYING GLASS PREP AND PRIMER. POOR
ADHESION CAN RESULT.
(5) Clean inside of windshield with ammonia based
glass cleaner and lint-free cloth.
(6) Apply molding to Top of windshield.
(7) Apply Glass Prep adhesion promoter 25 mm (1
in.) wide around perimeter of windshield and wipe
with clean/dry lint-free cloth until no streaks are vis-
ible.
(8) Apply Glass Primer 25 mm (1 in.) wide around
perimeter of windshield. Allow at least three minutes
drying time.
(9) Using a razor knife, remove as much original
urethane as possible. Do not damage paint on wind-
shield fence.
Fig. 1 Windshield Header and Outside Molding
1 ± WINDSHIELD HEADER MOLDING
2 ± A-PILLAR OUTSIDE MOLDING
3 ± A-PILLAR
Fig. 2 Cut Urethane Around Windshield
1 ± COLD KNIFE
2 ± WINDSHIELD
PLBODY 23 - 5
REMOVAL AND INSTALLATION (Continued)
Page 1123 of 1285
(10) Apply pinch weld primer 15 mm (.75 in.) wide
around the windshield fence. Allow at least three
minutes drying time.
(11) Apply a 10 mm (0.4 in.) bead of urethane on
center line of windshield fence.
(12) With the aid of a helper, position the wind-
shield over the windshield opening. Align the refer-
ence marks at the bottom of the windshield to the
support spacers.
(13) Slowly lower windshield glass to windshield
opening fence. Guide the molding into proper position
as necessary. Push windshield inward molding is
flush to roof line and A-pillars (Fig. 4).
(14) Clean access urethane from exterior with
Mopart, Super Clean or equivalent.
(15) Apply 150 mm (6 in.) lengths of 50 mm (2 in.)
masking tape spaced 250 mm (10 in.) apart to hold
molding in place until urethane cures.
(16) Install A-pillar moldings.
(17) Install cowl cover and wipers.
(18) Install inside rear view mirror.
(19) After urethane has cured, remove tape strips
and water test windshield to verify repair.
REAR WINDOW
WARNING: DO NOT OPERATE THE VEHICLE
WITHIN 24 HOURS OF WINDSHIELD INSTALLATION.IT TAKES AT LEAST 24 HOURS FOR URETHANE
ADHESIVE TO CURE. IF IT IS NOT CURED, THE
WINDSHIELD MAY NOT PERFORM PROPERLY IN
AN ACCIDENT. BE SURE TO REFER TO THE URE-
THANE MANUFACTURER'S DIRECTIONS FOR CUR-
ING TIME SPECIFICATIONS, AND DO NOT USE
ADHESIVE AFTER ITS EXPIRATION DATE.
CAUTION: Open the left front door glass before
installing the rear window to avoid pressurizing the
passenger compartment if a door is slammed
before the urethane bonding is fully cured. Water
leaks can result
Refer to the windshield paragraph of this section
for a description of tools and adhesive systems that
are recommended for use in this procedure.
REAR WINDOW REMOVAL
(1) Remove rear window moldings.
(2) Remove upper quarter trim panel.
(3) Disconnect wire connectors from rear window
defogger.
WARNING: WEAR EYE AND HAND PROTECTION
WHEN HANDLING SAFETY GLASS. PERSONAL
INJURY CAN RESULT.
CAUTION: Do not damage body or trim finish when
cutting out glass or applying fence primer.
(4) Cut the urethane around the perimeter of the
rear window glass. Refer to Windshield section of
this group for proper procedures.
(5) Remove the rear window from the vehicle.
REAR WINDOW INSTALLATION
(1) Prepare the work area, window fence, and
glass the same way as described in the Windshield
section of this group.
(2) Place fence spacers at the locations shown (Fig.
5).
(3) Install the rear window molding on glass.
(4) Apply a 10 mm (0.4 in.) bead of urethane
around the perimeter of the glass.
(5) Install the glass in the same manner described
in the Windshield section of this group (Fig. 5).
(6) Connect rear window defogger wiring and inte-
rior trim.
(7) After urethane has cured, water test rear win-
dow to verify repair. Verify rear window defogger
operation.
Fig. 3 Work Surface Set up and Molding Installation
1 ± WINDSHIELD AND MOULDINGS
2 ± URETHANE BEAD AROUND GLASS 7mm (.3 in.) FROM
EDGE
3 ± BLOCKS
23 - 6 BODYPL
REMOVAL AND INSTALLATION (Continued)
Page 1129 of 1285
BODY COMPONENTS
TABLE OF CONTENTS
page page
DESCRIPTION AND OPERATION
GRILLE................................13
HOOD.................................13
FRONT DOOR...........................14
SPLASH SHIELD.........................16
DIAGNOSIS AND TESTING
WATER LEAKS..........................18
WIND NOISE............................19
SERVICE PROCEDURES
HEAT STAKING..........................19
PLASTIC BODY PANEL REPAIR..............19
REMOVAL AND INSTALLATION
GRILLE................................23
HOOD LATCH...........................24
HOOD LATCH STRIKER....................24
HOOD RELEASE CABLE...................25
HOOD.................................26
HOOD SILENCER........................26
HOOD HINGE...........................26
COWL COVER...........................27
FRONT WHEELHOUSE SPLASH SHIELD......28
FENDER...............................28
EXTERIOR BADGEING ATTACHED WITH
DOUBLE SIDED FOAM TAPE..............28
EXTERIOR BADGEING/TAPE STRIPES
ATTACHED WITH ADHESIVES.............28
FRONT/REAR DOOR WINDOW CRANK........29
FRONT DOOR TRIM......................30
FRONT DOOR WATER DAM................30
DOOR OUTER BELT WEATHERSTRIP.........30
FRONT/REAR DOOR INNER BELT
WEATHERSTRIP........................32
FRONT DOOR GLASS RUN WEATHERSTRIP . . . 32
FRONT DOOR OUTSIDE HANDLE............33
DOOR LOCK CYLINDER...................33
FRONT DOOR LATCH.....................33
FRONT DOOR LATCH STRIKER.............34
FRONT VERTICAL GUIDE BAR..............34
FRONT DOOR GLASS.....................36
FRONT DOOR CHECK STRAP..............36
FRONT DOOR...........................36
FRONT DOOR HINGE.....................38
FRONT/REAR DOOR APPLIQUE.............38
SIDE VIEW MIRROR......................39
SIDE VIEW MIRROR TRIM BEZEL............39
DOOR UPPER SECONDARY WEATHERSTRIP . . 39
SILL SECONDARY WEATHERSTRIP..........40
REAR DOOR TRIM.......................40REAR DOOR WATER DAM.................40
REAR DOOR OUTSIDE HANDLE.............40
REAR DOOR LATCH......................41
REAR DOOR LATCH STRIKER..............43
REAR DOOR GLASS......................43
REAR DOOR WINDOW REGULATOR.........43
REAR DOOR GLASS RUN WEATHERSTRIP....43
REAR DOOR CHECK STRAP................45
REAR DOOR............................45
REAR DOOR HINGE......................45
FUEL FILL DOOR.........................46
DECKLID LATCH.........................47
DECKLID...............................47
DECKLID LIFT SPRINGS...................47
DECKLID LOCK CYLINDER.................48
DECKLID LATCH STRIKER.................48
DECKLID OPENING WEATHERSTRIP.........49
TRUNK CARPET.........................49
DECKLID COVER.........................50
ROOF RAIL WEATHERSTRIP................50
ROOF RAIL WEATHERSTRIP RETAINER
CHANNEL.............................50
B-PILLAR WEATHERSTRIP CHANNEL.........51
A-PILLAR TRIM..........................51
DOOR SILL TRIM.........................51
SIDE COWL TRIM........................52
B-PILLAR TRIM..........................52
UPPER QUARTER TRIM...................53
LOWER QUARTER TRIM...................53
FLOOR CONSOLE........................54
FRONT SEAT BELT BUCKLE................54
FRONT SEAT BELT RETRACTOR............54
FRONT SHOULDER BELT ADJUSTER.........54
REAR SEAT BELT BUCKLE.................55
REAR SEAT BELT RETRACTOR.............55
CARPET...............................56
SUN VISOR.............................56
HEADLINER.............................57
INSIDE REAR VIEW MIRROR...............57
REAR SHELF TRIM PANEL.................57
BODY VENT.............................58
ADJUSTMENTS
FRONT DOOR LATCH ADJUSTMENT.........58
REAR DOOR LATCH ADJUSTMENT..........58
SPECIFICATIONS
BODY LUBRICATION......................59
SPECIAL TOOLS
BODY.................................59
23 - 12 BODYPL
Page 1149 of 1285
FRONT/REAR DOOR INNER BELT
WEATHERSTRIP
REMOVAL
(1) Remove door trim panel.
(2) Remove weatherstrip from door. Use a rubber
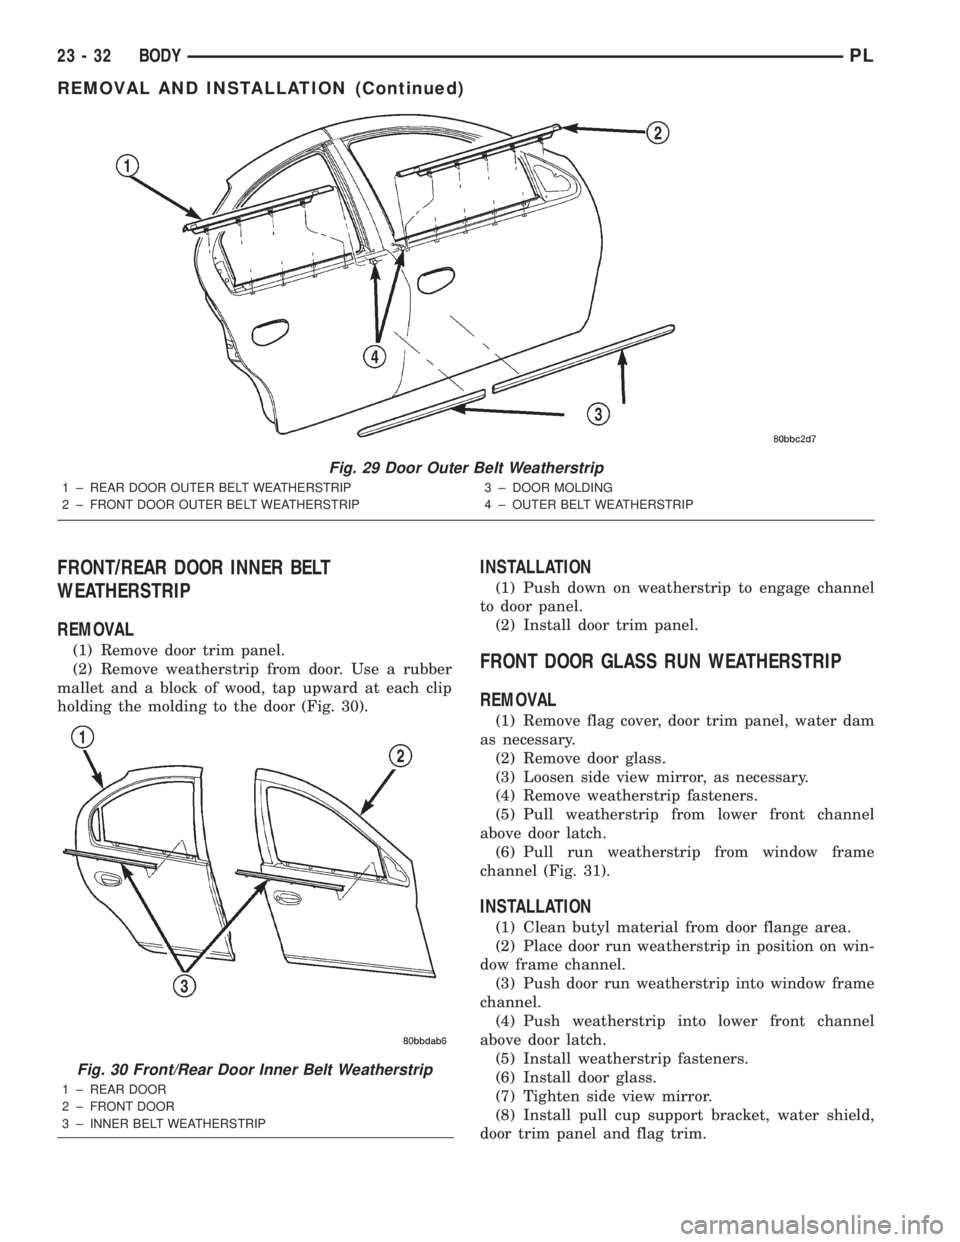
mallet and a block of wood, tap upward at each clip
holding the molding to the door (Fig. 30).
INSTALLATION
(1) Push down on weatherstrip to engage channel
to door panel.
(2) Install door trim panel.
FRONT DOOR GLASS RUN WEATHERSTRIP
REMOVAL
(1) Remove flag cover, door trim panel, water dam
as necessary.
(2) Remove door glass.
(3) Loosen side view mirror, as necessary.
(4) Remove weatherstrip fasteners.
(5) Pull weatherstrip from lower front channel
above door latch.
(6) Pull run weatherstrip from window frame
channel (Fig. 31).
INSTALLATION
(1) Clean butyl material from door flange area.
(2) Place door run weatherstrip in position on win-
dow frame channel.
(3) Push door run weatherstrip into window frame
channel.
(4) Push weatherstrip into lower front channel
above door latch.
(5) Install weatherstrip fasteners.
(6) Install door glass.
(7) Tighten side view mirror.
(8) Install pull cup support bracket, water shield,
door trim panel and flag trim.
Fig. 29 Door Outer Belt Weatherstrip
1 ± REAR DOOR OUTER BELT WEATHERSTRIP
2 ± FRONT DOOR OUTER BELT WEATHERSTRIP3 ± DOOR MOLDING
4 ± OUTER BELT WEATHERSTRIP
Fig. 30 Front/Rear Door Inner Belt Weatherstrip
1 ± REAR DOOR
2 ± FRONT DOOR
3 ± INNER BELT WEATHERSTRIP
23 - 32 BODYPL
REMOVAL AND INSTALLATION (Continued)
Page 1156 of 1285
INSTALLATION
(1) Place applique into position on door.
(2) Install fasteners into door applique.
SIDE VIEW MIRROR
REMOVAL
(1) Remove side view mirror bezel or door trim
panel as necessary.
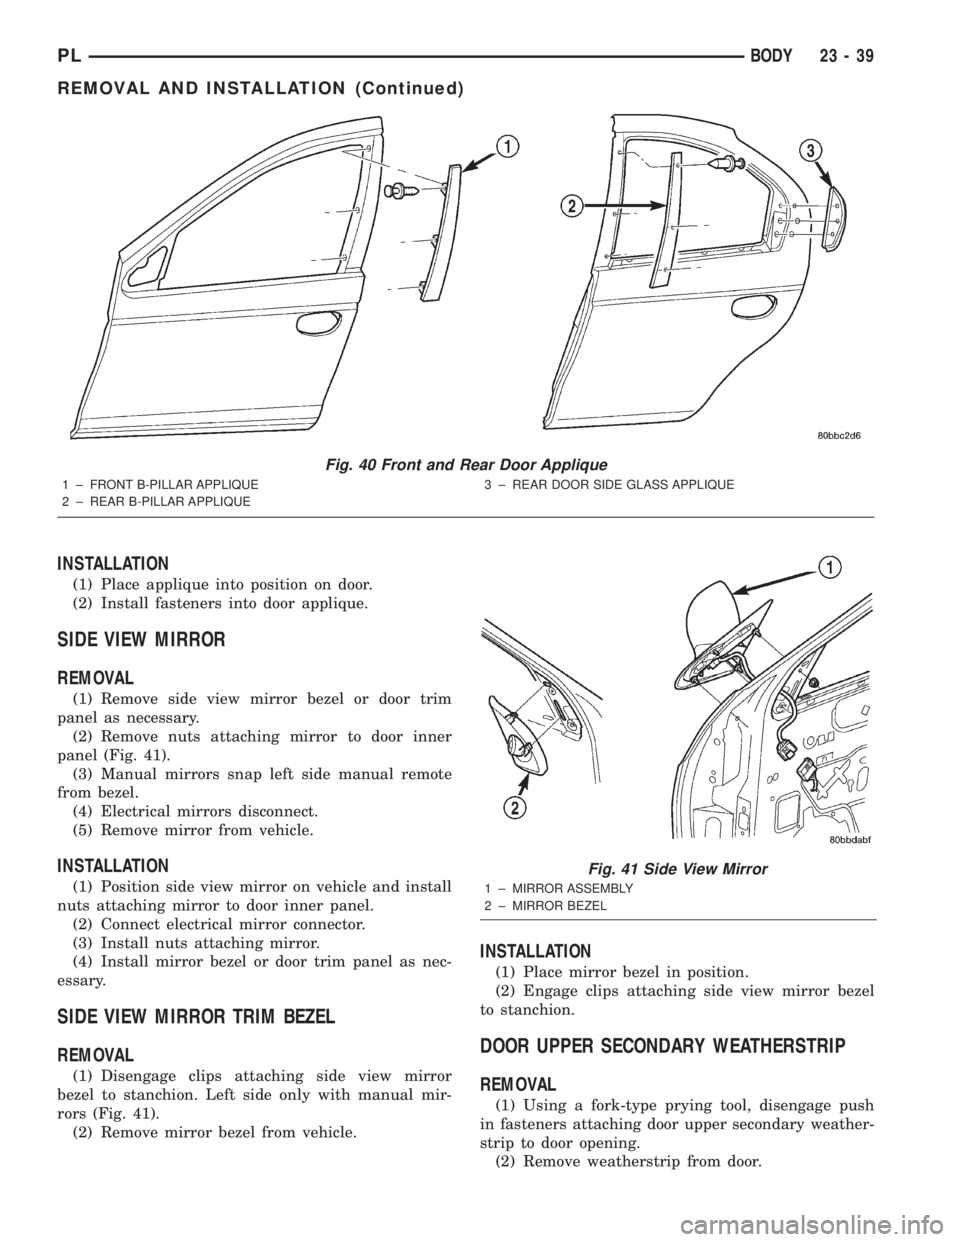
(2) Remove nuts attaching mirror to door inner
panel (Fig. 41).
(3) Manual mirrors snap left side manual remote
from bezel.
(4) Electrical mirrors disconnect.
(5) Remove mirror from vehicle.
INSTALLATION
(1) Position side view mirror on vehicle and install
nuts attaching mirror to door inner panel.
(2) Connect electrical mirror connector.
(3) Install nuts attaching mirror.
(4) Install mirror bezel or door trim panel as nec-
essary.
SIDE VIEW MIRROR TRIM BEZEL
REMOVAL
(1) Disengage clips attaching side view mirror
bezel to stanchion. Left side only with manual mir-
rors (Fig. 41).
(2) Remove mirror bezel from vehicle.
INSTALLATION
(1) Place mirror bezel in position.
(2) Engage clips attaching side view mirror bezel
to stanchion.
DOOR UPPER SECONDARY WEATHERSTRIP
REMOVAL
(1) Using a fork-type prying tool, disengage push
in fasteners attaching door upper secondary weather-
strip to door opening.
(2) Remove weatherstrip from door.
Fig. 40 Front and Rear Door Applique
1 ± FRONT B-PILLAR APPLIQUE
2 ± REAR B-PILLAR APPLIQUE3 ± REAR DOOR SIDE GLASS APPLIQUE
Fig. 41 Side View Mirror
1 ± MIRROR ASSEMBLY
2 ± MIRROR BEZEL
PLBODY 23 - 39
REMOVAL AND INSTALLATION (Continued)