Page 25 of 65

60G-74E
INSTRUMENT PANEL
60G-05-024
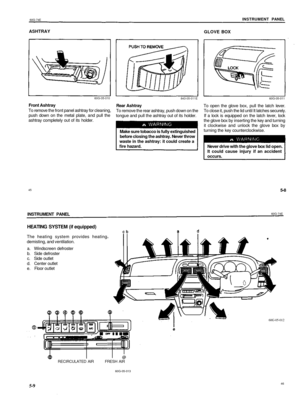
Dehumidifying
Push in the A/C button, and the desired
function button and move the air intake lever
to "FRESH AIR", the temperature control lever
to the desired temperature position, and the
fan switch to the desired fan speed position.
NOTE:
Because the air conditioner dehumidifies the
air, turning it on will help keep the windows
clear, even when blowing heated air using the
DEMIST or HEATER & DEMIST functions.
60G-05-025
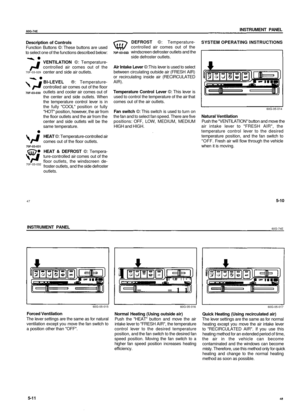
NOTE:
There are two types of air conditioning
systems used in MARUTI vehicles. One type
uses refrigerant CFC-12, commonly called R-
12; the other type uses the new refrigerant
HFC-134a, commonly called R-134a. For each
system, the correct refrigerant must be used.
To identify the system, a label that states
"R134a" or "HFC 134a" is stuck on the front
side of the engine compartment if the system
uses R-134a refrigerant.
CAUTION
Using the wrong refrigerant may
damage the air conditioning system.
Use correct refrigerant only. Do not mix
the two refrigerants.
60G-74E
5-14
OTHER CONTROLS AND EQUIPMENT
OTHER CONTROLS AND EQUIPMENT
Parking Brake Lever 6-1
Pedals 6-2
Gear Lever 6-2
Fuel Filler Cap 6-3
Folding Rear Seats 6-4
Sun Visor 6-5
Interior Light Switch 6-5
Assist Grips 6-5
Bonnet 6-6
Cup Holder (if equipped) 6-7
Tyre Changing Tools 6-7
Luggage Compartment Trim 6-8
Trunk (Boot) Light 6-8
Front Seat Back Pocket (if equipped) 6-9
Rear spoiler with Stop lamp (if equipped) 6-9
Alloy Wheels (if equipped) 6-9
Power Antenna (if equipped) 6-10
Leather Cover (if equipped) 6-10
High Mount Stop Lamp 6-10
53
Page 26 of 65

60G-74E
INSTRUMENT PANEL
60G-05-024
Dehumidifying
Push in the A/C button, and the desired
function button and move the air intake lever
to "FRESH AIR", the temperature control lever
to the desired temperature position, and the
fan switch to the desired fan speed position.
NOTE:
Because the air conditioner dehumidifies the
air, turning it on will help keep the windows
clear, even when blowing heated air using the
DEMIST or HEATER & DEMIST functions.
60G-05-025
NOTE:
There are two types of air conditioning
systems used in MARUTI vehicles. One type
uses refrigerant CFC-12, commonly called R-
12; the other type uses the new refrigerant
HFC-134a, commonly called R-134a. For each
system, the correct refrigerant must be used.
To identify the system, a label that states
"R134a" or "HFC 134a" is stuck on the front
side of the engine compartment if the system
uses R-134a refrigerant.
CAUTION
Using the wrong refrigerant may
damage the air conditioning system.
Use correct refrigerant only. Do not mix
the two refrigerants.
60G-74E
5-14
OTHER CONTROLS AND EQUIPMENT
OTHER CONTROLS AND EQUIPMENT
Parking Brake Lever 6-1
Pedals 6-2
Gear Lever 6-2
Fuel Filler Cap 6-3
Folding Rear Seats 6-4
Sun Visor 6-5
Interior Light Switch 6-5
Assist Grips 6-5
Bonnet 6-6
Cup Holder (if equipped) 6-7
Tyre Changing Tools 6-7
Luggage Compartment Trim 6-8
Trunk (Boot) Light 6-8
Front Seat Back Pocket (if equipped) 6-9
Rear spoiler with Stop lamp (if equipped) 6-9
Alloy Wheels (if equipped) 6-9
Power Antenna (if equipped) 6-10
Leather Cover (if equipped) 6-10
High Mount Stop Lamp 6-10
53
Page 27 of 65

OTHER CONTROLS AND EQUIPMENTS
60G-74E
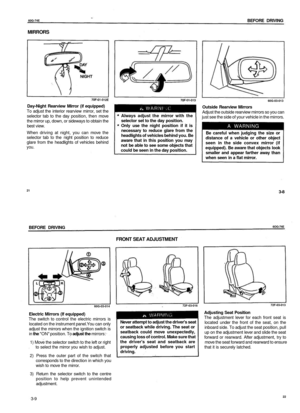
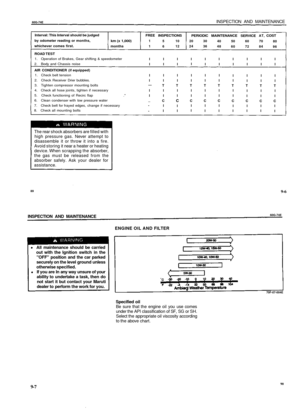
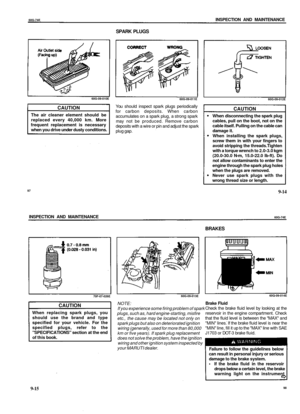
PARKING BRAKE LEVER
63B-06-001E
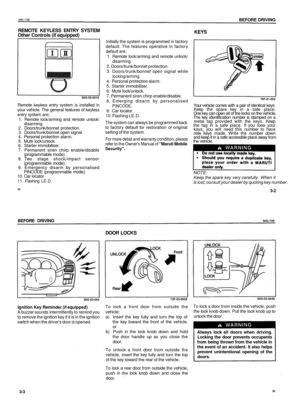
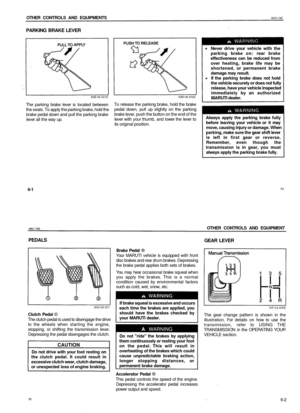
The parking brake lever is located between
the seats. To apply the parking brake, hold the
brake pedal down and pull the parking brake
lever all the way up.
63B-06-002E
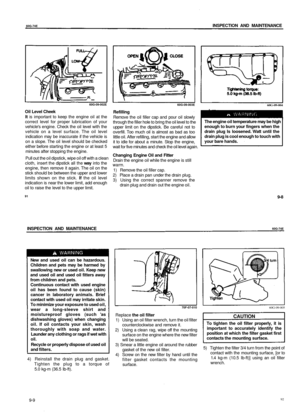
To release the parking brake, hold the brake
pedal down, pull up slightly on the parking
brake lever, push the button on the end of the
lever with your thumb, and lower the lever to
its original position.
Never drive your vehicle with the
parking brake on: rear brake
effectiveness can be reduced from
over heating, brake life may be
shortened, or permanent brake
damage may result.
If the parking brake does not hold
the vehicle securely or does not fully
release, have your vehicle inspected
immediately by an authorized
MARUTI dealer.
Always apply the parking brake fully
before leaving your vehicle or it may
move, causing injury or damage. When
parking, make sure the gear shift lever
is left in first gear or reverse.
Remember, even though the
transmission is in gear, you must
always apply the parking brake fully.
6-1
54
60G-74E
OTHER CONTROLS AND EQUIPMENT
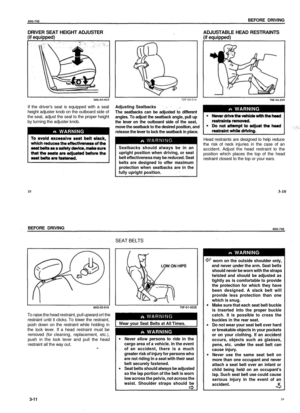
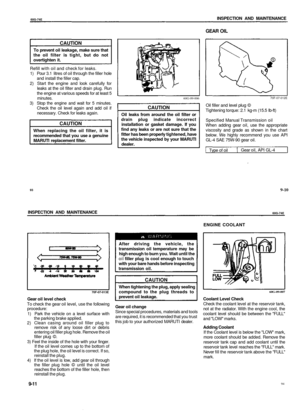
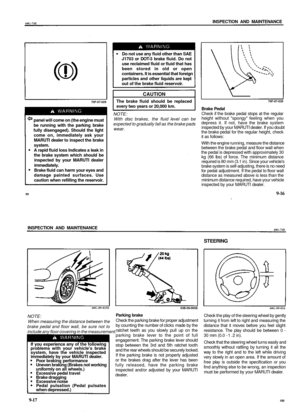
PEDALS
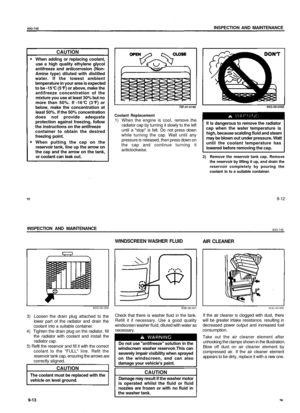
GEAR LEVER
60G-06-001
Clutch Pedal ©
The clutch pedal is used to disengage the drive
to the wheels when starting the engine,
stopping, or shifting the transmission lever.
Depressing the pedal disengages the clutch.
CAUTION
Do not drive with your foot resting on
the clutch pedal. It could result in
excessive clutch wear, clutch damage,
or unexpected loss of engine braking.
Brake Pedal ®
Your MARUTI vehicle is equipped with front
disc brakes and rear drum brakes. Depressing
the brake pedal applies both sets of brakes.
You may hear occasional brake squeal when
you apply the brakes. This is a normal
condition caused by environmental factors
such as cold, wet, snow, etc.
If brake squeal is excessive and occurs
each time the brakes are applied, you
should have the brakes checked by
your MARUTI dealer.
A WARNING
Do not "ride" the brakes by applying
them continuously or resting your foot
on the pedal. This will result in
overheating of the brakes which could
cause unpredictable braking action,
longer stopping distances, or
permanent brake damage.
Accelerator Pedal ®
This pedal controls the speed of the engine.
Depressing the accelerator pedal increases
power output and speed.
70F-04-005E
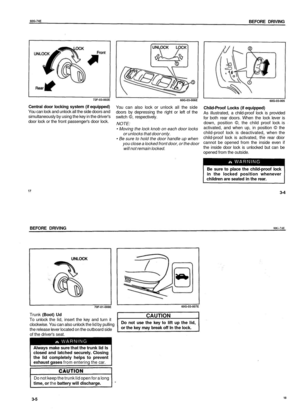
The gear change pattern is shown in the
illustration. For details on how to use the
transmission, refer to USING THE
TRANSMISSION in the OPERATING YOUR
VEHICLE section.
55
6-2
Page 28 of 65

OTHER CONTROLS AND EQUIPMENTS
60G-74E
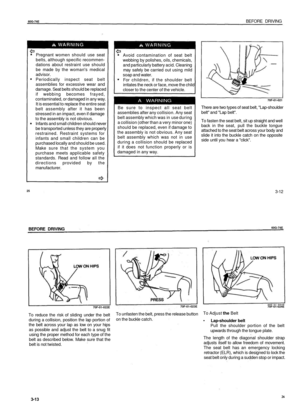
FUEL FILLER CAP
60G-06-002
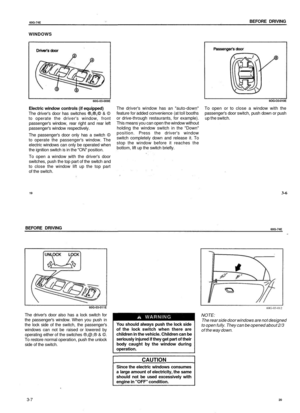
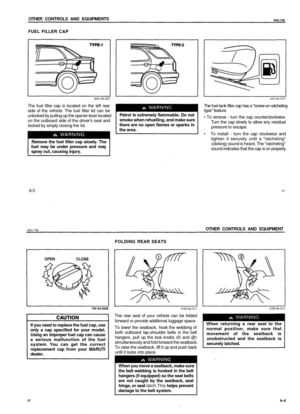
The fuel filler cap is located on the left rear
side of the vehicle. The fuel filler lid can be
unlocked by pulling up the opener lever located
on the outboard side of the driver's seat and
locked by simply closing the lid.
Remove the fuel filler cap slowly. The
fuel may be under pressure and may
spray out, causing injury.
Petrol Is extremely flammable. Do not
smoke when refuelling, and make sure
there are no open flames or sparks in
the area.
60G-06-OO3
The fuel tank filler cap has a "screw-on ratcheting
type" feature.
• To remove - turn the cap counterclockwise.
Turn the cap slowly to allow any residual
pressure to escape.
• To install - turn the cap clockwise and
tighten it securely until a "ratcheting"
(clicking) sound is heard. The "ratcheting"
sound indicates that the cap is on properly.
6-3
56
60G-74E
OTHER CONTROLS AND EQUIPMENT
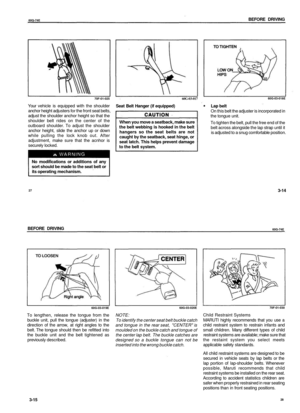
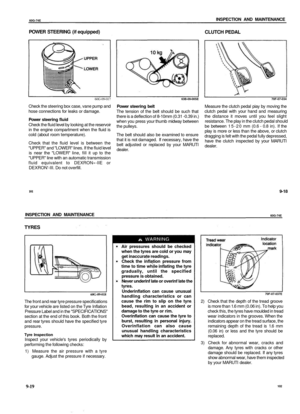
FOLDING REAR SEATS
70F-04-008E
If you need to replace the fuel cap, use
only a cap specified for your model.
Using an improper fuel cap can cause
a serious malfunction of the fuel
system. You can get the correct
replacement cap from your MARUTI
dealer.
63B-06-013
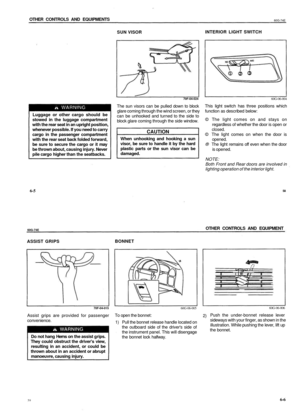
The rear seat of your vehicle can be folded
forward ro provide additional luggage space.
To lower the seatback, hook the webbing of
both outboard lap-shoulder belts in the belt
hangers, pull up the lock knobs (© and @)
simultaneously and fold forward the seatback.
To raise the seatback, lift it up and push back
until it locks into place.
When you move a seatback, make sure
the belt webbing is hooked in the belt
hangers (if equipped) so the seat belts
are not caught by the seatback, seat
hinge, or seat latch.This helps prevent
damage to the belt system.
63B-06-014
When returning a rear seat to the
normal position, make sure that
movement of the seatback is
unobstructed and the seatback is
securely latched.
57
6-4
Page 29 of 65

OTHER CONTROLS AND EQUIPMENTS
60G-74E
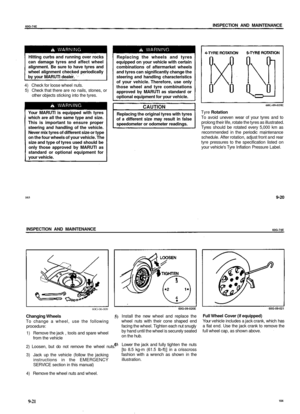
SUN VISOR
INTERIOR LIGHT SWITCH
70F-04-024
Luggage or other cargo should be
stowed in the luggage compartment
with the rear seat in an upright position,
whenever possible. If you need to carry
cargo in the passenger compartment
with the rear seat back folded forward,
be sure to secure the cargo or it may
be thrown about, causing injury. Never
pile cargo higher than the seatbacks.
The sun visors can be pulled down to block
glare coming through the wind screen, or they
can be unhooked and turned to the side to
block glare coming through the side window.
CAUTION
When unhooking and hooking a sun
visor, be sure to handle it by the hard
plastic parts or the sun visor can be
damaged.
60G-06-004
This light switch has three positions which
function as described below:
© The light comes on and stays on
regardless of whether the door is open or
closed.
© The light comes on when the door is
opened.
® The light remains off even when the door
is opened.
NOTE:
Both Front and Rear doors are involved in
lighting operation of the interior light.
6-5
58
60G-74E
OTHER CONTROLS AND EQUIPMENT
ASSIST GRIPS
BONNET
70F-04-015
Assist grips are provided for passenger
convenience.
Do not hang Herns on the assist grips.
They could obstruct the driver's view,
resulting in an accident, or could be
thrown about in an accident or abrupt
manoeuvre, causing injury.
60G-06-005
To open the bonnet:
1) Pull the bonnet release handle located on
the outboard side of the driver's side of
the instrument panel. This will disengage
the bonnet lock halfway.
60G-06-006
2)
Push the under-bonnet release lever
sideways with your finger, as shown in the
illustration. While pushing the lever, lift up
the bonnet.
59
6-6
Page 30 of 65

TYRE CHANGING TOOLS
60G-06-007
3)
Continue to lift up the bonnet until it is high
enough to support with the prop rod.
Make sure")
OTHER CONTROLS AND EQUIPMENTS
60G-74E
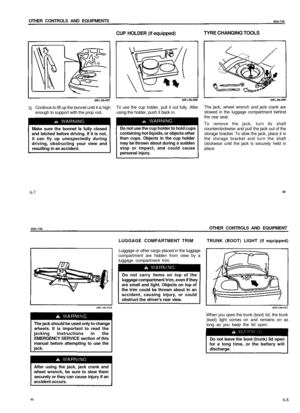
CUP HOLDER (if equipped)
TYRE CHANGING TOOLS
60G-06-007
3)
Continue to lift up the bonnet until it is high
enough to support with the prop rod.
Make sure the bonnet Is fully closed
and latched before driving. If it is not,
it can fly up unexpectedly during
driving, obstructing your view and
resulting in an accident.
60G-06-008
To use the cup holder, pull it out fully. After
using the holder, push it back in.
Do not use the cup holder to hold cups
containing hot liquids, or objects other
than cups. Objects in the cup holder
may be thrown about during a sudden
stop or impact, and could cause
personal injury.
60G-06-009
The jack, wheel wrench and jack crank are
stowed in the luggage compartment behind
the rear seat.
To remove the jack, turn its shaft
counterclockwise and pull the jack out of the
storage bracket. To stow the jack, place it in
the storage bracket and turn the shaft
clockwise until the jack is securely held in
place.
6-7
60
60G-74E
OTHER CONTROLS AND EQUIPMENT
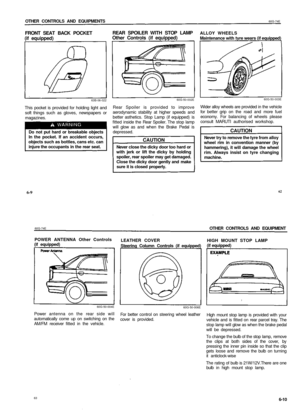
LUGGAGE COMPARTMENT TRIM TRUNK (BOOT) LIGHT (if equipped)
Luggage or other cargo placed in the luggage
compartment are hidden from view by a
luggage compartment trim.
Do not carry items on top of the
luggage compartment trim, even if they
are small and light. Objects on top of
the trim could be thrown about In an
accident, causing injury, or could
obstruct the driver's rear view.
60G-06-010
6OG-O6-O11
The jack should be used only to change
wheels. It is important to read the
jacking Instructions in the
EMERGENCY SERVICE section of this
manual before attempting to use the
jack.
When you open the trunk (boot) lid, the trunk
(boot) light comes on and remains on as
long as you keep the lid open.
Do not leave the boot (trunk) lid open
for a long time, or the battery will
discharge.
After using the jack, jack crank and
wheel wrench, be sure to stow them
securely or they can cause injury if an
accident occurs.
61
6-8
Page 31 of 65

REAR SPOILER WITH STOP LAMP
Other Controls (if equipped)
63B-06-022
This pocket is provided for holding light and
so")
OTHER CONTROLS AND EQUIPMENTS
60G-74E
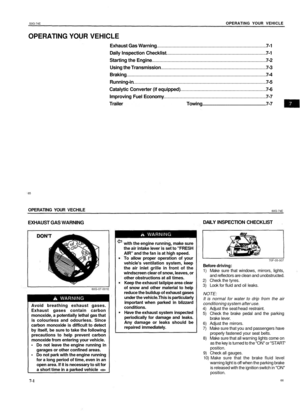
FRONT SEAT BACK POCKET
(if equipped)
REAR SPOILER WITH STOP LAMP
Other Controls (if equipped)
63B-06-022
This pocket is provided for holding light and
soft things such as gloves, newspapers or
magazines.
Do not put hard or breakable objects
In the pocket. If an accident occurs,
objects such as bottles, cans etc. can
injure the occupants in the rear seat.
60G-50-002E
Rear Spoiler is provided to improve
aerodynamic stability at higher speeds and
better asthetics. Stop Lamp (if equipped) is
fitted inside the Rear Spoiler. The stop lamp
will glow as and when the Brake Pedal is
depressed.
CAUTION
Never close the dicky door too hard or
with jerk or lift the dicky by holding
spoiler, rear spoiler may get damaged.
Close the dicky door gently and make
sure it is closed properly.
ALLOY WHEELS
Maintenance with tyre wears (if equipped)
60G-50-003E
Wider alloy wheels are provided in the vehicle
for better grip on the road and more fuel
economy. For balancing of wheels please
consult MARUTI authorised workshop.
CAUTION
Never try to remove the tyre from alloy
wheel rim in convention manner (by
hammering), it will damage the wheel
rim. Always insist on tyre changing
machine.
6-9
62
60G-74E
OTHER CONTROLS AND EQUIPMENT
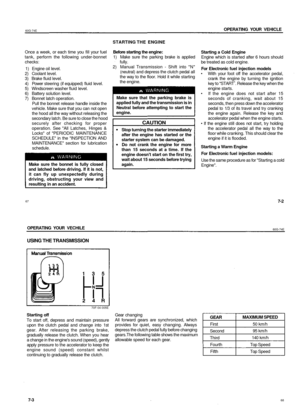
POWER ANTENNA Other Controls
(if equipped)
LEATHER COVER
Steering Column Controls (if equipped)
60G-50-004E
60G-50-006E
Power antenna on the rear side will
automatically come up on switching on the
AM/FM receiver fitted in the vehicle.
For better control on steering wheel leather
cover is provided.
HIGH MOUNT STOP LAMP
(if equipped)
High mount stop lamp is provided with your
vehicle and is fitted on rear parcel tray. The
stop lamp will glow as when the brake pedal
will be depressed.
To change the bulb of the stop lamp, remove
the clips at both sides of the cover, by
pressing the inner pin inside so that the clip
gets loose and remove the bulb on turning
it anticlock-wise
The rating of bulb is 21W/12V.There are one
bulb in high mount stop lamp.
63
6-10
Page 32 of 65

S0G-74E
OPERATING YOUR VEHICLE
OPERATING YOUR VEHICLE
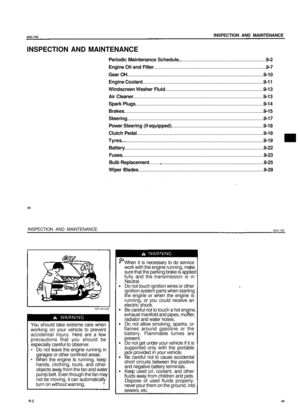
Exhaust Gas Warning 7-1
Daily Inspection Checklist 7-1
Starting the Engine 7-2
Using the Transmission 7-3
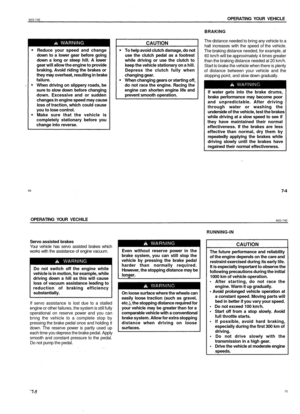
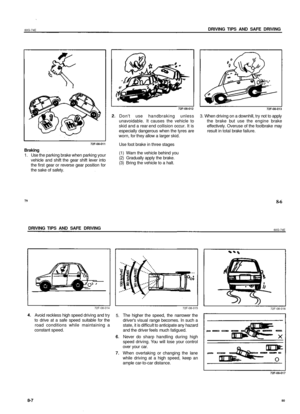
Braking 7-4
Running-in 7-5
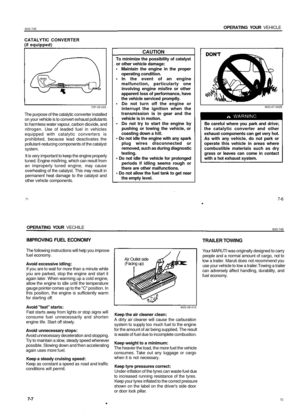
Catalytic Converter (if equipped) 7-6
Improving Fuel Economy 7-7
Trailer Towing 7-7
OPERATING YOUR VECHILE
60G-74E
EXHAUST GAS WARNING
DAILY INSPECTION CHECKLIST
60G-07-001E
Avoid breathing exhaust gases.
Exhaust gases contain carbon
monoxide, a potentially lethal gas that
is colourless and odourless. Since
carbon monoxide is difficult to detect
by itself, be sure to take the following
precautions to help prevent carbon
monoxide from entering your vehicle.
• Do not leave the engine running in
garages or other confined areas.
• Do not park with the engine running
for a long period of time, even in an
open area. If it is necessary to sit for
a short time in a parked vehicle <=>
with the engine running, make sure
the air intake lever is set to "FRESH
AIR" and the fan is at high speed.
To allow proper operation of your
vehicle's ventilation system, keep
the air inlet grille in front of the
windscreen clear of snow, leaves, or
other obstructions at all times.
Keep the exhaust tailpipe area clear
of snow and other material to help
reduce the buildup of exhaust gases
under the vehicle.This is particularly
important when parked in blizzard
conditions.
Have the exhaust system inspected
periodically for damage and leaks.
Any damage or leaks should be
repaired immediately.
7-1
70F-05-007
Before driving:
1) Make sure that windows, mirrors, lights,
and reflectors are clean and unobstructed.
2) Check the tyres.
3) Look for fluid and oil leaks.
NOTE:
It is normal for water to drip from the air
conditioning system after use.
4) Adjust the seat/head restraint.
5) Check the brake pedal and the parking
brake lever.
6) Adjust the mirrors.
7) Make sure that you and passengers have
properly fastened your seat belts.
8) Make sure that all warning lights come on
as the key is turned to the "ON" or "START'
position.
9) Check all gauges.
10) Make sure that the brake fluid level
warning light is off when the parking brake
is released with the ignition switch in "ON"
position.
66
65