1999 SUZUKI BALENO turn signal
[x] Cancel search: turn signalPage 7 of 65

60G-74E
BEFORE DRIVING
REMOTE KEYLESS ENTRY SYSTEM
Other Controls (if equipped)
KEYS
60G-50-001E
Remote keyless entry system is installed in
your vehicle. The general features of keyless
entry system are;
1. Remote lock/arming and remote unlock/
disarming.
2. Doors/trunk/bonnet protection.
3. Doors/trunk/bonnet open signal.
4. Personal protection alarm.
5. Mute lock/unlock.
6. Starter immobiliser.
7. Permanent siren chirp enable/disable
(programmable mode).
8. Two stage shock/impact sensor
(programmable mode).
9. Emergency disarm by personalised
PINCODE (programmable mode).
10. Car locator
11. Flashing LE.D.
15
Initially the system is programmed in factory
default. The features operative in factory
default are;
1. Remote lock/arming and remote unlock/
disarming.
2. Doors/trunk/bonnet protection.
3. Doors/trunk/bonnet open signal while
locking/arming.
4. Personal protection alarm.
5. Starter immobiliser.
6. Mute lock/unlock.
7. Permanent siren chirp enable/disable.
8. Emerging disarm by personalised
PINCODE.
9. Car locator.
10. Flashing LE.D.
The system can always be programmed back
to factory default for restoration of original
setting of the system.
For more detail and warranty condition, please
refer to the Owner's Manual of "Maruti Mobile
Security".
70F-01-003
Your vehicle comes with a pair of identical keys.
Keep the spare key in a safe place.
One key can open all of the locks on the vehicle.
The key identification number is stamped on a
metal tag provided with the keys. Keep
the tag in a safe place. If you lose your
keys, you will need this number to have
new keys made. Write the number down
and keep it in a safe accessible place away from
the vehicle.
NOTE:
Keep the spare key very carefully. When it
is lost, consult your dealer by quoting key number.
3-2
BEFORE DRIVING
60G-74E
DOOR LOCKS
60G-03-003
Ignition Key Reminder (if equipped)
A buzzer sounds intermittently to remind you
to remove the ignition key if it is in the ignition
switch when the driver's door is opened.
72F-03-002E
To lock a front door from outside the
vehicle:
a) Insert the key fully and turn the top of
the key toward the front of the vehicle,
or
b) Push in the lock knob down and hold
the door handle up as you close the
door.
To unlock a front door from outside the
vehicle, insert the key fully and turn the top
of the key toward the rear of the vehicle.
To lock a rear door from outside the vehicle,
push in the lock knob down and close the
door.
60G-03-004E
To lock a door from inside the vehicle, push
the lock knob down. Pull the lock knob up to
unlock the door.
3-3
16
Always lock all doors when driving.
Locking the door prevents occupants
from being thrown from the vehicle in
the event of an accident. It also helps
prevent unintentional opening of the
doors.
Page 15 of 65

60G-74E
STEERING COLUMN CONTROLS
STEERING COLUMN CONTROLS
ignition Switch 4.1
Lighting/Tum Signal Control Lever 4-2
Windscreen Wiper and Washer Lever 4-4
Horn 4.5
Rear Wiper and Washer(lf equipped) 4-5
31
STEERING COLUMN CONTROLS
60G-74E
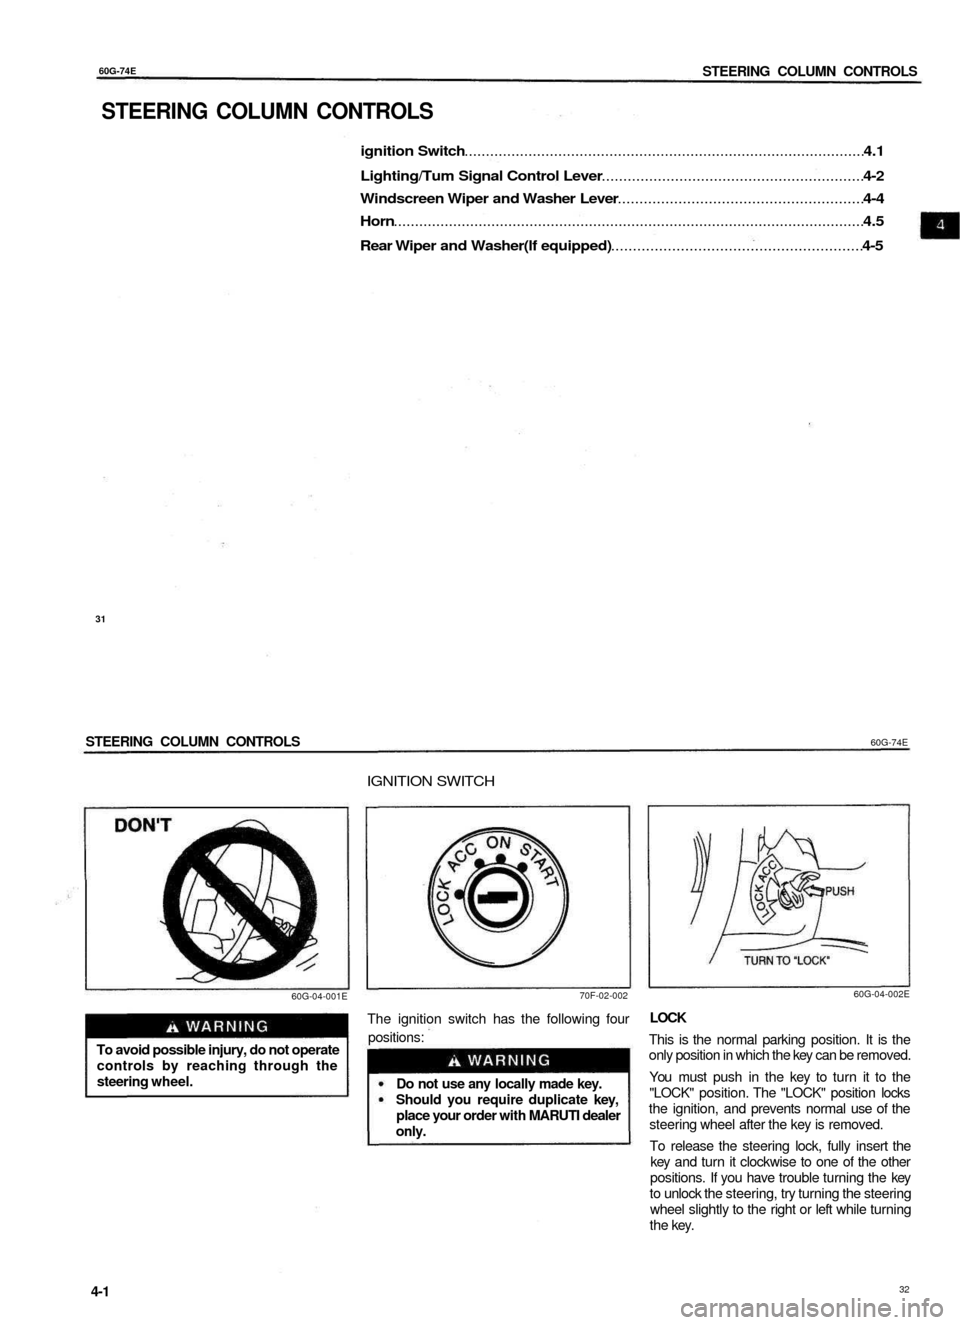
IGNITION SWITCH
60G-04-001E
70F-02-002
To avoid possible injury, do not operate
controls by reaching through the
steering wheel.
The ignition switch has the following four
positions:
Do not use any locally made key.
Should you require duplicate key,
place your order with MARUTI dealer
only.
60G-04-002E
LOCK
This is the normal parking position. It is the
only position in which the key can be removed.
You must push in the key to turn it to the
"LOCK" position. The "LOCK" position locks
the ignition, and prevents normal use of the
steering wheel after the key is removed.
To release the steering lock, fully insert the
key and turn it clockwise to one of the other
positions. If you have trouble turning the key
to unlock the steering, try turning the steering
wheel slightly to the right or left while turning
the key.
4-1
32
Page 16 of 65

6OG-74E
STEERING COLUMN CONTROLS
ACC
Accessories such as the radio can operate,
but the engine is off.
ON
This is the normal operating position. All
electrical systems are on.
START
This is the position for starting the engine using
the starter motor. The key should be released
from this position as soon as the engine starts.
Never remove the ignition key while
the vehicle is moving. The steering
wheel will lock and you will not be
able to steer the vehicle.
Do not leave children alone In a
parked vehicle. Unattended children
could cause accidental movement of
the vehicle, which could result in
severe personal Injury.
Always remove the key when parked
to prevent unintentional operation of
the vehicle and to improve security.
LIGHTING/TURN SIGNAL
CONTROL LEVER
CAUTION
Do not use the starter motor for
more than 15 seconds at a time. If
the engine does not start; wait 15
seconds before trying again. If the
engine does not start after several
attempts, check the fuel and ignition
systems or consult your MARUTI
dealer.
Do not leave the ignition switch in
the "ON" position if the engine is not
running as the battery will
discharge.
60G-04-003
This control lever is located on the outboard
side of the steering column. Operate the lever
as described below.
Lighting Operation
To turn the lights on or off, twist the knob on
the end of the lever. There are three positions:
in the "OFF" position all lights are off; in the
middle position the front parking lights, tail-
lights, registration plate light, and instrument
lights are on, but the headlights are off; in the
third position the headlights come on in
addition to the other lights.
33
4-2
STEERING COLUMN CONTROLS
60G-74E
With the headlights on, push the lever forward
to switch to the high beams (main beams) or
pull the lever toward you to switch to the low
beams. When the high beams (main beams)
are on, a light on the instrument panel will
come on. To flash the high beams (main
beams) pull the lever slightly towards you and
release it.
Lights "On" Reminder (if Equipped)
A buzzer/chime sounds to remind you to turn
off the lights if they are left on when the ignition
key is removed and the driver's door is opened.
Turn Signal Operation
With the ignition switch in the "ON" position,
move the lever up or down to activate the left
or right turn signals.
Normal Turn Signal
Move the lever clockwise until it clicks to signal
a right turn or anticlockwise to signal a left
turn. When the turn is completed, the signal
will cancel and the lever will return to its normal
position.
6OG-04-006
Lane Change Signal
Some times, such as when changing lanes,
the steering wheel is not turned far enough
to cancel the turn signal. For convenience,
you can flash the turn signal by moving the
lever part way and holding it there. The
lever will return to its normal position when
you release it.
4-3
34
60G-04-006
60G-04-005
60G-04-004E
Page 18 of 65

60G-74E
INSTRUMENT PANEL
INSTRUMENT PANEL
Instrument Panel 5-1
Instrument Cluster 5-2
Warning and Indicator Lights 5-3
Speedometer/Odometer/Tripmeter (if equipped) 5-5
Tachometer (if equipped) 5-6
Fuel Gauge 5-6
Temperature Gauge 5-6
Hazard Warning Switch 5-7
Rear Window Defroster Switch (if equipped) 5-7
Cigarette Lighter (if equipped) 5-7
Ashtray 5-8
Glove Box 5-8
Heating System (if equipped) 5-9
System Operating Instructions 5-10
Air Conditioning System (if equipped) 5-13
System Operating Instructions 5-13
37
INSTRUMENT PANEL
60G-74E
INSTRUMENT PANEL
1. Instrument cluster
2. Ignition switch
3. Lighting switch/Turn signal and
dimmer switch
4. Windscreen wiper and washer
switch
5. Hazard warning switch
6. Rear window defroster switch
(if equipped)
7. Other switches (if equipped)
8. Heater control panel
9. Audio system (if equipped)
10. Cigarette lighter (if equipped)
11. Ashtray
12. Bonnet release
13. Center ventilator
14. Side ventilator
15. Side defroster
16. Glove box
17. Fuse box
18. Cup holder (if equipped)
5-1
38
Page 20 of 65

60G-74E
INSTRUMENT PANEL
60G-09-002
CAUTION
If you operate the engine with this
light on, severe engine damage can
result.
Do not rely on the Oil Pressure Light
to indicate the need to add oil. Be
sure to periodically check the engine
oil level (see pages 9-8 and 9-9).
70F-03-009
Charging Light
This light comes on when the ignition switch
is turned on, and goes out when the engine is
started. The light will come on and remain on
if there is something wrong with the battery
charging system. If the light comes on when
the engine is running, the charging system
should be inspected immediately by your
MARUTI dealer.
CAUTION
Do not continue driving long with the
charging light ON as this will drain the
battery 'dead'.
72F-05-027
"Malfunction Indicator" Light
Your vehicle has a computer-controlled
emission control system. A "Malfunction
Indicator" light is provided on the instrument
panel to indicate when it is necessary to have
the emission control system serviced. The
"Malfunction Indicator" light comes on when
the ignition switch is turned to "ON" and goes
out when the engine is started.
If the "Malfunction Indicator" light comes on
when the engine is running, there is a problem
with the emission control system. Take the
vehicle to your MARUTI dealer to have the
problem corrected.
CAUTION
Continuing to drive the vehicle when
the "Malfunction Indicator" light is on
can cause permanent damage to the
vehicle's emission control system, and
can affect fuel economy and
driveability.
5-4
INSTRUMENT PANEL
60G-74E
70F-03-042
Turn Signal Indicators
When you turn on the left or right turn signals,
the corresponding green arrow on the
instrument panel will flash along with the
respective turn signal lights. When you turn
on the hazard warning switch, both arrows will
flash along with all of the turn signal lights.
70F-03-043
Main Beam (High Beam) Indicator Light
This indicator comes on when headlight main
beams (high beams) are turned on.
SPEEDOMETER/ODOMETER/
TRIPMETER (if equipped)
60G-05-003
© Speedometer
© Odometer
(D Trip meter
© Trip meter reset knob
The speedometer indicates vehicle speed in
km/h.The odometer records the total distance
the vehicle has been driven. The tripmeter can
be used to measure the distance travelled on
short trips or between fuel stops. You can reset
the tripmeter to zero by pushing the reset
knob.
CAUTION
Keep track of your odometer reading
and check the maintenance schedule
regularly for required services.
Increased wear or damage to certain
parts can result from failure to perform
required services at the proper mileage
intervals and your warranty rights may
be affected.
5-5
42
41
Page 21 of 65

60G-74E
INSTRUMENT PANEL
TACHOMETER (if equipped)
FUEL GAUGE
TEMPERATURE GAUGE
60G-05-004
The tachometer indicates engine speed in
revolutions per minute.
Never drive with the engine speed
indicator in the red zone or severe
engine damage can result.
60G-05-005
This gauge gives an approximate indication
of the amount of fuel in the fuel tank as shown
in figure. "P stands for full and "E" stands for
empty.
If the indicator gets in the red zone, refill the
tank as soon as possible.
Note:
This vehicle has fuel gauge of new design.
Even when the ignition switch is "OFF", the
needle will not return to "E" position but will
show the reading.
60G-05-006
When the ignition switch is on, this gauge
indicates the engine coolant temperature.
Under normal driving conditions, the indicator
should stay within the normal, acceptable
temperature range between "H" and "C". If the
indicator approaches "H", and maintains that
reading, overheating is indicated. Follow the
instructions for engine overheating in the
EMERGENCY REMEDIES section.
CAUTION
Continuing to drive the vehicle when
engine overheating is indicated, can
result in severe engine damage.
43
5-6
INSTRUMENT PANEL
60G-74E
HAZARD WARNING SWITCH
REAR WINDOW DEFROSTER SWITCH CIGARETTE LIGHTER (if equipped)
(if equipped)
60G-05-007
Push in the hazard warning switch to activate
the hazard warning lights. All four turn signal
lights and both turn signal indicators will flash
simultaneously. To turn off the lights, push the
switch again.
Use the hazard warning lights to warn other
traffic during emergency parking or when your
vehicle could otherwise become a traffic
hazard.
60G-05-008
When the rear window is misted, push this
switch to clear the window. An indicator light
will be lit when the defroster is on. The
defroster will only work when the ignition
switch is in the "ON position. To turn off the
defroster, push the switch again.
CAUTION
The rear window defroster uses a large
amount of electricity. Be sure to turn
off after the window has become clear.
60G-05-009
To use the cigarette lighter, push it all the way
into the receptacle and release it. It will
automatically heat up and will pop out to its
normal position when it is ready for use.
5-7
44
Page 38 of 65

60G-74E
DRIVING TIPS AND SAFE DRIVING
72F-08-004
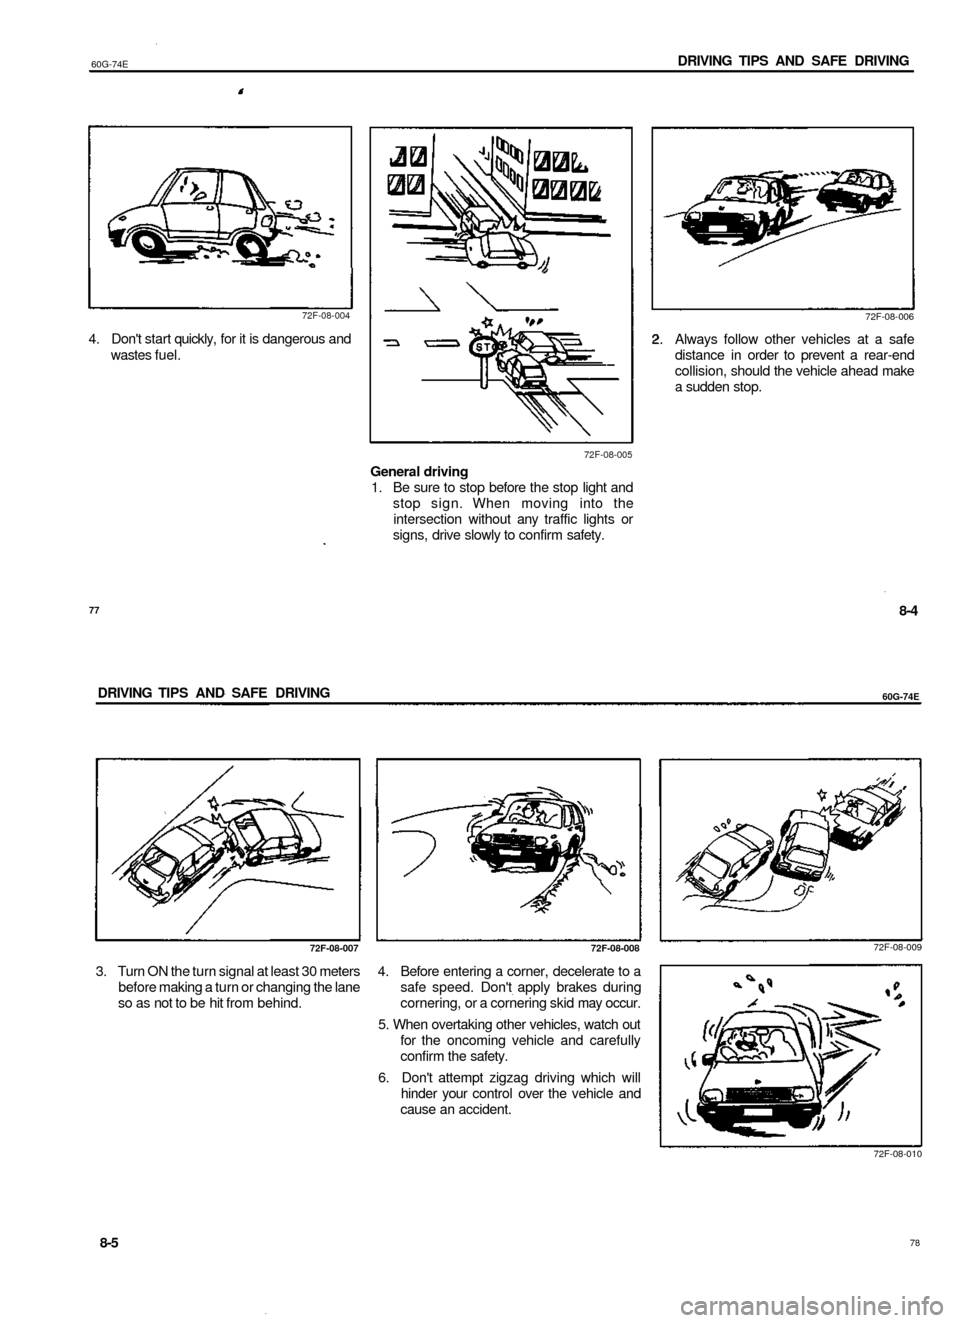
4. Don't start quickly, for it is dangerous and
wastes fuel.
72F-08-006
72F-08-005
General driving
1. Be sure to stop before the stop light and
stop sign. When moving into the
intersection without any traffic lights or
signs, drive slowly to confirm safety.
Always follow other vehicles at a safe
distance in order to prevent a rear-end
collision, should the vehicle ahead make
a sudden stop.
77
8-4
DRIVING TIPS AND SAFE DRIVING
60G-74E
72F-08-007 72F-08-008
72F-08-009
3.
Turn ON the turn signal at least 30 meters
before making a turn or changing the lane
so as not to be hit from behind.
4. Before entering a corner, decelerate to a
safe speed. Don't apply brakes during
cornering, or a cornering skid may occur.
5. When overtaking other vehicles, watch out
for the oncoming vehicle and carefully
confirm the safety.
6. Don't attempt zigzag driving which will
hinder your control over the vehicle and
cause an accident.
72F-08-010
8-5
78
Page 54 of 65

60G-74E
INSPECTION AND MAINTENANCE
60G-09-031
Headlights
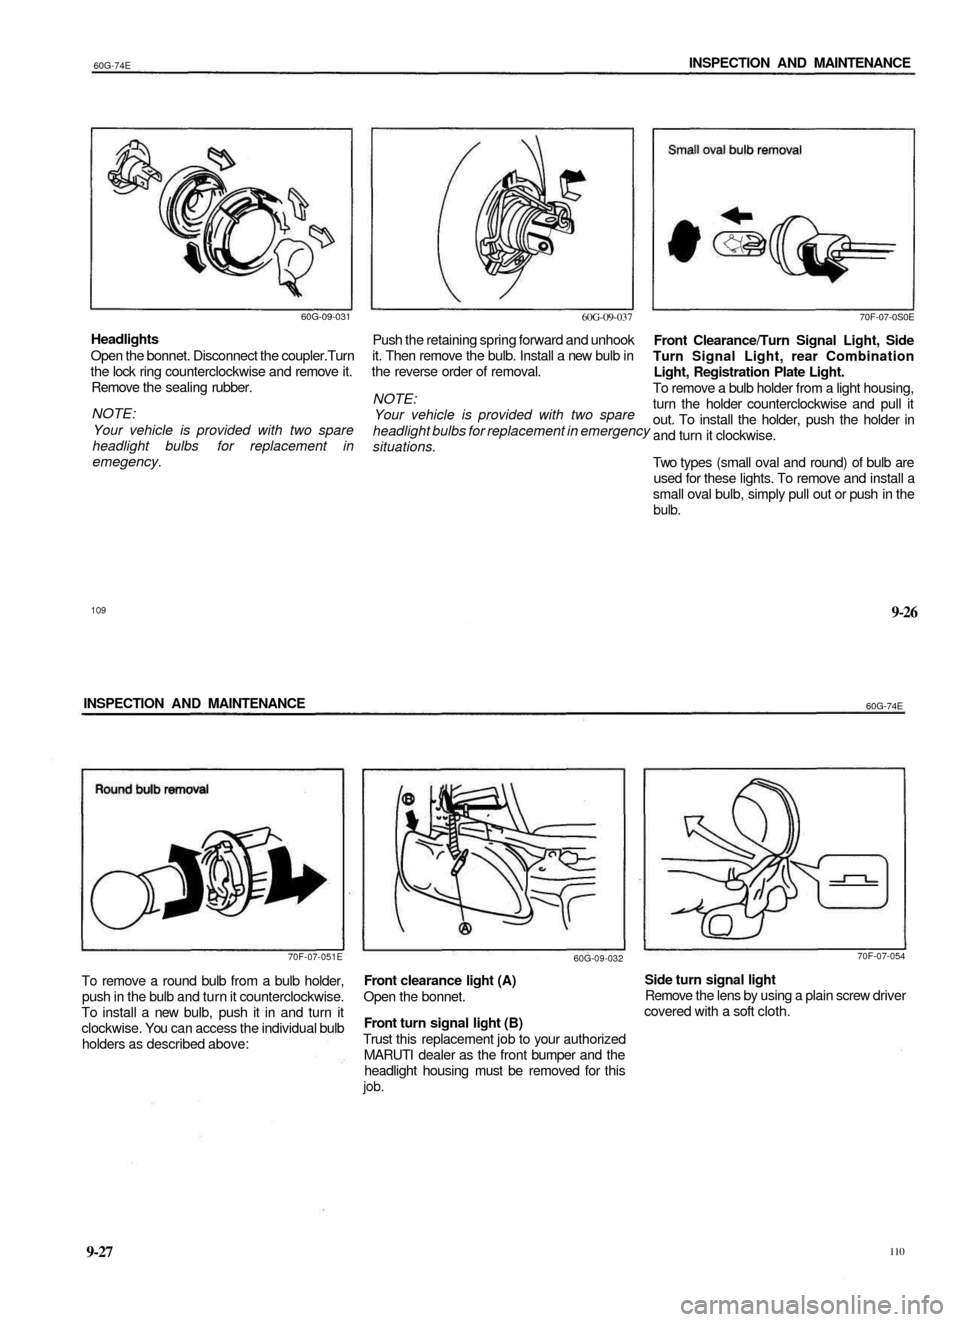
Open the bonnet. Disconnect the coupler.Turn
the lock ring counterclockwise and remove it.
Remove the sealing rubber.
NOTE:
Your vehicle is provided with two spare
headlight bulbs for replacement in
emegency.
60G-09-037
Push the retaining spring forward and unhook
it. Then remove the bulb. Install a new bulb in
the reverse order of removal.
NOTE:
Your vehicle is provided with two spare
headlight bulbs for replacement in emergency
situations.
70F-07-0S0E
Front Clearance/Turn Signal Light, Side
Turn Signal Light, rear Combination
Light, Registration Plate Light.
To remove a bulb holder from a light housing,
turn the holder counterclockwise and pull it
out. To install the holder, push the holder in
and turn it clockwise.
Two types (small oval and round) of bulb are
used for these lights. To remove and install a
small oval bulb, simply pull out or push in the
bulb.
109
9-26
INSPECTION AND MAINTENANCE
60G-74E
70F-07-051E
To remove a round bulb from a bulb holder,
push in the bulb and turn it counterclockwise.
To install a new bulb, push it in and turn it
clockwise. You can access the individual bulb
holders as described above:
60G-09-032
Front clearance light (A)
Open the bonnet.
Front turn signal light (B)
Trust this replacement job to your authorized
MARUTI dealer as the front bumper and the
headlight housing must be removed for this
job.
70F-07-054
Side turn signal light
Remove the lens by using a plain screw driver
covered with a soft cloth.
9-27
110