Page 17 of 65

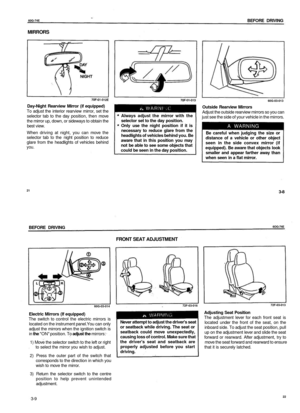
60G-74E
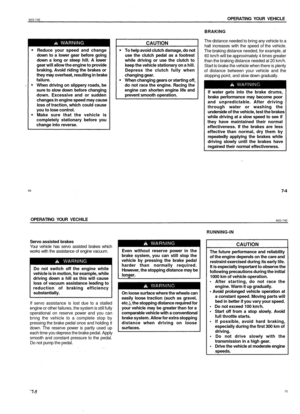
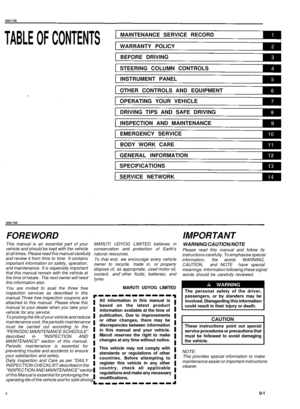
STEERING COLUMN CONTROLS
WINDSCREEN WIPER AND
WASHER LEVER
60G-04-007E
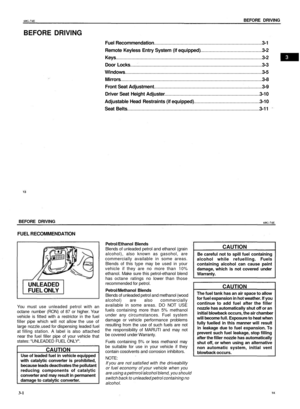
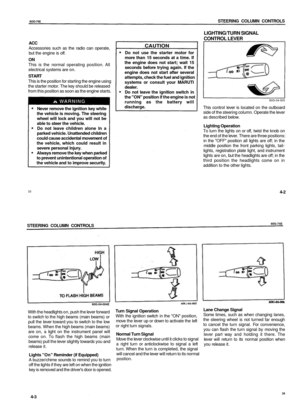
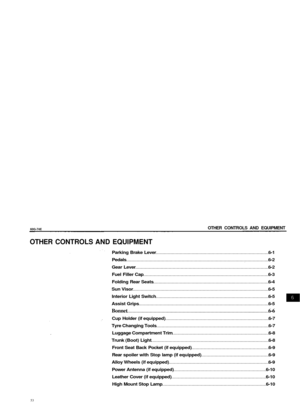
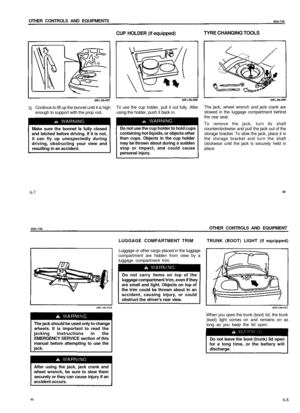
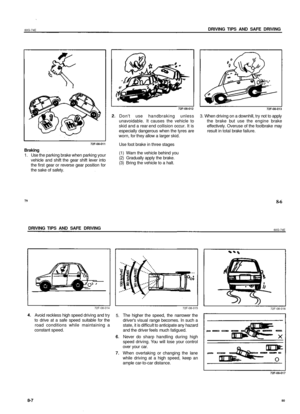
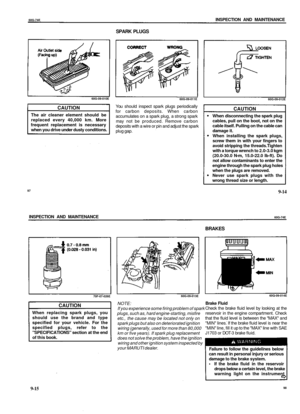
Windscreen Wipers
To turn the windscreen wipers on, move the
lever down to one of the three operating
positions. In the "INT position (if equipped),
the wipers operate intermittently. The "INT'
position is very convenient for driving in mist
or light rain. In the "LO" position, the wipers
operate at a steady low speed. In the "HI"
position, the wipers operate at a steady high
speed. To turn off the wipers, move the lever
back to the "OFF position.
60G-04-008E
If the lever is equipped with "INT TIME" control,
turn the control toward the "SLOW" or "FAST'
positions to adjust the intermittent wiper
operation to the desired interval.
60G-04-011E
The operation of windscreen wiper and washer
Type-2 is same as Type-1.
60G-04-009E
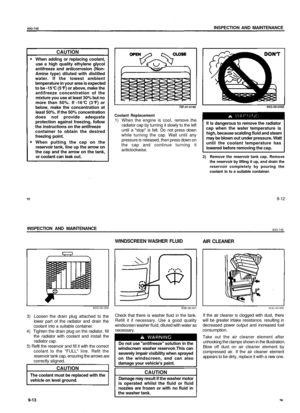
Windscreen Washer
To spray windscreen washer fluid, pull the
lever toward you. The windscreen wipers will
automatically turn on at low speed if
they are not already on and the "INT" position
is equipped.
To prevent windscreen icing in cold
weather, turn on the defroster to heat
the windscreen before and during
windscreen washer use.
Do not use radiator antifreeze in the
windscreen washer reservoir. It can
severely impair visibility when
sprayed on the windscreen, and can
also damage your vehicle's paint.
35
4-4
STEERING COLUMN CONTROLS
60G-74E
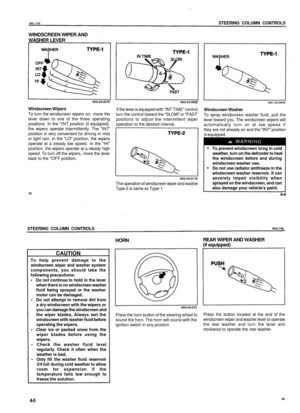
CAUTION
To help prevent damage to the
windscreen wiper and washer system
components, you should take the
following precautions:
• Do not continue to hold in the lever
when there is no windscreen washer
fluid being sprayed or the washer
motor can be damaged.
• Do not attempt to remove dirt from
a dry windscreen with the wipers or
you can damage the windscreen and
the wiper blades. Always wet the
windscreen with washer fluid before
operating the wipers.
• Clear ice or packed snow from the
wiper blades before using the
wipers.
• Check the washer fluid level
regularly. Check it often when the
weather is bad.
• Only fill the washer fluid reservoir
3/4 full during cold weather to allow
room for expansion if the
temperature falls low enough to
freeze the solution.
HORN
REAR WIPER AND WASHER
(if equipped)
60G-04-010
Press the horn button of the steering wheel to
sound the horn. The horn will sound with the
ignition switch in any position.
Press the button located at the end of the
windscreen wiper and washer lever to operate
the rear washer and turn the lever anti
clockwise to operate the rear washer.
4-5
36
Page 18 of 65
 5-5
Tachometer (if equipped)")
60G-74E
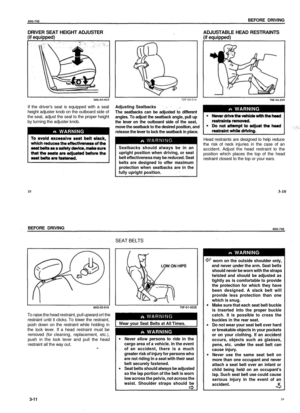
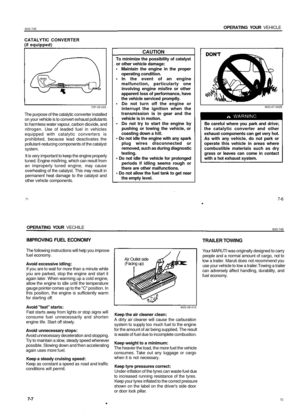
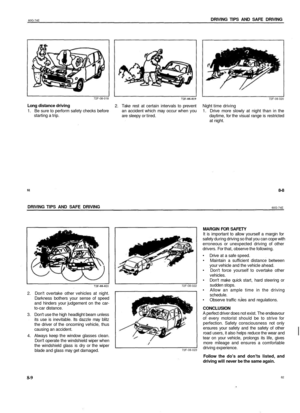
INSTRUMENT PANEL
INSTRUMENT PANEL
Instrument Panel 5-1
Instrument Cluster 5-2
Warning and Indicator Lights 5-3
Speedometer/Odometer/Tripmeter (if equipped) 5-5
Tachometer (if equipped) 5-6
Fuel Gauge 5-6
Temperature Gauge 5-6
Hazard Warning Switch 5-7
Rear Window Defroster Switch (if equipped) 5-7
Cigarette Lighter (if equipped) 5-7
Ashtray 5-8
Glove Box 5-8
Heating System (if equipped) 5-9
System Operating Instructions 5-10
Air Conditioning System (if equipped) 5-13
System Operating Instructions 5-13
37
INSTRUMENT PANEL
60G-74E
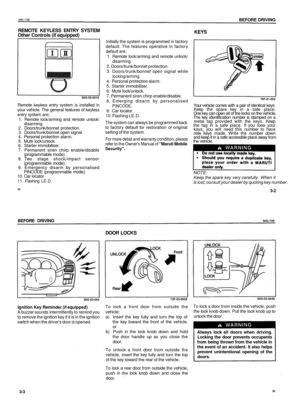
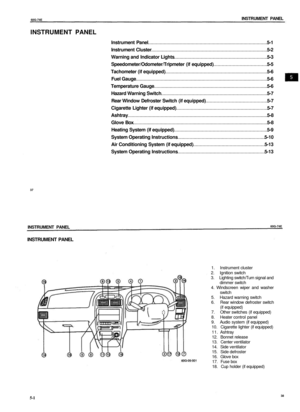
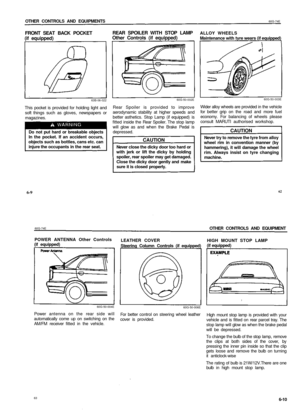
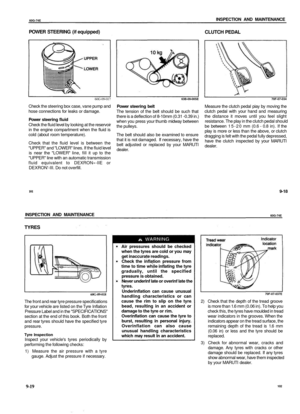
INSTRUMENT PANEL
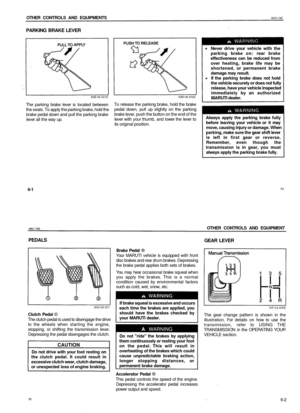
1. Instrument cluster
2. Ignition switch
3. Lighting switch/Turn signal and
dimmer switch
4. Windscreen wiper and washer
switch
5. Hazard warning switch
6. Rear window defroster switch
(if equipped)
7. Other switches (if equipped)
8. Heater control panel
9. Audio system (if equipped)
10. Cigarette lighter (if equipped)
11. Ashtray
12. Bonnet release
13. Center ventilator
14. Side ventilator
15. Side defroster
16. Glove box
17. Fuse box
18. Cup holder (if equipped)
5-1
38
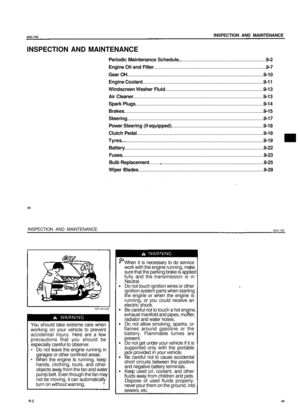
Page 19 of 65

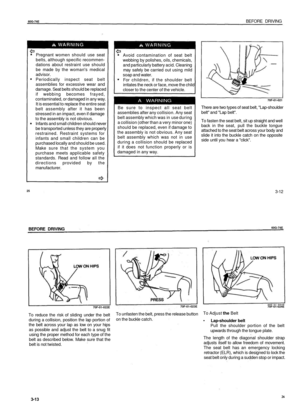
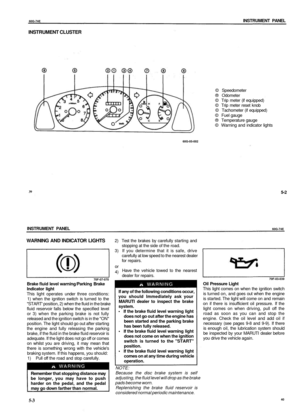
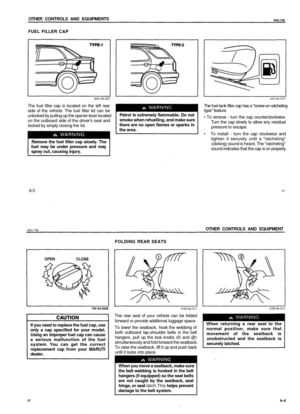
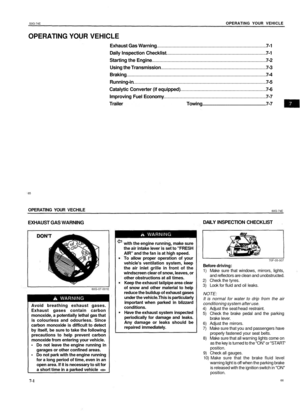
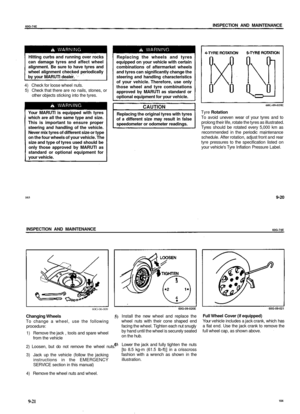
© Trip meter reset knob
© Tachometer (if equipped)
© Fuel gauge
® Temperature gauge
©")
60G-74E
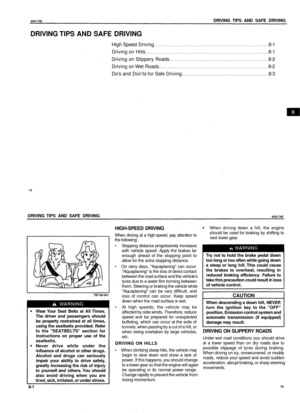
INSTRUMENT PANEL
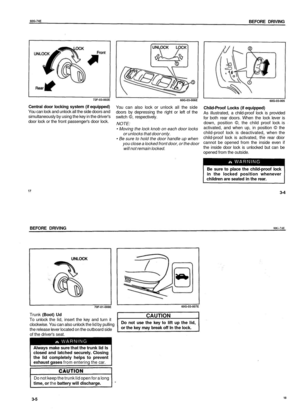
INSTRUMENT CLUSTER
© Speedometer
® Odometer
© Trip meter (if equipped)
© Trip meter reset knob
© Tachometer (if equipped)
© Fuel gauge
® Temperature gauge
© Warning and indicator lights
60G-05-002
39
5-2
INSTRUMENT PANEL
60G-74E
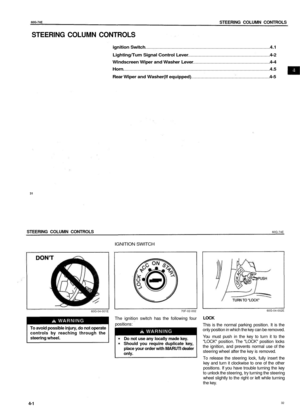
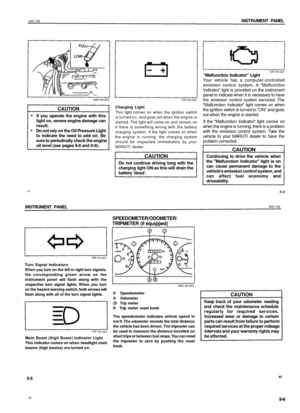
WARNING AND INDICATOR LIGHTS
70F-07-070
Brake fluid level warning/Parking Brake
Indicator light
This light operates under three conditions:
1) when the ignition switch is turned to the
"START' position, 2) when the fluid in the brake
fluid reservoir falls below the specified level
or 3) when the parking brake is not fully
released and the ignition switch is in the "ON"
position. The light should go out after starting
the engine and fully releasing the parking
brake, if the fluid in the brake fluid reservoir is
adequate. If the light does not go off or comes
on whilst you are driving, it may mean that
there is something wrong with the vehicle's
braking system. If this happens, you should:
1) Pull off the road and stop carefully.
Remember that stopping distance may
be longer, you may have to push
harder on the pedal, and the pedal
may go down farther than normal.
2) Test the brakes by carefully starting and
stopping at the side of the road.
3) If you determine that it is safe, drive
carefully at low speed to the nearest dealer
for repairs.
Have the vehicle towed to the nearest
dealer for repairs.
or
4)
If any of the following conditions occur,
you should Immediately ask your
MARUTI dealer to inspect the brake
system.
• If the brake fluid level warning light
does not go out after the engine has
been started and the parking brake
has been fully released.
• If the brake fluid level warning light
does not come on when the ignition
switch is turned to the "START"
position.
• If the brake fluid level warning light
comes on at any time during vehicle
operation.
NOTE:
Because the disc brake system is self
adjusting, the fluid level will drop as the brake
pads become worn.
Replenishing the brake fluid reservoir is
considered normal periodic maintenance.
70F-03-039
Oil Pressure Light
This light comes on when the ignition switch
is turned on, and goes out when the engine
is started. The light will come on and remain
on if there is insufficient oil pressure. If the
light comes on when driving, pull off the
road as soon as you can and stop the
engine. Check the oil level and add oil if
necessary (see pages 9-8 and 9-9). If there
is enough oil, the lubrication system should
be inspected by your MARUTI dealer before
you drive the vehicle again.
5-3
40
Page 20 of 65

60G-74E
INSTRUMENT PANEL
60G-09-002
CAUTION
If you operate the engine with this
light on, severe engine damage can
result.
Do not rely on the Oil Pressure Light
to indicate the need to add oil. Be
sure to periodically check the engine
oil level (see pages 9-8 and 9-9).
70F-03-009
Charging Light
This light comes on when the ignition switch
is turned on, and goes out when the engine is
started. The light will come on and remain on
if there is something wrong with the battery
charging system. If the light comes on when
the engine is running, the charging system
should be inspected immediately by your
MARUTI dealer.
CAUTION
Do not continue driving long with the
charging light ON as this will drain the
battery 'dead'.
72F-05-027
"Malfunction Indicator" Light
Your vehicle has a computer-controlled
emission control system. A "Malfunction
Indicator" light is provided on the instrument
panel to indicate when it is necessary to have
the emission control system serviced. The
"Malfunction Indicator" light comes on when
the ignition switch is turned to "ON" and goes
out when the engine is started.
If the "Malfunction Indicator" light comes on
when the engine is running, there is a problem
with the emission control system. Take the
vehicle to your MARUTI dealer to have the
problem corrected.
CAUTION
Continuing to drive the vehicle when
the "Malfunction Indicator" light is on
can cause permanent damage to the
vehicle's emission control system, and
can affect fuel economy and
driveability.
5-4
INSTRUMENT PANEL
60G-74E
70F-03-042
Turn Signal Indicators
When you turn on the left or right turn signals,
the corresponding green arrow on the
instrument panel will flash along with the
respective turn signal lights. When you turn
on the hazard warning switch, both arrows will
flash along with all of the turn signal lights.
70F-03-043
Main Beam (High Beam) Indicator Light
This indicator comes on when headlight main
beams (high beams) are turned on.
SPEEDOMETER/ODOMETER/
TRIPMETER (if equipped)
60G-05-003
© Speedometer
© Odometer
(D Trip meter
© Trip meter reset knob
The speedometer indicates vehicle speed in
km/h.The odometer records the total distance
the vehicle has been driven. The tripmeter can
be used to measure the distance travelled on
short trips or between fuel stops. You can reset
the tripmeter to zero by pushing the reset
knob.
CAUTION
Keep track of your odometer reading
and check the maintenance schedule
regularly for required services.
Increased wear or damage to certain
parts can result from failure to perform
required services at the proper mileage
intervals and your warranty rights may
be affected.
5-5
42
41
Page 21 of 65

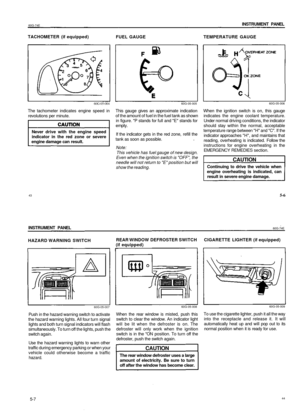
FUEL GAUGE
TEMPERATURE GAUGE
60G-05-004
The tachometer indicates engine speed in
revolutions per minute.
Never drive with the engine speed
i")
60G-74E
INSTRUMENT PANEL
TACHOMETER (if equipped)
FUEL GAUGE
TEMPERATURE GAUGE
60G-05-004
The tachometer indicates engine speed in
revolutions per minute.
Never drive with the engine speed
indicator in the red zone or severe
engine damage can result.
60G-05-005
This gauge gives an approximate indication
of the amount of fuel in the fuel tank as shown
in figure. "P stands for full and "E" stands for
empty.
If the indicator gets in the red zone, refill the
tank as soon as possible.
Note:
This vehicle has fuel gauge of new design.
Even when the ignition switch is "OFF", the
needle will not return to "E" position but will
show the reading.
60G-05-006
When the ignition switch is on, this gauge
indicates the engine coolant temperature.
Under normal driving conditions, the indicator
should stay within the normal, acceptable
temperature range between "H" and "C". If the
indicator approaches "H", and maintains that
reading, overheating is indicated. Follow the
instructions for engine overheating in the
EMERGENCY REMEDIES section.
CAUTION
Continuing to drive the vehicle when
engine overheating is indicated, can
result in severe engine damage.
43
5-6
INSTRUMENT PANEL
60G-74E
HAZARD WARNING SWITCH
REAR WINDOW DEFROSTER SWITCH CIGARETTE LIGHTER (if equipped)
(if equipped)
60G-05-007
Push in the hazard warning switch to activate
the hazard warning lights. All four turn signal
lights and both turn signal indicators will flash
simultaneously. To turn off the lights, push the
switch again.
Use the hazard warning lights to warn other
traffic during emergency parking or when your
vehicle could otherwise become a traffic
hazard.
60G-05-008
When the rear window is misted, push this
switch to clear the window. An indicator light
will be lit when the defroster is on. The
defroster will only work when the ignition
switch is in the "ON position. To turn off the
defroster, push the switch again.
CAUTION
The rear window defroster uses a large
amount of electricity. Be sure to turn
off after the window has become clear.
60G-05-009
To use the cigarette lighter, push it all the way
into the receptacle and release it. It will
automatically heat up and will pop out to its
normal position when it is ready for use.
5-7
44
Page 22 of 65

60G-74E
INSTRUMENT PANEL
ASHTRAY
GLOVE BOX
60G-05-010
843-05-011E
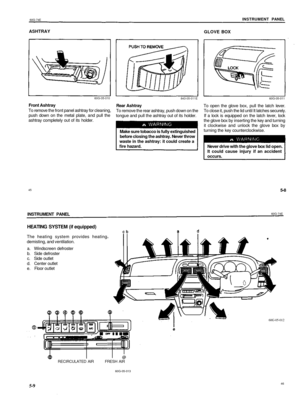
Front Ashtray
To remove the front panel ashtray for cleaning,
push down on the metal plate, and pull the
ashtray completely out of its holder.
Rear Ashtray
To remove the rear ashtray, push down on the
tongue and pull the ashtray out of its holder.
Make sure tobacco is fully extinguished
before closing the ashtray. Never throw
waste in the ashtray: it could create a
fire hazard.
60G-05-011
To open the glove box, pull the latch lever.
To close it, push the lid until It latches securely.
If a lock is equipped on the latch lever, lock
the glove box by inserting the key and turning
it clockwise and unlock the glove box by
turning the key counterclockwise.
Never drive with the glove box lid open.
It could cause injury if an accident
occurs.
45
5-8
INSTRUMENT PANEL
60G-74E
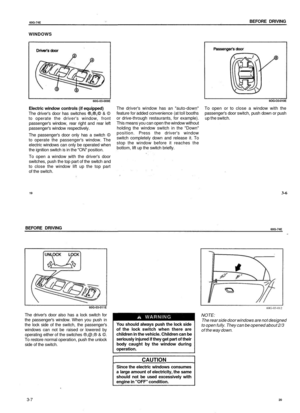
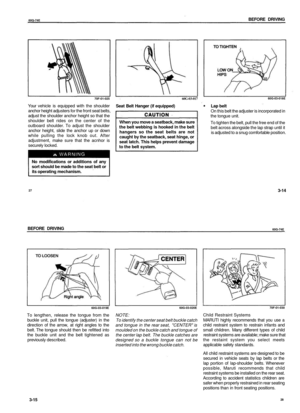
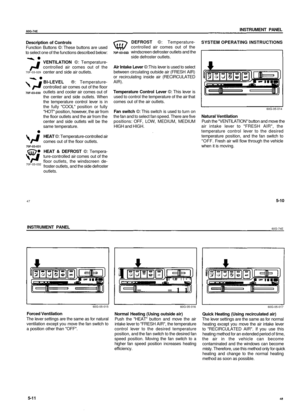
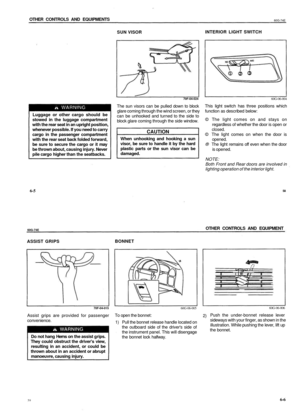
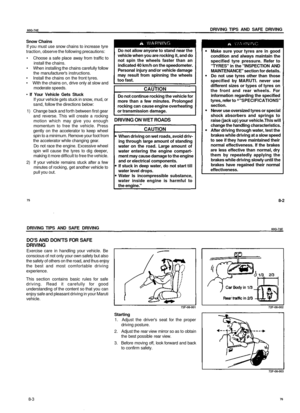
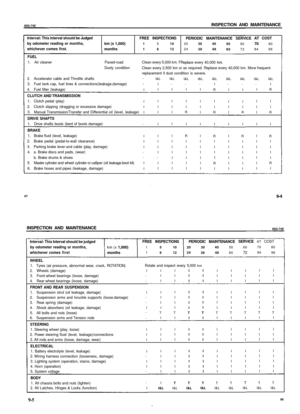
HEATING SYSTEM (if equipped)
The heating system provides heating
demisting, and ventilation.
a. Windscreen defroster
b. Side defroster
c. Side outlet
d. Center outlet
e. Floor outlet
60G-05-012
@
RECIRCULATED AIR FRESH AIR
60G-05-013
5-9
46
Page 23 of 65

60G-74E
INSTRUMENT PANEL
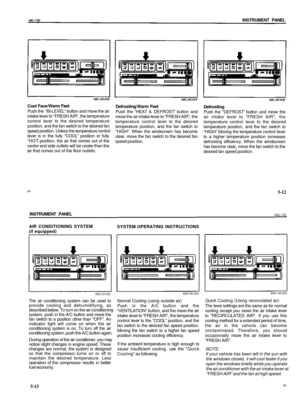
Description of Controls
Function Buttons ©: These buttons are used
to select one of the functions described below:
VENTILATION ©: Temperature-
controlled air comes out of the
center and side air outlets.
BI-LEVEL ®: Temperature-
controlled air comes out of the floor
outlets and cooler air comes out of
the center and side outlets. When
the temperature control lever is in
the fully "COOL" position or fully
"HOT" position, however, the air from
the floor outlets and the air from the
center and side outlets will be the
same temperature.
HEAT ©: Temperature-controlled air
comes out of the floor outlets.
HEAT & DEFROST ©: Tempera-
ture-controlled air comes out of the
floor outlets, the windscreen de-
froster outlets, and the side defroster
outlets.
DEFROST ©: Temperature-
controlled air comes out of the
windscreen defroster outlets and the
side defroster outlets.
Air Intake Lever ©:This lever is used to select
between circulating outside air (FRESH AIR)
or recirculating inside air (RECIRCULATED
AIR).
Temperature Control Lever ©: This lever is
used to control the temperature of the air that
comes out of the air outlets.
Fan switch ©: This switch is used to turn on
the fan and to select fan speed. There are five
positions: OFF, LOW, MEDIUM, MEDIUM
HIGH and HIGH.
SYSTEM OPERATING INSTRUCTIONS
60G-05-014
Natural Ventilation
Push the "VENTILATION" button and move the
air intake lever to "FRESH AIR", the
temperature control lever to the desired
temperature position, and the fan switch to
"OFF. Fresh air will flow through the vehicle
when it is moving.
70F-03-032
47
5-10
INSTRUMENT PANEL
60G-74E
60G-05-015
Forced Ventilation
The lever settings are the same as for natural
ventilation except you move the fan switch to
a position other than "OFF".
1
I
*
A/C
1
OFF
| | ••
= =11
60G-05-016
Normal Heating (Using outside air)
Push the "HEAT" button and move the air
intake lever to "FRESH AIR", the temperature
control lever to the desired temperature
position, and the fan switch to the desired fan
speed position. Moving the fan switch to a
higher fan speed position increases heating
efficiency.
60G-05-017
Quick Heating (Using recirculated air)
The lever settings are the same as for normal
heating except you move the air intake lever
to "RECIRCULATED AIR". If you use this
heating method for an extended period of time,
the air in the vehicle can become
contaminated and the windows can become
misty. Therefore, use this method only for quick
heating and change to the normal heating
method as soon as possible.
5-11
70F-03-031
70F-03-030
70F-03-029
Page 24 of 65

60G-74E
INSTRUMENT PANEL
60G-05-018
Cool Face/Warm Feet
Push the "BI-LEVEL" button and move the air
intake lever to "FRESH AIR", the temperature
control lever to the desired temperature
position, and the fan switch to the desired fan
speed position. Unless the temperature control
lever is in the fully "COOL" position or fully
"HOT position, the air that comes out of the
center and side outlets will be cooler than the
air that comes out of the floor outlets.
60G-05-019
Defrosting/Warm Feet
Push the "HEAT & DEFROST' button and
move the air intake lever to "FRESH AIR", the
temperature control lever to the desired
temperature position, and the fan switch to
"HIGH". When the windscreen has become
clear, move the fan switch to the desired fan
speed position.
60G-05-020
Defrosting
Push the "DEFROST' button and move the
air intake lever to "FRESH AIR", the
temperature control lever to the desired
temperature position, and the fan switch to
"HIGH" Moving the temperature control lever
to a higher temperature position increases
defrosting efficiency. When the windscreen
has become clear, move the fan switch to the
desired fan speed position.
49
5-12
INSTRUMENT PANEL
60G-74E
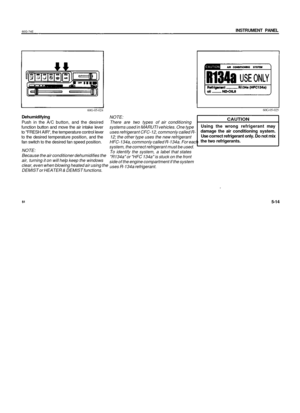
AIR CONDITIONING SYSTEM
(if equipped)
SYSTEM OPERATING INSTRUCTIONS
60G-05-021
The air conditioning system can be used to
provide cooling and dehumidifying, as
described below. To turn on the air conditioning
system, push in the A/C button and move the
fan switch to a position other than "OFF". An
indicator light will come on when the air
conditioning system is on. To turn off the air
conditioning system, push the A/C button again.
During operation of the air conditioner, you may
notice slight changes in engine speed. These
changes are normal, the system is designed
so that the compressor turns on or off to
maintain the desired temperature. Less
operation of the compressor results in better
fuel economy.
60G-05-022
Normal Cooling (using outside air)
Push in the A/C button and the
"VENTILATION" button, and the move the air
intake lever to "FRESH AIR", the temperature
control lever to the "COOL" position, and the
fan switch to the desired fan speed position.
Moving the fan switch to a higher fan speed
position increases cooling efficiency.
If the ambient temperature is high enough to
cause insufficient cooling, use the "Quick
Cooling" as following.
60G -05-023
Quick Cooling (Using recirculated air)
The lever settings are the same as for normal
cooling except you move the air intake lever
to "RECIRCULATED AIR". If you use this
cooling method for a extended period of time,
the air in the vehicle can become
contaminated. Therefore, you should
occasionally move the air intake lever to
"FRESH AIR".
NOTE:
If your vehicle has been left in the sun with
the windows closed, it will cool faster if you
open the windows briefly while you operate
the air conditioner with the air intake lever at
"FRESH AIR" and the fan at high speed.
5-13
50