Page 658 of 3342
B3M0042A
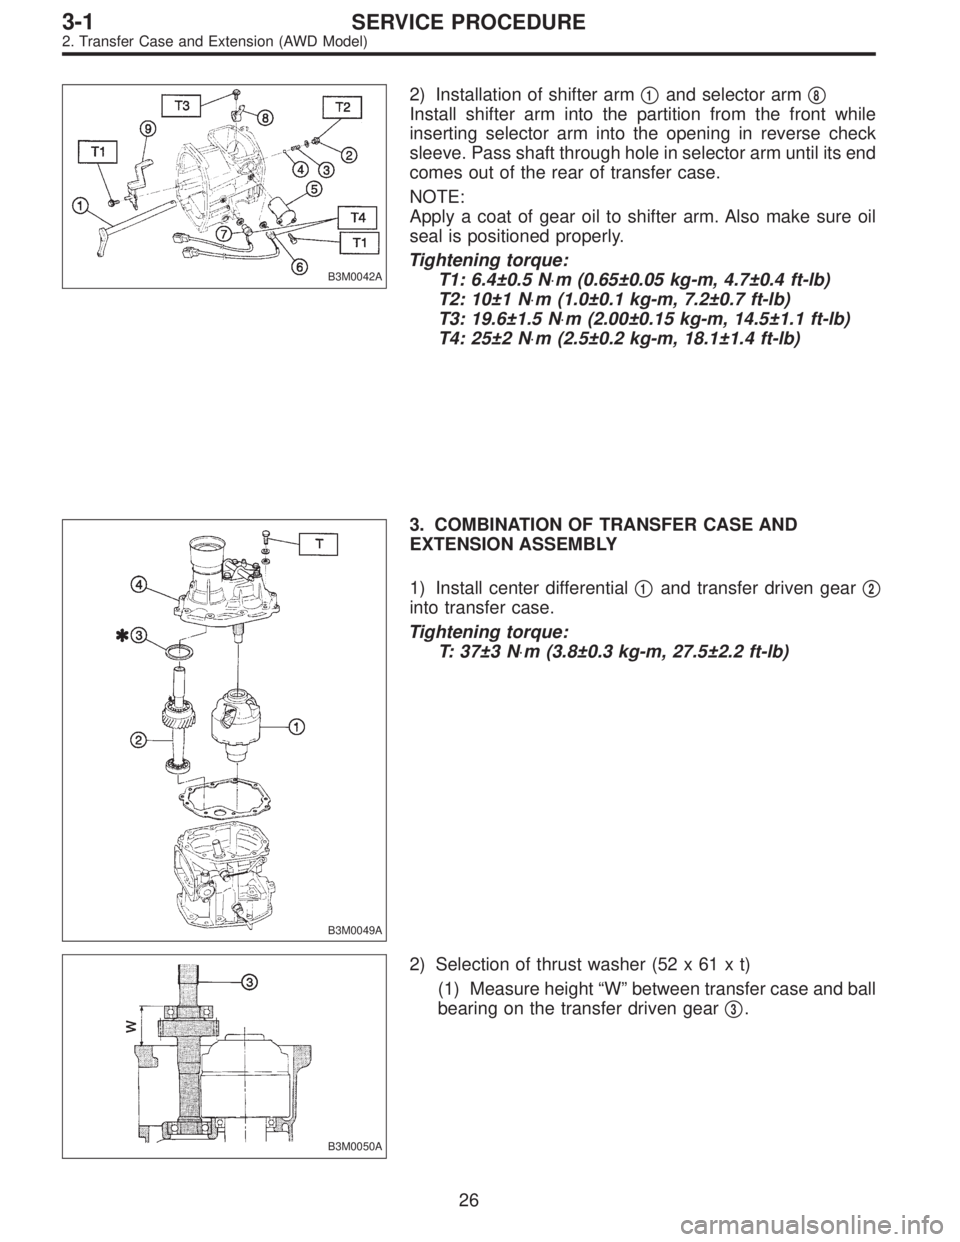
2) Installation of shifter arm�1and selector arm�8
Install shifter arm into the partition from the front while
inserting selector arm into the opening in reverse check
sleeve. Pass shaft through hole in selector arm until its end
comes out of the rear of transfer case.
NOTE:
Apply a coat of gear oil to shifter arm. Also make sure oil
seal is positioned properly.
Tightening torque:
T1: 6.4±0.5 N⋅m (0.65±0.05 kg-m, 4.7±0.4 ft-lb)
T2: 10±1 N⋅m (1.0±0.1 kg-m, 7.2±0.7 ft-lb)
T3: 19.6±1.5 N⋅m (2.00±0.15 kg-m, 14.5±1.1 ft-lb)
T4: 25±2 N⋅m (2.5±0.2 kg-m, 18.1±1.4 ft-lb)
B3M0049A
3. COMBINATION OF TRANSFER CASE AND
EXTENSION ASSEMBLY
1) Install center differential�
1and transfer driven gear�2
into transfer case.
Tightening torque:
T: 37±3 N⋅m (3.8±0.3 kg-m, 27.5±2.2 ft-lb)
B3M0050A
2) Selection of thrust washer (52 x 61 x t)
(1) Measure height“W”between transfer case and ball
bearing on the transfer driven gear�
3.
26
3-1SERVICE PROCEDURE
2. Transfer Case and Extension (AWD Model)
Page 666 of 3342
G3M0598
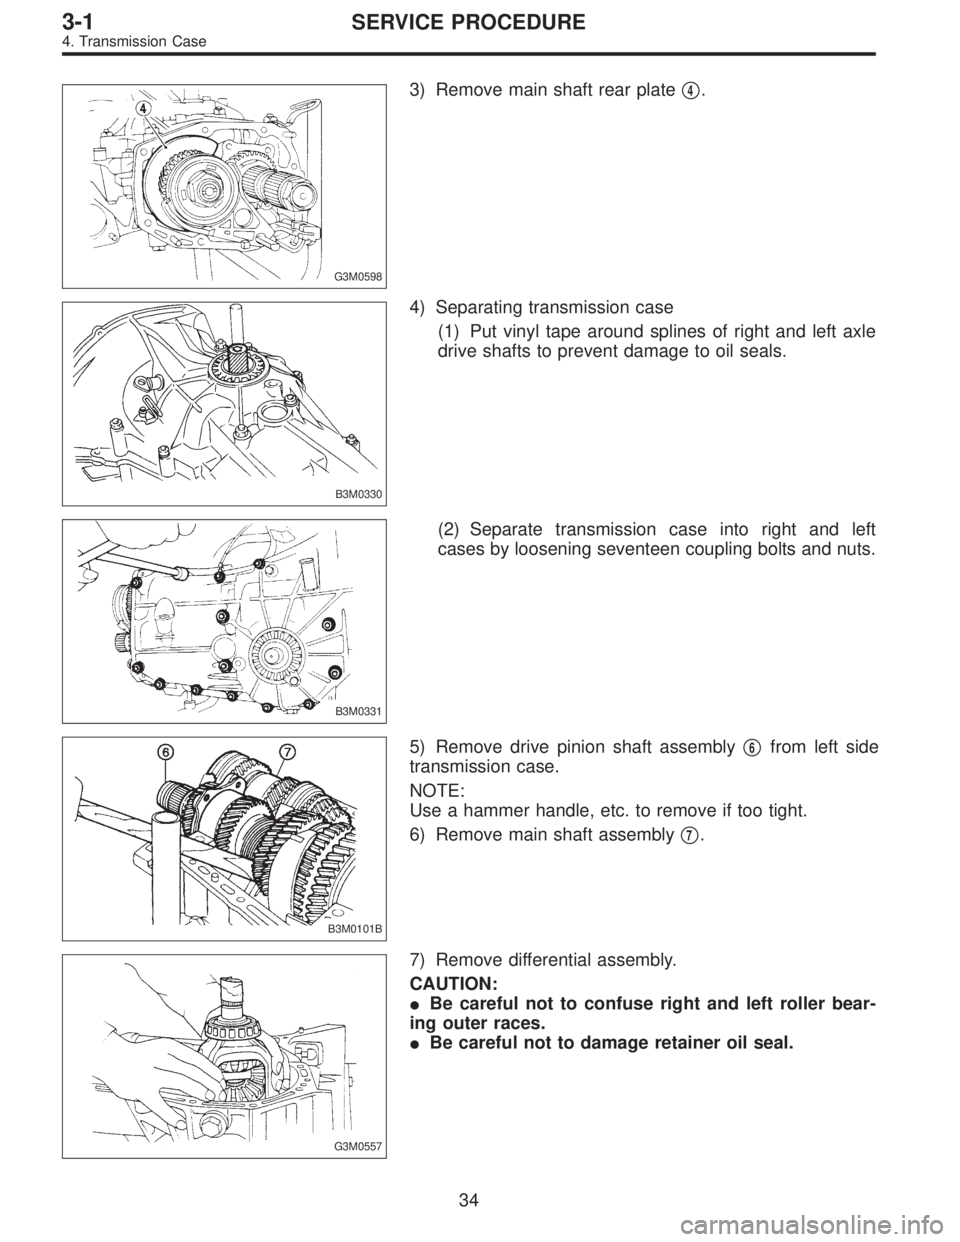
3) Remove main shaft rear plate�4.
B3M0330
4) Separating transmission case
(1) Put vinyl tape around splines of right and left axle
drive shafts to prevent damage to oil seals.
B3M0331
(2) Separate transmission case into right and left
cases by loosening seventeen coupling bolts and nuts.
B3M0101B
5) Remove drive pinion shaft assembly�6from left side
transmission case.
NOTE:
Use a hammer handle, etc. to remove if too tight.
6) Remove main shaft assembly�
7.
G3M0557
7) Remove differential assembly.
CAUTION:
�Be careful not to confuse right and left roller bear-
ing outer races.
�Be careful not to damage retainer oil seal.
34
3-1SERVICE PROCEDURE
4. Transmission Case
Page 668 of 3342
B3M0333B
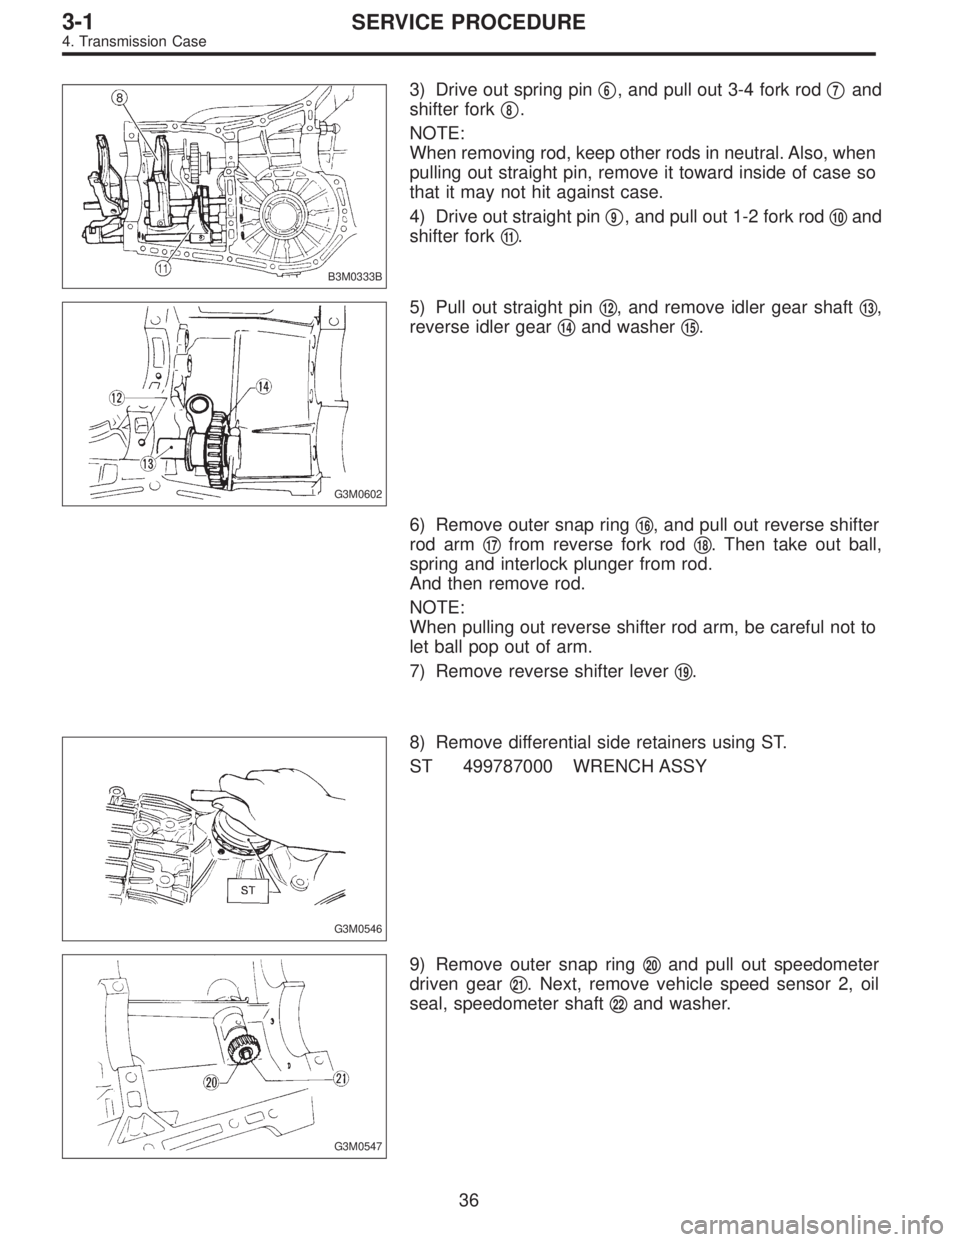
3) Drive out spring pin�6, and pull out 3-4 fork rod�7and
shifter fork�
8.
NOTE:
When removing rod, keep other rods in neutral. Also, when
pulling out straight pin, remove it toward inside of case so
that it may not hit against case.
4) Drive out straight pin�
9, and pull out 1-2 fork rod�10and
shifter fork�
11.
G3M0602
5) Pull out straight pin�12, and remove idler gear shaft�13,
reverse idler gear�
14and washer�15.
6) Remove outer snap ring�
16, and pull out reverse shifter
rod arm�
17from reverse fork rod�18. Then take out ball,
spring and interlock plunger from rod.
And then remove rod.
NOTE:
When pulling out reverse shifter rod arm, be careful not to
let ball pop out of arm.
7) Remove reverse shifter lever�
19.
G3M0546
8) Remove differential side retainers using ST.
ST 499787000 WRENCH ASSY
G3M0547
9) Remove outer snap ring�20and pull out speedometer
driven gear�
21. Next, remove vehicle speed sensor 2, oil
seal, speedometer shaft�
22and washer.
36
3-1SERVICE PROCEDURE
4. Transmission Case
Page 675 of 3342
G3M0557
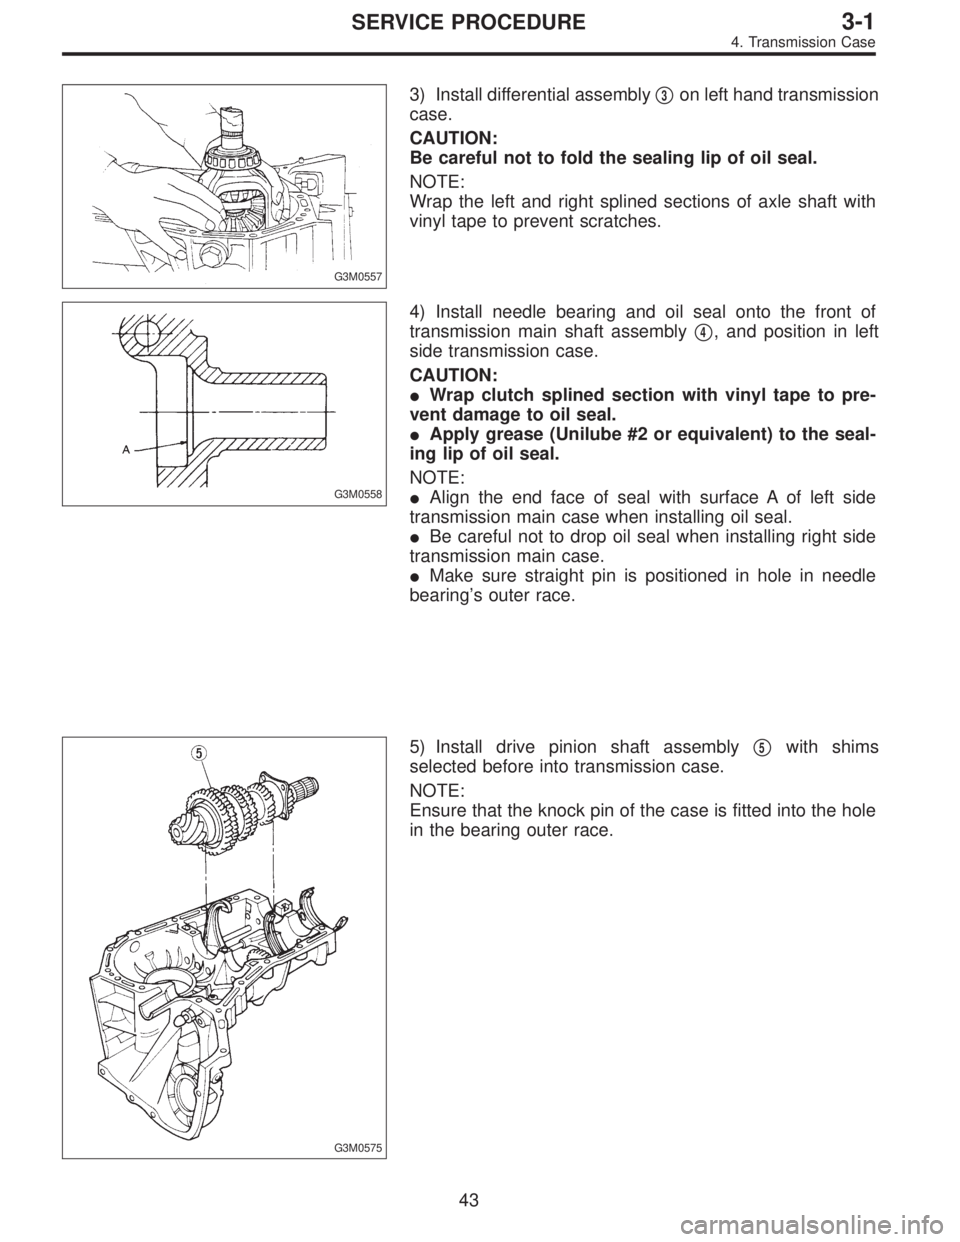
3) Install differential assembly�3on left hand transmission
case.
CAUTION:
Be careful not to fold the sealing lip of oil seal.
NOTE:
Wrap the left and right splined sections of axle shaft with
vinyl tape to prevent scratches.
G3M0558
4) Install needle bearing and oil seal onto the front of
transmission main shaft assembly�
4, and position in left
side transmission case.
CAUTION:
�Wrap clutch splined section with vinyl tape to pre-
vent damage to oil seal.
�Apply grease (Unilube #2 or equivalent) to the seal-
ing lip of oil seal.
NOTE:
�Align the end face of seal with surface A of left side
transmission main case when installing oil seal.
�Be careful not to drop oil seal when installing right side
transmission main case.
�Make sure straight pin is positioned in hole in needle
bearing’s outer race.
G3M0575
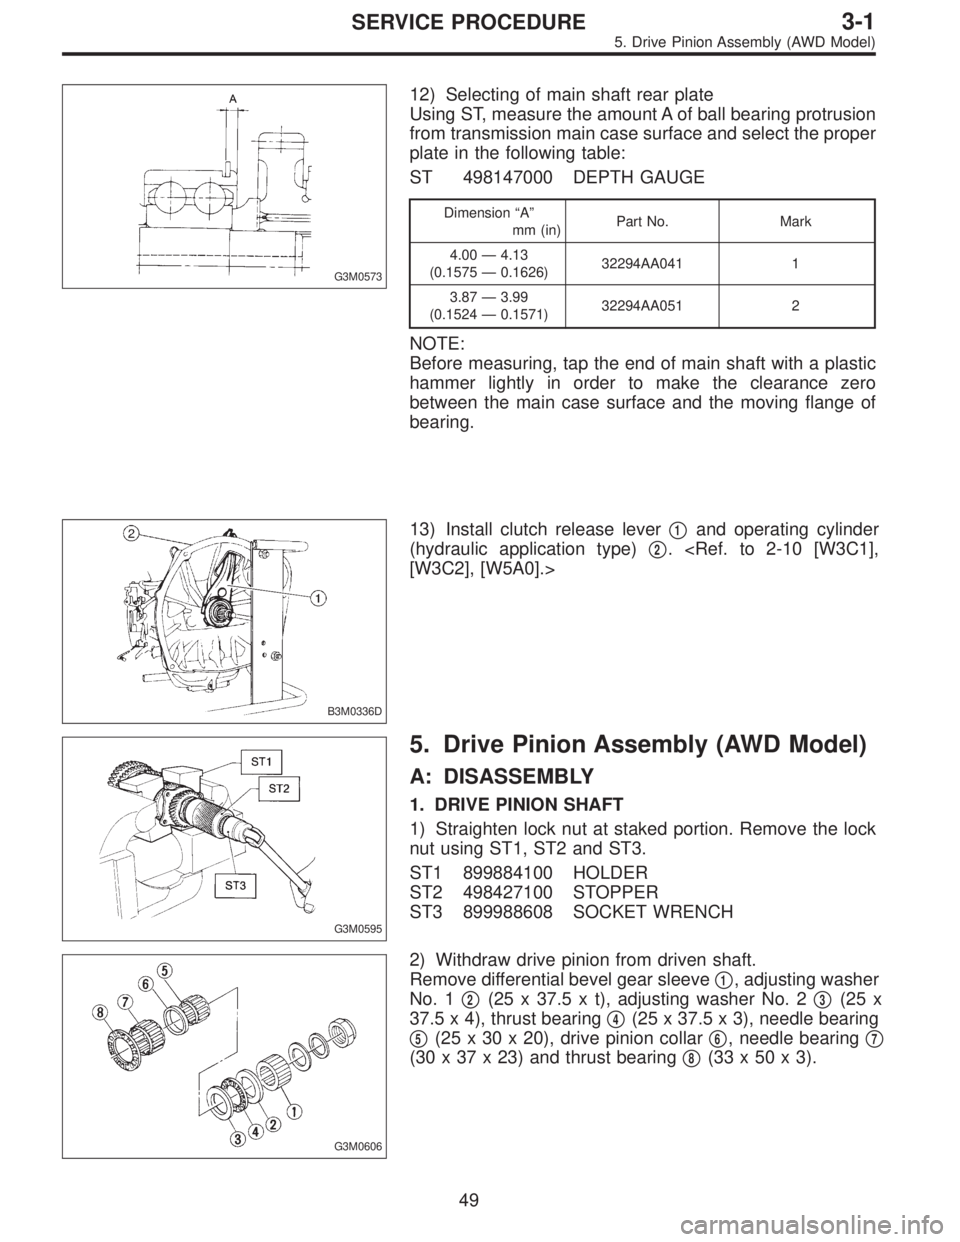
5) Install drive pinion shaft assembly�5with shims
selected before into transmission case.
NOTE:
Ensure that the knock pin of the case is fitted into the hole
in the bearing outer race.
43
3-1SERVICE PROCEDURE
4. Transmission Case
Page 681 of 3342
G3M0573
12) Selecting of main shaft rear plate
Using ST, measure the amount A of ball bearing protrusion
from transmission main case surface and select the proper
plate in the following table:
ST 498147000 DEPTH GAUGE
Dimension“A”
mm (in)Part No. Mark
4.00—4.13
(0.1575—0.1626)32294AA041 1
3.87—3.99
(0.1524—0.1571)32294AA051 2
NOTE:
Before measuring, tap the end of main shaft with a plastic
hammer lightly in order to make the clearance zero
between the main case surface and the moving flange of
bearing.
B3M0336D
13) Install clutch release lever�1and operating cylinder
(hydraulic application type)�
2.
[W3C2], [W5A0].>
G3M0595
5. Drive Pinion Assembly (AWD Model)
A: DISASSEMBLY
1. DRIVE PINION SHAFT
1) Straighten lock nut at staked portion. Remove the lock
nut using ST1, ST2 and ST3.
ST1 899884100 HOLDER
ST2 498427100 STOPPER
ST3 899988608 SOCKET WRENCH
G3M0606
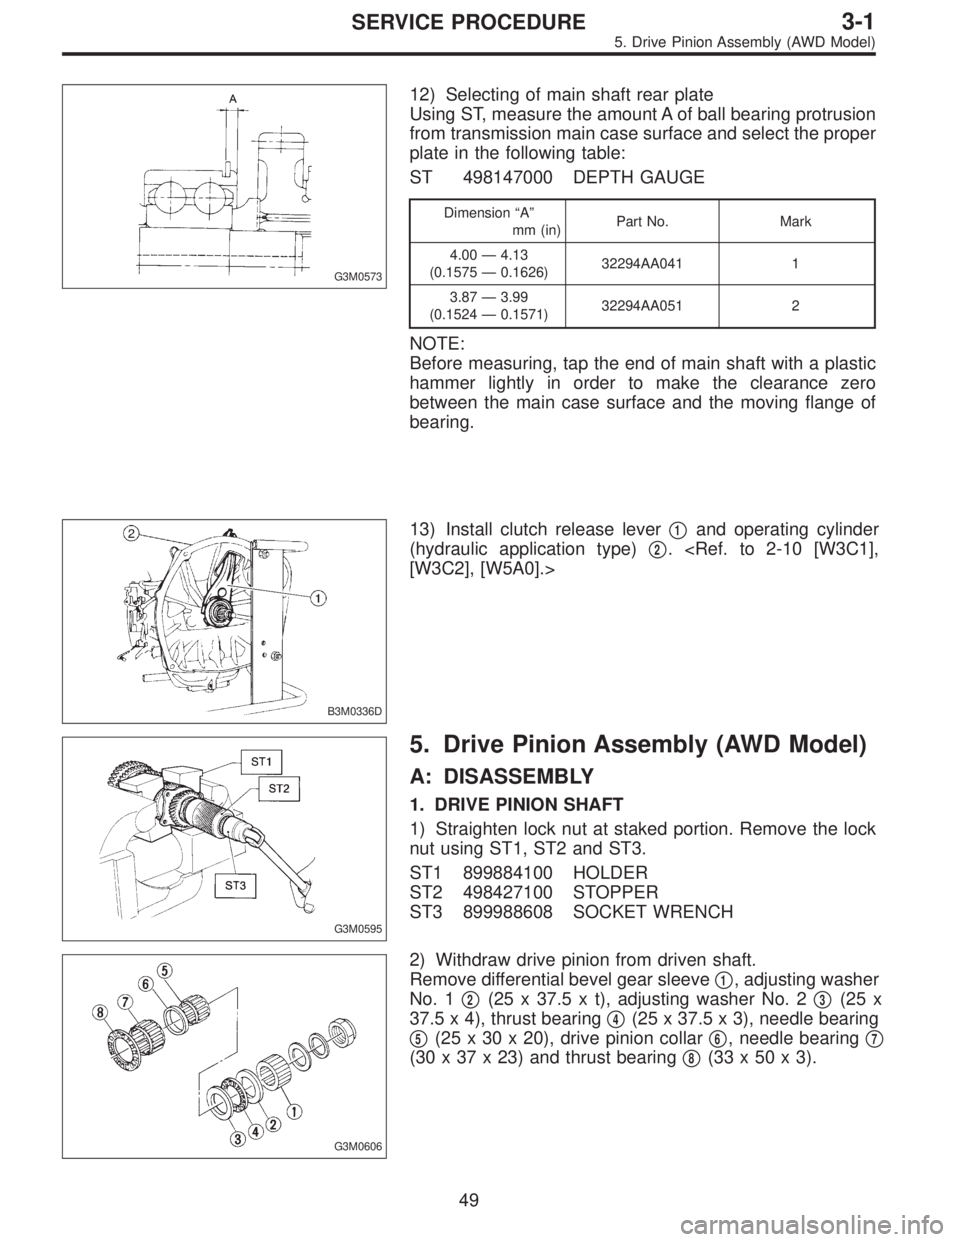
2) Withdraw drive pinion from driven shaft.
Remove differential bevel gear sleeve�
1, adjusting washer
No. 1�
2(25 x 37.5 x t), adjusting washer No. 2�3(25 x
37.5 x 4), thrust bearing�
4(25 x 37.5 x 3), needle bearing
�
5(25 x 30 x 20), drive pinion collar�6, needle bearing�7
(30 x 37 x 23) and thrust bearing�8(33x50x3).
49
3-1SERVICE PROCEDURE
5. Drive Pinion Assembly (AWD Model)
Page 682 of 3342
G3M0573
12) Selecting of main shaft rear plate
Using ST, measure the amount A of ball bearing protrusion
from transmission main case surface and select the proper
plate in the following table:
ST 498147000 DEPTH GAUGE
Dimension“A”
mm (in)Part No. Mark
4.00—4.13
(0.1575—0.1626)32294AA041 1
3.87—3.99
(0.1524—0.1571)32294AA051 2
NOTE:
Before measuring, tap the end of main shaft with a plastic
hammer lightly in order to make the clearance zero
between the main case surface and the moving flange of
bearing.
B3M0336D
13) Install clutch release lever�1and operating cylinder
(hydraulic application type)�
2.
[W3C2], [W5A0].>
G3M0595
5. Drive Pinion Assembly (AWD Model)
A: DISASSEMBLY
1. DRIVE PINION SHAFT
1) Straighten lock nut at staked portion. Remove the lock
nut using ST1, ST2 and ST3.
ST1 899884100 HOLDER
ST2 498427100 STOPPER
ST3 899988608 SOCKET WRENCH
G3M0606
2) Withdraw drive pinion from driven shaft.
Remove differential bevel gear sleeve�
1, adjusting washer
No. 1�
2(25 x 37.5 x t), adjusting washer No. 2�3(25 x
37.5 x 4), thrust bearing�
4(25 x 37.5 x 3), needle bearing
�
5(25 x 30 x 20), drive pinion collar�6, needle bearing�7
(30 x 37 x 23) and thrust bearing�8(33x50x3).
49
3-1SERVICE PROCEDURE
5. Drive Pinion Assembly (AWD Model)
Page 690 of 3342
B3M0082A
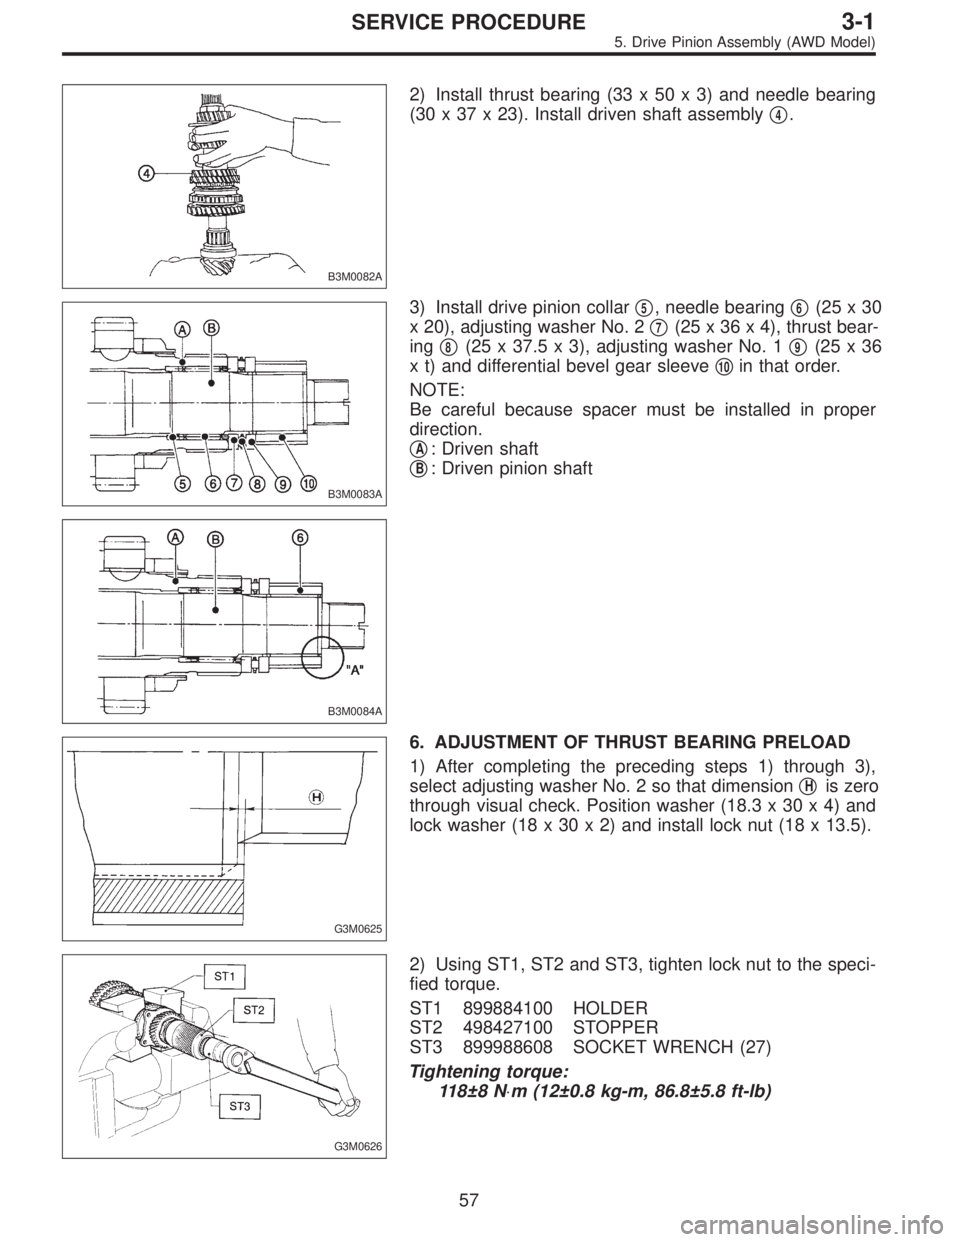
2) Install thrust bearing (33 x 50 x 3) and needle bearing
(30 x 37 x 23). Install driven shaft assembly�
4.
B3M0083A
3) Install drive pinion collar�5, needle bearing�6(25x30
x 20), adjusting washer No. 2�
7(25 x 36 x 4), thrust bear-
ing�
8(25 x 37.5 x 3), adjusting washer No. 1�9(25x36
x t) and differential bevel gear sleeve�
10in that order.
NOTE:
Be careful because spacer must be installed in proper
direction.
�
A: Driven shaft
�
B: Driven pinion shaft
B3M0084A
G3M0625
6. ADJUSTMENT OF THRUST BEARING PRELOAD
1) After completing the preceding steps 1) through 3),
select adjusting washer No. 2 so that dimension�
His zero
through visual check. Position washer (18.3 x 30 x 4) and
lock washer (18 x 30 x 2) and install lock nut (18 x 13.5).
G3M0626
2) Using ST1, ST2 and ST3, tighten lock nut to the speci-
fied torque.
ST1 899884100 HOLDER
ST2 498427100 STOPPER
ST3 899988608 SOCKET WRENCH (27)
Tightening torque:
118±8 N⋅m (12±0.8 kg-m, 86.8±5.8 ft-lb)
57
3-1SERVICE PROCEDURE
5. Drive Pinion Assembly (AWD Model)
Page 700 of 3342
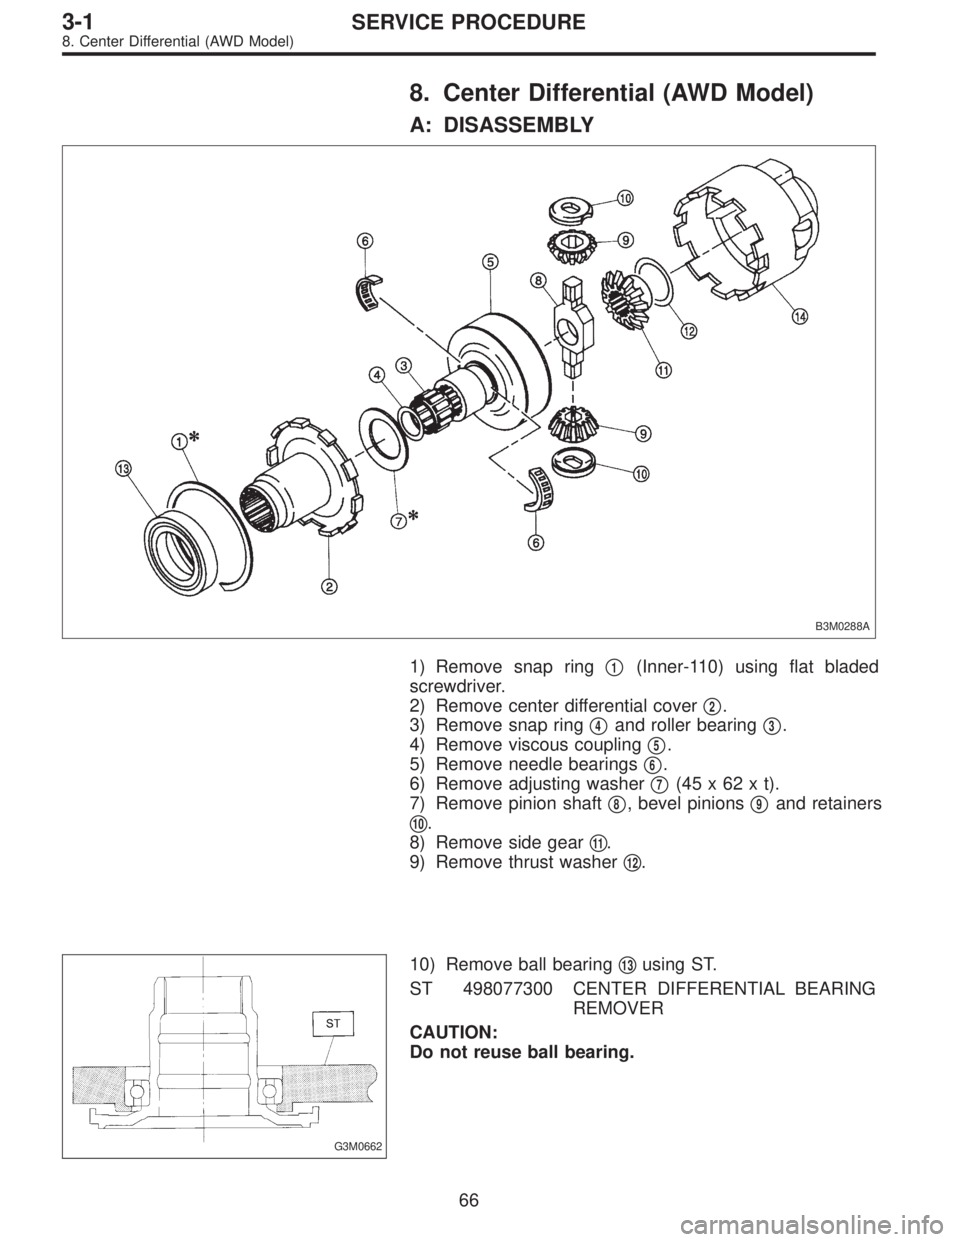
8. Center Differential (AWD Model)
A: DISASSEMBLY
B3M0288A
1) Remove snap ring�1(Inner-110) using flat bladed
screwdriver.
2) Remove center differential cover�
2.
3) Remove snap ring�
4and roller bearing�3.
4) Remove viscous coupling�
5.
5) Remove needle bearings�
6.
6) Remove adjusting washer�
7(45x62xt).
7) Remove pinion shaft�
8, bevel pinions�9and retainers
�
10.
8) Remove side gear�
11.
9) Remove thrust washer�
12.
G3M0662
10) Remove ball bearing�13using ST.
ST 498077300 CENTER DIFFERENTIAL BEARING
REMOVER
CAUTION:
Do not reuse ball bearing.
66
3-1SERVICE PROCEDURE
8. Center Differential (AWD Model)